mirror of
https://github.com/huggingface/diffusers.git
synced 2025-12-08 05:24:20 +08:00
Compare commits
7 Commits
| Author | SHA1 | Date | |
|---|---|---|---|
|
|
aa4634a7fa | ||
|
|
0709650e9d | ||
|
|
a9829164f4 | ||
|
|
49c95178ad | ||
|
|
c2f755bc62 | ||
|
|
2fb877b66c | ||
|
|
ef9824f9f7 |
2
.github/PULL_REQUEST_TEMPLATE.md
vendored
2
.github/PULL_REQUEST_TEMPLATE.md
vendored
@@ -41,7 +41,7 @@ Core library:
|
||||
- Schedulers: @williamberman and @patrickvonplaten
|
||||
- Pipelines: @patrickvonplaten and @sayakpaul
|
||||
- Training examples: @sayakpaul and @patrickvonplaten
|
||||
- Docs: @stevhliu and @yiyixuxu
|
||||
- Docs: @stevenliu and @yiyixu
|
||||
- JAX and MPS: @pcuenca
|
||||
- Audio: @sanchit-gandhi
|
||||
- General functionalities: @patrickvonplaten and @sayakpaul
|
||||
|
||||
58
.github/workflows/pr_tests.yml
vendored
58
.github/workflows/pr_tests.yml
vendored
@@ -67,7 +67,6 @@ jobs:
|
||||
run: |
|
||||
apt-get update && apt-get install libsndfile1-dev libgl1 -y
|
||||
python -m pip install -e .[quality,test]
|
||||
python -m pip install git+https://github.com/huggingface/accelerate.git
|
||||
|
||||
- name: Environment
|
||||
run: |
|
||||
@@ -114,60 +113,3 @@ jobs:
|
||||
with:
|
||||
name: pr_${{ matrix.config.report }}_test_reports
|
||||
path: reports
|
||||
|
||||
run_staging_tests:
|
||||
strategy:
|
||||
fail-fast: false
|
||||
matrix:
|
||||
config:
|
||||
- name: Hub tests for models, schedulers, and pipelines
|
||||
framework: hub_tests_pytorch
|
||||
runner: docker-cpu
|
||||
image: diffusers/diffusers-pytorch-cpu
|
||||
report: torch_hub
|
||||
|
||||
name: ${{ matrix.config.name }}
|
||||
|
||||
runs-on: ${{ matrix.config.runner }}
|
||||
|
||||
container:
|
||||
image: ${{ matrix.config.image }}
|
||||
options: --shm-size "16gb" --ipc host -v /mnt/hf_cache:/mnt/cache/
|
||||
|
||||
defaults:
|
||||
run:
|
||||
shell: bash
|
||||
|
||||
steps:
|
||||
- name: Checkout diffusers
|
||||
uses: actions/checkout@v3
|
||||
with:
|
||||
fetch-depth: 2
|
||||
|
||||
- name: Install dependencies
|
||||
run: |
|
||||
apt-get update && apt-get install libsndfile1-dev libgl1 -y
|
||||
python -m pip install -e .[quality,test]
|
||||
|
||||
- name: Environment
|
||||
run: |
|
||||
python utils/print_env.py
|
||||
|
||||
- name: Run Hub tests for models, schedulers, and pipelines on a staging env
|
||||
if: ${{ matrix.config.framework == 'hub_tests_pytorch' }}
|
||||
run: |
|
||||
HUGGINGFACE_CO_STAGING=true python -m pytest \
|
||||
-m "is_staging_test" \
|
||||
--make-reports=tests_${{ matrix.config.report }} \
|
||||
tests
|
||||
|
||||
- name: Failure short reports
|
||||
if: ${{ failure() }}
|
||||
run: cat reports/tests_${{ matrix.config.report }}_failures_short.txt
|
||||
|
||||
- name: Test suite reports artifacts
|
||||
if: ${{ always() }}
|
||||
uses: actions/upload-artifact@v2
|
||||
with:
|
||||
name: pr_${{ matrix.config.report }}_test_reports
|
||||
path: reports
|
||||
1
.github/workflows/push_tests.yml
vendored
1
.github/workflows/push_tests.yml
vendored
@@ -63,7 +63,6 @@ jobs:
|
||||
run: |
|
||||
apt-get update && apt-get install libsndfile1-dev libgl1 -y
|
||||
python -m pip install -e .[quality,test]
|
||||
python -m pip install git+https://github.com/huggingface/accelerate.git
|
||||
|
||||
- name: Environment
|
||||
run: |
|
||||
|
||||
2
.github/workflows/push_tests_mps.yml
vendored
2
.github/workflows/push_tests_mps.yml
vendored
@@ -40,7 +40,7 @@ jobs:
|
||||
${CONDA_RUN} python -m pip install --upgrade pip
|
||||
${CONDA_RUN} python -m pip install -e .[quality,test]
|
||||
${CONDA_RUN} python -m pip install torch torchvision torchaudio
|
||||
${CONDA_RUN} python -m pip install git+https://github.com/huggingface/accelerate.git
|
||||
${CONDA_RUN} python -m pip install accelerate --upgrade
|
||||
${CONDA_RUN} python -m pip install transformers --upgrade
|
||||
|
||||
- name: Environment
|
||||
|
||||
2
Makefile
2
Makefile
@@ -78,7 +78,7 @@ test:
|
||||
# Run tests for examples
|
||||
|
||||
test-examples:
|
||||
python -m pytest -n auto --dist=loadfile -s -v ./examples/
|
||||
python -m pytest -n auto --dist=loadfile -s -v ./examples/pytorch/
|
||||
|
||||
|
||||
# Release stuff
|
||||
|
||||
@@ -90,7 +90,7 @@ The following design principles are followed:
|
||||
- To integrate new model checkpoints whose general architecture can be classified as an architecture that already exists in Diffusers, the existing model architecture shall be adapted to make it work with the new checkpoint. One should only create a new file if the model architecture is fundamentally different.
|
||||
- Models should be designed to be easily extendable to future changes. This can be achieved by limiting public function arguments, configuration arguments, and "foreseeing" future changes, *e.g.* it is usually better to add `string` "...type" arguments that can easily be extended to new future types instead of boolean `is_..._type` arguments. Only the minimum amount of changes shall be made to existing architectures to make a new model checkpoint work.
|
||||
- The model design is a difficult trade-off between keeping code readable and concise and supporting many model checkpoints. For most parts of the modeling code, classes shall be adapted for new model checkpoints, while there are some exceptions where it is preferred to add new classes to make sure the code is kept concise and
|
||||
readable longterm, such as [UNet blocks](https://github.com/huggingface/diffusers/blob/main/src/diffusers/models/unet_2d_blocks.py) and [Attention processors](https://github.com/huggingface/diffusers/blob/main/src/diffusers/models/attention_processor.py).
|
||||
readable longterm, such as [UNet blocks](https://github.com/huggingface/diffusers/blob/main/src/diffusers/models/unet_2d_blocks.py) and [Attention processors](https://github.com/huggingface/diffusers/blob/main/src/diffusers/models/cross_attention.py).
|
||||
|
||||
### Schedulers
|
||||
|
||||
|
||||
@@ -1,6 +1,6 @@
|
||||
<p align="center">
|
||||
<br>
|
||||
<img src="https://raw.githubusercontent.com/huggingface/diffusers/main/docs/source/en/imgs/diffusers_library.jpg" width="400"/>
|
||||
<img src="https://github.com/huggingface/diffusers/blob/main/docs/source/en/imgs/diffusers_library.jpg" width="400"/>
|
||||
<br>
|
||||
<p>
|
||||
<p align="center">
|
||||
@@ -10,9 +10,6 @@
|
||||
<a href="https://github.com/huggingface/diffusers/releases">
|
||||
<img alt="GitHub release" src="https://img.shields.io/github/release/huggingface/diffusers.svg">
|
||||
</a>
|
||||
<a href="https://pepy.tech/project/diffusers">
|
||||
<img alt="GitHub release" src="https://static.pepy.tech/badge/diffusers/month">
|
||||
</a>
|
||||
<a href="CODE_OF_CONDUCT.md">
|
||||
<img alt="Contributor Covenant" src="https://img.shields.io/badge/Contributor%20Covenant-2.0-4baaaa.svg">
|
||||
</a>
|
||||
|
||||
@@ -13,8 +13,6 @@
|
||||
title: Overview
|
||||
- local: using-diffusers/write_own_pipeline
|
||||
title: Understanding models and schedulers
|
||||
- local: tutorials/autopipeline
|
||||
title: AutoPipeline
|
||||
- local: tutorials/basic_training
|
||||
title: Train a diffusion model
|
||||
title: Tutorials
|
||||
@@ -32,22 +30,20 @@
|
||||
title: Load safetensors
|
||||
- local: using-diffusers/other-formats
|
||||
title: Load different Stable Diffusion formats
|
||||
- local: using-diffusers/push_to_hub
|
||||
title: Push files to the Hub
|
||||
title: Loading & Hub
|
||||
- sections:
|
||||
- local: using-diffusers/pipeline_overview
|
||||
title: Overview
|
||||
- local: using-diffusers/unconditional_image_generation
|
||||
title: Unconditional image generation
|
||||
- local: using-diffusers/conditional_image_generation
|
||||
title: Text-to-image
|
||||
title: Text-to-image generation
|
||||
- local: using-diffusers/img2img
|
||||
title: Image-to-image
|
||||
title: Text-guided image-to-image
|
||||
- local: using-diffusers/inpaint
|
||||
title: Inpainting
|
||||
title: Text-guided image-inpainting
|
||||
- local: using-diffusers/depth2img
|
||||
title: Depth-to-image
|
||||
title: Tasks
|
||||
- sections:
|
||||
title: Text-guided depth-to-image
|
||||
- local: using-diffusers/textual_inversion_inference
|
||||
title: Textual inversion
|
||||
- local: training/distributed_inference
|
||||
@@ -56,28 +52,16 @@
|
||||
title: Improve image quality with deterministic generation
|
||||
- local: using-diffusers/control_brightness
|
||||
title: Control image brightness
|
||||
- local: using-diffusers/weighted_prompts
|
||||
title: Prompt weighting
|
||||
title: Techniques
|
||||
- sections:
|
||||
- local: using-diffusers/pipeline_overview
|
||||
title: Overview
|
||||
- local: using-diffusers/sdxl
|
||||
title: Stable Diffusion XL
|
||||
- local: using-diffusers/controlnet
|
||||
title: ControlNet
|
||||
- local: using-diffusers/shap-e
|
||||
title: Shap-E
|
||||
- local: using-diffusers/diffedit
|
||||
title: DiffEdit
|
||||
- local: using-diffusers/distilled_sd
|
||||
title: Distilled Stable Diffusion inference
|
||||
- local: using-diffusers/reproducibility
|
||||
title: Create reproducible pipelines
|
||||
- local: using-diffusers/custom_pipeline_examples
|
||||
title: Community pipelines
|
||||
- local: using-diffusers/contribute_pipeline
|
||||
title: How to contribute a community pipeline
|
||||
- local: using-diffusers/stable_diffusion_jax_how_to
|
||||
title: Stable Diffusion in JAX/Flax
|
||||
- local: using-diffusers/weighted_prompts
|
||||
title: Weighting Prompts
|
||||
title: Pipelines for Inference
|
||||
- sections:
|
||||
- local: training/overview
|
||||
@@ -102,8 +86,6 @@
|
||||
title: InstructPix2Pix Training
|
||||
- local: training/custom_diffusion
|
||||
title: Custom Diffusion
|
||||
- local: training/t2i_adapters
|
||||
title: T2I-Adapters
|
||||
title: Training
|
||||
- sections:
|
||||
- local: using-diffusers/other-modalities
|
||||
@@ -117,8 +99,6 @@
|
||||
title: Memory and Speed
|
||||
- local: optimization/torch2.0
|
||||
title: Torch2.0 support
|
||||
- local: using-diffusers/stable_diffusion_jax_how_to
|
||||
title: Stable Diffusion in JAX/Flax
|
||||
- local: optimization/xformers
|
||||
title: xFormers
|
||||
- local: optimization/onnx
|
||||
@@ -182,8 +162,6 @@
|
||||
title: AutoencoderKL
|
||||
- local: api/models/asymmetricautoencoderkl
|
||||
title: AsymmetricAutoencoderKL
|
||||
- local: api/models/autoencoder_tiny
|
||||
title: Tiny AutoEncoder
|
||||
- local: api/models/transformer2d
|
||||
title: Transformer2D
|
||||
- local: api/models/transformer_temporal
|
||||
@@ -204,16 +182,12 @@
|
||||
title: Audio Diffusion
|
||||
- local: api/pipelines/audioldm
|
||||
title: AudioLDM
|
||||
- local: api/pipelines/audioldm2
|
||||
title: AudioLDM 2
|
||||
- local: api/pipelines/auto_pipeline
|
||||
title: AutoPipeline
|
||||
- local: api/pipelines/consistency_models
|
||||
title: Consistency Models
|
||||
- local: api/pipelines/controlnet
|
||||
title: ControlNet
|
||||
- local: api/pipelines/controlnet_sdxl
|
||||
title: ControlNet with Stable Diffusion XL
|
||||
- local: api/pipelines/cycle_diffusion
|
||||
title: Cycle Diffusion
|
||||
- local: api/pipelines/dance_diffusion
|
||||
@@ -238,8 +212,6 @@
|
||||
title: Latent Diffusion
|
||||
- local: api/pipelines/panorama
|
||||
title: MultiDiffusion
|
||||
- local: api/pipelines/musicldm
|
||||
title: MusicLDM
|
||||
- local: api/pipelines/paint_by_example
|
||||
title: PaintByExample
|
||||
- local: api/pipelines/paradigms
|
||||
@@ -287,8 +259,6 @@
|
||||
title: LDM3D Text-to-(RGB, Depth)
|
||||
- local: api/pipelines/stable_diffusion/adapter
|
||||
title: Stable Diffusion T2I-adapter
|
||||
- local: api/pipelines/stable_diffusion/gligen
|
||||
title: GLIGEN (Grounded Language-to-Image Generation)
|
||||
title: Stable Diffusion
|
||||
- local: api/pipelines/stable_unclip
|
||||
title: Stable unCLIP
|
||||
@@ -312,56 +282,54 @@
|
||||
title: Versatile Diffusion
|
||||
- local: api/pipelines/vq_diffusion
|
||||
title: VQ Diffusion
|
||||
- local: api/pipelines/wuerstchen
|
||||
title: Wuerstchen
|
||||
title: Pipelines
|
||||
- sections:
|
||||
- local: api/schedulers/overview
|
||||
title: Overview
|
||||
- local: api/schedulers/cm_stochastic_iterative
|
||||
title: CMStochasticIterativeScheduler
|
||||
- local: api/schedulers/ddim_inverse
|
||||
title: DDIMInverseScheduler
|
||||
title: Consistency Model Multistep Scheduler
|
||||
- local: api/schedulers/ddim
|
||||
title: DDIMScheduler
|
||||
title: DDIM
|
||||
- local: api/schedulers/ddim_inverse
|
||||
title: DDIMInverse
|
||||
- local: api/schedulers/ddpm
|
||||
title: DDPMScheduler
|
||||
title: DDPM
|
||||
- local: api/schedulers/deis
|
||||
title: DEISMultistepScheduler
|
||||
- local: api/schedulers/multistep_dpm_solver_inverse
|
||||
title: DPMSolverMultistepInverse
|
||||
- local: api/schedulers/multistep_dpm_solver
|
||||
title: DPMSolverMultistepScheduler
|
||||
title: DEIS
|
||||
- local: api/schedulers/dpm_discrete
|
||||
title: DPM Discrete Scheduler
|
||||
- local: api/schedulers/dpm_discrete_ancestral
|
||||
title: DPM Discrete Scheduler with ancestral sampling
|
||||
- local: api/schedulers/dpm_sde
|
||||
title: DPMSolverSDEScheduler
|
||||
- local: api/schedulers/singlestep_dpm_solver
|
||||
title: DPMSolverSinglestepScheduler
|
||||
- local: api/schedulers/euler_ancestral
|
||||
title: EulerAncestralDiscreteScheduler
|
||||
title: Euler Ancestral Scheduler
|
||||
- local: api/schedulers/euler
|
||||
title: EulerDiscreteScheduler
|
||||
title: Euler scheduler
|
||||
- local: api/schedulers/heun
|
||||
title: HeunDiscreteScheduler
|
||||
title: Heun Scheduler
|
||||
- local: api/schedulers/multistep_dpm_solver_inverse
|
||||
title: Inverse Multistep DPM-Solver
|
||||
- local: api/schedulers/ipndm
|
||||
title: IPNDMScheduler
|
||||
- local: api/schedulers/stochastic_karras_ve
|
||||
title: KarrasVeScheduler
|
||||
- local: api/schedulers/dpm_discrete_ancestral
|
||||
title: KDPM2AncestralDiscreteScheduler
|
||||
- local: api/schedulers/dpm_discrete
|
||||
title: KDPM2DiscreteScheduler
|
||||
title: IPNDM
|
||||
- local: api/schedulers/lms_discrete
|
||||
title: LMSDiscreteScheduler
|
||||
title: Linear Multistep
|
||||
- local: api/schedulers/multistep_dpm_solver
|
||||
title: Multistep DPM-Solver
|
||||
- local: api/schedulers/pndm
|
||||
title: PNDMScheduler
|
||||
title: PNDM
|
||||
- local: api/schedulers/repaint
|
||||
title: RePaintScheduler
|
||||
- local: api/schedulers/score_sde_ve
|
||||
title: ScoreSdeVeScheduler
|
||||
- local: api/schedulers/score_sde_vp
|
||||
title: ScoreSdeVpScheduler
|
||||
title: RePaint Scheduler
|
||||
- local: api/schedulers/singlestep_dpm_solver
|
||||
title: Singlestep DPM-Solver
|
||||
- local: api/schedulers/stochastic_karras_ve
|
||||
title: Stochastic Kerras VE
|
||||
- local: api/schedulers/unipc
|
||||
title: UniPCMultistepScheduler
|
||||
- local: api/schedulers/score_sde_ve
|
||||
title: VE-SDE
|
||||
- local: api/schedulers/score_sde_vp
|
||||
title: VP-SDE
|
||||
- local: api/schedulers/vq_diffusion
|
||||
title: VQDiffusionScheduler
|
||||
title: Schedulers
|
||||
|
||||
@@ -1,45 +0,0 @@
|
||||
# Tiny AutoEncoder
|
||||
|
||||
Tiny AutoEncoder for Stable Diffusion (TAESD) was introduced in [madebyollin/taesd](https://github.com/madebyollin/taesd) by Ollin Boer Bohan. It is a tiny distilled version of Stable Diffusion's VAE that can quickly decode the latents in a [`StableDiffusionPipeline`] or [`StableDiffusionXLPipeline`] almost instantly.
|
||||
|
||||
To use with Stable Diffusion v-2.1:
|
||||
|
||||
```python
|
||||
import torch
|
||||
from diffusers import DiffusionPipeline, AutoencoderTiny
|
||||
|
||||
pipe = DiffusionPipeline.from_pretrained(
|
||||
"stabilityai/stable-diffusion-2-1-base", torch_dtype=torch.float16
|
||||
)
|
||||
pipe.vae = AutoencoderTiny.from_pretrained("madebyollin/taesd", torch_dtype=torch.float16)
|
||||
pipe = pipe.to("cuda")
|
||||
|
||||
prompt = "slice of delicious New York-style berry cheesecake"
|
||||
image = pipe(prompt, num_inference_steps=25).images[0]
|
||||
image.save("cheesecake.png")
|
||||
```
|
||||
|
||||
To use with Stable Diffusion XL 1.0
|
||||
|
||||
```python
|
||||
import torch
|
||||
from diffusers import DiffusionPipeline, AutoencoderTiny
|
||||
|
||||
pipe = DiffusionPipeline.from_pretrained(
|
||||
"stabilityai/stable-diffusion-xl-base-1.0", torch_dtype=torch.float16
|
||||
)
|
||||
pipe.vae = AutoencoderTiny.from_pretrained("madebyollin/taesdxl", torch_dtype=torch.float16)
|
||||
pipe = pipe.to("cuda")
|
||||
|
||||
prompt = "slice of delicious New York-style berry cheesecake"
|
||||
image = pipe(prompt, num_inference_steps=25).images[0]
|
||||
image.save("cheesecake_sdxl.png")
|
||||
```
|
||||
|
||||
## AutoencoderTiny
|
||||
|
||||
[[autodoc]] AutoencoderTiny
|
||||
|
||||
## AutoencoderTinyOutput
|
||||
|
||||
[[autodoc]] models.autoencoder_tiny.AutoencoderTinyOutput
|
||||
@@ -9,8 +9,4 @@ All models are built from the base [`ModelMixin`] class which is a [`torch.nn.mo
|
||||
|
||||
## FlaxModelMixin
|
||||
|
||||
[[autodoc]] FlaxModelMixin
|
||||
|
||||
## PushToHubMixin
|
||||
|
||||
[[autodoc]] utils.PushToHubMixin
|
||||
[[autodoc]] FlaxModelMixin
|
||||
@@ -46,5 +46,6 @@ Make sure to check out the Schedulers [guide](/using-diffusers/schedulers) to le
|
||||
- all
|
||||
- __call__
|
||||
|
||||
## AudioPipelineOutput
|
||||
[[autodoc]] pipelines.AudioPipelineOutput
|
||||
## StableDiffusionPipelineOutput
|
||||
|
||||
[[autodoc]] pipelines.stable_diffusion.StableDiffusionPipelineOutput
|
||||
@@ -1,93 +0,0 @@
|
||||
<!--Copyright 2023 The HuggingFace Team. All rights reserved.
|
||||
|
||||
Licensed under the Apache License, Version 2.0 (the "License"); you may not use this file except in compliance with
|
||||
the License. You may obtain a copy of the License at
|
||||
|
||||
http://www.apache.org/licenses/LICENSE-2.0
|
||||
|
||||
Unless required by applicable law or agreed to in writing, software distributed under the License is distributed on
|
||||
an "AS IS" BASIS, WITHOUT WARRANTIES OR CONDITIONS OF ANY KIND, either express or implied. See the License for the
|
||||
specific language governing permissions and limitations under the License.
|
||||
-->
|
||||
|
||||
# AudioLDM 2
|
||||
|
||||
AudioLDM 2 was proposed in [AudioLDM 2: Learning Holistic Audio Generation with Self-supervised Pretraining](https://arxiv.org/abs/2308.05734)
|
||||
by Haohe Liu et al. AudioLDM 2 takes a text prompt as input and predicts the corresponding audio. It can generate
|
||||
text-conditional sound effects, human speech and music.
|
||||
|
||||
Inspired by [Stable Diffusion](https://huggingface.co/docs/diffusers/api/pipelines/stable_diffusion/overview), AudioLDM 2
|
||||
is a text-to-audio _latent diffusion model (LDM)_ that learns continuous audio representations from text embeddings. Two
|
||||
text encoder models are used to compute the text embeddings from a prompt input: the text-branch of [CLAP](https://huggingface.co/docs/transformers/main/en/model_doc/clap)
|
||||
and the encoder of [Flan-T5](https://huggingface.co/docs/transformers/main/en/model_doc/flan-t5). These text embeddings
|
||||
are then projected to a shared embedding space by an [AudioLDM2ProjectionModel](https://huggingface.co/docs/diffusers/main/api/pipelines/audioldm2#diffusers.AudioLDM2ProjectionModel).
|
||||
A [GPT2](https://huggingface.co/docs/transformers/main/en/model_doc/gpt2) _language model (LM)_ is used to auto-regressively
|
||||
predict eight new embedding vectors, conditional on the projected CLAP and Flan-T5 embeddings. The generated embedding
|
||||
vectors and Flan-T5 text embeddings are used as cross-attention conditioning in the LDM. The [UNet](https://huggingface.co/docs/diffusers/main/en/api/pipelines/audioldm2#diffusers.AudioLDM2UNet2DConditionModel)
|
||||
of AudioLDM 2 is unique in the sense that it takes **two** cross-attention embeddings, as opposed to one cross-attention
|
||||
conditioning, as in most other LDMs.
|
||||
|
||||
The abstract of the paper is the following:
|
||||
|
||||
*Although audio generation shares commonalities across different types of audio, such as speech, music, and sound effects, designing models for each type requires careful consideration of specific objectives and biases that can significantly differ from those of other types. To bring us closer to a unified perspective of audio generation, this paper proposes a framework that utilizes the same learning method for speech, music, and sound effect generation. Our framework introduces a general representation of audio, called language of audio (LOA). Any audio can be translated into LOA based on AudioMAE, a self-supervised pre-trained representation learning model. In the generation process, we translate any modalities into LOA by using a GPT-2 model, and we perform self-supervised audio generation learning with a latent diffusion model conditioned on LOA. The proposed framework naturally brings advantages such as in-context learning abilities and reusable self-supervised pretrained AudioMAE and latent diffusion models. Experiments on the major benchmarks of text-to-audio, text-to-music, and text-to-speech demonstrate new state-of-the-art or competitive performance to previous approaches.*
|
||||
|
||||
This pipeline was contributed by [sanchit-gandhi](https://huggingface.co/sanchit-gandhi). The original codebase can be
|
||||
found at [haoheliu/audioldm2](https://github.com/haoheliu/audioldm2).
|
||||
|
||||
## Tips
|
||||
|
||||
### Choosing a checkpoint
|
||||
|
||||
AudioLDM2 comes in three variants. Two of these checkpoints are applicable to the general task of text-to-audio
|
||||
generation. The third checkpoint is trained exclusively on text-to-music generation.
|
||||
|
||||
All checkpoints share the same model size for the text encoders and VAE. They differ in the size and depth of the UNet.
|
||||
See table below for details on the three checkpoints:
|
||||
|
||||
| Checkpoint | Task | UNet Model Size | Total Model Size | Training Data / h |
|
||||
|-----------------------------------------------------------------|---------------|-----------------|------------------|-------------------|
|
||||
| [audioldm2](https://huggingface.co/cvssp/audioldm2) | Text-to-audio | 350M | 1.1B | 1150k |
|
||||
| [audioldm2-large](https://huggingface.co/cvssp/audioldm2-large) | Text-to-audio | 750M | 1.5B | 1150k |
|
||||
| [audioldm2-music](https://huggingface.co/cvssp/audioldm2-music) | Text-to-music | 350M | 1.1B | 665k |
|
||||
|
||||
### Constructing a prompt
|
||||
|
||||
* Descriptive prompt inputs work best: use adjectives to describe the sound (e.g. "high quality" or "clear") and make the prompt context specific (e.g. "water stream in a forest" instead of "stream").
|
||||
* It's best to use general terms like "cat" or "dog" instead of specific names or abstract objects the model may not be familiar with.
|
||||
* Using a **negative prompt** can significantly improve the quality of the generated waveform, by guiding the generation away from terms that correspond to poor quality audio. Try using a negative prompt of "Low quality."
|
||||
|
||||
### Controlling inference
|
||||
|
||||
* The _quality_ of the predicted audio sample can be controlled by the `num_inference_steps` argument; higher steps give higher quality audio at the expense of slower inference.
|
||||
* The _length_ of the predicted audio sample can be controlled by varying the `audio_length_in_s` argument.
|
||||
|
||||
### Evaluating generated waveforms:
|
||||
|
||||
* The quality of the generated waveforms can vary significantly based on the seed. Try generating with different seeds until you find a satisfactory generation
|
||||
* Multiple waveforms can be generated in one go: set `num_waveforms_per_prompt` to a value greater than 1. Automatic scoring will be performed between the generated waveforms and prompt text, and the audios ranked from best to worst accordingly.
|
||||
|
||||
The following example demonstrates how to construct good music generation using the aforementioned tips: [example](https://huggingface.co/docs/diffusers/main/en/api/pipelines/audioldm2#diffusers.AudioLDM2Pipeline.__call__.example).
|
||||
|
||||
<Tip>
|
||||
|
||||
Make sure to check out the Schedulers [guide](/using-diffusers/schedulers) to learn how to explore the tradeoff between
|
||||
scheduler speed and quality, and see the [reuse components across pipelines](/using-diffusers/loading#reuse-components-across-pipelines)
|
||||
section to learn how to efficiently load the same components into multiple pipelines.
|
||||
|
||||
</Tip>
|
||||
|
||||
## AudioLDM2Pipeline
|
||||
[[autodoc]] AudioLDM2Pipeline
|
||||
- all
|
||||
- __call__
|
||||
|
||||
## AudioLDM2ProjectionModel
|
||||
[[autodoc]] AudioLDM2ProjectionModel
|
||||
- forward
|
||||
|
||||
## AudioLDM2UNet2DConditionModel
|
||||
[[autodoc]] AudioLDM2UNet2DConditionModel
|
||||
- forward
|
||||
|
||||
## AudioPipelineOutput
|
||||
[[autodoc]] pipelines.AudioPipelineOutput
|
||||
@@ -12,41 +12,35 @@ specific language governing permissions and limitations under the License.
|
||||
|
||||
# AutoPipeline
|
||||
|
||||
`AutoPipeline` is designed to:
|
||||
In many cases, one checkpoint can be used for multiple tasks. For example, you may be able to use the same checkpoint for Text-to-Image, Image-to-Image, and Inpainting. However, you'll need to know the pipeline class names linked to your checkpoint.
|
||||
|
||||
1. make it easy for you to load a checkpoint for a task without knowing the specific pipeline class to use
|
||||
2. use multiple pipelines in your workflow
|
||||
AutoPipeline is designed to make it easy for you to use multiple pipelines in your workflow. We currently provide 3 AutoPipeline classes to perform three different tasks, i.e. [`AutoPipelineForText2Image`], [`AutoPipelineForImage2Image`], and [`AutoPipelineForInpainting`]. You'll need to choose the AutoPipeline class based on the task you want to perform and use it to automatically retrieve the relevant pipeline given the name/path to the pre-trained weights.
|
||||
|
||||
Based on the task, the `AutoPipeline` class automatically retrieves the relevant pipeline given the name or path to the pretrained weights with the `from_pretrained()` method.
|
||||
For example, to perform Image-to-Image with the SD1.5 checkpoint, you can do
|
||||
|
||||
To seamlessly switch between tasks with the same checkpoint without reallocating additional memory, use the `from_pipe()` method to transfer the components from the original pipeline to the new one.
|
||||
```python
|
||||
from diffusers import PipelineForImageToImage
|
||||
|
||||
```py
|
||||
from diffusers import AutoPipelineForText2Image
|
||||
import torch
|
||||
|
||||
pipeline = AutoPipelineForText2Image.from_pretrained(
|
||||
"runwayml/stable-diffusion-v1-5", torch_dtype=torch.float16, use_safetensors=True
|
||||
).to("cuda")
|
||||
prompt = "Astronaut in a jungle, cold color palette, muted colors, detailed, 8k"
|
||||
|
||||
image = pipeline(prompt, num_inference_steps=25).images[0]
|
||||
pipe_i2i = PipelineForImageoImage.from_pretrained("runwayml/stable-diffusion-v1-5")
|
||||
```
|
||||
|
||||
<Tip>
|
||||
It will also help you switch between tasks seamlessly using the same checkpoint without reallocating additional memory. For example, to re-use the Image-to-Image pipeline we just created for inpainting, you can do
|
||||
|
||||
Check out the [AutoPipeline](/tutorials/autopipeline) tutorial to learn how to use this API!
|
||||
```python
|
||||
from diffusers import PipelineForInpainting
|
||||
|
||||
</Tip>
|
||||
pipe_inpaint = AutoPipelineForInpainting.from_pipe(pipe_i2i)
|
||||
```
|
||||
All the components will be transferred to the inpainting pipeline with zero cost.
|
||||
|
||||
`AutoPipeline` supports text-to-image, image-to-image, and inpainting for the following diffusion models:
|
||||
|
||||
- [Stable Diffusion](./stable_diffusion)
|
||||
- [ControlNet](./api/pipelines/controlnet)
|
||||
- [Stable Diffusion XL (SDXL)](./stable_diffusion/stable_diffusion_xl)
|
||||
- [DeepFloyd IF](./if)
|
||||
Currently AutoPipeline support the Text-to-Image, Image-to-Image, and Inpainting tasks for below diffusion models:
|
||||
- [stable Diffusion](./stable_diffusion)
|
||||
- [Stable Diffusion Controlnet](./api/pipelines/controlnet)
|
||||
- [Stable Diffusion XL](./stable_diffusion/stable_diffusion_xl)
|
||||
- [IF](./if)
|
||||
- [Kandinsky](./kandinsky)
|
||||
- [Kandinsky 2.2](./kandinsky#kandinsky-22)
|
||||
- [Kandinsky 2.2](./kandinsky)
|
||||
|
||||
|
||||
## AutoPipelineForText2Image
|
||||
|
||||
@@ -12,9 +12,9 @@ specific language governing permissions and limitations under the License.
|
||||
|
||||
# ControlNet
|
||||
|
||||
ControlNet was introduced in [Adding Conditional Control to Text-to-Image Diffusion Models](https://huggingface.co/papers/2302.05543) by Lvmin Zhang and Maneesh Agrawala.
|
||||
[Adding Conditional Control to Text-to-Image Diffusion Models](https://huggingface.co/papers/2302.05543) by Lvmin Zhang and Maneesh Agrawala.
|
||||
|
||||
With a ControlNet model, you can provide an additional control image to condition and control Stable Diffusion generation. For example, if you provide a depth map, the ControlNet model generates an image that'll preserve the spatial information from the depth map. It is a more flexible and accurate way to control the image generation process.
|
||||
Using a pretrained model, we can provide control images (for example, a depth map) to control Stable Diffusion text-to-image generation so that it follows the structure of the depth image and fills in the details.
|
||||
|
||||
The abstract from the paper is:
|
||||
|
||||
@@ -22,13 +22,290 @@ The abstract from the paper is:
|
||||
|
||||
This model was contributed by [takuma104](https://huggingface.co/takuma104). ❤️
|
||||
|
||||
The original codebase can be found at [lllyasviel/ControlNet](https://github.com/lllyasviel/ControlNet), and you can find official ControlNet checkpoints on [lllyasviel's](https://huggingface.co/lllyasviel) Hub profile.
|
||||
The original codebase can be found at [lllyasviel/ControlNet](https://github.com/lllyasviel/ControlNet).
|
||||
|
||||
<Tip>
|
||||
## Usage example
|
||||
|
||||
Make sure to check out the Schedulers [guide](/using-diffusers/schedulers) to learn how to explore the tradeoff between scheduler speed and quality, and see the [reuse components across pipelines](/using-diffusers/loading#reuse-components-across-pipelines) section to learn how to efficiently load the same components into multiple pipelines.
|
||||
In the following we give a simple example of how to use a *ControlNet* checkpoint with Diffusers for inference.
|
||||
The inference pipeline is the same for all pipelines:
|
||||
|
||||
</Tip>
|
||||
* 1. Take an image and run it through a pre-conditioning processor.
|
||||
* 2. Run the pre-processed image through the [`StableDiffusionControlNetPipeline`].
|
||||
|
||||
Let's have a look at a simple example using the [Canny Edge ControlNet](https://huggingface.co/lllyasviel/sd-controlnet-canny).
|
||||
|
||||
```python
|
||||
from diffusers import StableDiffusionControlNetPipeline
|
||||
from diffusers.utils import load_image
|
||||
|
||||
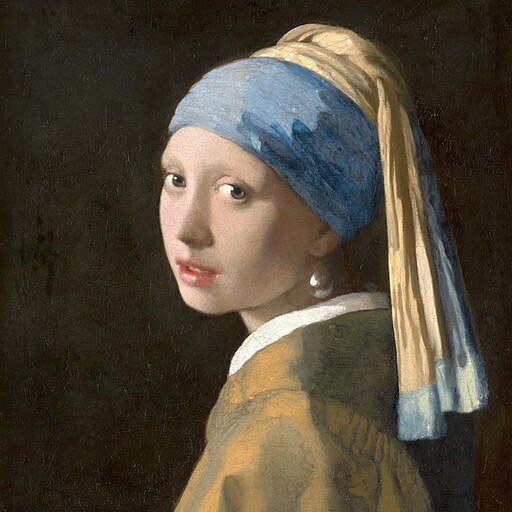
# Let's load the popular vermeer image
|
||||
image = load_image(
|
||||
"https://hf.co/datasets/huggingface/documentation-images/resolve/main/diffusers/input_image_vermeer.png"
|
||||
)
|
||||
```
|
||||
|
||||
|
||||
|
||||
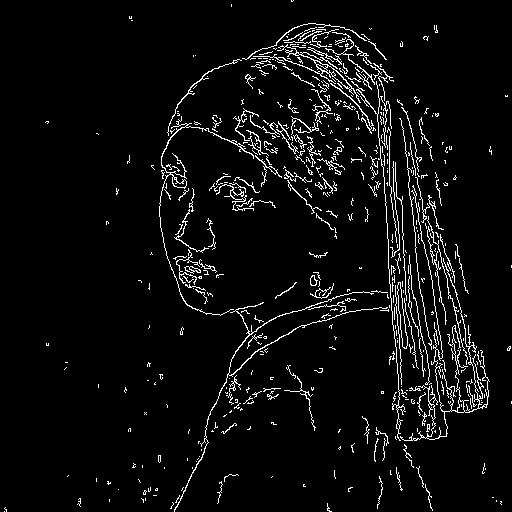
Next, we process the image to get the canny image. This is step *1.* - running the pre-conditioning processor. The pre-conditioning processor is different for every ControlNet. Please see the model cards of the [official checkpoints](#controlnet-with-stable-diffusion-1.5) for more information about other models.
|
||||
|
||||
First, we need to install opencv:
|
||||
|
||||
```
|
||||
pip install opencv-contrib-python
|
||||
```
|
||||
|
||||
Next, let's also install all required Hugging Face libraries:
|
||||
|
||||
```
|
||||
pip install diffusers transformers git+https://github.com/huggingface/accelerate.git
|
||||
```
|
||||
|
||||
Then we can retrieve the canny edges of the image.
|
||||
|
||||
```python
|
||||
import cv2
|
||||
from PIL import Image
|
||||
import numpy as np
|
||||
|
||||
image = np.array(image)
|
||||
|
||||
low_threshold = 100
|
||||
high_threshold = 200
|
||||
|
||||
image = cv2.Canny(image, low_threshold, high_threshold)
|
||||
image = image[:, :, None]
|
||||
image = np.concatenate([image, image, image], axis=2)
|
||||
canny_image = Image.fromarray(image)
|
||||
```
|
||||
|
||||
Let's take a look at the processed image.
|
||||
|
||||
|
||||
|
||||
Now, we load the official [Stable Diffusion 1.5 Model](runwayml/stable-diffusion-v1-5) as well as the ControlNet for canny edges.
|
||||
|
||||
```py
|
||||
from diffusers import StableDiffusionControlNetPipeline, ControlNetModel
|
||||
import torch
|
||||
|
||||
controlnet = ControlNetModel.from_pretrained("lllyasviel/sd-controlnet-canny", torch_dtype=torch.float16)
|
||||
pipe = StableDiffusionControlNetPipeline.from_pretrained(
|
||||
"runwayml/stable-diffusion-v1-5", controlnet=controlnet, torch_dtype=torch.float16
|
||||
)
|
||||
```
|
||||
|
||||
To speed-up things and reduce memory, let's enable model offloading and use the fast [`UniPCMultistepScheduler`].
|
||||
|
||||
```py
|
||||
from diffusers import UniPCMultistepScheduler
|
||||
|
||||
pipe.scheduler = UniPCMultistepScheduler.from_config(pipe.scheduler.config)
|
||||
|
||||
# this command loads the individual model components on GPU on-demand.
|
||||
pipe.enable_model_cpu_offload()
|
||||
```
|
||||
|
||||
Finally, we can run the pipeline:
|
||||
|
||||
```py
|
||||
generator = torch.manual_seed(0)
|
||||
|
||||
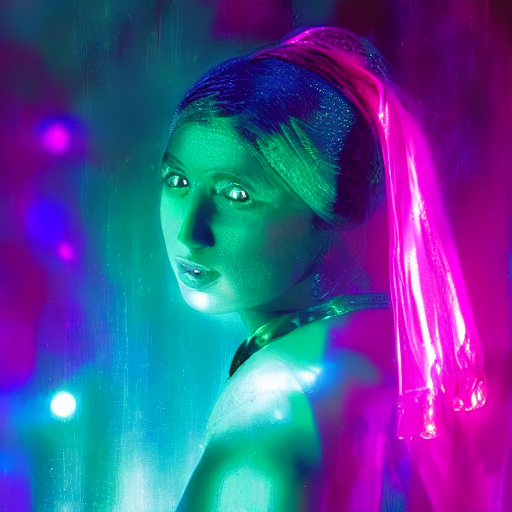
out_image = pipe(
|
||||
"disco dancer with colorful lights", num_inference_steps=20, generator=generator, image=canny_image
|
||||
).images[0]
|
||||
```
|
||||
|
||||
This should take only around 3-4 seconds on GPU (depending on hardware). The output image then looks as follows:
|
||||
|
||||
|
||||
|
||||
|
||||
**Note**: To see how to run all other ControlNet checkpoints, please have a look at [ControlNet with Stable Diffusion 1.5](#controlnet-with-stable-diffusion-1.5).
|
||||
|
||||
<!-- TODO: add space -->
|
||||
|
||||
## Combining multiple conditionings
|
||||
|
||||
Multiple ControlNet conditionings can be combined for a single image generation. Pass a list of ControlNets to the pipeline's constructor and a corresponding list of conditionings to `__call__`.
|
||||
|
||||
When combining conditionings, it is helpful to mask conditionings such that they do not overlap. In the example, we mask the middle of the canny map where the pose conditioning is located.
|
||||
|
||||
It can also be helpful to vary the `controlnet_conditioning_scales` to emphasize one conditioning over the other.
|
||||
|
||||
### Canny conditioning
|
||||
|
||||
The original image:
|
||||
|
||||
<img src="https://huggingface.co/datasets/huggingface/documentation-images/resolve/main/diffusers/landscape.png"/>
|
||||
|
||||
Prepare the conditioning:
|
||||
|
||||
```python
|
||||
from diffusers.utils import load_image
|
||||
from PIL import Image
|
||||
import cv2
|
||||
import numpy as np
|
||||
from diffusers.utils import load_image
|
||||
|
||||
canny_image = load_image(
|
||||
"https://huggingface.co/datasets/huggingface/documentation-images/resolve/main/diffusers/landscape.png"
|
||||
)
|
||||
canny_image = np.array(canny_image)
|
||||
|
||||
low_threshold = 100
|
||||
high_threshold = 200
|
||||
|
||||
canny_image = cv2.Canny(canny_image, low_threshold, high_threshold)
|
||||
|
||||
# zero out middle columns of image where pose will be overlayed
|
||||
zero_start = canny_image.shape[1] // 4
|
||||
zero_end = zero_start + canny_image.shape[1] // 2
|
||||
canny_image[:, zero_start:zero_end] = 0
|
||||
|
||||
canny_image = canny_image[:, :, None]
|
||||
canny_image = np.concatenate([canny_image, canny_image, canny_image], axis=2)
|
||||
canny_image = Image.fromarray(canny_image)
|
||||
```
|
||||
|
||||
<img src="https://huggingface.co/datasets/huggingface/documentation-images/resolve/main/blog/controlnet/landscape_canny_masked.png"/>
|
||||
|
||||
### Openpose conditioning
|
||||
|
||||
The original image:
|
||||
|
||||
<img src="https://huggingface.co/datasets/huggingface/documentation-images/resolve/main/diffusers/person.png" width=600/>
|
||||
|
||||
Prepare the conditioning:
|
||||
|
||||
```python
|
||||
from controlnet_aux import OpenposeDetector
|
||||
from diffusers.utils import load_image
|
||||
|
||||
openpose = OpenposeDetector.from_pretrained("lllyasviel/ControlNet")
|
||||
|
||||
openpose_image = load_image(
|
||||
"https://huggingface.co/datasets/huggingface/documentation-images/resolve/main/diffusers/person.png"
|
||||
)
|
||||
openpose_image = openpose(openpose_image)
|
||||
```
|
||||
|
||||
<img src="https://huggingface.co/datasets/huggingface/documentation-images/resolve/main/blog/controlnet/person_pose.png" width=600/>
|
||||
|
||||
### Running ControlNet with multiple conditionings
|
||||
|
||||
```python
|
||||
from diffusers import StableDiffusionControlNetPipeline, ControlNetModel, UniPCMultistepScheduler
|
||||
import torch
|
||||
|
||||
controlnet = [
|
||||
ControlNetModel.from_pretrained("lllyasviel/sd-controlnet-openpose", torch_dtype=torch.float16),
|
||||
ControlNetModel.from_pretrained("lllyasviel/sd-controlnet-canny", torch_dtype=torch.float16),
|
||||
]
|
||||
|
||||
pipe = StableDiffusionControlNetPipeline.from_pretrained(
|
||||
"runwayml/stable-diffusion-v1-5", controlnet=controlnet, torch_dtype=torch.float16
|
||||
)
|
||||
pipe.scheduler = UniPCMultistepScheduler.from_config(pipe.scheduler.config)
|
||||
|
||||
pipe.enable_xformers_memory_efficient_attention()
|
||||
pipe.enable_model_cpu_offload()
|
||||
|
||||
prompt = "a giant standing in a fantasy landscape, best quality"
|
||||
negative_prompt = "monochrome, lowres, bad anatomy, worst quality, low quality"
|
||||
|
||||
generator = torch.Generator(device="cpu").manual_seed(1)
|
||||
|
||||
images = [openpose_image, canny_image]
|
||||
|
||||
image = pipe(
|
||||
prompt,
|
||||
images,
|
||||
num_inference_steps=20,
|
||||
generator=generator,
|
||||
negative_prompt=negative_prompt,
|
||||
controlnet_conditioning_scale=[1.0, 0.8],
|
||||
).images[0]
|
||||
|
||||
image.save("./multi_controlnet_output.png")
|
||||
```
|
||||
|
||||
<img src="https://huggingface.co/datasets/huggingface/documentation-images/resolve/main/blog/controlnet/multi_controlnet_output.png" width=600/>
|
||||
|
||||
### Guess Mode
|
||||
|
||||
Guess Mode is [a ControlNet feature that was implemented](https://github.com/lllyasviel/ControlNet#guess-mode--non-prompt-mode) after the publication of [the paper](https://arxiv.org/abs/2302.05543). The description states:
|
||||
|
||||
>In this mode, the ControlNet encoder will try best to recognize the content of the input control map, like depth map, edge map, scribbles, etc, even if you remove all prompts.
|
||||
|
||||
#### The core implementation:
|
||||
|
||||
It adjusts the scale of the output residuals from ControlNet by a fixed ratio depending on the block depth. The shallowest DownBlock corresponds to `0.1`. As the blocks get deeper, the scale increases exponentially, and the scale for the output of the MidBlock becomes `1.0`.
|
||||
|
||||
Since the core implementation is just this, **it does not have any impact on prompt conditioning**. While it is common to use it without specifying any prompts, it is also possible to provide prompts if desired.
|
||||
|
||||
#### Usage:
|
||||
|
||||
Just specify `guess_mode=True` in the pipe() function. A `guidance_scale` between 3.0 and 5.0 is [recommended](https://github.com/lllyasviel/ControlNet#guess-mode--non-prompt-mode).
|
||||
```py
|
||||
from diffusers import StableDiffusionControlNetPipeline, ControlNetModel
|
||||
import torch
|
||||
|
||||
controlnet = ControlNetModel.from_pretrained("lllyasviel/sd-controlnet-canny")
|
||||
pipe = StableDiffusionControlNetPipeline.from_pretrained("runwayml/stable-diffusion-v1-5", controlnet=controlnet).to(
|
||||
"cuda"
|
||||
)
|
||||
image = pipe("", image=canny_image, guess_mode=True, guidance_scale=3.0).images[0]
|
||||
image.save("guess_mode_generated.png")
|
||||
```
|
||||
|
||||
#### Output image comparison:
|
||||
Canny Control Example
|
||||
|
||||
|no guess_mode with prompt|guess_mode without prompt|
|
||||
|---|---|
|
||||
|<a href="https://huggingface.co/takuma104/controlnet_dev/resolve/main/gen_compare_guess_mode/output_images/diffusers/output_bird_canny_0.png"><img width="128" src="https://huggingface.co/takuma104/controlnet_dev/resolve/main/gen_compare_guess_mode/output_images/diffusers/output_bird_canny_0.png"/></a>|<a href="https://huggingface.co/takuma104/controlnet_dev/resolve/main/gen_compare_guess_mode/output_images/diffusers/output_bird_canny_0_gm.png"><img width="128" src="https://huggingface.co/takuma104/controlnet_dev/resolve/main/gen_compare_guess_mode/output_images/diffusers/output_bird_canny_0_gm.png"/></a>|
|
||||
|
||||
|
||||
## Available checkpoints
|
||||
|
||||
ControlNet requires a *control image* in addition to the text-to-image *prompt*.
|
||||
Each pretrained model is trained using a different conditioning method that requires different images for conditioning the generated outputs. For example, Canny edge conditioning requires the control image to be the output of a Canny filter, while depth conditioning requires the control image to be a depth map. See the overview and image examples below to know more.
|
||||
|
||||
All checkpoints can be found under the authors' namespace [lllyasviel](https://huggingface.co/lllyasviel).
|
||||
|
||||
**13.04.2024 Update**: The author has released improved controlnet checkpoints v1.1 - see [here](#controlnet-v1.1).
|
||||
|
||||
### ControlNet v1.0
|
||||
|
||||
| Model Name | Control Image Overview| Control Image Example | Generated Image Example |
|
||||
|---|---|---|---|
|
||||
|[lllyasviel/sd-controlnet-canny](https://huggingface.co/lllyasviel/sd-controlnet-canny)<br/> *Trained with canny edge detection* | A monochrome image with white edges on a black background.|<a href="https://huggingface.co/takuma104/controlnet_dev/blob/main/gen_compare/control_images/converted/control_bird_canny.png"><img width="64" style="margin:0;padding:0;" src="https://huggingface.co/takuma104/controlnet_dev/resolve/main/gen_compare/control_images/converted/control_bird_canny.png"/></a>|<a href="https://huggingface.co/takuma104/controlnet_dev/resolve/main/gen_compare/output_images/diffusers/output_bird_canny_1.png"><img width="64" src="https://huggingface.co/takuma104/controlnet_dev/resolve/main/gen_compare/output_images/diffusers/output_bird_canny_1.png"/></a>|
|
||||
|[lllyasviel/sd-controlnet-depth](https://huggingface.co/lllyasviel/sd-controlnet-depth)<br/> *Trained with Midas depth estimation* |A grayscale image with black representing deep areas and white representing shallow areas.|<a href="https://huggingface.co/takuma104/controlnet_dev/blob/main/gen_compare/control_images/converted/control_vermeer_depth.png"><img width="64" src="https://huggingface.co/takuma104/controlnet_dev/resolve/main/gen_compare/control_images/converted/control_vermeer_depth.png"/></a>|<a href="https://huggingface.co/takuma104/controlnet_dev/resolve/main/gen_compare/output_images/diffusers/output_vermeer_depth_2.png"><img width="64" src="https://huggingface.co/takuma104/controlnet_dev/resolve/main/gen_compare/output_images/diffusers/output_vermeer_depth_2.png"/></a>|
|
||||
|[lllyasviel/sd-controlnet-hed](https://huggingface.co/lllyasviel/sd-controlnet-hed)<br/> *Trained with HED edge detection (soft edge)* |A monochrome image with white soft edges on a black background.|<a href="https://huggingface.co/takuma104/controlnet_dev/blob/main/gen_compare/control_images/converted/control_bird_hed.png"><img width="64" src="https://huggingface.co/takuma104/controlnet_dev/resolve/main/gen_compare/control_images/converted/control_bird_hed.png"/></a>|<a href="https://huggingface.co/takuma104/controlnet_dev/resolve/main/gen_compare/output_images/diffusers/output_bird_hed_1.png"><img width="64" src="https://huggingface.co/takuma104/controlnet_dev/resolve/main/gen_compare/output_images/diffusers/output_bird_hed_1.png"/></a> |
|
||||
|[lllyasviel/sd-controlnet-mlsd](https://huggingface.co/lllyasviel/sd-controlnet-mlsd)<br/> *Trained with M-LSD line detection* |A monochrome image composed only of white straight lines on a black background.|<a href="https://huggingface.co/takuma104/controlnet_dev/blob/main/gen_compare/control_images/converted/control_room_mlsd.png"><img width="64" src="https://huggingface.co/takuma104/controlnet_dev/resolve/main/gen_compare/control_images/converted/control_room_mlsd.png"/></a>|<a href="https://huggingface.co/takuma104/controlnet_dev/resolve/main/gen_compare/output_images/diffusers/output_room_mlsd_0.png"><img width="64" src="https://huggingface.co/takuma104/controlnet_dev/resolve/main/gen_compare/output_images/diffusers/output_room_mlsd_0.png"/></a>|
|
||||
|[lllyasviel/sd-controlnet-normal](https://huggingface.co/lllyasviel/sd-controlnet-normal)<br/> *Trained with normal map* |A [normal mapped](https://en.wikipedia.org/wiki/Normal_mapping) image.|<a href="https://huggingface.co/takuma104/controlnet_dev/blob/main/gen_compare/control_images/converted/control_human_normal.png"><img width="64" src="https://huggingface.co/takuma104/controlnet_dev/resolve/main/gen_compare/control_images/converted/control_human_normal.png"/></a>|<a href="https://huggingface.co/takuma104/controlnet_dev/resolve/main/gen_compare/output_images/diffusers/output_human_normal_1.png"><img width="64" src="https://huggingface.co/takuma104/controlnet_dev/resolve/main/gen_compare/output_images/diffusers/output_human_normal_1.png"/></a>|
|
||||
|[lllyasviel/sd-controlnet-openpose](https://huggingface.co/lllyasviel/sd-controlnet_openpose)<br/> *Trained with OpenPose bone image* |A [OpenPose bone](https://github.com/CMU-Perceptual-Computing-Lab/openpose) image.|<a href="https://huggingface.co/takuma104/controlnet_dev/blob/main/gen_compare/control_images/converted/control_human_openpose.png"><img width="64" src="https://huggingface.co/takuma104/controlnet_dev/resolve/main/gen_compare/control_images/converted/control_human_openpose.png"/></a>|<a href="https://huggingface.co/takuma104/controlnet_dev/resolve/main/gen_compare/output_images/diffusers/output_human_openpose_0.png"><img width="64" src="https://huggingface.co/takuma104/controlnet_dev/resolve/main/gen_compare/output_images/diffusers/output_human_openpose_0.png"/></a>|
|
||||
|[lllyasviel/sd-controlnet-scribble](https://huggingface.co/lllyasviel/sd-controlnet_scribble)<br/> *Trained with human scribbles* |A hand-drawn monochrome image with white outlines on a black background.|<a href="https://huggingface.co/takuma104/controlnet_dev/blob/main/gen_compare/control_images/converted/control_vermeer_scribble.png"><img width="64" src="https://huggingface.co/takuma104/controlnet_dev/resolve/main/gen_compare/control_images/converted/control_vermeer_scribble.png"/></a>|<a href="https://huggingface.co/takuma104/controlnet_dev/resolve/main/gen_compare/output_images/diffusers/output_vermeer_scribble_0.png"><img width="64" src="https://huggingface.co/takuma104/controlnet_dev/resolve/main/gen_compare/output_images/diffusers/output_vermeer_scribble_0.png"/></a> |
|
||||
|[lllyasviel/sd-controlnet-seg](https://huggingface.co/lllyasviel/sd-controlnet_seg)<br/>*Trained with semantic segmentation* |An [ADE20K](https://groups.csail.mit.edu/vision/datasets/ADE20K/)'s segmentation protocol image.|<a href="https://huggingface.co/takuma104/controlnet_dev/blob/main/gen_compare/control_images/converted/control_room_seg.png"><img width="64" src="https://huggingface.co/takuma104/controlnet_dev/resolve/main/gen_compare/control_images/converted/control_room_seg.png"/></a>|<a href="https://huggingface.co/takuma104/controlnet_dev/resolve/main/gen_compare/output_images/diffusers/output_room_seg_1.png"><img width="64" src="https://huggingface.co/takuma104/controlnet_dev/resolve/main/gen_compare/output_images/diffusers/output_room_seg_1.png"/></a> |
|
||||
|
||||
### ControlNet v1.1
|
||||
|
||||
| Model Name | Control Image Overview| Condition Image | Control Image Example | Generated Image Example |
|
||||
|---|---|---|---|---|
|
||||
|[lllyasviel/control_v11p_sd15_canny](https://huggingface.co/lllyasviel/control_v11p_sd15_canny)<br/> | *Trained with canny edge detection* | A monochrome image with white edges on a black background.|<a href="https://huggingface.co/lllyasviel/control_v11p_sd15_canny/resolve/main/images/control.png"><img width="64" style="margin:0;padding:0;" src="https://huggingface.co/lllyasviel/control_v11p_sd15_canny/resolve/main/images/control.png"/></a>|<a href="https://huggingface.co/lllyasviel/control_v11p_sd15_canny/resolve/main/images/image_out.png"><img width="64" src="https://huggingface.co/lllyasviel/control_v11p_sd15_canny/resolve/main/images/image_out.png"/></a>|
|
||||
|[lllyasviel/control_v11e_sd15_ip2p](https://huggingface.co/lllyasviel/control_v11e_sd15_ip2p)<br/> | *Trained with pixel to pixel instruction* | No condition .|<a href="https://huggingface.co/lllyasviel/control_v11e_sd15_ip2p/resolve/main/images/control.png"><img width="64" style="margin:0;padding:0;" src="https://huggingface.co/lllyasviel/control_v11e_sd15_ip2p/resolve/main/images/control.png"/></a>|<a href="https://huggingface.co/lllyasviel/control_v11e_sd15_ip2p/resolve/main/images/image_out.png"><img width="64" src="https://huggingface.co/lllyasviel/control_v11e_sd15_ip2p/resolve/main/images/image_out.png"/></a>|
|
||||
|[lllyasviel/control_v11p_sd15_inpaint](https://huggingface.co/lllyasviel/control_v11p_sd15_inpaint)<br/> | Trained with image inpainting | No condition.|<a href="https://huggingface.co/lllyasviel/control_v11p_sd15_inpaint/resolve/main/images/control.png"><img width="64" style="margin:0;padding:0;" src="https://huggingface.co/lllyasviel/control_v11p_sd15_inpaint/resolve/main/images/control.png"/></a>|<a href="https://huggingface.co/lllyasviel/control_v11p_sd15_inpaint/resolve/main/images/output.png"><img width="64" src="https://huggingface.co/lllyasviel/control_v11p_sd15_inpaint/resolve/main/images/output.png"/></a>|
|
||||
|[lllyasviel/control_v11p_sd15_mlsd](https://huggingface.co/lllyasviel/control_v11p_sd15_mlsd)<br/> | Trained with multi-level line segment detection | An image with annotated line segments.|<a href="https://huggingface.co/lllyasviel/control_v11p_sd15_mlsd/resolve/main/images/control.png"><img width="64" style="margin:0;padding:0;" src="https://huggingface.co/lllyasviel/control_v11p_sd15_mlsd/resolve/main/images/control.png"/></a>|<a href="https://huggingface.co/lllyasviel/control_v11p_sd15_mlsd/resolve/main/images/image_out.png"><img width="64" src="https://huggingface.co/lllyasviel/control_v11p_sd15_mlsd/resolve/main/images/image_out.png"/></a>|
|
||||
|[lllyasviel/control_v11f1p_sd15_depth](https://huggingface.co/lllyasviel/control_v11f1p_sd15_depth)<br/> | Trained with depth estimation | An image with depth information, usually represented as a grayscale image.|<a href="https://huggingface.co/lllyasviel/control_v11f1p_sd15_depth/resolve/main/images/control.png"><img width="64" style="margin:0;padding:0;" src="https://huggingface.co/lllyasviel/control_v11f1p_sd15_depth/resolve/main/images/control.png"/></a>|<a href="https://huggingface.co/lllyasviel/control_v11f1p_sd15_depth/resolve/main/images/image_out.png"><img width="64" src="https://huggingface.co/lllyasviel/control_v11f1p_sd15_depth/resolve/main/images/image_out.png"/></a>|
|
||||
|[lllyasviel/control_v11p_sd15_normalbae](https://huggingface.co/lllyasviel/control_v11p_sd15_normalbae)<br/> | Trained with surface normal estimation | An image with surface normal information, usually represented as a color-coded image.|<a href="https://huggingface.co/lllyasviel/control_v11p_sd15_normalbae/resolve/main/images/control.png"><img width="64" style="margin:0;padding:0;" src="https://huggingface.co/lllyasviel/control_v11p_sd15_normalbae/resolve/main/images/control.png"/></a>|<a href="https://huggingface.co/lllyasviel/control_v11p_sd15_normalbae/resolve/main/images/image_out.png"><img width="64" src="https://huggingface.co/lllyasviel/control_v11p_sd15_normalbae/resolve/main/images/image_out.png"/></a>|
|
||||
|[lllyasviel/control_v11p_sd15_seg](https://huggingface.co/lllyasviel/control_v11p_sd15_seg)<br/> | Trained with image segmentation | An image with segmented regions, usually represented as a color-coded image.|<a href="https://huggingface.co/lllyasviel/control_v11p_sd15_seg/resolve/main/images/control.png"><img width="64" style="margin:0;padding:0;" src="https://huggingface.co/lllyasviel/control_v11p_sd15_seg/resolve/main/images/control.png"/></a>|<a href="https://huggingface.co/lllyasviel/control_v11p_sd15_seg/resolve/main/images/image_out.png"><img width="64" src="https://huggingface.co/lllyasviel/control_v11p_sd15_seg/resolve/main/images/image_out.png"/></a>|
|
||||
|[lllyasviel/control_v11p_sd15_lineart](https://huggingface.co/lllyasviel/control_v11p_sd15_lineart)<br/> | Trained with line art generation | An image with line art, usually black lines on a white background.|<a href="https://huggingface.co/lllyasviel/control_v11p_sd15_lineart/resolve/main/images/control.png"><img width="64" style="margin:0;padding:0;" src="https://huggingface.co/lllyasviel/control_v11p_sd15_lineart/resolve/main/images/control.png"/></a>|<a href="https://huggingface.co/lllyasviel/control_v11p_sd15_lineart/resolve/main/images/image_out.png"><img width="64" src="https://huggingface.co/lllyasviel/control_v11p_sd15_lineart/resolve/main/images/image_out.png"/></a>|
|
||||
|[lllyasviel/control_v11p_sd15s2_lineart_anime](https://huggingface.co/lllyasviel/control_v11p_sd15s2_lineart_anime)<br/> | Trained with anime line art generation | An image with anime-style line art.|<a href="https://huggingface.co/lllyasviel/control_v11p_sd15s2_lineart_anime/resolve/main/images/control.png"><img width="64" style="margin:0;padding:0;" src="https://huggingface.co/lllyasviel/control_v11p_sd15s2_lineart_anime/resolve/main/images/control.png"/></a>|<a href="https://huggingface.co/lllyasviel/control_v11p_sd15s2_lineart_anime/resolve/main/images/image_out.png"><img width="64" src="https://huggingface.co/lllyasviel/control_v11p_sd15s2_lineart_anime/resolve/main/images/image_out.png"/></a>|
|
||||
|[lllyasviel/control_v11p_sd15_openpose](https://huggingface.co/lllyasviel/control_v11p_sd15s2_lineart_anime)<br/> | Trained with human pose estimation | An image with human poses, usually represented as a set of keypoints or skeletons.|<a href="https://huggingface.co/lllyasviel/control_v11p_sd15_openpose/resolve/main/images/control.png"><img width="64" style="margin:0;padding:0;" src="https://huggingface.co/lllyasviel/control_v11p_sd15_openpose/resolve/main/images/control.png"/></a>|<a href="https://huggingface.co/lllyasviel/control_v11p_sd15_openpose/resolve/main/images/image_out.png"><img width="64" src="https://huggingface.co/lllyasviel/control_v11p_sd15_openpose/resolve/main/images/image_out.png"/></a>|
|
||||
|[lllyasviel/control_v11p_sd15_scribble](https://huggingface.co/lllyasviel/control_v11p_sd15_scribble)<br/> | Trained with scribble-based image generation | An image with scribbles, usually random or user-drawn strokes.|<a href="https://huggingface.co/lllyasviel/control_v11p_sd15_scribble/resolve/main/images/control.png"><img width="64" style="margin:0;padding:0;" src="https://huggingface.co/lllyasviel/control_v11p_sd15_scribble/resolve/main/images/control.png"/></a>|<a href="https://huggingface.co/lllyasviel/control_v11p_sd15_scribble/resolve/main/images/image_out.png"><img width="64" src="https://huggingface.co/lllyasviel/control_v11p_sd15_scribble/resolve/main/images/image_out.png"/></a>|
|
||||
|[lllyasviel/control_v11p_sd15_softedge](https://huggingface.co/lllyasviel/control_v11p_sd15_softedge)<br/> | Trained with soft edge image generation | An image with soft edges, usually to create a more painterly or artistic effect.|<a href="https://huggingface.co/lllyasviel/control_v11p_sd15_softedge/resolve/main/images/control.png"><img width="64" style="margin:0;padding:0;" src="https://huggingface.co/lllyasviel/control_v11p_sd15_softedge/resolve/main/images/control.png"/></a>|<a href="https://huggingface.co/lllyasviel/control_v11p_sd15_softedge/resolve/main/images/image_out.png"><img width="64" src="https://huggingface.co/lllyasviel/control_v11p_sd15_softedge/resolve/main/images/image_out.png"/></a>|
|
||||
|[lllyasviel/control_v11e_sd15_shuffle](https://huggingface.co/lllyasviel/control_v11e_sd15_shuffle)<br/> | Trained with image shuffling | An image with shuffled patches or regions.|<a href="https://huggingface.co/lllyasviel/control_v11e_sd15_shuffle/resolve/main/images/control.png"><img width="64" style="margin:0;padding:0;" src="https://huggingface.co/lllyasviel/control_v11e_sd15_shuffle/resolve/main/images/control.png"/></a>|<a href="https://huggingface.co/lllyasviel/control_v11e_sd15_shuffle/resolve/main/images/image_out.png"><img width="64" src="https://huggingface.co/lllyasviel/control_v11e_sd15_shuffle/resolve/main/images/image_out.png"/></a>|
|
||||
|[lllyasviel/control_v11f1e_sd15_tile](https://huggingface.co/lllyasviel/control_v11f1e_sd15_tile)<br/> | Trained with image tiling | A blurry image or part of an image .|<a href="https://huggingface.co/lllyasviel/control_v11f1e_sd15_tile/resolve/main/images/original.png"><img width="64" style="margin:0;padding:0;" src="https://huggingface.co/lllyasviel/control_v11f1e_sd15_tile/resolve/main/images/original.png"/></a>|<a href="https://huggingface.co/lllyasviel/control_v11f1e_sd15_tile/resolve/main/images/output.png"><img width="64" src="https://huggingface.co/lllyasviel/control_v11f1e_sd15_tile/resolve/main/images/output.png"/></a>|
|
||||
|
||||
## StableDiffusionControlNetPipeline
|
||||
[[autodoc]] StableDiffusionControlNetPipeline
|
||||
@@ -66,15 +343,8 @@ Make sure to check out the Schedulers [guide](/using-diffusers/schedulers) to le
|
||||
- disable_xformers_memory_efficient_attention
|
||||
- load_textual_inversion
|
||||
|
||||
## StableDiffusionPipelineOutput
|
||||
|
||||
[[autodoc]] pipelines.stable_diffusion.StableDiffusionPipelineOutput
|
||||
|
||||
## FlaxStableDiffusionControlNetPipeline
|
||||
[[autodoc]] FlaxStableDiffusionControlNetPipeline
|
||||
- all
|
||||
- __call__
|
||||
|
||||
## FlaxStableDiffusionControlNetPipelineOutput
|
||||
|
||||
[[autodoc]] pipelines.stable_diffusion.FlaxStableDiffusionPipelineOutput
|
||||
@@ -1,46 +0,0 @@
|
||||
<!--Copyright 2023 The HuggingFace Team. All rights reserved.
|
||||
|
||||
Licensed under the Apache License, Version 2.0 (the "License"); you may not use this file except in compliance with
|
||||
the License. You may obtain a copy of the License at
|
||||
|
||||
http://www.apache.org/licenses/LICENSE-2.0
|
||||
|
||||
Unless required by applicable law or agreed to in writing, software distributed under the License is distributed on
|
||||
an "AS IS" BASIS, WITHOUT WARRANTIES OR CONDITIONS OF ANY KIND, either express or implied. See the License for the
|
||||
specific language governing permissions and limitations under the License.
|
||||
-->
|
||||
|
||||
# ControlNet with Stable Diffusion XL
|
||||
|
||||
ControlNet was introduced in [Adding Conditional Control to Text-to-Image Diffusion Models](https://huggingface.co/papers/2302.05543) by Lvmin Zhang and Maneesh Agrawala.
|
||||
|
||||
With a ControlNet model, you can provide an additional control image to condition and control Stable Diffusion generation. For example, if you provide a depth map, the ControlNet model generates an image that'll preserve the spatial information from the depth map. It is a more flexible and accurate way to control the image generation process.
|
||||
|
||||
The abstract from the paper is:
|
||||
|
||||
*We present a neural network structure, ControlNet, to control pretrained large diffusion models to support additional input conditions. The ControlNet learns task-specific conditions in an end-to-end way, and the learning is robust even when the training dataset is small (< 50k). Moreover, training a ControlNet is as fast as fine-tuning a diffusion model, and the model can be trained on a personal devices. Alternatively, if powerful computation clusters are available, the model can scale to large amounts (millions to billions) of data. We report that large diffusion models like Stable Diffusion can be augmented with ControlNets to enable conditional inputs like edge maps, segmentation maps, keypoints, etc. This may enrich the methods to control large diffusion models and further facilitate related applications.*
|
||||
|
||||
You can find additional smaller Stable Diffusion XL (SDXL) ControlNet checkpoints from the 🤗 [Diffusers](https://huggingface.co/diffusers) Hub organization, and browse [community-trained](https://huggingface.co/models?other=stable-diffusion-xl&other=controlnet) checkpoints on the Hub.
|
||||
|
||||
<Tip warning={true}>
|
||||
|
||||
🧪 Many of the SDXL ControlNet checkpoints are experimental, and there is a lot of room for improvement. Feel free to open an [Issue](https://github.com/huggingface/diffusers/issues/new/choose) and leave us feedback on how we can improve!
|
||||
|
||||
</Tip>
|
||||
|
||||
If you don't see a checkpoint you're interested in, you can train your own SDXL ControlNet with our [training script](https://github.com/huggingface/diffusers/blob/main/examples/controlnet/README_sdxl.md).
|
||||
|
||||
<Tip>
|
||||
|
||||
Make sure to check out the Schedulers [guide](/using-diffusers/schedulers) to learn how to explore the tradeoff between scheduler speed and quality, and see the [reuse components across pipelines](/using-diffusers/loading#reuse-components-across-pipelines) section to learn how to efficiently load the same components into multiple pipelines.
|
||||
|
||||
</Tip>
|
||||
|
||||
## StableDiffusionXLControlNetPipeline
|
||||
[[autodoc]] StableDiffusionXLControlNetPipeline
|
||||
- all
|
||||
- __call__
|
||||
|
||||
## StableDiffusionPipelineOutput
|
||||
|
||||
[[autodoc]] pipelines.stable_diffusion.StableDiffusionPipelineOutput
|
||||
@@ -24,32 +24,325 @@ This pipeline was contributed by [clarencechen](https://github.com/clarencechen)
|
||||
|
||||
## Tips
|
||||
|
||||
* The pipeline can generate masks that can be fed into other inpainting pipelines.
|
||||
* In order to generate an image using this pipeline, both an image mask (source and target prompts can be manually specified or generated, and passed to [`~StableDiffusionDiffEditPipeline.generate_mask`])
|
||||
and a set of partially inverted latents (generated using [`~StableDiffusionDiffEditPipeline.invert`]) _must_ be provided as arguments when calling the pipeline to generate the final edited image.
|
||||
* The function [`~StableDiffusionDiffEditPipeline.generate_mask`] exposes two prompt arguments, `source_prompt` and `target_prompt`
|
||||
* The pipeline can generate masks that can be fed into other inpainting pipelines. Check out the code examples below to know more.
|
||||
* In order to generate an image using this pipeline, both an image mask (manually specified or generated using `generate_mask`)
|
||||
and a set of partially inverted latents (generated using `invert`) _must_ be provided as arguments when calling the pipeline to generate the final edited image.
|
||||
Refer to the code examples below for more details.
|
||||
* The function `generate_mask` exposes two prompt arguments, `source_prompt` and `target_prompt`,
|
||||
that let you control the locations of the semantic edits in the final image to be generated. Let's say,
|
||||
you wanted to translate from "cat" to "dog". In this case, the edit direction will be "cat -> dog". To reflect
|
||||
this in the generated mask, you simply have to set the embeddings related to the phrases including "cat" to
|
||||
`source_prompt` and "dog" to `target_prompt`.
|
||||
`source_prompt_embeds` and "dog" to `target_prompt_embeds`. Refer to the code example below for more details.
|
||||
* When generating partially inverted latents using `invert`, assign a caption or text embedding describing the
|
||||
overall image to the `prompt` argument to help guide the inverse latent sampling process. In most cases, the
|
||||
source concept is sufficently descriptive to yield good results, but feel free to explore alternatives.
|
||||
Please refer to [this code example](#generating-image-captions-for-inversion) for more details.
|
||||
* When calling the pipeline to generate the final edited image, assign the source concept to `negative_prompt`
|
||||
and the target concept to `prompt`. Taking the above example, you simply have to set the embeddings related to
|
||||
the phrases including "cat" to `negative_prompt` and "dog" to `prompt`.
|
||||
the phrases including "cat" to `negative_prompt_embeds` and "dog" to `prompt_embeds`. Refer to the code example
|
||||
below for more details.
|
||||
* If you wanted to reverse the direction in the example above, i.e., "dog -> cat", then it's recommended to:
|
||||
* Swap the `source_prompt` and `target_prompt` in the arguments to `generate_mask`.
|
||||
* Change the input prompt in [`~StableDiffusionDiffEditPipeline.invert`] to include "dog".
|
||||
* Change the input prompt for `invert` to include "dog".
|
||||
* Swap the `prompt` and `negative_prompt` in the arguments to call the pipeline to generate the final edited image.
|
||||
* The source and target prompts, or their corresponding embeddings, can also be automatically generated. Please refer to the [DiffEdit](/using-diffusers/diffedit) guide for more details.
|
||||
* Note that the source and target prompts, or their corresponding embeddings, can also be automatically generated. Please, refer to [this discussion](#generating-source-and-target-embeddings) for more details.
|
||||
|
||||
## Usage example
|
||||
|
||||
### Based on an input image with a caption
|
||||
|
||||
When the pipeline is conditioned on an input image, we first obtain partially inverted latents from the input image using a
|
||||
`DDIMInverseScheduler` with the help of a caption. Then we generate an editing mask to identify relevant regions in the image using the source and target prompts. Finally,
|
||||
the inverted noise and generated mask is used to start the generation process.
|
||||
|
||||
First, let's load our pipeline:
|
||||
|
||||
```py
|
||||
import torch
|
||||
from diffusers import DDIMScheduler, DDIMInverseScheduler, StableDiffusionDiffEditPipeline
|
||||
|
||||
sd_model_ckpt = "stabilityai/stable-diffusion-2-1"
|
||||
pipeline = StableDiffusionDiffEditPipeline.from_pretrained(
|
||||
sd_model_ckpt,
|
||||
torch_dtype=torch.float16,
|
||||
safety_checker=None,
|
||||
)
|
||||
pipeline.scheduler = DDIMScheduler.from_config(pipeline.scheduler.config)
|
||||
pipeline.inverse_scheduler = DDIMInverseScheduler.from_config(pipeline.scheduler.config)
|
||||
pipeline.enable_model_cpu_offload()
|
||||
pipeline.enable_vae_slicing()
|
||||
generator = torch.manual_seed(0)
|
||||
```
|
||||
|
||||
Then, we load an input image to edit using our method:
|
||||
|
||||
```py
|
||||
from diffusers.utils import load_image
|
||||
|
||||
img_url = "https://github.com/Xiang-cd/DiffEdit-stable-diffusion/raw/main/assets/origin.png"
|
||||
raw_image = load_image(img_url).convert("RGB").resize((768, 768))
|
||||
```
|
||||
|
||||
Then, we employ the source and target prompts to generate the editing mask:
|
||||
|
||||
```py
|
||||
# See the "Generating source and target embeddings" section below to
|
||||
# automate the generation of these captions with a pre-trained model like Flan-T5 as explained below.
|
||||
|
||||
source_prompt = "a bowl of fruits"
|
||||
target_prompt = "a basket of fruits"
|
||||
mask_image = pipeline.generate_mask(
|
||||
image=raw_image,
|
||||
source_prompt=source_prompt,
|
||||
target_prompt=target_prompt,
|
||||
generator=generator,
|
||||
)
|
||||
```
|
||||
|
||||
Then, we employ the caption and the input image to get the inverted latents:
|
||||
|
||||
```py
|
||||
inv_latents = pipeline.invert(prompt=source_prompt, image=raw_image, generator=generator).latents
|
||||
```
|
||||
|
||||
Now, generate the image with the inverted latents and semantically generated mask:
|
||||
|
||||
```py
|
||||
image = pipeline(
|
||||
prompt=target_prompt,
|
||||
mask_image=mask_image,
|
||||
image_latents=inv_latents,
|
||||
generator=generator,
|
||||
negative_prompt=source_prompt,
|
||||
).images[0]
|
||||
image.save("edited_image.png")
|
||||
```
|
||||
|
||||
## Generating image captions for inversion
|
||||
|
||||
The authors originally used the source concept prompt as the caption for generating the partially inverted latents. However, we can also leverage open source and public image captioning models for the same purpose.
|
||||
Below, we provide an end-to-end example with the [BLIP](https://huggingface.co/docs/transformers/model_doc/blip) model
|
||||
for generating captions.
|
||||
|
||||
First, let's load our automatic image captioning model:
|
||||
|
||||
```py
|
||||
import torch
|
||||
from transformers import BlipForConditionalGeneration, BlipProcessor
|
||||
|
||||
captioner_id = "Salesforce/blip-image-captioning-base"
|
||||
processor = BlipProcessor.from_pretrained(captioner_id)
|
||||
model = BlipForConditionalGeneration.from_pretrained(captioner_id, torch_dtype=torch.float16, low_cpu_mem_usage=True)
|
||||
```
|
||||
|
||||
Then, we define a utility to generate captions from an input image using the model:
|
||||
|
||||
```py
|
||||
@torch.no_grad()
|
||||
def generate_caption(images, caption_generator, caption_processor):
|
||||
text = "a photograph of"
|
||||
|
||||
inputs = caption_processor(images, text, return_tensors="pt").to(device="cuda", dtype=caption_generator.dtype)
|
||||
caption_generator.to("cuda")
|
||||
outputs = caption_generator.generate(**inputs, max_new_tokens=128)
|
||||
|
||||
# offload caption generator
|
||||
caption_generator.to("cpu")
|
||||
|
||||
caption = caption_processor.batch_decode(outputs, skip_special_tokens=True)[0]
|
||||
return caption
|
||||
```
|
||||
|
||||
Then, we load an input image for conditioning and obtain a suitable caption for it:
|
||||
|
||||
```py
|
||||
from diffusers.utils import load_image
|
||||
|
||||
img_url = "https://github.com/Xiang-cd/DiffEdit-stable-diffusion/raw/main/assets/origin.png"
|
||||
raw_image = load_image(img_url).convert("RGB").resize((768, 768))
|
||||
caption = generate_caption(raw_image, model, processor)
|
||||
```
|
||||
|
||||
Then, we employ the generated caption and the input image to get the inverted latents:
|
||||
|
||||
```py
|
||||
from diffusers import DDIMInverseScheduler, DDIMScheduler
|
||||
|
||||
pipeline = StableDiffusionDiffEditPipeline.from_pretrained(
|
||||
"stabilityai/stable-diffusion-2-1", torch_dtype=torch.float16
|
||||
)
|
||||
pipeline = pipeline.to("cuda")
|
||||
pipeline.enable_model_cpu_offload()
|
||||
pipeline.enable_vae_slicing()
|
||||
|
||||
pipeline.scheduler = DDIMScheduler.from_config(pipeline.scheduler.config)
|
||||
pipeline.inverse_scheduler = DDIMInverseScheduler.from_config(pipeline.scheduler.config)
|
||||
|
||||
generator = torch.manual_seed(0)
|
||||
inv_latents = pipeline.invert(prompt=caption, image=raw_image, generator=generator).latents
|
||||
```
|
||||
|
||||
Now, generate the image with the inverted latents and semantically generated mask from our source and target prompts:
|
||||
|
||||
```py
|
||||
source_prompt = "a bowl of fruits"
|
||||
target_prompt = "a basket of fruits"
|
||||
|
||||
mask_image = pipeline.generate_mask(
|
||||
image=raw_image,
|
||||
source_prompt=source_prompt,
|
||||
target_prompt=target_prompt,
|
||||
generator=generator,
|
||||
)
|
||||
|
||||
image = pipeline(
|
||||
prompt=target_prompt,
|
||||
mask_image=mask_image,
|
||||
image_latents=inv_latents,
|
||||
generator=generator,
|
||||
negative_prompt=source_prompt,
|
||||
).images[0]
|
||||
image.save("edited_image.png")
|
||||
```
|
||||
|
||||
## Generating source and target embeddings
|
||||
|
||||
The authors originally required the user to manually provide the source and target prompts for discovering
|
||||
edit directions. However, we can also leverage open source and public models for the same purpose.
|
||||
Below, we provide an end-to-end example with the [Flan-T5](https://huggingface.co/docs/transformers/model_doc/flan-t5) model
|
||||
for generating source an target embeddings.
|
||||
|
||||
**1. Load the generation model**:
|
||||
|
||||
```py
|
||||
import torch
|
||||
from transformers import AutoTokenizer, T5ForConditionalGeneration
|
||||
|
||||
tokenizer = AutoTokenizer.from_pretrained("google/flan-t5-xl")
|
||||
model = T5ForConditionalGeneration.from_pretrained("google/flan-t5-xl", device_map="auto", torch_dtype=torch.float16)
|
||||
```
|
||||
|
||||
**2. Construct a starting prompt**:
|
||||
|
||||
```py
|
||||
source_concept = "bowl"
|
||||
target_concept = "basket"
|
||||
|
||||
source_text = f"Provide a caption for images containing a {source_concept}. "
|
||||
"The captions should be in English and should be no longer than 150 characters."
|
||||
|
||||
target_text = f"Provide a caption for images containing a {target_concept}. "
|
||||
"The captions should be in English and should be no longer than 150 characters."
|
||||
```
|
||||
|
||||
Here, we're interested in the "bowl -> basket" direction.
|
||||
|
||||
**3. Generate prompts**:
|
||||
|
||||
We can use a utility like so for this purpose.
|
||||
|
||||
```py
|
||||
@torch.no_grad
|
||||
def generate_prompts(input_prompt):
|
||||
input_ids = tokenizer(input_prompt, return_tensors="pt").input_ids.to("cuda")
|
||||
|
||||
outputs = model.generate(
|
||||
input_ids, temperature=0.8, num_return_sequences=16, do_sample=True, max_new_tokens=128, top_k=10
|
||||
)
|
||||
return tokenizer.batch_decode(outputs, skip_special_tokens=True)
|
||||
```
|
||||
|
||||
And then we just call it to generate our prompts:
|
||||
|
||||
```py
|
||||
source_prompts = generate_prompts(source_text)
|
||||
target_prompts = generate_prompts(target_text)
|
||||
```
|
||||
|
||||
We encourage you to play around with the different parameters supported by the
|
||||
`generate()` method ([documentation](https://huggingface.co/docs/transformers/main/en/main_classes/text_generation#transformers.generation_tf_utils.TFGenerationMixin.generate)) for the generation quality you are looking for.
|
||||
|
||||
**4. Load the embedding model**:
|
||||
|
||||
Here, we need to use the same text encoder model used by the subsequent Stable Diffusion model.
|
||||
|
||||
```py
|
||||
from diffusers import StableDiffusionDiffEditPipeline
|
||||
|
||||
pipeline = StableDiffusionDiffEditPipeline.from_pretrained(
|
||||
"stabilityai/stable-diffusion-2-1", torch_dtype=torch.float16
|
||||
)
|
||||
pipeline = pipeline.to("cuda")
|
||||
pipeline.enable_model_cpu_offload()
|
||||
pipeline.enable_vae_slicing()
|
||||
|
||||
generator = torch.manual_seed(0)
|
||||
```
|
||||
|
||||
**5. Compute embeddings**:
|
||||
|
||||
```py
|
||||
import torch
|
||||
|
||||
@torch.no_grad()
|
||||
def embed_prompts(sentences, tokenizer, text_encoder, device="cuda"):
|
||||
embeddings = []
|
||||
for sent in sentences:
|
||||
text_inputs = tokenizer(
|
||||
sent,
|
||||
padding="max_length",
|
||||
max_length=tokenizer.model_max_length,
|
||||
truncation=True,
|
||||
return_tensors="pt",
|
||||
)
|
||||
text_input_ids = text_inputs.input_ids
|
||||
prompt_embeds = text_encoder(text_input_ids.to(device), attention_mask=None)[0]
|
||||
embeddings.append(prompt_embeds)
|
||||
return torch.concatenate(embeddings, dim=0).mean(dim=0).unsqueeze(0)
|
||||
|
||||
source_embeddings = embed_prompts(source_prompts, pipeline.tokenizer, pipeline.text_encoder)
|
||||
target_embeddings = embed_prompts(target_captions, pipeline.tokenizer, pipeline.text_encoder)
|
||||
```
|
||||
|
||||
And you're done! Now, you can use these embeddings directly while calling the pipeline:
|
||||
|
||||
```py
|
||||
from diffusers import DDIMInverseScheduler, DDIMScheduler
|
||||
from diffusers.utils import load_image
|
||||
|
||||
pipeline.scheduler = DDIMScheduler.from_config(pipeline.scheduler.config)
|
||||
pipeline.inverse_scheduler = DDIMInverseScheduler.from_config(pipeline.scheduler.config)
|
||||
|
||||
img_url = "https://github.com/Xiang-cd/DiffEdit-stable-diffusion/raw/main/assets/origin.png"
|
||||
raw_image = load_image(img_url).convert("RGB").resize((768, 768))
|
||||
|
||||
|
||||
mask_image = pipeline.generate_mask(
|
||||
image=raw_image,
|
||||
source_prompt_embeds=source_embeds,
|
||||
target_prompt_embeds=target_embeds,
|
||||
generator=generator,
|
||||
)
|
||||
|
||||
inv_latents = pipeline.invert(
|
||||
prompt_embeds=source_embeds,
|
||||
image=raw_image,
|
||||
generator=generator,
|
||||
).latents
|
||||
|
||||
images = pipeline(
|
||||
mask_image=mask_image,
|
||||
image_latents=inv_latents,
|
||||
prompt_embeds=target_embeddings,
|
||||
negative_prompt_embeds=source_embeddings,
|
||||
generator=generator,
|
||||
).images
|
||||
images[0].save("edited_image.png")
|
||||
```
|
||||
|
||||
## StableDiffusionDiffEditPipeline
|
||||
[[autodoc]] StableDiffusionDiffEditPipeline
|
||||
- all
|
||||
- generate_mask
|
||||
- invert
|
||||
- __call__
|
||||
|
||||
## StableDiffusionPipelineOutput
|
||||
[[autodoc]] pipelines.stable_diffusion.StableDiffusionPipelineOutput
|
||||
- __call__
|
||||
@@ -107,13 +107,13 @@ One cheeseburger monster coming up! Enjoy!
|
||||
|
||||
<Tip>
|
||||
|
||||
We also provide an end-to-end Kandinsky pipeline [`KandinskyCombinedPipeline`], which combines both the prior pipeline and text-to-image pipeline, and lets you perform inference in a single step. You can create the combined pipeline with the [`~AutoPipelineForText2Image.from_pretrained`] method
|
||||
We also provide an end-to-end Kandinsky pipeline [`KandinskyCombinedPipeline`], which combines both the prior pipeline and text-to-image pipeline, and lets you perform inference in a single step. You can create the combined pipeline with the [`~AutoPipelineForTextToImage.from_pretrained`] method
|
||||
|
||||
```python
|
||||
from diffusers import AutoPipelineForText2Image
|
||||
from diffusers import AutoPipelineForTextToImage
|
||||
import torch
|
||||
|
||||
pipe = AutoPipelineForText2Image.from_pretrained(
|
||||
pipe = AutoPipelineForTextToImage.from_pretrained(
|
||||
"kandinsky-community/kandinsky-2-1", torch_dtype=torch.float16
|
||||
)
|
||||
pipe.enable_model_cpu_offload()
|
||||
|
||||
@@ -1,57 +0,0 @@
|
||||
<!--Copyright 2023 The HuggingFace Team. All rights reserved.
|
||||
|
||||
Licensed under the Apache License, Version 2.0 (the "License"); you may not use this file except in compliance with
|
||||
the License. You may obtain a copy of the License at
|
||||
|
||||
http://www.apache.org/licenses/LICENSE-2.0
|
||||
|
||||
Unless required by applicable law or agreed to in writing, software distributed under the License is distributed on
|
||||
an "AS IS" BASIS, WITHOUT WARRANTIES OR CONDITIONS OF ANY KIND, either express or implied. See the License for the
|
||||
specific language governing permissions and limitations under the License.
|
||||
-->
|
||||
|
||||
# MusicLDM
|
||||
|
||||
MusicLDM was proposed in [MusicLDM: Enhancing Novelty in Text-to-Music Generation Using Beat-Synchronous Mixup Strategies](https://huggingface.co/papers/2308.01546) by Ke Chen, Yusong Wu, Haohe Liu, Marianna Nezhurina, Taylor Berg-Kirkpatrick, Shlomo Dubnov.
|
||||
MusicLDM takes a text prompt as input and predicts the corresponding music sample.
|
||||
|
||||
Inspired by [Stable Diffusion](https://huggingface.co/docs/diffusers/api/pipelines/stable_diffusion/overview) and [AudioLDM](https://huggingface.co/docs/diffusers/api/pipelines/audioldm/overview),
|
||||
MusicLDM is a text-to-music _latent diffusion model (LDM)_ that learns continuous audio representations from [CLAP](https://huggingface.co/docs/transformers/main/model_doc/clap)
|
||||
latents.
|
||||
|
||||
MusicLDM is trained on a corpus of 466 hours of music data. Beat-synchronous data augmentation strategies are applied to
|
||||
the music samples, both in the time domain and in the latent space. Using beat-synchronous data augmentation strategies
|
||||
encourages the model to interpolate between the training samples, but stay within the domain of the training data. The
|
||||
result is generated music that is more diverse while staying faithful to the corresponding style.
|
||||
|
||||
The abstract of the paper is the following:
|
||||
|
||||
*In this paper, we present MusicLDM, a state-of-the-art text-to-music model that adapts Stable Diffusion and AudioLDM architectures to the music domain. We achieve this by retraining the contrastive language-audio pretraining model (CLAP) and the Hifi-GAN vocoder, as components of MusicLDM, on a collection of music data samples. Then, we leverage a beat tracking model and propose two different mixup strategies for data augmentation: beat-synchronous audio mixup and beat-synchronous latent mixup, to encourage the model to generate music more diverse while still staying faithful to the corresponding style.*
|
||||
|
||||
This pipeline was contributed by [sanchit-gandhi](https://huggingface.co/sanchit-gandhi).
|
||||
|
||||
## Tips
|
||||
|
||||
When constructing a prompt, keep in mind:
|
||||
|
||||
* Descriptive prompt inputs work best; use adjectives to describe the sound (for example, "high quality" or "clear") and make the prompt context specific where possible (e.g. "melodic techno with a fast beat and synths" works better than "techno").
|
||||
* Using a *negative prompt* can significantly improve the quality of the generated audio. Try using a negative prompt of "low quality, average quality".
|
||||
|
||||
During inference:
|
||||
|
||||
* The _quality_ of the generated audio sample can be controlled by the `num_inference_steps` argument; higher steps give higher quality audio at the expense of slower inference.
|
||||
* Multiple waveforms can be generated in one go: set `num_waveforms_per_prompt` to a value greater than 1 to enable. Automatic scoring will be performed between the generated waveforms and prompt text, and the audios ranked from best to worst accordingly.
|
||||
* The _length_ of the generated audio sample can be controlled by varying the `audio_length_in_s` argument.
|
||||
|
||||
<Tip>
|
||||
|
||||
Make sure to check out the Schedulers [guide](/using-diffusers/schedulers) to learn how to explore the tradeoff between
|
||||
scheduler speed and quality, and see the [reuse components across pipelines](/using-diffusers/loading#reuse-components-across-pipelines)
|
||||
section to learn how to efficiently load the same components into multiple pipelines.
|
||||
|
||||
</Tip>
|
||||
|
||||
## MusicLDMPipeline
|
||||
[[autodoc]] MusicLDMPipeline
|
||||
- all
|
||||
- __call__
|
||||
@@ -34,7 +34,3 @@ Pipelines do not offer any training functionality. You'll notice PyTorch's autog
|
||||
## FlaxDiffusionPipeline
|
||||
|
||||
[[autodoc]] pipelines.pipeline_flax_utils.FlaxDiffusionPipeline
|
||||
|
||||
## PushToHubMixin
|
||||
|
||||
[[autodoc]] utils.PushToHubMixin
|
||||
|
||||
@@ -35,12 +35,4 @@ Make sure to check out the Schedulers [guide](/using-diffusers/schedulers) to le
|
||||
- save_lora_weights
|
||||
|
||||
## StableDiffusionPipelineOutput
|
||||
[[autodoc]] pipelines.stable_diffusion.StableDiffusionPipelineOutput
|
||||
|
||||
## StableDiffusionXLInstructPix2PixPipeline
|
||||
[[autodoc]] StableDiffusionXLInstructPix2PixPipeline
|
||||
- __call__
|
||||
- all
|
||||
|
||||
## StableDiffusionXLPipelineOutput
|
||||
[[autodoc]] pipelines.stable_diffusion_xl.StableDiffusionXLPipelineOutput
|
||||
[[autodoc]] pipelines.stable_diffusion.StableDiffusionPipelineOutput
|
||||
@@ -9,7 +9,7 @@ specific language governing permissions and limitations under the License.
|
||||
|
||||
# Shap-E
|
||||
|
||||
The Shap-E model was proposed in [Shap-E: Generating Conditional 3D Implicit Functions](https://huggingface.co/papers/2305.02463) by Alex Nichol and Heewon Jun from [OpenAI](https://github.com/openai).
|
||||
The Shap-E model was proposed in [Shap-E: Generating Conditional 3D Implicit Functions](https://huggingface.co/papers/2305.02463) by Alex Nichol and Heewon Jun from [OpenAI](https://github.com/openai).
|
||||
|
||||
The abstract from the paper is:
|
||||
|
||||
@@ -19,10 +19,163 @@ The original codebase can be found at [openai/shap-e](https://github.com/openai/
|
||||
|
||||
<Tip>
|
||||
|
||||
See the [reuse components across pipelines](/using-diffusers/loading#reuse-components-across-pipelines) section to learn how to efficiently load the same components into multiple pipelines.
|
||||
Make sure to check out the Schedulers [guide](/using-diffusers/schedulers) to learn how to explore the tradeoff between scheduler speed and quality, and see the [reuse components across pipelines](/using-diffusers/loading#reuse-components-across-pipelines) section to learn how to efficiently load the same components into multiple pipelines.
|
||||
|
||||
</Tip>
|
||||
|
||||
## Usage Examples
|
||||
|
||||
In the following, we will walk you through some examples of how to use Shap-E pipelines to create 3D objects in gif format.
|
||||
|
||||
### Text-to-3D image generation
|
||||
|
||||
We can use [`ShapEPipeline`] to create 3D object based on a text prompt. In this example, we will make a birthday cupcake for :firecracker: diffusers library's 1 year birthday. The workflow to use the Shap-E text-to-image pipeline is same as how you would use other text-to-image pipelines in diffusers.
|
||||
|
||||
```python
|
||||
import torch
|
||||
|
||||
from diffusers import DiffusionPipeline
|
||||
|
||||
device = torch.device("cuda" if torch.cuda.is_available() else "cpu")
|
||||
|
||||
repo = "openai/shap-e"
|
||||
pipe = DiffusionPipeline.from_pretrained(repo, torch_dtype=torch.float16)
|
||||
pipe = pipe.to(device)
|
||||
|
||||
guidance_scale = 15.0
|
||||
prompt = ["A firecracker", "A birthday cupcake"]
|
||||
|
||||
images = pipe(
|
||||
prompt,
|
||||
guidance_scale=guidance_scale,
|
||||
num_inference_steps=64,
|
||||
frame_size=256,
|
||||
).images
|
||||
```
|
||||
|
||||
The output of [`ShapEPipeline`] is a list of lists of images frames. Each list of frames can be used to create a 3D object. Let's use the `export_to_gif` utility function in diffusers to make a 3D cupcake!
|
||||
|
||||
```python
|
||||
from diffusers.utils import export_to_gif
|
||||
|
||||
export_to_gif(images[0], "firecracker_3d.gif")
|
||||
export_to_gif(images[1], "cake_3d.gif")
|
||||
```
|
||||

|
||||
|
||||
|
||||
|
||||
### Image-to-Image generation
|
||||
|
||||
You can use [`ShapEImg2ImgPipeline`] along with other text-to-image pipelines in diffusers and turn your 2D generation into 3D.
|
||||
|
||||
In this example, We will first genrate a cheeseburger with a simple prompt "A cheeseburger, white background"
|
||||
|
||||
```python
|
||||
from diffusers import DiffusionPipeline
|
||||
import torch
|
||||
|
||||
pipe_prior = DiffusionPipeline.from_pretrained("kandinsky-community/kandinsky-2-1-prior", torch_dtype=torch.float16)
|
||||
pipe_prior.to("cuda")
|
||||
|
||||
t2i_pipe = DiffusionPipeline.from_pretrained("kandinsky-community/kandinsky-2-1", torch_dtype=torch.float16)
|
||||
t2i_pipe.to("cuda")
|
||||
|
||||
prompt = "A cheeseburger, white background"
|
||||
|
||||
image_embeds, negative_image_embeds = pipe_prior(prompt, guidance_scale=1.0).to_tuple()
|
||||
image = t2i_pipe(
|
||||
prompt,
|
||||
image_embeds=image_embeds,
|
||||
negative_image_embeds=negative_image_embeds,
|
||||
).images[0]
|
||||
|
||||
image.save("burger.png")
|
||||
```
|
||||
|
||||
|
||||
|
||||
we will then use the Shap-E image-to-image pipeline to turn it into a 3D cheeseburger :)
|
||||
|
||||
```python
|
||||
from PIL import Image
|
||||
from diffusers.utils import export_to_gif
|
||||
|
||||
repo = "openai/shap-e-img2img"
|
||||
pipe = DiffusionPipeline.from_pretrained(repo, torch_dtype=torch.float16)
|
||||
pipe = pipe.to("cuda")
|
||||
|
||||
guidance_scale = 3.0
|
||||
image = Image.open("burger.png").resize((256, 256))
|
||||
|
||||
images = pipe(
|
||||
image,
|
||||
guidance_scale=guidance_scale,
|
||||
num_inference_steps=64,
|
||||
frame_size=256,
|
||||
).images
|
||||
|
||||
gif_path = export_to_gif(images[0], "burger_3d.gif")
|
||||
```
|
||||
|
||||
|
||||
### Generate mesh
|
||||
|
||||
For both [`ShapEPipeline`] and [`ShapEImg2ImgPipeline`], you can generate mesh output by passing `output_type` as `mesh` to the pipeline, and then use the [`ShapEPipeline.export_to_ply`] utility function to save the output as a `ply` file. We also provide a [`ShapEPipeline.export_to_obj`] function that you can use to save mesh outputs as `obj` files.
|
||||
|
||||
```python
|
||||
import torch
|
||||
|
||||
from diffusers import DiffusionPipeline
|
||||
from diffusers.utils import export_to_ply
|
||||
|
||||
device = torch.device("cuda" if torch.cuda.is_available() else "cpu")
|
||||
|
||||
repo = "openai/shap-e"
|
||||
pipe = DiffusionPipeline.from_pretrained(repo, torch_dtype=torch.float16, variant="fp16")
|
||||
pipe = pipe.to(device)
|
||||
|
||||
guidance_scale = 15.0
|
||||
prompt = "A birthday cupcake"
|
||||
|
||||
images = pipe(prompt, guidance_scale=guidance_scale, num_inference_steps=64, frame_size=256, output_type="mesh").images
|
||||
|
||||
ply_path = export_to_ply(images[0], "3d_cake.ply")
|
||||
print(f"saved to folder: {ply_path}")
|
||||
```
|
||||
|
||||
Huggingface Datasets supports mesh visualization for mesh files in `glb` format. Below we will show you how to convert your mesh file into `glb` format so that you can use the Dataset viewer to render 3D objects.
|
||||
|
||||
We need to install `trimesh` library.
|
||||
|
||||
```
|
||||
pip install trimesh
|
||||
```
|
||||
|
||||
To convert the mesh file into `glb` format,
|
||||
|
||||
```python
|
||||
import trimesh
|
||||
|
||||
mesh = trimesh.load("3d_cake.ply")
|
||||
mesh.export("3d_cake.glb", file_type="glb")
|
||||
```
|
||||
|
||||
By default, the mesh output of Shap-E is from the bottom viewpoint; you can change the default viewpoint by applying a rotation transformation
|
||||
|
||||
```python
|
||||
import trimesh
|
||||
import numpy as np
|
||||
|
||||
mesh = trimesh.load("3d_cake.ply")
|
||||
rot = trimesh.transformations.rotation_matrix(-np.pi / 2, [1, 0, 0])
|
||||
mesh = mesh.apply_transform(rot)
|
||||
mesh.export("3d_cake.glb", file_type="glb")
|
||||
```
|
||||
|
||||
Now you can upload your mesh file to your dataset and visualize it! Here is the link to the 3D cake we just generated
|
||||
https://huggingface.co/datasets/hf-internal-testing/diffusers-images/blob/main/shap_e/3d_cake.glb
|
||||
|
||||
## ShapEPipeline
|
||||
[[autodoc]] ShapEPipeline
|
||||
- all
|
||||
|
||||
@@ -29,11 +29,10 @@ This model was contributed by the community contributor [HimariO](https://github
|
||||
| Pipeline | Tasks | Demo
|
||||
|---|---|:---:|
|
||||
| [StableDiffusionAdapterPipeline](https://github.com/huggingface/diffusers/blob/main/src/diffusers/pipelines/stable_diffusion/pipeline_stable_diffusion_adapter.py) | *Text-to-Image Generation with T2I-Adapter Conditioning* | -
|
||||
| [StableDiffusionXLAdapterPipeline](https://github.com/huggingface/diffusers/blob/main/src/diffusers/pipelines/stable_diffusion/pipeline_stable_diffusion_xl_adapter.py) | *Text-to-Image Generation with T2I-Adapter Conditioning on StableDiffusion-XL* | -
|
||||
|
||||
## Usage example with the base model of StableDiffusion-1.4/1.5
|
||||
## Usage example
|
||||
|
||||
In the following we give a simple example of how to use a *T2IAdapter* checkpoint with Diffusers for inference based on StableDiffusion-1.4/1.5.
|
||||
In the following we give a simple example of how to use a *T2IAdapter* checkpoint with Diffusers for inference.
|
||||
All adapters use the same pipeline.
|
||||
|
||||
1. Images are first converted into the appropriate *control image* format.
|
||||
@@ -70,7 +69,7 @@ Next, create the adapter pipeline
|
||||
import torch
|
||||
from diffusers import StableDiffusionAdapterPipeline, T2IAdapter
|
||||
|
||||
adapter = T2IAdapter.from_pretrained("TencentARC/t2iadapter_color_sd14v1", torch_dtype=torch.float16)
|
||||
adapter = T2IAdapter.from_pretrained("TencentARC/t2iadapter_color_sd14v1")
|
||||
pipe = StableDiffusionAdapterPipeline.from_pretrained(
|
||||
"CompVis/stable-diffusion-v1-4",
|
||||
adapter=adapter,
|
||||
@@ -94,62 +93,6 @@ out_image = pipe(
|
||||
|
||||
|
||||
|
||||
## Usage example with the base model of StableDiffusion-XL
|
||||
|
||||
In the following we give a simple example of how to use a *T2IAdapter* checkpoint with Diffusers for inference based on StableDiffusion-XL.
|
||||
All adapters use the same pipeline.
|
||||
|
||||
1. Images are first downloaded into the appropriate *control image* format.
|
||||
2. The *control image* and *prompt* are passed to the [`StableDiffusionXLAdapterPipeline`].
|
||||
|
||||
Let's have a look at a simple example using the [Sketch Adapter](https://huggingface.co/Adapter/t2iadapter/tree/main/sketch_sdxl_1.0).
|
||||
|
||||
```python
|
||||
from diffusers.utils import load_image
|
||||
|
||||
sketch_image = load_image("https://huggingface.co/Adapter/t2iadapter/resolve/main/sketch.png").convert("L")
|
||||
```
|
||||
|
||||
|
||||
|
||||
Then, create the adapter pipeline
|
||||
|
||||
```py
|
||||
import torch
|
||||
from diffusers import (
|
||||
T2IAdapter,
|
||||
StableDiffusionXLAdapterPipeline,
|
||||
DDPMScheduler
|
||||
)
|
||||
from diffusers.models.unet_2d_condition import UNet2DConditionModel
|
||||
|
||||
model_id = "stabilityai/stable-diffusion-xl-base-1.0"
|
||||
adapter = T2IAdapter.from_pretrained("Adapter/t2iadapter", subfolder="sketch_sdxl_1.0",torch_dtype=torch.float16, adapter_type="full_adapter_xl")
|
||||
scheduler = DDPMScheduler.from_pretrained(model_id, subfolder="scheduler")
|
||||
|
||||
pipe = StableDiffusionXLAdapterPipeline.from_pretrained(
|
||||
model_id, adapter=adapter, safety_checker=None, torch_dtype=torch.float16, variant="fp16", scheduler=scheduler
|
||||
)
|
||||
|
||||
pipe.to("cuda")
|
||||
```
|
||||
|
||||
Finally, pass the prompt and control image to the pipeline
|
||||
|
||||
```py
|
||||
# fix the random seed, so you will get the same result as the example
|
||||
generator = torch.Generator().manual_seed(42)
|
||||
|
||||
sketch_image_out = pipe(
|
||||
prompt="a photo of a dog in real world, high quality",
|
||||
negative_prompt="extra digit, fewer digits, cropped, worst quality, low quality",
|
||||
image=sketch_image,
|
||||
generator=generator,
|
||||
guidance_scale=7.5
|
||||
).images[0]
|
||||
```
|
||||
|
||||
|
||||
|
||||
## Available checkpoints
|
||||
|
||||
@@ -170,9 +113,6 @@ Non-diffusers checkpoints can be found under [TencentARC/T2I-Adapter](https://hu
|
||||
|[TencentARC/t2iadapter_depth_sd15v2](https://huggingface.co/TencentARC/t2iadapter_depth_sd15v2)||
|
||||
|[TencentARC/t2iadapter_sketch_sd15v2](https://huggingface.co/TencentARC/t2iadapter_sketch_sd15v2)||
|
||||
|[TencentARC/t2iadapter_zoedepth_sd15v1](https://huggingface.co/TencentARC/t2iadapter_zoedepth_sd15v1)||
|
||||
|[Adapter/t2iadapter, subfolder='sketch_sdxl_1.0'](https://huggingface.co/Adapter/t2iadapter/tree/main/sketch_sdxl_1.0)||
|
||||
|[Adapter/t2iadapter, subfolder='canny_sdxl_1.0'](https://huggingface.co/Adapter/t2iadapter/tree/main/canny_sdxl_1.0)||
|
||||
|[Adapter/t2iadapter, subfolder='openpose_sdxl_1.0'](https://huggingface.co/Adapter/t2iadapter/tree/main/openpose_sdxl_1.0)||
|
||||
|
||||
## Combining multiple adapters
|
||||
|
||||
@@ -245,14 +185,3 @@ However, T2I-Adapter performs slightly worse than ControlNet.
|
||||
- disable_vae_slicing
|
||||
- enable_xformers_memory_efficient_attention
|
||||
- disable_xformers_memory_efficient_attention
|
||||
|
||||
## StableDiffusionXLAdapterPipeline
|
||||
[[autodoc]] StableDiffusionXLAdapterPipeline
|
||||
- all
|
||||
- __call__
|
||||
- enable_attention_slicing
|
||||
- disable_attention_slicing
|
||||
- enable_vae_slicing
|
||||
- disable_vae_slicing
|
||||
- enable_xformers_memory_efficient_attention
|
||||
- disable_xformers_memory_efficient_attention
|
||||
|
||||
@@ -1,59 +0,0 @@
|
||||
<!--Copyright 2023 The GLIGEN Authors and The HuggingFace Team. All rights reserved.
|
||||
|
||||
Licensed under the Apache License, Version 2.0 (the "License"); you may not use this file except in compliance with
|
||||
the License. You may obtain a copy of the License at
|
||||
|
||||
http://www.apache.org/licenses/LICENSE-2.0
|
||||
|
||||
Unless required by applicable law or agreed to in writing, software distributed under the License is distributed on
|
||||
an "AS IS" BASIS, WITHOUT WARRANTIES OR CONDITIONS OF ANY KIND, either express or implied. See the License for the
|
||||
specific language governing permissions and limitations under the License.
|
||||
-->
|
||||
|
||||
# GLIGEN (Grounded Language-to-Image Generation)
|
||||
|
||||
The GLIGEN model was created by researchers and engineers from [University of Wisconsin-Madison, Columbia University, and Microsoft](https://github.com/gligen/GLIGEN). The [`StableDiffusionGLIGENPipeline`] and [`StableDiffusionGLIGENTextImagePipeline`] can generate photorealistic images conditioned on grounding inputs. Along with text and bounding boxes with [`StableDiffusionGLIGENPipeline`], if input images are given, [`StableDiffusionGLIGENTextImagePipeline`] can insert objects described by text at the region defined by bounding boxes. Otherwise, it'll generate an image described by the caption/prompt and insert objects described by text at the region defined by bounding boxes. It's trained on COCO2014D and COCO2014CD datasets, and the model uses a frozen CLIP ViT-L/14 text encoder to condition itself on grounding inputs.
|
||||
|
||||
The abstract from the [paper](https://huggingface.co/papers/2301.07093) is:
|
||||
|
||||
*Large-scale text-to-image diffusion models have made amazing advances. However, the status quo is to use text input alone, which can impede controllability. In this work, we propose GLIGEN, Grounded-Language-to-Image Generation, a novel approach that builds upon and extends the functionality of existing pre-trained text-to-image diffusion models by enabling them to also be conditioned on grounding inputs. To preserve the vast concept knowledge of the pre-trained model, we freeze all of its weights and inject the grounding information into new trainable layers via a gated mechanism. Our model achieves open-world grounded text2img generation with caption and bounding box condition inputs, and the grounding ability generalizes well to novel spatial configurations and concepts. GLIGEN’s zeroshot performance on COCO and LVIS outperforms existing supervised layout-to-image baselines by a large margin.*
|
||||
|
||||
<Tip>
|
||||
|
||||
Make sure to check out the Stable Diffusion [Tips](https://huggingface.co/docs/diffusers/en/api/pipelines/stable_diffusion/overview#tips) section to learn how to explore the tradeoff between scheduler speed and quality and how to reuse pipeline components efficiently!
|
||||
|
||||
If you want to use one of the official checkpoints for a task, explore the [gligen](https://huggingface.co/gligen) Hub organizations!
|
||||
|
||||
</Tip>
|
||||
|
||||
[`StableDiffusionGLIGENPipeline`] was contributed by [Nikhil Gajendrakumar](https://github.com/nikhil-masterful) and [`StableDiffusionGLIGENTextImagePipeline`] was contributed by [Nguyễn Công Tú Anh](https://github.com/tuanh123789).
|
||||
|
||||
## StableDiffusionGLIGENPipeline
|
||||
|
||||
[[autodoc]] StableDiffusionGLIGENPipeline
|
||||
- all
|
||||
- __call__
|
||||
- enable_vae_slicing
|
||||
- disable_vae_slicing
|
||||
- enable_vae_tiling
|
||||
- disable_vae_tiling
|
||||
- enable_model_cpu_offload
|
||||
- prepare_latents
|
||||
- enable_fuser
|
||||
|
||||
## StableDiffusionGLIGENTextImagePipeline
|
||||
|
||||
[[autodoc]] StableDiffusionGLIGENTextImagePipeline
|
||||
- all
|
||||
- __call__
|
||||
- enable_vae_slicing
|
||||
- disable_vae_slicing
|
||||
- enable_vae_tiling
|
||||
- disable_vae_tiling
|
||||
- enable_model_cpu_offload
|
||||
- prepare_latents
|
||||
- enable_fuser
|
||||
|
||||
## StableDiffusionPipelineOutput
|
||||
|
||||
[[autodoc]] pipelines.stable_diffusion.StableDiffusionPipelineOutput
|
||||
@@ -30,8 +30,8 @@ Make sure to check out the Stable Diffusion [Tips](overview#tips) section to lea
|
||||
- all
|
||||
- __call__
|
||||
|
||||
## LDM3DPipelineOutput
|
||||
## StableDiffusionPipelineOutput
|
||||
|
||||
[[autodoc]] pipelines.stable_diffusion.pipeline_stable_diffusion_ldm3d.LDM3DPipelineOutput
|
||||
[[autodoc]] pipelines.stable_diffusion.StableDiffusionPipelineOutput
|
||||
- all
|
||||
- __call__
|
||||
|
||||
@@ -10,29 +10,366 @@ an "AS IS" BASIS, WITHOUT WARRANTIES OR CONDITIONS OF ANY KIND, either express o
|
||||
specific language governing permissions and limitations under the License.
|
||||
-->
|
||||
|
||||
# Stable Diffusion XL
|
||||
# Stable diffusion XL
|
||||
|
||||
Stable Diffusion XL (SDXL) was proposed in [SDXL: Improving Latent Diffusion Models for High-Resolution Image Synthesis](https://huggingface.co/papers/2307.01952) by Dustin Podell, Zion English, Kyle Lacey, Andreas Blattmann, Tim Dockhorn, Jonas Müller, Joe Penna, and Robin Rombach.
|
||||
Stable Diffusion XL was proposed in [SDXL: Improving Latent Diffusion Models for High-Resolution Image Synthesis](https://arxiv.org/abs/2307.01952) by Dustin Podell, Zion English, Kyle Lacey, Andreas Blattmann, Tim Dockhorn, Jonas Müller, Joe Penna, Robin Rombach
|
||||
|
||||
The abstract from the paper is:
|
||||
The abstract of the paper is the following:
|
||||
|
||||
*We present SDXL, a latent diffusion model for text-to-image synthesis. Compared to previous versions of Stable Diffusion, SDXL leverages a three times larger UNet backbone: The increase of model parameters is mainly due to more attention blocks and a larger cross-attention context as SDXL uses a second text encoder. We design multiple novel conditioning schemes and train SDXL on multiple aspect ratios. We also introduce a refinement model which is used to improve the visual fidelity of samples generated by SDXL using a post-hoc image-to-image technique. We demonstrate that SDXL shows drastically improved performance compared the previous versions of Stable Diffusion and achieves results competitive with those of black-box state-of-the-art image generators.*
|
||||
|
||||
## Tips
|
||||
|
||||
- Most SDXL checkpoints work best with an image size of 1024x1024. Image sizes of 768x768 and 512x512 are also supported, but the results aren't as good. Anything below 512x512 is not recommended and likely won't for for default checkpoints like [stabilityai/stable-diffusion-xl-base-1.0](https://huggingface.co/stabilityai/stable-diffusion-xl-base-1.0).
|
||||
- SDXL can pass a different prompt for each of the text encoders it was trained on. We can even pass different parts of the same prompt to the text encoders.
|
||||
- SDXL output images can be improved by making use of a refiner model in an image-to-image setting.
|
||||
- SDXL offers `negative_original_size`, `negative_crops_coords_top_left`, and `negative_target_size` to negatively condition the model on image resolution and cropping parameters.
|
||||
- Stable Diffusion XL works especially well with images between 768 and 1024.
|
||||
- Stable Diffusion XL can pass a different prompt for each of the text encoders it was trained on as shown below. We can even pass different parts of the same prompt to the text encoders.
|
||||
- Stable Diffusion XL output image can be improved by making use of a refiner as shown below.
|
||||
|
||||
### Available checkpoints:
|
||||
|
||||
- *Text-to-Image (1024x1024 resolution)*: [stabilityai/stable-diffusion-xl-base-1.0](https://huggingface.co/stabilityai/stable-diffusion-xl-base-1.0) with [`StableDiffusionXLPipeline`]
|
||||
- *Image-to-Image / Refiner (1024x1024 resolution)*: [stabilityai/stable-diffusion-xl-refiner-1.0](https://huggingface.co/stabilityai/stable-diffusion-xl-refiner-1.0) with [`StableDiffusionXLImg2ImgPipeline`]
|
||||
|
||||
## Usage Example
|
||||
|
||||
Before using SDXL make sure to have `transformers`, `accelerate`, `safetensors` and `invisible_watermark` installed.
|
||||
You can install the libraries as follows:
|
||||
|
||||
```
|
||||
pip install transformers
|
||||
pip install accelerate
|
||||
pip install safetensors
|
||||
pip install invisible-watermark>=0.2.0
|
||||
```
|
||||
|
||||
### Text-to-Image
|
||||
|
||||
You can use SDXL as follows for *text-to-image*:
|
||||
|
||||
```py
|
||||
from diffusers import StableDiffusionXLPipeline
|
||||
import torch
|
||||
|
||||
pipe = StableDiffusionXLPipeline.from_pretrained(
|
||||
"stabilityai/stable-diffusion-xl-base-1.0", torch_dtype=torch.float16, variant="fp16", use_safetensors=True
|
||||
)
|
||||
pipe.to("cuda")
|
||||
|
||||
prompt = "Astronaut in a jungle, cold color palette, muted colors, detailed, 8k"
|
||||
image = pipe(prompt=prompt).images[0]
|
||||
```
|
||||
|
||||
### Image-to-image
|
||||
|
||||
You can use SDXL as follows for *image-to-image*:
|
||||
|
||||
```py
|
||||
import torch
|
||||
from diffusers import StableDiffusionXLImg2ImgPipeline
|
||||
from diffusers.utils import load_image
|
||||
|
||||
pipe = StableDiffusionXLImg2ImgPipeline.from_pretrained(
|
||||
"stabilityai/stable-diffusion-xl-refiner-1.0", torch_dtype=torch.float16, variant="fp16", use_safetensors=True
|
||||
)
|
||||
pipe = pipe.to("cuda")
|
||||
url = "https://huggingface.co/datasets/patrickvonplaten/images/resolve/main/aa_xl/000000009.png"
|
||||
|
||||
init_image = load_image(url).convert("RGB")
|
||||
prompt = "a photo of an astronaut riding a horse on mars"
|
||||
image = pipe(prompt, image=init_image).images[0]
|
||||
```
|
||||
|
||||
### Inpainting
|
||||
|
||||
You can use SDXL as follows for *inpainting*
|
||||
|
||||
```py
|
||||
import torch
|
||||
from diffusers import StableDiffusionXLInpaintPipeline
|
||||
from diffusers.utils import load_image
|
||||
|
||||
pipe = StableDiffusionXLInpaintPipeline.from_pretrained(
|
||||
"stabilityai/stable-diffusion-xl-base-1.0", torch_dtype=torch.float16, variant="fp16", use_safetensors=True
|
||||
)
|
||||
pipe.to("cuda")
|
||||
|
||||
img_url = "https://raw.githubusercontent.com/CompVis/latent-diffusion/main/data/inpainting_examples/overture-creations-5sI6fQgYIuo.png"
|
||||
mask_url = "https://raw.githubusercontent.com/CompVis/latent-diffusion/main/data/inpainting_examples/overture-creations-5sI6fQgYIuo_mask.png"
|
||||
|
||||
init_image = load_image(img_url).convert("RGB")
|
||||
mask_image = load_image(mask_url).convert("RGB")
|
||||
|
||||
prompt = "A majestic tiger sitting on a bench"
|
||||
image = pipe(prompt=prompt, image=init_image, mask_image=mask_image, num_inference_steps=50, strength=0.80).images[0]
|
||||
```
|
||||
|
||||
### Refining the image output
|
||||
|
||||
In addition to the [base model checkpoint](https://huggingface.co/stabilityai/stable-diffusion-xl-base-1.0),
|
||||
StableDiffusion-XL also includes a [refiner checkpoint](huggingface.co/stabilityai/stable-diffusion-xl-refiner-1.0)
|
||||
that is specialized in denoising low-noise stage images to generate images of improved high-frequency quality.
|
||||
This refiner checkpoint can be used as a "second-step" pipeline after having run the base checkpoint to improve
|
||||
image quality.
|
||||
|
||||
When using the refiner, one can easily
|
||||
- 1.) employ the base model and refiner as an *Ensemble of Expert Denoisers* as first proposed in [eDiff-I](https://research.nvidia.com/labs/dir/eDiff-I/) or
|
||||
- 2.) simply run the refiner in [SDEdit](https://arxiv.org/abs/2108.01073) fashion after the base model.
|
||||
|
||||
**Note**: The idea of using SD-XL base & refiner as an ensemble of experts was first brought forward by
|
||||
a couple community contributors which also helped shape the following `diffusers` implementation, namely:
|
||||
- [SytanSD](https://github.com/SytanSD)
|
||||
- [bghira](https://github.com/bghira)
|
||||
- [Birch-san](https://github.com/Birch-san)
|
||||
- [AmericanPresidentJimmyCarter](https://github.com/AmericanPresidentJimmyCarter)
|
||||
|
||||
#### 1.) Ensemble of Expert Denoisers
|
||||
|
||||
When using the base and refiner model as an ensemble of expert of denoisers, the base model should serve as the
|
||||
expert for the high-noise diffusion stage and the refiner serves as the expert for the low-noise diffusion stage.
|
||||
|
||||
The advantage of 1.) over 2.) is that it requires less overall denoising steps and therefore should be significantly
|
||||
faster. The drawback is that one cannot really inspect the output of the base model; it will still be heavily denoised.
|
||||
|
||||
To use the base model and refiner as an ensemble of expert denoisers, make sure to define the span
|
||||
of timesteps which should be run through the high-noise denoising stage (*i.e.* the base model) and the low-noise
|
||||
denoising stage (*i.e.* the refiner model) respectively. We can set the intervals using the [`denoising_end`](https://huggingface.co/docs/diffusers/main/en/api/pipelines/stable_diffusion/stable_diffusion_xl#diffusers.StableDiffusionXLPipeline.__call__.denoising_end) of the base model
|
||||
and [`denoising_start`](https://huggingface.co/docs/diffusers/main/en/api/pipelines/stable_diffusion/stable_diffusion_xl#diffusers.StableDiffusionXLImg2ImgPipeline.__call__.denoising_start) of the refiner model.
|
||||
|
||||
For both `denoising_end` and `denoising_start` a float value between 0 and 1 should be passed.
|
||||
When passed, the end and start of denoising will be defined by proportions of discrete timesteps as
|
||||
defined by the model schedule.
|
||||
Note that this will override `strength` if it is also declared, since the number of denoising steps
|
||||
is determined by the discrete timesteps the model was trained on and the declared fractional cutoff.
|
||||
|
||||
Let's look at an example.
|
||||
First, we import the two pipelines. Since the text encoders and variational autoencoder are the same
|
||||
you don't have to load those again for the refiner.
|
||||
|
||||
```py
|
||||
from diffusers import DiffusionPipeline
|
||||
import torch
|
||||
|
||||
base = DiffusionPipeline.from_pretrained(
|
||||
"stabilityai/stable-diffusion-xl-base-1.0", torch_dtype=torch.float16, variant="fp16", use_safetensors=True
|
||||
)
|
||||
base.to("cuda")
|
||||
|
||||
refiner = DiffusionPipeline.from_pretrained(
|
||||
"stabilityai/stable-diffusion-xl-refiner-1.0",
|
||||
text_encoder_2=base.text_encoder_2,
|
||||
vae=base.vae,
|
||||
torch_dtype=torch.float16,
|
||||
use_safetensors=True,
|
||||
variant="fp16",
|
||||
)
|
||||
refiner.to("cuda")
|
||||
```
|
||||
|
||||
Now we define the number of inference steps and the point at which the model shall be run through the
|
||||
high-noise denoising stage (*i.e.* the base model).
|
||||
|
||||
```py
|
||||
n_steps = 40
|
||||
high_noise_frac = 0.8
|
||||
```
|
||||
|
||||
Stable Diffusion XL base is trained on timesteps 0-999 and Stable Diffusion XL refiner is finetuned
|
||||
from the base model on low noise timesteps 0-199 inclusive, so we use the base model for the first
|
||||
800 timesteps (high noise) and the refiner for the last 200 timesteps (low noise). Hence, `high_noise_frac`
|
||||
is set to 0.8, so that all steps 200-999 (the first 80% of denoising timesteps) are performed by the
|
||||
base model and steps 0-199 (the last 20% of denoising timesteps) are performed by the refiner model.
|
||||
|
||||
Remember, the denoising process starts at **high value** (high noise) timesteps and ends at
|
||||
**low value** (low noise) timesteps.
|
||||
|
||||
Let's run the two pipelines now. Make sure to set `denoising_end` and
|
||||
`denoising_start` to the same values and keep `num_inference_steps` constant. Also remember that
|
||||
the output of the base model should be in latent space:
|
||||
|
||||
```py
|
||||
prompt = "A majestic lion jumping from a big stone at night"
|
||||
|
||||
image = base(
|
||||
prompt=prompt,
|
||||
num_inference_steps=n_steps,
|
||||
denoising_end=high_noise_frac,
|
||||
output_type="latent",
|
||||
).images
|
||||
image = refiner(
|
||||
prompt=prompt,
|
||||
num_inference_steps=n_steps,
|
||||
denoising_start=high_noise_frac,
|
||||
image=image,
|
||||
).images[0]
|
||||
```
|
||||
|
||||
Let's have a look at the images
|
||||
|
||||
| Original Image | Ensemble of Denoisers Experts |
|
||||
|---|---|
|
||||
|  | 
|
||||
|
||||
If we would have just run the base model on the same 40 steps, the image would have been arguably less detailed (e.g. the lion eyes and nose):
|
||||
|
||||
<Tip>
|
||||
|
||||
To learn how to use SDXL for various tasks, how to optimize performance, and other usage examples, take a look at the [Stable Diffusion XL](../../../using-diffusers/sdxl) guide.
|
||||
|
||||
Check out the [Stability AI](https://huggingface.co/stabilityai) Hub organization for the official base and refiner model checkpoints!
|
||||
The ensemble-of-experts method works well on all available schedulers!
|
||||
|
||||
</Tip>
|
||||
|
||||
#### 2.) Refining the image output from fully denoised base image
|
||||
|
||||
In standard [`StableDiffusionImg2ImgPipeline`]-fashion, the fully-denoised image generated of the base model
|
||||
can be further improved using the [refiner checkpoint](huggingface.co/stabilityai/stable-diffusion-xl-refiner-1.0).
|
||||
|
||||
For this, you simply run the refiner as a normal image-to-image pipeline after the "base" text-to-image
|
||||
pipeline. You can leave the outputs of the base model in latent space.
|
||||
|
||||
```py
|
||||
from diffusers import DiffusionPipeline
|
||||
import torch
|
||||
|
||||
pipe = DiffusionPipeline.from_pretrained(
|
||||
"stabilityai/stable-diffusion-xl-base-1.0", torch_dtype=torch.float16, variant="fp16", use_safetensors=True
|
||||
)
|
||||
pipe.to("cuda")
|
||||
|
||||
refiner = DiffusionPipeline.from_pretrained(
|
||||
"stabilityai/stable-diffusion-xl-refiner-1.0",
|
||||
text_encoder_2=pipe.text_encoder_2,
|
||||
vae=pipe.vae,
|
||||
torch_dtype=torch.float16,
|
||||
use_safetensors=True,
|
||||
variant="fp16",
|
||||
)
|
||||
refiner.to("cuda")
|
||||
|
||||
prompt = "Astronaut in a jungle, cold color palette, muted colors, detailed, 8k"
|
||||
|
||||
image = pipe(prompt=prompt, output_type="latent" if use_refiner else "pil").images[0]
|
||||
image = refiner(prompt=prompt, image=image[None, :]).images[0]
|
||||
```
|
||||
|
||||
| Original Image | Refined Image |
|
||||
|---|---|
|
||||
|  |  |
|
||||
|
||||
<Tip>
|
||||
|
||||
The refiner can also very well be used in an in-painting setting. To do so just make
|
||||
sure you use the [`StableDiffusionXLInpaintPipeline`] classes as shown below
|
||||
|
||||
</Tip>
|
||||
|
||||
To use the refiner for inpainting in the Ensemble of Expert Denoisers setting you can do the following:
|
||||
|
||||
```py
|
||||
from diffusers import StableDiffusionXLInpaintPipeline
|
||||
from diffusers.utils import load_image
|
||||
|
||||
pipe = StableDiffusionXLInpaintPipeline.from_pretrained(
|
||||
"stabilityai/stable-diffusion-xl-base-1.0", torch_dtype=torch.float16, variant="fp16", use_safetensors=True
|
||||
)
|
||||
pipe.to("cuda")
|
||||
|
||||
refiner = StableDiffusionXLInpaintPipeline.from_pretrained(
|
||||
"stabilityai/stable-diffusion-xl-refiner-1.0",
|
||||
text_encoder_2=pipe.text_encoder_2,
|
||||
vae=pipe.vae,
|
||||
torch_dtype=torch.float16,
|
||||
use_safetensors=True,
|
||||
variant="fp16",
|
||||
)
|
||||
refiner.to("cuda")
|
||||
|
||||
img_url = "https://raw.githubusercontent.com/CompVis/latent-diffusion/main/data/inpainting_examples/overture-creations-5sI6fQgYIuo.png"
|
||||
mask_url = "https://raw.githubusercontent.com/CompVis/latent-diffusion/main/data/inpainting_examples/overture-creations-5sI6fQgYIuo_mask.png"
|
||||
|
||||
init_image = load_image(img_url).convert("RGB")
|
||||
mask_image = load_image(mask_url).convert("RGB")
|
||||
|
||||
prompt = "A majestic tiger sitting on a bench"
|
||||
num_inference_steps = 75
|
||||
high_noise_frac = 0.7
|
||||
|
||||
image = pipe(
|
||||
prompt=prompt,
|
||||
image=init_image,
|
||||
mask_image=mask_image,
|
||||
num_inference_steps=num_inference_steps,
|
||||
denoising_start=high_noise_frac,
|
||||
output_type="latent",
|
||||
).images
|
||||
image = refiner(
|
||||
prompt=prompt,
|
||||
image=image,
|
||||
mask_image=mask_image,
|
||||
num_inference_steps=num_inference_steps,
|
||||
denoising_start=high_noise_frac,
|
||||
).images[0]
|
||||
```
|
||||
|
||||
To use the refiner for inpainting in the standard SDE-style setting, simply remove `denoising_end` and `denoising_start` and choose a smaller
|
||||
number of inference steps for the refiner.
|
||||
|
||||
### Loading single file checkpoints / original file format
|
||||
|
||||
By making use of [`~diffusers.loaders.FromSingleFileMixin.from_single_file`] you can also load the
|
||||
original file format into `diffusers`:
|
||||
|
||||
```py
|
||||
from diffusers import StableDiffusionXLPipeline, StableDiffusionXLImg2ImgPipeline
|
||||
import torch
|
||||
|
||||
pipe = StableDiffusionXLPipeline.from_single_file(
|
||||
"./sd_xl_base_1.0.safetensors", torch_dtype=torch.float16, variant="fp16", use_safetensors=True
|
||||
)
|
||||
pipe.to("cuda")
|
||||
|
||||
refiner = StableDiffusionXLImg2ImgPipeline.from_single_file(
|
||||
"./sd_xl_refiner_1.0.safetensors", torch_dtype=torch.float16, use_safetensors=True, variant="fp16"
|
||||
)
|
||||
refiner.to("cuda")
|
||||
```
|
||||
|
||||
### Memory optimization via model offloading
|
||||
|
||||
If you are seeing out-of-memory errors, we recommend making use of [`StableDiffusionXLPipeline.enable_model_cpu_offload`].
|
||||
|
||||
```diff
|
||||
- pipe.to("cuda")
|
||||
+ pipe.enable_model_cpu_offload()
|
||||
```
|
||||
|
||||
and
|
||||
|
||||
```diff
|
||||
- refiner.to("cuda")
|
||||
+ refiner.enable_model_cpu_offload()
|
||||
```
|
||||
|
||||
### Speed-up inference with `torch.compile`
|
||||
|
||||
You can speed up inference by making use of `torch.compile`. This should give you **ca.** 20% speed-up.
|
||||
|
||||
```diff
|
||||
+ pipe.unet = torch.compile(pipe.unet, mode="reduce-overhead", fullgraph=True)
|
||||
+ refiner.unet = torch.compile(refiner.unet, mode="reduce-overhead", fullgraph=True)
|
||||
```
|
||||
|
||||
### Running with `torch < 2.0`
|
||||
|
||||
**Note** that if you want to run Stable Diffusion XL with `torch` < 2.0, please make sure to enable xformers
|
||||
attention:
|
||||
|
||||
```
|
||||
pip install xformers
|
||||
```
|
||||
|
||||
```diff
|
||||
+pipe.enable_xformers_memory_efficient_attention()
|
||||
+refiner.enable_xformers_memory_efficient_attention()
|
||||
```
|
||||
|
||||
## StableDiffusionXLPipeline
|
||||
|
||||
[[autodoc]] StableDiffusionXLPipeline
|
||||
@@ -50,3 +387,25 @@ Check out the [Stability AI](https://huggingface.co/stabilityai) Hub organizatio
|
||||
[[autodoc]] StableDiffusionXLInpaintPipeline
|
||||
- all
|
||||
- __call__
|
||||
|
||||
### Passing different prompts to each text-encoder
|
||||
|
||||
Stable Diffusion XL was trained on two text encoders. The default behavior is to pass the same prompt to each. But it is possible to pass a different prompt for each text-encoder, as [some users](https://github.com/huggingface/diffusers/issues/4004#issuecomment-1627764201) noted that it can boost quality.
|
||||
To do so, you can pass `prompt_2` and `negative_prompt_2` in addition to `prompt` and `negative_prompt`. By doing that, you will pass the original prompts and negative prompts (as in `prompt` and `negative_prompt`) to `text_encoder` (in official SDXL 0.9/1.0 that is [OpenAI CLIP-ViT/L-14](https://huggingface.co/openai/clip-vit-large-patch14)),
|
||||
and `prompt_2` and `negative_prompt_2` to `text_encoder_2` (in official SDXL 0.9/1.0 that is [OpenCLIP-ViT/bigG-14](https://huggingface.co/laion/CLIP-ViT-bigG-14-laion2B-39B-b160k)).
|
||||
|
||||
```py
|
||||
from diffusers import StableDiffusionXLPipeline
|
||||
import torch
|
||||
|
||||
pipe = StableDiffusionXLPipeline.from_pretrained(
|
||||
"stabilityai/stable-diffusion-xl-base-1.0", torch_dtype=torch.float16, variant="fp16", use_safetensors=True
|
||||
)
|
||||
pipe.to("cuda")
|
||||
|
||||
# prompt will be passed to OAI CLIP-ViT/L-14
|
||||
prompt = "Astronaut in a jungle, cold color palette, muted colors, detailed, 8k"
|
||||
# prompt_2 will be passed to OpenCLIP-ViT/bigG-14
|
||||
prompt_2 = "monet painting"
|
||||
image = pipe(prompt=prompt, prompt_2=prompt_2).images[0]
|
||||
```
|
||||
|
||||
@@ -20,12 +20,6 @@ The abstract from the [paper](https://arxiv.org/abs/2303.06555) is:
|
||||
|
||||
You can find the original codebase at [thu-ml/unidiffuser](https://github.com/thu-ml/unidiffuser) and additional checkpoints at [thu-ml](https://huggingface.co/thu-ml).
|
||||
|
||||
<Tip warning={true}>
|
||||
|
||||
There is currently an issue on PyTorch 1.X where the output images are all black or the pixel values become `NaNs`. This issue can be mitigated by switching to PyTorch 2.X.
|
||||
|
||||
</Tip>
|
||||
|
||||
This pipeline was contributed by [dg845](https://github.com/dg845). ❤️
|
||||
|
||||
## Usage Examples
|
||||
|
||||
@@ -1,135 +0,0 @@
|
||||
# Würstchen
|
||||
|
||||
<img src="https://github.com/dome272/Wuerstchen/assets/61938694/0617c863-165a-43ee-9303-2a17299a0cf9">
|
||||
|
||||
[Würstchen: Efficient Pretraining of Text-to-Image Models](https://huggingface.co/papers/2306.00637) is by Pablo Pernias, Dominic Rampas, and Marc Aubreville.
|
||||
|
||||
The abstract from the paper is:
|
||||
|
||||
*We introduce Würstchen, a novel technique for text-to-image synthesis that unites competitive performance with unprecedented cost-effectiveness and ease of training on constrained hardware. Building on recent advancements in machine learning, our approach, which utilizes latent diffusion strategies at strong latent image compression rates, significantly reduces the computational burden, typically associated with state-of-the-art models, while preserving, if not enhancing, the quality of generated images. Wuerstchen achieves notable speed improvements at inference time, thereby rendering real-time applications more viable. One of the key advantages of our method lies in its modest training requirements of only 9,200 GPU hours, slashing the usual costs significantly without compromising the end performance. In a comparison against the state-of-the-art, we found the approach to yield strong competitiveness. This paper opens the door to a new line of research that prioritizes both performance and computational accessibility, hence democratizing the use of sophisticated AI technologies. Through Wuerstchen, we demonstrate a compelling stride forward in the realm of text-to-image synthesis, offering an innovative path to explore in future research.*
|
||||
|
||||
## Würstchen v2 comes to Diffusers
|
||||
|
||||
After the initial paper release, we have improved numerous things in the architecture, training and sampling, making Würstchen competetive to current state-of-the-art models in many ways. We are excited to release this new version together with Diffusers. Here is a list of the improvements.
|
||||
|
||||
- Higher resolution (1024x1024 up to 2048x2048)
|
||||
- Faster inference
|
||||
- Multi Aspect Resolution Sampling
|
||||
- Better quality
|
||||
|
||||
|
||||
We are releasing 3 checkpoints for the text-conditional image generation model (Stage C). Those are:
|
||||
|
||||
- v2-base
|
||||
- v2-aesthetic
|
||||
- v2-interpolated (50% interpolation between v2-base and v2-aesthetic)
|
||||
|
||||
We recommend to use v2-interpolated, as it has a nice touch of both photorealism and aesthetic. Use v2-base for finetunings as it does not have a style bias and use v2-aesthetic for very artistic generations.
|
||||
A comparison can be seen here:
|
||||
|
||||
<img src="https://github.com/dome272/Wuerstchen/assets/61938694/2914830f-cbd3-461c-be64-d50734f4b49d" width=500>
|
||||
|
||||
## Text-to-Image Generation
|
||||
|
||||
For the sake of usability Würstchen can be used with a single pipeline. This pipeline is called `WuerstchenCombinedPipeline` and can be used as follows:
|
||||
|
||||
```python
|
||||
import torch
|
||||
from diffusers import AutoPipelineForText2Image
|
||||
from diffusers.pipelines.wuerstchen import DEFAULT_STAGE_C_TIMESTEPS
|
||||
|
||||
pipe = AutoPipelineForText2Image.from_pretrained("warp-ai/wuerstchen", torch_dtype=torch.float16).to("cuda")
|
||||
|
||||
caption = "Anthropomorphic cat dressed as a fire fighter"
|
||||
images = pipe(
|
||||
caption,
|
||||
width=1024,
|
||||
height=1536,
|
||||
prior_timesteps=DEFAULT_STAGE_C_TIMESTEPS,
|
||||
prior_guidance_scale=4.0,
|
||||
num_images_per_prompt=2,
|
||||
).images
|
||||
```
|
||||
|
||||
For explanation purposes, we can also initialize the two main pipelines of Würstchen individually. Würstchen consists of 3 stages: Stage C, Stage B, Stage A. They all have different jobs and work only together. When generating text-conditional images, Stage C will first generate the latents in a very compressed latent space. This is what happens in the `prior_pipeline`. Afterwards, the generated latents will be passed to Stage B, which decompresses the latents into a bigger latent space of a VQGAN. These latents can then be decoded by Stage A, which is a VQGAN, into the pixel-space. Stage B & Stage A are both encapsulated in the `decoder_pipeline`. For more details, take a look at the [paper](https://huggingface.co/papers/2306.00637).
|
||||
|
||||
```python
|
||||
import torch
|
||||
from diffusers import WuerstchenDecoderPipeline, WuerstchenPriorPipeline
|
||||
from diffusers.pipelines.wuerstchen import DEFAULT_STAGE_C_TIMESTEPS
|
||||
|
||||
device = "cuda"
|
||||
dtype = torch.float16
|
||||
num_images_per_prompt = 2
|
||||
|
||||
prior_pipeline = WuerstchenPriorPipeline.from_pretrained(
|
||||
"warp-ai/wuerstchen-prior", torch_dtype=dtype
|
||||
).to(device)
|
||||
decoder_pipeline = WuerstchenDecoderPipeline.from_pretrained(
|
||||
"warp-ai/wuerstchen", torch_dtype=dtype
|
||||
).to(device)
|
||||
|
||||
caption = "Anthropomorphic cat dressed as a fire fighter"
|
||||
negative_prompt = ""
|
||||
|
||||
prior_output = prior_pipeline(
|
||||
prompt=caption,
|
||||
height=1024,
|
||||
width=1536,
|
||||
timesteps=DEFAULT_STAGE_C_TIMESTEPS,
|
||||
negative_prompt=negative_prompt,
|
||||
guidance_scale=4.0,
|
||||
num_images_per_prompt=num_images_per_prompt,
|
||||
)
|
||||
decoder_output = decoder_pipeline(
|
||||
image_embeddings=prior_output.image_embeddings,
|
||||
prompt=caption,
|
||||
negative_prompt=negative_prompt,
|
||||
num_images_per_prompt=num_images_per_prompt,
|
||||
guidance_scale=0.0,
|
||||
output_type="pil",
|
||||
).images
|
||||
```
|
||||
|
||||
## Speed-Up Inference
|
||||
You can make use of `torch.compile` function and gain a speed-up of about 2-3x:
|
||||
|
||||
```python
|
||||
pipeline.prior = torch.compile(pipeline.prior, mode="reduce-overhead", fullgraph=True)
|
||||
pipeline.decoder = torch.compile(pipeline.decoder, mode="reduce-overhead", fullgraph=True)
|
||||
```
|
||||
|
||||
## Limitations
|
||||
|
||||
- Due to the high compression employed by Würstchen, generations can lack a good amount
|
||||
of detail. To our human eye, this is especially noticeable in faces, hands etc.
|
||||
- **Images can only be generated in 128-pixel steps**, e.g. the next higher resolution
|
||||
after 1024x1024 is 1152x1152
|
||||
- The model lacks the ability to render correct text in images
|
||||
- The model often does not achieve photorealism
|
||||
- Difficult compositional prompts are hard for the model
|
||||
|
||||
The original codebase, as well as experimental ideas, can be found at [dome272/Wuerstchen](https://github.com/dome272/Wuerstchen).
|
||||
|
||||
## WuerschenPipeline
|
||||
|
||||
[[autodoc]] WuerstchenCombinedPipeline
|
||||
- all
|
||||
- __call__
|
||||
|
||||
## WuerstchenPriorPipeline
|
||||
|
||||
[[autodoc]] WuerstchenDecoderPipeline
|
||||
|
||||
- all
|
||||
- __call__
|
||||
|
||||
## WuerstchenPriorPipelineOutput
|
||||
|
||||
[[autodoc]] pipelines.wuerstchen.pipeline_wuerstchen_prior.WuerstchenPriorPipelineOutput
|
||||
|
||||
## WuerstchenDecoderPipeline
|
||||
|
||||
[[autodoc]] WuerstchenDecoderPipeline
|
||||
- all
|
||||
- __call__
|
||||
@@ -1,15 +1,11 @@
|
||||
# CMStochasticIterativeScheduler
|
||||
# Consistency Model Multistep Scheduler
|
||||
|
||||
[Consistency Models](https://huggingface.co/papers/2303.01469) by Yang Song, Prafulla Dhariwal, Mark Chen, and Ilya Sutskever introduced a multistep and onestep scheduler (Algorithm 1) that is capable of generating good samples in one or a small number of steps.
|
||||
## Overview
|
||||
|
||||
The abstract from the paper is:
|
||||
|
||||
*Diffusion models have made significant breakthroughs in image, audio, and video generation, but they depend on an iterative generation process that causes slow sampling speed and caps their potential for real-time applications. To overcome this limitation, we propose consistency models, a new family of generative models that achieve high sample quality without adversarial training. They support fast one-step generation by design, while still allowing for few-step sampling to trade compute for sample quality. They also support zero-shot data editing, like image inpainting, colorization, and super-resolution, without requiring explicit training on these tasks. Consistency models can be trained either as a way to distill pre-trained diffusion models, or as standalone generative models. Through extensive experiments, we demonstrate that they outperform existing distillation techniques for diffusion models in one- and few-step generation. For example, we achieve the new state-of-the-art FID of 3.55 on CIFAR-10 and 6.20 on ImageNet 64x64 for one-step generation. When trained as standalone generative models, consistency models also outperform single-step, non-adversarial generative models on standard benchmarks like CIFAR-10, ImageNet 64x64 and LSUN 256x256.*
|
||||
|
||||
The original codebase can be found at [openai/consistency_models](https://github.com/openai/consistency_models).
|
||||
Multistep and onestep scheduler (Algorithm 1) introduced alongside consistency models in the paper [Consistency Models](https://arxiv.org/abs/2303.01469) by Yang Song, Prafulla Dhariwal, Mark Chen, and Ilya Sutskever.
|
||||
Based on the [original consistency models implementation](https://github.com/openai/consistency_models).
|
||||
Should generate good samples from [`ConsistencyModelPipeline`] in one or a small number of steps.
|
||||
|
||||
## CMStochasticIterativeScheduler
|
||||
[[autodoc]] CMStochasticIterativeScheduler
|
||||
|
||||
## CMStochasticIterativeSchedulerOutput
|
||||
[[autodoc]] schedulers.scheduling_consistency_models.CMStochasticIterativeSchedulerOutput
|
||||
@@ -10,11 +10,13 @@ an "AS IS" BASIS, WITHOUT WARRANTIES OR CONDITIONS OF ANY KIND, either express o
|
||||
specific language governing permissions and limitations under the License.
|
||||
-->
|
||||
|
||||
# DDIMScheduler
|
||||
# Denoising Diffusion Implicit Models (DDIM)
|
||||
|
||||
[Denoising Diffusion Implicit Models](https://huggingface.co/papers/2010.02502) (DDIM) by Jiaming Song, Chenlin Meng and Stefano Ermon.
|
||||
## Overview
|
||||
|
||||
The abstract from the paper is:
|
||||
[Denoising Diffusion Implicit Models](https://arxiv.org/abs/2010.02502) (DDIM) by Jiaming Song, Chenlin Meng and Stefano Ermon.
|
||||
|
||||
The abstract of the paper is the following:
|
||||
|
||||
*Denoising diffusion probabilistic models (DDPMs) have achieved high quality image generation without adversarial training,
|
||||
yet they require simulating a Markov chain for many steps to produce a sample.
|
||||
@@ -24,43 +26,50 @@ We construct a class of non-Markovian diffusion processes that lead to the same
|
||||
We empirically demonstrate that DDIMs can produce high quality samples 10× to 50× faster in terms of wall-clock time compared to DDPMs, allow us to trade off
|
||||
computation for sample quality, and can perform semantically meaningful image interpolation directly in the latent space.*
|
||||
|
||||
The original codebase of this paper can be found at [ermongroup/ddim](https://github.com/ermongroup/ddim), and you can contact the author on [tsong.me](https://tsong.me/).
|
||||
The original codebase of this paper can be found here: [ermongroup/ddim](https://github.com/ermongroup/ddim).
|
||||
For questions, feel free to contact the author on [tsong.me](https://tsong.me/).
|
||||
|
||||
## Tips
|
||||
### Experimental: "Common Diffusion Noise Schedules and Sample Steps are Flawed":
|
||||
|
||||
The paper [Common Diffusion Noise Schedules and Sample Steps are Flawed](https://huggingface.co/papers/2305.08891) claims that a mismatch between the training and inference settings leads to suboptimal inference generation results for Stable Diffusion. To fix this, the authors propose:
|
||||
The paper **[Common Diffusion Noise Schedules and Sample Steps are Flawed](https://arxiv.org/abs/2305.08891)**
|
||||
claims that a mismatch between the training and inference settings leads to suboptimal inference generation results for Stable Diffusion.
|
||||
|
||||
<Tip warning={true}>
|
||||
The abstract reads as follows:
|
||||
|
||||
🧪 This is an experimental feature!
|
||||
|
||||
</Tip>
|
||||
|
||||
1. rescale the noise schedule to enforce zero terminal signal-to-noise ratio (SNR)
|
||||
*We discover that common diffusion noise schedules do not enforce the last timestep to have zero signal-to-noise ratio (SNR),
|
||||
and some implementations of diffusion samplers do not start from the last timestep.
|
||||
Such designs are flawed and do not reflect the fact that the model is given pure Gaussian noise at inference, creating a discrepancy between training and inference.
|
||||
We show that the flawed design causes real problems in existing implementations.
|
||||
In Stable Diffusion, it severely limits the model to only generate images with medium brightness and
|
||||
prevents it from generating very bright and dark samples. We propose a few simple fixes:
|
||||
- (1) rescale the noise schedule to enforce zero terminal SNR;
|
||||
- (2) train the model with v prediction;
|
||||
- (3) change the sampler to always start from the last timestep;
|
||||
- (4) rescale classifier-free guidance to prevent over-exposure.
|
||||
These simple changes ensure the diffusion process is congruent between training and inference and
|
||||
allow the model to generate samples more faithful to the original data distribution.*
|
||||
|
||||
You can apply all of these changes in `diffusers` when using [`DDIMScheduler`]:
|
||||
- (1) rescale the noise schedule to enforce zero terminal SNR;
|
||||
```py
|
||||
pipe.scheduler = DDIMScheduler.from_config(pipe.scheduler.config, rescale_betas_zero_snr=True)
|
||||
```
|
||||
|
||||
2. train a model with `v_prediction` (add the following argument to the [train_text_to_image.py](https://github.com/huggingface/diffusers/blob/main/examples/text_to_image/train_text_to_image.py) or [train_text_to_image_lora.py](https://github.com/huggingface/diffusers/blob/main/examples/text_to_image/train_text_to_image_lora.py) scripts)
|
||||
|
||||
```bash
|
||||
--prediction_type="v_prediction"
|
||||
```
|
||||
|
||||
3. change the sampler to always start from the last timestep
|
||||
|
||||
- (2) train the model with v prediction;
|
||||
Continue fine-tuning a checkpoint with [`train_text_to_image.py`](https://github.com/huggingface/diffusers/blob/main/examples/text_to_image/train_text_to_image.py) or [`train_text_to_image_lora.py`](https://github.com/huggingface/diffusers/blob/main/examples/text_to_image/train_text_to_image_lora.py)
|
||||
and `--prediction_type="v_prediction"`.
|
||||
- (3) change the sampler to always start from the last timestep;
|
||||
```py
|
||||
pipe.scheduler = DDIMScheduler.from_config(pipe.scheduler.config, timestep_spacing="trailing")
|
||||
```
|
||||
|
||||
4. rescale classifier-free guidance to prevent over-exposure
|
||||
|
||||
- (4) rescale classifier-free guidance to prevent over-exposure.
|
||||
```py
|
||||
image = pipeline(prompt, guidance_rescale=0.7).images[0]
|
||||
pipe(..., guidance_rescale=0.7)
|
||||
```
|
||||
|
||||
For example:
|
||||
An example is to use [this checkpoint](https://huggingface.co/ptx0/pseudo-journey-v2)
|
||||
which has been fine-tuned using the `"v_prediction"`.
|
||||
|
||||
The checkpoint can then be run in inference as follows:
|
||||
|
||||
```py
|
||||
from diffusers import DiffusionPipeline, DDIMScheduler
|
||||
@@ -77,6 +86,3 @@ image = pipeline(prompt, guidance_rescale=0.7).images[0]
|
||||
|
||||
## DDIMScheduler
|
||||
[[autodoc]] DDIMScheduler
|
||||
|
||||
## DDIMSchedulerOutput
|
||||
[[autodoc]] schedulers.scheduling_ddim.DDIMSchedulerOutput
|
||||
|
||||
@@ -10,10 +10,12 @@ an "AS IS" BASIS, WITHOUT WARRANTIES OR CONDITIONS OF ANY KIND, either express o
|
||||
specific language governing permissions and limitations under the License.
|
||||
-->
|
||||
|
||||
# DDIMInverseScheduler
|
||||
# Inverse Denoising Diffusion Implicit Models (DDIMInverse)
|
||||
|
||||
`DDIMInverseScheduler` is the inverted scheduler from [Denoising Diffusion Implicit Models](https://huggingface.co/papers/2010.02502) (DDIM) by Jiaming Song, Chenlin Meng and Stefano Ermon.
|
||||
The implementation is mostly based on the DDIM inversion definition from [Null-text Inversion for Editing Real Images using Guided Diffusion Models](https://huggingface.co/papers/2211.09794.pdf).
|
||||
## Overview
|
||||
|
||||
This scheduler is the inverted scheduler of [Denoising Diffusion Implicit Models](https://arxiv.org/abs/2010.02502) (DDIM) by Jiaming Song, Chenlin Meng and Stefano Ermon.
|
||||
The implementation is mostly based on the DDIM inversion definition of [Null-text Inversion for Editing Real Images using Guided Diffusion Models](https://arxiv.org/pdf/2211.09794.pdf)
|
||||
|
||||
## DDIMInverseScheduler
|
||||
[[autodoc]] DDIMInverseScheduler
|
||||
|
||||
@@ -10,16 +10,18 @@ an "AS IS" BASIS, WITHOUT WARRANTIES OR CONDITIONS OF ANY KIND, either express o
|
||||
specific language governing permissions and limitations under the License.
|
||||
-->
|
||||
|
||||
# DDPMScheduler
|
||||
# Denoising Diffusion Probabilistic Models (DDPM)
|
||||
|
||||
[Denoising Diffusion Probabilistic Models](https://huggingface.co/papers/2006.11239) (DDPM) by Jonathan Ho, Ajay Jain and Pieter Abbeel proposes a diffusion based model of the same name. In the context of the 🤗 Diffusers library, DDPM refers to the discrete denoising scheduler from the paper as well as the pipeline.
|
||||
## Overview
|
||||
|
||||
The abstract from the paper is:
|
||||
[Denoising Diffusion Probabilistic Models](https://arxiv.org/abs/2006.11239)
|
||||
(DDPM) by Jonathan Ho, Ajay Jain and Pieter Abbeel proposes the diffusion based model of the same name, but in the context of the 🤗 Diffusers library, DDPM refers to the discrete denoising scheduler from the paper as well as the pipeline.
|
||||
|
||||
*We present high quality image synthesis results using diffusion probabilistic models, a class of latent variable models inspired by considerations from nonequilibrium thermodynamics. Our best results are obtained by training on a weighted variational bound designed according to a novel connection between diffusion probabilistic models and denoising score matching with Langevin dynamics, and our models naturally admit a progressive lossy decompression scheme that can be interpreted as a generalization of autoregressive decoding. On the unconditional CIFAR10 dataset, we obtain an Inception score of 9.46 and a state-of-the-art FID score of 3.17. On 256x256 LSUN, we obtain sample quality similar to ProgressiveGAN.*
|
||||
The abstract of the paper is the following:
|
||||
|
||||
We present high quality image synthesis results using diffusion probabilistic models, a class of latent variable models inspired by considerations from nonequilibrium thermodynamics. Our best results are obtained by training on a weighted variational bound designed according to a novel connection between diffusion probabilistic models and denoising score matching with Langevin dynamics, and our models naturally admit a progressive lossy decompression scheme that can be interpreted as a generalization of autoregressive decoding. On the unconditional CIFAR10 dataset, we obtain an Inception score of 9.46 and a state-of-the-art FID score of 3.17. On 256x256 LSUN, we obtain sample quality similar to ProgressiveGAN.
|
||||
|
||||
The original paper can be found [here](https://arxiv.org/abs/2010.02502).
|
||||
|
||||
## DDPMScheduler
|
||||
[[autodoc]] DDPMScheduler
|
||||
|
||||
## DDPMSchedulerOutput
|
||||
[[autodoc]] schedulers.scheduling_ddpm.DDPMSchedulerOutput
|
||||
@@ -10,27 +10,13 @@ an "AS IS" BASIS, WITHOUT WARRANTIES OR CONDITIONS OF ANY KIND, either express o
|
||||
specific language governing permissions and limitations under the License.
|
||||
-->
|
||||
|
||||
# DEISMultistepScheduler
|
||||
# DEIS
|
||||
|
||||
Diffusion Exponential Integrator Sampler (DEIS) is proposed in [Fast Sampling of Diffusion Models with Exponential Integrator](https://huggingface.co/papers/2204.13902) by Qinsheng Zhang and Yongxin Chen. `DEISMultistepScheduler` is a fast high order solver for diffusion ordinary differential equations (ODEs).
|
||||
Fast Sampling of Diffusion Models with Exponential Integrator.
|
||||
|
||||
This implementation modifies the polynomial fitting formula in log-rho space instead of the original linear `t` space in the DEIS paper. The modification enjoys closed-form coefficients for exponential multistep update instead of replying on the numerical solver.
|
||||
## Overview
|
||||
|
||||
The abstract from the paper is:
|
||||
|
||||
*The past few years have witnessed the great success of Diffusion models~(DMs) in generating high-fidelity samples in generative modeling tasks. A major limitation of the DM is its notoriously slow sampling procedure which normally requires hundreds to thousands of time discretization steps of the learned diffusion process to reach the desired accuracy. Our goal is to develop a fast sampling method for DMs with a much less number of steps while retaining high sample quality. To this end, we systematically analyze the sampling procedure in DMs and identify key factors that affect the sample quality, among which the method of discretization is most crucial. By carefully examining the learned diffusion process, we propose Diffusion Exponential Integrator Sampler~(DEIS). It is based on the Exponential Integrator designed for discretizing ordinary differential equations (ODEs) and leverages a semilinear structure of the learned diffusion process to reduce the discretization error. The proposed method can be applied to any DMs and can generate high-fidelity samples in as few as 10 steps. In our experiments, it takes about 3 minutes on one A6000 GPU to generate 50k images from CIFAR10. Moreover, by directly using pre-trained DMs, we achieve the state-of-art sampling performance when the number of score function evaluation~(NFE) is limited, e.g., 4.17 FID with 10 NFEs, 3.37 FID, and 9.74 IS with only 15 NFEs on CIFAR10. Code is available at [this https URL](https://github.com/qsh-zh/deis).*
|
||||
|
||||
The original codebase can be found at [qsh-zh/deis](https://github.com/qsh-zh/deis).
|
||||
|
||||
## Tips
|
||||
|
||||
It is recommended to set `solver_order` to 2 or 3, while `solver_order=1` is equivalent to [`DDIMScheduler`].
|
||||
|
||||
Dynamic thresholding from [Imagen](https://huggingface.co/papers/2205.11487) is supported, and for pixel-space
|
||||
diffusion models, you can set `thresholding=True` to use the dynamic thresholding.
|
||||
Original paper can be found [here](https://arxiv.org/abs/2204.13902). The original implementation can be found [here](https://github.com/qsh-zh/deis).
|
||||
|
||||
## DEISMultistepScheduler
|
||||
[[autodoc]] DEISMultistepScheduler
|
||||
|
||||
## SchedulerOutput
|
||||
[[autodoc]] schedulers.scheduling_utils.SchedulerOutput
|
||||
@@ -10,14 +10,13 @@ an "AS IS" BASIS, WITHOUT WARRANTIES OR CONDITIONS OF ANY KIND, either express o
|
||||
specific language governing permissions and limitations under the License.
|
||||
-->
|
||||
|
||||
# KDPM2DiscreteScheduler
|
||||
# DPM Discrete Scheduler inspired by Karras et. al paper
|
||||
|
||||
The `KDPM2DiscreteScheduler` is inspired by the [Elucidating the Design Space of Diffusion-Based Generative Models](https://huggingface.co/papers/2206.00364) paper, and the scheduler is ported from and created by [Katherine Crowson](https://github.com/crowsonkb/).
|
||||
## Overview
|
||||
|
||||
The original codebase can be found at [crowsonkb/k-diffusion](https://github.com/crowsonkb/k-diffusion).
|
||||
Inspired by [Karras et. al](https://arxiv.org/abs/2206.00364). Scheduler ported from @crowsonkb's https://github.com/crowsonkb/k-diffusion library:
|
||||
|
||||
All credit for making this scheduler work goes to [Katherine Crowson](https://github.com/crowsonkb/)
|
||||
|
||||
## KDPM2DiscreteScheduler
|
||||
[[autodoc]] KDPM2DiscreteScheduler
|
||||
|
||||
## SchedulerOutput
|
||||
[[autodoc]] schedulers.scheduling_utils.SchedulerOutput
|
||||
[[autodoc]] KDPM2DiscreteScheduler
|
||||
@@ -10,14 +10,13 @@ an "AS IS" BASIS, WITHOUT WARRANTIES OR CONDITIONS OF ANY KIND, either express o
|
||||
specific language governing permissions and limitations under the License.
|
||||
-->
|
||||
|
||||
# KDPM2AncestralDiscreteScheduler
|
||||
# DPM Discrete Scheduler with ancestral sampling inspired by Karras et. al paper
|
||||
|
||||
The `KDPM2DiscreteScheduler` with ancestral sampling is inspired by the [Elucidating the Design Space of Diffusion-Based Generative Models](https://huggingface.co/papers/2206.00364) paper, and the scheduler is ported from and created by [Katherine Crowson](https://github.com/crowsonkb/).
|
||||
## Overview
|
||||
|
||||
The original codebase can be found at [crowsonkb/k-diffusion](https://github.com/crowsonkb/k-diffusion).
|
||||
Inspired by [Karras et. al](https://arxiv.org/abs/2206.00364). Scheduler ported from @crowsonkb's https://github.com/crowsonkb/k-diffusion library:
|
||||
|
||||
All credit for making this scheduler work goes to [Katherine Crowson](https://github.com/crowsonkb/)
|
||||
|
||||
## KDPM2AncestralDiscreteScheduler
|
||||
[[autodoc]] KDPM2AncestralDiscreteScheduler
|
||||
|
||||
## SchedulerOutput
|
||||
[[autodoc]] schedulers.scheduling_utils.SchedulerOutput
|
||||
[[autodoc]] KDPM2AncestralDiscreteScheduler
|
||||
@@ -10,12 +10,14 @@ an "AS IS" BASIS, WITHOUT WARRANTIES OR CONDITIONS OF ANY KIND, either express o
|
||||
specific language governing permissions and limitations under the License.
|
||||
-->
|
||||
|
||||
# DPMSolverSDEScheduler
|
||||
# DPM Stochastic Scheduler inspired by Karras et. al paper
|
||||
|
||||
The `DPMSolverSDEScheduler` is inspired by the stochastic sampler from the [Elucidating the Design Space of Diffusion-Based Generative Models](https://huggingface.co/papers/2206.00364) paper, and the scheduler is ported from and created by [Katherine Crowson](https://github.com/crowsonkb/).
|
||||
## Overview
|
||||
|
||||
Inspired by Stochastic Sampler from [Karras et. al](https://arxiv.org/abs/2206.00364).
|
||||
Scheduler ported from @crowsonkb's https://github.com/crowsonkb/k-diffusion library:
|
||||
|
||||
All credit for making this scheduler work goes to [Katherine Crowson](https://github.com/crowsonkb/)
|
||||
|
||||
## DPMSolverSDEScheduler
|
||||
[[autodoc]] DPMSolverSDEScheduler
|
||||
|
||||
## SchedulerOutput
|
||||
[[autodoc]] schedulers.scheduling_utils.SchedulerOutput
|
||||
[[autodoc]] DPMSolverSDEScheduler
|
||||
@@ -10,13 +10,12 @@ an "AS IS" BASIS, WITHOUT WARRANTIES OR CONDITIONS OF ANY KIND, either express o
|
||||
specific language governing permissions and limitations under the License.
|
||||
-->
|
||||
|
||||
# EulerDiscreteScheduler
|
||||
# Euler scheduler
|
||||
|
||||
The Euler scheduler (Algorithm 2) is from the [Elucidating the Design Space of Diffusion-Based Generative Models](https://huggingface.co/papers/2206.00364) paper by Karras et al. This is a fast scheduler which can often generate good outputs in 20-30 steps. The scheduler is based on the original [k-diffusion](https://github.com/crowsonkb/k-diffusion/blob/481677d114f6ea445aa009cf5bd7a9cdee909e47/k_diffusion/sampling.py#L51) implementation by [Katherine Crowson](https://github.com/crowsonkb/).
|
||||
## Overview
|
||||
|
||||
Euler scheduler (Algorithm 2) from the paper [Elucidating the Design Space of Diffusion-Based Generative Models](https://arxiv.org/abs/2206.00364) by Karras et al. (2022). Based on the original [k-diffusion](https://github.com/crowsonkb/k-diffusion/blob/481677d114f6ea445aa009cf5bd7a9cdee909e47/k_diffusion/sampling.py#L51) implementation by Katherine Crowson.
|
||||
Fast scheduler which often times generates good outputs with 20-30 steps.
|
||||
|
||||
## EulerDiscreteScheduler
|
||||
[[autodoc]] EulerDiscreteScheduler
|
||||
|
||||
## EulerDiscreteSchedulerOutput
|
||||
[[autodoc]] schedulers.scheduling_euler_discrete.EulerDiscreteSchedulerOutput
|
||||
[[autodoc]] EulerDiscreteScheduler
|
||||
@@ -10,12 +10,12 @@ an "AS IS" BASIS, WITHOUT WARRANTIES OR CONDITIONS OF ANY KIND, either express o
|
||||
specific language governing permissions and limitations under the License.
|
||||
-->
|
||||
|
||||
# EulerAncestralDiscreteScheduler
|
||||
# Euler Ancestral scheduler
|
||||
|
||||
A scheduler that uses ancestral sampling with Euler method steps. This is a fast scheduler which can often generate good outputs in 20-30 steps. The scheduler is based on the original [k-diffusion](https://github.com/crowsonkb/k-diffusion/blob/481677d114f6ea445aa009cf5bd7a9cdee909e47/k_diffusion/sampling.py#L72) implementation by [Katherine Crowson](https://github.com/crowsonkb/).
|
||||
## Overview
|
||||
|
||||
Ancestral sampling with Euler method steps. Based on the original [k-diffusion](https://github.com/crowsonkb/k-diffusion/blob/481677d114f6ea445aa009cf5bd7a9cdee909e47/k_diffusion/sampling.py#L72) implementation by Katherine Crowson.
|
||||
Fast scheduler which often times generates good outputs with 20-30 steps.
|
||||
|
||||
## EulerAncestralDiscreteScheduler
|
||||
[[autodoc]] EulerAncestralDiscreteScheduler
|
||||
|
||||
## EulerAncestralDiscreteSchedulerOutput
|
||||
[[autodoc]] schedulers.scheduling_euler_ancestral_discrete.EulerAncestralDiscreteSchedulerOutput
|
||||
@@ -10,12 +10,14 @@ an "AS IS" BASIS, WITHOUT WARRANTIES OR CONDITIONS OF ANY KIND, either express o
|
||||
specific language governing permissions and limitations under the License.
|
||||
-->
|
||||
|
||||
# HeunDiscreteScheduler
|
||||
# Heun scheduler inspired by Karras et. al paper
|
||||
|
||||
The Heun scheduler (Algorithm 1) is from the [Elucidating the Design Space of Diffusion-Based Generative Models](https://huggingface.co/papers/2206.00364) paper by Karras et al. The scheduler is ported from the [k-diffusion](https://github.com/crowsonkb/k-diffusion) library and created by [Katherine Crowson](https://github.com/crowsonkb/).
|
||||
## Overview
|
||||
|
||||
Algorithm 1 of [Karras et. al](https://arxiv.org/abs/2206.00364).
|
||||
Scheduler ported from @crowsonkb's https://github.com/crowsonkb/k-diffusion library:
|
||||
|
||||
All credit for making this scheduler work goes to [Katherine Crowson](https://github.com/crowsonkb/)
|
||||
|
||||
## HeunDiscreteScheduler
|
||||
[[autodoc]] HeunDiscreteScheduler
|
||||
|
||||
## SchedulerOutput
|
||||
[[autodoc]] schedulers.scheduling_utils.SchedulerOutput
|
||||
[[autodoc]] HeunDiscreteScheduler
|
||||
@@ -10,12 +10,11 @@ an "AS IS" BASIS, WITHOUT WARRANTIES OR CONDITIONS OF ANY KIND, either express o
|
||||
specific language governing permissions and limitations under the License.
|
||||
-->
|
||||
|
||||
# IPNDMScheduler
|
||||
# improved pseudo numerical methods for diffusion models (iPNDM)
|
||||
|
||||
`IPNDMScheduler` is a fourth-order Improved Pseudo Linear Multistep scheduler. The original implementation can be found at [crowsonkb/v-diffusion-pytorch](https://github.com/crowsonkb/v-diffusion-pytorch/blob/987f8985e38208345c1959b0ea767a625831cc9b/diffusion/sampling.py#L296).
|
||||
## Overview
|
||||
|
||||
Original implementation can be found [here](https://github.com/crowsonkb/v-diffusion-pytorch/blob/987f8985e38208345c1959b0ea767a625831cc9b/diffusion/sampling.py#L296).
|
||||
|
||||
## IPNDMScheduler
|
||||
[[autodoc]] IPNDMScheduler
|
||||
|
||||
## SchedulerOutput
|
||||
[[autodoc]] schedulers.scheduling_utils.SchedulerOutput
|
||||
[[autodoc]] IPNDMScheduler
|
||||
@@ -10,12 +10,11 @@ an "AS IS" BASIS, WITHOUT WARRANTIES OR CONDITIONS OF ANY KIND, either express o
|
||||
specific language governing permissions and limitations under the License.
|
||||
-->
|
||||
|
||||
# LMSDiscreteScheduler
|
||||
# Linear multistep scheduler for discrete beta schedules
|
||||
|
||||
`LMSDiscreteScheduler` is a linear multistep scheduler for discrete beta schedules. The scheduler is ported from and created by [Katherine Crowson](https://github.com/crowsonkb/), and the original implementation can be found at [crowsonkb/k-diffusion](https://github.com/crowsonkb/k-diffusion/blob/481677d114f6ea445aa009cf5bd7a9cdee909e47/k_diffusion/sampling.py#L181).
|
||||
## Overview
|
||||
|
||||
Original implementation can be found [here](https://arxiv.org/abs/2206.00364).
|
||||
|
||||
## LMSDiscreteScheduler
|
||||
[[autodoc]] LMSDiscreteScheduler
|
||||
|
||||
## LMSDiscreteSchedulerOutput
|
||||
[[autodoc]] schedulers.scheduling_lms_discrete.LMSDiscreteSchedulerOutput
|
||||
[[autodoc]] LMSDiscreteScheduler
|
||||
@@ -10,26 +10,11 @@ an "AS IS" BASIS, WITHOUT WARRANTIES OR CONDITIONS OF ANY KIND, either express o
|
||||
specific language governing permissions and limitations under the License.
|
||||
-->
|
||||
|
||||
# DPMSolverMultistepScheduler
|
||||
# Multistep DPM-Solver
|
||||
|
||||
`DPMSolverMultistep` is a multistep scheduler from [DPM-Solver: A Fast ODE Solver for Diffusion Probabilistic Model Sampling in Around 10 Steps](https://huggingface.co/papers/2206.00927) and [DPM-Solver++: Fast Solver for Guided Sampling of Diffusion Probabilistic Models](https://huggingface.co/papers/2211.01095) by Cheng Lu, Yuhao Zhou, Fan Bao, Jianfei Chen, Chongxuan Li, and Jun Zhu.
|
||||
## Overview
|
||||
|
||||
DPMSolver (and the improved version DPMSolver++) is a fast dedicated high-order solver for diffusion ODEs with convergence order guarantee. Empirically, DPMSolver sampling with only 20 steps can generate high-quality
|
||||
samples, and it can generate quite good samples even in 10 steps.
|
||||
|
||||
## Tips
|
||||
|
||||
It is recommended to set `solver_order` to 2 for guide sampling, and `solver_order=3` for unconditional sampling.
|
||||
|
||||
Dynamic thresholding from Imagen (https://huggingface.co/papers/2205.11487) is supported, and for pixel-space
|
||||
diffusion models, you can set both `algorithm_type="dpmsolver++"` and `thresholding=True` to use the dynamic
|
||||
thresholding. This thresholding method is unsuitable for latent-space diffusion models such as
|
||||
Stable Diffusion.
|
||||
|
||||
The SDE variant of DPMSolver and DPM-Solver++ is also supported, but only for the first and second-order solvers. This is a fast SDE solver for the reverse diffusion SDE. It is recommended to use the second-order `sde-dpmsolver++`.
|
||||
Original paper can be found [here](https://arxiv.org/abs/2206.00927) and the [improved version](https://arxiv.org/abs/2211.01095). The original implementation can be found [here](https://github.com/LuChengTHU/dpm-solver).
|
||||
|
||||
## DPMSolverMultistepScheduler
|
||||
[[autodoc]] DPMSolverMultistepScheduler
|
||||
|
||||
## SchedulerOutput
|
||||
[[autodoc]] schedulers.scheduling_utils.SchedulerOutput
|
||||
[[autodoc]] DPMSolverMultistepScheduler
|
||||
@@ -10,21 +10,13 @@ an "AS IS" BASIS, WITHOUT WARRANTIES OR CONDITIONS OF ANY KIND, either express o
|
||||
specific language governing permissions and limitations under the License.
|
||||
-->
|
||||
|
||||
# DPMSolverMultistepInverse
|
||||
# Inverse Multistep DPM-Solver (DPMSolverMultistepInverse)
|
||||
|
||||
`DPMSolverMultistepInverse` is the inverted scheduler from [DPM-Solver: A Fast ODE Solver for Diffusion Probabilistic Model Sampling in Around 10 Steps](https://huggingface.co/papers/2206.00927) and [DPM-Solver++: Fast Solver for Guided Sampling of Diffusion Probabilistic Models](https://huggingface.co/papers/2211.01095) by Cheng Lu, Yuhao Zhou, Fan Bao, Jianfei Chen, Chongxuan Li, and Jun Zhu.
|
||||
## Overview
|
||||
|
||||
The implementation is mostly based on the DDIM inversion definition of [Null-text Inversion for Editing Real Images using Guided Diffusion Models](https://huggingface.co/papers/2211.09794.pdf) and notebook implementation of the [`DiffEdit`] latent inversion from [Xiang-cd/DiffEdit-stable-diffusion](https://github.com/Xiang-cd/DiffEdit-stable-diffusion/blob/main/diffedit.ipynb).
|
||||
|
||||
## Tips
|
||||
|
||||
Dynamic thresholding from Imagen (https://huggingface.co/papers/2205.11487) is supported, and for pixel-space
|
||||
diffusion models, you can set both `algorithm_type="dpmsolver++"` and `thresholding=True` to use the dynamic
|
||||
thresholding. This thresholding method is unsuitable for latent-space diffusion models such as
|
||||
Stable Diffusion.
|
||||
This scheduler is the inverted scheduler of [DPM-Solver: A Fast ODE Solver for Diffusion Probabilistic Model Sampling in Around 10 Steps](https://arxiv.org/abs/2206.00927) and [DPM-Solver++: Fast Solver for Guided Sampling of Diffusion Probabilistic Models
|
||||
](https://arxiv.org/abs/2211.01095) by Cheng Lu, Yuhao Zhou, Fan Bao, Jianfei Chen, Chongxuan Li, and Jun Zhu.
|
||||
The implementation is mostly based on the DDIM inversion definition of [Null-text Inversion for Editing Real Images using Guided Diffusion Models](https://arxiv.org/pdf/2211.09794.pdf) and the ad-hoc notebook implementation for DiffEdit latent inversion [here](https://github.com/Xiang-cd/DiffEdit-stable-diffusion/blob/main/diffedit.ipynb).
|
||||
|
||||
## DPMSolverMultistepInverseScheduler
|
||||
[[autodoc]] DPMSolverMultistepInverseScheduler
|
||||
|
||||
## SchedulerOutput
|
||||
[[autodoc]] schedulers.scheduling_utils.SchedulerOutput
|
||||
|
||||
@@ -12,53 +12,81 @@ specific language governing permissions and limitations under the License.
|
||||
|
||||
# Schedulers
|
||||
|
||||
🤗 Diffusers provides many scheduler functions for the diffusion process. A scheduler takes a model's output (the sample which the diffusion process is iterating on) and a timestep to return a denoised sample. The timestep is important because it dictates where in the diffusion process the step is; data is generated by iterating forward *n* timesteps and inference occurs by propagating backward through the timesteps. Based on the timestep, a scheduler may be *discrete* in which case the timestep is an `int` or *continuous* in which case the timestep is a `float`.
|
||||
Diffusers contains multiple pre-built schedule functions for the diffusion process.
|
||||
|
||||
Depending on the context, a scheduler defines how to iteratively add noise to an image or how to update a sample based on a model's output:
|
||||
## What is a scheduler?
|
||||
|
||||
- during *training*, a scheduler adds noise (there are different algorithms for how to add noise) to a sample to train a diffusion model
|
||||
- during *inference*, a scheduler defines how to update a sample based on a pretrained model's output
|
||||
The schedule functions, denoted *Schedulers* in the library take in the output of a trained model, a sample which the diffusion process is iterating on, and a timestep to return a denoised sample. That's why schedulers may also be called *Samplers* in other diffusion models implementations.
|
||||
|
||||
Many schedulers are implemented from the [k-diffusion](https://github.com/crowsonkb/k-diffusion) library by [Katherine Crowson](https://github.com/crowsonkb/), and they're also widely used in A1111. To help you map the schedulers from k-diffusion and A1111 to the schedulers in 🤗 Diffusers, take a look at the table below:
|
||||
- Schedulers define the methodology for iteratively adding noise to an image or for updating a sample based on model outputs.
|
||||
- adding noise in different manners represent the algorithmic processes to train a diffusion model by adding noise to images.
|
||||
- for inference, the scheduler defines how to update a sample based on an output from a pretrained model.
|
||||
- Schedulers are often defined by a *noise schedule* and an *update rule* to solve the differential equation solution.
|
||||
|
||||
| A1111/k-diffusion | 🤗 Diffusers | Usage |
|
||||
|---------------------|-------------------------------------|---------------------------------------------------------------------------------------------------------------|
|
||||
| DPM++ 2M | [`DPMSolverMultistepScheduler`] | |
|
||||
| DPM++ 2M Karras | [`DPMSolverMultistepScheduler`] | init with `use_karras_sigmas=True` |
|
||||
| DPM++ 2M SDE | [`DPMSolverMultistepScheduler`] | init with `algorithm_type="sde-dpmsolver++"` |
|
||||
| DPM++ 2M SDE Karras | [`DPMSolverMultistepScheduler`] | init with `use_karras_sigmas=True` and `algorithm_type="sde-dpmsolver++"` |
|
||||
| DPM++ 2S a | N/A | very similar to `DPMSolverSinglestepScheduler` |
|
||||
| DPM++ 2S a Karras | N/A | very similar to `DPMSolverSinglestepScheduler(use_karras_sigmas=True, ...)` |
|
||||
| DPM++ SDE | [`DPMSolverSinglestepScheduler`] | |
|
||||
| DPM++ SDE Karras | [`DPMSolverSinglestepScheduler`] | init with `use_karras_sigmas=True` |
|
||||
| DPM2 | [`KDPM2DiscreteScheduler`] | |
|
||||
| DPM2 Karras | [`KDPM2DiscreteScheduler`] | init with `use_karras_sigmas=True` |
|
||||
| DPM2 a | [`KDPM2AncestralDiscreteScheduler`] | |
|
||||
| DPM2 a Karras | [`KDPM2AncestralDiscreteScheduler`] | init with `use_karras_sigmas=True` |
|
||||
| DPM adaptive | N/A | |
|
||||
| DPM fast | N/A | |
|
||||
| Euler | [`EulerDiscreteScheduler`] | |
|
||||
| Euler a | [`EulerAncestralDiscreteScheduler`] | |
|
||||
| Heun | [`HeunDiscreteScheduler`] | |
|
||||
| LMS | [`LMSDiscreteScheduler`] | |
|
||||
| LMS Karras | [`LMSDiscreteScheduler`] | init with `use_karras_sigmas=True` |
|
||||
| N/A | [`DEISMultistepScheduler`] | |
|
||||
| N/A | [`UniPCMultistepScheduler`] | |
|
||||
### Discrete versus continuous schedulers
|
||||
|
||||
All schedulers are built from the base [`SchedulerMixin`] class which implements low level utilities shared by all schedulers.
|
||||
All schedulers take in a timestep to predict the updated version of the sample being diffused.
|
||||
The timesteps dictate where in the diffusion process the step is, where data is generated by iterating forward in time and inference is executed by propagating backwards through timesteps.
|
||||
Different algorithms use timesteps that can be discrete (accepting `int` inputs), such as the [`DDPMScheduler`] or [`PNDMScheduler`], or continuous (accepting `float` inputs), such as the score-based schedulers [`ScoreSdeVeScheduler`] or [`ScoreSdeVpScheduler`].
|
||||
|
||||
## SchedulerMixin
|
||||
## Designing Re-usable schedulers
|
||||
|
||||
The core design principle between the schedule functions is to be model, system, and framework independent.
|
||||
This allows for rapid experimentation and cleaner abstractions in the code, where the model prediction is separated from the sample update.
|
||||
To this end, the design of schedulers is such that:
|
||||
|
||||
- Schedulers can be used interchangeably between diffusion models in inference to find the preferred trade-off between speed and generation quality.
|
||||
- Schedulers are currently by default in PyTorch, but are designed to be framework independent (partial Jax support currently exists).
|
||||
- Many diffusion pipelines, such as [`StableDiffusionPipeline`] and [`DiTPipeline`] can use any of [`KarrasDiffusionSchedulers`]
|
||||
|
||||
## Schedulers Summary
|
||||
|
||||
The following table summarizes all officially supported schedulers, their corresponding paper
|
||||
|
||||
| Scheduler | Paper |
|
||||
|---|---|
|
||||
| [ddim](./ddim) | [**Denoising Diffusion Implicit Models**](https://arxiv.org/abs/2010.02502) |
|
||||
| [ddim_inverse](./ddim_inverse) | [**Denoising Diffusion Implicit Models**](https://arxiv.org/abs/2010.02502) |
|
||||
| [ddpm](./ddpm) | [**Denoising Diffusion Probabilistic Models**](https://arxiv.org/abs/2006.11239) |
|
||||
| [deis](./deis) | [**DEISMultistepScheduler**](https://arxiv.org/abs/2204.13902) |
|
||||
| [singlestep_dpm_solver](./singlestep_dpm_solver) | [**Singlestep DPM-Solver**](https://arxiv.org/abs/2206.00927) |
|
||||
| [multistep_dpm_solver](./multistep_dpm_solver) | [**Multistep DPM-Solver**](https://arxiv.org/abs/2206.00927) |
|
||||
| [heun](./heun) | [**Heun scheduler inspired by Karras et. al paper**](https://arxiv.org/abs/2206.00364) |
|
||||
| [dpm_discrete](./dpm_discrete) | [**DPM Discrete Scheduler inspired by Karras et. al paper**](https://arxiv.org/abs/2206.00364) |
|
||||
| [dpm_discrete_ancestral](./dpm_discrete_ancestral) | [**DPM Discrete Scheduler with ancestral sampling inspired by Karras et. al paper**](https://arxiv.org/abs/2206.00364) |
|
||||
| [stochastic_karras_ve](./stochastic_karras_ve) | [**Variance exploding, stochastic sampling from Karras et. al**](https://arxiv.org/abs/2206.00364) |
|
||||
| [lms_discrete](./lms_discrete) | [**Linear multistep scheduler for discrete beta schedules**](https://arxiv.org/abs/2206.00364) |
|
||||
| [pndm](./pndm) | [**Pseudo numerical methods for diffusion models (PNDM)**](https://github.com/crowsonkb/k-diffusion/blob/481677d114f6ea445aa009cf5bd7a9cdee909e47/k_diffusion/sampling.py#L181) |
|
||||
| [score_sde_ve](./score_sde_ve) | [**variance exploding stochastic differential equation (VE-SDE) scheduler**](https://arxiv.org/abs/2011.13456) |
|
||||
| [ipndm](./ipndm) | [**improved pseudo numerical methods for diffusion models (iPNDM)**](https://github.com/crowsonkb/v-diffusion-pytorch/blob/987f8985e38208345c1959b0ea767a625831cc9b/diffusion/sampling.py#L296) |
|
||||
| [score_sde_vp](./score_sde_vp) | [**Variance preserving stochastic differential equation (VP-SDE) scheduler**](https://arxiv.org/abs/2011.13456) |
|
||||
| [euler](./euler) | [**Euler scheduler**](https://arxiv.org/abs/2206.00364) |
|
||||
| [euler_ancestral](./euler_ancestral) | [**Euler Ancestral scheduler**](https://github.com/crowsonkb/k-diffusion/blob/481677d114f6ea445aa009cf5bd7a9cdee909e47/k_diffusion/sampling.py#L72) |
|
||||
| [vq_diffusion](./vq_diffusion) | [**VQDiffusionScheduler**](https://arxiv.org/abs/2111.14822) |
|
||||
| [unipc](./unipc) | [**UniPCMultistepScheduler**](https://arxiv.org/abs/2302.04867) |
|
||||
| [repaint](./repaint) | [**RePaint scheduler**](https://arxiv.org/abs/2201.09865) |
|
||||
|
||||
## API
|
||||
|
||||
The core API for any new scheduler must follow a limited structure.
|
||||
- Schedulers should provide one or more `def step(...)` functions that should be called to update the generated sample iteratively.
|
||||
- Schedulers should provide a `set_timesteps(...)` method that configures the parameters of a schedule function for a specific inference task.
|
||||
- Schedulers should be framework-specific.
|
||||
|
||||
The base class [`SchedulerMixin`] implements low level utilities used by multiple schedulers.
|
||||
|
||||
### SchedulerMixin
|
||||
[[autodoc]] SchedulerMixin
|
||||
|
||||
## SchedulerOutput
|
||||
### SchedulerOutput
|
||||
The class [`SchedulerOutput`] contains the outputs from any schedulers `step(...)` call.
|
||||
|
||||
[[autodoc]] schedulers.scheduling_utils.SchedulerOutput
|
||||
|
||||
## KarrasDiffusionSchedulers
|
||||
### KarrasDiffusionSchedulers
|
||||
|
||||
[`KarrasDiffusionSchedulers`] are a broad generalization of schedulers in 🤗 Diffusers. The schedulers in this class are distinguished at a high level by their noise sampling strategy, the type of network and scaling, the training strategy, and how the loss is weighed.
|
||||
`KarrasDiffusionSchedulers` encompasses the main generalization of schedulers in Diffusers. The schedulers in this class are distinguished, at a high level, by their noise sampling strategy; the type of network and scaling; and finally the training strategy or how the loss is weighed.
|
||||
|
||||
The different schedulers in this class, depending on the ordinary differential equations (ODE) solver type, fall into the above taxonomy and provide a good abstraction for the design of the main schedulers implemented in 🤗 Diffusers. The schedulers in this class are given [here](https://github.com/huggingface/diffusers/blob/a69754bb879ed55b9b6dc9dd0b3cf4fa4124c765/src/diffusers/schedulers/scheduling_utils.py#L32).
|
||||
The different schedulers, depending on the type of ODE solver, fall into the above taxonomy and provide a good abstraction for the design of the main schedulers implemented in Diffusers. The schedulers in this class are given below:
|
||||
|
||||
## PushToHubMixin
|
||||
|
||||
[[autodoc]] utils.PushToHubMixin
|
||||
[[autodoc]] schedulers.scheduling_utils.KarrasDiffusionSchedulers
|
||||
|
||||
@@ -10,12 +10,11 @@ an "AS IS" BASIS, WITHOUT WARRANTIES OR CONDITIONS OF ANY KIND, either express o
|
||||
specific language governing permissions and limitations under the License.
|
||||
-->
|
||||
|
||||
# PNDMScheduler
|
||||
# Pseudo numerical methods for diffusion models (PNDM)
|
||||
|
||||
`PNDMScheduler`, or pseudo numerical methods for diffusion models, uses more advanced ODE integration techniques like the Runge-Kutta and linear multi-step method. The original implementation can be found at [crowsonkb/k-diffusion](https://github.com/crowsonkb/k-diffusion/blob/481677d114f6ea445aa009cf5bd7a9cdee909e47/k_diffusion/sampling.py#L181).
|
||||
## Overview
|
||||
|
||||
Original implementation can be found [here](https://github.com/crowsonkb/k-diffusion/blob/481677d114f6ea445aa009cf5bd7a9cdee909e47/k_diffusion/sampling.py#L181).
|
||||
|
||||
## PNDMScheduler
|
||||
[[autodoc]] PNDMScheduler
|
||||
|
||||
## SchedulerOutput
|
||||
[[autodoc]] schedulers.scheduling_utils.SchedulerOutput
|
||||
[[autodoc]] PNDMScheduler
|
||||
@@ -10,18 +10,14 @@ an "AS IS" BASIS, WITHOUT WARRANTIES OR CONDITIONS OF ANY KIND, either express o
|
||||
specific language governing permissions and limitations under the License.
|
||||
-->
|
||||
|
||||
# RePaintScheduler
|
||||
# RePaint scheduler
|
||||
|
||||
`RePaintScheduler` is a DDPM-based inpainting scheduler for unsupervised inpainting with extreme masks. It is designed to be used with the [`RePaintPipeline`], and it is based on the paper [RePaint: Inpainting using Denoising Diffusion Probabilistic Models](https://huggingface.co/papers/2201.09865) by Andreas Lugmayr et al.
|
||||
## Overview
|
||||
|
||||
The abstract from the paper is:
|
||||
|
||||
*Free-form inpainting is the task of adding new content to an image in the regions specified by an arbitrary binary mask. Most existing approaches train for a certain distribution of masks, which limits their generalization capabilities to unseen mask types. Furthermore, training with pixel-wise and perceptual losses often leads to simple textural extensions towards the missing areas instead of semantically meaningful generation. In this work, we propose RePaint: A Denoising Diffusion Probabilistic Model (DDPM) based inpainting approach that is applicable to even extreme masks. We employ a pretrained unconditional DDPM as the generative prior. To condition the generation process, we only alter the reverse diffusion iterations by sampling the unmasked regions using the given image information. Since this technique does not modify or condition the original DDPM network itself, the model produces high-quality and diverse output images for any inpainting form. We validate our method for both faces and general-purpose image inpainting using standard and extreme masks. RePaint outperforms state-of-the-art Autoregressive, and GAN approaches for at least five out of six mask distributions. Github Repository: git.io/RePaint*.
|
||||
|
||||
The original implementation can be found at [andreas128/RePaint](https://github.com/andreas128/).
|
||||
DDPM-based inpainting scheduler for unsupervised inpainting with extreme masks.
|
||||
Intended for use with [`RePaintPipeline`].
|
||||
Based on the paper [RePaint: Inpainting using Denoising Diffusion Probabilistic Models](https://arxiv.org/abs/2201.09865)
|
||||
and the original implementation by Andreas Lugmayr et al.: https://github.com/andreas128/RePaint
|
||||
|
||||
## RePaintScheduler
|
||||
[[autodoc]] RePaintScheduler
|
||||
|
||||
## RePaintSchedulerOutput
|
||||
[[autodoc]] schedulers.scheduling_repaint.RePaintSchedulerOutput
|
||||
[[autodoc]] RePaintScheduler
|
||||
@@ -10,16 +10,11 @@ an "AS IS" BASIS, WITHOUT WARRANTIES OR CONDITIONS OF ANY KIND, either express o
|
||||
specific language governing permissions and limitations under the License.
|
||||
-->
|
||||
|
||||
# ScoreSdeVeScheduler
|
||||
# Variance Exploding Stochastic Differential Equation (VE-SDE) scheduler
|
||||
|
||||
`ScoreSdeVeScheduler` is a variance exploding stochastic differential equation (SDE) scheduler. It was introduced in the [Score-Based Generative Modeling through Stochastic Differential Equations](https://huggingface.co/papers/2011.13456) paper by Yang Song, Jascha Sohl-Dickstein, Diederik P. Kingma, Abhishek Kumar, Stefano Ermon, Ben Poole.
|
||||
## Overview
|
||||
|
||||
The abstract from the paper is:
|
||||
|
||||
*Creating noise from data is easy; creating data from noise is generative modeling. We present a stochastic differential equation (SDE) that smoothly transforms a complex data distribution to a known prior distribution by slowly injecting noise, and a corresponding reverse-time SDE that transforms the prior distribution back into the data distribution by slowly removing the noise. Crucially, the reverse-time SDE depends only on the time-dependent gradient field (\aka, score) of the perturbed data distribution. By leveraging advances in score-based generative modeling, we can accurately estimate these scores with neural networks, and use numerical SDE solvers to generate samples. We show that this framework encapsulates previous approaches in score-based generative modeling and diffusion probabilistic modeling, allowing for new sampling procedures and new modeling capabilities. In particular, we introduce a predictor-corrector framework to correct errors in the evolution of the discretized reverse-time SDE. We also derive an equivalent neural ODE that samples from the same distribution as the SDE, but additionally enables exact likelihood computation, and improved sampling efficiency. In addition, we provide a new way to solve inverse problems with score-based models, as demonstrated with experiments on class-conditional generation, image inpainting, and colorization. Combined with multiple architectural improvements, we achieve record-breaking performance for unconditional image generation on CIFAR-10 with an Inception score of 9.89 and FID of 2.20, a competitive likelihood of 2.99 bits/dim, and demonstrate high fidelity generation of 1024 x 1024 images for the first time from a score-based generative model*.
|
||||
Original paper can be found [here](https://arxiv.org/abs/2011.13456).
|
||||
|
||||
## ScoreSdeVeScheduler
|
||||
[[autodoc]] ScoreSdeVeScheduler
|
||||
|
||||
## SdeVeOutput
|
||||
[[autodoc]] schedulers.scheduling_sde_ve.SdeVeOutput
|
||||
@@ -10,17 +10,15 @@ an "AS IS" BASIS, WITHOUT WARRANTIES OR CONDITIONS OF ANY KIND, either express o
|
||||
specific language governing permissions and limitations under the License.
|
||||
-->
|
||||
|
||||
# ScoreSdeVpScheduler
|
||||
# Variance Preserving Stochastic Differential Equation (VP-SDE) scheduler
|
||||
|
||||
`ScoreSdeVpScheduler` is a variance preserving stochastic differential equation (SDE) scheduler. It was introduced in the [Score-Based Generative Modeling through Stochastic Differential Equations](https://huggingface.co/papers/2011.13456) paper by Yang Song, Jascha Sohl-Dickstein, Diederik P. Kingma, Abhishek Kumar, Stefano Ermon, Ben Poole.
|
||||
## Overview
|
||||
|
||||
The abstract from the paper is:
|
||||
|
||||
*Creating noise from data is easy; creating data from noise is generative modeling. We present a stochastic differential equation (SDE) that smoothly transforms a complex data distribution to a known prior distribution by slowly injecting noise, and a corresponding reverse-time SDE that transforms the prior distribution back into the data distribution by slowly removing the noise. Crucially, the reverse-time SDE depends only on the time-dependent gradient field (\aka, score) of the perturbed data distribution. By leveraging advances in score-based generative modeling, we can accurately estimate these scores with neural networks, and use numerical SDE solvers to generate samples. We show that this framework encapsulates previous approaches in score-based generative modeling and diffusion probabilistic modeling, allowing for new sampling procedures and new modeling capabilities. In particular, we introduce a predictor-corrector framework to correct errors in the evolution of the discretized reverse-time SDE. We also derive an equivalent neural ODE that samples from the same distribution as the SDE, but additionally enables exact likelihood computation, and improved sampling efficiency. In addition, we provide a new way to solve inverse problems with score-based models, as demonstrated with experiments on class-conditional generation, image inpainting, and colorization. Combined with multiple architectural improvements, we achieve record-breaking performance for unconditional image generation on CIFAR-10 with an Inception score of 9.89 and FID of 2.20, a competitive likelihood of 2.99 bits/dim, and demonstrate high fidelity generation of 1024 x 1024 images for the first time from a score-based generative model*.
|
||||
Original paper can be found [here](https://arxiv.org/abs/2011.13456).
|
||||
|
||||
<Tip warning={true}>
|
||||
|
||||
🚧 This scheduler is under construction!
|
||||
Score SDE-VP is under construction.
|
||||
|
||||
</Tip>
|
||||
|
||||
|
||||
@@ -10,26 +10,11 @@ an "AS IS" BASIS, WITHOUT WARRANTIES OR CONDITIONS OF ANY KIND, either express o
|
||||
specific language governing permissions and limitations under the License.
|
||||
-->
|
||||
|
||||
# DPMSolverSinglestepScheduler
|
||||
# Singlestep DPM-Solver
|
||||
|
||||
`DPMSolverSinglestepScheduler` is a single step scheduler from [DPM-Solver: A Fast ODE Solver for Diffusion Probabilistic Model Sampling in Around 10 Steps](https://huggingface.co/papers/2206.00927) and [DPM-Solver++: Fast Solver for Guided Sampling of Diffusion Probabilistic Models](https://huggingface.co/papers/2211.01095) by Cheng Lu, Yuhao Zhou, Fan Bao, Jianfei Chen, Chongxuan Li, and Jun Zhu.
|
||||
## Overview
|
||||
|
||||
DPMSolver (and the improved version DPMSolver++) is a fast dedicated high-order solver for diffusion ODEs with convergence order guarantee. Empirically, DPMSolver sampling with only 20 steps can generate high-quality
|
||||
samples, and it can generate quite good samples even in 10 steps.
|
||||
|
||||
The original implementation can be found at [LuChengTHU/dpm-solver](https://github.com/LuChengTHU/dpm-solver).
|
||||
|
||||
## Tips
|
||||
|
||||
It is recommended to set `solver_order` to 2 for guide sampling, and `solver_order=3` for unconditional sampling.
|
||||
|
||||
Dynamic thresholding from Imagen (https://huggingface.co/papers/2205.11487) is supported, and for pixel-space
|
||||
diffusion models, you can set both `algorithm_type="dpmsolver++"` and `thresholding=True` to use dynamic
|
||||
thresholding. This thresholding method is unsuitable for latent-space diffusion models such as
|
||||
Stable Diffusion.
|
||||
Original paper can be found [here](https://arxiv.org/abs/2206.00927) and the [improved version](https://arxiv.org/abs/2211.01095). The original implementation can be found [here](https://github.com/LuChengTHU/dpm-solver).
|
||||
|
||||
## DPMSolverSinglestepScheduler
|
||||
[[autodoc]] DPMSolverSinglestepScheduler
|
||||
|
||||
## SchedulerOutput
|
||||
[[autodoc]] schedulers.scheduling_utils.SchedulerOutput
|
||||
[[autodoc]] DPMSolverSinglestepScheduler
|
||||
@@ -10,12 +10,11 @@ an "AS IS" BASIS, WITHOUT WARRANTIES OR CONDITIONS OF ANY KIND, either express o
|
||||
specific language governing permissions and limitations under the License.
|
||||
-->
|
||||
|
||||
# KarrasVeScheduler
|
||||
# Variance exploding, stochastic sampling from Karras et. al
|
||||
|
||||
`KarrasVeScheduler` is a stochastic sampler tailored o variance-expanding (VE) models. It is based on the [Elucidating the Design Space of Diffusion-Based Generative Models](https://huggingface.co/papers/2206.00364) and [Score-based generative modeling through stochastic differential equations](https://huggingface.co/papers/2011.13456) papers.
|
||||
## Overview
|
||||
|
||||
Original paper can be found [here](https://arxiv.org/abs/2206.00364).
|
||||
|
||||
## KarrasVeScheduler
|
||||
[[autodoc]] KarrasVeScheduler
|
||||
|
||||
## KarrasVeOutput
|
||||
[[autodoc]] schedulers.scheduling_karras_ve.KarrasVeOutput
|
||||
[[autodoc]] KarrasVeScheduler
|
||||
@@ -10,28 +10,15 @@ an "AS IS" BASIS, WITHOUT WARRANTIES OR CONDITIONS OF ANY KIND, either express o
|
||||
specific language governing permissions and limitations under the License.
|
||||
-->
|
||||
|
||||
# UniPCMultistepScheduler
|
||||
# UniPC
|
||||
|
||||
`UniPCMultistepScheduler` is a training-free framework designed for fast sampling of diffusion models. It was introduced in [UniPC: A Unified Predictor-Corrector Framework for Fast Sampling of Diffusion Models](https://huggingface.co/papers/2302.04867) by Wenliang Zhao, Lujia Bai, Yongming Rao, Jie Zhou, Jiwen Lu.
|
||||
## Overview
|
||||
|
||||
It consists of a corrector (UniC) and a predictor (UniP) that share a unified analytical form and support arbitrary orders.
|
||||
UniPC is by design model-agnostic, supporting pixel-space/latent-space DPMs on unconditional/conditional sampling. It can also be applied to both noise prediction and data prediction models. The corrector UniC can be also applied after any off-the-shelf solvers to increase the order of accuracy.
|
||||
UniPC is a training-free framework designed for the fast sampling of diffusion models, which consists of a corrector (UniC) and a predictor (UniP) that share a unified analytical form and support arbitrary orders.
|
||||
|
||||
The abstract from the paper is:
|
||||
For more details about the method, please refer to the [paper](https://arxiv.org/abs/2302.04867) and the [code](https://github.com/wl-zhao/UniPC).
|
||||
|
||||
*Diffusion probabilistic models (DPMs) have demonstrated a very promising ability in high-resolution image synthesis. However, sampling from a pre-trained DPM usually requires hundreds of model evaluations, which is computationally expensive. Despite recent progress in designing high-order solvers for DPMs, there still exists room for further speedup, especially in extremely few steps (e.g., 5~10 steps). Inspired by the predictor-corrector for ODE solvers, we develop a unified corrector (UniC) that can be applied after any existing DPM sampler to increase the order of accuracy without extra model evaluations, and derive a unified predictor (UniP) that supports arbitrary order as a byproduct. Combining UniP and UniC, we propose a unified predictor-corrector framework called UniPC for the fast sampling of DPMs, which has a unified analytical form for any order and can significantly improve the sampling quality over previous methods. We evaluate our methods through extensive experiments including both unconditional and conditional sampling using pixel-space and latent-space DPMs. Our UniPC can achieve 3.87 FID on CIFAR10 (unconditional) and 7.51 FID on ImageNet 256times256 (conditional) with only 10 function evaluations. Code is available at https://github.com/wl-zhao/UniPC*.
|
||||
|
||||
The original codebase can be found at [wl-zhao/UniPC](https://github.com/wl-zhao/UniPC).
|
||||
|
||||
## Tips
|
||||
|
||||
It is recommended to set `solver_order` to 2 for guide sampling, and `solver_order=3` for unconditional sampling.
|
||||
|
||||
Dynamic thresholding from Imagen (https://huggingface.co/papers/2205.11487) is supported, and for pixel-space
|
||||
diffusion models, you can set both `predict_x0=True` and `thresholding=True` to use dynamic thresholding. This thresholding method is unsuitable for latent-space diffusion models such as Stable Diffusion.
|
||||
Fast Sampling of Diffusion Models with Exponential Integrator.
|
||||
|
||||
## UniPCMultistepScheduler
|
||||
[[autodoc]] UniPCMultistepScheduler
|
||||
|
||||
## SchedulerOutput
|
||||
[[autodoc]] schedulers.scheduling_utils.SchedulerOutput
|
||||
@@ -12,14 +12,9 @@ specific language governing permissions and limitations under the License.
|
||||
|
||||
# VQDiffusionScheduler
|
||||
|
||||
`VQDiffusionScheduler` converts the transformer model's output into a sample for the unnoised image at the previous diffusion timestep. It was introduced in [Vector Quantized Diffusion Model for Text-to-Image Synthesis](https://huggingface.co/papers/2111.14822) by Shuyang Gu, Dong Chen, Jianmin Bao, Fang Wen, Bo Zhang, Dongdong Chen, Lu Yuan, Baining Guo.
|
||||
## Overview
|
||||
|
||||
The abstract from the paper is:
|
||||
|
||||
*We present the vector quantized diffusion (VQ-Diffusion) model for text-to-image generation. This method is based on a vector quantized variational autoencoder (VQ-VAE) whose latent space is modeled by a conditional variant of the recently developed Denoising Diffusion Probabilistic Model (DDPM). We find that this latent-space method is well-suited for text-to-image generation tasks because it not only eliminates the unidirectional bias with existing methods but also allows us to incorporate a mask-and-replace diffusion strategy to avoid the accumulation of errors, which is a serious problem with existing methods. Our experiments show that the VQ-Diffusion produces significantly better text-to-image generation results when compared with conventional autoregressive (AR) models with similar numbers of parameters. Compared with previous GAN-based text-to-image methods, our VQ-Diffusion can handle more complex scenes and improve the synthesized image quality by a large margin. Finally, we show that the image generation computation in our method can be made highly efficient by reparameterization. With traditional AR methods, the text-to-image generation time increases linearly with the output image resolution and hence is quite time consuming even for normal size images. The VQ-Diffusion allows us to achieve a better trade-off between quality and speed. Our experiments indicate that the VQ-Diffusion model with the reparameterization is fifteen times faster than traditional AR methods while achieving a better image quality.*
|
||||
Original paper can be found [here](https://arxiv.org/abs/2111.14822)
|
||||
|
||||
## VQDiffusionScheduler
|
||||
[[autodoc]] VQDiffusionScheduler
|
||||
|
||||
## VQDiffusionSchedulerOutput
|
||||
[[autodoc]] schedulers.scheduling_vq_diffusion.VQDiffusionSchedulerOutput
|
||||
[[autodoc]] VQDiffusionScheduler
|
||||
@@ -2,26 +2,22 @@
|
||||
|
||||
Utility and helper functions for working with 🤗 Diffusers.
|
||||
|
||||
## randn_tensor
|
||||
|
||||
[[autodoc]] diffusers.utils.randn_tensor
|
||||
|
||||
## numpy_to_pil
|
||||
|
||||
[[autodoc]] utils.numpy_to_pil
|
||||
[[autodoc]] utils.pil_utils.numpy_to_pil
|
||||
|
||||
## pt_to_pil
|
||||
|
||||
[[autodoc]] utils.pt_to_pil
|
||||
[[autodoc]] utils.pil_utils.pt_to_pil
|
||||
|
||||
## load_image
|
||||
|
||||
[[autodoc]] utils.load_image
|
||||
|
||||
## export_to_gif
|
||||
|
||||
[[autodoc]] utils.export_to_gif
|
||||
[[autodoc]] utils.testing_utils.load_image
|
||||
|
||||
## export_to_video
|
||||
|
||||
[[autodoc]] utils.export_to_video
|
||||
|
||||
## make_image_grid
|
||||
|
||||
[[autodoc]] utils.pil_utils.make_image_grid
|
||||
[[autodoc]] utils.testing_utils.export_to_video
|
||||
@@ -334,7 +334,7 @@ image_processor = CLIPImageProcessor.from_pretrained(clip_id)
|
||||
image_encoder = CLIPVisionModelWithProjection.from_pretrained(clip_id).to(device)
|
||||
```
|
||||
|
||||
Notice that we are using a particular CLIP checkpoint, i.e., `openai/clip-vit-large-patch14`. This is because the Stable Diffusion pre-training was performed with this CLIP variant. For more details, refer to the [documentation](https://huggingface.co/docs/transformers/model_doc/clip).
|
||||
Notice that we are using a particular CLIP checkpoint, i.e., `openai/clip-vit-large-patch14`. This is because the Stable Diffusion pre-training was performed with this CLIP variant. For more details, refer to the [documentation](https://huggingface.co/docs/diffusers/main/en/api/pipelines/stable_diffusion/pix2pix#diffusers.StableDiffusionInstructPix2PixPipeline.text_encoder).
|
||||
|
||||
Next, we prepare a PyTorch `nn.Module` to compute directional similarity:
|
||||
|
||||
|
||||
@@ -90,7 +90,7 @@ The following design principles are followed:
|
||||
- To integrate new model checkpoints whose general architecture can be classified as an architecture that already exists in Diffusers, the existing model architecture shall be adapted to make it work with the new checkpoint. One should only create a new file if the model architecture is fundamentally different.
|
||||
- Models should be designed to be easily extendable to future changes. This can be achieved by limiting public function arguments, configuration arguments, and "foreseeing" future changes, *e.g.* it is usually better to add `string` "...type" arguments that can easily be extended to new future types instead of boolean `is_..._type` arguments. Only the minimum amount of changes shall be made to existing architectures to make a new model checkpoint work.
|
||||
- The model design is a difficult trade-off between keeping code readable and concise and supporting many model checkpoints. For most parts of the modeling code, classes shall be adapted for new model checkpoints, while there are some exceptions where it is preferred to add new classes to make sure the code is kept concise and
|
||||
readable longterm, such as [UNet blocks](https://github.com/huggingface/diffusers/blob/main/src/diffusers/models/unet_2d_blocks.py) and [Attention processors](https://github.com/huggingface/diffusers/blob/main/src/diffusers/models/attention_processor.py).
|
||||
readable longterm, such as [UNet blocks](https://github.com/huggingface/diffusers/blob/main/src/diffusers/models/unet_2d_blocks.py) and [Attention processors](https://github.com/huggingface/diffusers/blob/main/src/diffusers/models/cross_attention.py).
|
||||
|
||||
### Schedulers
|
||||
|
||||
|
||||
@@ -51,7 +51,6 @@ from diffusers import DiffusionPipeline
|
||||
pipe = DiffusionPipeline.from_pretrained(
|
||||
"runwayml/stable-diffusion-v1-5",
|
||||
torch_dtype=torch.float16,
|
||||
use_safetensors=True,
|
||||
)
|
||||
pipe = pipe.to("cuda")
|
||||
|
||||
@@ -66,11 +65,42 @@ image = pipe(prompt).images[0]
|
||||
|
||||
</Tip>
|
||||
|
||||
## Sliced attention for additional memory savings
|
||||
|
||||
For even additional memory savings, you can use a sliced version of attention that performs the computation in steps instead of all at once.
|
||||
|
||||
<Tip>
|
||||
Attention slicing is useful even if a batch size of just 1 is used - as long
|
||||
as the model uses more than one attention head. If there is more than one
|
||||
attention head the *QK^T* attention matrix can be computed sequentially for
|
||||
each head which can save a significant amount of memory.
|
||||
</Tip>
|
||||
|
||||
To perform the attention computation sequentially over each head, you only need to invoke [`~DiffusionPipeline.enable_attention_slicing`] in your pipeline before inference, like here:
|
||||
|
||||
```Python
|
||||
import torch
|
||||
from diffusers import DiffusionPipeline
|
||||
|
||||
pipe = DiffusionPipeline.from_pretrained(
|
||||
"runwayml/stable-diffusion-v1-5",
|
||||
torch_dtype=torch.float16,
|
||||
)
|
||||
pipe = pipe.to("cuda")
|
||||
|
||||
prompt = "a photo of an astronaut riding a horse on mars"
|
||||
pipe.enable_attention_slicing()
|
||||
image = pipe(prompt).images[0]
|
||||
```
|
||||
|
||||
There's a small performance penalty of about 10% slower inference times, but this method allows you to use Stable Diffusion in as little as 3.2 GB of VRAM!
|
||||
|
||||
|
||||
## Sliced VAE decode for larger batches
|
||||
|
||||
To decode large batches of images with limited VRAM, or to enable batches with 32 images or more, you can use sliced VAE decode that decodes the batch latents one image at a time.
|
||||
|
||||
You likely want to couple this with [`~StableDiffusionPipeline.enable_xformers_memory_efficient_attention`] to further minimize memory use.
|
||||
You likely want to couple this with [`~StableDiffusionPipeline.enable_attention_slicing`] or [`~StableDiffusionPipeline.enable_xformers_memory_efficient_attention`] to further minimize memory use.
|
||||
|
||||
To perform the VAE decode one image at a time, invoke [`~StableDiffusionPipeline.enable_vae_slicing`] in your pipeline before inference. For example:
|
||||
|
||||
@@ -81,7 +111,6 @@ from diffusers import StableDiffusionPipeline
|
||||
pipe = StableDiffusionPipeline.from_pretrained(
|
||||
"runwayml/stable-diffusion-v1-5",
|
||||
torch_dtype=torch.float16,
|
||||
use_safetensors=True,
|
||||
)
|
||||
pipe = pipe.to("cuda")
|
||||
|
||||
@@ -97,7 +126,7 @@ You may see a small performance boost in VAE decode on multi-image batches. Ther
|
||||
|
||||
Tiled VAE processing makes it possible to work with large images on limited VRAM. For example, generating 4k images in 8GB of VRAM. Tiled VAE decoder splits the image into overlapping tiles, decodes the tiles, and blends the outputs to make the final image.
|
||||
|
||||
You want to couple this with [`~StableDiffusionPipeline.enable_xformers_memory_efficient_attention`] to further minimize memory use.
|
||||
You want to couple this with [`~StableDiffusionPipeline.enable_attention_slicing`] or [`~StableDiffusionPipeline.enable_xformers_memory_efficient_attention`] to further minimize memory use.
|
||||
|
||||
To use tiled VAE processing, invoke [`~StableDiffusionPipeline.enable_vae_tiling`] in your pipeline before inference. For example:
|
||||
|
||||
@@ -108,7 +137,6 @@ from diffusers import StableDiffusionPipeline, UniPCMultistepScheduler
|
||||
pipe = StableDiffusionPipeline.from_pretrained(
|
||||
"runwayml/stable-diffusion-v1-5",
|
||||
torch_dtype=torch.float16,
|
||||
use_safetensors=True,
|
||||
)
|
||||
pipe.scheduler = UniPCMultistepScheduler.from_config(pipe.scheduler.config)
|
||||
pipe = pipe.to("cuda")
|
||||
@@ -136,7 +164,6 @@ from diffusers import StableDiffusionPipeline
|
||||
pipe = StableDiffusionPipeline.from_pretrained(
|
||||
"runwayml/stable-diffusion-v1-5",
|
||||
torch_dtype=torch.float16,
|
||||
use_safetensors=True,
|
||||
)
|
||||
|
||||
prompt = "a photo of an astronaut riding a horse on mars"
|
||||
@@ -161,11 +188,11 @@ from diffusers import StableDiffusionPipeline
|
||||
pipe = StableDiffusionPipeline.from_pretrained(
|
||||
"runwayml/stable-diffusion-v1-5",
|
||||
torch_dtype=torch.float16,
|
||||
use_safetensors=True,
|
||||
)
|
||||
|
||||
prompt = "a photo of an astronaut riding a horse on mars"
|
||||
pipe.enable_sequential_cpu_offload()
|
||||
pipe.enable_attention_slicing(1)
|
||||
|
||||
image = pipe(prompt).images[0]
|
||||
```
|
||||
@@ -194,7 +221,6 @@ from diffusers import StableDiffusionPipeline
|
||||
pipe = StableDiffusionPipeline.from_pretrained(
|
||||
"runwayml/stable-diffusion-v1-5",
|
||||
torch_dtype=torch.float16,
|
||||
use_safetensors=True,
|
||||
)
|
||||
|
||||
prompt = "a photo of an astronaut riding a horse on mars"
|
||||
@@ -211,11 +237,11 @@ from diffusers import StableDiffusionPipeline
|
||||
pipe = StableDiffusionPipeline.from_pretrained(
|
||||
"runwayml/stable-diffusion-v1-5",
|
||||
torch_dtype=torch.float16,
|
||||
use_safetensors=True,
|
||||
)
|
||||
|
||||
prompt = "a photo of an astronaut riding a horse on mars"
|
||||
pipe.enable_model_cpu_offload()
|
||||
pipe.enable_attention_slicing(1)
|
||||
|
||||
image = pipe(prompt).images[0]
|
||||
```
|
||||
@@ -274,7 +300,6 @@ def generate_inputs():
|
||||
pipe = StableDiffusionPipeline.from_pretrained(
|
||||
"runwayml/stable-diffusion-v1-5",
|
||||
torch_dtype=torch.float16,
|
||||
use_safetensors=True,
|
||||
).to("cuda")
|
||||
unet = pipe.unet
|
||||
unet.eval()
|
||||
@@ -338,7 +363,6 @@ class UNet2DConditionOutput:
|
||||
pipe = StableDiffusionPipeline.from_pretrained(
|
||||
"runwayml/stable-diffusion-v1-5",
|
||||
torch_dtype=torch.float16,
|
||||
use_safetensors=True,
|
||||
).to("cuda")
|
||||
|
||||
# use jitted unet
|
||||
@@ -398,7 +422,6 @@ import torch
|
||||
pipe = DiffusionPipeline.from_pretrained(
|
||||
"runwayml/stable-diffusion-v1-5",
|
||||
torch_dtype=torch.float16,
|
||||
use_safetensors=True,
|
||||
).to("cuda")
|
||||
|
||||
pipe.enable_xformers_memory_efficient_attention()
|
||||
|
||||
@@ -11,7 +11,7 @@ specific language governing permissions and limitations under the License.
|
||||
-->
|
||||
|
||||
|
||||
# How to use ONNX Runtime for inference
|
||||
# How to use the ONNX Runtime for inference
|
||||
|
||||
🤗 [Optimum](https://github.com/huggingface/optimum) provides a Stable Diffusion pipeline compatible with ONNX Runtime.
|
||||
|
||||
@@ -27,7 +27,7 @@ pip install optimum["onnxruntime"]
|
||||
|
||||
### Inference
|
||||
|
||||
To load an ONNX model and run inference with ONNX Runtime, you need to replace [`StableDiffusionPipeline`] with `ORTStableDiffusionPipeline`. In case you want to load a PyTorch model and convert it to the ONNX format on-the-fly, you can set `export=True`.
|
||||
To load an ONNX model and run inference with the ONNX Runtime, you need to replace [`StableDiffusionPipeline`] with `ORTStableDiffusionPipeline`. In case you want to load a PyTorch model and convert it to the ONNX format on-the-fly, you can set `export=True`.
|
||||
|
||||
```python
|
||||
from optimum.onnxruntime import ORTStableDiffusionPipeline
|
||||
@@ -86,13 +86,12 @@ optimum-cli export onnx --model stabilityai/stable-diffusion-xl-base-1.0 --task
|
||||
|
||||
### Inference
|
||||
|
||||
Here is an example of how you can load a SDXL ONNX model from [stabilityai/stable-diffusion-xl-base-1.0](https://huggingface.co/stabilityai/stable-diffusion-xl-base-1.0) and run inference with ONNX Runtime :
|
||||
To load an ONNX model and run inference with ONNX Runtime, you need to replace `StableDiffusionPipelineXL` with `ORTStableDiffusionPipelineXL` :
|
||||
|
||||
```python
|
||||
from optimum.onnxruntime import ORTStableDiffusionXLPipeline
|
||||
|
||||
model_id = "stabilityai/stable-diffusion-xl-base-1.0"
|
||||
pipeline = ORTStableDiffusionXLPipeline.from_pretrained(model_id)
|
||||
pipeline = ORTStableDiffusionXLPipeline.from_pretrained("sd_xl_onnx")
|
||||
prompt = "sailing ship in storm by Leonardo da Vinci"
|
||||
image = pipeline(prompt).images[0]
|
||||
```
|
||||
|
||||
@@ -85,13 +85,11 @@ You can find more examples in the optimum [documentation](https://huggingface.co
|
||||
|
||||
### Inference
|
||||
|
||||
Here is an example of how you can load a SDXL OpenVINO model from [stabilityai/stable-diffusion-xl-base-1.0](https://huggingface.co/stabilityai/stable-diffusion-xl-base-1.0) and run inference with OpenVINO Runtime :
|
||||
|
||||
```python
|
||||
from optimum.intel import OVStableDiffusionXLPipeline
|
||||
|
||||
model_id = "stabilityai/stable-diffusion-xl-base-1.0"
|
||||
pipeline = OVStableDiffusionXLPipeline.from_pretrained(model_id)
|
||||
pipeline = OVStableDiffusionXLPipeline.from_pretrained(model_id, export=True)
|
||||
prompt = "sailing ship in storm by Rembrandt"
|
||||
image = pipeline(prompt).images[0]
|
||||
```
|
||||
|
||||
@@ -39,7 +39,7 @@ pip install --upgrade torch diffusers
|
||||
import torch
|
||||
from diffusers import DiffusionPipeline
|
||||
|
||||
pipe = DiffusionPipeline.from_pretrained("runwayml/stable-diffusion-v1-5", torch_dtype=torch.float16, use_safetensors=True)
|
||||
pipe = DiffusionPipeline.from_pretrained("runwayml/stable-diffusion-v1-5", torch_dtype=torch.float16)
|
||||
pipe = pipe.to("cuda")
|
||||
|
||||
prompt = "a photo of an astronaut riding a horse on mars"
|
||||
@@ -53,7 +53,7 @@ pip install --upgrade torch diffusers
|
||||
from diffusers import DiffusionPipeline
|
||||
+ from diffusers.models.attention_processor import AttnProcessor2_0
|
||||
|
||||
pipe = DiffusionPipeline.from_pretrained("runwayml/stable-diffusion-v1-5", torch_dtype=torch.float16, use_safetensors=True).to("cuda")
|
||||
pipe = DiffusionPipeline.from_pretrained("runwayml/stable-diffusion-v1-5", torch_dtype=torch.float16).to("cuda")
|
||||
+ pipe.unet.set_attn_processor(AttnProcessor2_0())
|
||||
|
||||
prompt = "a photo of an astronaut riding a horse on mars"
|
||||
@@ -69,7 +69,7 @@ pip install --upgrade torch diffusers
|
||||
from diffusers import DiffusionPipeline
|
||||
from diffusers.models.attention_processor import AttnProcessor
|
||||
|
||||
pipe = DiffusionPipeline.from_pretrained("runwayml/stable-diffusion-v1-5", torch_dtype=torch.float16, use_safetensors=True).to("cuda")
|
||||
pipe = DiffusionPipeline.from_pretrained("runwayml/stable-diffusion-v1-5", torch_dtype=torch.float16).to("cuda")
|
||||
pipe.unet.set_default_attn_processor()
|
||||
|
||||
prompt = "a photo of an astronaut riding a horse on mars"
|
||||
@@ -107,7 +107,7 @@ path = "runwayml/stable-diffusion-v1-5"
|
||||
|
||||
run_compile = True # Set True / False
|
||||
|
||||
pipe = DiffusionPipeline.from_pretrained(path, torch_dtype=torch.float16, use_safetensors=True)
|
||||
pipe = DiffusionPipeline.from_pretrained(path, torch_dtype=torch.float16)
|
||||
pipe = pipe.to("cuda")
|
||||
pipe.unet.to(memory_format=torch.channels_last)
|
||||
|
||||
@@ -140,7 +140,7 @@ path = "runwayml/stable-diffusion-v1-5"
|
||||
|
||||
run_compile = True # Set True / False
|
||||
|
||||
pipe = StableDiffusionImg2ImgPipeline.from_pretrained(path, torch_dtype=torch.float16, use_safetensors=True)
|
||||
pipe = StableDiffusionImg2ImgPipeline.from_pretrained(path, torch_dtype=torch.float16)
|
||||
pipe = pipe.to("cuda")
|
||||
pipe.unet.to(memory_format=torch.channels_last)
|
||||
|
||||
@@ -180,7 +180,7 @@ path = "runwayml/stable-diffusion-inpainting"
|
||||
|
||||
run_compile = True # Set True / False
|
||||
|
||||
pipe = StableDiffusionInpaintPipeline.from_pretrained(path, torch_dtype=torch.float16, use_safetensors=True)
|
||||
pipe = StableDiffusionInpaintPipeline.from_pretrained(path, torch_dtype=torch.float16)
|
||||
pipe = pipe.to("cuda")
|
||||
pipe.unet.to(memory_format=torch.channels_last)
|
||||
|
||||
@@ -212,9 +212,9 @@ init_image = init_image.resize((512, 512))
|
||||
path = "runwayml/stable-diffusion-v1-5"
|
||||
|
||||
run_compile = True # Set True / False
|
||||
controlnet = ControlNetModel.from_pretrained("lllyasviel/sd-controlnet-canny", torch_dtype=torch.float16, use_safetensors=True)
|
||||
controlnet = ControlNetModel.from_pretrained("lllyasviel/sd-controlnet-canny", torch_dtype=torch.float16)
|
||||
pipe = StableDiffusionControlNetPipeline.from_pretrained(
|
||||
path, controlnet=controlnet, torch_dtype=torch.float16, use_safetensors=True
|
||||
path, controlnet=controlnet, torch_dtype=torch.float16
|
||||
)
|
||||
|
||||
pipe = pipe.to("cuda")
|
||||
@@ -240,11 +240,11 @@ import torch
|
||||
|
||||
run_compile = True # Set True / False
|
||||
|
||||
pipe = DiffusionPipeline.from_pretrained("DeepFloyd/IF-I-M-v1.0", variant="fp16", text_encoder=None, torch_dtype=torch.float16, use_safetensors=True)
|
||||
pipe = DiffusionPipeline.from_pretrained("DeepFloyd/IF-I-M-v1.0", variant="fp16", text_encoder=None, torch_dtype=torch.float16)
|
||||
pipe.to("cuda")
|
||||
pipe_2 = DiffusionPipeline.from_pretrained("DeepFloyd/IF-II-M-v1.0", variant="fp16", text_encoder=None, torch_dtype=torch.float16, use_safetensors=True)
|
||||
pipe_2 = DiffusionPipeline.from_pretrained("DeepFloyd/IF-II-M-v1.0", variant="fp16", text_encoder=None, torch_dtype=torch.float16)
|
||||
pipe_2.to("cuda")
|
||||
pipe_3 = DiffusionPipeline.from_pretrained("stabilityai/stable-diffusion-x4-upscaler", torch_dtype=torch.float16, use_safetensors=True)
|
||||
pipe_3 = DiffusionPipeline.from_pretrained("stabilityai/stable-diffusion-x4-upscaler", torch_dtype=torch.float16)
|
||||
pipe_3.to("cuda")
|
||||
|
||||
|
||||
|
||||
@@ -67,7 +67,7 @@ Load the model with the [`~DiffusionPipeline.from_pretrained`] method:
|
||||
```python
|
||||
>>> from diffusers import DiffusionPipeline
|
||||
|
||||
>>> pipeline = DiffusionPipeline.from_pretrained("runwayml/stable-diffusion-v1-5", use_safetensors=True)
|
||||
>>> pipeline = DiffusionPipeline.from_pretrained("runwayml/stable-diffusion-v1-5")
|
||||
```
|
||||
|
||||
The [`DiffusionPipeline`] downloads and caches all modeling, tokenization, and scheduling components. You'll see that the Stable Diffusion pipeline is composed of the [`UNet2DConditionModel`] and [`PNDMScheduler`] among other things:
|
||||
@@ -130,7 +130,7 @@ You can also use the pipeline locally. The only difference is you need to downlo
|
||||
Then load the saved weights into the pipeline:
|
||||
|
||||
```python
|
||||
>>> pipeline = DiffusionPipeline.from_pretrained("./stable-diffusion-v1-5", use_safetensors=True)
|
||||
>>> pipeline = DiffusionPipeline.from_pretrained("./stable-diffusion-v1-5")
|
||||
```
|
||||
|
||||
Now you can run the pipeline as you would in the section above.
|
||||
@@ -142,7 +142,7 @@ Different schedulers come with different denoising speeds and quality trade-offs
|
||||
```py
|
||||
>>> from diffusers import EulerDiscreteScheduler
|
||||
|
||||
>>> pipeline = DiffusionPipeline.from_pretrained("runwayml/stable-diffusion-v1-5", use_safetensors=True)
|
||||
>>> pipeline = DiffusionPipeline.from_pretrained("runwayml/stable-diffusion-v1-5")
|
||||
>>> pipeline.scheduler = EulerDiscreteScheduler.from_config(pipeline.scheduler.config)
|
||||
```
|
||||
|
||||
@@ -160,7 +160,7 @@ Models are initiated with the [`~ModelMixin.from_pretrained`] method which also
|
||||
>>> from diffusers import UNet2DModel
|
||||
|
||||
>>> repo_id = "google/ddpm-cat-256"
|
||||
>>> model = UNet2DModel.from_pretrained(repo_id, use_safetensors=True)
|
||||
>>> model = UNet2DModel.from_pretrained(repo_id)
|
||||
```
|
||||
|
||||
To access the model parameters, call `model.config`:
|
||||
|
||||
@@ -26,7 +26,7 @@ Begin by loading the [`runwayml/stable-diffusion-v1-5`](https://huggingface.co/r
|
||||
from diffusers import DiffusionPipeline
|
||||
|
||||
model_id = "runwayml/stable-diffusion-v1-5"
|
||||
pipeline = DiffusionPipeline.from_pretrained(model_id, use_safetensors=True)
|
||||
pipeline = DiffusionPipeline.from_pretrained(model_id)
|
||||
```
|
||||
|
||||
The example prompt you'll use is a portrait of an old warrior chief, but feel free to use your own prompt:
|
||||
@@ -75,7 +75,7 @@ Let's start by loading the model in `float16` and generate an image:
|
||||
```python
|
||||
import torch
|
||||
|
||||
pipeline = DiffusionPipeline.from_pretrained(model_id, torch_dtype=torch.float16, use_safetensors=True)
|
||||
pipeline = DiffusionPipeline.from_pretrained(model_id, torch_dtype=torch.float16)
|
||||
pipeline = pipeline.to("cuda")
|
||||
generator = torch.Generator("cuda").manual_seed(0)
|
||||
image = pipeline(prompt, generator=generator).images[0]
|
||||
@@ -152,13 +152,26 @@ def get_inputs(batch_size=1):
|
||||
return {"prompt": prompts, "generator": generator, "num_inference_steps": num_inference_steps}
|
||||
```
|
||||
|
||||
You'll also need a function that'll display each batch of images:
|
||||
|
||||
```python
|
||||
from PIL import Image
|
||||
|
||||
|
||||
def image_grid(imgs, rows=2, cols=2):
|
||||
w, h = imgs[0].size
|
||||
grid = Image.new("RGB", size=(cols * w, rows * h))
|
||||
|
||||
for i, img in enumerate(imgs):
|
||||
grid.paste(img, box=(i % cols * w, i // cols * h))
|
||||
return grid
|
||||
```
|
||||
|
||||
Start with `batch_size=4` and see how much memory you've consumed:
|
||||
|
||||
```python
|
||||
from diffusers.utils import make_image_grid
|
||||
|
||||
images = pipeline(**get_inputs(batch_size=4)).images
|
||||
make_image_grid(images, 2, 2)
|
||||
image_grid(images)
|
||||
```
|
||||
|
||||
Unless you have a GPU with more RAM, the code above probably returned an `OOM` error! Most of the memory is taken up by the cross-attention layers. Instead of running this operation in a batch, you can run it sequentially to save a significant amount of memory. All you have to do is configure the pipeline to use the [`~DiffusionPipeline.enable_attention_slicing`] function:
|
||||
@@ -171,7 +184,7 @@ Now try increasing the `batch_size` to 8!
|
||||
|
||||
```python
|
||||
images = pipeline(**get_inputs(batch_size=8)).images
|
||||
make_image_grid(images, rows=2, cols=4)
|
||||
image_grid(images, rows=2, cols=4)
|
||||
```
|
||||
|
||||
<div class="flex justify-center">
|
||||
@@ -200,7 +213,7 @@ from diffusers import AutoencoderKL
|
||||
vae = AutoencoderKL.from_pretrained("stabilityai/sd-vae-ft-mse", torch_dtype=torch.float16).to("cuda")
|
||||
pipeline.vae = vae
|
||||
images = pipeline(**get_inputs(batch_size=8)).images
|
||||
make_image_grid(images, rows=2, cols=4)
|
||||
image_grid(images, rows=2, cols=4)
|
||||
```
|
||||
|
||||
<div class="flex justify-center">
|
||||
@@ -225,7 +238,7 @@ Generate a batch of images with the new prompt:
|
||||
|
||||
```python
|
||||
images = pipeline(**get_inputs(batch_size=8)).images
|
||||
make_image_grid(images, rows=2, cols=4)
|
||||
image_grid(images, rows=2, cols=4)
|
||||
```
|
||||
|
||||
<div class="flex justify-center">
|
||||
@@ -244,7 +257,7 @@ prompts = [
|
||||
|
||||
generator = [torch.Generator("cuda").manual_seed(1) for _ in range(len(prompts))]
|
||||
images = pipeline(prompt=prompts, generator=generator, num_inference_steps=25).images
|
||||
make_image_grid(images, 2, 2)
|
||||
image_grid(images)
|
||||
```
|
||||
|
||||
<div class="flex justify-center">
|
||||
|
||||
@@ -11,7 +11,7 @@ A [`UNet2DConditionModel`] by default accepts 4 channels in the [input sample](h
|
||||
```py
|
||||
from diffusers import StableDiffusionPipeline
|
||||
|
||||
pipeline = StableDiffusionPipeline.from_pretrained("runwayml/stable-diffusion-v1-5", use_safetensors=True)
|
||||
pipeline = StableDiffusionPipeline.from_pretrained("runwayml/stable-diffusion-v1-5")
|
||||
pipeline.unet.config["in_channels"]
|
||||
4
|
||||
```
|
||||
@@ -21,7 +21,7 @@ Inpainting requires 9 channels in the input sample. You can check this value in
|
||||
```py
|
||||
from diffusers import StableDiffusionPipeline
|
||||
|
||||
pipeline = StableDiffusionPipeline.from_pretrained("runwayml/stable-diffusion-inpainting", use_safetensors=True)
|
||||
pipeline = StableDiffusionPipeline.from_pretrained("runwayml/stable-diffusion-inpainting")
|
||||
pipeline.unet.config["in_channels"]
|
||||
9
|
||||
```
|
||||
@@ -35,12 +35,7 @@ from diffusers import UNet2DConditionModel
|
||||
|
||||
model_id = "runwayml/stable-diffusion-v1-5"
|
||||
unet = UNet2DConditionModel.from_pretrained(
|
||||
model_id,
|
||||
subfolder="unet",
|
||||
in_channels=9,
|
||||
low_cpu_mem_usage=False,
|
||||
ignore_mismatched_sizes=True,
|
||||
use_safetensors=True,
|
||||
model_id, subfolder="unet", in_channels=9, low_cpu_mem_usage=False, ignore_mismatched_sizes=True
|
||||
)
|
||||
```
|
||||
|
||||
|
||||
@@ -265,7 +265,7 @@ distributed_type: DEEPSPEED
|
||||
|
||||
See [documentation](https://huggingface.co/docs/accelerate/usage_guides/deepspeed) for more DeepSpeed configuration options.
|
||||
|
||||
</Tip>
|
||||
<Tip>
|
||||
|
||||
Changing the default Adam optimizer to DeepSpeed's Adam
|
||||
`deepspeed.ops.adam.DeepSpeedCPUAdam` gives a substantial speedup but
|
||||
@@ -306,9 +306,9 @@ import torch
|
||||
base_model_path = "path to model"
|
||||
controlnet_path = "path to controlnet"
|
||||
|
||||
controlnet = ControlNetModel.from_pretrained(controlnet_path, torch_dtype=torch.float16, use_safetensors=True)
|
||||
controlnet = ControlNetModel.from_pretrained(controlnet_path, torch_dtype=torch.float16)
|
||||
pipe = StableDiffusionControlNetPipeline.from_pretrained(
|
||||
base_model_path, controlnet=controlnet, torch_dtype=torch.float16, use_safetensors=True
|
||||
base_model_path, controlnet=controlnet, torch_dtype=torch.float16
|
||||
)
|
||||
|
||||
# speed up diffusion process with faster scheduler and memory optimization
|
||||
@@ -327,7 +327,3 @@ image = pipe(prompt, num_inference_steps=20, generator=generator, image=control_
|
||||
|
||||
image.save("./output.png")
|
||||
```
|
||||
|
||||
## Stable Diffusion XL
|
||||
|
||||
Training with [Stable Diffusion XL](https://huggingface.co/papers/2307.01952) is also supported via the `train_controlnet_sdxl.py` script. Please refer to the docs [here](https://github.com/huggingface/diffusers/blob/main/examples/controlnet/README_sdxl.md).
|
||||
|
||||
@@ -222,9 +222,7 @@ Once you have trained a model using the above command, you can run inference usi
|
||||
import torch
|
||||
from diffusers import DiffusionPipeline
|
||||
|
||||
pipe = DiffusionPipeline.from_pretrained(
|
||||
"CompVis/stable-diffusion-v1-4", torch_dtype=torch.float16, use_safetensors=True
|
||||
).to("cuda")
|
||||
pipe = DiffusionPipeline.from_pretrained("CompVis/stable-diffusion-v1-4", torch_dtype=torch.float16).to("cuda")
|
||||
pipe.unet.load_attn_procs("path-to-save-model", weight_name="pytorch_custom_diffusion_weights.bin")
|
||||
pipe.load_textual_inversion("path-to-save-model", weight_name="<new1>.bin")
|
||||
|
||||
@@ -248,7 +246,7 @@ model_id = "sayakpaul/custom-diffusion-cat"
|
||||
card = RepoCard.load(model_id)
|
||||
base_model_id = card.data.to_dict()["base_model"]
|
||||
|
||||
pipe = DiffusionPipeline.from_pretrained(base_model_id, torch_dtype=torch.float16, use_safetensors=True).to("cuda")
|
||||
pipe = DiffusionPipeline.from_pretrained(base_model_id, torch_dtype=torch.float16).to("cuda")
|
||||
pipe.unet.load_attn_procs(model_id, weight_name="pytorch_custom_diffusion_weights.bin")
|
||||
pipe.load_textual_inversion(model_id, weight_name="<new1>.bin")
|
||||
|
||||
@@ -272,7 +270,7 @@ model_id = "sayakpaul/custom-diffusion-cat-wooden-pot"
|
||||
card = RepoCard.load(model_id)
|
||||
base_model_id = card.data.to_dict()["base_model"]
|
||||
|
||||
pipe = DiffusionPipeline.from_pretrained(base_model_id, torch_dtype=torch.float16, use_safetensors=True).to("cuda")
|
||||
pipe = DiffusionPipeline.from_pretrained(base_model_id, torch_dtype=torch.float16).to("cuda")
|
||||
pipe.unet.load_attn_procs(model_id, weight_name="pytorch_custom_diffusion_weights.bin")
|
||||
pipe.load_textual_inversion(model_id, weight_name="<new1>.bin")
|
||||
pipe.load_textual_inversion(model_id, weight_name="<new2>.bin")
|
||||
|
||||
@@ -16,9 +16,7 @@ Now use the [`~accelerate.PartialState.split_between_processes`] utility as a co
|
||||
from accelerate import PartialState
|
||||
from diffusers import DiffusionPipeline
|
||||
|
||||
pipeline = DiffusionPipeline.from_pretrained(
|
||||
"runwayml/stable-diffusion-v1-5", torch_dtype=torch.float16, use_safetensors=True
|
||||
)
|
||||
pipeline = DiffusionPipeline.from_pretrained("runwayml/stable-diffusion-v1-5", torch_dtype=torch.float16)
|
||||
distributed_state = PartialState()
|
||||
pipeline.to(distributed_state.device)
|
||||
|
||||
@@ -52,9 +50,7 @@ import torch.multiprocessing as mp
|
||||
|
||||
from diffusers import DiffusionPipeline
|
||||
|
||||
sd = DiffusionPipeline.from_pretrained(
|
||||
"runwayml/stable-diffusion-v1-5", torch_dtype=torch.float16, use_safetensors=True
|
||||
)
|
||||
sd = DiffusionPipeline.from_pretrained("runwayml/stable-diffusion-v1-5", torch_dtype=torch.float16)
|
||||
```
|
||||
|
||||
You'll want to create a function to run inference; [`init_process_group`](https://pytorch.org/docs/stable/distributed.html?highlight=init_process_group#torch.distributed.init_process_group) handles creating a distributed environment with the type of backend to use, the `rank` of the current process, and the `world_size` or the number of processes participating. If you're running inference in parallel over 2 GPUs, then the `world_size` is 2.
|
||||
|
||||
@@ -303,9 +303,7 @@ unet = UNet2DConditionModel.from_pretrained("/sddata/dreambooth/daruma-v2-1/chec
|
||||
# if you have trained with `--args.train_text_encoder` make sure to also load the text encoder
|
||||
text_encoder = CLIPTextModel.from_pretrained("/sddata/dreambooth/daruma-v2-1/checkpoint-100/text_encoder")
|
||||
|
||||
pipeline = DiffusionPipeline.from_pretrained(
|
||||
model_id, unet=unet, text_encoder=text_encoder, dtype=torch.float16, use_safetensors=True
|
||||
)
|
||||
pipeline = DiffusionPipeline.from_pretrained(model_id, unet=unet, text_encoder=text_encoder, dtype=torch.float16)
|
||||
pipeline.to("cuda")
|
||||
|
||||
# Perform inference, or save, or push to the hub
|
||||
@@ -320,7 +318,7 @@ from diffusers import DiffusionPipeline
|
||||
|
||||
# Load the pipeline with the same arguments (model, revision) that were used for training
|
||||
model_id = "CompVis/stable-diffusion-v1-4"
|
||||
pipeline = DiffusionPipeline.from_pretrained(model_id, use_safetensors=True)
|
||||
pipeline = DiffusionPipeline.from_pretrained(model_id)
|
||||
|
||||
accelerator = Accelerator()
|
||||
|
||||
@@ -335,7 +333,6 @@ pipeline = DiffusionPipeline.from_pretrained(
|
||||
model_id,
|
||||
unet=accelerator.unwrap_model(unet),
|
||||
text_encoder=accelerator.unwrap_model(text_encoder),
|
||||
use_safetensors=True,
|
||||
)
|
||||
|
||||
# Perform inference, or save, or push to the hub
|
||||
@@ -491,7 +488,7 @@ from diffusers import DiffusionPipeline
|
||||
import torch
|
||||
|
||||
model_id = "path_to_saved_model"
|
||||
pipe = DiffusionPipeline.from_pretrained(model_id, torch_dtype=torch.float16, use_safetensors=True).to("cuda")
|
||||
pipe = DiffusionPipeline.from_pretrained(model_id, torch_dtype=torch.float16).to("cuda")
|
||||
|
||||
prompt = "A photo of sks dog in a bucket"
|
||||
image = pipe(prompt, num_inference_steps=50, guidance_scale=7.5).images[0]
|
||||
@@ -513,7 +510,7 @@ must also update the pipeline's scheduler config.
|
||||
```py
|
||||
from diffusers import DiffusionPipeline
|
||||
|
||||
pipe = DiffusionPipeline.from_pretrained("DeepFloyd/IF-I-XL-v1.0", use_safetensors=True)
|
||||
pipe = DiffusionPipeline.from_pretrained("DeepFloyd/IF-I-XL-v1.0")
|
||||
|
||||
pipe.load_lora_weights("<lora weights path>")
|
||||
|
||||
@@ -707,4 +704,4 @@ accelerate launch train_dreambooth.py \
|
||||
|
||||
## Stable Diffusion XL
|
||||
|
||||
We support fine-tuning of the UNet and text encoders shipped in [Stable Diffusion XL](https://huggingface.co/papers/2307.01952) with DreamBooth and LoRA via the `train_dreambooth_lora_sdxl.py` script. Please refer to the docs [here](https://github.com/huggingface/diffusers/blob/main/examples/dreambooth/README_sdxl.md).
|
||||
We support fine-tuning of the UNet shipped in [Stable Diffusion XL](https://huggingface.co/papers/2307.01952) with DreamBooth and LoRA via the `train_dreambooth_lora_sdxl.py` script. Please refer to the docs [here](https://github.com/huggingface/diffusers/blob/main/examples/dreambooth/README_sdxl.md).
|
||||
@@ -165,9 +165,7 @@ import torch
|
||||
from diffusers import StableDiffusionInstructPix2PixPipeline
|
||||
|
||||
model_id = "your_model_id" # <- replace this
|
||||
pipe = StableDiffusionInstructPix2PixPipeline.from_pretrained(
|
||||
model_id, torch_dtype=torch.float16, use_safetensors=True
|
||||
).to("cuda")
|
||||
pipe = StableDiffusionInstructPix2PixPipeline.from_pretrained(model_id, torch_dtype=torch.float16).to("cuda")
|
||||
generator = torch.Generator("cuda").manual_seed(0)
|
||||
|
||||
url = "https://huggingface.co/datasets/sayakpaul/sample-datasets/resolve/main/test_pix2pix_4.png"
|
||||
@@ -214,4 +212,4 @@ If you're looking for some interesting ways to use the InstructPix2Pix training
|
||||
|
||||
## Stable Diffusion XL
|
||||
|
||||
Training with [Stable Diffusion XL](https://huggingface.co/papers/2307.01952) is also supported via the `train_instruct_pix2pix_sdxl.py` script. Please refer to the docs [here](https://github.com/huggingface/diffusers/blob/main/examples/instruct_pix2pix/README_sdxl.md).
|
||||
We support fine-tuning of the UNet shipped in [Stable Diffusion XL](https://huggingface.co/papers/2307.01952) with DreamBooth and LoRA via the `train_dreambooth_lora_sdxl.py` script. Please refer to the docs [here](https://github.com/huggingface/diffusers/blob/main/examples/instruct_pix2pix/README_sdxl.md).
|
||||
@@ -98,7 +98,7 @@ Now you can use the model for inference by loading the base model in the [`Stabl
|
||||
|
||||
>>> model_base = "runwayml/stable-diffusion-v1-5"
|
||||
|
||||
>>> pipe = StableDiffusionPipeline.from_pretrained(model_base, torch_dtype=torch.float16, use_safetensors=True)
|
||||
>>> pipe = StableDiffusionPipeline.from_pretrained(model_base, torch_dtype=torch.float16)
|
||||
>>> pipe.scheduler = DPMSolverMultistepScheduler.from_config(pipe.scheduler.config)
|
||||
```
|
||||
|
||||
@@ -137,7 +137,7 @@ lora_model_id = "sayakpaul/sd-model-finetuned-lora-t4"
|
||||
card = RepoCard.load(lora_model_id)
|
||||
base_model_id = card.data.to_dict()["base_model"]
|
||||
|
||||
pipe = StableDiffusionPipeline.from_pretrained(base_model_id, torch_dtype=torch.float16, use_safetensors=True)
|
||||
pipe = StableDiffusionPipeline.from_pretrained(base_model_id, torch_dtype=torch.float16)
|
||||
...
|
||||
```
|
||||
|
||||
@@ -211,7 +211,7 @@ Now you can use the model for inference by loading the base model in the [`Stabl
|
||||
|
||||
>>> model_base = "runwayml/stable-diffusion-v1-5"
|
||||
|
||||
>>> pipe = StableDiffusionPipeline.from_pretrained(model_base, torch_dtype=torch.float16, use_safetensors=True)
|
||||
>>> pipe = StableDiffusionPipeline.from_pretrained(model_base, torch_dtype=torch.float16)
|
||||
```
|
||||
|
||||
Load the LoRA weights from your finetuned DreamBooth model *on top of the base model weights*, and then move the pipeline to a GPU for faster inference. When you merge the LoRA weights with the frozen pretrained model weights, you can optionally adjust how much of the weights to merge with the `scale` parameter:
|
||||
@@ -251,7 +251,7 @@ lora_model_id = "sayakpaul/dreambooth-text-encoder-test"
|
||||
card = RepoCard.load(lora_model_id)
|
||||
base_model_id = card.data.to_dict()["base_model"]
|
||||
|
||||
pipe = StableDiffusionPipeline.from_pretrained(base_model_id, torch_dtype=torch.float16, use_safetensors=True)
|
||||
pipe = StableDiffusionPipeline.from_pretrained(base_model_id, torch_dtype=torch.float16)
|
||||
pipe = pipe.to("cuda")
|
||||
pipe.load_lora_weights(lora_model_id)
|
||||
image = pipe("A picture of a sks dog in a bucket", num_inference_steps=25).images[0]
|
||||
@@ -276,76 +276,20 @@ Note that the use of [`~diffusers.loaders.LoraLoaderMixin.load_lora_weights`] is
|
||||
|
||||
* LoRA parameters that have separate identifiers for the UNet and the text encoder such as: [`"sayakpaul/dreambooth"`](https://huggingface.co/sayakpaul/dreambooth).
|
||||
|
||||
<Tip>
|
||||
|
||||
You can also provide a local directory path to [`~diffusers.loaders.LoraLoaderMixin.load_lora_weights`] as well as [`~diffusers.loaders.UNet2DConditionLoadersMixin.load_attn_procs`].
|
||||
|
||||
</Tip>
|
||||
|
||||
## Stable Diffusion XL
|
||||
|
||||
We support fine-tuning with [Stable Diffusion XL](https://huggingface.co/papers/2307.01952). Please refer to the following docs:
|
||||
|
||||
* [text_to_image/README_sdxl.md](https://github.com/huggingface/diffusers/blob/main/examples/text_to_image/README_sdxl.md)
|
||||
* [dreambooth/README_sdxl.md](https://github.com/huggingface/diffusers/blob/main/examples/dreambooth/README_sdxl.md)
|
||||
**Note** that it is possible to provide a local directory path to [`~diffusers.loaders.LoraLoaderMixin.load_lora_weights`] as well as [`~diffusers.loaders.UNet2DConditionLoadersMixin.load_attn_procs`]. To know about the supported inputs,
|
||||
refer to the respective docstrings.
|
||||
|
||||
## Unloading LoRA parameters
|
||||
|
||||
You can call [`~diffusers.loaders.LoraLoaderMixin.unload_lora_weights`] on a pipeline to unload the LoRA parameters.
|
||||
|
||||
## Fusing LoRA parameters
|
||||
## Supporting A1111 themed LoRA checkpoints from Diffusers
|
||||
|
||||
You can call [`~diffusers.loaders.LoraLoaderMixin.fuse_lora`] on a pipeline to merge the LoRA parameters with the original parameters of the underlying model(s). This can lead to a potential speedup in the inference latency.
|
||||
This support was made possible because of our amazing contributors: [@takuma104](https://github.com/takuma104) and [@isidentical](https://github.com/isidentical).
|
||||
|
||||
## Unfusing LoRA parameters
|
||||
|
||||
To undo `fuse_lora`, call [`~diffusers.loaders.LoraLoaderMixin.unfuse_lora`] on a pipeline.
|
||||
|
||||
## Working with different LoRA scales when using LoRA fusion
|
||||
|
||||
If you need to use `scale` when working with `fuse_lora()` to control the influence of the LoRA parameters on the outputs, you should specify `lora_scale` within `fuse_lora()`. Passing the `scale` parameter to `cross_attention_kwargs` when you call the pipeline won't work.
|
||||
|
||||
To use a different `lora_scale` with `fuse_lora()`, you should first call `unfuse_lora()` on the corresponding pipeline and call `fuse_lora()` again with the expected `lora_scale`.
|
||||
|
||||
```python
|
||||
from diffusers import DiffusionPipeline
|
||||
import torch
|
||||
|
||||
pipe = DiffusionPipeline.from_pretrained("stabilityai/stable-diffusion-xl-base-1.0", torch_dtype=torch.float16).to("cuda")
|
||||
lora_model_id = "hf-internal-testing/sdxl-1.0-lora"
|
||||
lora_filename = "sd_xl_offset_example-lora_1.0.safetensors"
|
||||
pipe.load_lora_weights(lora_model_id, weight_name=lora_filename)
|
||||
|
||||
# This uses a default `lora_scale` of 1.0.
|
||||
pipe.fuse_lora()
|
||||
|
||||
generator = torch.manual_seed(0)
|
||||
images_fusion = pipe(
|
||||
"masterpiece, best quality, mountain", output_type="np", generator=generator, num_inference_steps=2
|
||||
).images
|
||||
|
||||
# To work with a different `lora_scale`, first reverse the effects of `fuse_lora()`.
|
||||
pipe.unfuse_lora()
|
||||
|
||||
# Then proceed as follows.
|
||||
pipe.load_lora_weights(lora_model_id, weight_name=lora_filename)
|
||||
pipe.fuse_lora(lora_scale=0.5)
|
||||
|
||||
generator = torch.manual_seed(0)
|
||||
images_fusion = pipe(
|
||||
"masterpiece, best quality, mountain", output_type="np", generator=generator, num_inference_steps=2
|
||||
).images
|
||||
```
|
||||
|
||||
## Supporting different LoRA checkpoints from Diffusers
|
||||
|
||||
🤗 Diffusers supports loading checkpoints from popular LoRA trainers such as [Kohya](https://github.com/kohya-ss/sd-scripts/) and [TheLastBen](https://github.com/TheLastBen/fast-stable-diffusion). In this section, we outline the current API's details and limitations.
|
||||
|
||||
### Kohya
|
||||
|
||||
This support was made possible because of the amazing contributors: [@takuma104](https://github.com/takuma104) and [@isidentical](https://github.com/isidentical).
|
||||
|
||||
We support loading Kohya LoRA checkpoints using [`~diffusers.loaders.LoraLoaderMixin.load_lora_weights`]. In this section, we explain how to load such a checkpoint from [CivitAI](https://civitai.com/)
|
||||
To provide seamless interoperability with A1111 to our users, we support loading A1111 formatted
|
||||
LoRA checkpoints using [`~diffusers.loaders.LoraLoaderMixin.load_lora_weights`] in a limited capacity.
|
||||
In this section, we explain how to load an A1111 formatted LoRA checkpoint from [CivitAI](https://civitai.com/)
|
||||
in Diffusers and perform inference with it.
|
||||
|
||||
First, download a checkpoint. We'll use
|
||||
@@ -363,7 +307,7 @@ import torch
|
||||
from diffusers import StableDiffusionPipeline, DPMSolverMultistepScheduler
|
||||
|
||||
pipeline = StableDiffusionPipeline.from_pretrained(
|
||||
"gsdf/Counterfeit-V2.5", torch_dtype=torch.float16, safety_checker=None, use_safetensors=True
|
||||
"gsdf/Counterfeit-V2.5", torch_dtype=torch.float16, safety_checker=None
|
||||
).to("cuda")
|
||||
pipeline.scheduler = DPMSolverMultistepScheduler.from_config(
|
||||
pipeline.scheduler.config, use_karras_sigmas=True
|
||||
@@ -410,78 +354,4 @@ directly with [`~diffusers.loaders.LoraLoaderMixin.load_lora_weights`] like so:
|
||||
lora_model_id = "sayakpaul/civitai-light-shadow-lora"
|
||||
lora_filename = "light_and_shadow.safetensors"
|
||||
pipeline.load_lora_weights(lora_model_id, weight_name=lora_filename)
|
||||
```
|
||||
|
||||
### Kohya + Stable Diffusion XL
|
||||
|
||||
After the release of [Stable Diffusion XL](https://huggingface.co/papers/2307.01952), the community contributed some amazing LoRA checkpoints trained on top of it with the Kohya trainer.
|
||||
|
||||
Here are some example checkpoints we tried out:
|
||||
|
||||
* SDXL 0.9:
|
||||
* https://civitai.com/models/22279?modelVersionId=118556
|
||||
* https://civitai.com/models/104515/sdxlor30costumesrevue-starlight-saijoclaudine-lora
|
||||
* https://civitai.com/models/108448/daiton-sdxl-test
|
||||
* https://filebin.net/2ntfqqnapiu9q3zx/pixelbuildings128-v1.safetensors
|
||||
* SDXL 1.0:
|
||||
* https://huggingface.co/stabilityai/stable-diffusion-xl-base-1.0/blob/main/sd_xl_offset_example-lora_1.0.safetensors
|
||||
|
||||
Here is an example of how to perform inference with these checkpoints in `diffusers`:
|
||||
|
||||
```python
|
||||
from diffusers import DiffusionPipeline
|
||||
import torch
|
||||
|
||||
base_model_id = "stabilityai/stable-diffusion-xl-base-0.9"
|
||||
pipeline = DiffusionPipeline.from_pretrained(base_model_id, torch_dtype=torch.float16).to("cuda")
|
||||
pipeline.load_lora_weights(".", weight_name="Kamepan.safetensors")
|
||||
|
||||
prompt = "anime screencap, glint, drawing, best quality, light smile, shy, a full body of a girl wearing wedding dress in the middle of the forest beneath the trees, fireflies, big eyes, 2d, cute, anime girl, waifu, cel shading, magical girl, vivid colors, (outline:1.1), manga anime artstyle, masterpiece, offical wallpaper, glint <lora:kame_sdxl_v2:1>"
|
||||
negative_prompt = "(deformed, bad quality, sketch, depth of field, blurry:1.1), grainy, bad anatomy, bad perspective, old, ugly, realistic, cartoon, disney, bad propotions"
|
||||
generator = torch.manual_seed(2947883060)
|
||||
num_inference_steps = 30
|
||||
guidance_scale = 7
|
||||
|
||||
image = pipeline(
|
||||
prompt=prompt, negative_prompt=negative_prompt, num_inference_steps=num_inference_steps,
|
||||
generator=generator, guidance_scale=guidance_scale
|
||||
).images[0]
|
||||
image.save("Kamepan.png")
|
||||
```
|
||||
|
||||
`Kamepan.safetensors` comes from https://civitai.com/models/22279?modelVersionId=118556 .
|
||||
|
||||
If you notice carefully, the inference UX is exactly identical to what we presented in the sections above.
|
||||
|
||||
Thanks to [@isidentical](https://github.com/isidentical) for helping us on integrating this feature.
|
||||
|
||||
<Tip warning={true}>
|
||||
|
||||
**Known limitations specific to the Kohya LoRAs**:
|
||||
|
||||
* When images don't looks similar to other UIs, such as ComfyUI, it can be because of multiple reasons, as explained [here](https://github.com/huggingface/diffusers/pull/4287/#issuecomment-1655110736).
|
||||
* We don't fully support [LyCORIS checkpoints](https://github.com/KohakuBlueleaf/LyCORIS). To the best of our knowledge, our current `load_lora_weights()` should support LyCORIS checkpoints that have LoRA and LoCon modules but not the other ones, such as Hada, LoKR, etc.
|
||||
|
||||
</Tip>
|
||||
|
||||
### TheLastBen
|
||||
|
||||
Here is an example:
|
||||
|
||||
```python
|
||||
from diffusers import DiffusionPipeline
|
||||
import torch
|
||||
|
||||
pipeline_id = "Lykon/dreamshaper-xl-1-0"
|
||||
|
||||
pipe = DiffusionPipeline.from_pretrained(pipeline_id, torch_dtype=torch.float16)
|
||||
pipe.enable_model_cpu_offload()
|
||||
|
||||
lora_model_id = "TheLastBen/Papercut_SDXL"
|
||||
lora_filename = "papercut.safetensors"
|
||||
pipe.load_lora_weights(lora_model_id, weight_name=lora_filename)
|
||||
|
||||
prompt = "papercut sonic"
|
||||
image = pipe(prompt=prompt, num_inference_steps=20, generator=torch.manual_seed(0)).images[0]
|
||||
image
|
||||
```
|
||||
```
|
||||
@@ -34,16 +34,13 @@ If you feel like another important example should exist, we are more than happy
|
||||
Training examples show how to pretrain or fine-tune diffusion models for a variety of tasks. Currently we support:
|
||||
|
||||
- [Unconditional Training](./unconditional_training)
|
||||
- [Text-to-Image Training](./text2image)<sup>*</sup>
|
||||
- [Text-to-Image Training](./text2image)
|
||||
- [Text Inversion](./text_inversion)
|
||||
- [Dreambooth](./dreambooth)<sup>*</sup>
|
||||
- [LoRA Support](./lora)<sup>*</sup>
|
||||
- [ControlNet](./controlnet)<sup>*</sup>
|
||||
- [InstructPix2Pix](./instructpix2pix)<sup>*</sup>
|
||||
- [Dreambooth](./dreambooth)
|
||||
- [LoRA Support](./lora)
|
||||
- [ControlNet](./controlnet)
|
||||
- [InstructPix2Pix](./instructpix2pix)
|
||||
- [Custom Diffusion](./custom_diffusion)
|
||||
- [T2I-Adapters](./t2i_adapters)<sup>*</sup>
|
||||
|
||||
<sup>*</sup>: Supports [Stable Diffusion XL](../api/pipelines/stable_diffusion/stable_diffusion_xl).
|
||||
|
||||
If possible, please [install xFormers](../optimization/xformers) for memory efficient attention. This could help make your training faster and less memory intensive.
|
||||
|
||||
@@ -57,7 +54,6 @@ If possible, please [install xFormers](../optimization/xformers) for memory effi
|
||||
| [**ControlNet**](./controlnet) | ✅ | ✅ | - |
|
||||
| [**InstructPix2Pix**](./instructpix2pix) | ✅ | ✅ | - |
|
||||
| [**Custom Diffusion**](./custom_diffusion) | ✅ | ✅ | - |
|
||||
| [**T2I Adapters**](./t2i_adapters) | ✅ | ✅ | - |
|
||||
|
||||
## Community
|
||||
|
||||
|
||||
@@ -1,143 +0,0 @@
|
||||
<!--Copyright 2023 The HuggingFace Team. All rights reserved.
|
||||
|
||||
Licensed under the Apache License, Version 2.0 (the "License"); you may not use this file except in compliance with
|
||||
the License. You may obtain a copy of the License at
|
||||
|
||||
http://www.apache.org/licenses/LICENSE-2.0
|
||||
|
||||
Unless required by applicable law or agreed to in writing, software distributed under the License is distributed on
|
||||
an "AS IS" BASIS, WITHOUT WARRANTIES OR CONDITIONS OF ANY KIND, either express or implied. See the License for the
|
||||
specific language governing permissions and limitations under the License.
|
||||
-->
|
||||
|
||||
# T2I-Adapters for Stable Diffusion XL (SDXL)
|
||||
|
||||
The `train_t2i_adapter_sdxl.py` script (as shown below) shows how to implement the [T2I-Adapter training procedure](https://hf.co/papers/2302.08453) for [Stable Diffusion XL](https://huggingface.co/papers/2307.01952).
|
||||
|
||||
## Running locally with PyTorch
|
||||
|
||||
### Installing the dependencies
|
||||
|
||||
Before running the scripts, make sure to install the library's training dependencies:
|
||||
|
||||
**Important**
|
||||
|
||||
To make sure you can successfully run the latest versions of the example scripts, we highly recommend **installing from source** and keeping the install up to date as we update the example scripts frequently and install some example-specific requirements. To do this, execute the following steps in a new virtual environment:
|
||||
|
||||
```bash
|
||||
git clone https://github.com/huggingface/diffusers
|
||||
cd diffusers
|
||||
pip install -e .
|
||||
```
|
||||
|
||||
Then cd in the `examples/t2i_adapter` folder and run
|
||||
```bash
|
||||
pip install -r requirements_sdxl.txt
|
||||
```
|
||||
|
||||
And initialize an [🤗Accelerate](https://github.com/huggingface/accelerate/) environment with:
|
||||
|
||||
```bash
|
||||
accelerate config
|
||||
```
|
||||
|
||||
Or for a default accelerate configuration without answering questions about your environment
|
||||
|
||||
```bash
|
||||
accelerate config default
|
||||
```
|
||||
|
||||
Or if your environment doesn't support an interactive shell (e.g., a notebook)
|
||||
|
||||
```python
|
||||
from accelerate.utils import write_basic_config
|
||||
write_basic_config()
|
||||
```
|
||||
|
||||
When running `accelerate config`, if we specify torch compile mode to True there can be dramatic speedups.
|
||||
|
||||
## Circle filling dataset
|
||||
|
||||
The original dataset is hosted in the [ControlNet repo](https://huggingface.co/lllyasviel/ControlNet/blob/main/training/fill50k.zip). We re-uploaded it to be compatible with `datasets` [here](https://huggingface.co/datasets/fusing/fill50k). Note that `datasets` handles dataloading within the training script.
|
||||
|
||||
## Training
|
||||
|
||||
Our training examples use two test conditioning images. They can be downloaded by running
|
||||
|
||||
```sh
|
||||
wget https://huggingface.co/datasets/huggingface/documentation-images/resolve/main/diffusers/controlnet_training/conditioning_image_1.png
|
||||
|
||||
wget https://huggingface.co/datasets/huggingface/documentation-images/resolve/main/diffusers/controlnet_training/conditioning_image_2.png
|
||||
```
|
||||
|
||||
Then run `huggingface-cli login` to log into your Hugging Face account. This is needed to be able to push the trained T2IAdapter parameters to Hugging Face Hub.
|
||||
|
||||
```bash
|
||||
export MODEL_DIR="stabilityai/stable-diffusion-xl-base-1.0"
|
||||
export OUTPUT_DIR="path to save model"
|
||||
|
||||
accelerate launch train_t2i_adapter_sdxl.py \
|
||||
--pretrained_model_name_or_path=$MODEL_DIR \
|
||||
--output_dir=$OUTPUT_DIR \
|
||||
--dataset_name=fusing/fill50k \
|
||||
--mixed_precision="fp16" \
|
||||
--resolution=1024 \
|
||||
--learning_rate=1e-5 \
|
||||
--max_train_steps=15000 \
|
||||
--validation_image "./conditioning_image_1.png" "./conditioning_image_2.png" \
|
||||
--validation_prompt "red circle with blue background" "cyan circle with brown floral background" \
|
||||
--validation_steps=100 \
|
||||
--train_batch_size=1 \
|
||||
--gradient_accumulation_steps=4 \
|
||||
--report_to="wandb" \
|
||||
--seed=42 \
|
||||
--push_to_hub
|
||||
```
|
||||
|
||||
To better track our training experiments, we're using the following flags in the command above:
|
||||
|
||||
* `report_to="wandb` will ensure the training runs are tracked on Weights and Biases. To use it, be sure to install `wandb` with `pip install wandb`.
|
||||
* `validation_image`, `validation_prompt`, and `validation_steps` to allow the script to do a few validation inference runs. This allows us to qualitatively check if the training is progressing as expected.
|
||||
|
||||
Our experiments were conducted on a single 40GB A100 GPU.
|
||||
|
||||
### Inference
|
||||
|
||||
Once training is done, we can perform inference like so:
|
||||
|
||||
```python
|
||||
from diffusers import StableDiffusionXLAdapterPipeline, T2IAdapter, EulerAncestralDiscreteSchedulerTest
|
||||
from diffusers.utils import load_image
|
||||
import torch
|
||||
|
||||
base_model_path = "stabilityai/stable-diffusion-xl-base-1.0"
|
||||
adapter_path = "path to adapter"
|
||||
|
||||
adapter = T2IAdapter.from_pretrained(adapter_path, torch_dtype=torch.float16)
|
||||
pipe = StableDiffusionXLAdapterPipeline.from_pretrained(
|
||||
base_model_path, adapter=adapter, torch_dtype=torch.float16
|
||||
)
|
||||
|
||||
# speed up diffusion process with faster scheduler and memory optimization
|
||||
pipe.scheduler = EulerAncestralDiscreteSchedulerTest.from_config(pipe.scheduler.config)
|
||||
# remove following line if xformers is not installed or when using Torch 2.0.
|
||||
pipe.enable_xformers_memory_efficient_attention()
|
||||
# memory optimization.
|
||||
pipe.enable_model_cpu_offload()
|
||||
|
||||
control_image = load_image("./conditioning_image_1.png")
|
||||
prompt = "pale golden rod circle with old lace background"
|
||||
|
||||
# generate image
|
||||
generator = torch.manual_seed(0)
|
||||
image = pipe(
|
||||
prompt, num_inference_steps=20, generator=generator, image=control_image
|
||||
).images[0]
|
||||
image.save("./output.png")
|
||||
```
|
||||
|
||||
## Notes
|
||||
|
||||
### Specifying a better VAE
|
||||
|
||||
SDXL's VAE is known to suffer from numerical instability issues. This is why we also expose a CLI argument namely `--pretrained_vae_model_name_or_path` that lets you specify the location of a better VAE (such as [this one](https://huggingface.co/madebyollin/sdxl-vae-fp16-fix)).
|
||||
@@ -238,7 +238,7 @@ Now you can load the fine-tuned model for inference by passing the model path or
|
||||
from diffusers import StableDiffusionPipeline
|
||||
|
||||
model_path = "path_to_saved_model"
|
||||
pipe = StableDiffusionPipeline.from_pretrained(model_path, torch_dtype=torch.float16, use_safetensors=True)
|
||||
pipe = StableDiffusionPipeline.from_pretrained(model_path, torch_dtype=torch.float16)
|
||||
pipe.to("cuda")
|
||||
|
||||
image = pipe(prompt="yoda").images[0]
|
||||
@@ -275,9 +275,3 @@ image.save("yoda-pokemon.png")
|
||||
```
|
||||
</jax>
|
||||
</frameworkcontent>
|
||||
|
||||
|
||||
## Stable Diffusion XL
|
||||
|
||||
* We support fine-tuning the UNet shipped in [Stable Diffusion XL](https://huggingface.co/papers/2307.01952) via the `train_text_to_image_sdxl.py` script. Please refer to the docs [here](https://github.com/huggingface/diffusers/blob/main/examples/text_to_image/README_sdxl.md).
|
||||
* We also support fine-tuning of the UNet and Text Encoder shipped in [Stable Diffusion XL](https://huggingface.co/papers/2307.01952) with LoRA via the `train_text_to_image_lora_sdxl.py` script. Please refer to the docs [here](https://github.com/huggingface/diffusers/blob/main/examples/text_to_image/README_sdxl.md).
|
||||
|
||||
@@ -204,7 +204,7 @@ from diffusers import StableDiffusionPipeline
|
||||
import torch
|
||||
|
||||
model_id = "runwayml/stable-diffusion-v1-5"
|
||||
pipe = StableDiffusionPipeline.from_pretrained(model_id, torch_dtype=torch.float16, use_safetensors=True).to("cuda")
|
||||
pipe = StableDiffusionPipeline.from_pretrained(model_id, torch_dtype=torch.float16).to("cuda")
|
||||
```
|
||||
|
||||
Next, we need to load the textual inversion embedding vector which can be done via the [`TextualInversionLoaderMixin.load_textual_inversion`]
|
||||
|
||||
@@ -1,146 +0,0 @@
|
||||
# AutoPipeline
|
||||
|
||||
🤗 Diffusers is able to complete many different tasks, and you can often reuse the same pretrained weights for multiple tasks such as text-to-image, image-to-image, and inpainting. If you're new to the library and diffusion models though, it may be difficult to know which pipeline to use for a task. For example, if you're using the [runwayml/stable-diffusion-v1-5](https://huggingface.co/runwayml/stable-diffusion-v1-5) checkpoint for text-to-image, you might not know that you could also use it for image-to-image and inpainting by loading the checkpoint with the [`StableDiffusionImg2ImgPipeline`] and [`StableDiffusionInpaintPipeline`] classes respectively.
|
||||
|
||||
The `AutoPipeline` class is designed to simplify the variety of pipelines in 🤗 Diffusers. It is a generic, *task-first* pipeline that lets you focus on the task. The `AutoPipeline` automatically detects the correct pipeline class to use, which makes it easier to load a checkpoint for a task without knowing the specific pipeline class name.
|
||||
|
||||
<Tip>
|
||||
|
||||
Take a look at the [AutoPipeline](./pipelines/auto_pipeline) reference to see which tasks are supported. Currently, it supports text-to-image, image-to-image, and inpainting.
|
||||
|
||||
</Tip>
|
||||
|
||||
This tutorial shows you how to use an `AutoPipeline` to automatically infer the pipeline class to load for a specific task, given the pretrained weights.
|
||||
|
||||
## Choose an AutoPipeline for your task
|
||||
|
||||
Start by picking a checkpoint. For example, if you're interested in text-to-image with the [runwayml/stable-diffusion-v1-5](https://huggingface.co/runwayml/stable-diffusion-v1-5) checkpoint, use [`AutoPipelineForText2Image`]:
|
||||
|
||||
```py
|
||||
from diffusers import AutoPipelineForText2Image
|
||||
import torch
|
||||
|
||||
pipeline = AutoPipelineForText2Image.from_pretrained(
|
||||
"runwayml/stable-diffusion-v1-5", torch_dtype=torch.float16, use_safetensors=True
|
||||
).to("cuda")
|
||||
prompt = "peasant and dragon combat, wood cutting style, viking era, bevel with rune"
|
||||
|
||||
image = pipeline(prompt, num_inference_steps=25).images[0]
|
||||
```
|
||||
|
||||
<div class="flex justify-center">
|
||||
<img src="https://huggingface.co/datasets/huggingface/documentation-images/resolve/main/diffusers/autopipeline-text2img.png" alt="generated image of peasant fighting dragon in wood cutting style"/>
|
||||
</div>
|
||||
|
||||
Under the hood, [`AutoPipelineForText2Image`]:
|
||||
|
||||
1. automatically detects a `"stable-diffusion"` class from the [`model_index.json`](https://huggingface.co/runwayml/stable-diffusion-v1-5/blob/main/model_index.json) file
|
||||
2. loads the corresponding text-to-image [`StableDiffusionPipline`] based on the `"stable-diffusion"` class name
|
||||
|
||||
Likewise, for image-to-image, [`AutoPipelineForImage2Image`] detects a `"stable-diffusion"` checkpoint from the `model_index.json` file and it'll load the corresponding [`StableDiffusionImg2ImgPipeline`] behind the scenes. You can also pass any additional arguments specific to the pipeline class such as `strength`, which determines the amount of noise or variation added to an input image:
|
||||
|
||||
```py
|
||||
from diffusers import AutoPipelineForImage2Image
|
||||
|
||||
pipeline = AutoPipelineForImage2Image.from_pretrained(
|
||||
"runwayml/stable-diffusion-v1-5",
|
||||
torch_dtype=torch.float16,
|
||||
use_safetensors=True,
|
||||
).to("cuda")
|
||||
prompt = "a portrait of a dog wearing a pearl earring"
|
||||
|
||||
url = "https://upload.wikimedia.org/wikipedia/commons/thumb/0/0f/1665_Girl_with_a_Pearl_Earring.jpg/800px-1665_Girl_with_a_Pearl_Earring.jpg"
|
||||
|
||||
response = requests.get(url)
|
||||
image = Image.open(BytesIO(response.content)).convert("RGB")
|
||||
image.thumbnail((768, 768))
|
||||
|
||||
image = pipeline(prompt, image, num_inference_steps=200, strength=0.75, guidance_scale=10.5).images[0]
|
||||
```
|
||||
|
||||
<div class="flex justify-center">
|
||||
<img src="https://huggingface.co/datasets/huggingface/documentation-images/resolve/main/diffusers/autopipeline-img2img.png" alt="generated image of a vermeer portrait of a dog wearing a pearl earring"/>
|
||||
</div>
|
||||
|
||||
And if you want to do inpainting, then [`AutoPipelineForInpainting`] loads the underlying [`StableDiffusionInpaintPipeline`] class in the same way:
|
||||
|
||||
```py
|
||||
from diffusers import AutoPipelineForInpainting
|
||||
from diffusers.utils import load_image
|
||||
|
||||
pipeline = AutoPipelineForInpainting.from_pretrained(
|
||||
"stabilityai/stable-diffusion-xl-base-1.0", torch_dtype=torch.float16, use_safetensors=True
|
||||
).to("cuda")
|
||||
|
||||
img_url = "https://raw.githubusercontent.com/CompVis/latent-diffusion/main/data/inpainting_examples/overture-creations-5sI6fQgYIuo.png"
|
||||
mask_url = "https://raw.githubusercontent.com/CompVis/latent-diffusion/main/data/inpainting_examples/overture-creations-5sI6fQgYIuo_mask.png"
|
||||
|
||||
init_image = load_image(img_url).convert("RGB")
|
||||
mask_image = load_image(mask_url).convert("RGB")
|
||||
|
||||
prompt = "A majestic tiger sitting on a bench"
|
||||
image = pipeline(prompt, image=init_image, mask_image=mask_image, num_inference_steps=50, strength=0.80).images[0]
|
||||
```
|
||||
|
||||
<div class="flex justify-center">
|
||||
<img src="https://huggingface.co/datasets/huggingface/documentation-images/resolve/main/diffusers/autopipeline-inpaint.png" alt="generated image of a tiger sitting on a bench"/>
|
||||
</div>
|
||||
|
||||
If you try to load an unsupported checkpoint, it'll throw an error:
|
||||
|
||||
```py
|
||||
from diffusers import AutoPipelineForImage2Image
|
||||
import torch
|
||||
|
||||
pipeline = AutoPipelineForImage2Image.from_pretrained(
|
||||
"openai/shap-e-img2img", torch_dtype=torch.float16, use_safetensors=True
|
||||
)
|
||||
"ValueError: AutoPipeline can't find a pipeline linked to ShapEImg2ImgPipeline for None"
|
||||
```
|
||||
|
||||
## Use multiple pipelines
|
||||
|
||||
For some workflows or if you're loading many pipelines, it is more memory-efficient to reuse the same components from a checkpoint instead of reloading them which would unnecessarily consume additional memory. For example, if you're using a checkpoint for text-to-image and you want to use it again for image-to-image, use the [`~AutoPipelineForImage2Image.from_pipe`] method. This method creates a new pipeline from the components of a previously loaded pipeline at no additional memory cost.
|
||||
|
||||
The [`~AutoPipelineForImage2Image.from_pipe`] method detects the original pipeline class and maps it to the new pipeline class corresponding to the task you want to do. For example, if you load a `"stable-diffusion"` class pipeline for text-to-image:
|
||||
|
||||
```py
|
||||
from diffusers import AutoPipelineForText2Image, AutoPipelineForImage2Image
|
||||
|
||||
pipeline_text2img = AutoPipelineForText2Image.from_pretrained(
|
||||
"runwayml/stable-diffusion-v1-5", torch_dtype=torch.float16, use_safetensors=True
|
||||
)
|
||||
print(type(pipeline_text2img))
|
||||
"<class 'diffusers.pipelines.stable_diffusion.pipeline_stable_diffusion.StableDiffusionPipeline'>"
|
||||
```
|
||||
|
||||
Then [`~AutoPipelineForImage2Image.from_pipe`] maps the original `"stable-diffusion"` pipeline class to [`StableDiffusionImg2ImgPipeline`]:
|
||||
|
||||
```py
|
||||
pipeline_img2img = AutoPipelineForImage2Image.from_pipe(pipeline_text2img)
|
||||
print(type(pipeline_img2img))
|
||||
"<class 'diffusers.pipelines.stable_diffusion.pipeline_stable_diffusion_img2img.StableDiffusionImg2ImgPipeline'>"
|
||||
```
|
||||
|
||||
If you passed an optional argument - like disabling the safety checker - to the original pipeline, this argument is also passed on to the new pipeline:
|
||||
|
||||
```py
|
||||
from diffusers import AutoPipelineForText2Image, AutoPipelineForImage2Image
|
||||
|
||||
pipeline_text2img = AutoPipelineForText2Image.from_pretrained(
|
||||
"runwayml/stable-diffusion-v1-5",
|
||||
torch_dtype=torch.float16,
|
||||
use_safetensors=True,
|
||||
requires_safety_checker=False,
|
||||
).to("cuda")
|
||||
|
||||
pipeline_img2img = AutoPipelineForImage2Image.from_pipe(pipeline_text2img)
|
||||
print(pipe.config.requires_safety_checker)
|
||||
"False"
|
||||
```
|
||||
|
||||
You can overwrite any of the arguments and even configuration from the original pipeline if you want to change the behavior of the new pipeline. For example, to turn the safety checker back on and add the `strength` argument:
|
||||
|
||||
```py
|
||||
pipeline_img2img = AutoPipelineForImage2Image.from_pipe(pipeline_text2img, requires_safety_checker=True, strength=0.3)
|
||||
```
|
||||
@@ -252,11 +252,18 @@ Then, you'll need a way to evaluate the model. For evaluation, you can use the [
|
||||
|
||||
```py
|
||||
>>> from diffusers import DDPMPipeline
|
||||
>>> from diffusers.utils import make_image_grid
|
||||
>>> import math
|
||||
>>> import os
|
||||
|
||||
|
||||
>>> def make_grid(images, rows, cols):
|
||||
... w, h = images[0].size
|
||||
... grid = Image.new("RGB", size=(cols * w, rows * h))
|
||||
... for i, image in enumerate(images):
|
||||
... grid.paste(image, box=(i % cols * w, i // cols * h))
|
||||
... return grid
|
||||
|
||||
|
||||
>>> def evaluate(config, epoch, pipeline):
|
||||
... # Sample some images from random noise (this is the backward diffusion process).
|
||||
... # The default pipeline output type is `List[PIL.Image]`
|
||||
@@ -266,7 +273,7 @@ Then, you'll need a way to evaluate the model. For evaluation, you can use the [
|
||||
... ).images
|
||||
|
||||
... # Make a grid out of the images
|
||||
... image_grid = make_image_grid(images, rows=4, cols=4)
|
||||
... image_grid = make_grid(images, rows=4, cols=4)
|
||||
|
||||
... # Save the images
|
||||
... test_dir = os.path.join(config.output_dir, "samples")
|
||||
|
||||
@@ -25,7 +25,7 @@ In this guide, you'll use [`DiffusionPipeline`] for text-to-image generation wit
|
||||
```python
|
||||
>>> from diffusers import DiffusionPipeline
|
||||
|
||||
>>> generator = DiffusionPipeline.from_pretrained("runwayml/stable-diffusion-v1-5", use_safetensors=True)
|
||||
>>> generator = DiffusionPipeline.from_pretrained("runwayml/stable-diffusion-v1-5")
|
||||
```
|
||||
|
||||
The [`DiffusionPipeline`] downloads and caches all modeling, tokenization, and scheduling components.
|
||||
|
||||
@@ -94,7 +94,7 @@ output = pipeline()
|
||||
But what's even better is you can load pre-existing weights into the pipeline if the pipeline structure is identical. For example, you can load the [`google/ddpm-cifar10-32`](https://huggingface.co/google/ddpm-cifar10-32) weights into the one-step pipeline:
|
||||
|
||||
```python
|
||||
pipeline = UnetSchedulerOneForwardPipeline.from_pretrained("google/ddpm-cifar10-32", use_safetensors=True)
|
||||
pipeline = UnetSchedulerOneForwardPipeline.from_pretrained("google/ddpm-cifar10-32")
|
||||
|
||||
output = pipeline()
|
||||
```
|
||||
@@ -108,9 +108,7 @@ Once it is merged, anyone with `diffusers >= 0.4.0` installed can use this pipel
|
||||
```python
|
||||
from diffusers import DiffusionPipeline
|
||||
|
||||
pipe = DiffusionPipeline.from_pretrained(
|
||||
"google/ddpm-cifar10-32", custom_pipeline="one_step_unet", use_safetensors=True
|
||||
)
|
||||
pipe = DiffusionPipeline.from_pretrained("google/ddpm-cifar10-32", custom_pipeline="one_step_unet")
|
||||
pipe()
|
||||
```
|
||||
|
||||
@@ -119,9 +117,7 @@ Another way to share your community pipeline is to upload the `one_step_unet.py`
|
||||
```python
|
||||
from diffusers import DiffusionPipeline
|
||||
|
||||
pipeline = DiffusionPipeline.from_pretrained(
|
||||
"google/ddpm-cifar10-32", custom_pipeline="stevhliu/one_step_unet", use_safetensors=True
|
||||
)
|
||||
pipeline = DiffusionPipeline.from_pretrained("google/ddpm-cifar10-32", custom_pipeline="stevhliu/one_step_unet")
|
||||
```
|
||||
|
||||
Take a look at the following table to compare the two sharing workflows to help you decide the best option for you:
|
||||
@@ -165,7 +161,6 @@ pipeline = DiffusionPipeline.from_pretrained(
|
||||
feature_extractor=feature_extractor,
|
||||
scheduler=scheduler,
|
||||
torch_dtype=torch.float16,
|
||||
use_safetensors=True,
|
||||
)
|
||||
```
|
||||
|
||||
|
||||
@@ -24,7 +24,7 @@ Next, configure the following parameters in the [`DDIMScheduler`]:
|
||||
```py
|
||||
>>> from diffusers import DiffusionPipeline, DDIMScheduler
|
||||
|
||||
>>> pipeline = DiffusionPipeline.from_pretrained("ptx0/pseudo-journey-v2", use_safetensors=True)
|
||||
>>> pipeline = DiffusionPipeline.from_pretrained("ptx0/pseudo-journey-v2")
|
||||
# switch the scheduler in the pipeline to use the DDIMScheduler
|
||||
|
||||
>>> pipeline.scheduler = DDIMScheduler.from_config(
|
||||
|
||||
@@ -40,8 +40,6 @@ Unless otherwise mentioned, these are techniques that work with existing models
|
||||
12. [Custom Diffusion](#custom-diffusion)
|
||||
13. [Model Editing](#model-editing)
|
||||
14. [DiffEdit](#diffedit)
|
||||
15. [T2I-Adapter](#t2i-adapter)
|
||||
16. [FABRIC](#fabric)
|
||||
|
||||
For convenience, we provide a table to denote which methods are inference-only and which require fine-tuning/training.
|
||||
|
||||
@@ -62,21 +60,21 @@ For convenience, we provide a table to denote which methods are inference-only a
|
||||
| [Model Editing](#model-editing) | ✅ | ❌ | |
|
||||
| [DiffEdit](#diffedit) | ✅ | ❌ | |
|
||||
| [T2I-Adapter](#t2i-adapter) | ✅ | ❌ | |
|
||||
| [Fabric](#fabric) | ✅ | ❌ | |
|
||||
|
||||
## Instruct Pix2Pix
|
||||
|
||||
[Paper](https://arxiv.org/abs/2211.09800)
|
||||
|
||||
[Instruct Pix2Pix](../api/pipelines/pix2pix) is fine-tuned from stable diffusion to support editing input images. It takes as inputs an image and a prompt describing an edit, and it outputs the edited image.
|
||||
[Instruct Pix2Pix](../api/pipelines/stable_diffusion/pix2pix) is fine-tuned from stable diffusion to support editing input images. It takes as inputs an image and a prompt describing an edit, and it outputs the edited image.
|
||||
Instruct Pix2Pix has been explicitly trained to work well with [InstructGPT](https://openai.com/blog/instruction-following/)-like prompts.
|
||||
|
||||
See [here](../api/pipelines/pix2pix) for more information on how to use it.
|
||||
See [here](../api/pipelines/stable_diffusion/pix2pix) for more information on how to use it.
|
||||
|
||||
## Pix2Pix Zero
|
||||
|
||||
[Paper](https://arxiv.org/abs/2302.03027)
|
||||
|
||||
[Pix2Pix Zero](../api/pipelines/pix2pix_zero) allows modifying an image so that one concept or subject is translated to another one while preserving general image semantics.
|
||||
[Pix2Pix Zero](../api/pipelines/stable_diffusion/pix2pix_zero) allows modifying an image so that one concept or subject is translated to another one while preserving general image semantics.
|
||||
|
||||
The denoising process is guided from one conceptual embedding towards another conceptual embedding. The intermediate latents are optimized during the denoising process to push the attention maps towards reference attention maps. The reference attention maps are from the denoising process of the input image and are used to encourage semantic preservation.
|
||||
|
||||
@@ -89,26 +87,26 @@ Pix2Pix Zero can be used both to edit synthetic images as well as real images.
|
||||
<Tip>
|
||||
|
||||
Pix2Pix Zero is the first model that allows "zero-shot" image editing. This means that the model
|
||||
can edit an image in less than a minute on a consumer GPU as shown [here](../api/pipelines/pix2pix_zero#usage-example).
|
||||
can edit an image in less than a minute on a consumer GPU as shown [here](../api/pipelines/stable_diffusion/pix2pix_zero#usage-example).
|
||||
|
||||
</Tip>
|
||||
|
||||
As mentioned above, Pix2Pix Zero includes optimizing the latents (and not any of the UNet, VAE, or the text encoder) to steer the generation toward a specific concept. This means that the overall
|
||||
pipeline might require more memory than a standard [StableDiffusionPipeline](../api/pipelines/stable_diffusion/text2img).
|
||||
|
||||
See [here](../api/pipelines/pix2pix_zero) for more information on how to use it.
|
||||
See [here](../api/pipelines/stable_diffusion/pix2pix_zero) for more information on how to use it.
|
||||
|
||||
## Attend and Excite
|
||||
|
||||
[Paper](https://arxiv.org/abs/2301.13826)
|
||||
|
||||
[Attend and Excite](../api/pipelines/attend_and_excite) allows subjects in the prompt to be faithfully represented in the final image.
|
||||
[Attend and Excite](../api/pipelines/stable_diffusion/attend_and_excite) allows subjects in the prompt to be faithfully represented in the final image.
|
||||
|
||||
A set of token indices are given as input, corresponding to the subjects in the prompt that need to be present in the image. During denoising, each token index is guaranteed to have a minimum attention threshold for at least one patch of the image. The intermediate latents are iteratively optimized during the denoising process to strengthen the attention of the most neglected subject token until the attention threshold is passed for all subject tokens.
|
||||
|
||||
Like Pix2Pix Zero, Attend and Excite also involves a mini optimization loop (leaving the pre-trained weights untouched) in its pipeline and can require more memory than the usual [StableDiffusionPipeline](../api/pipelines/stable_diffusion/text2img).
|
||||
Like Pix2Pix Zero, Attend and Excite also involves a mini optimization loop (leaving the pre-trained weights untouched) in its pipeline and can require more memory than the usual `StableDiffusionPipeline`.
|
||||
|
||||
See [here](../api/pipelines/attend_and_excite) for more information on how to use it.
|
||||
See [here](../api/pipelines/stable_diffusion/attend_and_excite) for more information on how to use it.
|
||||
|
||||
## Semantic Guidance (SEGA)
|
||||
|
||||
@@ -126,11 +124,11 @@ See [here](../api/pipelines/semantic_stable_diffusion) for more information on h
|
||||
|
||||
[Paper](https://arxiv.org/abs/2210.00939)
|
||||
|
||||
[Self-attention Guidance](../api/pipelines/self_attention_guidance) improves the general quality of images.
|
||||
[Self-attention Guidance](../api/pipelines/stable_diffusion/self_attention_guidance) improves the general quality of images.
|
||||
|
||||
SAG provides guidance from predictions not conditioned on high-frequency details to fully conditioned images. The high frequency details are extracted out of the UNet self-attention maps.
|
||||
|
||||
See [here](../api/pipelines/self_attention_guidance) for more information on how to use it.
|
||||
See [here](../api/pipelines/stable_diffusion/self_attention_guidance) for more information on how to use it.
|
||||
|
||||
## Depth2Image
|
||||
|
||||
@@ -155,9 +153,9 @@ apply Pix2Pix Zero to any of the available Stable Diffusion models.
|
||||
[Paper](https://arxiv.org/abs/2302.08113)
|
||||
|
||||
MultiDiffusion defines a new generation process over a pre-trained diffusion model. This process binds together multiple diffusion generation methods that can be readily applied to generate high quality and diverse images. Results adhere to user-provided controls, such as desired aspect ratio (e.g., panorama), and spatial guiding signals, ranging from tight segmentation masks to bounding boxes.
|
||||
[MultiDiffusion Panorama](../api/pipelines/panorama) allows to generate high-quality images at arbitrary aspect ratios (e.g., panoramas).
|
||||
[MultiDiffusion Panorama](../api/pipelines/stable_diffusion/panorama) allows to generate high-quality images at arbitrary aspect ratios (e.g., panoramas).
|
||||
|
||||
See [here](../api/pipelines/panorama) for more information on how to use it to generate panoramic images.
|
||||
See [here](../api/pipelines/stable_diffusion/panorama) for more information on how to use it to generate panoramic images.
|
||||
|
||||
## Fine-tuning your own models
|
||||
|
||||
@@ -207,20 +205,20 @@ For more details, check out our [official doc](../training/custom_diffusion).
|
||||
|
||||
[Paper](https://arxiv.org/abs/2303.08084)
|
||||
|
||||
The [text-to-image model editing pipeline](../api/pipelines/model_editing) helps you mitigate some of the incorrect implicit assumptions a pre-trained text-to-image
|
||||
The [text-to-image model editing pipeline](../api/pipelines/stable_diffusion/model_editing) helps you mitigate some of the incorrect implicit assumptions a pre-trained text-to-image
|
||||
diffusion model might make about the subjects present in the input prompt. For example, if you prompt Stable Diffusion to generate images for "A pack of roses", the roses in the generated images
|
||||
are more likely to be red. This pipeline helps you change that assumption.
|
||||
|
||||
To know more details, check out the [official doc](../api/pipelines/model_editing).
|
||||
To know more details, check out the [official doc](../api/pipelines/stable_diffusion/model_editing).
|
||||
|
||||
## DiffEdit
|
||||
|
||||
[Paper](https://arxiv.org/abs/2210.11427)
|
||||
|
||||
[DiffEdit](../api/pipelines/diffedit) allows for semantic editing of input images along with
|
||||
[DiffEdit](../api/pipelines/stable_diffusion/diffedit) allows for semantic editing of input images along with
|
||||
input prompts while preserving the original input images as much as possible.
|
||||
|
||||
To know more details, check out the [official doc](../api/pipelines/diffedit).
|
||||
To know more details, check out the [official doc](../api/pipelines/stable_diffusion/model_editing).
|
||||
|
||||
## T2I-Adapter
|
||||
|
||||
@@ -231,14 +229,3 @@ There are 8 canonical pre-trained adapters trained on different conditionings su
|
||||
depth maps, and semantic segmentations.
|
||||
|
||||
See [here](../api/pipelines/stable_diffusion/adapter) for more information on how to use it.
|
||||
|
||||
## Fabric
|
||||
|
||||
[Paper](https://arxiv.org/abs/2307.10159)
|
||||
|
||||
[Fabric](../api/pipelines/fabric) is a training-free
|
||||
approach applicable to a wide range of popular diffusion models, which exploits
|
||||
the self-attention layer present in the most widely used architectures to condition
|
||||
the diffusion process on a set of feedback images.
|
||||
|
||||
To know more details, check out the [official doc](../api/pipelines/fabric).
|
||||
|
||||
@@ -1,529 +0,0 @@
|
||||
# ControlNet
|
||||
|
||||
ControlNet is a type of model for controlling image diffusion models by conditioning the model with an additional input image. There are many types of conditioning inputs (canny edge, user sketching, human pose, depth, and more) you can use to control a diffusion model. This is hugely useful because it affords you greater control over image generation, making it easier to generate specific images without experimenting with different text prompts or denoising values as much.
|
||||
|
||||
<Tip>
|
||||
|
||||
Check out Section 3.5 of the [ControlNet](https://huggingface.co/papers/2302.05543) paper for a list of ControlNet implementations on various conditioning inputs. You can find the official Stable Diffusion ControlNet conditioned models on [lllyasviel](https://huggingface.co/lllyasviel)'s Hub profile, and more [community-trained](https://huggingface.co/models?other=stable-diffusion&other=controlnet) ones on the Hub.
|
||||
|
||||
For Stable Diffusion XL (SDXL) ControlNet models, you can find them on the 🤗 [Diffusers](https://huggingface.co/diffusers) Hub organization, or you can browse [community-trained](https://huggingface.co/models?other=stable-diffusion-xl&other=controlnet) ones on the Hub.
|
||||
|
||||
</Tip>
|
||||
|
||||
A ControlNet model has two sets of weights (or blocks) connected by a zero-convolution layer:
|
||||
|
||||
- a *locked copy* keeps everything a large pretrained diffusion model has learned
|
||||
- a *trainable copy* is trained on the additional conditioning input
|
||||
|
||||
Since the locked copy preserves the pretrained model, training and implementing a ControlNet on a new conditioning input is as fast as finetuning any other model because you aren't training the model from scratch.
|
||||
|
||||
This guide will show you how to use ControlNet for text-to-image, image-to-image, inpainting, and more! There are many types of ControlNet conditioning inputs to choose from, but in this guide we'll only focus on several of them. Feel free to experiment with other conditioning inputs!
|
||||
|
||||
Before you begin, make sure you have the following libraries installed:
|
||||
|
||||
```py
|
||||
# uncomment to install the necessary libraries in Colab
|
||||
#!pip install diffusers transformers accelerate safetensors opencv-python
|
||||
```
|
||||
|
||||
## Text-to-image
|
||||
|
||||
For text-to-image, you normally pass a text prompt to the model. But with ControlNet, you can specify an additional conditioning input. Let's condition the model with a canny image, a white outline of an image on a black background. This way, the ControlNet can use the canny image as a control to guide the model to generate an image with the same outline.
|
||||
|
||||
Load an image and use the [opencv-python](https://github.com/opencv/opencv-python) library to extract the canny image:
|
||||
|
||||
```py
|
||||
from diffusers import StableDiffusionControlNetPipeline
|
||||
from diffusers.utils import load_image
|
||||
from PIL import Image
|
||||
import cv2
|
||||
import numpy as np
|
||||
|
||||
image = load_image(
|
||||
"https://hf.co/datasets/huggingface/documentation-images/resolve/main/diffusers/input_image_vermeer.png"
|
||||
)
|
||||
|
||||
image = np.array(image)
|
||||
|
||||
low_threshold = 100
|
||||
high_threshold = 200
|
||||
|
||||
image = cv2.Canny(image, low_threshold, high_threshold)
|
||||
image = image[:, :, None]
|
||||
image = np.concatenate([image, image, image], axis=2)
|
||||
canny_image = Image.fromarray(image)
|
||||
```
|
||||
|
||||
<div class="flex gap-4">
|
||||
<div>
|
||||
<img class="rounded-xl" src="https://huggingface.co/datasets/huggingface/documentation-images/resolve/main/diffusers/input_image_vermeer.png"/>
|
||||
<figcaption class="mt-2 text-center text-sm text-gray-500">original image</figcaption>
|
||||
</div>
|
||||
<div>
|
||||
<img class="rounded-xl" src="https://huggingface.co/datasets/huggingface/documentation-images/resolve/main/diffusers/vermeer_canny_edged.png"/>
|
||||
<figcaption class="mt-2 text-center text-sm text-gray-500">canny image</figcaption>
|
||||
</div>
|
||||
</div>
|
||||
|
||||
Next, load a ControlNet model conditioned on canny edge detection and pass it to the [`StableDiffusionControlNetPipeline`]. Use the faster [`UniPCMultistepScheduler`] and enable model offloading to speed up inference and reduce memory usage.
|
||||
|
||||
```py
|
||||
from diffusers import StableDiffusionControlNetPipeline, ControlNetModel, UniPCMultistepScheduler
|
||||
import torch
|
||||
|
||||
controlnet = ControlNetModel.from_pretrained("lllyasviel/sd-controlnet-canny", torch_dtype=torch.float16, use_safetensors=True)
|
||||
pipe = StableDiffusionControlNetPipeline.from_pretrained(
|
||||
"runwayml/stable-diffusion-v1-5", controlnet=controlnet, torch_dtype=torch.float16, use_safetensors=True
|
||||
).to("cuda")
|
||||
|
||||
pipe.scheduler = UniPCMultistepScheduler.from_config(pipe.scheduler.config)
|
||||
pipe.enable_model_cpu_offload()
|
||||
```
|
||||
|
||||
Now pass your prompt and canny image to the pipeline:
|
||||
|
||||
```py
|
||||
output = pipe(
|
||||
"the mona lisa", image=canny_image
|
||||
).images[0]
|
||||
```
|
||||
|
||||
<div class="flex justify-center">
|
||||
<img src="https://huggingface.co/datasets/huggingface/documentation-images/resolve/main/diffusers/controlnet-text2img.png"/>
|
||||
</div>
|
||||
|
||||
## Image-to-image
|
||||
|
||||
For image-to-image, you'd typically pass an initial image and a prompt to the pipeline to generate a new image. With ControlNet, you can pass an additional conditioning input to guide the model. Let's condition the model with a depth map, an image which contains spatial information. This way, the ControlNet can use the depth map as a control to guide the model to generate an image that preserves spatial information.
|
||||
|
||||
You'll use the [`StableDiffusionControlNetImg2ImgPipeline`] for this task, which is different from the [`StableDiffusionControlNetPipeline`] because it allows you to pass an initial image as the starting point for the image generation process.
|
||||
|
||||
Load an image and use the `depth-estimation` [`~transformers.Pipeline`] from 🤗 Transformers to extract the depth map of an image:
|
||||
|
||||
```py
|
||||
import torch
|
||||
import numpy as np
|
||||
|
||||
from transformers import pipeline
|
||||
from diffusers.utils import load_image
|
||||
|
||||
image = load_image(
|
||||
"https://huggingface.co/datasets/huggingface/documentation-images/resolve/main/diffusers/controlnet-img2img.jpg"
|
||||
).resize((768, 768))
|
||||
|
||||
|
||||
def get_depth_map(image, depth_estimator):
|
||||
image = depth_estimator(image)["depth"]
|
||||
image = np.array(image)
|
||||
image = image[:, :, None]
|
||||
image = np.concatenate([image, image, image], axis=2)
|
||||
detected_map = torch.from_numpy(image).float() / 255.0
|
||||
depth_map = detected_map.permute(2, 0, 1)
|
||||
return depth_map
|
||||
|
||||
depth_estimator = pipeline("depth-estimation")
|
||||
depth_map = get_depth_map(image, depth_estimator).unsqueeze(0).half().to("cuda")
|
||||
```
|
||||
|
||||
Next, load a ControlNet model conditioned on depth maps and pass it to the [`StableDiffusionControlNetImg2ImgPipeline`]. Use the faster [`UniPCMultistepScheduler`] and enable model offloading to speed up inference and reduce memory usage.
|
||||
|
||||
```py
|
||||
from diffusers import StableDiffusionControlNetImg2ImgPipeline, ControlNetModel, UniPCMultistepScheduler
|
||||
import torch
|
||||
|
||||
controlnet = ControlNetModel.from_pretrained("lllyasviel/control_v11f1p_sd15_depth", torch_dtype=torch.float16, use_safetensors=True)
|
||||
pipe = StableDiffusionControlNetImg2ImgPipeline.from_pretrained(
|
||||
"runwayml/stable-diffusion-v1-5", controlnet=controlnet, torch_dtype=torch.float16, use_safetensors=True
|
||||
).to("cuda")
|
||||
|
||||
pipe.scheduler = UniPCMultistepScheduler.from_config(pipe.scheduler.config)
|
||||
pipe.enable_model_cpu_offload()
|
||||
```
|
||||
|
||||
Now pass your prompt, initial image, and depth map to the pipeline:
|
||||
|
||||
```py
|
||||
output = pipe(
|
||||
"lego batman and robin", image=image, control_image=depth_map,
|
||||
).images[0]
|
||||
```
|
||||
|
||||
<div class="flex gap-4">
|
||||
<div>
|
||||
<img class="rounded-xl" src="https://huggingface.co/datasets/huggingface/documentation-images/resolve/main/diffusers/controlnet-img2img.jpg"/>
|
||||
<figcaption class="mt-2 text-center text-sm text-gray-500">original image</figcaption>
|
||||
</div>
|
||||
<div>
|
||||
<img class="rounded-xl" src="https://huggingface.co/datasets/huggingface/documentation-images/resolve/main/diffusers/controlnet-img2img-2.png"/>
|
||||
<figcaption class="mt-2 text-center text-sm text-gray-500">generated image</figcaption>
|
||||
</div>
|
||||
</div>
|
||||
|
||||
|
||||
## Inpainting
|
||||
|
||||
For inpainting, you need an initial image, a mask image, and a prompt describing what to replace the mask with. ControlNet models allow you to add another control image to condition a model with. Let’s condition the model with a canny image, a white outline of an image on a black background. This way, the ControlNet can use the canny image as a control to guide the model to generate an image with the same outline.
|
||||
|
||||
Load an initial image and a mask image:
|
||||
|
||||
```py
|
||||
from diffusers import StableDiffusionControlNetInpaintPipeline, ControlNetModel, UniPCMultistepScheduler
|
||||
from diffusers.utils import load_image
|
||||
import numpy as np
|
||||
import torch
|
||||
|
||||
init_image = load_image(
|
||||
"https://huggingface.co/datasets/huggingface/documentation-images/resolve/main/diffusers/controlnet-inpaint.jpg"
|
||||
)
|
||||
init_image = init_image.resize((512, 512))
|
||||
|
||||
mask_image = load_image(
|
||||
"https://huggingface.co/datasets/huggingface/documentation-images/resolve/main/diffusers/controlnet-inpaint-mask.jpg"
|
||||
)
|
||||
mask_image = mask_image.resize((512, 512))
|
||||
```
|
||||
|
||||
Create a function to prepare the control image from the initial and mask images. This'll create a tensor to mark the pixels in `init_image` as masked if the corresponding pixel in `mask_image` is over a certain threshold.
|
||||
|
||||
```py
|
||||
def make_inpaint_condition(image, image_mask):
|
||||
image = np.array(image.convert("RGB")).astype(np.float32) / 255.0
|
||||
image_mask = np.array(image_mask.convert("L")).astype(np.float32) / 255.0
|
||||
|
||||
assert image.shape[0:1] == image_mask.shape[0:1]
|
||||
image[image_mask > 0.5] = 1.0 # set as masked pixel
|
||||
image = np.expand_dims(image, 0).transpose(0, 3, 1, 2)
|
||||
image = torch.from_numpy(image)
|
||||
return image
|
||||
|
||||
control_image = make_inpaint_condition(init_image, mask_image)
|
||||
```
|
||||
|
||||
<div class="flex gap-4">
|
||||
<div>
|
||||
<img class="rounded-xl" src="https://huggingface.co/datasets/huggingface/documentation-images/resolve/main/diffusers/controlnet-inpaint.jpg"/>
|
||||
<figcaption class="mt-2 text-center text-sm text-gray-500">original image</figcaption>
|
||||
</div>
|
||||
<div>
|
||||
<img class="rounded-xl" src="https://huggingface.co/datasets/huggingface/documentation-images/resolve/main/diffusers/controlnet-inpaint-mask.jpg"/>
|
||||
<figcaption class="mt-2 text-center text-sm text-gray-500">mask image</figcaption>
|
||||
</div>
|
||||
</div>
|
||||
|
||||
Load a ControlNet model conditioned on inpainting and pass it to the [`StableDiffusionControlNetInpaintPipeline`]. Use the faster [`UniPCMultistepScheduler`] and enable model offloading to speed up inference and reduce memory usage.
|
||||
|
||||
```py
|
||||
from diffusers import StableDiffusionControlNetInpaintPipeline, ControlNetModel, UniPCMultistepScheduler
|
||||
import torch
|
||||
|
||||
controlnet = ControlNetModel.from_pretrained("lllyasviel/control_v11p_sd15_inpaint", torch_dtype=torch.float16, use_safetensors=True)
|
||||
pipe = StableDiffusionControlNetInpaintPipeline.from_pretrained(
|
||||
"runwayml/stable-diffusion-v1-5", controlnet=controlnet, torch_dtype=torch.float16, use_safetensors=True
|
||||
).to("cuda")
|
||||
|
||||
pipe.scheduler = UniPCMultistepScheduler.from_config(pipe.scheduler.config)
|
||||
pipe.enable_model_cpu_offload()
|
||||
```
|
||||
|
||||
Now pass your prompt, initial image, mask image, and control image to the pipeline:
|
||||
|
||||
```py
|
||||
output = pipe(
|
||||
"corgi face with large ears, detailed, pixar, animated, disney",
|
||||
num_inference_steps=20,
|
||||
eta=1.0,
|
||||
image=init_image,
|
||||
mask_image=mask_image,
|
||||
control_image=control_image,
|
||||
).images[0]
|
||||
```
|
||||
|
||||
<div class="flex justify-center">
|
||||
<img src="https://huggingface.co/datasets/huggingface/documentation-images/resolve/main/diffusers/controlnet-inpaint-result.png"/>
|
||||
</div>
|
||||
|
||||
## Guess mode
|
||||
|
||||
[Guess mode](https://github.com/lllyasviel/ControlNet/discussions/188) does not require supplying a prompt to a ControlNet at all! This forces the ControlNet encoder to do it's best to "guess" the contents of the input control map (depth map, pose estimation, canny edge, etc.).
|
||||
|
||||
Guess mode adjusts the scale of the output residuals from a ControlNet by a fixed ratio depending on the block depth. The shallowest `DownBlock` corresponds to 0.1, and as the blocks get deeper, the scale increases exponentially such that the scale of the `MidBlock` output becomes 1.0.
|
||||
|
||||
<Tip>
|
||||
|
||||
Guess mode does not have any impact on prompt conditioning and you can still provide a prompt if you want.
|
||||
|
||||
</Tip>
|
||||
|
||||
Set `guess_mode=True` in the pipeline, and it is [recommended](https://github.com/lllyasviel/ControlNet#guess-mode--non-prompt-mode) to set the `guidance_scale` value between 3.0 and 5.0.
|
||||
|
||||
```py
|
||||
from diffusers import StableDiffusionControlNetPipeline, ControlNetModel
|
||||
import torch
|
||||
|
||||
controlnet = ControlNetModel.from_pretrained("lllyasviel/sd-controlnet-canny", use_safetensors=True)
|
||||
pipe = StableDiffusionControlNetPipeline.from_pretrained("runwayml/stable-diffusion-v1-5", controlnet=controlnet, use_safetensors=True).to(
|
||||
"cuda"
|
||||
)
|
||||
image = pipe("", image=canny_image, guess_mode=True, guidance_scale=3.0).images[0]
|
||||
image
|
||||
```
|
||||
|
||||
<div class="flex gap-4">
|
||||
<div>
|
||||
<img class="rounded-xl" src="https://huggingface.co/takuma104/controlnet_dev/resolve/main/gen_compare_guess_mode/output_images/diffusers/output_bird_canny_0.png"/>
|
||||
<figcaption class="mt-2 text-center text-sm text-gray-500">regular mode with prompt</figcaption>
|
||||
</div>
|
||||
<div>
|
||||
<img class="rounded-xl" src="https://huggingface.co/takuma104/controlnet_dev/resolve/main/gen_compare_guess_mode/output_images/diffusers/output_bird_canny_0_gm.png"/>
|
||||
<figcaption class="mt-2 text-center text-sm text-gray-500">guess mode without prompt</figcaption>
|
||||
</div>
|
||||
</div>
|
||||
|
||||
## ControlNet with Stable Diffusion XL
|
||||
|
||||
There aren't too many ControlNet models compatible with Stable Diffusion XL (SDXL) at the moment, but we've trained two full-sized ControlNet models for SDXL conditioned on canny edge detection and depth maps. We're also experimenting with creating smaller versions of these SDXL-compatible ControlNet models so it is easier to run on resource-constrained hardware. You can find these checkpoints on the 🤗 [Diffusers](https://huggingface.co/diffusers) Hub organization!
|
||||
|
||||
Let's use a SDXL ControlNet conditioned on canny images to generate an image. Start by loading an image and prepare the canny image:
|
||||
|
||||
```py
|
||||
from diffusers import StableDiffusionXLControlNetPipeline, ControlNetModel, AutoencoderKL
|
||||
from diffusers.utils import load_image
|
||||
from PIL import Image
|
||||
import cv2
|
||||
import numpy as np
|
||||
|
||||
image = load_image(
|
||||
"https://huggingface.co/datasets/hf-internal-testing/diffusers-images/resolve/main/sd_controlnet/hf-logo.png"
|
||||
)
|
||||
|
||||
image = np.array(image)
|
||||
|
||||
low_threshold = 100
|
||||
high_threshold = 200
|
||||
|
||||
image = cv2.Canny(image, low_threshold, high_threshold)
|
||||
image = image[:, :, None]
|
||||
image = np.concatenate([image, image, image], axis=2)
|
||||
canny_image = Image.fromarray(image)
|
||||
canny_image
|
||||
```
|
||||
|
||||
<div class="flex gap-4">
|
||||
<div>
|
||||
<img class="rounded-xl" src="https://huggingface.co/datasets/hf-internal-testing/diffusers-images/resolve/main/sd_controlnet/hf-logo.png"/>
|
||||
<figcaption class="mt-2 text-center text-sm text-gray-500">original image</figcaption>
|
||||
</div>
|
||||
<div>
|
||||
<img class="rounded-xl" src="https://huggingface.co/datasets/huggingface/documentation-images/resolve/main/diffusers/hf-logo-canny.png"/>
|
||||
<figcaption class="mt-2 text-center text-sm text-gray-500">canny image</figcaption>
|
||||
</div>
|
||||
</div>
|
||||
|
||||
Load a SDXL ControlNet model conditioned on canny edge detection and pass it to the [`StableDiffusionXLControlNetPipeline`]. You can also enable model offloading to reduce memory usage.
|
||||
|
||||
```py
|
||||
controlnet = ControlNetModel.from_pretrained(
|
||||
"diffusers/controlnet-canny-sdxl-1.0",
|
||||
torch_dtype=torch.float16,
|
||||
use_safetensors=True
|
||||
)
|
||||
vae = AutoencoderKL.from_pretrained("madebyollin/sdxl-vae-fp16-fix", torch_dtype=torch.float16, use_safetensors=True)
|
||||
pipe = StableDiffusionXLControlNetPipeline.from_pretrained(
|
||||
"stabilityai/stable-diffusion-xl-base-1.0",
|
||||
controlnet=controlnet,
|
||||
vae=vae,
|
||||
torch_dtype=torch.float16,
|
||||
use_safetensors=True
|
||||
)
|
||||
pipe.enable_model_cpu_offload()
|
||||
```
|
||||
|
||||
Now pass your prompt (and optionally a negative prompt if you're using one) and canny image to the pipeline:
|
||||
|
||||
<Tip>
|
||||
|
||||
The [`controlnet_conditioning_scale`](https://huggingface.co/docs/diffusers/main/en/api/pipelines/controlnet#diffusers.StableDiffusionControlNetPipeline.__call__.controlnet_conditioning_scale) parameter determines how much weight to assign to the conditioning inputs. A value of 0.5 is recommended for good generalization, but feel free to experiment with this number!
|
||||
|
||||
</Tip>
|
||||
|
||||
```py
|
||||
prompt = "aerial view, a futuristic research complex in a bright foggy jungle, hard lighting"
|
||||
negative_prompt = 'low quality, bad quality, sketches'
|
||||
|
||||
images = pipe(
|
||||
prompt,
|
||||
negative_prompt=negative_prompt,
|
||||
image=image,
|
||||
controlnet_conditioning_scale=0.5,
|
||||
).images[0]
|
||||
images
|
||||
```
|
||||
|
||||
<div class="flex justify-center">
|
||||
<img class="rounded-xl" src="https://huggingface.co/diffusers/controlnet-canny-sdxl-1.0/resolve/main/out_hug_lab_7.png"/>
|
||||
</div>
|
||||
|
||||
You can use [`StableDiffusionXLControlNetPipeline`] in guess mode as well by setting the parameter to `True`:
|
||||
|
||||
```py
|
||||
from diffusers import StableDiffusionXLControlNetPipeline, ControlNetModel, AutoencoderKL
|
||||
from diffusers.utils import load_image
|
||||
import numpy as np
|
||||
import torch
|
||||
|
||||
import cv2
|
||||
from PIL import Image
|
||||
|
||||
prompt = "aerial view, a futuristic research complex in a bright foggy jungle, hard lighting"
|
||||
negative_prompt = "low quality, bad quality, sketches"
|
||||
|
||||
image = load_image(
|
||||
"https://hf.co/datasets/hf-internal-testing/diffusers-images/resolve/main/sd_controlnet/hf-logo.png"
|
||||
)
|
||||
|
||||
controlnet = ControlNetModel.from_pretrained(
|
||||
"diffusers/controlnet-canny-sdxl-1.0", torch_dtype=torch.float16, use_safetensors=True
|
||||
)
|
||||
vae = AutoencoderKL.from_pretrained("madebyollin/sdxl-vae-fp16-fix", torch_dtype=torch.float16, use_safetensors=True)
|
||||
pipe = StableDiffusionXLControlNetPipeline.from_pretrained(
|
||||
"stabilityai/stable-diffusion-xl-base-1.0", controlnet=controlnet, vae=vae, torch_dtype=torch.float16, use_safetensors=True
|
||||
)
|
||||
pipe.enable_model_cpu_offload()
|
||||
|
||||
image = np.array(image)
|
||||
image = cv2.Canny(image, 100, 200)
|
||||
image = image[:, :, None]
|
||||
image = np.concatenate([image, image, image], axis=2)
|
||||
canny_image = Image.fromarray(image)
|
||||
|
||||
image = pipe(
|
||||
prompt, controlnet_conditioning_scale=0.5, image=canny_image, guess_mode=True,
|
||||
).images[0]
|
||||
```
|
||||
|
||||
### MultiControlNet
|
||||
|
||||
<Tip>
|
||||
|
||||
Replace the SDXL model with a model like [runwayml/stable-diffusion-v1-5](https://huggingface.co/runwayml/stable-diffusion-v1-5) to use multiple conditioning inputs with Stable Diffusion models.
|
||||
|
||||
</Tip>
|
||||
|
||||
You can compose multiple ControlNet conditionings from different image inputs to create a *MultiControlNet*. To get better results, it is often helpful to:
|
||||
|
||||
1. mask conditionings such that they don't overlap (for example, mask the area of a canny image where the pose conditioning is located)
|
||||
2. experiment with the [`controlnet_conditioning_scale`](https://huggingface.co/docs/diffusers/main/en/api/pipelines/controlnet#diffusers.StableDiffusionControlNetPipeline.__call__.controlnet_conditioning_scale) parameter to determine how much weight to assign to each conditioning input
|
||||
|
||||
In this example, you'll combine a canny image and a human pose estimation image to generate a new image.
|
||||
|
||||
Prepare the canny image conditioning:
|
||||
|
||||
```py
|
||||
from diffusers.utils import load_image
|
||||
from PIL import Image
|
||||
import numpy as np
|
||||
import cv2
|
||||
|
||||
canny_image = load_image(
|
||||
"https://huggingface.co/datasets/huggingface/documentation-images/resolve/main/diffusers/landscape.png"
|
||||
)
|
||||
canny_image = np.array(canny_image)
|
||||
|
||||
low_threshold = 100
|
||||
high_threshold = 200
|
||||
|
||||
canny_image = cv2.Canny(canny_image, low_threshold, high_threshold)
|
||||
|
||||
# zero out middle columns of image where pose will be overlayed
|
||||
zero_start = canny_image.shape[1] // 4
|
||||
zero_end = zero_start + canny_image.shape[1] // 2
|
||||
canny_image[:, zero_start:zero_end] = 0
|
||||
|
||||
canny_image = canny_image[:, :, None]
|
||||
canny_image = np.concatenate([canny_image, canny_image, canny_image], axis=2)
|
||||
canny_image = Image.fromarray(canny_image).resize((1024, 1024))
|
||||
```
|
||||
|
||||
<div class="flex gap-4">
|
||||
<div>
|
||||
<img class="rounded-xl" src="https://huggingface.co/datasets/huggingface/documentation-images/resolve/main/diffusers/landscape.png"/>
|
||||
<figcaption class="mt-2 text-center text-sm text-gray-500">original image</figcaption>
|
||||
</div>
|
||||
<div>
|
||||
<img class="rounded-xl" src="https://huggingface.co/datasets/huggingface/documentation-images/resolve/main/blog/controlnet/landscape_canny_masked.png"/>
|
||||
<figcaption class="mt-2 text-center text-sm text-gray-500">canny image</figcaption>
|
||||
</div>
|
||||
</div>
|
||||
|
||||
Prepare the human pose estimation conditioning:
|
||||
|
||||
```py
|
||||
from controlnet_aux import OpenposeDetector
|
||||
from diffusers.utils import load_image
|
||||
|
||||
openpose = OpenposeDetector.from_pretrained("lllyasviel/ControlNet")
|
||||
|
||||
openpose_image = load_image(
|
||||
"https://huggingface.co/datasets/huggingface/documentation-images/resolve/main/diffusers/person.png"
|
||||
)
|
||||
openpose_image = openpose(openpose_image).resize((1024, 1024))
|
||||
```
|
||||
|
||||
<div class="flex gap-4">
|
||||
<div>
|
||||
<img class="rounded-xl" src="https://huggingface.co/datasets/huggingface/documentation-images/resolve/main/diffusers/person.png"/>
|
||||
<figcaption class="mt-2 text-center text-sm text-gray-500">original image</figcaption>
|
||||
</div>
|
||||
<div>
|
||||
<img class="rounded-xl" src="https://huggingface.co/datasets/huggingface/documentation-images/resolve/main/blog/controlnet/person_pose.png"/>
|
||||
<figcaption class="mt-2 text-center text-sm text-gray-500">human pose image</figcaption>
|
||||
</div>
|
||||
</div>
|
||||
|
||||
Load a list of ControlNet models that correspond to each conditioning, and pass them to the [`StableDiffusionXLControlNetPipeline`]. Use the faster [`UniPCMultistepScheduler`] and enable model offloading to reduce memory usage.
|
||||
|
||||
```py
|
||||
from diffusers import StableDiffusionXLControlNetPipeline, ControlNetModel, AutoencoderKL, UniPCMultistepScheduler
|
||||
import torch
|
||||
|
||||
controlnets = [
|
||||
ControlNetModel.from_pretrained(
|
||||
"thibaud/controlnet-openpose-sdxl-1.0", torch_dtype=torch.float16, use_safetensors=True
|
||||
),
|
||||
ControlNetModel.from_pretrained(
|
||||
"diffusers/controlnet-canny-sdxl-1.0", torch_dtype=torch.float16, use_safetensors=True
|
||||
),
|
||||
]
|
||||
|
||||
vae = AutoencoderKL.from_pretrained("madebyollin/sdxl-vae-fp16-fix", torch_dtype=torch.float16, use_safetensors=True)
|
||||
pipe = StableDiffusionXLControlNetPipeline.from_pretrained(
|
||||
"stabilityai/stable-diffusion-xl-base-1.0", controlnet=controlnets, vae=vae, torch_dtype=torch.float16, use_safetensors=True
|
||||
)
|
||||
pipe.scheduler = UniPCMultistepScheduler.from_config(pipe.scheduler.config)
|
||||
pipe.enable_model_cpu_offload()
|
||||
```
|
||||
|
||||
Now you can pass your prompt (an optional negative prompt if you're using one), canny image, and pose image to the pipeline:
|
||||
|
||||
```py
|
||||
prompt = "a giant standing in a fantasy landscape, best quality"
|
||||
negative_prompt = "monochrome, lowres, bad anatomy, worst quality, low quality"
|
||||
|
||||
generator = torch.manual_seed(1)
|
||||
|
||||
images = [openpose_image, canny_image]
|
||||
|
||||
images = pipe(
|
||||
prompt,
|
||||
image=images,
|
||||
num_inference_steps=25,
|
||||
generator=generator,
|
||||
negative_prompt=negative_prompt,
|
||||
num_images_per_prompt=3,
|
||||
controlnet_conditioning_scale=[1.0, 0.8],
|
||||
).images[0]
|
||||
```
|
||||
|
||||
<div class="flex justify-center">
|
||||
<img class="rounded-xl" src="https://huggingface.co/datasets/huggingface/documentation-images/resolve/main/diffusers/multicontrolnet.png"/>
|
||||
</div>
|
||||
@@ -32,7 +32,7 @@ If a community doesn't work as expected, please open an issue and ping the autho
|
||||
To load a custom pipeline you just need to pass the `custom_pipeline` argument to `DiffusionPipeline`, as one of the files in `diffusers/examples/community`. Feel free to send a PR with your own pipelines, we will merge them quickly.
|
||||
```py
|
||||
pipe = DiffusionPipeline.from_pretrained(
|
||||
"CompVis/stable-diffusion-v1-4", custom_pipeline="filename_in_the_community_folder", use_safetensors=True
|
||||
"CompVis/stable-diffusion-v1-4", custom_pipeline="filename_in_the_community_folder"
|
||||
)
|
||||
```
|
||||
|
||||
@@ -61,7 +61,6 @@ guided_pipeline = DiffusionPipeline.from_pretrained(
|
||||
clip_model=clip_model,
|
||||
feature_extractor=feature_extractor,
|
||||
torch_dtype=torch.float16,
|
||||
use_safetensors=True,
|
||||
)
|
||||
guided_pipeline.enable_attention_slicing()
|
||||
guided_pipeline = guided_pipeline.to("cuda")
|
||||
@@ -118,7 +117,6 @@ pipe = DiffusionPipeline.from_pretrained(
|
||||
torch_dtype=torch.float16,
|
||||
safety_checker=None, # Very important for videos...lots of false positives while interpolating
|
||||
custom_pipeline="interpolate_stable_diffusion",
|
||||
use_safetensors=True,
|
||||
).to("cuda")
|
||||
pipe.enable_attention_slicing()
|
||||
|
||||
@@ -161,7 +159,6 @@ pipe = DiffusionPipeline.from_pretrained(
|
||||
"CompVis/stable-diffusion-v1-4",
|
||||
custom_pipeline="stable_diffusion_mega",
|
||||
torch_dtype=torch.float16,
|
||||
use_safetensors=True,
|
||||
)
|
||||
pipe.to("cuda")
|
||||
pipe.enable_attention_slicing()
|
||||
@@ -206,7 +203,7 @@ from diffusers import DiffusionPipeline
|
||||
import torch
|
||||
|
||||
pipe = DiffusionPipeline.from_pretrained(
|
||||
"hakurei/waifu-diffusion", custom_pipeline="lpw_stable_diffusion", torch_dtype=torch.float16, use_safetensors=True
|
||||
"hakurei/waifu-diffusion", custom_pipeline="lpw_stable_diffusion", torch_dtype=torch.float16
|
||||
)
|
||||
pipe = pipe.to("cuda")
|
||||
|
||||
@@ -227,7 +224,6 @@ pipe = DiffusionPipeline.from_pretrained(
|
||||
custom_pipeline="lpw_stable_diffusion_onnx",
|
||||
revision="onnx",
|
||||
provider="CUDAExecutionProvider",
|
||||
use_safetensors=True,
|
||||
)
|
||||
|
||||
prompt = "a photo of an astronaut riding a horse on mars, best quality"
|
||||
@@ -271,8 +267,8 @@ diffuser_pipeline = DiffusionPipeline.from_pretrained(
|
||||
custom_pipeline="speech_to_image_diffusion",
|
||||
speech_model=model,
|
||||
speech_processor=processor,
|
||||
|
||||
torch_dtype=torch.float16,
|
||||
use_safetensors=True,
|
||||
)
|
||||
|
||||
diffuser_pipeline.enable_attention_slicing()
|
||||
|
||||
@@ -30,7 +30,7 @@ To load any community pipeline on the Hub, pass the repository id of the communi
|
||||
from diffusers import DiffusionPipeline
|
||||
|
||||
pipeline = DiffusionPipeline.from_pretrained(
|
||||
"google/ddpm-cifar10-32", custom_pipeline="hf-internal-testing/diffusers-dummy-pipeline", use_safetensors=True
|
||||
"google/ddpm-cifar10-32", custom_pipeline="hf-internal-testing/diffusers-dummy-pipeline"
|
||||
)
|
||||
```
|
||||
|
||||
@@ -50,7 +50,6 @@ pipeline = DiffusionPipeline.from_pretrained(
|
||||
custom_pipeline="clip_guided_stable_diffusion",
|
||||
clip_model=clip_model,
|
||||
feature_extractor=feature_extractor,
|
||||
use_safetensors=True,
|
||||
)
|
||||
```
|
||||
|
||||
|
||||
@@ -28,7 +28,6 @@ from diffusers import StableDiffusionDepth2ImgPipeline
|
||||
pipe = StableDiffusionDepth2ImgPipeline.from_pretrained(
|
||||
"stabilityai/stable-diffusion-2-depth",
|
||||
torch_dtype=torch.float16,
|
||||
use_safetensors=True,
|
||||
).to("cuda")
|
||||
```
|
||||
|
||||
|
||||
@@ -1,262 +0,0 @@
|
||||
# DiffEdit
|
||||
|
||||
[[open-in-colab]]
|
||||
|
||||
Image editing typically requires providing a mask of the area to be edited. DiffEdit automatically generates the mask for you based on a text query, making it easier overall to create a mask without image editing software. The DiffEdit algorithm works in three steps:
|
||||
|
||||
1. the diffusion model denoises an image conditioned on some query text and reference text which produces different noise estimates for different areas of the image; the difference is used to infer a mask to identify which area of the image needs to be changed to match the query text
|
||||
2. the input image is encoded into latent space with DDIM
|
||||
3. the latents are decoded with the diffusion model conditioned on the text query, using the mask as a guide such that pixels outside the mask remain the same as in the input image
|
||||
|
||||
This guide will show you how to use DiffEdit to edit images without manually creating a mask.
|
||||
|
||||
Before you begin, make sure you have the following libraries installed:
|
||||
|
||||
```py
|
||||
# uncomment to install the necessary libraries in Colab
|
||||
#!pip install diffusers transformers accelerate safetensors
|
||||
```
|
||||
|
||||
The [`StableDiffusionDiffEditPipeline`] requires an image mask and a set of partially inverted latents. The image mask is generated from the [`~StableDiffusionDiffEditPipeline.generate_mask`] function, and includes two parameters, `source_prompt` and `target_prompt`. These parameters determine what to edit in the image. For example, if you want to change a bowl of *fruits* to a bowl of *pears*, then:
|
||||
|
||||
```py
|
||||
source_prompt = "a bowl of fruits"
|
||||
target_prompt = "a bowl of pears"
|
||||
```
|
||||
|
||||
The partially inverted latents are generated from the [`~StableDiffusionDiffEditPipeline.invert`] function, and it is generally a good idea to include a `prompt` or *caption* describing the image to help guide the inverse latent sampling process. The caption can often be your `source_prompt`, but feel free to experiment with other text descriptions!
|
||||
|
||||
Let's load the pipeline, scheduler, inverse scheduler, and enable some optimizations to reduce memory usage:
|
||||
|
||||
```py
|
||||
import torch
|
||||
from diffusers import DDIMScheduler, DDIMInverseScheduler, StableDiffusionDiffEditPipeline
|
||||
|
||||
pipeline = StableDiffusionDiffEditPipeline.from_pretrained(
|
||||
"stabilityai/stable-diffusion-2-1",
|
||||
torch_dtype=torch.float16,
|
||||
safety_checker=None,
|
||||
use_safetensors=True,
|
||||
)
|
||||
pipeline.scheduler = DDIMScheduler.from_config(pipeline.scheduler.config)
|
||||
pipeline.inverse_scheduler = DDIMInverseScheduler.from_config(pipeline.scheduler.config)
|
||||
pipeline.enable_model_cpu_offload()
|
||||
pipeline.enable_vae_slicing()
|
||||
```
|
||||
|
||||
Load the image to edit:
|
||||
|
||||
```py
|
||||
from diffusers.utils import load_image
|
||||
|
||||
img_url = "https://github.com/Xiang-cd/DiffEdit-stable-diffusion/raw/main/assets/origin.png"
|
||||
raw_image = load_image(img_url).convert("RGB").resize((768, 768))
|
||||
```
|
||||
|
||||
Use the [`~StableDiffusionDiffEditPipeline.generate_mask`] function to generate the image mask. You'll need to pass it the `source_prompt` and `target_prompt` to specify what to edit in the image:
|
||||
|
||||
```py
|
||||
source_prompt = "a bowl of fruits"
|
||||
target_prompt = "a basket of pears"
|
||||
mask_image = pipeline.generate_mask(
|
||||
image=raw_image,
|
||||
source_prompt=source_prompt,
|
||||
target_prompt=target_prompt,
|
||||
)
|
||||
```
|
||||
|
||||
Next, create the inverted latents and pass it a caption describing the image:
|
||||
|
||||
```py
|
||||
inv_latents = pipeline.invert(prompt=source_prompt, image=raw_image).latents
|
||||
```
|
||||
|
||||
Finally, pass the image mask and inverted latents to the pipeline. The `target_prompt` becomes the `prompt` now, and the `source_prompt` is used as the `negative_prompt`:
|
||||
|
||||
```py
|
||||
image = pipeline(
|
||||
prompt=target_prompt,
|
||||
mask_image=mask_image,
|
||||
image_latents=inv_latents,
|
||||
negative_prompt=source_prompt,
|
||||
).images[0]
|
||||
image.save("edited_image.png")
|
||||
```
|
||||
|
||||
<div class="flex gap-4">
|
||||
<div>
|
||||
<img class="rounded-xl" src="https://github.com/Xiang-cd/DiffEdit-stable-diffusion/raw/main/assets/origin.png"/>
|
||||
<figcaption class="mt-2 text-center text-sm text-gray-500">original image</figcaption>
|
||||
</div>
|
||||
<div>
|
||||
<img class="rounded-xl" src="https://github.com/Xiang-cd/DiffEdit-stable-diffusion/blob/main/assets/target.png?raw=true"/>
|
||||
<figcaption class="mt-2 text-center text-sm text-gray-500">edited image</figcaption>
|
||||
</div>
|
||||
</div>
|
||||
|
||||
## Generate source and target embeddings
|
||||
|
||||
The source and target embeddings can be automatically generated with the [Flan-T5](https://huggingface.co/docs/transformers/model_doc/flan-t5) model instead of creating them manually.
|
||||
|
||||
Load the Flan-T5 model and tokenizer from the 🤗 Transformers library:
|
||||
|
||||
```py
|
||||
import torch
|
||||
from transformers import AutoTokenizer, T5ForConditionalGeneration
|
||||
|
||||
tokenizer = AutoTokenizer.from_pretrained("google/flan-t5-xl")
|
||||
model = T5ForConditionalGeneration.from_pretrained("google/flan-t5-xl", device_map="auto", torch_dtype=torch.float16)
|
||||
```
|
||||
|
||||
Provide some initial text to prompt the model to generate the source and target prompts.
|
||||
|
||||
```py
|
||||
source_concept = "bowl"
|
||||
target_concept = "basket"
|
||||
|
||||
source_text = f"Provide a caption for images containing a {source_concept}. "
|
||||
"The captions should be in English and should be no longer than 150 characters."
|
||||
|
||||
target_text = f"Provide a caption for images containing a {target_concept}. "
|
||||
"The captions should be in English and should be no longer than 150 characters."
|
||||
```
|
||||
|
||||
Next, create a utility function to generate the prompts:
|
||||
|
||||
```py
|
||||
@torch.no_grad
|
||||
def generate_prompts(input_prompt):
|
||||
input_ids = tokenizer(input_prompt, return_tensors="pt").input_ids.to("cuda")
|
||||
|
||||
outputs = model.generate(
|
||||
input_ids, temperature=0.8, num_return_sequences=16, do_sample=True, max_new_tokens=128, top_k=10
|
||||
)
|
||||
return tokenizer.batch_decode(outputs, skip_special_tokens=True)
|
||||
|
||||
source_prompts = generate_prompts(source_text)
|
||||
target_prompts = generate_prompts(target_text)
|
||||
print(source_prompts)
|
||||
print(target_prompts)
|
||||
```
|
||||
|
||||
<Tip>
|
||||
|
||||
Check out the [generation strategy](https://huggingface.co/docs/transformers/main/en/generation_strategies) guide if you're interested in learning more about strategies for generating different quality text.
|
||||
|
||||
</Tip>
|
||||
|
||||
Load the text encoder model used by the [`StableDiffusionDiffEditPipeline`] to encode the text. You'll use the text encoder to compute the text embeddings:
|
||||
|
||||
```py
|
||||
import torch
|
||||
from diffusers import StableDiffusionDiffEditPipeline
|
||||
|
||||
pipeline = StableDiffusionDiffEditPipeline.from_pretrained(
|
||||
"stabilityai/stable-diffusion-2-1", torch_dtype=torch.float16, use_safetensors=True
|
||||
).to("cuda")
|
||||
pipeline.enable_model_cpu_offload()
|
||||
pipeline.enable_vae_slicing()
|
||||
|
||||
@torch.no_grad()
|
||||
def embed_prompts(sentences, tokenizer, text_encoder, device="cuda"):
|
||||
embeddings = []
|
||||
for sent in sentences:
|
||||
text_inputs = tokenizer(
|
||||
sent,
|
||||
padding="max_length",
|
||||
max_length=tokenizer.model_max_length,
|
||||
truncation=True,
|
||||
return_tensors="pt",
|
||||
)
|
||||
text_input_ids = text_inputs.input_ids
|
||||
prompt_embeds = text_encoder(text_input_ids.to(device), attention_mask=None)[0]
|
||||
embeddings.append(prompt_embeds)
|
||||
return torch.concatenate(embeddings, dim=0).mean(dim=0).unsqueeze(0)
|
||||
|
||||
source_embeds = embed_prompts(source_prompts, pipeline.tokenizer, pipeline.text_encoder)
|
||||
target_embeds = embed_prompts(target_prompts, pipeline.tokenizer, pipeline.text_encoder)
|
||||
```
|
||||
|
||||
Finally, pass the embeddings to the [`~StableDiffusionDiffEditPipeline.generate_mask`] and [`~StableDiffusionDiffEditPipeline.invert`] functions, and pipeline to generate the image:
|
||||
|
||||
```diff
|
||||
from diffusers import DDIMInverseScheduler, DDIMScheduler
|
||||
from diffusers.utils import load_image
|
||||
|
||||
pipeline.scheduler = DDIMScheduler.from_config(pipeline.scheduler.config)
|
||||
pipeline.inverse_scheduler = DDIMInverseScheduler.from_config(pipeline.scheduler.config)
|
||||
|
||||
img_url = "https://github.com/Xiang-cd/DiffEdit-stable-diffusion/raw/main/assets/origin.png"
|
||||
raw_image = load_image(img_url).convert("RGB").resize((768, 768))
|
||||
|
||||
|
||||
mask_image = pipeline.generate_mask(
|
||||
image=raw_image,
|
||||
+ source_prompt_embeds=source_embeds,
|
||||
+ target_prompt_embeds=target_embeds,
|
||||
)
|
||||
|
||||
inv_latents = pipeline.invert(
|
||||
+ prompt_embeds=source_embeds,
|
||||
image=raw_image,
|
||||
).latents
|
||||
|
||||
images = pipeline(
|
||||
mask_image=mask_image,
|
||||
image_latents=inv_latents,
|
||||
+ prompt_embeds=target_embeds,
|
||||
+ negative_prompt_embeds=source_embeds,
|
||||
).images
|
||||
images[0].save("edited_image.png")
|
||||
```
|
||||
|
||||
## Generate a caption for inversion
|
||||
|
||||
While you can use the `source_prompt` as a caption to help generate the partially inverted latents, you can also use the [BLIP](https://huggingface.co/docs/transformers/model_doc/blip) model to automatically generate a caption.
|
||||
|
||||
Load the BLIP model and processor from the 🤗 Transformers library:
|
||||
|
||||
```py
|
||||
import torch
|
||||
from transformers import BlipForConditionalGeneration, BlipProcessor
|
||||
|
||||
processor = BlipProcessor.from_pretrained("Salesforce/blip-image-captioning-base")
|
||||
model = BlipForConditionalGeneration.from_pretrained("Salesforce/blip-image-captioning-base", torch_dtype=torch.float16, low_cpu_mem_usage=True)
|
||||
```
|
||||
|
||||
Create a utility function to generate a caption from the input image:
|
||||
|
||||
```py
|
||||
@torch.no_grad()
|
||||
def generate_caption(images, caption_generator, caption_processor):
|
||||
text = "a photograph of"
|
||||
|
||||
inputs = caption_processor(images, text, return_tensors="pt").to(device="cuda", dtype=caption_generator.dtype)
|
||||
caption_generator.to("cuda")
|
||||
outputs = caption_generator.generate(**inputs, max_new_tokens=128)
|
||||
|
||||
# offload caption generator
|
||||
caption_generator.to("cpu")
|
||||
|
||||
caption = caption_processor.batch_decode(outputs, skip_special_tokens=True)[0]
|
||||
return caption
|
||||
```
|
||||
|
||||
Load an input image and generate a caption for it using the `generate_caption` function:
|
||||
|
||||
```py
|
||||
from diffusers.utils import load_image
|
||||
|
||||
img_url = "https://github.com/Xiang-cd/DiffEdit-stable-diffusion/raw/main/assets/origin.png"
|
||||
raw_image = load_image(img_url).convert("RGB").resize((768, 768))
|
||||
caption = generate_caption(raw_image, model, processor)
|
||||
```
|
||||
|
||||
<div class="flex justify-center">
|
||||
<figure>
|
||||
<img class="rounded-xl" src="https://github.com/Xiang-cd/DiffEdit-stable-diffusion/raw/main/assets/origin.png"/>
|
||||
<figcaption class="text-center">generated caption: "a photograph of a bowl of fruit on a table"</figcaption>
|
||||
</figure>
|
||||
</div>
|
||||
|
||||
Now you can drop the caption into the [`~StableDiffusionDiffEditPipeline.invert`] function to generate the partially inverted latents!
|
||||
@@ -1,121 +0,0 @@
|
||||
# Distilled Stable Diffusion inference
|
||||
|
||||
[[open-in-colab]]
|
||||
|
||||
Stable Diffusion inference can be a computationally intensive process because it must iteratively denoise the latents to generate an image. To reduce the computational burden, you can use a *distilled* version of the Stable Diffusion model from [Nota AI](https://huggingface.co/nota-ai). The distilled version of their Stable Diffusion model eliminates some of the residual and attention blocks from the UNet, reducing the model size by 51% and improving latency on CPU/GPU by 43%.
|
||||
|
||||
<Tip>
|
||||
|
||||
Read this [blog post](https://huggingface.co/blog/sd_distillation) to learn more about how knowledge distillation training works to produce a faster, smaller, and cheaper generative model.
|
||||
|
||||
</Tip>
|
||||
|
||||
Let's load the distilled Stable Diffusion model and compare it against the original Stable Diffusion model:
|
||||
|
||||
```py
|
||||
from diffusers import StableDiffusionPipeline
|
||||
import torch
|
||||
|
||||
distilled = StableDiffusionPipeline.from_pretrained(
|
||||
"nota-ai/bk-sdm-small", torch_dtype=torch.float16, use_safetensors=True,
|
||||
).to("cuda")
|
||||
|
||||
original = StableDiffusionPipeline.from_pretrained(
|
||||
"CompVis/stable-diffusion-v1-4", torch_dtype=torch.float16, use_safetensors=True,
|
||||
).to("cuda")
|
||||
```
|
||||
|
||||
Given a prompt, get the inference time for the original model:
|
||||
|
||||
```py
|
||||
import time
|
||||
|
||||
seed = 2023
|
||||
generator = torch.manual_seed(seed)
|
||||
|
||||
NUM_ITERS_TO_RUN = 3
|
||||
NUM_INFERENCE_STEPS = 25
|
||||
NUM_IMAGES_PER_PROMPT = 4
|
||||
|
||||
prompt = "a golden vase with different flowers"
|
||||
|
||||
start = time.time_ns()
|
||||
for _ in range(NUM_ITERS_TO_RUN):
|
||||
images = original(
|
||||
prompt,
|
||||
num_inference_steps=NUM_INFERENCE_STEPS,
|
||||
generator=generator,
|
||||
num_images_per_prompt=NUM_IMAGES_PER_PROMPT
|
||||
).images
|
||||
end = time.time_ns()
|
||||
original_sd = f"{(end - start) / 1e6:.1f}"
|
||||
|
||||
print(f"Execution time -- {original_sd} ms\n")
|
||||
"Execution time -- 45781.5 ms"
|
||||
```
|
||||
|
||||
Time the distilled model inference:
|
||||
|
||||
```py
|
||||
start = time.time_ns()
|
||||
for _ in range(NUM_ITERS_TO_RUN):
|
||||
images = distilled(
|
||||
prompt,
|
||||
num_inference_steps=NUM_INFERENCE_STEPS,
|
||||
generator=generator,
|
||||
num_images_per_prompt=NUM_IMAGES_PER_PROMPT
|
||||
).images
|
||||
end = time.time_ns()
|
||||
|
||||
distilled_sd = f"{(end - start) / 1e6:.1f}"
|
||||
print(f"Execution time -- {distilled_sd} ms\n")
|
||||
"Execution time -- 29884.2 ms"
|
||||
```
|
||||
|
||||
<div class="flex gap-4">
|
||||
<div>
|
||||
<img class="rounded-xl" src="https://huggingface.co/datasets/huggingface/documentation-images/resolve/main/diffusers/original_sd.png"/>
|
||||
<figcaption class="mt-2 text-center text-sm text-gray-500">original Stable Diffusion (45781.5 ms)</figcaption>
|
||||
</div>
|
||||
<div>
|
||||
<img class="rounded-xl" src="https://huggingface.co/datasets/huggingface/documentation-images/resolve/main/diffusers/distilled_sd.png"/>
|
||||
<figcaption class="mt-2 text-center text-sm text-gray-500">distilled Stable Diffusion (29884.2 ms)</figcaption>
|
||||
</div>
|
||||
</div>
|
||||
|
||||
## Tiny AutoEncoder
|
||||
|
||||
To speed inference up even more, use a tiny distilled version of the [Stable Diffusion VAE](https://huggingface.co/sayakpaul/taesdxl-diffusers) to denoise the latents into images. Replace the VAE in the distilled Stable Diffusion model with the tiny VAE:
|
||||
|
||||
```py
|
||||
from diffusers import AutoencoderTiny
|
||||
|
||||
distilled.vae = AutoencoderTiny.from_pretrained(
|
||||
"sayakpaul/taesd-diffusers", torch_dtype=torch.float16, use_safetensors=True,
|
||||
).to("cuda")
|
||||
```
|
||||
|
||||
Time the distilled model and distilled VAE inference:
|
||||
|
||||
```py
|
||||
start = time.time_ns()
|
||||
for _ in range(NUM_ITERS_TO_RUN):
|
||||
images = distilled(
|
||||
prompt,
|
||||
num_inference_steps=NUM_INFERENCE_STEPS,
|
||||
generator=generator,
|
||||
num_images_per_prompt=NUM_IMAGES_PER_PROMPT
|
||||
).images
|
||||
end = time.time_ns()
|
||||
|
||||
distilled_tiny_sd = f"{(end - start) / 1e6:.1f}"
|
||||
print(f"Execution time -- {distilled_tiny_sd} ms\n")
|
||||
"Execution time -- 27165.7 ms"
|
||||
```
|
||||
|
||||
<div class="flex justify-center">
|
||||
<div>
|
||||
<img class="rounded-xl" src="https://huggingface.co/datasets/huggingface/documentation-images/resolve/main/diffusers/distilled_sd_vae.png" />
|
||||
<figcaption class="mt-2 text-center text-sm text-gray-500">distilled Stable Diffusion + Tiny AutoEncoder (27165.7 ms)</figcaption>
|
||||
</div>
|
||||
</div>
|
||||
@@ -33,9 +33,9 @@ from io import BytesIO
|
||||
from diffusers import StableDiffusionImg2ImgPipeline
|
||||
|
||||
device = "cuda"
|
||||
pipe = StableDiffusionImg2ImgPipeline.from_pretrained(
|
||||
"nitrosocke/Ghibli-Diffusion", torch_dtype=torch.float16, use_safetensors=True
|
||||
).to(device)
|
||||
pipe = StableDiffusionImg2ImgPipeline.from_pretrained("nitrosocke/Ghibli-Diffusion", torch_dtype=torch.float16).to(
|
||||
device
|
||||
)
|
||||
```
|
||||
|
||||
Download and preprocess an initial image so you can pass it to the pipeline:
|
||||
|
||||
@@ -29,8 +29,6 @@ from diffusers import StableDiffusionInpaintPipeline
|
||||
pipeline = StableDiffusionInpaintPipeline.from_pretrained(
|
||||
"runwayml/stable-diffusion-inpainting",
|
||||
torch_dtype=torch.float16,
|
||||
use_safetensors=True,
|
||||
variant="fp16",
|
||||
)
|
||||
pipeline = pipeline.to("cuda")
|
||||
```
|
||||
@@ -76,49 +74,3 @@ Check out the Spaces below to try out image inpainting yourself!
|
||||
width="850"
|
||||
height="500"
|
||||
></iframe>
|
||||
|
||||
## Preserving the Unmasked Area of the Image
|
||||
|
||||
Generally speaking, [`StableDiffusionInpaintPipeline`] (and other inpainting pipelines) will change the unmasked part of the image as well. If this behavior is undesirable, you can force the unmasked area to remain the same as follows:
|
||||
|
||||
```python
|
||||
import PIL
|
||||
import numpy as np
|
||||
import torch
|
||||
|
||||
from diffusers import StableDiffusionInpaintPipeline
|
||||
from diffusers.utils import load_image
|
||||
|
||||
device = "cuda"
|
||||
pipeline = StableDiffusionInpaintPipeline.from_pretrained(
|
||||
"runwayml/stable-diffusion-inpainting",
|
||||
torch_dtype=torch.float16,
|
||||
)
|
||||
pipeline = pipeline.to(device)
|
||||
|
||||
img_url = "https://raw.githubusercontent.com/CompVis/latent-diffusion/main/data/inpainting_examples/overture-creations-5sI6fQgYIuo.png"
|
||||
mask_url = "https://raw.githubusercontent.com/CompVis/latent-diffusion/main/data/inpainting_examples/overture-creations-5sI6fQgYIuo_mask.png"
|
||||
|
||||
init_image = load_image(img_url).resize((512, 512))
|
||||
mask_image = load_image(mask_url).resize((512, 512))
|
||||
|
||||
prompt = "Face of a yellow cat, high resolution, sitting on a park bench"
|
||||
repainted_image = pipeline(prompt=prompt, image=init_image, mask_image=mask_image).images[0]
|
||||
repainted_image.save("repainted_image.png")
|
||||
|
||||
# Convert mask to grayscale NumPy array
|
||||
mask_image_arr = np.array(mask_image.convert("L"))
|
||||
# Add a channel dimension to the end of the grayscale mask
|
||||
mask_image_arr = mask_image_arr[:, :, None]
|
||||
# Binarize the mask: 1s correspond to the pixels which are repainted
|
||||
mask_image_arr = mask_image_arr.astype(np.float32) / 255.0
|
||||
mask_image_arr[mask_image_arr < 0.5] = 0
|
||||
mask_image_arr[mask_image_arr >= 0.5] = 1
|
||||
|
||||
# Take the masked pixels from the repainted image and the unmasked pixels from the initial image
|
||||
unmasked_unchanged_image_arr = (1 - mask_image_arr) * init_image + mask_image_arr * repainted_image
|
||||
unmasked_unchanged_image = PIL.Image.fromarray(unmasked_unchanged_image_arr.round().astype("uint8"))
|
||||
unmasked_unchanged_image.save("force_unmasked_unchanged.png")
|
||||
```
|
||||
|
||||
Forcing the unmasked portion of the image to remain the same might result in some weird transitions between the unmasked and masked areas, since the model will typically change the masked and unmasked areas to make the transition more natural.
|
||||
|
||||
@@ -39,7 +39,7 @@ The [`DiffusionPipeline`] class is the simplest and most generic way to load any
|
||||
from diffusers import DiffusionPipeline
|
||||
|
||||
repo_id = "runwayml/stable-diffusion-v1-5"
|
||||
pipe = DiffusionPipeline.from_pretrained(repo_id, use_safetensors=True)
|
||||
pipe = DiffusionPipeline.from_pretrained(repo_id)
|
||||
```
|
||||
|
||||
You can also load a checkpoint with it's specific pipeline class. The example above loaded a Stable Diffusion model; to get the same result, use the [`StableDiffusionPipeline`] class:
|
||||
@@ -48,7 +48,7 @@ You can also load a checkpoint with it's specific pipeline class. The example ab
|
||||
from diffusers import StableDiffusionPipeline
|
||||
|
||||
repo_id = "runwayml/stable-diffusion-v1-5"
|
||||
pipe = StableDiffusionPipeline.from_pretrained(repo_id, use_safetensors=True)
|
||||
pipe = StableDiffusionPipeline.from_pretrained(repo_id)
|
||||
```
|
||||
|
||||
A checkpoint (such as [`CompVis/stable-diffusion-v1-4`](https://huggingface.co/CompVis/stable-diffusion-v1-4) or [`runwayml/stable-diffusion-v1-5`](https://huggingface.co/runwayml/stable-diffusion-v1-5)) may also be used for more than one task, like text-to-image or image-to-image. To differentiate what task you want to use the checkpoint for, you have to load it directly with it's corresponding task-specific pipeline class:
|
||||
@@ -65,7 +65,7 @@ pipe = StableDiffusionImg2ImgPipeline.from_pretrained(repo_id)
|
||||
To load a diffusion pipeline locally, use [`git-lfs`](https://git-lfs.github.com/) to manually download the checkpoint (in this case, [`runwayml/stable-diffusion-v1-5`](https://huggingface.co/runwayml/stable-diffusion-v1-5)) to your local disk. This creates a local folder, `./stable-diffusion-v1-5`, on your disk:
|
||||
|
||||
```bash
|
||||
git-lfs install
|
||||
git lfs install
|
||||
git clone https://huggingface.co/runwayml/stable-diffusion-v1-5
|
||||
```
|
||||
|
||||
@@ -75,7 +75,7 @@ Then pass the local path to [`~DiffusionPipeline.from_pretrained`]:
|
||||
from diffusers import DiffusionPipeline
|
||||
|
||||
repo_id = "./stable-diffusion-v1-5"
|
||||
stable_diffusion = DiffusionPipeline.from_pretrained(repo_id, use_safetensors=True)
|
||||
stable_diffusion = DiffusionPipeline.from_pretrained(repo_id)
|
||||
```
|
||||
|
||||
The [`~DiffusionPipeline.from_pretrained`] method won't download any files from the Hub when it detects a local path, but this also means it won't download and cache the latest changes to a checkpoint.
|
||||
@@ -94,7 +94,7 @@ To find out which schedulers are compatible for customization, you can use the `
|
||||
from diffusers import DiffusionPipeline
|
||||
|
||||
repo_id = "runwayml/stable-diffusion-v1-5"
|
||||
stable_diffusion = DiffusionPipeline.from_pretrained(repo_id, use_safetensors=True)
|
||||
stable_diffusion = DiffusionPipeline.from_pretrained(repo_id)
|
||||
stable_diffusion.scheduler.compatibles
|
||||
```
|
||||
|
||||
@@ -109,7 +109,7 @@ repo_id = "runwayml/stable-diffusion-v1-5"
|
||||
|
||||
scheduler = EulerDiscreteScheduler.from_pretrained(repo_id, subfolder="scheduler")
|
||||
|
||||
stable_diffusion = DiffusionPipeline.from_pretrained(repo_id, scheduler=scheduler, use_safetensors=True)
|
||||
stable_diffusion = DiffusionPipeline.from_pretrained(repo_id, scheduler=scheduler)
|
||||
```
|
||||
|
||||
### Safety checker
|
||||
@@ -120,7 +120,7 @@ Diffusion models like Stable Diffusion can generate harmful content, which is wh
|
||||
from diffusers import DiffusionPipeline
|
||||
|
||||
repo_id = "runwayml/stable-diffusion-v1-5"
|
||||
stable_diffusion = DiffusionPipeline.from_pretrained(repo_id, safety_checker=None, use_safetensors=True)
|
||||
stable_diffusion = DiffusionPipeline.from_pretrained(repo_id, safety_checker=None)
|
||||
```
|
||||
|
||||
### Reuse components across pipelines
|
||||
@@ -131,7 +131,7 @@ You can also reuse the same components in multiple pipelines to avoid loading th
|
||||
from diffusers import StableDiffusionPipeline, StableDiffusionImg2ImgPipeline
|
||||
|
||||
model_id = "runwayml/stable-diffusion-v1-5"
|
||||
stable_diffusion_txt2img = StableDiffusionPipeline.from_pretrained(model_id, use_safetensors=True)
|
||||
stable_diffusion_txt2img = StableDiffusionPipeline.from_pretrained(model_id)
|
||||
|
||||
components = stable_diffusion_txt2img.components
|
||||
```
|
||||
@@ -148,7 +148,7 @@ You can also pass the components individually to the pipeline if you want more f
|
||||
from diffusers import StableDiffusionPipeline, StableDiffusionImg2ImgPipeline
|
||||
|
||||
model_id = "runwayml/stable-diffusion-v1-5"
|
||||
stable_diffusion_txt2img = StableDiffusionPipeline.from_pretrained(model_id, use_safetensors=True)
|
||||
stable_diffusion_txt2img = StableDiffusionPipeline.from_pretrained(model_id)
|
||||
stable_diffusion_img2img = StableDiffusionImg2ImgPipeline(
|
||||
vae=stable_diffusion_txt2img.vae,
|
||||
text_encoder=stable_diffusion_txt2img.text_encoder,
|
||||
@@ -194,12 +194,10 @@ import torch
|
||||
|
||||
# load fp16 variant
|
||||
stable_diffusion = DiffusionPipeline.from_pretrained(
|
||||
"runwayml/stable-diffusion-v1-5", variant="fp16", torch_dtype=torch.float16, use_safetensors=True
|
||||
"runwayml/stable-diffusion-v1-5", variant="fp16", torch_dtype=torch.float16
|
||||
)
|
||||
# load non_ema variant
|
||||
stable_diffusion = DiffusionPipeline.from_pretrained(
|
||||
"runwayml/stable-diffusion-v1-5", variant="non_ema", use_safetensors=True
|
||||
)
|
||||
stable_diffusion = DiffusionPipeline.from_pretrained("runwayml/stable-diffusion-v1-5", variant="non_ema")
|
||||
```
|
||||
|
||||
To save a checkpoint stored in a different floating point type or as a non-EMA variant, use the [`DiffusionPipeline.save_pretrained`] method and specify the `variant` argument. You should try and save a variant to the same folder as the original checkpoint, so you can load both from the same folder:
|
||||
@@ -217,12 +215,10 @@ If you don't save the variant to an existing folder, you must specify the `varia
|
||||
|
||||
```python
|
||||
# 👎 this won't work
|
||||
stable_diffusion = DiffusionPipeline.from_pretrained(
|
||||
"./stable-diffusion-v1-5", torch_dtype=torch.float16, use_safetensors=True
|
||||
)
|
||||
stable_diffusion = DiffusionPipeline.from_pretrained("./stable-diffusion-v1-5", torch_dtype=torch.float16)
|
||||
# 👍 this works
|
||||
stable_diffusion = DiffusionPipeline.from_pretrained(
|
||||
"./stable-diffusion-v1-5", variant="fp16", torch_dtype=torch.float16, use_safetensors=True
|
||||
"./stable-diffusion-v1-5", variant="fp16", torch_dtype=torch.float16
|
||||
)
|
||||
```
|
||||
|
||||
@@ -237,7 +233,7 @@ load model variants, e.g.:
|
||||
```python
|
||||
from diffusers import DiffusionPipeline
|
||||
|
||||
pipe = DiffusionPipeline.from_pretrained("CompVis/stable-diffusion-v1-4", revision="fp16", use_safetensors=True)
|
||||
pipe = DiffusionPipeline.from_pretrained("CompVis/stable-diffusion-v1-4", revision="fp16")
|
||||
```
|
||||
|
||||
However, this behavior is now deprecated since the "revision" argument should (just as it's done in GitHub) better be used to load model checkpoints from a specific commit or branch in development.
|
||||
@@ -263,7 +259,7 @@ Models can be loaded from a subfolder with the `subfolder` argument. For example
|
||||
from diffusers import UNet2DConditionModel
|
||||
|
||||
repo_id = "runwayml/stable-diffusion-v1-5"
|
||||
model = UNet2DConditionModel.from_pretrained(repo_id, subfolder="unet", use_safetensors=True)
|
||||
model = UNet2DConditionModel.from_pretrained(repo_id, subfolder="unet")
|
||||
```
|
||||
|
||||
Or directly from a repository's [directory](https://huggingface.co/google/ddpm-cifar10-32/tree/main):
|
||||
@@ -272,7 +268,7 @@ Or directly from a repository's [directory](https://huggingface.co/google/ddpm-c
|
||||
from diffusers import UNet2DModel
|
||||
|
||||
repo_id = "google/ddpm-cifar10-32"
|
||||
model = UNet2DModel.from_pretrained(repo_id, use_safetensors=True)
|
||||
model = UNet2DModel.from_pretrained(repo_id)
|
||||
```
|
||||
|
||||
You can also load and save model variants by specifying the `variant` argument in [`ModelMixin.from_pretrained`] and [`ModelMixin.save_pretrained`]:
|
||||
@@ -280,9 +276,7 @@ You can also load and save model variants by specifying the `variant` argument i
|
||||
```python
|
||||
from diffusers import UNet2DConditionModel
|
||||
|
||||
model = UNet2DConditionModel.from_pretrained(
|
||||
"runwayml/stable-diffusion-v1-5", subfolder="unet", variant="non-ema", use_safetensors=True
|
||||
)
|
||||
model = UNet2DConditionModel.from_pretrained("runwayml/stable-diffusion-v1-5", subfolder="unet", variant="non-ema")
|
||||
model.save_pretrained("./local-unet", variant="non-ema")
|
||||
```
|
||||
|
||||
@@ -316,7 +310,7 @@ euler = EulerDiscreteScheduler.from_pretrained(repo_id, subfolder="scheduler")
|
||||
dpm = DPMSolverMultistepScheduler.from_pretrained(repo_id, subfolder="scheduler")
|
||||
|
||||
# replace `dpm` with any of `ddpm`, `ddim`, `pndm`, `lms`, `euler_anc`, `euler`
|
||||
pipeline = StableDiffusionPipeline.from_pretrained(repo_id, scheduler=dpm, use_safetensors=True)
|
||||
pipeline = StableDiffusionPipeline.from_pretrained(repo_id, scheduler=dpm)
|
||||
```
|
||||
|
||||
## DiffusionPipeline explained
|
||||
@@ -332,7 +326,7 @@ The pipelines underlying folder structure corresponds directly with their class
|
||||
from diffusers import DiffusionPipeline
|
||||
|
||||
repo_id = "runwayml/stable-diffusion-v1-5"
|
||||
pipeline = DiffusionPipeline.from_pretrained(repo_id, use_safetensors=True)
|
||||
pipeline = DiffusionPipeline.from_pretrained(repo_id)
|
||||
print(pipeline)
|
||||
```
|
||||
|
||||
@@ -466,4 +460,4 @@ Every pipeline expects a `model_index.json` file that tells the [`DiffusionPipel
|
||||
"AutoencoderKL"
|
||||
]
|
||||
}
|
||||
```
|
||||
```
|
||||
@@ -111,9 +111,7 @@ If you prefer to run inference with code, click on the **Use in Diffusers** butt
|
||||
```py
|
||||
from diffusers import DiffusionPipeline
|
||||
|
||||
pipeline = DiffusionPipeline.from_pretrained(
|
||||
"sayakpaul/textual-inversion-cat-kerascv_sd_diffusers_pipeline", use_safetensors=True
|
||||
)
|
||||
pipeline = DiffusionPipeline.from_pretrained("sayakpaul/textual-inversion-cat-kerascv_sd_diffusers_pipeline")
|
||||
```
|
||||
|
||||
Then you can generate an image like:
|
||||
@@ -121,9 +119,7 @@ Then you can generate an image like:
|
||||
```py
|
||||
from diffusers import DiffusionPipeline
|
||||
|
||||
pipeline = DiffusionPipeline.from_pretrained(
|
||||
"sayakpaul/textual-inversion-cat-kerascv_sd_diffusers_pipeline", use_safetensors=True
|
||||
)
|
||||
pipeline = DiffusionPipeline.from_pretrained("sayakpaul/textual-inversion-cat-kerascv_sd_diffusers_pipeline")
|
||||
pipeline.to("cuda")
|
||||
|
||||
placeholder_token = "<my-funny-cat-token>"
|
||||
@@ -175,12 +171,22 @@ images = pipeline(
|
||||
).images
|
||||
```
|
||||
|
||||
Display the images:
|
||||
Finally, create a helper function to display the images:
|
||||
|
||||
```py
|
||||
from diffusers.utils import make_image_grid
|
||||
from PIL import Image
|
||||
|
||||
make_image_grid(images, 2, 2)
|
||||
|
||||
def image_grid(imgs, rows=2, cols=2):
|
||||
w, h = imgs[0].size
|
||||
grid = Image.new("RGB", size=(cols * w, rows * h))
|
||||
|
||||
for i, img in enumerate(imgs):
|
||||
grid.paste(img, box=(i % cols * w, i // cols * h))
|
||||
return grid
|
||||
|
||||
|
||||
image_grid(images)
|
||||
```
|
||||
|
||||
<div class="flex justify-center">
|
||||
|
||||
@@ -12,6 +12,6 @@ specific language governing permissions and limitations under the License.
|
||||
|
||||
# Overview
|
||||
|
||||
A pipeline is an end-to-end class that provides a quick and easy way to use a diffusion system for inference by bundling independently trained models and schedulers together. Certain combinations of models and schedulers define specific pipeline types, like [`StableDiffusionXLPipeline`] or [`StableDiffusionControlNetPipeline`], with specific capabilities. All pipeline types inherit from the base [`DiffusionPipeline`] class; pass it any checkpoint, and it'll automatically detect the pipeline type and load the necessary components.
|
||||
A pipeline is an end-to-end class that provides a quick and easy way to use a diffusion system for inference by bundling independently trained models and schedulers together. Certain combinations of models and schedulers define specific pipeline types, like [`StableDiffusionPipeline`] or [`StableDiffusionControlNetPipeline`], with specific capabilities. All pipeline types inherit from the base [`DiffusionPipeline`] class; pass it any checkpoint, and it'll automatically detect the pipeline type and load the necessary components.
|
||||
|
||||
This section introduces you to some of the more complex pipelines like Stable Diffusion XL, ControlNet, and DiffEdit, which require additional inputs. You'll also learn how to use a distilled version of the Stable Diffusion model to speed up inference, how to control randomness on your hardware when generating images, and how to create a community pipeline for a custom task like generating images from speech.
|
||||
This section introduces you to some of the tasks supported by our pipelines such as unconditional image generation and different techniques and variations of text-to-image generation. You'll also learn how to gain more control over the generation process by setting a seed for reproducibility and weighting prompts to adjust the influence certain words in the prompt has over the output. Finally, you'll see how you can create a community pipeline for a custom task like generating images from speech.
|
||||
@@ -1,171 +0,0 @@
|
||||
# Push files to the Hub
|
||||
|
||||
[[open-in-colab]]
|
||||
|
||||
🤗 Diffusers provides a [`~diffusers.utils.PushToHubMixin`] for uploading your model, scheduler, or pipeline to the Hub. It is an easy way to store your files on the Hub, and also allows you to share your work with others. Under the hood, the [`~diffusers.utils.PushToHubMixin`]:
|
||||
|
||||
1. creates a repository on the Hub
|
||||
2. saves your model, scheduler, or pipeline files so they can be reloaded later
|
||||
3. uploads folder containing these files to the Hub
|
||||
|
||||
This guide will show you how to use the [`~diffusers.utils.PushToHubMixin`] to upload your files to the Hub.
|
||||
|
||||
You'll need to log in to your Hub account with your access [token](https://huggingface.co/settings/tokens) first:
|
||||
|
||||
```py
|
||||
from huggingface_hub import notebook_login
|
||||
|
||||
notebook_login()
|
||||
```
|
||||
|
||||
## Models
|
||||
|
||||
To push a model to the Hub, call [`~diffusers.utils.PushToHubMixin.push_to_hub`] and specfiy the repository id of the model to be stored on the Hub:
|
||||
|
||||
```py
|
||||
from diffusers import ControlNetModel
|
||||
|
||||
controlnet = ControlNetModel(
|
||||
block_out_channels=(32, 64),
|
||||
layers_per_block=2,
|
||||
in_channels=4,
|
||||
down_block_types=("DownBlock2D", "CrossAttnDownBlock2D"),
|
||||
cross_attention_dim=32,
|
||||
conditioning_embedding_out_channels=(16, 32),
|
||||
)
|
||||
controlnet.push_to_hub("my-controlnet-model")
|
||||
```
|
||||
|
||||
For model's, you can also specify the [*variant*](loading#checkpoint-variants) of the weights to push to the Hub. For example, to push `fp16` weights:
|
||||
|
||||
```py
|
||||
controlnet.push_to_hub("my-controlnet-model", variant="fp16")
|
||||
```
|
||||
|
||||
The [`~diffusers.utils.PushToHubMixin.push_to_hub`] function saves the model's `config.json` file and the weights are automatically saved in the `safetensors` format.
|
||||
|
||||
Now you can reload the model from your repository on the Hub:
|
||||
|
||||
```py
|
||||
model = ControlNetModel.from_pretrained("your-namespace/my-controlnet-model")
|
||||
```
|
||||
|
||||
## Scheduler
|
||||
|
||||
To push a scheduler to the Hub, call [`~diffusers.utils.PushToHubMixin.push_to_hub`] and specfiy the repository id of the scheduler to be stored on the Hub:
|
||||
|
||||
```py
|
||||
from diffusers import DDIMScheduler
|
||||
|
||||
scheduler = DDIMScheduler(
|
||||
beta_start=0.00085,
|
||||
beta_end=0.012,
|
||||
beta_schedule="scaled_linear",
|
||||
clip_sample=False,
|
||||
set_alpha_to_one=False,
|
||||
)
|
||||
scheduler.push_to_hub("my-controlnet-scheduler")
|
||||
```
|
||||
|
||||
The [`~diffusers.utils.PushToHubMixin.push_to_hub`] function saves the scheduler's `scheduler_config.json` file to the specified repository.
|
||||
|
||||
Now you can reload the scheduler from your repository on the Hub:
|
||||
|
||||
```py
|
||||
scheduler = DDIMScheduler.from_pretrained("your-namepsace/my-controlnet-scheduler")
|
||||
```
|
||||
|
||||
## Pipeline
|
||||
|
||||
You can also push an entire pipeline with all it's components to the Hub. For example, initialize the components of a [`StableDiffusionPipeline`] with the parameters you want:
|
||||
|
||||
```py
|
||||
from diffusers import (
|
||||
UNet2DConditionModel,
|
||||
AutoencoderKL,
|
||||
DDIMScheduler,
|
||||
StableDiffusionPipeline,
|
||||
)
|
||||
from transformers import CLIPTextModel, CLIPTextConfig, CLIPTokenizer
|
||||
|
||||
unet = UNet2DConditionModel(
|
||||
block_out_channels=(32, 64),
|
||||
layers_per_block=2,
|
||||
sample_size=32,
|
||||
in_channels=4,
|
||||
out_channels=4,
|
||||
down_block_types=("DownBlock2D", "CrossAttnDownBlock2D"),
|
||||
up_block_types=("CrossAttnUpBlock2D", "UpBlock2D"),
|
||||
cross_attention_dim=32,
|
||||
)
|
||||
|
||||
scheduler = DDIMScheduler(
|
||||
beta_start=0.00085,
|
||||
beta_end=0.012,
|
||||
beta_schedule="scaled_linear",
|
||||
clip_sample=False,
|
||||
set_alpha_to_one=False,
|
||||
)
|
||||
|
||||
vae = AutoencoderKL(
|
||||
block_out_channels=[32, 64],
|
||||
in_channels=3,
|
||||
out_channels=3,
|
||||
down_block_types=["DownEncoderBlock2D", "DownEncoderBlock2D"],
|
||||
up_block_types=["UpDecoderBlock2D", "UpDecoderBlock2D"],
|
||||
latent_channels=4,
|
||||
)
|
||||
|
||||
text_encoder_config = CLIPTextConfig(
|
||||
bos_token_id=0,
|
||||
eos_token_id=2,
|
||||
hidden_size=32,
|
||||
intermediate_size=37,
|
||||
layer_norm_eps=1e-05,
|
||||
num_attention_heads=4,
|
||||
num_hidden_layers=5,
|
||||
pad_token_id=1,
|
||||
vocab_size=1000,
|
||||
)
|
||||
text_encoder = CLIPTextModel(text_encoder_config)
|
||||
tokenizer = CLIPTokenizer.from_pretrained("hf-internal-testing/tiny-random-clip")
|
||||
```
|
||||
|
||||
Pass all of the components to the [`StableDiffusionPipeline`] and call [`~diffusers.utils.PushToHubMixin.push_to_hub`] to push the pipeline to the Hub:
|
||||
|
||||
```py
|
||||
components = {
|
||||
"unet": unet,
|
||||
"scheduler": scheduler,
|
||||
"vae": vae,
|
||||
"text_encoder": text_encoder,
|
||||
"tokenizer": tokenizer,
|
||||
"safety_checker": None,
|
||||
"feature_extractor": None,
|
||||
}
|
||||
|
||||
pipeline = StableDiffusionPipeline(**components)
|
||||
pipeline.push_to_hub("my-pipeline")
|
||||
```
|
||||
|
||||
The [`~diffusers.utils.PushToHubMixin.push_to_hub`] function saves each component to a subfolder in the repository. Now you can reload the pipeline from your repository on the Hub:
|
||||
|
||||
```py
|
||||
pipeline = StableDiffusionPipeline.from_pretrained("your-namespace/my-pipeline")
|
||||
```
|
||||
|
||||
## Privacy
|
||||
|
||||
Set `private=True` in the [`~diffusers.utils.PushToHubMixin.push_to_hub`] function to keep your model, scheduler, or pipeline files private:
|
||||
|
||||
```py
|
||||
controlnet.push_to_hub("my-controlnet-model", private=True)
|
||||
```
|
||||
|
||||
Private repositories are only visible to you, and other users won't be able to clone the repository and your repository won't appear in search results. Even if a user has the URL to your private repository, they'll receive a `404 - Repo not found error.`
|
||||
|
||||
To load a model, scheduler, or pipeline from a private or gated repositories, set `use_auth_token=True`:
|
||||
|
||||
```py
|
||||
model = ControlNet.from_pretrained("your-namespace/my-controlnet-model", use_auth_token=True)
|
||||
```
|
||||
@@ -28,7 +28,7 @@ This is why it's important to understand how to control sources of randomness in
|
||||
|
||||
## Control randomness
|
||||
|
||||
During inference, pipelines rely heavily on random sampling operations which include creating the
|
||||
During inference, pipelines rely heavily on random sampling operations which include creating the
|
||||
Gaussian noise tensors to denoise and adding noise to the scheduling step.
|
||||
|
||||
Take a look at the tensor values in the [`DDIMPipeline`] after two inference steps:
|
||||
@@ -40,14 +40,14 @@ import numpy as np
|
||||
model_id = "google/ddpm-cifar10-32"
|
||||
|
||||
# load model and scheduler
|
||||
ddim = DDIMPipeline.from_pretrained(model_id, use_safetensors=True)
|
||||
ddim = DDIMPipeline.from_pretrained(model_id)
|
||||
|
||||
# run pipeline for just two steps and return numpy tensor
|
||||
image = ddim(num_inference_steps=2, output_type="np").images
|
||||
print(np.abs(image).sum())
|
||||
```
|
||||
|
||||
Running the code above prints one value, but if you run it again you get a different value. What is going on here?
|
||||
Running the code above prints one value, but if you run it again you get a different value. What is going on here?
|
||||
|
||||
Every time the pipeline is run, [`torch.randn`](https://pytorch.org/docs/stable/generated/torch.randn.html) uses a different random seed to create Gaussian noise which is denoised stepwise. This leads to a different result each time it is run, which is great for diffusion pipelines since it generates a different random image each time.
|
||||
|
||||
@@ -65,7 +65,7 @@ import numpy as np
|
||||
model_id = "google/ddpm-cifar10-32"
|
||||
|
||||
# load model and scheduler
|
||||
ddim = DDIMPipeline.from_pretrained(model_id, use_safetensors=True)
|
||||
ddim = DDIMPipeline.from_pretrained(model_id)
|
||||
|
||||
# create a generator for reproducibility
|
||||
generator = torch.Generator(device="cpu").manual_seed(0)
|
||||
@@ -81,16 +81,16 @@ If you run this code example on your specific hardware and PyTorch version, you
|
||||
|
||||
<Tip>
|
||||
|
||||
💡 It might be a bit unintuitive at first to pass `Generator` objects to the pipeline instead of
|
||||
just integer values representing the seed, but this is the recommended design when dealing with
|
||||
probabilistic models in PyTorch as `Generator`'s are *random states* that can be
|
||||
💡 It might be a bit unintuitive at first to pass `Generator` objects to the pipeline instead of
|
||||
just integer values representing the seed, but this is the recommended design when dealing with
|
||||
probabilistic models in PyTorch as `Generator`'s are *random states* that can be
|
||||
passed to multiple pipelines in a sequence.
|
||||
|
||||
</Tip>
|
||||
|
||||
### GPU
|
||||
|
||||
Writing a reproducible pipeline on a GPU is a bit trickier, and full reproducibility across different hardware is not guaranteed because matrix multiplication - which diffusion pipelines require a lot of - is less deterministic on a GPU than a CPU. For example, if you run the same code example above on a GPU:
|
||||
|
||||
```python
|
||||
import torch
|
||||
@@ -100,7 +100,7 @@ import numpy as np
|
||||
model_id = "google/ddpm-cifar10-32"
|
||||
|
||||
# load model and scheduler
|
||||
ddim = DDIMPipeline.from_pretrained(model_id, use_safetensors=True)
|
||||
ddim = DDIMPipeline.from_pretrained(model_id)
|
||||
ddim.to("cuda")
|
||||
|
||||
# create a generator for reproducibility
|
||||
@@ -113,7 +113,7 @@ print(np.abs(image).sum())
|
||||
|
||||
The result is not the same even though you're using an identical seed because the GPU uses a different random number generator than the CPU.
|
||||
|
||||
To circumvent this problem, 🧨 Diffusers has a [`~diffusers.utils.torch_utils.randn_tensor`] function for creating random noise on the CPU, and then moving the tensor to a GPU if necessary. The `randn_tensor` function is used everywhere inside the pipeline, allowing the user to **always** pass a CPU `Generator` even if the pipeline is run on a GPU.
|
||||
To circumvent this problem, 🧨 Diffusers has a [`~diffusers.utils.randn_tensor`] function for creating random noise on the CPU, and then moving the tensor to a GPU if necessary. The `randn_tensor` function is used everywhere inside the pipeline, allowing the user to **always** pass a CPU `Generator` even if the pipeline is run on a GPU.
|
||||
|
||||
You'll see the results are much closer now!
|
||||
|
||||
@@ -125,7 +125,7 @@ import numpy as np
|
||||
model_id = "google/ddpm-cifar10-32"
|
||||
|
||||
# load model and scheduler
|
||||
ddim = DDIMPipeline.from_pretrained(model_id, use_safetensors=True)
|
||||
ddim = DDIMPipeline.from_pretrained(model_id)
|
||||
ddim.to("cuda")
|
||||
|
||||
# create a generator for reproducibility; notice you don't place it on the GPU!
|
||||
@@ -139,14 +139,14 @@ print(np.abs(image).sum())
|
||||
<Tip>
|
||||
|
||||
💡 If reproducibility is important, we recommend always passing a CPU generator.
|
||||
The performance loss is often neglectable, and you'll generate much more similar
|
||||
The performance loss is often neglectable, and you'll generate much more similar
|
||||
values than if the pipeline had been run on a GPU.
|
||||
|
||||
</Tip>
|
||||
|
||||
Finally, for more complex pipelines such as [`UnCLIPPipeline`], these are often extremely
|
||||
susceptible to precision error propagation. Don't expect similar results across
|
||||
different GPU hardware or PyTorch versions. In this case, you'll need to run
|
||||
Finally, for more complex pipelines such as [`UnCLIPPipeline`], these are often extremely
|
||||
susceptible to precision error propagation. Don't expect similar results across
|
||||
different GPU hardware or PyTorch versions. In this case, you'll need to run
|
||||
exactly the same hardware and PyTorch version for full reproducibility.
|
||||
|
||||
## Deterministic algorithms
|
||||
@@ -174,7 +174,7 @@ from diffusers import DDIMScheduler, StableDiffusionPipeline
|
||||
import numpy as np
|
||||
|
||||
model_id = "runwayml/stable-diffusion-v1-5"
|
||||
pipe = StableDiffusionPipeline.from_pretrained(model_id, use_safetensors=True).to("cuda")
|
||||
pipe = StableDiffusionPipeline.from_pretrained(model_id).to("cuda")
|
||||
pipe.scheduler = DDIMScheduler.from_config(pipe.scheduler.config)
|
||||
g = torch.Generator(device="cuda")
|
||||
|
||||
|
||||
@@ -27,9 +27,7 @@ Instantiate a pipeline with [`DiffusionPipeline.from_pretrained`] and place it o
|
||||
```python
|
||||
>>> from diffusers import DiffusionPipeline
|
||||
|
||||
>>> pipe = DiffusionPipeline.from_pretrained(
|
||||
... "runwayml/stable-diffusion-v1-5", torch_dtype=torch.float16, use_safetensors=True
|
||||
... )
|
||||
>>> pipe = DiffusionPipeline.from_pretrained("runwayml/stable-diffusion-v1-5", torch_dtype=torch.float16)
|
||||
>>> pipe = pipe.to("cuda")
|
||||
```
|
||||
|
||||
|
||||
@@ -39,9 +39,7 @@ import torch
|
||||
|
||||
login()
|
||||
|
||||
pipeline = DiffusionPipeline.from_pretrained(
|
||||
"runwayml/stable-diffusion-v1-5", torch_dtype=torch.float16, use_safetensors=True
|
||||
)
|
||||
pipeline = DiffusionPipeline.from_pretrained("runwayml/stable-diffusion-v1-5", torch_dtype=torch.float16)
|
||||
```
|
||||
|
||||
Next, we move it to GPU:
|
||||
|
||||
@@ -1,429 +0,0 @@
|
||||
# Stable Diffusion XL
|
||||
|
||||
[[open-in-colab]]
|
||||
|
||||
[Stable Diffusion XL](https://huggingface.co/papers/2307.01952) (SDXL) is a powerful text-to-image generation model that iterates on the previous Stable Diffusion models in three key ways:
|
||||
|
||||
1. the UNet is 3x larger and SDXL combines a second text encoder (OpenCLIP ViT-bigG/14) with the original text encoder to significantly increase the number of parameters
|
||||
2. introduces size and crop-conditioning to preserve training data from being discarded and gain more control over how a generated image should be cropped
|
||||
3. introduces a two-stage model process; the *base* model (can also be run as a standalone model) generates an image as an input to the *refiner* model which adds additional high-quality details
|
||||
|
||||
This guide will show you how to use SDXL for text-to-image, image-to-image, and inpainting.
|
||||
|
||||
Before you begin, make sure you have the following libraries installed:
|
||||
|
||||
```py
|
||||
# uncomment to install the necessary libraries in Colab
|
||||
#!pip install diffusers transformers accelerate safetensors omegaconf invisible-watermark>=0.2.0
|
||||
```
|
||||
|
||||
<Tip warning={true}>
|
||||
|
||||
We recommend installing the [invisible-watermark](https://pypi.org/project/invisible-watermark/) library to help identify images that are generated. If the invisible-watermark library is installed, it is used by default. To disable the watermarker:
|
||||
|
||||
```py
|
||||
pipeline = StableDiffusionXLPipeline.from_pretrained(..., add_watermarker=False)
|
||||
```
|
||||
|
||||
</Tip>
|
||||
|
||||
## Load model checkpoints
|
||||
|
||||
Model weights may be stored in separate subfolders on the Hub or locally, in which case, you should use the [`~StableDiffusionXLPipeline.from_pretrained`] method:
|
||||
|
||||
```py
|
||||
from diffusers import StableDiffusionXLPipeline, StableDiffusionXLImg2ImgPipeline
|
||||
import torch
|
||||
|
||||
pipeline = StableDiffusionXLPipeline.from_pretrained(
|
||||
"stabilityai/stable-diffusion-xl-base-1.0", torch_dtype=torch.float16, variant="fp16", use_safetensors=True
|
||||
).to("cuda")
|
||||
|
||||
refiner = StableDiffusionXLImg2ImgPipeline.from_single_file(
|
||||
"stabilityai/stable-diffusion-xl-refiner-1.0", torch_dtype=torch.float16, use_safetensors=True, variant="fp16"
|
||||
).to("cuda")
|
||||
```
|
||||
|
||||
You can also use the [`~StableDiffusionXLPipeline.from_single_file`] method to load a model checkpoint stored in a single file format (`.ckpt` or `.safetensors`) from the Hub or locally:
|
||||
|
||||
```py
|
||||
from diffusers import StableDiffusionXLPipeline, StableDiffusionXLImg2ImgPipeline
|
||||
import torch
|
||||
|
||||
pipeline = StableDiffusionXLPipeline.from_single_file(
|
||||
"https://huggingface.co/stabilityai/stable-diffusion-xl-base-1.0/blob/main/sd_xl_base_1.0.safetensors", torch_dtype=torch.float16, variant="fp16", use_safetensors=True
|
||||
).to("cuda")
|
||||
|
||||
refiner = StableDiffusionXLImg2ImgPipeline.from_single_file(
|
||||
"https://huggingface.co/stabilityai/stable-diffusion-xl-refiner-1.0/blob/main/sd_xl_refiner_1.0.safetensors", torch_dtype=torch.float16, use_safetensors=True, variant="fp16"
|
||||
).to("cuda")
|
||||
```
|
||||
|
||||
## Text-to-image
|
||||
|
||||
For text-to-image, pass a text prompt. By default, SDXL generates a 1024x1024 image for the best results. You can try setting the `height` and `width` parameters to 768x768 or 512x512, but anything below 512x512 is not likely to work.
|
||||
|
||||
```py
|
||||
from diffusers import AutoPipelineForText2Image
|
||||
import torch
|
||||
|
||||
pipeline_text2image = AutoPipelineForText2Image.from_pretrained(
|
||||
"stabilityai/stable-diffusion-xl-base-1.0", torch_dtype=torch.float16, variant="fp16", use_safetensors=True
|
||||
).to("cuda")
|
||||
|
||||
prompt = "Astronaut in a jungle, cold color palette, muted colors, detailed, 8k"
|
||||
image = pipeline(prompt=prompt).images[0]
|
||||
```
|
||||
|
||||
<div class="flex justify-center">
|
||||
<img src="https://huggingface.co/datasets/huggingface/documentation-images/resolve/main/diffusers/sdxl-text2img.png" alt="generated image of an astronaut in a jungle"/>
|
||||
</div>
|
||||
|
||||
## Image-to-image
|
||||
|
||||
For image-to-image, SDXL works especially well with image sizes between 768x768 and 1024x1024. Pass an initial image, and a text prompt to condition the image with:
|
||||
|
||||
```py
|
||||
from diffusers import AutoPipelineForImg2Img
|
||||
from diffusers.utils import load_image
|
||||
|
||||
# use from_pipe to avoid consuming additional memory when loading a checkpoint
|
||||
pipeline = AutoPipelineForImage2Image.from_pipe(pipeline_text2image).to("cuda")
|
||||
url = "https://huggingface.co/datasets/huggingface/documentation-images/resolve/main/diffusers/sdxl-img2img.png"
|
||||
|
||||
init_image = load_image(url).convert("RGB")
|
||||
prompt = "a dog catching a frisbee in the jungle"
|
||||
image = pipeline(prompt, image=init_image, strength=0.8, guidance_scale=10.5).images[0]
|
||||
```
|
||||
|
||||
<div class="flex justify-center">
|
||||
<img src="https://huggingface.co/datasets/huggingface/documentation-images/resolve/main/diffusers/sdxl-img2img.png" alt="generated image of a dog catching a frisbee in a jungle"/>
|
||||
</div>
|
||||
|
||||
## Inpainting
|
||||
|
||||
For inpainting, you'll need the original image and a mask of what you want to replace in the original image. Create a prompt to describe what you want to replace the masked area with.
|
||||
|
||||
```py
|
||||
from diffusers import AutoPipelineForInpainting
|
||||
from diffusers.utils import load_image
|
||||
|
||||
# use from_pipe to avoid consuming additional memory when loading a checkpoint
|
||||
pipeline = AutoPipelineForInpainting.from_pipe(pipeline_text2image).to("cuda")
|
||||
|
||||
img_url = "https://huggingface.co/datasets/huggingface/documentation-images/resolve/main/diffusers/sdxl-text2img.png"
|
||||
mask_url = "https://huggingface.co/datasets/huggingface/documentation-images/resolve/main/diffusers/sdxl-inpaint-mask.png"
|
||||
|
||||
init_image = load_image(img_url).convert("RGB")
|
||||
mask_image = load_image(mask_url).convert("RGB")
|
||||
|
||||
prompt = "A deep sea diver floating"
|
||||
image = pipeline(prompt=prompt, image=init_image, mask_image=mask_image, strength=0.85, guidance_scale=12.5).images[0]
|
||||
```
|
||||
|
||||
<div class="flex justify-center">
|
||||
<img src="https://huggingface.co/datasets/huggingface/documentation-images/resolve/main/diffusers/sdxl-inpaint.png" alt="generated image of a deep sea diver in a jungle"/>
|
||||
</div>
|
||||
|
||||
## Refine image quality
|
||||
|
||||
SDXL includes a [refiner model](https://huggingface.co/stabilityai/stable-diffusion-xl-refiner-1.0) specialized in denoising low-noise stage images to generate higher-quality images from the base model. There are two ways to use the refiner:
|
||||
|
||||
1. use the base and refiner model together to produce a refined image
|
||||
2. use the base model to produce an image, and subsequently use the refiner model to add more details to the image (this is how SDXL is originally trained)
|
||||
|
||||
### Base + refiner model
|
||||
|
||||
When you use the base and refiner model together to generate an image, this is known as an ([*ensemble of expert denoisers*](https://research.nvidia.com/labs/dir/eDiff-I/)). The ensemble of expert denoisers approach requires less overall denoising steps versus passing the base model's output to the refiner model, so it should be significantly faster to run. However, you won't be able to inspect the base model's output because it still contains a large amount of noise.
|
||||
|
||||
As an ensemble of expert denoisers, the base model serves as the expert during the high-noise diffusion stage and the refiner model serves as the expert during the low-noise diffusion stage. Load the base and refiner model:
|
||||
|
||||
```py
|
||||
from diffusers import DiffusionPipeline
|
||||
import torch
|
||||
|
||||
base = DiffusionPipeline.from_pretrained(
|
||||
"stabilityai/stable-diffusion-xl-base-1.0", torch_dtype=torch.float16, variant="fp16", use_safetensors=True
|
||||
).to("cuda")
|
||||
|
||||
refiner = DiffusionPipeline.from_pretrained(
|
||||
"stabilityai/stable-diffusion-xl-refiner-1.0",
|
||||
text_encoder_2=base.text_encoder_2,
|
||||
vae=base.vae,
|
||||
torch_dtype=torch.float16,
|
||||
use_safetensors=True,
|
||||
variant="fp16",
|
||||
).to("cuda")
|
||||
```
|
||||
|
||||
To use this approach, you need to define the number of timesteps for each model to run through their respective stages. For the base model, this is controlled by the [`denoising_end`](https://huggingface.co/docs/diffusers/main/en/api/pipelines/stable_diffusion/stable_diffusion_xl#diffusers.StableDiffusionXLPipeline.__call__.denoising_end) parameter and for the refiner model, it is controlled by the [`denoising_start`](https://huggingface.co/docs/diffusers/main/en/api/pipelines/stable_diffusion/stable_diffusion_xl#diffusers.StableDiffusionXLImg2ImgPipeline.__call__.denoising_start) parameter.
|
||||
|
||||
<Tip>
|
||||
|
||||
The `denoising_end` and `denoising_start` parameters should be a float between 0 and 1. These parameters are represented as a proportion of discrete timesteps as defined by the scheduler. If you're also using the `strength` parameter, it'll be ignored because the number of denoising steps is determined by the discrete timesteps the model is trained on and the declared fractional cutoff.
|
||||
|
||||
</Tip>
|
||||
|
||||
Let's set `denoising_end=0.8` so the base model performs the first 80% of denoising the **high-noise** timesteps and set `denoising_start=0.8` so the refiner model performs the last 20% of denoising the **low-noise** timesteps. The base model output should be in **latent** space instead of a PIL image.
|
||||
|
||||
```py
|
||||
prompt = "A majestic lion jumping from a big stone at night"
|
||||
|
||||
image = base(
|
||||
prompt=prompt,
|
||||
num_inference_steps=40,
|
||||
denoising_end=0.8,
|
||||
output_type="latent",
|
||||
).images
|
||||
image = refiner(
|
||||
prompt=prompt,
|
||||
num_inference_steps=40,
|
||||
denoising_start=0.8,
|
||||
image=image,
|
||||
).images[0]
|
||||
```
|
||||
|
||||
<div class="flex gap-4">
|
||||
<div>
|
||||
<img class="rounded-xl" src="https://huggingface.co/datasets/huggingface/documentation-images/resolve/main/diffusers/lion_base.png" alt="generated image of a lion on a rock at night" />
|
||||
<figcaption class="mt-2 text-center text-sm text-gray-500">base model</figcaption>
|
||||
</div>
|
||||
<div>
|
||||
<img class="rounded-xl" src="https://huggingface.co/datasets/huggingface/documentation-images/resolve/main/diffusers/lion_refined.png" alt="generated image of a lion on a rock at night in higher quality" />
|
||||
<figcaption class="mt-2 text-center text-sm text-gray-500">ensemble of expert denoisers</figcaption>
|
||||
</div>
|
||||
</div>
|
||||
|
||||
The refiner model can also be used for inpainting in the [`StableDiffusionXLInpaintPipeline`]:
|
||||
|
||||
```py
|
||||
from diffusers import StableDiffusionXLInpaintPipeline
|
||||
from diffusers.utils import load_image
|
||||
|
||||
base = StableDiffusionXLInpaintPipeline.from_pretrained(
|
||||
"stabilityai/stable-diffusion-xl-base-1.0", torch_dtype=torch.float16, variant="fp16", use_safetensors=True
|
||||
).to("cuda")
|
||||
|
||||
refiner = StableDiffusionXLInpaintPipeline.from_pretrained(
|
||||
"stabilityai/stable-diffusion-xl-refiner-1.0",
|
||||
text_encoder_2=pipe.text_encoder_2,
|
||||
vae=pipe.vae,
|
||||
torch_dtype=torch.float16,
|
||||
use_safetensors=True,
|
||||
variant="fp16",
|
||||
).to("cuda")
|
||||
|
||||
img_url = "https://raw.githubusercontent.com/CompVis/latent-diffusion/main/data/inpainting_examples/overture-creations-5sI6fQgYIuo.png"
|
||||
mask_url = "https://raw.githubusercontent.com/CompVis/latent-diffusion/main/data/inpainting_examples/overture-creations-5sI6fQgYIuo_mask.png"
|
||||
|
||||
init_image = load_image(img_url).convert("RGB")
|
||||
mask_image = load_image(mask_url).convert("RGB")
|
||||
|
||||
prompt = "A majestic tiger sitting on a bench"
|
||||
num_inference_steps = 75
|
||||
high_noise_frac = 0.7
|
||||
|
||||
image = base(
|
||||
prompt=prompt,
|
||||
image=init_image,
|
||||
mask_image=mask_image,
|
||||
num_inference_steps=num_inference_steps,
|
||||
denoising_end=high_noise_frac,
|
||||
output_type="latent",
|
||||
).images
|
||||
image = refiner(
|
||||
prompt=prompt,
|
||||
image=image,
|
||||
mask_image=mask_image,
|
||||
num_inference_steps=num_inference_steps,
|
||||
denoising_start=high_noise_frac,
|
||||
).images[0]
|
||||
```
|
||||
|
||||
This ensemble of expert denoisers method works well for all available schedulers!
|
||||
|
||||
### Base to refiner model
|
||||
|
||||
SDXL gets a boost in image quality by using the refiner model to add additional high-quality details to the fully-denoised image from the base model, in an image-to-image setting.
|
||||
|
||||
Load the base and refiner models:
|
||||
|
||||
```py
|
||||
from diffusers import DiffusionPipeline
|
||||
import torch
|
||||
|
||||
base = DiffusionPipeline.from_pretrained(
|
||||
"stabilityai/stable-diffusion-xl-base-1.0", torch_dtype=torch.float16, variant="fp16", use_safetensors=True
|
||||
).to("cuda")
|
||||
|
||||
refiner = DiffusionPipeline.from_pretrained(
|
||||
"stabilityai/stable-diffusion-xl-refiner-1.0",
|
||||
text_encoder_2=pipe.text_encoder_2,
|
||||
vae=pipe.vae,
|
||||
torch_dtype=torch.float16,
|
||||
use_safetensors=True,
|
||||
variant="fp16",
|
||||
).to("cuda")
|
||||
```
|
||||
|
||||
Generate an image from the base model, and set the model output to **latent** space:
|
||||
|
||||
```py
|
||||
prompt = "Astronaut in a jungle, cold color palette, muted colors, detailed, 8k"
|
||||
|
||||
image = base(prompt=prompt, output_type="latent").images[0]
|
||||
```
|
||||
|
||||
Pass the generated image to the refiner model:
|
||||
|
||||
```py
|
||||
image = refiner(prompt=prompt, image=image[None, :]).images[0]
|
||||
```
|
||||
|
||||
<div class="flex gap-4">
|
||||
<div>
|
||||
<img class="rounded-xl" src="https://huggingface.co/datasets/diffusers/docs-images/resolve/main/sd_xl/init_image.png" alt="generated image of an astronaut riding a green horse on Mars" />
|
||||
<figcaption class="mt-2 text-center text-sm text-gray-500">base model</figcaption>
|
||||
</div>
|
||||
<div>
|
||||
<img class="rounded-xl" src="https://huggingface.co/datasets/diffusers/docs-images/resolve/main/sd_xl/refined_image.png" alt="higher quality generated image of an astronaut riding a green horse on Mars" />
|
||||
<figcaption class="mt-2 text-center text-sm text-gray-500">base model + refiner model</figcaption>
|
||||
</div>
|
||||
</div>
|
||||
|
||||
For inpainting, load the refiner model in the [`StableDiffusionXLInpaintPipeline`], remove the `denoising_end` and `denoising_start` parameters, and choose a smaller number of inference steps for the refiner.
|
||||
|
||||
## Micro-conditioning
|
||||
|
||||
SDXL training involves several additional conditioning techniques, which are referred to as *micro-conditioning*. These include original image size, target image size, and cropping parameters. The micro-conditionings can be used at inference time to create high-quality, centered images.
|
||||
|
||||
<Tip>
|
||||
|
||||
You can use both micro-conditioning and negative micro-conditioning parameters thanks to classifier-free guidance. They are available in the [`StableDiffusionXLPipeline`], [`StableDiffusionXLImg2ImgPipeline`], [`StableDiffusionXLInpaintPipeline`], and [`StableDiffusionXLControlNetPipeline`].
|
||||
|
||||
</Tip>
|
||||
|
||||
### Size conditioning
|
||||
|
||||
There are two types of size conditioning:
|
||||
|
||||
- [`original_size`](https://huggingface.co/docs/diffusers/main/en/api/pipelines/stable_diffusion/stable_diffusion_xl#diffusers.StableDiffusionXLPipeline.__call__.original_size) conditioning comes from upscaled images in the training batch (because it would be wasteful to discard the smaller images which make up almost 40% of the total training data). This way, SDXL learns that upscaling artifacts are not supposed to be present in high-resolution images. During inference, you can use `original_size` to indicate the original image resolution. Using the default value of `(1024, 1024)` produces higher-quality images that resemble the 1024x1024 images in the dataset. If you choose to use a lower resolution, such as `(256, 256)`, the model still generates 1024x1024 images, but they'll look like the low resolution images (simpler patterns, blurring) in the dataset.
|
||||
|
||||
- [`target_size`](https://huggingface.co/docs/diffusers/main/en/api/pipelines/stable_diffusion/stable_diffusion_xl#diffusers.StableDiffusionXLPipeline.__call__.target_size) conditioning comes from finetuning SDXL to support different image aspect ratios. During inference, if you use the default value of `(1024, 1024)`, you'll get an image that resembles the composition of square images in the dataset. We recommend using the same value for `target_size` and `original_size`, but feel free to experiment with other options!
|
||||
|
||||
🤗 Diffusers also lets you specify negative conditions about an image's size to steer generation away from certain image resolutions:
|
||||
|
||||
```py
|
||||
from diffusers import StableDiffusionXLPipeline
|
||||
import torch
|
||||
|
||||
pipe = StableDiffusionXLPipeline.from_pretrained(
|
||||
"stabilityai/stable-diffusion-xl-base-1.0", torch_dtype=torch.float16, variant="fp16", use_safetensors=True
|
||||
).to("cuda")
|
||||
|
||||
prompt = "Astronaut in a jungle, cold color palette, muted colors, detailed, 8k"
|
||||
image = pipe(
|
||||
prompt=prompt,
|
||||
negative_original_size=(512, 512),
|
||||
negative_target_size=(1024, 1024),
|
||||
).images[0]
|
||||
```
|
||||
|
||||
<div class="flex flex-col justify-center">
|
||||
<img src="https://huggingface.co/datasets/diffusers/docs-images/resolve/main/sd_xl/negative_conditions.png"/>
|
||||
<figcaption class="text-center">Images negative conditioned on image resolutions of (128, 128), (256, 256), and (512, 512).</figcaption>
|
||||
</div>
|
||||
|
||||
### Crop conditioning
|
||||
|
||||
Images generated by previous Stable Diffusion models may sometimes appear to be cropped. This is because images are actually cropped during training so that all the images in a batch have the same size. By conditioning on crop coordinates, SDXL *learns* that no cropping - coordinates `(0, 0)` - usually correlates with centered subjects and complete faces (this is the default value in 🤗 Diffusers). You can experiment with different coordinates if you want to generate off-centered compositions!
|
||||
|
||||
```py
|
||||
from diffusers import StableDiffusionXLPipeline
|
||||
import torch
|
||||
|
||||
|
||||
pipeline = StableDiffusionXLPipeline.from_pretrained(
|
||||
"stabilityai/stable-diffusion-xl-base-1.0", torch_dtype=torch.float16, variant="fp16", use_safetensors=True
|
||||
).to("cuda")
|
||||
|
||||
prompt = "Astronaut in a jungle, cold color palette, muted colors, detailed, 8k"
|
||||
image = pipeline(prompt=prompt, crops_coords_top_left=(256,0)).images[0]
|
||||
```
|
||||
|
||||
<div class="flex justify-center">
|
||||
<img src="https://huggingface.co/datasets/huggingface/documentation-images/resolve/main/diffusers/sdxl-cropped.png" alt="generated image of an astronaut in a jungle, slightly cropped"/>
|
||||
</div>
|
||||
|
||||
You can also specify negative cropping coordinates to steer generation away from certain cropping parameters:
|
||||
|
||||
```py
|
||||
from diffusers import StableDiffusionXLPipeline
|
||||
import torch
|
||||
|
||||
pipe = StableDiffusionXLPipeline.from_pretrained(
|
||||
"stabilityai/stable-diffusion-xl-base-1.0", torch_dtype=torch.float16, variant="fp16", use_safetensors=True
|
||||
).to("cuda")
|
||||
|
||||
prompt = "Astronaut in a jungle, cold color palette, muted colors, detailed, 8k"
|
||||
image = pipe(
|
||||
prompt=prompt,
|
||||
negative_original_size=(512, 512),
|
||||
negative_crops_coords_top_left=(0, 0),
|
||||
negative_target_size=(1024, 1024),
|
||||
).images[0]
|
||||
```
|
||||
|
||||
## Use a different prompt for each text-encoder
|
||||
|
||||
SDXL uses two text-encoders, so it is possible to pass a different prompt to each text-encoder, which can [improve quality](https://github.com/huggingface/diffusers/issues/4004#issuecomment-1627764201). Pass your original prompt to `prompt` and the second prompt to `prompt_2` (use `negative_prompt` and `negative_prompt_2` if you're using a negative prompts):
|
||||
|
||||
```py
|
||||
from diffusers import StableDiffusionXLPipeline
|
||||
import torch
|
||||
|
||||
pipeline = StableDiffusionXLPipeline.from_pretrained(
|
||||
"stabilityai/stable-diffusion-xl-base-1.0", torch_dtype=torch.float16, variant="fp16", use_safetensors=True
|
||||
).to("cuda")
|
||||
|
||||
# prompt is passed to OAI CLIP-ViT/L-14
|
||||
prompt = "Astronaut in a jungle, cold color palette, muted colors, detailed, 8k"
|
||||
# prompt_2 is passed to OpenCLIP-ViT/bigG-14
|
||||
prompt_2 = "Van Gogh painting"
|
||||
image = pipeline(prompt=prompt, prompt_2=prompt_2).images[0]
|
||||
```
|
||||
|
||||
<div class="flex justify-center">
|
||||
<img src="https://huggingface.co/datasets/huggingface/documentation-images/resolve/main/diffusers/sdxl-double-prompt.png" alt="generated image of an astronaut in a jungle in the style of a van gogh painting"/>
|
||||
</div>
|
||||
|
||||
## Optimizations
|
||||
|
||||
SDXL is a large model, and you may need to optimize memory to get it to run on your hardware. Here are some tips to save memory and speed up inference.
|
||||
|
||||
1. Offload the model to the CPU with [`~StableDiffusionXLPipeline.enable_model_cpu_offload`] for out-of-memory errors:
|
||||
|
||||
```diff
|
||||
- base.to("cuda")
|
||||
- refiner.to("cuda")
|
||||
+ base.enable_model_cpu_offload
|
||||
+ refiner.enable_model_cpu_offload
|
||||
```
|
||||
|
||||
2. Use `torch.compile` for ~20% speed-up (you need `torch>2.0`):
|
||||
|
||||
```diff
|
||||
+ base.unet = torch.compile(base.unet, mode="reduce-overhead", fullgraph=True)
|
||||
+ refiner.unet = torch.compile(refiner.unet, mode="reduce-overhead", fullgraph=True)
|
||||
```
|
||||
|
||||
3. Enable [xFormers](/optimization/xformers) to run SDXL if `torch<2.0`:
|
||||
|
||||
```diff
|
||||
+ base.enable_xformers_memory_efficient_attention()
|
||||
+ refiner.enable_xformers_memory_efficient_attention()
|
||||
```
|
||||
|
||||
## Other resources
|
||||
|
||||
If you're interested in experimenting with a minimal version of the [`UNet2DConditionModel`] used in SDXL, take a look at the [minSDXL](https://github.com/cloneofsimo/minSDXL) implementation which is written in PyTorch and directly compatible with 🤗 Diffusers.
|
||||
@@ -1,179 +0,0 @@
|
||||
# Shap-E
|
||||
|
||||
[[open-in-colab]]
|
||||
|
||||
Shap-E is a conditional model for generating 3D assets which could be used for video game development, interior design, and architecture. It is trained on a large dataset of 3D assets, and post-processed to render more views of each object and produce 16K instead of 4K point clouds. The Shap-E model is trained in two steps:
|
||||
|
||||
1. a encoder accepts the point clouds and rendered views of a 3D asset and outputs the parameters of implicit functions that represent the asset
|
||||
2. a diffusion model is trained on the latents produced by the encoder to generate either neural radiance fields (NeRFs) or a textured 3D mesh, making it easier to render and use the 3D asset in downstream applications
|
||||
|
||||
This guide will show you how to use Shap-E to start generating your own 3D assets!
|
||||
|
||||
Before you begin, make sure you have the following libraries installed:
|
||||
|
||||
```py
|
||||
# uncomment to install the necessary libraries in Colab
|
||||
#!pip install diffusers transformers accelerate safetensors trimesh
|
||||
```
|
||||
|
||||
## Text-to-3D
|
||||
|
||||
To generate a gif of a 3D object, pass a text prompt to the [`ShapEPipeline`]. The pipeline generates a list of image frames which are used to create the 3D object.
|
||||
|
||||
```py
|
||||
import torch
|
||||
from diffusers import ShapEPipeline
|
||||
|
||||
device = torch.device("cuda" if torch.cuda.is_available() else "cpu")
|
||||
|
||||
pipe = ShapEPipeline.from_pretrained("openai/shap-e", torch_dtype=torch.float16, variant="fp16", use_safetensors=True)
|
||||
pipe = pipe.to(device)
|
||||
|
||||
guidance_scale = 15.0
|
||||
prompt = ["A firecracker", "A birthday cupcake"]
|
||||
|
||||
images = pipe(
|
||||
prompt,
|
||||
guidance_scale=guidance_scale,
|
||||
num_inference_steps=64,
|
||||
frame_size=256,
|
||||
).images
|
||||
```
|
||||
|
||||
Now use the [`~utils.export_to_gif`] function to turn the list of image frames into a gif of the 3D object.
|
||||
|
||||
```py
|
||||
from diffusers.utils import export_to_gif
|
||||
|
||||
export_to_gif(images[0], "firecracker_3d.gif")
|
||||
export_to_gif(images[1], "cake_3d.gif")
|
||||
```
|
||||
|
||||
<div class="flex gap-4">
|
||||
<div>
|
||||
<img class="rounded-xl" src="https://huggingface.co/datasets/hf-internal-testing/diffusers-images/resolve/main/shap_e/firecracker_out.gif"/>
|
||||
<figcaption class="mt-2 text-center text-sm text-gray-500">firecracker</figcaption>
|
||||
</div>
|
||||
<div>
|
||||
<img class="rounded-xl" src="https://huggingface.co/datasets/hf-internal-testing/diffusers-images/resolve/main/shap_e/cake_out.gif"/>
|
||||
<figcaption class="mt-2 text-center text-sm text-gray-500">cupcake</figcaption>
|
||||
</div>
|
||||
</div>
|
||||
|
||||
## Image-to-3D
|
||||
|
||||
To generate a 3D object from another image, use the [`ShapEImg2ImgPipeline`]. You can use an existing image or generate an entirely new one. Let's use the the [Kandinsky 2.1](../api/pipelines/kandinsky) model to generate a new image.
|
||||
|
||||
```py
|
||||
from diffusers import DiffusionPipeline
|
||||
import torch
|
||||
|
||||
prior_pipeline = DiffusionPipeline.from_pretrained("kandinsky-community/kandinsky-2-1-prior", torch_dtype=torch.float16, use_safetensors=True).to("cuda")
|
||||
pipeline = DiffusionPipeline.from_pretrained("kandinsky-community/kandinsky-2-1", torch_dtype=torch.float16, use_safetensors=True).to("cuda")
|
||||
|
||||
prompt = "A cheeseburger, white background"
|
||||
|
||||
image_embeds, negative_image_embeds = prior_pipeline(prompt, guidance_scale=1.0).to_tuple()
|
||||
image = pipeline(
|
||||
prompt,
|
||||
image_embeds=image_embeds,
|
||||
negative_image_embeds=negative_image_embeds,
|
||||
).images[0]
|
||||
|
||||
image.save("burger.png")
|
||||
```
|
||||
|
||||
Pass the cheeseburger to the [`ShapEImg2ImgPipeline`] to generate a 3D representation of it.
|
||||
|
||||
```py
|
||||
from PIL import Image
|
||||
from diffusers.utils import export_to_gif
|
||||
|
||||
pipe = ShapEImg2ImgPipeline.from_pretrained("openai/shap-e-img2img", torch_dtype=torch.float16, variant="fp16").to("cuda")
|
||||
|
||||
guidance_scale = 3.0
|
||||
image = Image.open("burger.png").resize((256, 256))
|
||||
|
||||
images = pipe(
|
||||
image,
|
||||
guidance_scale=guidance_scale,
|
||||
num_inference_steps=64,
|
||||
frame_size=256,
|
||||
).images
|
||||
|
||||
gif_path = export_to_gif(images[0], "burger_3d.gif")
|
||||
```
|
||||
|
||||
<div class="flex gap-4">
|
||||
<div>
|
||||
<img class="rounded-xl" src="https://huggingface.co/datasets/hf-internal-testing/diffusers-images/resolve/main/shap_e/burger_in.png"/>
|
||||
<figcaption class="mt-2 text-center text-sm text-gray-500">cheeseburger</figcaption>
|
||||
</div>
|
||||
<div>
|
||||
<img class="rounded-xl" src="https://huggingface.co/datasets/hf-internal-testing/diffusers-images/resolve/main/shap_e/burger_out.gif"/>
|
||||
<figcaption class="mt-2 text-center text-sm text-gray-500">3D cheeseburger</figcaption>
|
||||
</div>
|
||||
</div>
|
||||
|
||||
## Generate mesh
|
||||
|
||||
Shap-E is a flexible model that can also generate textured mesh outputs to be rendered for downstream applications. In this example, you'll convert the output into a `glb` file because the 🤗 Datasets library supports mesh visualization of `glb` files which can be rendered by the [Dataset viewer](https://huggingface.co/docs/hub/datasets-viewer#dataset-preview).
|
||||
|
||||
You can generate mesh outputs for both the [`ShapEPipeline`] and [`ShapEImg2ImgPipeline`] by specifying the `output_type` parameter as `"mesh"`:
|
||||
|
||||
```py
|
||||
import torch
|
||||
from diffusers import ShapEPipeline
|
||||
|
||||
device = torch.device("cuda" if torch.cuda.is_available() else "cpu")
|
||||
|
||||
pipe = ShapEPipeline.from_pretrained("openai/shap-e", torch_dtype=torch.float16, variant="fp16", use_safetensors=True)
|
||||
pipe = pipe.to(device)
|
||||
|
||||
guidance_scale = 15.0
|
||||
prompt = "A birthday cupcake"
|
||||
|
||||
images = pipe(prompt, guidance_scale=guidance_scale, num_inference_steps=64, frame_size=256, output_type="mesh").images
|
||||
```
|
||||
|
||||
Use the [`~utils.export_to_ply`] function to save the mesh output as a `ply` file:
|
||||
|
||||
<Tip>
|
||||
|
||||
You can optionally save the mesh output as an `obj` file with the [`~utils.export_to_obj`] function. The ability to save the mesh output in a variety of formats makes it more flexible for downstream usage!
|
||||
|
||||
</Tip>
|
||||
|
||||
```py
|
||||
from diffusers.utils import export_to_ply
|
||||
|
||||
ply_path = export_to_ply(images[0], "3d_cake.ply")
|
||||
print(f"saved to folder: {ply_path}")
|
||||
```
|
||||
|
||||
Then you can convert the `ply` file to a `glb` file with the trimesh library:
|
||||
|
||||
```py
|
||||
import trimesh
|
||||
|
||||
mesh = trimesh.load("3d_cake.ply")
|
||||
mesh.export("3d_cake.glb", file_type="glb")
|
||||
```
|
||||
|
||||
By default, the mesh output is focused from the bottom viewpoint but you can change the default viewpoint by applying a rotation transform:
|
||||
|
||||
```py
|
||||
import trimesh
|
||||
import numpy as np
|
||||
|
||||
mesh = trimesh.load("3d_cake.ply")
|
||||
rot = trimesh.transformations.rotation_matrix(-np.pi / 2, [1, 0, 0])
|
||||
mesh = mesh.apply_transform(rot)
|
||||
mesh.export("3d_cake.glb", file_type="glb")
|
||||
```
|
||||
|
||||
Upload the mesh file to your dataset repository to visualize it with the Dataset viewer!
|
||||
|
||||
<div class="flex justify-center">
|
||||
<img class="rounded-xl" src="https://huggingface.co/datasets/huggingface/documentation-images/resolve/main/diffusers/3D-cake.gif"/>
|
||||
</div>
|
||||
@@ -153,10 +153,19 @@ images = pipeline.numpy_to_pil(images)
|
||||
|
||||
### Visualization
|
||||
|
||||
```python
|
||||
from diffusers import make_image_grid
|
||||
Let's create a helper function to display images in a grid.
|
||||
|
||||
make_image_grid(images, 2, 4)
|
||||
```python
|
||||
def image_grid(imgs, rows, cols):
|
||||
w, h = imgs[0].size
|
||||
grid = Image.new("RGB", size=(cols * w, rows * h))
|
||||
for i, img in enumerate(imgs):
|
||||
grid.paste(img, box=(i % cols * w, i // cols * h))
|
||||
return grid
|
||||
```
|
||||
|
||||
```python
|
||||
image_grid(images, 2, 4)
|
||||
```
|
||||
|
||||
|
||||
@@ -189,7 +198,7 @@ images = pipeline(prompt_ids, p_params, rng, jit=True).images
|
||||
images = images.reshape((images.shape[0] * images.shape[1],) + images.shape[-3:])
|
||||
images = pipeline.numpy_to_pil(images)
|
||||
|
||||
make_image_grid(images, 2, 4)
|
||||
image_grid(images, 2, 4)
|
||||
```
|
||||
|
||||
|
||||
|
||||
@@ -14,7 +14,7 @@ from huggingface_hub import notebook_login
|
||||
notebook_login()
|
||||
```
|
||||
|
||||
Import the necessary libraries:
|
||||
Import the necessary libraries, and create a helper function to visualize the generated images:
|
||||
|
||||
```py
|
||||
import os
|
||||
@@ -24,8 +24,19 @@ import PIL
|
||||
from PIL import Image
|
||||
|
||||
from diffusers import StableDiffusionPipeline
|
||||
from diffusers.utils import make_image_grid
|
||||
from transformers import CLIPFeatureExtractor, CLIPTextModel, CLIPTokenizer
|
||||
|
||||
|
||||
def image_grid(imgs, rows, cols):
|
||||
assert len(imgs) == rows * cols
|
||||
|
||||
w, h = imgs[0].size
|
||||
grid = Image.new("RGB", size=(cols * w, rows * h))
|
||||
grid_w, grid_h = grid.size
|
||||
|
||||
for i, img in enumerate(imgs):
|
||||
grid.paste(img, box=(i % cols * w, i // cols * h))
|
||||
return grid
|
||||
```
|
||||
|
||||
Pick a Stable Diffusion checkpoint and a pre-learned concept from the [Stable Diffusion Conceptualizer](https://huggingface.co/spaces/sd-concepts-library/stable-diffusion-conceptualizer):
|
||||
@@ -38,9 +49,7 @@ repo_id_embeds = "sd-concepts-library/cat-toy"
|
||||
Now you can load a pipeline, and pass the pre-learned concept to it:
|
||||
|
||||
```py
|
||||
pipeline = StableDiffusionPipeline.from_pretrained(
|
||||
pretrained_model_name_or_path, torch_dtype=torch.float16, use_safetensors=True
|
||||
).to("cuda")
|
||||
pipeline = StableDiffusionPipeline.from_pretrained(pretrained_model_name_or_path, torch_dtype=torch.float16).to("cuda")
|
||||
|
||||
pipeline.load_textual_inversion(repo_id_embeds)
|
||||
```
|
||||
@@ -62,7 +71,7 @@ for _ in range(num_rows):
|
||||
images = pipe(prompt, num_images_per_prompt=num_samples, num_inference_steps=50, guidance_scale=7.5).images
|
||||
all_images.extend(images)
|
||||
|
||||
grid = make_image_grid(all_images, num_samples, num_rows)
|
||||
grid = image_grid(all_images, num_samples, num_rows)
|
||||
grid
|
||||
```
|
||||
|
||||
|
||||
@@ -32,7 +32,7 @@ In this guide, you'll use [`DiffusionPipeline`] for unconditional image generati
|
||||
```python
|
||||
>>> from diffusers import DiffusionPipeline
|
||||
|
||||
>>> generator = DiffusionPipeline.from_pretrained("anton-l/ddpm-butterflies-128", use_safetensors=True)
|
||||
>>> generator = DiffusionPipeline.from_pretrained("anton-l/ddpm-butterflies-128")
|
||||
```
|
||||
|
||||
The [`DiffusionPipeline`] downloads and caches all modeling, tokenization, and scheduling components.
|
||||
|
||||
@@ -40,9 +40,7 @@ You can use the model with the new `.safetensors` weights by specifying the refe
|
||||
```py
|
||||
from diffusers import DiffusionPipeline
|
||||
|
||||
pipeline = DiffusionPipeline.from_pretrained(
|
||||
"stabilityai/stable-diffusion-2-1", revision="refs/pr/22", use_safetensors=True
|
||||
)
|
||||
pipeline = DiffusionPipeline.from_pretrained("stabilityai/stable-diffusion-2-1", revision="refs/pr/22")
|
||||
```
|
||||
|
||||
## Why use safetensors?
|
||||
@@ -57,7 +55,7 @@ There are several reasons for using safetensors:
|
||||
```py
|
||||
from diffusers import StableDiffusionPipeline
|
||||
|
||||
pipeline = StableDiffusionPipeline.from_pretrained("stabilityai/stable-diffusion-2-1", use_safetensors=True)
|
||||
pipeline = StableDiffusionPipeline.from_pretrained("stabilityai/stable-diffusion-2-1")
|
||||
"Loaded in safetensors 0:00:02.033658"
|
||||
"Loaded in PyTorch 0:00:02.663379"
|
||||
```
|
||||
|
||||
@@ -10,36 +10,31 @@ an "AS IS" BASIS, WITHOUT WARRANTIES OR CONDITIONS OF ANY KIND, either express o
|
||||
specific language governing permissions and limitations under the License.
|
||||
-->
|
||||
|
||||
# Prompt weighting
|
||||
# Weighting prompts
|
||||
|
||||
[[open-in-colab]]
|
||||
|
||||
Prompt weighting provides a way to emphasize or de-emphasize certain parts of a prompt, allowing for more control over the generated image. A prompt can include several concepts, which gets turned into contextualized text embeddings. The embeddings are used by the model to condition its cross-attention layers to generate an image (read the Stable Diffusion [blog post](https://huggingface.co/blog/stable_diffusion) to learn more about how it works).
|
||||
Text-guided diffusion models generate images based on a given text prompt. The text prompt
|
||||
can include multiple concepts that the model should generate and it's often desirable to weight
|
||||
certain parts of the prompt more or less.
|
||||
|
||||
Prompt weighting works by increasing or decreasing the scale of the text embedding vector that corresponds to its concept in the prompt because you may not necessarily want the model to focus on all concepts equally. The easiest way to prepare the prompt-weighted embeddings is to use [Compel](https://github.com/damian0815/compel), a text prompt-weighting and blending library. Once you have the prompt-weighted embeddings, you can pass them to any pipeline that has a [`prompt_embeds`](https://huggingface.co/docs/diffusers/en/api/pipelines/stable_diffusion/text2img#diffusers.StableDiffusionPipeline.__call__.prompt_embeds) (and optionally [`negative_prompt_embeds`](https://huggingface.co/docs/diffusers/en/api/pipelines/stable_diffusion/text2img#diffusers.StableDiffusionPipeline.__call__.negative_prompt_embeds)) parameter, such as [`StableDiffusionPipeline`], [`StableDiffusionControlNetPipeline`], and [`StableDiffusionXLPipeline`].
|
||||
Diffusion models work by conditioning the cross attention layers of the diffusion model with contextualized text embeddings (see the [Stable Diffusion Guide for more information](../stable-diffusion)).
|
||||
Thus a simple way to emphasize (or de-emphasize) certain parts of the prompt is by increasing or reducing the scale of the text embedding vector that corresponds to the relevant part of the prompt.
|
||||
This is called "prompt-weighting" and has been a highly demanded feature by the community (see issue [here](https://github.com/huggingface/diffusers/issues/2431)).
|
||||
|
||||
<Tip>
|
||||
## How to do prompt-weighting in Diffusers
|
||||
|
||||
If your favorite pipeline doesn't have a `prompt_embeds` parameter, please open an [issue](https://github.com/huggingface/diffusers/issues/new/choose) so we can add it!
|
||||
We believe the role of `diffusers` is to be a toolbox that provides essential features that enable other projects, such as [InvokeAI](https://github.com/invoke-ai/InvokeAI) or [diffuzers](https://github.com/abhishekkrthakur/diffuzers), to build powerful UIs. In order to support arbitrary methods to manipulate prompts, `diffusers` exposes a [`prompt_embeds`](https://huggingface.co/docs/diffusers/v0.14.0/en/api/pipelines/stable_diffusion/text2img#diffusers.StableDiffusionPipeline.__call__.prompt_embeds) function argument to many pipelines such as [`StableDiffusionPipeline`], allowing to directly pass the "prompt-weighted"/scaled text embeddings to the pipeline.
|
||||
|
||||
</Tip>
|
||||
The [compel library](https://github.com/damian0815/compel) provides an easy way to emphasize or de-emphasize portions of the prompt for you. We strongly recommend it instead of preparing the embeddings yourself.
|
||||
|
||||
This guide will show you how to weight and blend your prompts with Compel in 🤗 Diffusers.
|
||||
|
||||
Before you begin, make sure you have the latest version of Compel installed:
|
||||
|
||||
```py
|
||||
# uncomment to install in Colab
|
||||
#!pip install compel --upgrade
|
||||
```
|
||||
|
||||
For this guide, let's generate an image with the prompt `"a red cat playing with a ball"` using the [`StableDiffusionPipeline`]:
|
||||
Let's look at a simple example. Imagine you want to generate an image of `"a red cat playing with a ball"` as
|
||||
follows:
|
||||
|
||||
```py
|
||||
from diffusers import StableDiffusionPipeline, UniPCMultistepScheduler
|
||||
import torch
|
||||
|
||||
pipe = StableDiffusionPipeline.from_pretrained("CompVis/stable-diffusion-v1-4", use_safetensors=True)
|
||||
pipe = StableDiffusionPipeline.from_pretrained("CompVis/stable-diffusion-v1-4")
|
||||
pipe.scheduler = UniPCMultistepScheduler.from_config(pipe.scheduler.config)
|
||||
|
||||
prompt = "a red cat playing with a ball"
|
||||
@@ -50,13 +45,19 @@ image = pipe(prompt, generator=generator, num_inference_steps=20).images[0]
|
||||
image
|
||||
```
|
||||
|
||||
<div class="flex justify-center">
|
||||
<img class="rounded-xl" src="https://huggingface.co/datasets/hf-internal-testing/diffusers-images/resolve/main/compel/forest_0.png"/>
|
||||
</div>
|
||||
This gives you:
|
||||
|
||||
## Weighting
|
||||
|
||||
|
||||
You'll notice there is no "ball" in the image! Let's use compel to upweight the concept of "ball" in the prompt. Create a [`Compel`](https://github.com/damian0815/compel/blob/main/doc/compel.md#compel-objects) object, and pass it a tokenizer and text encoder:
|
||||
As you can see, there is no "ball" in the image. Let's emphasize this part!
|
||||
|
||||
For this we should install the `compel` library:
|
||||
|
||||
```
|
||||
pip install compel
|
||||
```
|
||||
|
||||
and then create a `Compel` object:
|
||||
|
||||
```py
|
||||
from compel import Compel
|
||||
@@ -64,114 +65,40 @@ from compel import Compel
|
||||
compel_proc = Compel(tokenizer=pipe.tokenizer, text_encoder=pipe.text_encoder)
|
||||
```
|
||||
|
||||
compel uses `+` or `-` to increase or decrease the weight of a word in the prompt. To increase the weight of "ball":
|
||||
|
||||
<Tip>
|
||||
|
||||
`+` corresponds to the value `1.1`, `++` corresponds to `1.1^2`, and so on. Similarly, `-` corresponds to `0.9` and `--` corresponds to `0.9^2`. Feel free to experiment with adding more `+` or `-` in your prompt!
|
||||
|
||||
</Tip>
|
||||
Now we emphasize the part "ball" with the `"++"` syntax:
|
||||
|
||||
```py
|
||||
prompt = "a red cat playing with a ball++"
|
||||
```
|
||||
|
||||
Pass the prompt to `compel_proc` to create the new prompt embeddings which are passed to the pipeline:
|
||||
and instead of passing this to the pipeline directly, we have to process it using `compel_proc`:
|
||||
|
||||
```py
|
||||
prompt_embeds = compel_proc(prompt)
|
||||
generator = torch.manual_seed(33)
|
||||
```
|
||||
|
||||
image = pipe(prompt_embeds=prompt_embeds, generator=generator, num_inference_steps=20).images[0]
|
||||
Now we can pass `prompt_embeds` directly to the pipeline:
|
||||
|
||||
```py
|
||||
generator = torch.Generator(device="cpu").manual_seed(33)
|
||||
|
||||
images = pipe(prompt_embeds=prompt_embeds, generator=generator, num_inference_steps=20).images[0]
|
||||
image
|
||||
```
|
||||
|
||||
<div class="flex justify-center">
|
||||
<img class="rounded-xl" src="https://huggingface.co/datasets/hf-internal-testing/diffusers-images/resolve/main/compel/forest_1.png"/>
|
||||
</div>
|
||||
We now get the following image which has a "ball"!
|
||||
|
||||
To downweight parts of the prompt, use the `-` suffix:
|
||||

|
||||
|
||||
```py
|
||||
prompt = "a red------- cat playing with a ball"
|
||||
prompt_embeds = compel_proc(prompt)
|
||||
Similarly, we de-emphasize parts of the sentence by using the `--` suffix for words, feel free to give it
|
||||
a try!
|
||||
|
||||
generator = torch.manual_seed(33)
|
||||
If your favorite pipeline does not have a `prompt_embeds` input, please make sure to open an issue, the
|
||||
diffusers team tries to be as responsive as possible.
|
||||
|
||||
Compel 1.1.6 adds a utility class to simplify using textual inversions. Instantiate a `DiffusersTextualInversionManager` and pass it to Compel init:
|
||||
|
||||
image = pipe(prompt_embeds=prompt_embeds, generator=generator, num_inference_steps=20).images[0]
|
||||
image
|
||||
```
|
||||
|
||||
<div class="flex justify-center">
|
||||
<img class="rounded-xl" src="https://huggingface.co/datasets/huggingface/documentation-images/resolve/main/diffusers/compel-neg.png"/>
|
||||
</div>
|
||||
|
||||
You can even up or downweight multiple concepts in the same prompt:
|
||||
|
||||
```py
|
||||
prompt = "a red cat++ playing with a ball----"
|
||||
prompt_embeds = compel_proc(prompt)
|
||||
|
||||
generator = torch.manual_seed(33)
|
||||
|
||||
image = pipe(prompt_embeds=prompt_embeds, generator=generator, num_inference_steps=20).images[0]
|
||||
image
|
||||
```
|
||||
|
||||
<div class="flex justify-center">
|
||||
<img class="rounded-xl" src="https://huggingface.co/datasets/huggingface/documentation-images/resolve/main/diffusers/compel-pos-neg.png"/>
|
||||
</div>
|
||||
|
||||
## Blending
|
||||
|
||||
You can also create a weighted *blend* of prompts by adding `.blend()` to a list of prompts and passing it some weights. Your blend may not always produce the result you expect because it breaks some assumptions about how the text encoder functions, so just have fun and experiment with it!
|
||||
|
||||
```py
|
||||
prompt_embeds = compel_proc('("a red cat playing with a ball", "jungle").blend(0.7, 0.8)')
|
||||
generator = torch.Generator(device="cuda").manual_seed(33)
|
||||
|
||||
image = pipe(prompt_embeds=prompt_embeds, generator=generator, num_inference_steps=20).images[0]
|
||||
image
|
||||
```
|
||||
|
||||
<div class="flex justify-center">
|
||||
<img class="rounded-xl" src="https://huggingface.co/datasets/huggingface/documentation-images/resolve/main/diffusers/compel-blend.png"/>
|
||||
</div>
|
||||
|
||||
## Conjunction
|
||||
|
||||
A conjunction diffuses each prompt independently and concatenates their results by their weighted sum. Add `.and()` to the end of a list of prompts to create a conjunction:
|
||||
|
||||
```py
|
||||
prompt_embeds = compel_proc('["a red cat", "playing with a", "ball"].and()')
|
||||
generator = torch.Generator(device="cuda").manual_seed(55)
|
||||
|
||||
image = pipe(prompt_embeds=prompt_embeds, generator=generator, num_inference_steps=20).images[0]
|
||||
image
|
||||
```
|
||||
|
||||
<div class="flex justify-center">
|
||||
<img class="rounded-xl" src="https://huggingface.co/datasets/huggingface/documentation-images/resolve/main/diffusers/compel-conj.png"/>
|
||||
</div>
|
||||
|
||||
## Textual inversion
|
||||
|
||||
[Textual inversion](../training/text_inversion) is a technique for learning a specific concept from some images which you can use to generate new images conditioned on that concept.
|
||||
|
||||
Create a pipeline and use the [`~loaders.TextualInversionLoaderMixin.load_textual_inversion`] function to load the textual inversion embeddings (feel free to browse the [Stable Diffusion Conceptualizer](https://huggingface.co/spaces/sd-concepts-library/stable-diffusion-conceptualizer) for 100+ trained concepts):
|
||||
|
||||
```py
|
||||
import torch
|
||||
from diffusers import StableDiffusionPipeline
|
||||
from compel import Compel, DiffusersTextualInversionManager
|
||||
|
||||
pipe = StableDiffusionPipeline.from_pretrained("runwayml/stable-diffusion-v1-5", torch_dtype=torch.float16, use_safetensors=True, variant="fp16").to("cuda")
|
||||
pipe.load_textual_inversion("sd-concepts-library/midjourney-style")
|
||||
```
|
||||
|
||||
Compel provides a `DiffusersTextualInversionManager` class to simplify prompt weighting with textual inversion. Instantiate `DiffusersTextualInversionManager` and pass it to the `Compel` class:
|
||||
|
||||
```py
|
||||
textual_inversion_manager = DiffusersTextualInversionManager(pipe)
|
||||
compel = Compel(
|
||||
tokenizer=pipe.tokenizer,
|
||||
@@ -179,87 +106,5 @@ compel = Compel(
|
||||
textual_inversion_manager=textual_inversion_manager)
|
||||
```
|
||||
|
||||
Incorporate the concept to condition a prompt with using the `<concept>` syntax:
|
||||
|
||||
```py
|
||||
prompt_embeds = compel_proc('("A red cat++ playing with a ball <midjourney-style>")')
|
||||
|
||||
image = pipe(prompt_embeds=prompt_embeds).images[0]
|
||||
image
|
||||
```
|
||||
|
||||
<div class="flex justify-center">
|
||||
<img class="rounded-xl" src="https://huggingface.co/datasets/huggingface/documentation-images/resolve/main/diffusers/compel-text-inversion.png"/>
|
||||
</div>
|
||||
|
||||
## DreamBooth
|
||||
|
||||
[DreamBooth](../training/dreambooth) is a technique for generating contextualized images of a subject given just a few images of the subject to train on. It is similar to textual inversion, but DreamBooth trains the full model whereas textual inversion only fine-tunes the text embeddings. This means you should use [`~DiffusionPipeline.from_pretrained`] to load the DreamBooth model (feel free to browse the [Stable Diffusion Dreambooth Concepts Library](https://huggingface.co/sd-dreambooth-library) for 100+ trained models):
|
||||
|
||||
```py
|
||||
import torch
|
||||
from diffusers import DiffusionPipeline, UniPCMultistepScheduler
|
||||
from compel import Compel
|
||||
|
||||
pipe = DiffusionPipeline.from_pretrained("sd-dreambooth-library/dndcoverart-v1", torch_dtype=torch.float16).to("cuda")
|
||||
pipe.scheduler = UniPCMultistepScheduler.from_config(pipe.scheduler.config)
|
||||
```
|
||||
|
||||
Create a `Compel` class with a tokenizer and text encoder, and pass your prompt to it. Depending on the model you use, you'll need to incorporate the model's unique identifier into your prompt. For example, the `dndcoverart-v1` model uses the identifier `dndcoverart`:
|
||||
|
||||
```py
|
||||
compel_proc = Compel(tokenizer=pipe.tokenizer, text_encoder=pipe.text_encoder)
|
||||
prompt_embeds = compel_proc('("magazine cover of a dndcoverart dragon, high quality, intricate details, larry elmore art style").and()')
|
||||
image = pipe(prompt_embeds=prompt_embeds).images[0]
|
||||
image
|
||||
```
|
||||
|
||||
<div class="flex justify-center">
|
||||
<img class="rounded-xl" src="https://huggingface.co/datasets/huggingface/documentation-images/resolve/main/diffusers/compel-dreambooth.png"/>
|
||||
</div>
|
||||
|
||||
## Stable Diffusion XL
|
||||
|
||||
Stable Diffusion XL (SDXL) has two tokenizers and text encoders so it's usage is a bit different. To address this, you should pass both tokenizers and encoders to the `Compel` class:
|
||||
|
||||
```py
|
||||
from compel import Compel, ReturnedEmbeddingsType
|
||||
from diffusers import DiffusionPipeline
|
||||
|
||||
pipeline = DiffusionPipeline.from_pretrained(
|
||||
"stabilityai/stable-diffusion-xl-base-1.0",
|
||||
variant="fp16",
|
||||
use_safetensors=True,
|
||||
torch_dtype=torch.float16
|
||||
).to("cuda")
|
||||
|
||||
compel = Compel(
|
||||
tokenizer=[pipeline.tokenizer, pipeline.tokenizer_2] ,
|
||||
text_encoder=[pipeline.text_encoder, pipeline.text_encoder_2],
|
||||
returned_embeddings_type=ReturnedEmbeddingsType.PENULTIMATE_HIDDEN_STATES_NON_NORMALIZED,
|
||||
requires_pooled=[False, True]
|
||||
)
|
||||
```
|
||||
|
||||
This time, let's upweight "ball" by a factor of 1.5 for the first prompt, and downweight "ball" by 0.6 for the second prompt. The [`StableDiffusionXLPipeline`] also requires [`pooled_prompt_embeds`](https://huggingface.co/docs/diffusers/en/api/pipelines/stable_diffusion/stable_diffusion_xl#diffusers.StableDiffusionXLInpaintPipeline.__call__.pooled_prompt_embeds) (and optionally [`negative_pooled_prompt_embeds`](https://huggingface.co/docs/diffusers/en/api/pipelines/stable_diffusion/stable_diffusion_xl#diffusers.StableDiffusionXLInpaintPipeline.__call__.negative_pooled_prompt_embeds)) so you should pass those to the pipeline along with the conditioning tensors:
|
||||
|
||||
```py
|
||||
# apply weights
|
||||
prompt = ["a red cat playing with a (ball)1.5", "a red cat playing with a (ball)0.6"]
|
||||
conditioning, pooled = compel(prompt)
|
||||
|
||||
# generate image
|
||||
generator = [torch.Generator().manual_seed(33) for _ in range(len(prompt))]
|
||||
images = pipeline(prompt_embeds=conditioning, pooled_prompt_embeds=pooled, generator=generator, num_inference_steps=30).images
|
||||
```
|
||||
|
||||
<div class="flex gap-4">
|
||||
<div>
|
||||
<img class="rounded-xl" src="https://huggingface.co/datasets/hf-internal-testing/diffusers-images/resolve/main/compel/sdxl_ball1.png"/>
|
||||
<figcaption class="mt-2 text-center text-sm text-gray-500">"a red cat playing with a (ball)1.5"</figcaption>
|
||||
</div>
|
||||
<div>
|
||||
<img class="rounded-xl" src="https://huggingface.co/datasets/hf-internal-testing/diffusers-images/resolve/main/compel/sdxl_ball2.png"/>
|
||||
<figcaption class="mt-2 text-center text-sm text-gray-500">"a red cat playing with a (ball)0.6"</figcaption>
|
||||
</div>
|
||||
</div>
|
||||
Also, please check out the documentation of the [compel](https://github.com/damian0815/compel) library for
|
||||
more information.
|
||||
|
||||
@@ -25,7 +25,7 @@ A pipeline is a quick and easy way to run a model for inference, requiring no mo
|
||||
```py
|
||||
>>> from diffusers import DDPMPipeline
|
||||
|
||||
>>> ddpm = DDPMPipeline.from_pretrained("google/ddpm-cat-256", use_safetensors=True).to("cuda")
|
||||
>>> ddpm = DDPMPipeline.from_pretrained("google/ddpm-cat-256").to("cuda")
|
||||
>>> image = ddpm(num_inference_steps=25).images[0]
|
||||
>>> image
|
||||
```
|
||||
@@ -46,7 +46,7 @@ To recreate the pipeline with the model and scheduler separately, let's write ou
|
||||
>>> from diffusers import DDPMScheduler, UNet2DModel
|
||||
|
||||
>>> scheduler = DDPMScheduler.from_pretrained("google/ddpm-cat-256")
|
||||
>>> model = UNet2DModel.from_pretrained("google/ddpm-cat-256", use_safetensors=True).to("cuda")
|
||||
>>> model = UNet2DModel.from_pretrained("google/ddpm-cat-256").to("cuda")
|
||||
```
|
||||
|
||||
2. Set the number of timesteps to run the denoising process for:
|
||||
@@ -94,9 +94,9 @@ This is the entire denoising process, and you can use this same pattern to write
|
||||
>>> from PIL import Image
|
||||
>>> import numpy as np
|
||||
|
||||
>>> image = (input / 2 + 0.5).clamp(0, 1).squeeze()
|
||||
>>> image = (image.permute(1, 2, 0) * 255).round().to(torch.uint8).cpu().numpy()
|
||||
>>> image = Image.fromarray(image)
|
||||
>>> image = (input / 2 + 0.5).clamp(0, 1)
|
||||
>>> image = image.cpu().permute(0, 2, 3, 1).numpy()[0]
|
||||
>>> image = Image.fromarray((image * 255).round().astype("uint8"))
|
||||
>>> image
|
||||
```
|
||||
|
||||
@@ -124,14 +124,10 @@ Now that you know what you need for the Stable Diffusion pipeline, load all thes
|
||||
>>> from transformers import CLIPTextModel, CLIPTokenizer
|
||||
>>> from diffusers import AutoencoderKL, UNet2DConditionModel, PNDMScheduler
|
||||
|
||||
>>> vae = AutoencoderKL.from_pretrained("CompVis/stable-diffusion-v1-4", subfolder="vae", use_safetensors=True)
|
||||
>>> vae = AutoencoderKL.from_pretrained("CompVis/stable-diffusion-v1-4", subfolder="vae")
|
||||
>>> tokenizer = CLIPTokenizer.from_pretrained("CompVis/stable-diffusion-v1-4", subfolder="tokenizer")
|
||||
>>> text_encoder = CLIPTextModel.from_pretrained(
|
||||
... "CompVis/stable-diffusion-v1-4", subfolder="text_encoder", use_safetensors=True
|
||||
... )
|
||||
>>> unet = UNet2DConditionModel.from_pretrained(
|
||||
... "CompVis/stable-diffusion-v1-4", subfolder="unet", use_safetensors=True
|
||||
... )
|
||||
>>> text_encoder = CLIPTextModel.from_pretrained("CompVis/stable-diffusion-v1-4", subfolder="text_encoder")
|
||||
>>> unet = UNet2DConditionModel.from_pretrained("CompVis/stable-diffusion-v1-4", subfolder="unet")
|
||||
```
|
||||
|
||||
Instead of the default [`PNDMScheduler`], exchange it for the [`UniPCMultistepScheduler`] to see how easy it is to plug a different scheduler in:
|
||||
@@ -271,11 +267,11 @@ with torch.no_grad():
|
||||
Lastly, convert the image to a `PIL.Image` to see your generated image!
|
||||
|
||||
```py
|
||||
>>> image = (image / 2 + 0.5).clamp(0, 1).squeeze()
|
||||
>>> image = (image.permute(1, 2, 0) * 255).to(torch.uint8).cpu().numpy()
|
||||
>>> image = (image / 2 + 0.5).clamp(0, 1)
|
||||
>>> image = image.detach().cpu().permute(0, 2, 3, 1).numpy()
|
||||
>>> images = (image * 255).round().astype("uint8")
|
||||
>>> image = Image.fromarray(image)
|
||||
>>> image
|
||||
>>> pil_images = [Image.fromarray(image) for image in images]
|
||||
>>> pil_images[0]
|
||||
```
|
||||
|
||||
<div class="flex justify-center">
|
||||
|
||||
Some files were not shown because too many files have changed in this diff Show More
Reference in New Issue
Block a user