mirror of
https://github.com/huggingface/diffusers.git
synced 2026-02-15 23:37:08 +08:00
Compare commits
1 Commits
controlnet
...
run_tests
| Author | SHA1 | Date | |
|---|---|---|---|
|
|
0dc0f98526 |
29
.github/ISSUE_TEMPLATE/bug-report.yml
vendored
29
.github/ISSUE_TEMPLATE/bug-report.yml
vendored
@@ -49,32 +49,3 @@ body:
|
||||
placeholder: diffusers version, platform, python version, ...
|
||||
validations:
|
||||
required: true
|
||||
- type: textarea
|
||||
id: who-can-help
|
||||
attributes:
|
||||
label: Who can help?
|
||||
description: |
|
||||
Your issue will be replied to more quickly if you can figure out the right person to tag with @
|
||||
If you know how to use git blame, that is the easiest way, otherwise, here is a rough guide of **who to tag**.
|
||||
|
||||
All issues are read by one of the core maintainers, so if you don't know who to tag, just leave this blank and
|
||||
a core maintainer will ping the right person.
|
||||
|
||||
Please tag fewer than 3 people.
|
||||
|
||||
General library related questions: @patrickvonplaten and @sayakpaul
|
||||
|
||||
Questions on the training examples: @williamberman, @sayakpaul, @yiyixuxu
|
||||
|
||||
Questions on memory optimizations, LoRA, float16, etc.: @williamberman, @patrickvonplaten, and @sayakpaul
|
||||
|
||||
Questions on schedulers: @patrickvonplaten and @williamberman
|
||||
|
||||
Questions on models and pipelines: @patrickvonplaten, @sayakpaul, and @williamberman
|
||||
|
||||
Questions on JAX- and MPS-related things: @pcuenca
|
||||
|
||||
Questions on audio pipelines: @patrickvonplaten, @kashif, and @sanchit-gandhi
|
||||
|
||||
Documentation: @stevhliu and @yiyixuxu
|
||||
placeholder: "@Username ..."
|
||||
|
||||
60
.github/PULL_REQUEST_TEMPLATE.md
vendored
60
.github/PULL_REQUEST_TEMPLATE.md
vendored
@@ -1,60 +0,0 @@
|
||||
# What does this PR do?
|
||||
|
||||
<!--
|
||||
Congratulations! You've made it this far! You're not quite done yet though.
|
||||
|
||||
Once merged, your PR is going to appear in the release notes with the title you set, so make sure it's a great title that fully reflects the extent of your awesome contribution.
|
||||
|
||||
Then, please replace this with a description of the change and which issue is fixed (if applicable). Please also include relevant motivation and context. List any dependencies (if any) that are required for this change.
|
||||
|
||||
Once you're done, someone will review your PR shortly (see the section "Who can review?" below to tag some potential reviewers). They may suggest changes to make the code even better. If no one reviewed your PR after a week has passed, don't hesitate to post a new comment @-mentioning the same persons---sometimes notifications get lost.
|
||||
-->
|
||||
|
||||
<!-- Remove if not applicable -->
|
||||
|
||||
Fixes # (issue)
|
||||
|
||||
|
||||
## Before submitting
|
||||
- [ ] This PR fixes a typo or improves the docs (you can dismiss the other checks if that's the case).
|
||||
- [ ] Did you read the [contributor guideline](https://github.com/huggingface/diffusers/blob/main/CONTRIBUTING.md)?
|
||||
- [ ] Did you read our [philosophy doc](https://github.com/huggingface/diffusers/blob/main/PHILOSOPHY.md) (important for complex PRs)?
|
||||
- [ ] Was this discussed/approved via a Github issue or the [forum](https://discuss.huggingface.co/)? Please add a link to it if that's the case.
|
||||
- [ ] Did you make sure to update the documentation with your changes? Here are the
|
||||
[documentation guidelines](https://github.com/huggingface/diffusers/tree/main/docs), and
|
||||
[here are tips on formatting docstrings](https://github.com/huggingface/transformers/tree/main/docs#writing-source-documentation).
|
||||
- [ ] Did you write any new necessary tests?
|
||||
|
||||
|
||||
## Who can review?
|
||||
|
||||
Anyone in the community is free to review the PR once the tests have passed. Feel free to tag
|
||||
members/contributors who may be interested in your PR.
|
||||
|
||||
<!-- Your PR will be replied to more quickly if you can figure out the right person to tag with @
|
||||
|
||||
If you know how to use git blame, that is the easiest way, otherwise, here is a rough guide of **who to tag**.
|
||||
Please tag fewer than 3 people.
|
||||
|
||||
Core library:
|
||||
|
||||
- Schedulers: @williamberman and @patrickvonplaten
|
||||
- Pipelines: @patrickvonplaten and @sayakpaul
|
||||
- Training examples: @sayakpaul and @patrickvonplaten
|
||||
- Docs: @stevenliu and @yiyixu
|
||||
- JAX and MPS: @pcuenca
|
||||
- Audio: @sanchit-gandhi
|
||||
- General functionalities: @patrickvonplaten and @sayakpaul
|
||||
|
||||
Integrations:
|
||||
|
||||
- deepspeed: HF Trainer/Accelerate: @pacman100
|
||||
|
||||
HF projects:
|
||||
|
||||
- accelerate: [different repo](https://github.com/huggingface/accelerate)
|
||||
- datasets: [different repo](https://github.com/huggingface/datasets)
|
||||
- transformers: [different repo](https://github.com/huggingface/transformers)
|
||||
- safetensors: [different repo](https://github.com/huggingface/safetensors)
|
||||
|
||||
-->
|
||||
4
.github/actions/setup-miniconda/action.yml
vendored
4
.github/actions/setup-miniconda/action.yml
vendored
@@ -27,7 +27,7 @@ runs:
|
||||
- name: Get date
|
||||
id: get-date
|
||||
shell: bash
|
||||
run: echo "today=$(/bin/date -u '+%Y%m%d')d" >> $GITHUB_OUTPUT
|
||||
run: echo "::set-output name=today::$(/bin/date -u '+%Y%m%d')d"
|
||||
- name: Setup miniconda cache
|
||||
id: miniconda-cache
|
||||
uses: actions/cache@v2
|
||||
@@ -143,4 +143,4 @@ runs:
|
||||
echo "There is ${AVAIL}KB free space left in $MOUNT, continue"
|
||||
fi
|
||||
fi
|
||||
done
|
||||
done
|
||||
8
.github/workflows/build_documentation.yml
vendored
8
.github/workflows/build_documentation.yml
vendored
@@ -6,18 +6,14 @@ on:
|
||||
- main
|
||||
- doc-builder*
|
||||
- v*-release
|
||||
- v*-patch
|
||||
|
||||
jobs:
|
||||
build:
|
||||
build:
|
||||
uses: huggingface/doc-builder/.github/workflows/build_main_documentation.yml@main
|
||||
with:
|
||||
commit_sha: ${{ github.sha }}
|
||||
install_libgl1: true
|
||||
package: diffusers
|
||||
notebook_folder: diffusers_doc
|
||||
languages: en ko zh
|
||||
|
||||
languages: en ko
|
||||
secrets:
|
||||
token: ${{ secrets.HUGGINGFACE_PUSH }}
|
||||
hf_token: ${{ secrets.HF_DOC_BUILD_PUSH }}
|
||||
|
||||
3
.github/workflows/build_pr_documentation.yml
vendored
3
.github/workflows/build_pr_documentation.yml
vendored
@@ -13,6 +13,5 @@ jobs:
|
||||
with:
|
||||
commit_sha: ${{ github.event.pull_request.head.sha }}
|
||||
pr_number: ${{ github.event.number }}
|
||||
install_libgl1: true
|
||||
package: diffusers
|
||||
languages: en ko zh
|
||||
languages: en ko
|
||||
|
||||
13
.github/workflows/delete_doc_comment.yml
vendored
13
.github/workflows/delete_doc_comment.yml
vendored
@@ -1,14 +1,13 @@
|
||||
name: Delete doc comment
|
||||
name: Delete dev documentation
|
||||
|
||||
on:
|
||||
workflow_run:
|
||||
workflows: ["Delete doc comment trigger"]
|
||||
types:
|
||||
- completed
|
||||
pull_request:
|
||||
types: [ closed ]
|
||||
|
||||
|
||||
jobs:
|
||||
delete:
|
||||
uses: huggingface/doc-builder/.github/workflows/delete_doc_comment.yml@main
|
||||
secrets:
|
||||
comment_bot_token: ${{ secrets.COMMENT_BOT_TOKEN }}
|
||||
with:
|
||||
pr_number: ${{ github.event.number }}
|
||||
package: diffusers
|
||||
|
||||
12
.github/workflows/delete_doc_comment_trigger.yml
vendored
12
.github/workflows/delete_doc_comment_trigger.yml
vendored
@@ -1,12 +0,0 @@
|
||||
name: Delete doc comment trigger
|
||||
|
||||
on:
|
||||
pull_request:
|
||||
types: [ closed ]
|
||||
|
||||
|
||||
jobs:
|
||||
delete:
|
||||
uses: huggingface/doc-builder/.github/workflows/delete_doc_comment_trigger.yml@main
|
||||
with:
|
||||
pr_number: ${{ github.event.number }}
|
||||
32
.github/workflows/pr_dependency_test.yml
vendored
32
.github/workflows/pr_dependency_test.yml
vendored
@@ -1,32 +0,0 @@
|
||||
name: Run dependency tests
|
||||
|
||||
on:
|
||||
pull_request:
|
||||
branches:
|
||||
- main
|
||||
push:
|
||||
branches:
|
||||
- main
|
||||
|
||||
concurrency:
|
||||
group: ${{ github.workflow }}-${{ github.head_ref || github.run_id }}
|
||||
cancel-in-progress: true
|
||||
|
||||
jobs:
|
||||
check_dependencies:
|
||||
runs-on: ubuntu-latest
|
||||
steps:
|
||||
- uses: actions/checkout@v3
|
||||
- name: Set up Python
|
||||
uses: actions/setup-python@v4
|
||||
with:
|
||||
python-version: "3.7"
|
||||
- name: Install dependencies
|
||||
run: |
|
||||
python -m pip install --upgrade pip
|
||||
pip install -e .
|
||||
pip install pytest
|
||||
- name: Check for soft dependencies
|
||||
run: |
|
||||
pytest tests/others/test_dependencies.py
|
||||
|
||||
75
.github/workflows/pr_tests.yml
vendored
75
.github/workflows/pr_tests.yml
vendored
@@ -4,9 +4,6 @@ on:
|
||||
pull_request:
|
||||
branches:
|
||||
- main
|
||||
push:
|
||||
branches:
|
||||
- ci-*
|
||||
|
||||
concurrency:
|
||||
group: ${{ github.workflow }}-${{ github.head_ref || github.run_id }}
|
||||
@@ -39,6 +36,11 @@ jobs:
|
||||
runner: docker-cpu
|
||||
image: diffusers/diffusers-flax-cpu
|
||||
report: flax_cpu
|
||||
- name: Fast ONNXRuntime CPU tests
|
||||
framework: onnxruntime
|
||||
runner: docker-cpu
|
||||
image: diffusers/diffusers-onnxruntime-cpu
|
||||
report: onnx_cpu
|
||||
- name: PyTorch Example CPU tests
|
||||
framework: pytorch_examples
|
||||
runner: docker-cpu
|
||||
@@ -65,8 +67,10 @@ jobs:
|
||||
|
||||
- name: Install dependencies
|
||||
run: |
|
||||
apt-get update && apt-get install libsndfile1-dev libgl1 -y
|
||||
apt-get update && apt-get install libsndfile1-dev -y
|
||||
python -m pip install -e .[quality,test]
|
||||
python -m pip install -U git+https://github.com/huggingface/transformers
|
||||
python -m pip install git+https://github.com/huggingface/accelerate
|
||||
|
||||
- name: Environment
|
||||
run: |
|
||||
@@ -84,7 +88,7 @@ jobs:
|
||||
if: ${{ matrix.config.framework == 'pytorch_models' }}
|
||||
run: |
|
||||
python -m pytest -n 2 --max-worker-restart=0 --dist=loadfile \
|
||||
-s -v -k "not Flax and not Onnx and not Dependency" \
|
||||
-s -v -k "not Flax and not Onnx" \
|
||||
--make-reports=tests_${{ matrix.config.report }} \
|
||||
tests/models tests/schedulers tests/others
|
||||
|
||||
@@ -96,6 +100,14 @@ jobs:
|
||||
--make-reports=tests_${{ matrix.config.report }} \
|
||||
tests
|
||||
|
||||
- name: Run fast ONNXRuntime CPU tests
|
||||
if: ${{ matrix.config.framework == 'onnxruntime' }}
|
||||
run: |
|
||||
python -m pytest -n 2 --max-worker-restart=0 --dist=loadfile \
|
||||
-s -v -k "Onnx" \
|
||||
--make-reports=tests_${{ matrix.config.report }} \
|
||||
tests/
|
||||
|
||||
- name: Run example PyTorch CPU tests
|
||||
if: ${{ matrix.config.framework == 'pytorch_examples' }}
|
||||
run: |
|
||||
@@ -113,3 +125,56 @@ jobs:
|
||||
with:
|
||||
name: pr_${{ matrix.config.report }}_test_reports
|
||||
path: reports
|
||||
|
||||
run_fast_tests_apple_m1:
|
||||
name: Fast PyTorch MPS tests on MacOS
|
||||
runs-on: [ self-hosted, apple-m1 ]
|
||||
|
||||
steps:
|
||||
- name: Checkout diffusers
|
||||
uses: actions/checkout@v3
|
||||
with:
|
||||
fetch-depth: 2
|
||||
|
||||
- name: Clean checkout
|
||||
shell: arch -arch arm64 bash {0}
|
||||
run: |
|
||||
git clean -fxd
|
||||
|
||||
- name: Setup miniconda
|
||||
uses: ./.github/actions/setup-miniconda
|
||||
with:
|
||||
python-version: 3.9
|
||||
|
||||
- name: Install dependencies
|
||||
shell: arch -arch arm64 bash {0}
|
||||
run: |
|
||||
${CONDA_RUN} python -m pip install --upgrade pip
|
||||
${CONDA_RUN} python -m pip install -e .[quality,test]
|
||||
${CONDA_RUN} python -m pip install torch torchvision torchaudio --extra-index-url https://download.pytorch.org/whl/cpu
|
||||
${CONDA_RUN} python -m pip install git+https://github.com/huggingface/accelerate
|
||||
${CONDA_RUN} python -m pip install -U git+https://github.com/huggingface/transformers
|
||||
|
||||
- name: Environment
|
||||
shell: arch -arch arm64 bash {0}
|
||||
run: |
|
||||
${CONDA_RUN} python utils/print_env.py
|
||||
|
||||
- name: Run fast PyTorch tests on M1 (MPS)
|
||||
shell: arch -arch arm64 bash {0}
|
||||
env:
|
||||
HF_HOME: /System/Volumes/Data/mnt/cache
|
||||
HUGGING_FACE_HUB_TOKEN: ${{ secrets.HUGGING_FACE_HUB_TOKEN }}
|
||||
run: |
|
||||
${CONDA_RUN} python -m pytest -n 0 -s -v --make-reports=tests_torch_mps tests/
|
||||
|
||||
- name: Failure short reports
|
||||
if: ${{ failure() }}
|
||||
run: cat reports/tests_torch_mps_failures_short.txt
|
||||
|
||||
- name: Test suite reports artifacts
|
||||
if: ${{ always() }}
|
||||
uses: actions/upload-artifact@v2
|
||||
with:
|
||||
name: pr_torch_mps_test_reports
|
||||
path: reports
|
||||
|
||||
9
.github/workflows/push_tests.yml
vendored
9
.github/workflows/push_tests.yml
vendored
@@ -17,7 +17,6 @@ jobs:
|
||||
run_slow_tests:
|
||||
strategy:
|
||||
fail-fast: false
|
||||
max-parallel: 1
|
||||
matrix:
|
||||
config:
|
||||
- name: Slow PyTorch CUDA tests on Ubuntu
|
||||
@@ -61,8 +60,9 @@ jobs:
|
||||
|
||||
- name: Install dependencies
|
||||
run: |
|
||||
apt-get update && apt-get install libsndfile1-dev libgl1 -y
|
||||
python -m pip install -e .[quality,test]
|
||||
python -m pip install -U git+https://github.com/huggingface/transformers
|
||||
python -m pip install git+https://github.com/huggingface/accelerate
|
||||
|
||||
- name: Environment
|
||||
run: |
|
||||
@@ -72,9 +72,6 @@ jobs:
|
||||
if: ${{ matrix.config.framework == 'pytorch' }}
|
||||
env:
|
||||
HUGGING_FACE_HUB_TOKEN: ${{ secrets.HUGGING_FACE_HUB_TOKEN }}
|
||||
# https://pytorch.org/docs/stable/notes/randomness.html#avoiding-nondeterministic-algorithms
|
||||
CUBLAS_WORKSPACE_CONFIG: :16:8
|
||||
|
||||
run: |
|
||||
python -m pytest -n 1 --max-worker-restart=0 --dist=loadfile \
|
||||
-s -v -k "not Flax and not Onnx" \
|
||||
@@ -134,6 +131,8 @@ jobs:
|
||||
- name: Install dependencies
|
||||
run: |
|
||||
python -m pip install -e .[quality,test,training]
|
||||
python -m pip install git+https://github.com/huggingface/accelerate
|
||||
python -m pip install -U git+https://github.com/huggingface/transformers
|
||||
|
||||
- name: Environment
|
||||
run: |
|
||||
|
||||
59
.github/workflows/push_tests_fast.yml
vendored
59
.github/workflows/push_tests_fast.yml
vendored
@@ -1,4 +1,4 @@
|
||||
name: Fast tests on main
|
||||
name: Slow tests on main
|
||||
|
||||
on:
|
||||
push:
|
||||
@@ -60,8 +60,10 @@ jobs:
|
||||
|
||||
- name: Install dependencies
|
||||
run: |
|
||||
apt-get update && apt-get install libsndfile1-dev libgl1 -y
|
||||
apt-get update && apt-get install libsndfile1-dev -y
|
||||
python -m pip install -e .[quality,test]
|
||||
python -m pip install -U git+https://github.com/huggingface/transformers
|
||||
python -m pip install git+https://github.com/huggingface/accelerate
|
||||
|
||||
- name: Environment
|
||||
run: |
|
||||
@@ -108,3 +110,56 @@ jobs:
|
||||
with:
|
||||
name: pr_${{ matrix.config.report }}_test_reports
|
||||
path: reports
|
||||
|
||||
run_fast_tests_apple_m1:
|
||||
name: Fast PyTorch MPS tests on MacOS
|
||||
runs-on: [ self-hosted, apple-m1 ]
|
||||
|
||||
steps:
|
||||
- name: Checkout diffusers
|
||||
uses: actions/checkout@v3
|
||||
with:
|
||||
fetch-depth: 2
|
||||
|
||||
- name: Clean checkout
|
||||
shell: arch -arch arm64 bash {0}
|
||||
run: |
|
||||
git clean -fxd
|
||||
|
||||
- name: Setup miniconda
|
||||
uses: ./.github/actions/setup-miniconda
|
||||
with:
|
||||
python-version: 3.9
|
||||
|
||||
- name: Install dependencies
|
||||
shell: arch -arch arm64 bash {0}
|
||||
run: |
|
||||
${CONDA_RUN} python -m pip install --upgrade pip
|
||||
${CONDA_RUN} python -m pip install -e .[quality,test]
|
||||
${CONDA_RUN} python -m pip install torch torchvision torchaudio --extra-index-url https://download.pytorch.org/whl/cpu
|
||||
${CONDA_RUN} python -m pip install git+https://github.com/huggingface/accelerate
|
||||
${CONDA_RUN} python -m pip install -U git+https://github.com/huggingface/transformers
|
||||
|
||||
- name: Environment
|
||||
shell: arch -arch arm64 bash {0}
|
||||
run: |
|
||||
${CONDA_RUN} python utils/print_env.py
|
||||
|
||||
- name: Run fast PyTorch tests on M1 (MPS)
|
||||
shell: arch -arch arm64 bash {0}
|
||||
env:
|
||||
HF_HOME: /System/Volumes/Data/mnt/cache
|
||||
HUGGING_FACE_HUB_TOKEN: ${{ secrets.HUGGING_FACE_HUB_TOKEN }}
|
||||
run: |
|
||||
${CONDA_RUN} python -m pytest -n 0 -s -v --make-reports=tests_torch_mps tests/
|
||||
|
||||
- name: Failure short reports
|
||||
if: ${{ failure() }}
|
||||
run: cat reports/tests_torch_mps_failures_short.txt
|
||||
|
||||
- name: Test suite reports artifacts
|
||||
if: ${{ always() }}
|
||||
uses: actions/upload-artifact@v2
|
||||
with:
|
||||
name: pr_torch_mps_test_reports
|
||||
path: reports
|
||||
|
||||
68
.github/workflows/push_tests_mps.yml
vendored
68
.github/workflows/push_tests_mps.yml
vendored
@@ -1,68 +0,0 @@
|
||||
name: Fast mps tests on main
|
||||
|
||||
on:
|
||||
push:
|
||||
branches:
|
||||
- main
|
||||
|
||||
env:
|
||||
DIFFUSERS_IS_CI: yes
|
||||
HF_HOME: /mnt/cache
|
||||
OMP_NUM_THREADS: 8
|
||||
MKL_NUM_THREADS: 8
|
||||
PYTEST_TIMEOUT: 600
|
||||
RUN_SLOW: no
|
||||
|
||||
jobs:
|
||||
run_fast_tests_apple_m1:
|
||||
name: Fast PyTorch MPS tests on MacOS
|
||||
runs-on: [ self-hosted, apple-m1 ]
|
||||
|
||||
steps:
|
||||
- name: Checkout diffusers
|
||||
uses: actions/checkout@v3
|
||||
with:
|
||||
fetch-depth: 2
|
||||
|
||||
- name: Clean checkout
|
||||
shell: arch -arch arm64 bash {0}
|
||||
run: |
|
||||
git clean -fxd
|
||||
|
||||
- name: Setup miniconda
|
||||
uses: ./.github/actions/setup-miniconda
|
||||
with:
|
||||
python-version: 3.9
|
||||
|
||||
- name: Install dependencies
|
||||
shell: arch -arch arm64 bash {0}
|
||||
run: |
|
||||
${CONDA_RUN} python -m pip install --upgrade pip
|
||||
${CONDA_RUN} python -m pip install -e .[quality,test]
|
||||
${CONDA_RUN} python -m pip install torch torchvision torchaudio
|
||||
${CONDA_RUN} python -m pip install accelerate --upgrade
|
||||
${CONDA_RUN} python -m pip install transformers --upgrade
|
||||
|
||||
- name: Environment
|
||||
shell: arch -arch arm64 bash {0}
|
||||
run: |
|
||||
${CONDA_RUN} python utils/print_env.py
|
||||
|
||||
- name: Run fast PyTorch tests on M1 (MPS)
|
||||
shell: arch -arch arm64 bash {0}
|
||||
env:
|
||||
HF_HOME: /System/Volumes/Data/mnt/cache
|
||||
HUGGING_FACE_HUB_TOKEN: ${{ secrets.HUGGING_FACE_HUB_TOKEN }}
|
||||
run: |
|
||||
${CONDA_RUN} python -m pytest -n 0 -s -v --make-reports=tests_torch_mps tests/
|
||||
|
||||
- name: Failure short reports
|
||||
if: ${{ failure() }}
|
||||
run: cat reports/tests_torch_mps_failures_short.txt
|
||||
|
||||
- name: Test suite reports artifacts
|
||||
if: ${{ always() }}
|
||||
uses: actions/upload-artifact@v2
|
||||
with:
|
||||
name: pr_torch_mps_test_reports
|
||||
path: reports
|
||||
16
.github/workflows/upload_pr_documentation.yml
vendored
16
.github/workflows/upload_pr_documentation.yml
vendored
@@ -1,16 +0,0 @@
|
||||
name: Upload PR Documentation
|
||||
|
||||
on:
|
||||
workflow_run:
|
||||
workflows: ["Build PR Documentation"]
|
||||
types:
|
||||
- completed
|
||||
|
||||
jobs:
|
||||
build:
|
||||
uses: huggingface/doc-builder/.github/workflows/upload_pr_documentation.yml@main
|
||||
with:
|
||||
package_name: diffusers
|
||||
secrets:
|
||||
hf_token: ${{ secrets.HF_DOC_BUILD_PUSH }}
|
||||
comment_bot_token: ${{ secrets.COMMENT_BOT_TOKEN }}
|
||||
@@ -125,14 +125,14 @@ Awesome! Tell us what problem it solved for you.
|
||||
|
||||
You can open a feature request [here](https://github.com/huggingface/diffusers/issues/new?assignees=&labels=&template=feature_request.md&title=).
|
||||
|
||||
#### 2.3 Feedback.
|
||||
#### 2.3 Feedback.
|
||||
|
||||
Feedback about the library design and why it is good or not good helps the core maintainers immensely to build a user-friendly library. To understand the philosophy behind the current design philosophy, please have a look [here](https://huggingface.co/docs/diffusers/conceptual/philosophy). If you feel like a certain design choice does not fit with the current design philosophy, please explain why and how it should be changed. If a certain design choice follows the design philosophy too much, hence restricting use cases, explain why and how it should be changed.
|
||||
If a certain design choice is very useful for you, please also leave a note as this is great feedback for future design decisions.
|
||||
|
||||
You can open an issue about feedback [here](https://github.com/huggingface/diffusers/issues/new?assignees=&labels=&template=feedback.md&title=).
|
||||
|
||||
#### 2.4 Technical questions.
|
||||
#### 2.4 Technical questions.
|
||||
|
||||
Technical questions are mainly about why certain code of the library was written in a certain way, or what a certain part of the code does. Please make sure to link to the code in question and please provide detail on
|
||||
why this part of the code is difficult to understand.
|
||||
@@ -297,7 +297,7 @@ if you don't know yet what specific component you would like to add:
|
||||
- [Model or pipeline](https://github.com/huggingface/diffusers/issues?q=is%3Aopen+is%3Aissue+label%3A%22New+pipeline%2Fmodel%22)
|
||||
- [Scheduler](https://github.com/huggingface/diffusers/issues?q=is%3Aopen+is%3Aissue+label%3A%22New+scheduler%22)
|
||||
|
||||
Before adding any of the three components, it is strongly recommended that you give the [Philosophy guide](https://github.com/huggingface/diffusers/blob/main/PHILOSOPHY.md) a read to better understand the design of any of the three components. Please be aware that
|
||||
Before adding any of the three components, it is strongly recommended that you give the [Philosophy guide](https://github.com/huggingface/diffusers/issues?q=is%3Aopen+is%3Aissue+label%3A%22Good+second+issue%22) a read to better understand the design of any of the three components. Please be aware that
|
||||
we cannot merge model, scheduler, or pipeline additions that strongly diverge from our design philosophy
|
||||
as it will lead to API inconsistencies. If you fundamentally disagree with a design choice, please
|
||||
open a [Feedback issue](https://github.com/huggingface/diffusers/issues/new?assignees=&labels=&template=feedback.md&title=) instead so that it can be discussed whether a certain design
|
||||
@@ -394,8 +394,8 @@ passes. You should run the tests impacted by your changes like this:
|
||||
```bash
|
||||
$ pytest tests/<TEST_TO_RUN>.py
|
||||
```
|
||||
|
||||
Before you run the tests, please make sure you install the dependencies required for testing. You can do so
|
||||
|
||||
Before you run the tests, please make sure you install the dependencies required for testing. You can do so
|
||||
with this command:
|
||||
|
||||
```bash
|
||||
|
||||
@@ -27,18 +27,18 @@ In a nutshell, Diffusers is built to be a natural extension of PyTorch. Therefor
|
||||
|
||||
## Simple over easy
|
||||
|
||||
As PyTorch states, **explicit is better than implicit** and **simple is better than complex**. This design philosophy is reflected in multiple parts of the library:
|
||||
As PyTorch states, **explicit is better than implicit** and **simple is better than complex**. This design philosophy is reflected in multiple parts of the library:
|
||||
- We follow PyTorch's API with methods like [`DiffusionPipeline.to`](https://huggingface.co/docs/diffusers/main/en/api/diffusion_pipeline#diffusers.DiffusionPipeline.to) to let the user handle device management.
|
||||
- Raising concise error messages is preferred to silently correct erroneous input. Diffusers aims at teaching the user, rather than making the library as easy to use as possible.
|
||||
- Complex model vs. scheduler logic is exposed instead of magically handled inside. Schedulers/Samplers are separated from diffusion models with minimal dependencies on each other. This forces the user to write the unrolled denoising loop. However, the separation allows for easier debugging and gives the user more control over adapting the denoising process or switching out diffusion models or schedulers.
|
||||
- Separately trained components of the diffusion pipeline, *e.g.* the text encoder, the unet, and the variational autoencoder, each have their own model class. This forces the user to handle the interaction between the different model components, and the serialization format separates the model components into different files. However, this allows for easier debugging and customization. Dreambooth or textual inversion training
|
||||
is very simple thanks to diffusers' ability to separate single components of the diffusion pipeline.
|
||||
|
||||
## Tweakable, contributor-friendly over abstraction
|
||||
|
||||
For large parts of the library, Diffusers adopts an important design principle of the [Transformers library](https://github.com/huggingface/transformers), which is to prefer copy-pasted code over hasty abstractions. This design principle is very opinionated and stands in stark contrast to popular design principles such as [Don't repeat yourself (DRY)](https://en.wikipedia.org/wiki/Don%27t_repeat_yourself).
|
||||
In short, just like Transformers does for modeling files, diffusers prefers to keep an extremely low level of abstraction and very self-contained code for pipelines and schedulers.
|
||||
Functions, long code blocks, and even classes can be copied across multiple files which at first can look like a bad, sloppy design choice that makes the library unmaintainable.
|
||||
Functions, long code blocks, and even classes can be copied across multiple files which at first can look like a bad, sloppy design choice that makes the library unmaintainable.
|
||||
**However**, this design has proven to be extremely successful for Transformers and makes a lot of sense for community-driven, open-source machine learning libraries because:
|
||||
- Machine Learning is an extremely fast-moving field in which paradigms, model architectures, and algorithms are changing rapidly, which therefore makes it very difficult to define long-lasting code abstractions.
|
||||
- Machine Learning practitioners like to be able to quickly tweak existing code for ideation and research and therefore prefer self-contained code over one that contains many abstractions.
|
||||
@@ -47,10 +47,10 @@ Functions, long code blocks, and even classes can be copied across multiple file
|
||||
At Hugging Face, we call this design the **single-file policy** which means that almost all of the code of a certain class should be written in a single, self-contained file. To read more about the philosophy, you can have a look
|
||||
at [this blog post](https://huggingface.co/blog/transformers-design-philosophy).
|
||||
|
||||
In diffusers, we follow this philosophy for both pipelines and schedulers, but only partly for diffusion models. The reason we don't follow this design fully for diffusion models is because almost all diffusion pipelines, such
|
||||
In diffusers, we follow this philosophy for both pipelines and schedulers, but only partly for diffusion models. The reason we don't follow this design fully for diffusion models is because almost all diffusion pipelines, such
|
||||
as [DDPM](https://huggingface.co/docs/diffusers/v0.12.0/en/api/pipelines/ddpm), [Stable Diffusion](https://huggingface.co/docs/diffusers/v0.12.0/en/api/pipelines/stable_diffusion/overview#stable-diffusion-pipelines), [UnCLIP (Dalle-2)](https://huggingface.co/docs/diffusers/v0.12.0/en/api/pipelines/unclip#overview) and [Imagen](https://imagen.research.google/) all rely on the same diffusion model, the [UNet](https://huggingface.co/docs/diffusers/api/models#diffusers.UNet2DConditionModel).
|
||||
|
||||
Great, now you should have generally understood why 🧨 Diffusers is designed the way it is 🤗.
|
||||
Great, now you should have generally understood why 🧨 Diffusers is designed the way it is 🤗.
|
||||
We try to apply these design principles consistently across the library. Nevertheless, there are some minor exceptions to the philosophy or some unlucky design choices. If you have feedback regarding the design, we would ❤️ to hear it [directly on GitHub](https://github.com/huggingface/diffusers/issues/new?assignees=&labels=&template=feedback.md&title=).
|
||||
|
||||
## Design Philosophy in Details
|
||||
@@ -89,7 +89,7 @@ The following design principles are followed:
|
||||
- Models should by default have the highest precision and lowest performance setting.
|
||||
- To integrate new model checkpoints whose general architecture can be classified as an architecture that already exists in Diffusers, the existing model architecture shall be adapted to make it work with the new checkpoint. One should only create a new file if the model architecture is fundamentally different.
|
||||
- Models should be designed to be easily extendable to future changes. This can be achieved by limiting public function arguments, configuration arguments, and "foreseeing" future changes, *e.g.* it is usually better to add `string` "...type" arguments that can easily be extended to new future types instead of boolean `is_..._type` arguments. Only the minimum amount of changes shall be made to existing architectures to make a new model checkpoint work.
|
||||
- The model design is a difficult trade-off between keeping code readable and concise and supporting many model checkpoints. For most parts of the modeling code, classes shall be adapted for new model checkpoints, while there are some exceptions where it is preferred to add new classes to make sure the code is kept concise and
|
||||
readable longterm, such as [UNet blocks](https://github.com/huggingface/diffusers/blob/main/src/diffusers/models/unet_2d_blocks.py) and [Attention processors](https://github.com/huggingface/diffusers/blob/main/src/diffusers/models/cross_attention.py).
|
||||
|
||||
### Schedulers
|
||||
@@ -97,9 +97,9 @@ readable longterm, such as [UNet blocks](https://github.com/huggingface/diffuser
|
||||
Schedulers are responsible to guide the denoising process for inference as well as to define a noise schedule for training. They are designed as individual classes with loadable configuration files and strongly follow the **single-file policy**.
|
||||
|
||||
The following design principles are followed:
|
||||
- All schedulers are found in [`src/diffusers/schedulers`](https://github.com/huggingface/diffusers/tree/main/src/diffusers/schedulers).
|
||||
- Schedulers are **not** allowed to import from large utils files and shall be kept very self-contained.
|
||||
- One scheduler python file corresponds to one scheduler algorithm (as might be defined in a paper).
|
||||
- If schedulers share similar functionalities, we can make use of the `#Copied from` mechanism.
|
||||
- Schedulers all inherit from `SchedulerMixin` and `ConfigMixin`.
|
||||
- Schedulers can be easily swapped out with the [`ConfigMixin.from_config`](https://huggingface.co/docs/diffusers/main/en/api/configuration#diffusers.ConfigMixin.from_config) method as explained in detail [here](./using-diffusers/schedulers.mdx).
|
||||
|
||||
149
README.md
149
README.md
@@ -1,6 +1,6 @@
|
||||
<p align="center">
|
||||
<br>
|
||||
<img src="https://github.com/huggingface/diffusers/blob/main/docs/source/en/imgs/diffusers_library.jpg" width="400"/>
|
||||
<img src="./docs/source/en/imgs/diffusers_library.jpg" width="400"/>
|
||||
<br>
|
||||
<p>
|
||||
<p align="center">
|
||||
@@ -25,12 +25,12 @@
|
||||
|
||||
## Installation
|
||||
|
||||
We recommend installing 🤗 Diffusers in a virtual environment from PyPi or Conda. For more details about installing [PyTorch](https://pytorch.org/get-started/locally/) and [Flax](https://flax.readthedocs.io/en/latest/#installation), please refer to their official documentation.
|
||||
We recommend installing 🤗 Diffusers in a virtual environment from PyPi or Conda. For more details about installing [PyTorch](https://pytorch.org/get-started/locally/) and [Flax](https://flax.readthedocs.io/en/latest/installation.html), please refer to their official documentation.
|
||||
|
||||
### PyTorch
|
||||
|
||||
With `pip` (official package):
|
||||
|
||||
|
||||
```bash
|
||||
pip install --upgrade diffusers[torch]
|
||||
```
|
||||
@@ -59,9 +59,8 @@ Generating outputs is super easy with 🤗 Diffusers. To generate an image from
|
||||
|
||||
```python
|
||||
from diffusers import DiffusionPipeline
|
||||
import torch
|
||||
|
||||
pipeline = DiffusionPipeline.from_pretrained("runwayml/stable-diffusion-v1-5", torch_dtype=torch.float16)
|
||||
pipeline = DiffusionPipeline.from_pretrained("runwayml/stable-diffusion-v1-5")
|
||||
pipeline.to("cuda")
|
||||
pipeline("An image of a squirrel in Picasso style").images[0]
|
||||
```
|
||||
@@ -100,14 +99,58 @@ Check out the [Quickstart](https://huggingface.co/docs/diffusers/quicktour) to l
|
||||
|
||||
| **Documentation** | **What can I learn?** |
|
||||
|---------------------------------------------------------------------|-------------------------------------------------------------------------------------------------------------------------------------------------------------------------------------------------|
|
||||
| [Tutorial](https://huggingface.co/docs/diffusers/tutorials/tutorial_overview) | A basic crash course for learning how to use the library's most important features like using models and schedulers to build your own diffusion system, and training your own diffusion model. |
|
||||
| [Loading](https://huggingface.co/docs/diffusers/using-diffusers/loading_overview) | Guides for how to load and configure all the components (pipelines, models, and schedulers) of the library, as well as how to use different schedulers. |
|
||||
| [Pipelines for inference](https://huggingface.co/docs/diffusers/using-diffusers/pipeline_overview) | Guides for how to use pipelines for different inference tasks, batched generation, controlling generated outputs and randomness, and how to contribute a pipeline to the library. |
|
||||
| [Optimization](https://huggingface.co/docs/diffusers/optimization/opt_overview) | Guides for how to optimize your diffusion model to run faster and consume less memory. |
|
||||
| Tutorial | A basic crash course for learning how to use the library's most important features like using models and schedulers to build your own diffusion system, and training your own diffusion model. |
|
||||
| Loading | Guides for how to load and configure all the components (pipelines, models, and schedulers) of the library, as well as how to use different schedulers. |
|
||||
| Pipelines for inference | Guides for how to use pipelines for different inference tasks, batched generation, controlling generated outputs and randomness, and how to contribute a pipeline to the library. |
|
||||
| Optimization | Guides for how to optimize your diffusion model to run faster and consume less memory. |
|
||||
| [Training](https://huggingface.co/docs/diffusers/training/overview) | Guides for how to train a diffusion model for different tasks with different training techniques. |
|
||||
|
||||
## Supported pipelines
|
||||
|
||||
| Pipeline | Paper | Tasks |
|
||||
|---|---|:---:|
|
||||
| [alt_diffusion](./api/pipelines/alt_diffusion) | [**AltDiffusion**](https://arxiv.org/abs/2211.06679) | Image-to-Image Text-Guided Generation |
|
||||
| [audio_diffusion](./api/pipelines/audio_diffusion) | [**Audio Diffusion**](https://github.com/teticio/audio-diffusion.git) | Unconditional Audio Generation |
|
||||
| [controlnet](./api/pipelines/stable_diffusion/controlnet) | [**ControlNet with Stable Diffusion**](https://arxiv.org/abs/2302.05543) | Image-to-Image Text-Guided Generation |
|
||||
| [cycle_diffusion](./api/pipelines/cycle_diffusion) | [**Cycle Diffusion**](https://arxiv.org/abs/2210.05559) | Image-to-Image Text-Guided Generation |
|
||||
| [dance_diffusion](./api/pipelines/dance_diffusion) | [**Dance Diffusion**](https://github.com/williamberman/diffusers.git) | Unconditional Audio Generation |
|
||||
| [ddpm](./api/pipelines/ddpm) | [**Denoising Diffusion Probabilistic Models**](https://arxiv.org/abs/2006.11239) | Unconditional Image Generation |
|
||||
| [ddim](./api/pipelines/ddim) | [**Denoising Diffusion Implicit Models**](https://arxiv.org/abs/2010.02502) | Unconditional Image Generation |
|
||||
| [latent_diffusion](./api/pipelines/latent_diffusion) | [**High-Resolution Image Synthesis with Latent Diffusion Models**](https://arxiv.org/abs/2112.10752)| Text-to-Image Generation |
|
||||
| [latent_diffusion](./api/pipelines/latent_diffusion) | [**High-Resolution Image Synthesis with Latent Diffusion Models**](https://arxiv.org/abs/2112.10752)| Super Resolution Image-to-Image |
|
||||
| [latent_diffusion_uncond](./api/pipelines/latent_diffusion_uncond) | [**High-Resolution Image Synthesis with Latent Diffusion Models**](https://arxiv.org/abs/2112.10752) | Unconditional Image Generation |
|
||||
| [paint_by_example](./api/pipelines/paint_by_example) | [**Paint by Example: Exemplar-based Image Editing with Diffusion Models**](https://arxiv.org/abs/2211.13227) | Image-Guided Image Inpainting |
|
||||
| [pndm](./api/pipelines/pndm) | [**Pseudo Numerical Methods for Diffusion Models on Manifolds**](https://arxiv.org/abs/2202.09778) | Unconditional Image Generation |
|
||||
| [score_sde_ve](./api/pipelines/score_sde_ve) | [**Score-Based Generative Modeling through Stochastic Differential Equations**](https://openreview.net/forum?id=PxTIG12RRHS) | Unconditional Image Generation |
|
||||
| [score_sde_vp](./api/pipelines/score_sde_vp) | [**Score-Based Generative Modeling through Stochastic Differential Equations**](https://openreview.net/forum?id=PxTIG12RRHS) | Unconditional Image Generation |
|
||||
| [semantic_stable_diffusion](./api/pipelines/semantic_stable_diffusion) | [**Semantic Guidance**](https://arxiv.org/abs/2301.12247) | Text-Guided Generation |
|
||||
| [stable_diffusion_text2img](./api/pipelines/stable_diffusion/text2img) | [**Stable Diffusion**](https://stability.ai/blog/stable-diffusion-public-release) | Text-to-Image Generation |
|
||||
| [stable_diffusion_img2img](./api/pipelines/stable_diffusion/img2img) | [**Stable Diffusion**](https://stability.ai/blog/stable-diffusion-public-release) | Image-to-Image Text-Guided Generation |
|
||||
| [stable_diffusion_inpaint](./api/pipelines/stable_diffusion/inpaint) | [**Stable Diffusion**](https://stability.ai/blog/stable-diffusion-public-release) | Text-Guided Image Inpainting |
|
||||
| [stable_diffusion_panorama](./api/pipelines/stable_diffusion/panorama) | [**MultiDiffusion**](https://multidiffusion.github.io/) | Text-to-Panorama Generation |
|
||||
| [stable_diffusion_pix2pix](./api/pipelines/stable_diffusion/pix2pix) | [**InstructPix2Pix**](https://github.com/timothybrooks/instruct-pix2pix) | Text-Guided Image Editing|
|
||||
| [stable_diffusion_pix2pix_zero](./api/pipelines/stable_diffusion/pix2pix_zero) | [**Zero-shot Image-to-Image Translation**](https://pix2pixzero.github.io/) | Text-Guided Image Editing |
|
||||
| [stable_diffusion_attend_and_excite](./api/pipelines/stable_diffusion/attend_and_excite) | [**Attend and Excite for Stable Diffusion**](https://attendandexcite.github.io/Attend-and-Excite/) | Text-to-Image Generation |
|
||||
| [stable_diffusion_self_attention_guidance](./api/pipelines/stable_diffusion/self_attention_guidance) | [**Self-Attention Guidance**](https://ku-cvlab.github.io/Self-Attention-Guidance) | Text-to-Image Generation |
|
||||
| [stable_diffusion_image_variation](./stable_diffusion/image_variation) | [**Stable Diffusion Image Variations**](https://github.com/LambdaLabsML/lambda-diffusers#stable-diffusion-image-variations) | Image-to-Image Generation |
|
||||
| [stable_diffusion_latent_upscale](./stable_diffusion/latent_upscale) | [**Stable Diffusion Latent Upscaler**](https://twitter.com/StabilityAI/status/1590531958815064065) | Text-Guided Super Resolution Image-to-Image |
|
||||
| [stable_diffusion_2](./api/pipelines/stable_diffusion_2) | [**Stable Diffusion 2**](https://stability.ai/blog/stable-diffusion-v2-release) | Text-to-Image Generation |
|
||||
| [stable_diffusion_2](./api/pipelines/stable_diffusion_2) | [**Stable Diffusion 2**](https://stability.ai/blog/stable-diffusion-v2-release) | Text-Guided Image Inpainting |
|
||||
| [stable_diffusion_2](./api/pipelines/stable_diffusion_2) | [**Depth-Conditional Stable Diffusion**](https://github.com/Stability-AI/stablediffusion#depth-conditional-stable-diffusion) | Depth-to-Image Generation |
|
||||
| [stable_diffusion_2](./api/pipelines/stable_diffusion_2) | [**Stable Diffusion 2**](https://stability.ai/blog/stable-diffusion-v2-release) | Text-Guided Super Resolution Image-to-Image |
|
||||
| [stable_diffusion_safe](./api/pipelines/stable_diffusion_safe) | [**Safe Stable Diffusion**](https://arxiv.org/abs/2211.05105) | Text-Guided Generation |
|
||||
| [stable_unclip](./stable_unclip) | **Stable unCLIP** | Text-to-Image Generation |
|
||||
| [stable_unclip](./stable_unclip) | **Stable unCLIP** | Image-to-Image Text-Guided Generation |
|
||||
| [stochastic_karras_ve](./api/pipelines/stochastic_karras_ve) | [**Elucidating the Design Space of Diffusion-Based Generative Models**](https://arxiv.org/abs/2206.00364) | Unconditional Image Generation |
|
||||
| [unclip](./api/pipelines/unclip) | [Hierarchical Text-Conditional Image Generation with CLIP Latents](https://arxiv.org/abs/2204.06125) | Text-to-Image Generation |
|
||||
| [versatile_diffusion](./api/pipelines/versatile_diffusion) | [Versatile Diffusion: Text, Images and Variations All in One Diffusion Model](https://arxiv.org/abs/2211.08332) | Text-to-Image Generation |
|
||||
| [versatile_diffusion](./api/pipelines/versatile_diffusion) | [Versatile Diffusion: Text, Images and Variations All in One Diffusion Model](https://arxiv.org/abs/2211.08332) | Image Variations Generation |
|
||||
| [versatile_diffusion](./api/pipelines/versatile_diffusion) | [Versatile Diffusion: Text, Images and Variations All in One Diffusion Model](https://arxiv.org/abs/2211.08332) | Dual Image and Text Guided Generation |
|
||||
| [vq_diffusion](./api/pipelines/vq_diffusion) | [Vector Quantized Diffusion Model for Text-to-Image Synthesis](https://arxiv.org/abs/2111.14822) | Text-to-Image Generation |
|
||||
|
||||
## Contribution
|
||||
|
||||
We ❤️ contributions from the open-source community!
|
||||
We ❤️ contributions from the open-source community!
|
||||
If you want to contribute to this library, please check out our [Contribution guide](https://github.com/huggingface/diffusers/blob/main/CONTRIBUTING.md).
|
||||
You can look out for [issues](https://github.com/huggingface/diffusers/issues) you'd like to tackle to contribute to the library.
|
||||
- See [Good first issues](https://github.com/huggingface/diffusers/issues?q=is%3Aopen+is%3Aissue+label%3A%22good+first+issue%22) for general opportunities to contribute
|
||||
@@ -117,92 +160,6 @@ You can look out for [issues](https://github.com/huggingface/diffusers/issues) y
|
||||
Also, say 👋 in our public Discord channel <a href="https://discord.gg/G7tWnz98XR"><img alt="Join us on Discord" src="https://img.shields.io/discord/823813159592001537?color=5865F2&logo=discord&logoColor=white"></a>. We discuss the hottest trends about diffusion models, help each other with contributions, personal projects or
|
||||
just hang out ☕.
|
||||
|
||||
|
||||
## Popular Tasks & Pipelines
|
||||
|
||||
<table>
|
||||
<tr>
|
||||
<th>Task</th>
|
||||
<th>Pipeline</th>
|
||||
<th>🤗 Hub</th>
|
||||
</tr>
|
||||
<tr style="border-top: 2px solid black">
|
||||
<td>Unconditional Image Generation</td>
|
||||
<td><a href="https://huggingface.co/docs/diffusers/api/pipelines/ddpm"> DDPM </a></td>
|
||||
<td><a href="https://huggingface.co/google/ddpm-ema-church-256"> google/ddpm-ema-church-256 </a></td>
|
||||
</tr>
|
||||
<tr style="border-top: 2px solid black">
|
||||
<td>Text-to-Image</td>
|
||||
<td><a href="https://huggingface.co/docs/diffusers/api/pipelines/stable_diffusion/text2img">Stable Diffusion Text-to-Image</a></td>
|
||||
<td><a href="https://huggingface.co/runwayml/stable-diffusion-v1-5"> runwayml/stable-diffusion-v1-5 </a></td>
|
||||
</tr>
|
||||
<tr>
|
||||
<td>Text-to-Image</td>
|
||||
<td><a href="https://huggingface.co/docs/diffusers/api/pipelines/unclip">unclip</a></td>
|
||||
<td><a href="https://huggingface.co/kakaobrain/karlo-v1-alpha"> kakaobrain/karlo-v1-alpha </a></td>
|
||||
</tr>
|
||||
<tr>
|
||||
<td>Text-to-Image</td>
|
||||
<td><a href="https://huggingface.co/docs/diffusers/api/pipelines/if">DeepFloyd IF</a></td>
|
||||
<td><a href="https://huggingface.co/DeepFloyd/IF-I-XL-v1.0"> DeepFloyd/IF-I-XL-v1.0 </a></td>
|
||||
</tr>
|
||||
<tr>
|
||||
<td>Text-to-Image</td>
|
||||
<td><a href="https://huggingface.co/docs/diffusers/api/pipelines/kandinsky">Kandinsky</a></td>
|
||||
<td><a href="https://huggingface.co/kandinsky-community/kandinsky-2-2-decoder"> kandinsky-community/kandinsky-2-2-decoder </a></td>
|
||||
</tr>
|
||||
<tr style="border-top: 2px solid black">
|
||||
<td>Text-guided Image-to-Image</td>
|
||||
<td><a href="https://huggingface.co/docs/diffusers/api/pipelines/stable_diffusion/controlnet">Controlnet</a></td>
|
||||
<td><a href="https://huggingface.co/lllyasviel/sd-controlnet-canny"> lllyasviel/sd-controlnet-canny </a></td>
|
||||
</tr>
|
||||
<tr>
|
||||
<td>Text-guided Image-to-Image</td>
|
||||
<td><a href="https://huggingface.co/docs/diffusers/api/pipelines/pix2pix">Instruct Pix2Pix</a></td>
|
||||
<td><a href="https://huggingface.co/timbrooks/instruct-pix2pix"> timbrooks/instruct-pix2pix </a></td>
|
||||
</tr>
|
||||
<tr>
|
||||
<td>Text-guided Image-to-Image</td>
|
||||
<td><a href="https://huggingface.co/docs/diffusers/api/pipelines/stable_diffusion/img2img">Stable Diffusion Image-to-Image</a></td>
|
||||
<td><a href="https://huggingface.co/runwayml/stable-diffusion-v1-5"> runwayml/stable-diffusion-v1-5 </a></td>
|
||||
</tr>
|
||||
<tr style="border-top: 2px solid black">
|
||||
<td>Text-guided Image Inpainting</td>
|
||||
<td><a href="https://huggingface.co/docs/diffusers/api/pipelines/stable_diffusion/inpaint">Stable Diffusion Inpaint</a></td>
|
||||
<td><a href="https://huggingface.co/runwayml/stable-diffusion-inpainting"> runwayml/stable-diffusion-inpainting </a></td>
|
||||
</tr>
|
||||
<tr style="border-top: 2px solid black">
|
||||
<td>Image Variation</td>
|
||||
<td><a href="https://huggingface.co/docs/diffusers/api/pipelines/stable_diffusion/image_variation">Stable Diffusion Image Variation</a></td>
|
||||
<td><a href="https://huggingface.co/lambdalabs/sd-image-variations-diffusers"> lambdalabs/sd-image-variations-diffusers </a></td>
|
||||
</tr>
|
||||
<tr style="border-top: 2px solid black">
|
||||
<td>Super Resolution</td>
|
||||
<td><a href="https://huggingface.co/docs/diffusers/api/pipelines/stable_diffusion/upscale">Stable Diffusion Upscale</a></td>
|
||||
<td><a href="https://huggingface.co/stabilityai/stable-diffusion-x4-upscaler"> stabilityai/stable-diffusion-x4-upscaler </a></td>
|
||||
</tr>
|
||||
<tr>
|
||||
<td>Super Resolution</td>
|
||||
<td><a href="https://huggingface.co/docs/diffusers/api/pipelines/stable_diffusion/latent_upscale">Stable Diffusion Latent Upscale</a></td>
|
||||
<td><a href="https://huggingface.co/stabilityai/sd-x2-latent-upscaler"> stabilityai/sd-x2-latent-upscaler </a></td>
|
||||
</tr>
|
||||
</table>
|
||||
|
||||
## Popular libraries using 🧨 Diffusers
|
||||
|
||||
- https://github.com/microsoft/TaskMatrix
|
||||
- https://github.com/invoke-ai/InvokeAI
|
||||
- https://github.com/apple/ml-stable-diffusion
|
||||
- https://github.com/Sanster/lama-cleaner
|
||||
- https://github.com/IDEA-Research/Grounded-Segment-Anything
|
||||
- https://github.com/ashawkey/stable-dreamfusion
|
||||
- https://github.com/deep-floyd/IF
|
||||
- https://github.com/bentoml/BentoML
|
||||
- https://github.com/bmaltais/kohya_ss
|
||||
- +3000 other amazing GitHub repositories 💪
|
||||
|
||||
Thank you for using us ❤️
|
||||
|
||||
## Credits
|
||||
|
||||
This library concretizes previous work by many different authors and would not have been possible without their great research and implementations. We'd like to thank, in particular, the following implementations which have helped us in our development and without which the API could not have been as polished today:
|
||||
|
||||
@@ -14,7 +14,6 @@ RUN apt update && \
|
||||
libsndfile1-dev \
|
||||
python3.8 \
|
||||
python3-pip \
|
||||
libgl1 \
|
||||
python3.8-venv && \
|
||||
rm -rf /var/lib/apt/lists
|
||||
|
||||
@@ -28,7 +27,6 @@ RUN python3 -m pip install --no-cache-dir --upgrade pip && \
|
||||
torch \
|
||||
torchvision \
|
||||
torchaudio \
|
||||
invisible_watermark \
|
||||
--extra-index-url https://download.pytorch.org/whl/cpu && \
|
||||
python3 -m pip install --no-cache-dir \
|
||||
accelerate \
|
||||
@@ -42,4 +40,4 @@ RUN python3 -m pip install --no-cache-dir --upgrade pip && \
|
||||
tensorboard \
|
||||
transformers
|
||||
|
||||
CMD ["/bin/bash"]
|
||||
CMD ["/bin/bash"]
|
||||
@@ -12,7 +12,6 @@ RUN apt update && \
|
||||
curl \
|
||||
ca-certificates \
|
||||
libsndfile1-dev \
|
||||
libgl1 \
|
||||
python3.8 \
|
||||
python3-pip \
|
||||
python3.8-venv && \
|
||||
@@ -28,7 +27,6 @@ RUN python3 -m pip install --no-cache-dir --upgrade pip && \
|
||||
torch \
|
||||
torchvision \
|
||||
torchaudio \
|
||||
invisible_watermark && \
|
||||
python3 -m pip install --no-cache-dir \
|
||||
accelerate \
|
||||
datasets \
|
||||
@@ -39,9 +37,6 @@ RUN python3 -m pip install --no-cache-dir --upgrade pip && \
|
||||
numpy \
|
||||
scipy \
|
||||
tensorboard \
|
||||
transformers \
|
||||
omegaconf \
|
||||
pytorch-lightning \
|
||||
xformers
|
||||
transformers
|
||||
|
||||
CMD ["/bin/bash"]
|
||||
|
||||
@@ -6,4 +6,4 @@ INSTALL_CONTENT = """
|
||||
# ! pip install git+https://github.com/huggingface/diffusers.git
|
||||
"""
|
||||
|
||||
notebook_first_cells = [{"type": "code", "content": INSTALL_CONTENT}]
|
||||
notebook_first_cells = [{"type": "code", "content": INSTALL_CONTENT}]
|
||||
@@ -26,10 +26,8 @@
|
||||
title: Load and compare different schedulers
|
||||
- local: using-diffusers/custom_pipeline_overview
|
||||
title: Load community pipelines
|
||||
- local: using-diffusers/using_safetensors
|
||||
title: Load safetensors
|
||||
- local: using-diffusers/other-formats
|
||||
title: Load different Stable Diffusion formats
|
||||
- local: using-diffusers/kerascv
|
||||
title: Load KerasCV Stable Diffusion checkpoints
|
||||
title: Loading & Hub
|
||||
- sections:
|
||||
- local: using-diffusers/pipeline_overview
|
||||
@@ -44,20 +42,16 @@
|
||||
title: Text-guided image-inpainting
|
||||
- local: using-diffusers/depth2img
|
||||
title: Text-guided depth-to-image
|
||||
- local: using-diffusers/textual_inversion_inference
|
||||
title: Textual inversion
|
||||
- local: training/distributed_inference
|
||||
title: Distributed inference with multiple GPUs
|
||||
- local: using-diffusers/reusing_seeds
|
||||
title: Improve image quality with deterministic generation
|
||||
- local: using-diffusers/control_brightness
|
||||
title: Control image brightness
|
||||
- local: using-diffusers/reproducibility
|
||||
title: Create reproducible pipelines
|
||||
- local: using-diffusers/custom_pipeline_examples
|
||||
title: Community pipelines
|
||||
- local: using-diffusers/contribute_pipeline
|
||||
title: How to contribute a community pipeline
|
||||
- local: using-diffusers/using_safetensors
|
||||
title: Using safetensors
|
||||
- local: using-diffusers/stable_diffusion_jax_how_to
|
||||
title: Stable Diffusion in JAX/Flax
|
||||
- local: using-diffusers/weighted_prompts
|
||||
@@ -66,10 +60,6 @@
|
||||
- sections:
|
||||
- local: training/overview
|
||||
title: Overview
|
||||
- local: training/create_dataset
|
||||
title: Create a dataset for training
|
||||
- local: training/adapt_a_model
|
||||
title: Adapt a model to a new task
|
||||
- local: training/unconditional_training
|
||||
title: Unconditional image generation
|
||||
- local: training/text_inversion
|
||||
@@ -115,10 +105,6 @@
|
||||
title: MPS
|
||||
- local: optimization/habana
|
||||
title: Habana Gaudi
|
||||
- local: optimization/tome
|
||||
title: Token Merging
|
||||
- local: optimization/bentoml
|
||||
title: BentoML Integration
|
||||
title: Optimization/Special Hardware
|
||||
- sections:
|
||||
- local: conceptual/philosophy
|
||||
@@ -134,8 +120,8 @@
|
||||
title: Conceptual Guides
|
||||
- sections:
|
||||
- sections:
|
||||
- local: api/attnprocessor
|
||||
title: Attention Processor
|
||||
- local: api/models
|
||||
title: Models
|
||||
- local: api/diffusion_pipeline
|
||||
title: Diffusion Pipeline
|
||||
- local: api/logging
|
||||
@@ -146,52 +132,16 @@
|
||||
title: Outputs
|
||||
- local: api/loaders
|
||||
title: Loaders
|
||||
- local: api/utilities
|
||||
title: Utilities
|
||||
- local: api/image_processor
|
||||
title: VAE Image Processor
|
||||
title: Main Classes
|
||||
- sections:
|
||||
- local: api/models/overview
|
||||
title: Overview
|
||||
- local: api/models/unet
|
||||
title: UNet1DModel
|
||||
- local: api/models/unet2d
|
||||
title: UNet2DModel
|
||||
- local: api/models/unet2d-cond
|
||||
title: UNet2DConditionModel
|
||||
- local: api/models/unet3d-cond
|
||||
title: UNet3DConditionModel
|
||||
- local: api/models/vq
|
||||
title: VQModel
|
||||
- local: api/models/autoencoderkl
|
||||
title: AutoencoderKL
|
||||
- local: api/models/asymmetricautoencoderkl
|
||||
title: AsymmetricAutoencoderKL
|
||||
- local: api/models/transformer2d
|
||||
title: Transformer2D
|
||||
- local: api/models/transformer_temporal
|
||||
title: Transformer Temporal
|
||||
- local: api/models/prior_transformer
|
||||
title: Prior Transformer
|
||||
- local: api/models/controlnet
|
||||
title: ControlNet
|
||||
title: Models
|
||||
- sections:
|
||||
- local: api/pipelines/overview
|
||||
title: Overview
|
||||
- local: api/pipelines/alt_diffusion
|
||||
title: AltDiffusion
|
||||
- local: api/pipelines/attend_and_excite
|
||||
title: Attend and Excite
|
||||
- local: api/pipelines/audio_diffusion
|
||||
title: Audio Diffusion
|
||||
- local: api/pipelines/audioldm
|
||||
title: AudioLDM
|
||||
- local: api/pipelines/consistency_models
|
||||
title: Consistency Models
|
||||
- local: api/pipelines/controlnet
|
||||
title: ControlNet
|
||||
- local: api/pipelines/cycle_diffusion
|
||||
title: Cycle Diffusion
|
||||
- local: api/pipelines/dance_diffusion
|
||||
@@ -200,40 +150,24 @@
|
||||
title: DDIM
|
||||
- local: api/pipelines/ddpm
|
||||
title: DDPM
|
||||
- local: api/pipelines/deepfloyd_if
|
||||
title: DeepFloyd IF
|
||||
- local: api/pipelines/diffedit
|
||||
title: DiffEdit
|
||||
- local: api/pipelines/dit
|
||||
title: DiT
|
||||
- local: api/pipelines/pix2pix
|
||||
title: InstructPix2Pix
|
||||
- local: api/pipelines/kandinsky
|
||||
title: Kandinsky
|
||||
- local: api/pipelines/latent_diffusion
|
||||
title: Latent Diffusion
|
||||
- local: api/pipelines/panorama
|
||||
title: MultiDiffusion Panorama
|
||||
- local: api/pipelines/paint_by_example
|
||||
title: PaintByExample
|
||||
- local: api/pipelines/paradigms
|
||||
title: Parallel Sampling of Diffusion Models
|
||||
- local: api/pipelines/pix2pix_zero
|
||||
title: Pix2Pix Zero
|
||||
- local: api/pipelines/pndm
|
||||
title: PNDM
|
||||
- local: api/pipelines/repaint
|
||||
title: RePaint
|
||||
- local: api/pipelines/stable_diffusion_safe
|
||||
title: Safe Stable Diffusion
|
||||
- local: api/pipelines/score_sde_ve
|
||||
title: Score SDE VE
|
||||
- local: api/pipelines/self_attention_guidance
|
||||
title: Self-Attention Guidance
|
||||
- local: api/pipelines/semantic_stable_diffusion
|
||||
title: Semantic Guidance
|
||||
- local: api/pipelines/shap_e
|
||||
title: Shap-E
|
||||
- local: api/pipelines/spectrogram_diffusion
|
||||
title: Spectrogram Diffusion
|
||||
title: "Spectrogram Diffusion"
|
||||
- sections:
|
||||
- local: api/pipelines/stable_diffusion/overview
|
||||
title: Overview
|
||||
@@ -247,27 +181,31 @@
|
||||
title: Depth-to-Image
|
||||
- local: api/pipelines/stable_diffusion/image_variation
|
||||
title: Image-Variation
|
||||
- local: api/pipelines/stable_diffusion/stable_diffusion_safe
|
||||
title: Safe Stable Diffusion
|
||||
- local: api/pipelines/stable_diffusion/stable_diffusion_2
|
||||
title: Stable Diffusion 2
|
||||
- local: api/pipelines/stable_diffusion/stable_diffusion_xl
|
||||
title: Stable Diffusion XL
|
||||
- local: api/pipelines/stable_diffusion/latent_upscale
|
||||
title: Stable-Diffusion-Latent-Upscaler
|
||||
- local: api/pipelines/stable_diffusion/upscale
|
||||
title: Super-Resolution
|
||||
- local: api/pipelines/stable_diffusion/ldm3d_diffusion
|
||||
title: LDM3D Text-to-(RGB, Depth)
|
||||
- local: api/pipelines/stable_diffusion/adapter
|
||||
title: Stable Diffusion T2I-adapter
|
||||
- local: api/pipelines/stable_diffusion/latent_upscale
|
||||
title: Stable-Diffusion-Latent-Upscaler
|
||||
- local: api/pipelines/stable_diffusion/pix2pix
|
||||
title: InstructPix2Pix
|
||||
- local: api/pipelines/stable_diffusion/attend_and_excite
|
||||
title: Attend and Excite
|
||||
- local: api/pipelines/stable_diffusion/pix2pix_zero
|
||||
title: Pix2Pix Zero
|
||||
- local: api/pipelines/stable_diffusion/self_attention_guidance
|
||||
title: Self-Attention Guidance
|
||||
- local: api/pipelines/stable_diffusion/panorama
|
||||
title: MultiDiffusion Panorama
|
||||
- local: api/pipelines/stable_diffusion/controlnet
|
||||
title: Text-to-Image Generation with ControlNet Conditioning
|
||||
- local: api/pipelines/stable_diffusion/model_editing
|
||||
title: Text-to-Image Model Editing
|
||||
title: Stable Diffusion
|
||||
- local: api/pipelines/stable_diffusion_2
|
||||
title: Stable Diffusion 2
|
||||
- local: api/pipelines/stable_unclip
|
||||
title: Stable unCLIP
|
||||
- local: api/pipelines/stochastic_karras_ve
|
||||
title: Stochastic Karras VE
|
||||
- local: api/pipelines/model_editing
|
||||
title: Text-to-Image Model Editing
|
||||
- local: api/pipelines/text_to_video
|
||||
title: Text-to-Video
|
||||
- local: api/pipelines/text_to_video_zero
|
||||
@@ -276,8 +214,6 @@
|
||||
title: UnCLIP
|
||||
- local: api/pipelines/latent_diffusion_uncond
|
||||
title: Unconditional Latent Diffusion
|
||||
- local: api/pipelines/unidiffuser
|
||||
title: UniDiffuser
|
||||
- local: api/pipelines/versatile_diffusion
|
||||
title: Versatile Diffusion
|
||||
- local: api/pipelines/vq_diffusion
|
||||
@@ -286,8 +222,6 @@
|
||||
- sections:
|
||||
- local: api/schedulers/overview
|
||||
title: Overview
|
||||
- local: api/schedulers/cm_stochastic_iterative
|
||||
title: Consistency Model Multistep Scheduler
|
||||
- local: api/schedulers/ddim
|
||||
title: DDIM
|
||||
- local: api/schedulers/ddim_inverse
|
||||
@@ -300,16 +234,12 @@
|
||||
title: DPM Discrete Scheduler
|
||||
- local: api/schedulers/dpm_discrete_ancestral
|
||||
title: DPM Discrete Scheduler with ancestral sampling
|
||||
- local: api/schedulers/dpm_sde
|
||||
title: DPMSolverSDEScheduler
|
||||
- local: api/schedulers/euler_ancestral
|
||||
title: Euler Ancestral Scheduler
|
||||
- local: api/schedulers/euler
|
||||
title: Euler scheduler
|
||||
- local: api/schedulers/heun
|
||||
title: Heun Scheduler
|
||||
- local: api/schedulers/multistep_dpm_solver_inverse
|
||||
title: Inverse Multistep DPM-Solver
|
||||
- local: api/schedulers/ipndm
|
||||
title: IPNDM
|
||||
- local: api/schedulers/lms_discrete
|
||||
|
||||
@@ -1,42 +0,0 @@
|
||||
# Attention Processor
|
||||
|
||||
An attention processor is a class for applying different types of attention mechanisms.
|
||||
|
||||
## AttnProcessor
|
||||
[[autodoc]] models.attention_processor.AttnProcessor
|
||||
|
||||
## AttnProcessor2_0
|
||||
[[autodoc]] models.attention_processor.AttnProcessor2_0
|
||||
|
||||
## LoRAAttnProcessor
|
||||
[[autodoc]] models.attention_processor.LoRAAttnProcessor
|
||||
|
||||
## LoRAAttnProcessor2_0
|
||||
[[autodoc]] models.attention_processor.LoRAAttnProcessor2_0
|
||||
|
||||
## CustomDiffusionAttnProcessor
|
||||
[[autodoc]] models.attention_processor.CustomDiffusionAttnProcessor
|
||||
|
||||
## AttnAddedKVProcessor
|
||||
[[autodoc]] models.attention_processor.AttnAddedKVProcessor
|
||||
|
||||
## AttnAddedKVProcessor2_0
|
||||
[[autodoc]] models.attention_processor.AttnAddedKVProcessor2_0
|
||||
|
||||
## LoRAAttnAddedKVProcessor
|
||||
[[autodoc]] models.attention_processor.LoRAAttnAddedKVProcessor
|
||||
|
||||
## XFormersAttnProcessor
|
||||
[[autodoc]] models.attention_processor.XFormersAttnProcessor
|
||||
|
||||
## LoRAXFormersAttnProcessor
|
||||
[[autodoc]] models.attention_processor.LoRAXFormersAttnProcessor
|
||||
|
||||
## CustomDiffusionXFormersAttnProcessor
|
||||
[[autodoc]] models.attention_processor.CustomDiffusionXFormersAttnProcessor
|
||||
|
||||
## SlicedAttnProcessor
|
||||
[[autodoc]] models.attention_processor.SlicedAttnProcessor
|
||||
|
||||
## SlicedAttnAddedKVProcessor
|
||||
[[autodoc]] models.attention_processor.SlicedAttnAddedKVProcessor
|
||||
@@ -12,13 +12,8 @@ specific language governing permissions and limitations under the License.
|
||||
|
||||
# Configuration
|
||||
|
||||
Schedulers from [`~schedulers.scheduling_utils.SchedulerMixin`] and models from [`ModelMixin`] inherit from [`ConfigMixin`] which stores all the parameters that are passed to their respective `__init__` methods in a JSON-configuration file.
|
||||
|
||||
<Tip>
|
||||
|
||||
To use private or [gated](https://huggingface.co/docs/hub/models-gated#gated-models) models, log-in with `huggingface-cli login`.
|
||||
|
||||
</Tip>
|
||||
Schedulers from [`~schedulers.scheduling_utils.SchedulerMixin`] and models from [`ModelMixin`] inherit from [`ConfigMixin`] which conveniently takes care of storing all the parameters that are
|
||||
passed to their respective `__init__` methods in a JSON-configuration file.
|
||||
|
||||
## ConfigMixin
|
||||
|
||||
|
||||
@@ -12,25 +12,36 @@ specific language governing permissions and limitations under the License.
|
||||
|
||||
# Pipelines
|
||||
|
||||
The [`DiffusionPipeline`] is the quickest way to load any pretrained diffusion pipeline from the [Hub](https://huggingface.co/models?library=diffusers) for inference.
|
||||
The [`DiffusionPipeline`] is the easiest way to load any pretrained diffusion pipeline from the [Hub](https://huggingface.co/models?library=diffusers) and to use it in inference.
|
||||
|
||||
<Tip>
|
||||
|
||||
You shouldn't use the [`DiffusionPipeline`] class for training or finetuning a diffusion model. Individual
|
||||
components (for example, [`UNet2DModel`] and [`UNet2DConditionModel`]) of diffusion pipelines are usually trained individually, so we suggest directly working with them instead.
|
||||
|
||||
One should not use the Diffusion Pipeline class for training or fine-tuning a diffusion model. Individual
|
||||
components of diffusion pipelines are usually trained individually, so we suggest to directly work
|
||||
with [`UNetModel`] and [`UNetConditionModel`].
|
||||
|
||||
</Tip>
|
||||
|
||||
The pipeline type (for example [`StableDiffusionPipeline`]) of any diffusion pipeline loaded with [`~DiffusionPipeline.from_pretrained`] is automatically
|
||||
detected and pipeline components are loaded and passed to the `__init__` function of the pipeline.
|
||||
Any diffusion pipeline that is loaded with [`~DiffusionPipeline.from_pretrained`] will automatically
|
||||
detect the pipeline type, *e.g.* [`StableDiffusionPipeline`] and consequently load each component of the
|
||||
pipeline and pass them into the `__init__` function of the pipeline, *e.g.* [`~StableDiffusionPipeline.__init__`].
|
||||
|
||||
Any pipeline object can be saved locally with [`~DiffusionPipeline.save_pretrained`].
|
||||
|
||||
## DiffusionPipeline
|
||||
|
||||
[[autodoc]] DiffusionPipeline
|
||||
- all
|
||||
- __call__
|
||||
- device
|
||||
- to
|
||||
- components
|
||||
|
||||
## ImagePipelineOutput
|
||||
By default diffusion pipelines return an object of class
|
||||
|
||||
[[autodoc]] pipelines.ImagePipelineOutput
|
||||
|
||||
## AudioPipelineOutput
|
||||
By default diffusion pipelines return an object of class
|
||||
|
||||
[[autodoc]] pipelines.AudioPipelineOutput
|
||||
|
||||
@@ -1,27 +0,0 @@
|
||||
<!--Copyright 2023 The HuggingFace Team. All rights reserved.
|
||||
|
||||
Licensed under the Apache License, Version 2.0 (the "License"); you may not use this file except in compliance with
|
||||
the License. You may obtain a copy of the License at
|
||||
|
||||
http://www.apache.org/licenses/LICENSE-2.0
|
||||
|
||||
Unless required by applicable law or agreed to in writing, software distributed under the License is distributed on
|
||||
an "AS IS" BASIS, WITHOUT WARRANTIES OR CONDITIONS OF ANY KIND, either express or implied. See the License for the
|
||||
specific language governing permissions and limitations under the License.
|
||||
-->
|
||||
|
||||
# VAE Image Processor
|
||||
|
||||
The [`VaeImageProcessor`] provides a unified API for [`StableDiffusionPipeline`]'s to prepare image inputs for VAE encoding and post-processing outputs once they're decoded. This includes transformations such as resizing, normalization, and conversion between PIL Image, PyTorch, and NumPy arrays.
|
||||
|
||||
All pipelines with [`VaeImageProcessor`] accepts PIL Image, PyTorch tensor, or NumPy arrays as image inputs and returns outputs based on the `output_type` argument by the user. You can pass encoded image latents directly to the pipeline and return latents from the pipeline as a specific output with the `output_type` argument (for example `output_type="pt"`). This allows you to take the generated latents from one pipeline and pass it to another pipeline as input without leaving the latent space. It also makes it much easier to use multiple pipelines together by passing PyTorch tensors directly between different pipelines.
|
||||
|
||||
## VaeImageProcessor
|
||||
|
||||
[[autodoc]] image_processor.VaeImageProcessor
|
||||
|
||||
## VaeImageProcessorLDM3D
|
||||
|
||||
The [`VaeImageProcessorLDM3D`] accepts RGB and depth inputs and returns RGB and depth outputs.
|
||||
|
||||
[[autodoc]] image_processor.VaeImageProcessorLDM3D
|
||||
@@ -12,34 +12,31 @@ specific language governing permissions and limitations under the License.
|
||||
|
||||
# Loaders
|
||||
|
||||
Adapters (textual inversion, LoRA, hypernetworks) allow you to modify a diffusion model to generate images in a specific style without training or finetuning the entire model. The adapter weights are typically only a tiny fraction of the pretrained model's which making them very portable. 🤗 Diffusers provides an easy-to-use `LoaderMixin` API to load adapter weights.
|
||||
There are many ways to train adapter neural networks for diffusion models, such as
|
||||
- [Textual Inversion](./training/text_inversion.mdx)
|
||||
- [LoRA](https://github.com/cloneofsimo/lora)
|
||||
- [Hypernetworks](https://arxiv.org/abs/1609.09106)
|
||||
|
||||
<Tip warning={true}>
|
||||
Such adapter neural networks often only consist of a fraction of the number of weights compared
|
||||
to the pretrained model and as such are very portable. The Diffusers library offers an easy-to-use
|
||||
API to load such adapter neural networks via the [`loaders.py` module](https://github.com/huggingface/diffusers/blob/main/src/diffusers/loaders.py).
|
||||
|
||||
🧪 The `LoaderMixins` are highly experimental and prone to future changes. To use private or [gated](https://huggingface.co/docs/hub/models-gated#gated-models) models, log-in with `huggingface-cli login`.
|
||||
**Note**: This module is still highly experimental and prone to future changes.
|
||||
|
||||
</Tip>
|
||||
## LoaderMixins
|
||||
|
||||
## UNet2DConditionLoadersMixin
|
||||
### UNet2DConditionLoadersMixin
|
||||
|
||||
[[autodoc]] loaders.UNet2DConditionLoadersMixin
|
||||
|
||||
## TextualInversionLoaderMixin
|
||||
### TextualInversionLoaderMixin
|
||||
|
||||
[[autodoc]] loaders.TextualInversionLoaderMixin
|
||||
|
||||
## LoraLoaderMixin
|
||||
### LoraLoaderMixin
|
||||
|
||||
[[autodoc]] loaders.LoraLoaderMixin
|
||||
|
||||
## FromSingleFileMixin
|
||||
### FromCkptMixin
|
||||
|
||||
[[autodoc]] loaders.FromSingleFileMixin
|
||||
|
||||
## FromOriginalControlnetMixin
|
||||
|
||||
[[autodoc]] loaders.FromOriginalControlnetMixin
|
||||
|
||||
## FromOriginalVAEMixin
|
||||
|
||||
[[autodoc]] loaders.FromOriginalVAEMixin
|
||||
[[autodoc]] loaders.FromCkptMixin
|
||||
|
||||
@@ -12,9 +12,12 @@ specific language governing permissions and limitations under the License.
|
||||
|
||||
# Logging
|
||||
|
||||
🤗 Diffusers has a centralized logging system to easily manage the verbosity of the library. The default verbosity is set to `WARNING`.
|
||||
🧨 Diffusers has a centralized logging system, so that you can setup the verbosity of the library easily.
|
||||
|
||||
To change the verbosity level, use one of the direct setters. For instance, to change the verbosity to the `INFO` level.
|
||||
Currently the default verbosity of the library is `WARNING`.
|
||||
|
||||
To change the level of verbosity, just use one of the direct setters. For instance, here is how to change the verbosity
|
||||
to the INFO level.
|
||||
|
||||
```python
|
||||
import diffusers
|
||||
@@ -30,7 +33,7 @@ DIFFUSERS_VERBOSITY=error ./myprogram.py
|
||||
```
|
||||
|
||||
Additionally, some `warnings` can be disabled by setting the environment variable
|
||||
`DIFFUSERS_NO_ADVISORY_WARNINGS` to a true value, like `1`. This disables any warning logged by
|
||||
`DIFFUSERS_NO_ADVISORY_WARNINGS` to a true value, like *1*. This will disable any warning that is logged using
|
||||
[`logger.warning_advice`]. For example:
|
||||
|
||||
```bash
|
||||
@@ -49,21 +52,20 @@ logger.warning("WARN")
|
||||
```
|
||||
|
||||
|
||||
All methods of the logging module are documented below. The main methods are
|
||||
All the methods of this logging module are documented below, the main ones are
|
||||
[`logging.get_verbosity`] to get the current level of verbosity in the logger and
|
||||
[`logging.set_verbosity`] to set the verbosity to the level of your choice.
|
||||
[`logging.set_verbosity`] to set the verbosity to the level of your choice. In order (from the least
|
||||
verbose to the most verbose), those levels (with their corresponding int values in parenthesis) are:
|
||||
|
||||
In order from the least verbose to the most verbose:
|
||||
- `diffusers.logging.CRITICAL` or `diffusers.logging.FATAL` (int value, 50): only report the most
|
||||
critical errors.
|
||||
- `diffusers.logging.ERROR` (int value, 40): only report errors.
|
||||
- `diffusers.logging.WARNING` or `diffusers.logging.WARN` (int value, 30): only reports error and
|
||||
warnings. This the default level used by the library.
|
||||
- `diffusers.logging.INFO` (int value, 20): reports error, warnings and basic information.
|
||||
- `diffusers.logging.DEBUG` (int value, 10): report all information.
|
||||
|
||||
| Method | Integer value | Description |
|
||||
|----------------------------------------------------------:|--------------:|----------------------------------------------------:|
|
||||
| `diffusers.logging.CRITICAL` or `diffusers.logging.FATAL` | 50 | only report the most critical errors |
|
||||
| `diffusers.logging.ERROR` | 40 | only report errors |
|
||||
| `diffusers.logging.WARNING` or `diffusers.logging.WARN` | 30 | only report errors and warnings (default) |
|
||||
| `diffusers.logging.INFO` | 20 | only report errors, warnings, and basic information |
|
||||
| `diffusers.logging.DEBUG` | 10 | report all information |
|
||||
|
||||
By default, `tqdm` progress bars are displayed during model download. [`logging.disable_progress_bar`] and [`logging.enable_progress_bar`] are used to enable or disable this behavior.
|
||||
By default, `tqdm` progress bars will be displayed during model download. [`logging.disable_progress_bar`] and [`logging.enable_progress_bar`] can be used to suppress or unsuppress this behavior.
|
||||
|
||||
## Base setters
|
||||
|
||||
|
||||
107
docs/source/en/api/models.mdx
Normal file
107
docs/source/en/api/models.mdx
Normal file
@@ -0,0 +1,107 @@
|
||||
<!--Copyright 2023 The HuggingFace Team. All rights reserved.
|
||||
|
||||
Licensed under the Apache License, Version 2.0 (the "License"); you may not use this file except in compliance with
|
||||
the License. You may obtain a copy of the License at
|
||||
|
||||
http://www.apache.org/licenses/LICENSE-2.0
|
||||
|
||||
Unless required by applicable law or agreed to in writing, software distributed under the License is distributed on
|
||||
an "AS IS" BASIS, WITHOUT WARRANTIES OR CONDITIONS OF ANY KIND, either express or implied. See the License for the
|
||||
specific language governing permissions and limitations under the License.
|
||||
-->
|
||||
|
||||
# Models
|
||||
|
||||
Diffusers contains pretrained models for popular algorithms and modules for creating the next set of diffusion models.
|
||||
The primary function of these models is to denoise an input sample, by modeling the distribution $p_\theta(\mathbf{x}_{t-1}|\mathbf{x}_t)$.
|
||||
The models are built on the base class ['ModelMixin'] that is a `torch.nn.module` with basic functionality for saving and loading models both locally and from the HuggingFace hub.
|
||||
|
||||
## ModelMixin
|
||||
[[autodoc]] ModelMixin
|
||||
|
||||
## UNet2DOutput
|
||||
[[autodoc]] models.unet_2d.UNet2DOutput
|
||||
|
||||
## UNet2DModel
|
||||
[[autodoc]] UNet2DModel
|
||||
|
||||
## UNet1DOutput
|
||||
[[autodoc]] models.unet_1d.UNet1DOutput
|
||||
|
||||
## UNet1DModel
|
||||
[[autodoc]] UNet1DModel
|
||||
|
||||
## UNet2DConditionOutput
|
||||
[[autodoc]] models.unet_2d_condition.UNet2DConditionOutput
|
||||
|
||||
## UNet2DConditionModel
|
||||
[[autodoc]] UNet2DConditionModel
|
||||
|
||||
## UNet3DConditionOutput
|
||||
[[autodoc]] models.unet_3d_condition.UNet3DConditionOutput
|
||||
|
||||
## UNet3DConditionModel
|
||||
[[autodoc]] UNet3DConditionModel
|
||||
|
||||
## DecoderOutput
|
||||
[[autodoc]] models.vae.DecoderOutput
|
||||
|
||||
## VQEncoderOutput
|
||||
[[autodoc]] models.vq_model.VQEncoderOutput
|
||||
|
||||
## VQModel
|
||||
[[autodoc]] VQModel
|
||||
|
||||
## AutoencoderKLOutput
|
||||
[[autodoc]] models.autoencoder_kl.AutoencoderKLOutput
|
||||
|
||||
## AutoencoderKL
|
||||
[[autodoc]] AutoencoderKL
|
||||
|
||||
## Transformer2DModel
|
||||
[[autodoc]] Transformer2DModel
|
||||
|
||||
## Transformer2DModelOutput
|
||||
[[autodoc]] models.transformer_2d.Transformer2DModelOutput
|
||||
|
||||
## TransformerTemporalModel
|
||||
[[autodoc]] models.transformer_temporal.TransformerTemporalModel
|
||||
|
||||
## Transformer2DModelOutput
|
||||
[[autodoc]] models.transformer_temporal.TransformerTemporalModelOutput
|
||||
|
||||
## PriorTransformer
|
||||
[[autodoc]] models.prior_transformer.PriorTransformer
|
||||
|
||||
## PriorTransformerOutput
|
||||
[[autodoc]] models.prior_transformer.PriorTransformerOutput
|
||||
|
||||
## ControlNetOutput
|
||||
[[autodoc]] models.controlnet.ControlNetOutput
|
||||
|
||||
## ControlNetModel
|
||||
[[autodoc]] ControlNetModel
|
||||
|
||||
## FlaxModelMixin
|
||||
[[autodoc]] FlaxModelMixin
|
||||
|
||||
## FlaxUNet2DConditionOutput
|
||||
[[autodoc]] models.unet_2d_condition_flax.FlaxUNet2DConditionOutput
|
||||
|
||||
## FlaxUNet2DConditionModel
|
||||
[[autodoc]] FlaxUNet2DConditionModel
|
||||
|
||||
## FlaxDecoderOutput
|
||||
[[autodoc]] models.vae_flax.FlaxDecoderOutput
|
||||
|
||||
## FlaxAutoencoderKLOutput
|
||||
[[autodoc]] models.vae_flax.FlaxAutoencoderKLOutput
|
||||
|
||||
## FlaxAutoencoderKL
|
||||
[[autodoc]] FlaxAutoencoderKL
|
||||
|
||||
## FlaxControlNetOutput
|
||||
[[autodoc]] models.controlnet_flax.FlaxControlNetOutput
|
||||
|
||||
## FlaxControlNetModel
|
||||
[[autodoc]] FlaxControlNetModel
|
||||
@@ -1,55 +0,0 @@
|
||||
# AsymmetricAutoencoderKL
|
||||
|
||||
Improved larger variational autoencoder (VAE) model with KL loss for inpainting task: [Designing a Better Asymmetric VQGAN for StableDiffusion](https://arxiv.org/abs/2306.04632) by Zixin Zhu, Xuelu Feng, Dongdong Chen, Jianmin Bao, Le Wang, Yinpeng Chen, Lu Yuan, Gang Hua.
|
||||
|
||||
The abstract from the paper is:
|
||||
|
||||
*StableDiffusion is a revolutionary text-to-image generator that is causing a stir in the world of image generation and editing. Unlike traditional methods that learn a diffusion model in pixel space, StableDiffusion learns a diffusion model in the latent space via a VQGAN, ensuring both efficiency and quality. It not only supports image generation tasks, but also enables image editing for real images, such as image inpainting and local editing. However, we have observed that the vanilla VQGAN used in StableDiffusion leads to significant information loss, causing distortion artifacts even in non-edited image regions. To this end, we propose a new asymmetric VQGAN with two simple designs. Firstly, in addition to the input from the encoder, the decoder contains a conditional branch that incorporates information from task-specific priors, such as the unmasked image region in inpainting. Secondly, the decoder is much heavier than the encoder, allowing for more detailed recovery while only slightly increasing the total inference cost. The training cost of our asymmetric VQGAN is cheap, and we only need to retrain a new asymmetric decoder while keeping the vanilla VQGAN encoder and StableDiffusion unchanged. Our asymmetric VQGAN can be widely used in StableDiffusion-based inpainting and local editing methods. Extensive experiments demonstrate that it can significantly improve the inpainting and editing performance, while maintaining the original text-to-image capability. The code is available at https://github.com/buxiangzhiren/Asymmetric_VQGAN*
|
||||
|
||||
Evaluation results can be found in section 4.1 of the original paper.
|
||||
|
||||
## Available checkpoints
|
||||
|
||||
* [https://huggingface.co/cross-attention/asymmetric-autoencoder-kl-x-1-5](https://huggingface.co/cross-attention/asymmetric-autoencoder-kl-x-1-5)
|
||||
* [https://huggingface.co/cross-attention/asymmetric-autoencoder-kl-x-2](https://huggingface.co/cross-attention/asymmetric-autoencoder-kl-x-2)
|
||||
|
||||
## Example Usage
|
||||
|
||||
```python
|
||||
from io import BytesIO
|
||||
from PIL import Image
|
||||
import requests
|
||||
from diffusers import AsymmetricAutoencoderKL, StableDiffusionInpaintPipeline
|
||||
|
||||
|
||||
def download_image(url: str) -> Image.Image:
|
||||
response = requests.get(url)
|
||||
return Image.open(BytesIO(response.content)).convert("RGB")
|
||||
|
||||
|
||||
prompt = "a photo of a person"
|
||||
img_url = "https://huggingface.co/datasets/hf-internal-testing/diffusers-images/resolve/main/repaint/celeba_hq_256.png"
|
||||
mask_url = "https://huggingface.co/datasets/hf-internal-testing/diffusers-images/resolve/main/repaint/mask_256.png"
|
||||
|
||||
image = download_image(img_url).resize((256, 256))
|
||||
mask_image = download_image(mask_url).resize((256, 256))
|
||||
|
||||
pipe = StableDiffusionInpaintPipeline.from_pretrained("runwayml/stable-diffusion-inpainting")
|
||||
pipe.vae = AsymmetricAutoencoderKL.from_pretrained("cross-attention/asymmetric-autoencoder-kl-x-1-5")
|
||||
pipe.to("cuda")
|
||||
|
||||
image = pipe(prompt=prompt, image=image, mask_image=mask_image).images[0]
|
||||
image.save("image.jpeg")
|
||||
```
|
||||
|
||||
## AsymmetricAutoencoderKL
|
||||
|
||||
[[autodoc]] models.autoencoder_asym_kl.AsymmetricAutoencoderKL
|
||||
|
||||
## AutoencoderKLOutput
|
||||
|
||||
[[autodoc]] models.autoencoder_kl.AutoencoderKLOutput
|
||||
|
||||
## DecoderOutput
|
||||
|
||||
[[autodoc]] models.vae.DecoderOutput
|
||||
@@ -1,43 +0,0 @@
|
||||
# AutoencoderKL
|
||||
|
||||
The variational autoencoder (VAE) model with KL loss was introduced in [Auto-Encoding Variational Bayes](https://arxiv.org/abs/1312.6114v11) by Diederik P. Kingma and Max Welling. The model is used in 🤗 Diffusers to encode images into latents and to decode latent representations into images.
|
||||
|
||||
The abstract from the paper is:
|
||||
|
||||
*How can we perform efficient inference and learning in directed probabilistic models, in the presence of continuous latent variables with intractable posterior distributions, and large datasets? We introduce a stochastic variational inference and learning algorithm that scales to large datasets and, under some mild differentiability conditions, even works in the intractable case. Our contributions are two-fold. First, we show that a reparameterization of the variational lower bound yields a lower bound estimator that can be straightforwardly optimized using standard stochastic gradient methods. Second, we show that for i.i.d. datasets with continuous latent variables per datapoint, posterior inference can be made especially efficient by fitting an approximate inference model (also called a recognition model) to the intractable posterior using the proposed lower bound estimator. Theoretical advantages are reflected in experimental results.*
|
||||
|
||||
## Loading from the original format
|
||||
|
||||
By default the [`AutoencoderKL`] should be loaded with [`~ModelMixin.from_pretrained`], but it can also be loaded
|
||||
from the original format using [`FromOriginalVAEMixin.from_single_file`] as follows:
|
||||
|
||||
```py
|
||||
from diffusers import AutoencoderKL
|
||||
|
||||
url = "https://huggingface.co/stabilityai/sd-vae-ft-mse-original/blob/main/vae-ft-mse-840000-ema-pruned.safetensors" # can also be local file
|
||||
model = AutoencoderKL.from_single_file(url)
|
||||
```
|
||||
|
||||
## AutoencoderKL
|
||||
|
||||
[[autodoc]] AutoencoderKL
|
||||
|
||||
## AutoencoderKLOutput
|
||||
|
||||
[[autodoc]] models.autoencoder_kl.AutoencoderKLOutput
|
||||
|
||||
## DecoderOutput
|
||||
|
||||
[[autodoc]] models.vae.DecoderOutput
|
||||
|
||||
## FlaxAutoencoderKL
|
||||
|
||||
[[autodoc]] FlaxAutoencoderKL
|
||||
|
||||
## FlaxAutoencoderKLOutput
|
||||
|
||||
[[autodoc]] models.vae_flax.FlaxAutoencoderKLOutput
|
||||
|
||||
## FlaxDecoderOutput
|
||||
|
||||
[[autodoc]] models.vae_flax.FlaxDecoderOutput
|
||||
@@ -1,38 +0,0 @@
|
||||
# ControlNet
|
||||
|
||||
The ControlNet model was introduced in [Adding Conditional Control to Text-to-Image Diffusion Models](https://huggingface.co/papers/2302.05543) by Lvmin Zhang and Maneesh Agrawala. It provides a greater degree of control over text-to-image generation by conditioning the model on additional inputs such as edge maps, depth maps, segmentation maps, and keypoints for pose detection.
|
||||
|
||||
The abstract from the paper is:
|
||||
|
||||
*We present a neural network structure, ControlNet, to control pretrained large diffusion models to support additional input conditions. The ControlNet learns task-specific conditions in an end-to-end way, and the learning is robust even when the training dataset is small (< 50k). Moreover, training a ControlNet is as fast as fine-tuning a diffusion model, and the model can be trained on a personal devices. Alternatively, if powerful computation clusters are available, the model can scale to large amounts (millions to billions) of data. We report that large diffusion models like Stable Diffusion can be augmented with ControlNets to enable conditional inputs like edge maps, segmentation maps, keypoints, etc. This may enrich the methods to control large diffusion models and further facilitate related applications.*
|
||||
|
||||
## Loading from the original format
|
||||
|
||||
By default the [`ControlNetModel`] should be loaded with [`~ModelMixin.from_pretrained`], but it can also be loaded
|
||||
from the original format using [`FromOriginalControlnetMixin.from_single_file`] as follows:
|
||||
|
||||
```py
|
||||
from diffusers import StableDiffusionControlnetPipeline, ControlNetModel
|
||||
|
||||
url = "https://huggingface.co/lllyasviel/ControlNet-v1-1/blob/main/control_v11p_sd15_canny.pth" # can also be a local path
|
||||
controlnet = ControlNetModel.from_single_file(url)
|
||||
|
||||
url = "https://huggingface.co/runwayml/stable-diffusion-v1-5/blob/main/v1-5-pruned.safetensors" # can also be a local path
|
||||
pipe = StableDiffusionControlnetPipeline.from_single_file(url, controlnet=controlnet)
|
||||
```
|
||||
|
||||
## ControlNetModel
|
||||
|
||||
[[autodoc]] ControlNetModel
|
||||
|
||||
## ControlNetOutput
|
||||
|
||||
[[autodoc]] models.controlnet.ControlNetOutput
|
||||
|
||||
## FlaxControlNetModel
|
||||
|
||||
[[autodoc]] FlaxControlNetModel
|
||||
|
||||
## FlaxControlNetOutput
|
||||
|
||||
[[autodoc]] models.controlnet_flax.FlaxControlNetOutput
|
||||
@@ -1,12 +0,0 @@
|
||||
# Models
|
||||
|
||||
🤗 Diffusers provides pretrained models for popular algorithms and modules to create custom diffusion systems. The primary function of models is to denoise an input sample as modeled by the distribution \\(p_{\theta}(x_{t-1}|x_{t})\\).
|
||||
|
||||
All models are built from the base [`ModelMixin`] class which is a [`torch.nn.module`](https://pytorch.org/docs/stable/generated/torch.nn.Module.html) providing basic functionality for saving and loading models, locally and from the Hugging Face Hub.
|
||||
|
||||
## ModelMixin
|
||||
[[autodoc]] ModelMixin
|
||||
|
||||
## FlaxModelMixin
|
||||
|
||||
[[autodoc]] FlaxModelMixin
|
||||
@@ -1,16 +0,0 @@
|
||||
# Prior Transformer
|
||||
|
||||
The Prior Transformer was originally introduced in [Hierarchical Text-Conditional Image Generation with CLIP Latents
|
||||
](https://huggingface.co/papers/2204.06125) by Ramesh et al. It is used to predict CLIP image embeddings from CLIP text embeddings; image embeddings are predicted through a denoising diffusion process.
|
||||
|
||||
The abstract from the paper is:
|
||||
|
||||
*Contrastive models like CLIP have been shown to learn robust representations of images that capture both semantics and style. To leverage these representations for image generation, we propose a two-stage model: a prior that generates a CLIP image embedding given a text caption, and a decoder that generates an image conditioned on the image embedding. We show that explicitly generating image representations improves image diversity with minimal loss in photorealism and caption similarity. Our decoders conditioned on image representations can also produce variations of an image that preserve both its semantics and style, while varying the non-essential details absent from the image representation. Moreover, the joint embedding space of CLIP enables language-guided image manipulations in a zero-shot fashion. We use diffusion models for the decoder and experiment with both autoregressive and diffusion models for the prior, finding that the latter are computationally more efficient and produce higher-quality samples.*
|
||||
|
||||
## PriorTransformer
|
||||
|
||||
[[autodoc]] PriorTransformer
|
||||
|
||||
## PriorTransformerOutput
|
||||
|
||||
[[autodoc]] models.prior_transformer.PriorTransformerOutput
|
||||
@@ -1,29 +0,0 @@
|
||||
# Transformer2D
|
||||
|
||||
A Transformer model for image-like data from [CompVis](https://huggingface.co/CompVis) that is based on the [Vision Transformer](https://huggingface.co/papers/2010.11929) introduced by Dosovitskiy et al. The [`Transformer2DModel`] accepts discrete (classes of vector embeddings) or continuous (actual embeddings) inputs.
|
||||
|
||||
When the input is **continuous**:
|
||||
|
||||
1. Project the input and reshape it to `(batch_size, sequence_length, feature_dimension)`.
|
||||
2. Apply the Transformer blocks in the standard way.
|
||||
3. Reshape to image.
|
||||
|
||||
When the input is **discrete**:
|
||||
|
||||
<Tip>
|
||||
|
||||
It is assumed one of the input classes is the masked latent pixel. The predicted classes of the unnoised image don't contain a prediction for the masked pixel because the unnoised image cannot be masked.
|
||||
|
||||
</Tip>
|
||||
|
||||
1. Convert input (classes of latent pixels) to embeddings and apply positional embeddings.
|
||||
2. Apply the Transformer blocks in the standard way.
|
||||
3. Predict classes of unnoised image.
|
||||
|
||||
## Transformer2DModel
|
||||
|
||||
[[autodoc]] Transformer2DModel
|
||||
|
||||
## Transformer2DModelOutput
|
||||
|
||||
[[autodoc]] models.transformer_2d.Transformer2DModelOutput
|
||||
@@ -1,11 +0,0 @@
|
||||
# Transformer Temporal
|
||||
|
||||
A Transformer model for video-like data.
|
||||
|
||||
## TransformerTemporalModel
|
||||
|
||||
[[autodoc]] models.transformer_temporal.TransformerTemporalModel
|
||||
|
||||
## TransformerTemporalModelOutput
|
||||
|
||||
[[autodoc]] models.transformer_temporal.TransformerTemporalModelOutput
|
||||
@@ -1,13 +0,0 @@
|
||||
# UNet1DModel
|
||||
|
||||
The [UNet](https://huggingface.co/papers/1505.04597) model was originally introduced by Ronneberger et al for biomedical image segmentation, but it is also commonly used in 🤗 Diffusers because it outputs images that are the same size as the input. It is one of the most important components of a diffusion system because it facilitates the actual diffusion process. There are several variants of the UNet model in 🤗 Diffusers, depending on it's number of dimensions and whether it is a conditional model or not. This is a 1D UNet model.
|
||||
|
||||
The abstract from the paper is:
|
||||
|
||||
*There is large consent that successful training of deep networks requires many thousand annotated training samples. In this paper, we present a network and training strategy that relies on the strong use of data augmentation to use the available annotated samples more efficiently. The architecture consists of a contracting path to capture context and a symmetric expanding path that enables precise localization. We show that such a network can be trained end-to-end from very few images and outperforms the prior best method (a sliding-window convolutional network) on the ISBI challenge for segmentation of neuronal structures in electron microscopic stacks. Using the same network trained on transmitted light microscopy images (phase contrast and DIC) we won the ISBI cell tracking challenge 2015 in these categories by a large margin. Moreover, the network is fast. Segmentation of a 512x512 image takes less than a second on a recent GPU. The full implementation (based on Caffe) and the trained networks are available at http://lmb.informatik.uni-freiburg.de/people/ronneber/u-net.*
|
||||
|
||||
## UNet1DModel
|
||||
[[autodoc]] UNet1DModel
|
||||
|
||||
## UNet1DOutput
|
||||
[[autodoc]] models.unet_1d.UNet1DOutput
|
||||
@@ -1,19 +0,0 @@
|
||||
# UNet2DConditionModel
|
||||
|
||||
The [UNet](https://huggingface.co/papers/1505.04597) model was originally introduced by Ronneberger et al for biomedical image segmentation, but it is also commonly used in 🤗 Diffusers because it outputs images that are the same size as the input. It is one of the most important components of a diffusion system because it facilitates the actual diffusion process. There are several variants of the UNet model in 🤗 Diffusers, depending on it's number of dimensions and whether it is a conditional model or not. This is a 2D UNet conditional model.
|
||||
|
||||
The abstract from the paper is:
|
||||
|
||||
*There is large consent that successful training of deep networks requires many thousand annotated training samples. In this paper, we present a network and training strategy that relies on the strong use of data augmentation to use the available annotated samples more efficiently. The architecture consists of a contracting path to capture context and a symmetric expanding path that enables precise localization. We show that such a network can be trained end-to-end from very few images and outperforms the prior best method (a sliding-window convolutional network) on the ISBI challenge for segmentation of neuronal structures in electron microscopic stacks. Using the same network trained on transmitted light microscopy images (phase contrast and DIC) we won the ISBI cell tracking challenge 2015 in these categories by a large margin. Moreover, the network is fast. Segmentation of a 512x512 image takes less than a second on a recent GPU. The full implementation (based on Caffe) and the trained networks are available at http://lmb.informatik.uni-freiburg.de/people/ronneber/u-net.*
|
||||
|
||||
## UNet2DConditionModel
|
||||
[[autodoc]] UNet2DConditionModel
|
||||
|
||||
## UNet2DConditionOutput
|
||||
[[autodoc]] models.unet_2d_condition.UNet2DConditionOutput
|
||||
|
||||
## FlaxUNet2DConditionModel
|
||||
[[autodoc]] models.unet_2d_condition_flax.FlaxUNet2DConditionModel
|
||||
|
||||
## FlaxUNet2DConditionOutput
|
||||
[[autodoc]] models.unet_2d_condition_flax.FlaxUNet2DConditionOutput
|
||||
@@ -1,13 +0,0 @@
|
||||
# UNet2DModel
|
||||
|
||||
The [UNet](https://huggingface.co/papers/1505.04597) model was originally introduced by Ronneberger et al for biomedical image segmentation, but it is also commonly used in 🤗 Diffusers because it outputs images that are the same size as the input. It is one of the most important components of a diffusion system because it facilitates the actual diffusion process. There are several variants of the UNet model in 🤗 Diffusers, depending on it's number of dimensions and whether it is a conditional model or not. This is a 2D UNet model.
|
||||
|
||||
The abstract from the paper is:
|
||||
|
||||
*There is large consent that successful training of deep networks requires many thousand annotated training samples. In this paper, we present a network and training strategy that relies on the strong use of data augmentation to use the available annotated samples more efficiently. The architecture consists of a contracting path to capture context and a symmetric expanding path that enables precise localization. We show that such a network can be trained end-to-end from very few images and outperforms the prior best method (a sliding-window convolutional network) on the ISBI challenge for segmentation of neuronal structures in electron microscopic stacks. Using the same network trained on transmitted light microscopy images (phase contrast and DIC) we won the ISBI cell tracking challenge 2015 in these categories by a large margin. Moreover, the network is fast. Segmentation of a 512x512 image takes less than a second on a recent GPU. The full implementation (based on Caffe) and the trained networks are available at http://lmb.informatik.uni-freiburg.de/people/ronneber/u-net.*
|
||||
|
||||
## UNet2DModel
|
||||
[[autodoc]] UNet2DModel
|
||||
|
||||
## UNet2DOutput
|
||||
[[autodoc]] models.unet_2d.UNet2DOutput
|
||||
@@ -1,13 +0,0 @@
|
||||
# UNet3DConditionModel
|
||||
|
||||
The [UNet](https://huggingface.co/papers/1505.04597) model was originally introduced by Ronneberger et al for biomedical image segmentation, but it is also commonly used in 🤗 Diffusers because it outputs images that are the same size as the input. It is one of the most important components of a diffusion system because it facilitates the actual diffusion process. There are several variants of the UNet model in 🤗 Diffusers, depending on it's number of dimensions and whether it is a conditional model or not. This is a 3D UNet conditional model.
|
||||
|
||||
The abstract from the paper is:
|
||||
|
||||
*There is large consent that successful training of deep networks requires many thousand annotated training samples. In this paper, we present a network and training strategy that relies on the strong use of data augmentation to use the available annotated samples more efficiently. The architecture consists of a contracting path to capture context and a symmetric expanding path that enables precise localization. We show that such a network can be trained end-to-end from very few images and outperforms the prior best method (a sliding-window convolutional network) on the ISBI challenge for segmentation of neuronal structures in electron microscopic stacks. Using the same network trained on transmitted light microscopy images (phase contrast and DIC) we won the ISBI cell tracking challenge 2015 in these categories by a large margin. Moreover, the network is fast. Segmentation of a 512x512 image takes less than a second on a recent GPU. The full implementation (based on Caffe) and the trained networks are available at http://lmb.informatik.uni-freiburg.de/people/ronneber/u-net.*
|
||||
|
||||
## UNet3DConditionModel
|
||||
[[autodoc]] UNet3DConditionModel
|
||||
|
||||
## UNet3DConditionOutput
|
||||
[[autodoc]] models.unet_3d_condition.UNet3DConditionOutput
|
||||
@@ -1,15 +0,0 @@
|
||||
# VQModel
|
||||
|
||||
The VQ-VAE model was introduced in [Neural Discrete Representation Learning](https://huggingface.co/papers/1711.00937) by Aaron van den Oord, Oriol Vinyals and Koray Kavukcuoglu. The model is used in 🤗 Diffusers to decode latent representations into images. Unlike [`AutoencoderKL`], the [`VQModel`] works in a quantized latent space.
|
||||
|
||||
The abstract from the paper is:
|
||||
|
||||
*Learning useful representations without supervision remains a key challenge in machine learning. In this paper, we propose a simple yet powerful generative model that learns such discrete representations. Our model, the Vector Quantised-Variational AutoEncoder (VQ-VAE), differs from VAEs in two key ways: the encoder network outputs discrete, rather than continuous, codes; and the prior is learnt rather than static. In order to learn a discrete latent representation, we incorporate ideas from vector quantisation (VQ). Using the VQ method allows the model to circumvent issues of "posterior collapse" -- where the latents are ignored when they are paired with a powerful autoregressive decoder -- typically observed in the VAE framework. Pairing these representations with an autoregressive prior, the model can generate high quality images, videos, and speech as well as doing high quality speaker conversion and unsupervised learning of phonemes, providing further evidence of the utility of the learnt representations.*
|
||||
|
||||
## VQModel
|
||||
|
||||
[[autodoc]] VQModel
|
||||
|
||||
## VQEncoderOutput
|
||||
|
||||
[[autodoc]] models.vq_model.VQEncoderOutput
|
||||
@@ -10,11 +10,13 @@ an "AS IS" BASIS, WITHOUT WARRANTIES OR CONDITIONS OF ANY KIND, either express o
|
||||
specific language governing permissions and limitations under the License.
|
||||
-->
|
||||
|
||||
# Outputs
|
||||
# BaseOutputs
|
||||
|
||||
All models outputs are subclasses of [`~utils.BaseOutput`], data structures containing all the information returned by the model. The outputs can also be used as tuples or dictionaries.
|
||||
All models have outputs that are instances of subclasses of [`~utils.BaseOutput`]. Those are
|
||||
data structures containing all the information returned by the model, but that can also be used as tuples or
|
||||
dictionaries.
|
||||
|
||||
For example:
|
||||
Let's see how this looks in an example:
|
||||
|
||||
```python
|
||||
from diffusers import DDIMPipeline
|
||||
@@ -23,45 +25,31 @@ pipeline = DDIMPipeline.from_pretrained("google/ddpm-cifar10-32")
|
||||
outputs = pipeline()
|
||||
```
|
||||
|
||||
The `outputs` object is a [`~pipelines.ImagePipelineOutput`] which means it has an image attribute.
|
||||
The `outputs` object is a [`~pipelines.ImagePipelineOutput`], as we can see in the
|
||||
documentation of that class below, it means it has an image attribute.
|
||||
|
||||
You can access each attribute as you normally would or with a keyword lookup, and if that attribute is not returned by the model, you will get `None`:
|
||||
You can access each attribute as you would usually do, and if that attribute has not been returned by the model, you will get `None`:
|
||||
|
||||
```python
|
||||
outputs.images
|
||||
```
|
||||
|
||||
or via keyword lookup
|
||||
|
||||
```python
|
||||
outputs["images"]
|
||||
```
|
||||
|
||||
When considering the `outputs` object as a tuple, it only considers the attributes that don't have `None` values.
|
||||
For instance, retrieving an image by indexing into it returns the tuple `(outputs.images)`:
|
||||
When considering our `outputs` object as tuple, it only considers the attributes that don't have `None` values.
|
||||
Here for instance, we could retrieve images via indexing:
|
||||
|
||||
```python
|
||||
outputs[:1]
|
||||
```
|
||||
|
||||
<Tip>
|
||||
|
||||
To check a specific pipeline or model output, refer to its corresponding API documentation.
|
||||
|
||||
</Tip>
|
||||
which will return the tuple `(outputs.images)` for instance.
|
||||
|
||||
## BaseOutput
|
||||
|
||||
[[autodoc]] utils.BaseOutput
|
||||
- to_tuple
|
||||
|
||||
## ImagePipelineOutput
|
||||
|
||||
[[autodoc]] pipelines.ImagePipelineOutput
|
||||
|
||||
## FlaxImagePipelineOutput
|
||||
|
||||
[[autodoc]] pipelines.pipeline_flax_utils.FlaxImagePipelineOutput
|
||||
|
||||
## AudioPipelineOutput
|
||||
|
||||
[[autodoc]] pipelines.AudioPipelineOutput
|
||||
|
||||
## ImageTextPipelineOutput
|
||||
|
||||
[[autodoc]] ImageTextPipelineOutput
|
||||
@@ -43,7 +43,7 @@ pipe = DiffusionPipeline.from_pretrained("teticio/audio-diffusion-256").to(devic
|
||||
|
||||
output = pipe()
|
||||
display(output.images[0])
|
||||
display(Audio(output.audios[0], rate=pipe.mel.get_sample_rate()))
|
||||
display(Audio(output.audios[0], rate=mel.get_sample_rate()))
|
||||
```
|
||||
|
||||
### Latent Audio Diffusion
|
||||
|
||||
@@ -25,14 +25,14 @@ This pipeline was contributed by [sanchit-gandhi](https://huggingface.co/sanchit
|
||||
|
||||
## Text-to-Audio
|
||||
|
||||
The [`AudioLDMPipeline`] can be used to load pre-trained weights from [cvssp/audioldm-s-full-v2](https://huggingface.co/cvssp/audioldm-s-full-v2) and generate text-conditional audio outputs:
|
||||
The [`AudioLDMPipeline`] can be used to load pre-trained weights from [cvssp/audioldm](https://huggingface.co/cvssp/audioldm) and generate text-conditional audio outputs:
|
||||
|
||||
```python
|
||||
from diffusers import AudioLDMPipeline
|
||||
import torch
|
||||
import scipy
|
||||
|
||||
repo_id = "cvssp/audioldm-s-full-v2"
|
||||
repo_id = "cvssp/audioldm"
|
||||
pipe = AudioLDMPipeline.from_pretrained(repo_id, torch_dtype=torch.float16)
|
||||
pipe = pipe.to("cuda")
|
||||
|
||||
@@ -56,7 +56,7 @@ Inference:
|
||||
### How to load and use different schedulers
|
||||
|
||||
The AudioLDM pipeline uses [`DDIMScheduler`] scheduler by default. But `diffusers` provides many other schedulers
|
||||
that can be used with the AudioLDM pipeline such as [`PNDMScheduler`], [`LMSDiscreteScheduler`], [`EulerDiscreteScheduler`],
|
||||
that can be used with the AudioLDM pipeline such as [`PNDMScheduler`], [`LMSDiscreteScheduler`], [`EulerDiscreteScheduler`],
|
||||
[`EulerAncestralDiscreteScheduler`] etc. We recommend using the [`DPMSolverMultistepScheduler`] as it's currently the fastest
|
||||
scheduler there is.
|
||||
|
||||
@@ -68,14 +68,12 @@ method, or pass the `scheduler` argument to the `from_pretrained` method of the
|
||||
>>> from diffusers import AudioLDMPipeline, DPMSolverMultistepScheduler
|
||||
>>> import torch
|
||||
|
||||
>>> pipeline = AudioLDMPipeline.from_pretrained("cvssp/audioldm-s-full-v2", torch_dtype=torch.float16)
|
||||
>>> pipeline = AudioLDMPipeline.from_pretrained("cvssp/audioldm", torch_dtype=torch.float16)
|
||||
>>> pipeline.scheduler = DPMSolverMultistepScheduler.from_config(pipeline.scheduler.config)
|
||||
|
||||
>>> # or
|
||||
>>> dpm_scheduler = DPMSolverMultistepScheduler.from_pretrained("cvssp/audioldm-s-full-v2", subfolder="scheduler")
|
||||
>>> pipeline = AudioLDMPipeline.from_pretrained(
|
||||
... "cvssp/audioldm-s-full-v2", scheduler=dpm_scheduler, torch_dtype=torch.float16
|
||||
... )
|
||||
>>> dpm_scheduler = DPMSolverMultistepScheduler.from_pretrained("cvssp/audioldm", subfolder="scheduler")
|
||||
>>> pipeline = AudioLDMPipeline.from_pretrained("cvssp/audioldm", scheduler=dpm_scheduler, torch_dtype=torch.float16)
|
||||
```
|
||||
|
||||
## AudioLDMPipeline
|
||||
|
||||
@@ -1,87 +0,0 @@
|
||||
# Consistency Models
|
||||
|
||||
Consistency Models were proposed in [Consistency Models](https://arxiv.org/abs/2303.01469) by Yang Song, Prafulla Dhariwal, Mark Chen, and Ilya Sutskever.
|
||||
|
||||
The abstract of the [paper](https://arxiv.org/pdf/2303.01469.pdf) is as follows:
|
||||
|
||||
*Diffusion models have significantly advanced the fields of image, audio, and video generation, but they depend on an iterative sampling process that causes slow generation. To overcome this limitation, we propose consistency models, a new family of models that generate high quality samples by directly mapping noise to data. They support fast one-step generation by design, while still allowing multistep sampling to trade compute for sample quality. They also support zero-shot data editing, such as image inpainting, colorization, and super-resolution, without requiring explicit training on these tasks. Consistency models can be trained either by distilling pre-trained diffusion models, or as standalone generative models altogether. Through extensive experiments, we demonstrate that they outperform existing distillation techniques for diffusion models in one- and few-step sampling, achieving the new state-of-the-art FID of 3.55 on CIFAR-10 and 6.20 on ImageNet 64x64 for one-step generation. When trained in isolation, consistency models become a new family of generative models that can outperform existing one-step, non-adversarial generative models on standard benchmarks such as CIFAR-10, ImageNet 64x64 and LSUN 256x256. *
|
||||
|
||||
Resources:
|
||||
|
||||
* [Paper](https://arxiv.org/abs/2303.01469)
|
||||
* [Original Code](https://github.com/openai/consistency_models)
|
||||
|
||||
Available Checkpoints are:
|
||||
- *cd_imagenet64_l2 (64x64 resolution)* [openai/consistency-model-pipelines](https://huggingface.co/openai/diffusers-cd_imagenet64_l2)
|
||||
- *cd_imagenet64_lpips (64x64 resolution)* [openai/diffusers-cd_imagenet64_lpips](https://huggingface.co/openai/diffusers-cd_imagenet64_lpips)
|
||||
- *ct_imagenet64 (64x64 resolution)* [openai/diffusers-ct_imagenet64](https://huggingface.co/openai/diffusers-ct_imagenet64)
|
||||
- *cd_bedroom256_l2 (256x256 resolution)* [openai/diffusers-cd_bedroom256_l2](https://huggingface.co/openai/diffusers-cd_bedroom256_l2)
|
||||
- *cd_bedroom256_lpips (256x256 resolution)* [openai/diffusers-cd_bedroom256_lpips](https://huggingface.co/openai/diffusers-cd_bedroom256_lpips)
|
||||
- *ct_bedroom256 (256x256 resolution)* [openai/diffusers-ct_bedroom256](https://huggingface.co/openai/diffusers-ct_bedroom256)
|
||||
- *cd_cat256_l2 (256x256 resolution)* [openai/diffusers-cd_cat256_l2](https://huggingface.co/openai/diffusers-cd_cat256_l2)
|
||||
- *cd_cat256_lpips (256x256 resolution)* [openai/diffusers-cd_cat256_lpips](https://huggingface.co/openai/diffusers-cd_cat256_lpips)
|
||||
- *ct_cat256 (256x256 resolution)* [openai/diffusers-ct_cat256](https://huggingface.co/openai/diffusers-ct_cat256)
|
||||
|
||||
## Available Pipelines
|
||||
|
||||
| Pipeline | Tasks | Demo | Colab |
|
||||
|:---:|:---:|:---:|:---:|
|
||||
| [ConsistencyModelPipeline](https://github.com/huggingface/diffusers/blob/main/src/diffusers/pipelines/pipeline_consistency_models.py) | *Unconditional Image Generation* | | |
|
||||
|
||||
This pipeline was contributed by our community members [dg845](https://github.com/dg845) and [ayushtues](https://huggingface.co/ayushtues) ❤️
|
||||
|
||||
## Usage Example
|
||||
|
||||
```python
|
||||
import torch
|
||||
|
||||
from diffusers import ConsistencyModelPipeline
|
||||
|
||||
device = "cuda"
|
||||
# Load the cd_imagenet64_l2 checkpoint.
|
||||
model_id_or_path = "openai/diffusers-cd_imagenet64_l2"
|
||||
pipe = ConsistencyModelPipeline.from_pretrained(model_id_or_path, torch_dtype=torch.float16)
|
||||
pipe.to(device)
|
||||
|
||||
# Onestep Sampling
|
||||
image = pipe(num_inference_steps=1).images[0]
|
||||
image.save("consistency_model_onestep_sample.png")
|
||||
|
||||
# Onestep sampling, class-conditional image generation
|
||||
# ImageNet-64 class label 145 corresponds to king penguins
|
||||
image = pipe(num_inference_steps=1, class_labels=145).images[0]
|
||||
image.save("consistency_model_onestep_sample_penguin.png")
|
||||
|
||||
# Multistep sampling, class-conditional image generation
|
||||
# Timesteps can be explicitly specified; the particular timesteps below are from the original Github repo.
|
||||
# https://github.com/openai/consistency_models/blob/main/scripts/launch.sh#L77
|
||||
image = pipe(timesteps=[22, 0], class_labels=145).images[0]
|
||||
image.save("consistency_model_multistep_sample_penguin.png")
|
||||
```
|
||||
|
||||
For an additional speed-up, one can also make use of `torch.compile`. Multiple images can be generated in <1 second as follows:
|
||||
|
||||
```py
|
||||
import torch
|
||||
from diffusers import ConsistencyModelPipeline
|
||||
|
||||
device = "cuda"
|
||||
# Load the cd_bedroom256_lpips checkpoint.
|
||||
model_id_or_path = "openai/diffusers-cd_bedroom256_lpips"
|
||||
pipe = ConsistencyModelPipeline.from_pretrained(model_id_or_path, torch_dtype=torch.float16)
|
||||
pipe.to(device)
|
||||
|
||||
pipe.unet = torch.compile(pipe.unet, mode="reduce-overhead", fullgraph=True)
|
||||
|
||||
# Multistep sampling
|
||||
# Timesteps can be explicitly specified; the particular timesteps below are from the original Github repo:
|
||||
# https://github.com/openai/consistency_models/blob/main/scripts/launch.sh#L83
|
||||
for _ in range(10):
|
||||
image = pipe(timesteps=[17, 0]).images[0]
|
||||
image.show()
|
||||
```
|
||||
|
||||
## ConsistencyModelPipeline
|
||||
[[autodoc]] ConsistencyModelPipeline
|
||||
- all
|
||||
- __call__
|
||||
@@ -1,523 +0,0 @@
|
||||
<!--Copyright 2023 The HuggingFace Team. All rights reserved.
|
||||
|
||||
Licensed under the Apache License, Version 2.0 (the "License"); you may not use this file except in compliance with
|
||||
the License. You may obtain a copy of the License at
|
||||
|
||||
http://www.apache.org/licenses/LICENSE-2.0
|
||||
|
||||
Unless required by applicable law or agreed to in writing, software distributed under the License is distributed on
|
||||
an "AS IS" BASIS, WITHOUT WARRANTIES OR CONDITIONS OF ANY KIND, either express or implied. See the License for the
|
||||
specific language governing permissions and limitations under the License.
|
||||
-->
|
||||
|
||||
# DeepFloyd IF
|
||||
|
||||
## Overview
|
||||
|
||||
DeepFloyd IF is a novel state-of-the-art open-source text-to-image model with a high degree of photorealism and language understanding.
|
||||
The model is a modular composed of a frozen text encoder and three cascaded pixel diffusion modules:
|
||||
- Stage 1: a base model that generates 64x64 px image based on text prompt,
|
||||
- Stage 2: a 64x64 px => 256x256 px super-resolution model, and a
|
||||
- Stage 3: a 256x256 px => 1024x1024 px super-resolution model
|
||||
Stage 1 and Stage 2 utilize a frozen text encoder based on the T5 transformer to extract text embeddings,
|
||||
which are then fed into a UNet architecture enhanced with cross-attention and attention pooling.
|
||||
Stage 3 is [Stability's x4 Upscaling model](https://huggingface.co/stabilityai/stable-diffusion-x4-upscaler).
|
||||
The result is a highly efficient model that outperforms current state-of-the-art models, achieving a zero-shot FID score of 6.66 on the COCO dataset.
|
||||
Our work underscores the potential of larger UNet architectures in the first stage of cascaded diffusion models and depicts a promising future for text-to-image synthesis.
|
||||
|
||||
## Usage
|
||||
|
||||
Before you can use IF, you need to accept its usage conditions. To do so:
|
||||
1. Make sure to have a [Hugging Face account](https://huggingface.co/join) and be logged in
|
||||
2. Accept the license on the model card of [DeepFloyd/IF-I-XL-v1.0](https://huggingface.co/DeepFloyd/IF-I-XL-v1.0). Accepting the license on the stage I model card will auto accept for the other IF models.
|
||||
3. Make sure to login locally. Install `huggingface_hub`
|
||||
```sh
|
||||
pip install huggingface_hub --upgrade
|
||||
```
|
||||
|
||||
run the login function in a Python shell
|
||||
|
||||
```py
|
||||
from huggingface_hub import login
|
||||
|
||||
login()
|
||||
```
|
||||
|
||||
and enter your [Hugging Face Hub access token](https://huggingface.co/docs/hub/security-tokens#what-are-user-access-tokens).
|
||||
|
||||
Next we install `diffusers` and dependencies:
|
||||
|
||||
```sh
|
||||
pip install diffusers accelerate transformers safetensors
|
||||
```
|
||||
|
||||
The following sections give more in-detail examples of how to use IF. Specifically:
|
||||
|
||||
- [Text-to-Image Generation](#text-to-image-generation)
|
||||
- [Image-to-Image Generation](#text-guided-image-to-image-generation)
|
||||
- [Inpainting](#text-guided-inpainting-generation)
|
||||
- [Reusing model weights](#converting-between-different-pipelines)
|
||||
- [Speed optimization](#optimizing-for-speed)
|
||||
- [Memory optimization](#optimizing-for-memory)
|
||||
|
||||
**Available checkpoints**
|
||||
- *Stage-1*
|
||||
- [DeepFloyd/IF-I-XL-v1.0](https://huggingface.co/DeepFloyd/IF-I-XL-v1.0)
|
||||
- [DeepFloyd/IF-I-L-v1.0](https://huggingface.co/DeepFloyd/IF-I-L-v1.0)
|
||||
- [DeepFloyd/IF-I-M-v1.0](https://huggingface.co/DeepFloyd/IF-I-M-v1.0)
|
||||
|
||||
- *Stage-2*
|
||||
- [DeepFloyd/IF-II-L-v1.0](https://huggingface.co/DeepFloyd/IF-II-L-v1.0)
|
||||
- [DeepFloyd/IF-II-M-v1.0](https://huggingface.co/DeepFloyd/IF-II-M-v1.0)
|
||||
|
||||
- *Stage-3*
|
||||
- [stabilityai/stable-diffusion-x4-upscaler](https://huggingface.co/stabilityai/stable-diffusion-x4-upscaler)
|
||||
|
||||
**Demo**
|
||||
[](https://huggingface.co/spaces/DeepFloyd/IF)
|
||||
|
||||
**Google Colab**
|
||||
[](https://colab.research.google.com/github/huggingface/notebooks/blob/main/diffusers/deepfloyd_if_free_tier_google_colab.ipynb)
|
||||
|
||||
### Text-to-Image Generation
|
||||
|
||||
By default diffusers makes use of [model cpu offloading](https://huggingface.co/docs/diffusers/optimization/fp16#model-offloading-for-fast-inference-and-memory-savings)
|
||||
to run the whole IF pipeline with as little as 14 GB of VRAM.
|
||||
|
||||
```python
|
||||
from diffusers import DiffusionPipeline
|
||||
from diffusers.utils import pt_to_pil
|
||||
import torch
|
||||
|
||||
# stage 1
|
||||
stage_1 = DiffusionPipeline.from_pretrained("DeepFloyd/IF-I-XL-v1.0", variant="fp16", torch_dtype=torch.float16)
|
||||
stage_1.enable_model_cpu_offload()
|
||||
|
||||
# stage 2
|
||||
stage_2 = DiffusionPipeline.from_pretrained(
|
||||
"DeepFloyd/IF-II-L-v1.0", text_encoder=None, variant="fp16", torch_dtype=torch.float16
|
||||
)
|
||||
stage_2.enable_model_cpu_offload()
|
||||
|
||||
# stage 3
|
||||
safety_modules = {
|
||||
"feature_extractor": stage_1.feature_extractor,
|
||||
"safety_checker": stage_1.safety_checker,
|
||||
"watermarker": stage_1.watermarker,
|
||||
}
|
||||
stage_3 = DiffusionPipeline.from_pretrained(
|
||||
"stabilityai/stable-diffusion-x4-upscaler", **safety_modules, torch_dtype=torch.float16
|
||||
)
|
||||
stage_3.enable_model_cpu_offload()
|
||||
|
||||
prompt = 'a photo of a kangaroo wearing an orange hoodie and blue sunglasses standing in front of the eiffel tower holding a sign that says "very deep learning"'
|
||||
generator = torch.manual_seed(1)
|
||||
|
||||
# text embeds
|
||||
prompt_embeds, negative_embeds = stage_1.encode_prompt(prompt)
|
||||
|
||||
# stage 1
|
||||
image = stage_1(
|
||||
prompt_embeds=prompt_embeds, negative_prompt_embeds=negative_embeds, generator=generator, output_type="pt"
|
||||
).images
|
||||
pt_to_pil(image)[0].save("./if_stage_I.png")
|
||||
|
||||
# stage 2
|
||||
image = stage_2(
|
||||
image=image,
|
||||
prompt_embeds=prompt_embeds,
|
||||
negative_prompt_embeds=negative_embeds,
|
||||
generator=generator,
|
||||
output_type="pt",
|
||||
).images
|
||||
pt_to_pil(image)[0].save("./if_stage_II.png")
|
||||
|
||||
# stage 3
|
||||
image = stage_3(prompt=prompt, image=image, noise_level=100, generator=generator).images
|
||||
image[0].save("./if_stage_III.png")
|
||||
```
|
||||
|
||||
### Text Guided Image-to-Image Generation
|
||||
|
||||
The same IF model weights can be used for text-guided image-to-image translation or image variation.
|
||||
In this case just make sure to load the weights using the [`IFInpaintingPipeline`] and [`IFInpaintingSuperResolutionPipeline`] pipelines.
|
||||
|
||||
**Note**: You can also directly move the weights of the text-to-image pipelines to the image-to-image pipelines
|
||||
without loading them twice by making use of the [`~DiffusionPipeline.components()`] function as explained [here](#converting-between-different-pipelines).
|
||||
|
||||
```python
|
||||
from diffusers import IFImg2ImgPipeline, IFImg2ImgSuperResolutionPipeline, DiffusionPipeline
|
||||
from diffusers.utils import pt_to_pil
|
||||
|
||||
import torch
|
||||
|
||||
from PIL import Image
|
||||
import requests
|
||||
from io import BytesIO
|
||||
|
||||
# download image
|
||||
url = "https://raw.githubusercontent.com/CompVis/stable-diffusion/main/assets/stable-samples/img2img/sketch-mountains-input.jpg"
|
||||
response = requests.get(url)
|
||||
original_image = Image.open(BytesIO(response.content)).convert("RGB")
|
||||
original_image = original_image.resize((768, 512))
|
||||
|
||||
# stage 1
|
||||
stage_1 = IFImg2ImgPipeline.from_pretrained("DeepFloyd/IF-I-XL-v1.0", variant="fp16", torch_dtype=torch.float16)
|
||||
stage_1.enable_model_cpu_offload()
|
||||
|
||||
# stage 2
|
||||
stage_2 = IFImg2ImgSuperResolutionPipeline.from_pretrained(
|
||||
"DeepFloyd/IF-II-L-v1.0", text_encoder=None, variant="fp16", torch_dtype=torch.float16
|
||||
)
|
||||
stage_2.enable_model_cpu_offload()
|
||||
|
||||
# stage 3
|
||||
safety_modules = {
|
||||
"feature_extractor": stage_1.feature_extractor,
|
||||
"safety_checker": stage_1.safety_checker,
|
||||
"watermarker": stage_1.watermarker,
|
||||
}
|
||||
stage_3 = DiffusionPipeline.from_pretrained(
|
||||
"stabilityai/stable-diffusion-x4-upscaler", **safety_modules, torch_dtype=torch.float16
|
||||
)
|
||||
stage_3.enable_model_cpu_offload()
|
||||
|
||||
prompt = "A fantasy landscape in style minecraft"
|
||||
generator = torch.manual_seed(1)
|
||||
|
||||
# text embeds
|
||||
prompt_embeds, negative_embeds = stage_1.encode_prompt(prompt)
|
||||
|
||||
# stage 1
|
||||
image = stage_1(
|
||||
image=original_image,
|
||||
prompt_embeds=prompt_embeds,
|
||||
negative_prompt_embeds=negative_embeds,
|
||||
generator=generator,
|
||||
output_type="pt",
|
||||
).images
|
||||
pt_to_pil(image)[0].save("./if_stage_I.png")
|
||||
|
||||
# stage 2
|
||||
image = stage_2(
|
||||
image=image,
|
||||
original_image=original_image,
|
||||
prompt_embeds=prompt_embeds,
|
||||
negative_prompt_embeds=negative_embeds,
|
||||
generator=generator,
|
||||
output_type="pt",
|
||||
).images
|
||||
pt_to_pil(image)[0].save("./if_stage_II.png")
|
||||
|
||||
# stage 3
|
||||
image = stage_3(prompt=prompt, image=image, generator=generator, noise_level=100).images
|
||||
image[0].save("./if_stage_III.png")
|
||||
```
|
||||
|
||||
### Text Guided Inpainting Generation
|
||||
|
||||
The same IF model weights can be used for text-guided image-to-image translation or image variation.
|
||||
In this case just make sure to load the weights using the [`IFInpaintingPipeline`] and [`IFInpaintingSuperResolutionPipeline`] pipelines.
|
||||
|
||||
**Note**: You can also directly move the weights of the text-to-image pipelines to the image-to-image pipelines
|
||||
without loading them twice by making use of the [`~DiffusionPipeline.components()`] function as explained [here](#converting-between-different-pipelines).
|
||||
|
||||
```python
|
||||
from diffusers import IFInpaintingPipeline, IFInpaintingSuperResolutionPipeline, DiffusionPipeline
|
||||
from diffusers.utils import pt_to_pil
|
||||
import torch
|
||||
|
||||
from PIL import Image
|
||||
import requests
|
||||
from io import BytesIO
|
||||
|
||||
# download image
|
||||
url = "https://huggingface.co/datasets/diffusers/docs-images/resolve/main/if/person.png"
|
||||
response = requests.get(url)
|
||||
original_image = Image.open(BytesIO(response.content)).convert("RGB")
|
||||
original_image = original_image
|
||||
|
||||
# download mask
|
||||
url = "https://huggingface.co/datasets/diffusers/docs-images/resolve/main/if/glasses_mask.png"
|
||||
response = requests.get(url)
|
||||
mask_image = Image.open(BytesIO(response.content))
|
||||
mask_image = mask_image
|
||||
|
||||
# stage 1
|
||||
stage_1 = IFInpaintingPipeline.from_pretrained("DeepFloyd/IF-I-XL-v1.0", variant="fp16", torch_dtype=torch.float16)
|
||||
stage_1.enable_model_cpu_offload()
|
||||
|
||||
# stage 2
|
||||
stage_2 = IFInpaintingSuperResolutionPipeline.from_pretrained(
|
||||
"DeepFloyd/IF-II-L-v1.0", text_encoder=None, variant="fp16", torch_dtype=torch.float16
|
||||
)
|
||||
stage_2.enable_model_cpu_offload()
|
||||
|
||||
# stage 3
|
||||
safety_modules = {
|
||||
"feature_extractor": stage_1.feature_extractor,
|
||||
"safety_checker": stage_1.safety_checker,
|
||||
"watermarker": stage_1.watermarker,
|
||||
}
|
||||
stage_3 = DiffusionPipeline.from_pretrained(
|
||||
"stabilityai/stable-diffusion-x4-upscaler", **safety_modules, torch_dtype=torch.float16
|
||||
)
|
||||
stage_3.enable_model_cpu_offload()
|
||||
|
||||
prompt = "blue sunglasses"
|
||||
generator = torch.manual_seed(1)
|
||||
|
||||
# text embeds
|
||||
prompt_embeds, negative_embeds = stage_1.encode_prompt(prompt)
|
||||
|
||||
# stage 1
|
||||
image = stage_1(
|
||||
image=original_image,
|
||||
mask_image=mask_image,
|
||||
prompt_embeds=prompt_embeds,
|
||||
negative_prompt_embeds=negative_embeds,
|
||||
generator=generator,
|
||||
output_type="pt",
|
||||
).images
|
||||
pt_to_pil(image)[0].save("./if_stage_I.png")
|
||||
|
||||
# stage 2
|
||||
image = stage_2(
|
||||
image=image,
|
||||
original_image=original_image,
|
||||
mask_image=mask_image,
|
||||
prompt_embeds=prompt_embeds,
|
||||
negative_prompt_embeds=negative_embeds,
|
||||
generator=generator,
|
||||
output_type="pt",
|
||||
).images
|
||||
pt_to_pil(image)[0].save("./if_stage_II.png")
|
||||
|
||||
# stage 3
|
||||
image = stage_3(prompt=prompt, image=image, generator=generator, noise_level=100).images
|
||||
image[0].save("./if_stage_III.png")
|
||||
```
|
||||
|
||||
### Converting between different pipelines
|
||||
|
||||
In addition to being loaded with `from_pretrained`, Pipelines can also be loaded directly from each other.
|
||||
|
||||
```python
|
||||
from diffusers import IFPipeline, IFSuperResolutionPipeline
|
||||
|
||||
pipe_1 = IFPipeline.from_pretrained("DeepFloyd/IF-I-XL-v1.0")
|
||||
pipe_2 = IFSuperResolutionPipeline.from_pretrained("DeepFloyd/IF-II-L-v1.0")
|
||||
|
||||
|
||||
from diffusers import IFImg2ImgPipeline, IFImg2ImgSuperResolutionPipeline
|
||||
|
||||
pipe_1 = IFImg2ImgPipeline(**pipe_1.components)
|
||||
pipe_2 = IFImg2ImgSuperResolutionPipeline(**pipe_2.components)
|
||||
|
||||
|
||||
from diffusers import IFInpaintingPipeline, IFInpaintingSuperResolutionPipeline
|
||||
|
||||
pipe_1 = IFInpaintingPipeline(**pipe_1.components)
|
||||
pipe_2 = IFInpaintingSuperResolutionPipeline(**pipe_2.components)
|
||||
```
|
||||
|
||||
### Optimizing for speed
|
||||
|
||||
The simplest optimization to run IF faster is to move all model components to the GPU.
|
||||
|
||||
```py
|
||||
pipe = DiffusionPipeline.from_pretrained("DeepFloyd/IF-I-XL-v1.0", variant="fp16", torch_dtype=torch.float16)
|
||||
pipe.to("cuda")
|
||||
```
|
||||
|
||||
You can also run the diffusion process for a shorter number of timesteps.
|
||||
|
||||
This can either be done with the `num_inference_steps` argument
|
||||
|
||||
```py
|
||||
pipe("<prompt>", num_inference_steps=30)
|
||||
```
|
||||
|
||||
Or with the `timesteps` argument
|
||||
|
||||
```py
|
||||
from diffusers.pipelines.deepfloyd_if import fast27_timesteps
|
||||
|
||||
pipe("<prompt>", timesteps=fast27_timesteps)
|
||||
```
|
||||
|
||||
When doing image variation or inpainting, you can also decrease the number of timesteps
|
||||
with the strength argument. The strength argument is the amount of noise to add to
|
||||
the input image which also determines how many steps to run in the denoising process.
|
||||
A smaller number will vary the image less but run faster.
|
||||
|
||||
```py
|
||||
pipe = IFImg2ImgPipeline.from_pretrained("DeepFloyd/IF-I-XL-v1.0", variant="fp16", torch_dtype=torch.float16)
|
||||
pipe.to("cuda")
|
||||
|
||||
image = pipe(image=image, prompt="<prompt>", strength=0.3).images
|
||||
```
|
||||
|
||||
You can also use [`torch.compile`](../../optimization/torch2.0). Note that we have not exhaustively tested `torch.compile`
|
||||
with IF and it might not give expected results.
|
||||
|
||||
```py
|
||||
import torch
|
||||
|
||||
pipe = DiffusionPipeline.from_pretrained("DeepFloyd/IF-I-XL-v1.0", variant="fp16", torch_dtype=torch.float16)
|
||||
pipe.to("cuda")
|
||||
|
||||
pipe.text_encoder = torch.compile(pipe.text_encoder)
|
||||
pipe.unet = torch.compile(pipe.unet)
|
||||
```
|
||||
|
||||
### Optimizing for memory
|
||||
|
||||
When optimizing for GPU memory, we can use the standard diffusers cpu offloading APIs.
|
||||
|
||||
Either the model based CPU offloading,
|
||||
|
||||
```py
|
||||
pipe = DiffusionPipeline.from_pretrained("DeepFloyd/IF-I-XL-v1.0", variant="fp16", torch_dtype=torch.float16)
|
||||
pipe.enable_model_cpu_offload()
|
||||
```
|
||||
|
||||
or the more aggressive layer based CPU offloading.
|
||||
|
||||
```py
|
||||
pipe = DiffusionPipeline.from_pretrained("DeepFloyd/IF-I-XL-v1.0", variant="fp16", torch_dtype=torch.float16)
|
||||
pipe.enable_sequential_cpu_offload()
|
||||
```
|
||||
|
||||
Additionally, T5 can be loaded in 8bit precision
|
||||
|
||||
```py
|
||||
from transformers import T5EncoderModel
|
||||
|
||||
text_encoder = T5EncoderModel.from_pretrained(
|
||||
"DeepFloyd/IF-I-XL-v1.0", subfolder="text_encoder", device_map="auto", load_in_8bit=True, variant="8bit"
|
||||
)
|
||||
|
||||
from diffusers import DiffusionPipeline
|
||||
|
||||
pipe = DiffusionPipeline.from_pretrained(
|
||||
"DeepFloyd/IF-I-XL-v1.0",
|
||||
text_encoder=text_encoder, # pass the previously instantiated 8bit text encoder
|
||||
unet=None,
|
||||
device_map="auto",
|
||||
)
|
||||
|
||||
prompt_embeds, negative_embeds = pipe.encode_prompt("<prompt>")
|
||||
```
|
||||
|
||||
For CPU RAM constrained machines like google colab free tier where we can't load all
|
||||
model components to the CPU at once, we can manually only load the pipeline with
|
||||
the text encoder or unet when the respective model components are needed.
|
||||
|
||||
```py
|
||||
from diffusers import IFPipeline, IFSuperResolutionPipeline
|
||||
import torch
|
||||
import gc
|
||||
from transformers import T5EncoderModel
|
||||
from diffusers.utils import pt_to_pil
|
||||
|
||||
text_encoder = T5EncoderModel.from_pretrained(
|
||||
"DeepFloyd/IF-I-XL-v1.0", subfolder="text_encoder", device_map="auto", load_in_8bit=True, variant="8bit"
|
||||
)
|
||||
|
||||
# text to image
|
||||
|
||||
pipe = DiffusionPipeline.from_pretrained(
|
||||
"DeepFloyd/IF-I-XL-v1.0",
|
||||
text_encoder=text_encoder, # pass the previously instantiated 8bit text encoder
|
||||
unet=None,
|
||||
device_map="auto",
|
||||
)
|
||||
|
||||
prompt = 'a photo of a kangaroo wearing an orange hoodie and blue sunglasses standing in front of the eiffel tower holding a sign that says "very deep learning"'
|
||||
prompt_embeds, negative_embeds = pipe.encode_prompt(prompt)
|
||||
|
||||
# Remove the pipeline so we can re-load the pipeline with the unet
|
||||
del text_encoder
|
||||
del pipe
|
||||
gc.collect()
|
||||
torch.cuda.empty_cache()
|
||||
|
||||
pipe = IFPipeline.from_pretrained(
|
||||
"DeepFloyd/IF-I-XL-v1.0", text_encoder=None, variant="fp16", torch_dtype=torch.float16, device_map="auto"
|
||||
)
|
||||
|
||||
generator = torch.Generator().manual_seed(0)
|
||||
image = pipe(
|
||||
prompt_embeds=prompt_embeds,
|
||||
negative_prompt_embeds=negative_embeds,
|
||||
output_type="pt",
|
||||
generator=generator,
|
||||
).images
|
||||
|
||||
pt_to_pil(image)[0].save("./if_stage_I.png")
|
||||
|
||||
# Remove the pipeline so we can load the super-resolution pipeline
|
||||
del pipe
|
||||
gc.collect()
|
||||
torch.cuda.empty_cache()
|
||||
|
||||
# First super resolution
|
||||
|
||||
pipe = IFSuperResolutionPipeline.from_pretrained(
|
||||
"DeepFloyd/IF-II-L-v1.0", text_encoder=None, variant="fp16", torch_dtype=torch.float16, device_map="auto"
|
||||
)
|
||||
|
||||
generator = torch.Generator().manual_seed(0)
|
||||
image = pipe(
|
||||
image=image,
|
||||
prompt_embeds=prompt_embeds,
|
||||
negative_prompt_embeds=negative_embeds,
|
||||
output_type="pt",
|
||||
generator=generator,
|
||||
).images
|
||||
|
||||
pt_to_pil(image)[0].save("./if_stage_II.png")
|
||||
```
|
||||
|
||||
|
||||
## Available Pipelines:
|
||||
|
||||
| Pipeline | Tasks | Colab
|
||||
|---|---|:---:|
|
||||
| [pipeline_if.py](https://github.com/huggingface/diffusers/blob/main/src/diffusers/pipelines/deepfloyd_if/pipeline_if.py) | *Text-to-Image Generation* | - |
|
||||
| [pipeline_if_superresolution.py](https://github.com/huggingface/diffusers/blob/main/src/diffusers/pipelines/deepfloyd_if/pipeline_if.py) | *Text-to-Image Generation* | - |
|
||||
| [pipeline_if_img2img.py](https://github.com/huggingface/diffusers/blob/main/src/diffusers/pipelines/deepfloyd_if/pipeline_if_img2img.py) | *Image-to-Image Generation* | - |
|
||||
| [pipeline_if_img2img_superresolution.py](https://github.com/huggingface/diffusers/blob/main/src/diffusers/pipelines/deepfloyd_if/pipeline_if_img2img_superresolution.py) | *Image-to-Image Generation* | - |
|
||||
| [pipeline_if_inpainting.py](https://github.com/huggingface/diffusers/blob/main/src/diffusers/pipelines/deepfloyd_if/pipeline_if_inpainting.py) | *Image-to-Image Generation* | - |
|
||||
| [pipeline_if_inpainting_superresolution.py](https://github.com/huggingface/diffusers/blob/main/src/diffusers/pipelines/deepfloyd_if/pipeline_if_inpainting_superresolution.py) | *Image-to-Image Generation* | - |
|
||||
|
||||
## IFPipeline
|
||||
[[autodoc]] IFPipeline
|
||||
- all
|
||||
- __call__
|
||||
|
||||
## IFSuperResolutionPipeline
|
||||
[[autodoc]] IFSuperResolutionPipeline
|
||||
- all
|
||||
- __call__
|
||||
|
||||
## IFImg2ImgPipeline
|
||||
[[autodoc]] IFImg2ImgPipeline
|
||||
- all
|
||||
- __call__
|
||||
|
||||
## IFImg2ImgSuperResolutionPipeline
|
||||
[[autodoc]] IFImg2ImgSuperResolutionPipeline
|
||||
- all
|
||||
- __call__
|
||||
|
||||
## IFInpaintingPipeline
|
||||
[[autodoc]] IFInpaintingPipeline
|
||||
- all
|
||||
- __call__
|
||||
|
||||
## IFInpaintingSuperResolutionPipeline
|
||||
[[autodoc]] IFInpaintingSuperResolutionPipeline
|
||||
- all
|
||||
- __call__
|
||||
@@ -1,360 +0,0 @@
|
||||
<!--Copyright 2023 The HuggingFace Team. All rights reserved.
|
||||
|
||||
Licensed under the Apache License, Version 2.0 (the "License"); you may not use this file except in compliance with
|
||||
the License. You may obtain a copy of the License at
|
||||
|
||||
http://www.apache.org/licenses/LICENSE-2.0
|
||||
|
||||
Unless required by applicable law or agreed to in writing, software distributed under the License is distributed on
|
||||
an "AS IS" BASIS, WITHOUT WARRANTIES OR CONDITIONS OF ANY KIND, either express or implied. See the License for the
|
||||
specific language governing permissions and limitations under the License.
|
||||
-->
|
||||
|
||||
# Zero-shot Diffusion-based Semantic Image Editing with Mask Guidance
|
||||
|
||||
## Overview
|
||||
|
||||
[DiffEdit: Diffusion-based semantic image editing with mask guidance](https://arxiv.org/abs/2210.11427) by Guillaume Couairon, Jakob Verbeek, Holger Schwenk, and Matthieu Cord.
|
||||
|
||||
The abstract of the paper is the following:
|
||||
|
||||
*Image generation has recently seen tremendous advances, with diffusion models allowing to synthesize convincing images for a large variety of text prompts. In this article, we propose DiffEdit, a method to take advantage of text-conditioned diffusion models for the task of semantic image editing, where the goal is to edit an image based on a text query. Semantic image editing is an extension of image generation, with the additional constraint that the generated image should be as similar as possible to a given input image. Current editing methods based on diffusion models usually require to provide a mask, making the task much easier by treating it as a conditional inpainting task. In contrast, our main contribution is able to automatically generate a mask highlighting regions of the input image that need to be edited, by contrasting predictions of a diffusion model conditioned on different text prompts. Moreover, we rely on latent inference to preserve content in those regions of interest and show excellent synergies with mask-based diffusion. DiffEdit achieves state-of-the-art editing performance on ImageNet. In addition, we evaluate semantic image editing in more challenging settings, using images from the COCO dataset as well as text-based generated images.*
|
||||
|
||||
Resources:
|
||||
|
||||
* [Paper](https://arxiv.org/abs/2210.11427).
|
||||
* [Blog Post with Demo](https://blog.problemsolversguild.com/technical/research/2022/11/02/DiffEdit-Implementation.html).
|
||||
* [Implementation on Github](https://github.com/Xiang-cd/DiffEdit-stable-diffusion/).
|
||||
|
||||
## Tips
|
||||
|
||||
* The pipeline can generate masks that can be fed into other inpainting pipelines. Check out the code examples below to know more.
|
||||
* In order to generate an image using this pipeline, both an image mask (manually specified or generated using `generate_mask`)
|
||||
and a set of partially inverted latents (generated using `invert`) _must_ be provided as arguments when calling the pipeline to generate the final edited image.
|
||||
Refer to the code examples below for more details.
|
||||
* The function `generate_mask` exposes two prompt arguments, `source_prompt` and `target_prompt`,
|
||||
that let you control the locations of the semantic edits in the final image to be generated. Let's say,
|
||||
you wanted to translate from "cat" to "dog". In this case, the edit direction will be "cat -> dog". To reflect
|
||||
this in the generated mask, you simply have to set the embeddings related to the phrases including "cat" to
|
||||
`source_prompt_embeds` and "dog" to `target_prompt_embeds`. Refer to the code example below for more details.
|
||||
* When generating partially inverted latents using `invert`, assign a caption or text embedding describing the
|
||||
overall image to the `prompt` argument to help guide the inverse latent sampling process. In most cases, the
|
||||
source concept is sufficently descriptive to yield good results, but feel free to explore alternatives.
|
||||
Please refer to [this code example](#generating-image-captions-for-inversion) for more details.
|
||||
* When calling the pipeline to generate the final edited image, assign the source concept to `negative_prompt`
|
||||
and the target concept to `prompt`. Taking the above example, you simply have to set the embeddings related to
|
||||
the phrases including "cat" to `negative_prompt_embeds` and "dog" to `prompt_embeds`. Refer to the code example
|
||||
below for more details.
|
||||
* If you wanted to reverse the direction in the example above, i.e., "dog -> cat", then it's recommended to:
|
||||
* Swap the `source_prompt` and `target_prompt` in the arguments to `generate_mask`.
|
||||
* Change the input prompt for `invert` to include "dog".
|
||||
* Swap the `prompt` and `negative_prompt` in the arguments to call the pipeline to generate the final edited image.
|
||||
* Note that the source and target prompts, or their corresponding embeddings, can also be automatically generated. Please, refer to [this discussion](#generating-source-and-target-embeddings) for more details.
|
||||
|
||||
## Available Pipelines:
|
||||
|
||||
| Pipeline | Tasks
|
||||
|---|---|
|
||||
| [StableDiffusionDiffEditPipeline](https://github.com/huggingface/diffusers/blob/main/src/diffusers/pipelines/stable_diffusion/pipeline_stable_diffusion_diffedit.py) | *Text-Based Image Editing*
|
||||
|
||||
<!-- TODO: add Colab -->
|
||||
|
||||
## Usage example
|
||||
|
||||
### Based on an input image with a caption
|
||||
|
||||
When the pipeline is conditioned on an input image, we first obtain partially inverted latents from the input image using a
|
||||
`DDIMInverseScheduler` with the help of a caption. Then we generate an editing mask to identify relevant regions in the image using the source and target prompts. Finally,
|
||||
the inverted noise and generated mask is used to start the generation process.
|
||||
|
||||
First, let's load our pipeline:
|
||||
|
||||
```py
|
||||
import torch
|
||||
from diffusers import DDIMScheduler, DDIMInverseScheduler, StableDiffusionDiffEditPipeline
|
||||
|
||||
sd_model_ckpt = "stabilityai/stable-diffusion-2-1"
|
||||
pipeline = StableDiffusionDiffEditPipeline.from_pretrained(
|
||||
sd_model_ckpt,
|
||||
torch_dtype=torch.float16,
|
||||
safety_checker=None,
|
||||
)
|
||||
pipeline.scheduler = DDIMScheduler.from_config(pipeline.scheduler.config)
|
||||
pipeline.inverse_scheduler = DDIMInverseScheduler.from_config(pipeline.scheduler.config)
|
||||
pipeline.enable_model_cpu_offload()
|
||||
pipeline.enable_vae_slicing()
|
||||
generator = torch.manual_seed(0)
|
||||
```
|
||||
|
||||
Then, we load an input image to edit using our method:
|
||||
|
||||
```py
|
||||
from diffusers.utils import load_image
|
||||
|
||||
img_url = "https://github.com/Xiang-cd/DiffEdit-stable-diffusion/raw/main/assets/origin.png"
|
||||
raw_image = load_image(img_url).convert("RGB").resize((768, 768))
|
||||
```
|
||||
|
||||
Then, we employ the source and target prompts to generate the editing mask:
|
||||
|
||||
```py
|
||||
# See the "Generating source and target embeddings" section below to
|
||||
# automate the generation of these captions with a pre-trained model like Flan-T5 as explained below.
|
||||
|
||||
source_prompt = "a bowl of fruits"
|
||||
target_prompt = "a basket of fruits"
|
||||
mask_image = pipeline.generate_mask(
|
||||
image=raw_image,
|
||||
source_prompt=source_prompt,
|
||||
target_prompt=target_prompt,
|
||||
generator=generator,
|
||||
)
|
||||
```
|
||||
|
||||
Then, we employ the caption and the input image to get the inverted latents:
|
||||
|
||||
```py
|
||||
inv_latents = pipeline.invert(prompt=source_prompt, image=raw_image, generator=generator).latents
|
||||
```
|
||||
|
||||
Now, generate the image with the inverted latents and semantically generated mask:
|
||||
|
||||
```py
|
||||
image = pipeline(
|
||||
prompt=target_prompt,
|
||||
mask_image=mask_image,
|
||||
image_latents=inv_latents,
|
||||
generator=generator,
|
||||
negative_prompt=source_prompt,
|
||||
).images[0]
|
||||
image.save("edited_image.png")
|
||||
```
|
||||
|
||||
## Generating image captions for inversion
|
||||
|
||||
The authors originally used the source concept prompt as the caption for generating the partially inverted latents. However, we can also leverage open source and public image captioning models for the same purpose.
|
||||
Below, we provide an end-to-end example with the [BLIP](https://huggingface.co/docs/transformers/model_doc/blip) model
|
||||
for generating captions.
|
||||
|
||||
First, let's load our automatic image captioning model:
|
||||
|
||||
```py
|
||||
import torch
|
||||
from transformers import BlipForConditionalGeneration, BlipProcessor
|
||||
|
||||
captioner_id = "Salesforce/blip-image-captioning-base"
|
||||
processor = BlipProcessor.from_pretrained(captioner_id)
|
||||
model = BlipForConditionalGeneration.from_pretrained(captioner_id, torch_dtype=torch.float16, low_cpu_mem_usage=True)
|
||||
```
|
||||
|
||||
Then, we define a utility to generate captions from an input image using the model:
|
||||
|
||||
```py
|
||||
@torch.no_grad()
|
||||
def generate_caption(images, caption_generator, caption_processor):
|
||||
text = "a photograph of"
|
||||
|
||||
inputs = caption_processor(images, text, return_tensors="pt").to(device="cuda", dtype=caption_generator.dtype)
|
||||
caption_generator.to("cuda")
|
||||
outputs = caption_generator.generate(**inputs, max_new_tokens=128)
|
||||
|
||||
# offload caption generator
|
||||
caption_generator.to("cpu")
|
||||
|
||||
caption = caption_processor.batch_decode(outputs, skip_special_tokens=True)[0]
|
||||
return caption
|
||||
```
|
||||
|
||||
Then, we load an input image for conditioning and obtain a suitable caption for it:
|
||||
|
||||
```py
|
||||
from diffusers.utils import load_image
|
||||
|
||||
img_url = "https://github.com/Xiang-cd/DiffEdit-stable-diffusion/raw/main/assets/origin.png"
|
||||
raw_image = load_image(img_url).convert("RGB").resize((768, 768))
|
||||
caption = generate_caption(raw_image, model, processor)
|
||||
```
|
||||
|
||||
Then, we employ the generated caption and the input image to get the inverted latents:
|
||||
|
||||
```py
|
||||
from diffusers import DDIMInverseScheduler, DDIMScheduler
|
||||
|
||||
pipeline = StableDiffusionDiffEditPipeline.from_pretrained(
|
||||
"stabilityai/stable-diffusion-2-1", torch_dtype=torch.float16
|
||||
)
|
||||
pipeline = pipeline.to("cuda")
|
||||
pipeline.enable_model_cpu_offload()
|
||||
pipeline.enable_vae_slicing()
|
||||
|
||||
pipeline.scheduler = DDIMScheduler.from_config(pipeline.scheduler.config)
|
||||
pipeline.inverse_scheduler = DDIMInverseScheduler.from_config(pipeline.scheduler.config)
|
||||
|
||||
generator = torch.manual_seed(0)
|
||||
inv_latents = pipeline.invert(prompt=caption, image=raw_image, generator=generator).latents
|
||||
```
|
||||
|
||||
Now, generate the image with the inverted latents and semantically generated mask from our source and target prompts:
|
||||
|
||||
```py
|
||||
source_prompt = "a bowl of fruits"
|
||||
target_prompt = "a basket of fruits"
|
||||
|
||||
mask_image = pipeline.generate_mask(
|
||||
image=raw_image,
|
||||
source_prompt=source_prompt,
|
||||
target_prompt=target_prompt,
|
||||
generator=generator,
|
||||
)
|
||||
|
||||
image = pipeline(
|
||||
prompt=target_prompt,
|
||||
mask_image=mask_image,
|
||||
image_latents=inv_latents,
|
||||
generator=generator,
|
||||
negative_prompt=source_prompt,
|
||||
).images[0]
|
||||
image.save("edited_image.png")
|
||||
```
|
||||
|
||||
## Generating source and target embeddings
|
||||
|
||||
The authors originally required the user to manually provide the source and target prompts for discovering
|
||||
edit directions. However, we can also leverage open source and public models for the same purpose.
|
||||
Below, we provide an end-to-end example with the [Flan-T5](https://huggingface.co/docs/transformers/model_doc/flan-t5) model
|
||||
for generating source an target embeddings.
|
||||
|
||||
**1. Load the generation model**:
|
||||
|
||||
```py
|
||||
import torch
|
||||
from transformers import AutoTokenizer, T5ForConditionalGeneration
|
||||
|
||||
tokenizer = AutoTokenizer.from_pretrained("google/flan-t5-xl")
|
||||
model = T5ForConditionalGeneration.from_pretrained("google/flan-t5-xl", device_map="auto", torch_dtype=torch.float16)
|
||||
```
|
||||
|
||||
**2. Construct a starting prompt**:
|
||||
|
||||
```py
|
||||
source_concept = "bowl"
|
||||
target_concept = "basket"
|
||||
|
||||
source_text = f"Provide a caption for images containing a {source_concept}. "
|
||||
"The captions should be in English and should be no longer than 150 characters."
|
||||
|
||||
target_text = f"Provide a caption for images containing a {target_concept}. "
|
||||
"The captions should be in English and should be no longer than 150 characters."
|
||||
```
|
||||
|
||||
Here, we're interested in the "bowl -> basket" direction.
|
||||
|
||||
**3. Generate prompts**:
|
||||
|
||||
We can use a utility like so for this purpose.
|
||||
|
||||
```py
|
||||
@torch.no_grad
|
||||
def generate_prompts(input_prompt):
|
||||
input_ids = tokenizer(input_prompt, return_tensors="pt").input_ids.to("cuda")
|
||||
|
||||
outputs = model.generate(
|
||||
input_ids, temperature=0.8, num_return_sequences=16, do_sample=True, max_new_tokens=128, top_k=10
|
||||
)
|
||||
return tokenizer.batch_decode(outputs, skip_special_tokens=True)
|
||||
```
|
||||
|
||||
And then we just call it to generate our prompts:
|
||||
|
||||
```py
|
||||
source_prompts = generate_prompts(source_text)
|
||||
target_prompts = generate_prompts(target_text)
|
||||
```
|
||||
|
||||
We encourage you to play around with the different parameters supported by the
|
||||
`generate()` method ([documentation](https://huggingface.co/docs/transformers/main/en/main_classes/text_generation#transformers.generation_tf_utils.TFGenerationMixin.generate)) for the generation quality you are looking for.
|
||||
|
||||
**4. Load the embedding model**:
|
||||
|
||||
Here, we need to use the same text encoder model used by the subsequent Stable Diffusion model.
|
||||
|
||||
```py
|
||||
from diffusers import StableDiffusionDiffEditPipeline
|
||||
|
||||
pipeline = StableDiffusionDiffEditPipeline.from_pretrained(
|
||||
"stabilityai/stable-diffusion-2-1", torch_dtype=torch.float16
|
||||
)
|
||||
pipeline = pipeline.to("cuda")
|
||||
pipeline.enable_model_cpu_offload()
|
||||
pipeline.enable_vae_slicing()
|
||||
|
||||
generator = torch.manual_seed(0)
|
||||
```
|
||||
|
||||
**5. Compute embeddings**:
|
||||
|
||||
```py
|
||||
import torch
|
||||
|
||||
@torch.no_grad()
|
||||
def embed_prompts(sentences, tokenizer, text_encoder, device="cuda"):
|
||||
embeddings = []
|
||||
for sent in sentences:
|
||||
text_inputs = tokenizer(
|
||||
sent,
|
||||
padding="max_length",
|
||||
max_length=tokenizer.model_max_length,
|
||||
truncation=True,
|
||||
return_tensors="pt",
|
||||
)
|
||||
text_input_ids = text_inputs.input_ids
|
||||
prompt_embeds = text_encoder(text_input_ids.to(device), attention_mask=None)[0]
|
||||
embeddings.append(prompt_embeds)
|
||||
return torch.concatenate(embeddings, dim=0).mean(dim=0).unsqueeze(0)
|
||||
|
||||
source_embeddings = embed_prompts(source_prompts, pipeline.tokenizer, pipeline.text_encoder)
|
||||
target_embeddings = embed_prompts(target_captions, pipeline.tokenizer, pipeline.text_encoder)
|
||||
```
|
||||
|
||||
And you're done! Now, you can use these embeddings directly while calling the pipeline:
|
||||
|
||||
```py
|
||||
from diffusers import DDIMInverseScheduler, DDIMScheduler
|
||||
from diffusers.utils import load_image
|
||||
|
||||
pipeline.scheduler = DDIMScheduler.from_config(pipeline.scheduler.config)
|
||||
pipeline.inverse_scheduler = DDIMInverseScheduler.from_config(pipeline.scheduler.config)
|
||||
|
||||
img_url = "https://github.com/Xiang-cd/DiffEdit-stable-diffusion/raw/main/assets/origin.png"
|
||||
raw_image = load_image(img_url).convert("RGB").resize((768, 768))
|
||||
|
||||
|
||||
mask_image = pipeline.generate_mask(
|
||||
image=raw_image,
|
||||
source_prompt_embeds=source_embeds,
|
||||
target_prompt_embeds=target_embeds,
|
||||
generator=generator,
|
||||
)
|
||||
|
||||
inv_latents = pipeline.invert(
|
||||
prompt_embeds=source_embeds,
|
||||
image=raw_image,
|
||||
generator=generator,
|
||||
).latents
|
||||
|
||||
images = pipeline(
|
||||
mask_image=mask_image,
|
||||
image_latents=inv_latents,
|
||||
prompt_embeds=target_embeddings,
|
||||
negative_prompt_embeds=source_embeddings,
|
||||
generator=generator,
|
||||
).images
|
||||
images[0].save("edited_image.png")
|
||||
```
|
||||
|
||||
## StableDiffusionDiffEditPipeline
|
||||
[[autodoc]] StableDiffusionDiffEditPipeline
|
||||
- all
|
||||
- generate_mask
|
||||
- invert
|
||||
- __call__
|
||||
@@ -1,614 +0,0 @@
|
||||
<!--Copyright 2023 The HuggingFace Team. All rights reserved.
|
||||
Licensed under the Apache License, Version 2.0 (the "License"); you may not use this file except in compliance with
|
||||
the License. You may obtain a copy of the License at
|
||||
http://www.apache.org/licenses/LICENSE-2.0
|
||||
Unless required by applicable law or agreed to in writing, software distributed under the License is distributed on
|
||||
an "AS IS" BASIS, WITHOUT WARRANTIES OR CONDITIONS OF ANY KIND, either express or implied. See the License for the
|
||||
specific language governing permissions and limitations under the License.
|
||||
-->
|
||||
|
||||
# Kandinsky
|
||||
|
||||
## Overview
|
||||
|
||||
Kandinsky inherits best practices from [DALL-E 2](https://huggingface.co/papers/2204.06125) and [Latent Diffusion](https://huggingface.co/docs/diffusers/api/pipelines/latent_diffusion), while introducing some new ideas.
|
||||
|
||||
It uses [CLIP](https://huggingface.co/docs/transformers/model_doc/clip) for encoding images and text, and a diffusion image prior (mapping) between latent spaces of CLIP modalities. This approach enhances the visual performance of the model and unveils new horizons in blending images and text-guided image manipulation.
|
||||
|
||||
The Kandinsky model is created by [Arseniy Shakhmatov](https://github.com/cene555), [Anton Razzhigaev](https://github.com/razzant), [Aleksandr Nikolich](https://github.com/AlexWortega), [Igor Pavlov](https://github.com/boomb0om), [Andrey Kuznetsov](https://github.com/kuznetsoffandrey) and [Denis Dimitrov](https://github.com/denndimitrov). The original codebase can be found [here](https://github.com/ai-forever/Kandinsky-2)
|
||||
|
||||
|
||||
## Usage example
|
||||
|
||||
In the following, we will walk you through some examples of how to use the Kandinsky pipelines to create some visually aesthetic artwork.
|
||||
|
||||
### Text-to-Image Generation
|
||||
|
||||
For text-to-image generation, we need to use both [`KandinskyPriorPipeline`] and [`KandinskyPipeline`].
|
||||
The first step is to encode text prompts with CLIP and then diffuse the CLIP text embeddings to CLIP image embeddings,
|
||||
as first proposed in [DALL-E 2](https://cdn.openai.com/papers/dall-e-2.pdf).
|
||||
Let's throw a fun prompt at Kandinsky to see what it comes up with.
|
||||
|
||||
```py
|
||||
prompt = "A alien cheeseburger creature eating itself, claymation, cinematic, moody lighting"
|
||||
```
|
||||
|
||||
First, let's instantiate the prior pipeline and the text-to-image pipeline. Both
|
||||
pipelines are diffusion models.
|
||||
|
||||
|
||||
```py
|
||||
from diffusers import DiffusionPipeline
|
||||
import torch
|
||||
|
||||
pipe_prior = DiffusionPipeline.from_pretrained("kandinsky-community/kandinsky-2-1-prior", torch_dtype=torch.float16)
|
||||
pipe_prior.to("cuda")
|
||||
|
||||
t2i_pipe = DiffusionPipeline.from_pretrained("kandinsky-community/kandinsky-2-1", torch_dtype=torch.float16)
|
||||
t2i_pipe.to("cuda")
|
||||
```
|
||||
|
||||
<Tip warning={true}>
|
||||
|
||||
By default, the text-to-image pipeline use [`DDIMScheduler`], you can change the scheduler to [`DDPMScheduler`]
|
||||
|
||||
```py
|
||||
scheduler = DDPMScheduler.from_pretrained("kandinsky-community/kandinsky-2-1", subfolder="ddpm_scheduler")
|
||||
t2i_pipe = DiffusionPipeline.from_pretrained(
|
||||
"kandinsky-community/kandinsky-2-1", scheduler=scheduler, torch_dtype=torch.float16
|
||||
)
|
||||
t2i_pipe.to("cuda")
|
||||
```
|
||||
|
||||
</Tip>
|
||||
|
||||
Now we pass the prompt through the prior to generate image embeddings. The prior
|
||||
returns both the image embeddings corresponding to the prompt and negative/unconditional image
|
||||
embeddings corresponding to an empty string.
|
||||
|
||||
```py
|
||||
image_embeds, negative_image_embeds = pipe_prior(prompt, guidance_scale=1.0).to_tuple()
|
||||
```
|
||||
|
||||
<Tip warning={true}>
|
||||
|
||||
The text-to-image pipeline expects both `image_embeds`, `negative_image_embeds` and the original
|
||||
`prompt` as the text-to-image pipeline uses another text encoder to better guide the second diffusion
|
||||
process of `t2i_pipe`.
|
||||
|
||||
By default, the prior returns unconditioned negative image embeddings corresponding to the negative prompt of `""`.
|
||||
For better results, you can also pass a `negative_prompt` to the prior. This will increase the effective batch size
|
||||
of the prior by a factor of 2.
|
||||
|
||||
```py
|
||||
prompt = "A alien cheeseburger creature eating itself, claymation, cinematic, moody lighting"
|
||||
negative_prompt = "low quality, bad quality"
|
||||
|
||||
image_embeds, negative_image_embeds = pipe_prior(prompt, negative_prompt, guidance_scale=1.0).to_tuple()
|
||||
```
|
||||
|
||||
</Tip>
|
||||
|
||||
|
||||
Next, we can pass the embeddings as well as the prompt to the text-to-image pipeline. Remember that
|
||||
in case you are using a customized negative prompt, that you should pass this one also to the text-to-image pipelines
|
||||
with `negative_prompt=negative_prompt`:
|
||||
|
||||
```py
|
||||
image = t2i_pipe(
|
||||
prompt, image_embeds=image_embeds, negative_image_embeds=negative_image_embeds, height=768, width=768
|
||||
).images[0]
|
||||
image.save("cheeseburger_monster.png")
|
||||
```
|
||||
|
||||
One cheeseburger monster coming up! Enjoy!
|
||||
|
||||
|
||||
|
||||
The Kandinsky model works extremely well with creative prompts. Here is some of the amazing art that can be created using the exact same process but with different prompts.
|
||||
|
||||
```python
|
||||
prompt = "bird eye view shot of a full body woman with cyan light orange magenta makeup, digital art, long braided hair her face separated by makeup in the style of yin Yang surrealism, symmetrical face, real image, contrasting tone, pastel gradient background"
|
||||
```
|
||||

|
||||
|
||||
```python
|
||||
prompt = "A car exploding into colorful dust"
|
||||
```
|
||||

|
||||
|
||||
```python
|
||||
prompt = "editorial photography of an organic, almost liquid smoke style armchair"
|
||||
```
|
||||

|
||||
|
||||
```python
|
||||
prompt = "birds eye view of a quilted paper style alien planet landscape, vibrant colours, Cinematic lighting"
|
||||
```
|
||||
|
||||
|
||||
|
||||
|
||||
### Text Guided Image-to-Image Generation
|
||||
|
||||
The same Kandinsky model weights can be used for text-guided image-to-image translation. In this case, just make sure to load the weights using the [`KandinskyImg2ImgPipeline`] pipeline.
|
||||
|
||||
**Note**: You can also directly move the weights of the text-to-image pipelines to the image-to-image pipelines
|
||||
without loading them twice by making use of the [`~DiffusionPipeline.components`] function as explained [here](#converting-between-different-pipelines).
|
||||
|
||||
Let's download an image.
|
||||
|
||||
```python
|
||||
from PIL import Image
|
||||
import requests
|
||||
from io import BytesIO
|
||||
|
||||
# download image
|
||||
url = "https://raw.githubusercontent.com/CompVis/stable-diffusion/main/assets/stable-samples/img2img/sketch-mountains-input.jpg"
|
||||
response = requests.get(url)
|
||||
original_image = Image.open(BytesIO(response.content)).convert("RGB")
|
||||
original_image = original_image.resize((768, 512))
|
||||
```
|
||||
|
||||
|
||||
|
||||
```python
|
||||
import torch
|
||||
from diffusers import KandinskyImg2ImgPipeline, KandinskyPriorPipeline
|
||||
|
||||
# create prior
|
||||
pipe_prior = KandinskyPriorPipeline.from_pretrained(
|
||||
"kandinsky-community/kandinsky-2-1-prior", torch_dtype=torch.float16
|
||||
)
|
||||
pipe_prior.to("cuda")
|
||||
|
||||
# create img2img pipeline
|
||||
pipe = KandinskyImg2ImgPipeline.from_pretrained("kandinsky-community/kandinsky-2-1", torch_dtype=torch.float16)
|
||||
pipe.to("cuda")
|
||||
|
||||
prompt = "A fantasy landscape, Cinematic lighting"
|
||||
negative_prompt = "low quality, bad quality"
|
||||
|
||||
image_embeds, negative_image_embeds = pipe_prior(prompt, negative_prompt).to_tuple()
|
||||
|
||||
out = pipe(
|
||||
prompt,
|
||||
image=original_image,
|
||||
image_embeds=image_embeds,
|
||||
negative_image_embeds=negative_image_embeds,
|
||||
height=768,
|
||||
width=768,
|
||||
strength=0.3,
|
||||
)
|
||||
|
||||
out.images[0].save("fantasy_land.png")
|
||||
```
|
||||
|
||||
|
||||
|
||||
|
||||
### Text Guided Inpainting Generation
|
||||
|
||||
You can use [`KandinskyInpaintPipeline`] to edit images. In this example, we will add a hat to the portrait of a cat.
|
||||
|
||||
```py
|
||||
from diffusers import KandinskyInpaintPipeline, KandinskyPriorPipeline
|
||||
from diffusers.utils import load_image
|
||||
import torch
|
||||
import numpy as np
|
||||
|
||||
pipe_prior = KandinskyPriorPipeline.from_pretrained(
|
||||
"kandinsky-community/kandinsky-2-1-prior", torch_dtype=torch.float16
|
||||
)
|
||||
pipe_prior.to("cuda")
|
||||
|
||||
prompt = "a hat"
|
||||
prior_output = pipe_prior(prompt)
|
||||
|
||||
pipe = KandinskyInpaintPipeline.from_pretrained("kandinsky-community/kandinsky-2-1-inpaint", torch_dtype=torch.float16)
|
||||
pipe.to("cuda")
|
||||
|
||||
init_image = load_image(
|
||||
"https://huggingface.co/datasets/hf-internal-testing/diffusers-images/resolve/main" "/kandinsky/cat.png"
|
||||
)
|
||||
|
||||
mask = np.ones((768, 768), dtype=np.float32)
|
||||
# Let's mask out an area above the cat's head
|
||||
mask[:250, 250:-250] = 0
|
||||
|
||||
out = pipe(
|
||||
prompt,
|
||||
image=init_image,
|
||||
mask_image=mask,
|
||||
**prior_output,
|
||||
height=768,
|
||||
width=768,
|
||||
num_inference_steps=150,
|
||||
)
|
||||
|
||||
image = out.images[0]
|
||||
image.save("cat_with_hat.png")
|
||||
```
|
||||
|
||||
|
||||
### Interpolate
|
||||
|
||||
The [`KandinskyPriorPipeline`] also comes with a cool utility function that will allow you to interpolate the latent space of different images and texts super easily. Here is an example of how you can create an Impressionist-style portrait for your pet based on "The Starry Night".
|
||||
|
||||
Note that you can interpolate between texts and images - in the below example, we passed a text prompt "a cat" and two images to the `interplate` function, along with a `weights` variable containing the corresponding weights for each condition we interplate.
|
||||
|
||||
```python
|
||||
from diffusers import KandinskyPriorPipeline, KandinskyPipeline
|
||||
from diffusers.utils import load_image
|
||||
import PIL
|
||||
|
||||
import torch
|
||||
|
||||
pipe_prior = KandinskyPriorPipeline.from_pretrained(
|
||||
"kandinsky-community/kandinsky-2-1-prior", torch_dtype=torch.float16
|
||||
)
|
||||
pipe_prior.to("cuda")
|
||||
|
||||
img1 = load_image(
|
||||
"https://huggingface.co/datasets/hf-internal-testing/diffusers-images/resolve/main" "/kandinsky/cat.png"
|
||||
)
|
||||
|
||||
img2 = load_image(
|
||||
"https://huggingface.co/datasets/hf-internal-testing/diffusers-images/resolve/main" "/kandinsky/starry_night.jpeg"
|
||||
)
|
||||
|
||||
# add all the conditions we want to interpolate, can be either text or image
|
||||
images_texts = ["a cat", img1, img2]
|
||||
|
||||
# specify the weights for each condition in images_texts
|
||||
weights = [0.3, 0.3, 0.4]
|
||||
|
||||
# We can leave the prompt empty
|
||||
prompt = ""
|
||||
prior_out = pipe_prior.interpolate(images_texts, weights)
|
||||
|
||||
pipe = KandinskyPipeline.from_pretrained("kandinsky-community/kandinsky-2-1", torch_dtype=torch.float16)
|
||||
pipe.to("cuda")
|
||||
|
||||
image = pipe(prompt, **prior_out, height=768, width=768).images[0]
|
||||
|
||||
image.save("starry_cat.png")
|
||||
```
|
||||
|
||||
|
||||
|
||||
### Text-to-Image Generation with ControlNet Conditioning
|
||||
|
||||
In the following, we give a simple example of how to use [`KandinskyV22ControlnetPipeline`] to add control to the text-to-image generation with a depth image.
|
||||
|
||||
First, let's take an image and extract its depth map.
|
||||
|
||||
```python
|
||||
from diffusers.utils import load_image
|
||||
|
||||
img = load_image(
|
||||
"https://huggingface.co/datasets/hf-internal-testing/diffusers-images/resolve/main/kandinskyv22/cat.png"
|
||||
).resize((768, 768))
|
||||
```
|
||||
|
||||
|
||||
We can use the `depth-estimation` pipeline from transformers to process the image and retrieve its depth map.
|
||||
|
||||
```python
|
||||
import torch
|
||||
import numpy as np
|
||||
|
||||
from transformers import pipeline
|
||||
from diffusers.utils import load_image
|
||||
|
||||
|
||||
def make_hint(image, depth_estimator):
|
||||
image = depth_estimator(image)["depth"]
|
||||
image = np.array(image)
|
||||
image = image[:, :, None]
|
||||
image = np.concatenate([image, image, image], axis=2)
|
||||
detected_map = torch.from_numpy(image).float() / 255.0
|
||||
hint = detected_map.permute(2, 0, 1)
|
||||
return hint
|
||||
|
||||
|
||||
depth_estimator = pipeline("depth-estimation")
|
||||
hint = make_hint(img, depth_estimator).unsqueeze(0).half().to("cuda")
|
||||
```
|
||||
Now, we load the prior pipeline and the text-to-image controlnet pipeline
|
||||
|
||||
```python
|
||||
from diffusers import KandinskyV22PriorPipeline, KandinskyV22ControlnetPipeline
|
||||
|
||||
pipe_prior = KandinskyV22PriorPipeline.from_pretrained(
|
||||
"kandinsky-community/kandinsky-2-2-prior", torch_dtype=torch.float16
|
||||
)
|
||||
pipe_prior = pipe_prior.to("cuda")
|
||||
|
||||
pipe = KandinskyV22ControlnetPipeline.from_pretrained(
|
||||
"kandinsky-community/kandinsky-2-2-controlnet-depth", torch_dtype=torch.float16
|
||||
)
|
||||
pipe = pipe.to("cuda")
|
||||
```
|
||||
|
||||
We pass the prompt and negative prompt through the prior to generate image embeddings
|
||||
|
||||
```python
|
||||
prompt = "A robot, 4k photo"
|
||||
|
||||
negative_prior_prompt = "lowres, text, error, cropped, worst quality, low quality, jpeg artifacts, ugly, duplicate, morbid, mutilated, out of frame, extra fingers, mutated hands, poorly drawn hands, poorly drawn face, mutation, deformed, blurry, dehydrated, bad anatomy, bad proportions, extra limbs, cloned face, disfigured, gross proportions, malformed limbs, missing arms, missing legs, extra arms, extra legs, fused fingers, too many fingers, long neck, username, watermark, signature"
|
||||
|
||||
generator = torch.Generator(device="cuda").manual_seed(43)
|
||||
image_emb, zero_image_emb = pipe_prior(
|
||||
prompt=prompt, negative_prompt=negative_prior_prompt, generator=generator
|
||||
).to_tuple()
|
||||
```
|
||||
|
||||
Now we can pass the image embeddings and the depth image we extracted to the controlnet pipeline. With Kandinsky 2.2, only prior pipelines accept `prompt` input. You do not need to pass the prompt to the controlnet pipeline.
|
||||
|
||||
```python
|
||||
images = pipe(
|
||||
image_embeds=image_emb,
|
||||
negative_image_embeds=zero_image_emb,
|
||||
hint=hint,
|
||||
num_inference_steps=50,
|
||||
generator=generator,
|
||||
height=768,
|
||||
width=768,
|
||||
).images
|
||||
|
||||
images[0].save("robot_cat.png")
|
||||
```
|
||||
|
||||
The output image looks as follow:
|
||||
|
||||
|
||||
### Image-to-Image Generation with ControlNet Conditioning
|
||||
|
||||
Kandinsky 2.2 also includes a [`KandinskyV22ControlnetImg2ImgPipeline`] that will allow you to add control to the image generation process with both the image and its depth map. This pipeline works really well with [`KandinskyV22PriorEmb2EmbPipeline`], which generates image embeddings based on both a text prompt and an image.
|
||||
|
||||
For our robot cat example, we will pass the prompt and cat image together to the prior pipeline to generate an image embedding. We will then use that image embedding and the depth map of the cat to further control the image generation process.
|
||||
|
||||
We can use the same cat image and its depth map from the last example.
|
||||
|
||||
```python
|
||||
import torch
|
||||
import numpy as np
|
||||
|
||||
from diffusers import KandinskyV22PriorEmb2EmbPipeline, KandinskyV22ControlnetImg2ImgPipeline
|
||||
from diffusers.utils import load_image
|
||||
from transformers import pipeline
|
||||
|
||||
img = load_image(
|
||||
"https://huggingface.co/datasets/hf-internal-testing/diffusers-images/resolve/main" "/kandinskyv22/cat.png"
|
||||
).resize((768, 768))
|
||||
|
||||
|
||||
def make_hint(image, depth_estimator):
|
||||
image = depth_estimator(image)["depth"]
|
||||
image = np.array(image)
|
||||
image = image[:, :, None]
|
||||
image = np.concatenate([image, image, image], axis=2)
|
||||
detected_map = torch.from_numpy(image).float() / 255.0
|
||||
hint = detected_map.permute(2, 0, 1)
|
||||
return hint
|
||||
|
||||
|
||||
depth_estimator = pipeline("depth-estimation")
|
||||
hint = make_hint(img, depth_estimator).unsqueeze(0).half().to("cuda")
|
||||
|
||||
pipe_prior = KandinskyV22PriorEmb2EmbPipeline.from_pretrained(
|
||||
"kandinsky-community/kandinsky-2-2-prior", torch_dtype=torch.float16
|
||||
)
|
||||
pipe_prior = pipe_prior.to("cuda")
|
||||
|
||||
pipe = KandinskyV22ControlnetImg2ImgPipeline.from_pretrained(
|
||||
"kandinsky-community/kandinsky-2-2-controlnet-depth", torch_dtype=torch.float16
|
||||
)
|
||||
pipe = pipe.to("cuda")
|
||||
|
||||
prompt = "A robot, 4k photo"
|
||||
negative_prior_prompt = "lowres, text, error, cropped, worst quality, low quality, jpeg artifacts, ugly, duplicate, morbid, mutilated, out of frame, extra fingers, mutated hands, poorly drawn hands, poorly drawn face, mutation, deformed, blurry, dehydrated, bad anatomy, bad proportions, extra limbs, cloned face, disfigured, gross proportions, malformed limbs, missing arms, missing legs, extra arms, extra legs, fused fingers, too many fingers, long neck, username, watermark, signature"
|
||||
|
||||
generator = torch.Generator(device="cuda").manual_seed(43)
|
||||
|
||||
# run prior pipeline
|
||||
|
||||
img_emb = pipe_prior(prompt=prompt, image=img, strength=0.85, generator=generator)
|
||||
negative_emb = pipe_prior(prompt=negative_prior_prompt, image=img, strength=1, generator=generator)
|
||||
|
||||
# run controlnet img2img pipeline
|
||||
images = pipe(
|
||||
image=img,
|
||||
strength=0.5,
|
||||
image_embeds=img_emb.image_embeds,
|
||||
negative_image_embeds=negative_emb.image_embeds,
|
||||
hint=hint,
|
||||
num_inference_steps=50,
|
||||
generator=generator,
|
||||
height=768,
|
||||
width=768,
|
||||
).images
|
||||
|
||||
images[0].save("robot_cat.png")
|
||||
```
|
||||
|
||||
Here is the output. Compared with the output from our text-to-image controlnet example, it kept a lot more cat facial details from the original image and worked into the robot style we asked for.
|
||||
|
||||

|
||||
|
||||
## Kandinsky 2.2
|
||||
|
||||
The Kandinsky 2.2 release includes robust new text-to-image models that support text-to-image generation, image-to-image generation, image interpolation, and text-guided image inpainting. The general workflow to perform these tasks using Kandinsky 2.2 is the same as in Kandinsky 2.1. First, you will need to use a prior pipeline to generate image embeddings based on your text prompt, and then use one of the image decoding pipelines to generate the output image. The only difference is that in Kandinsky 2.2, all of the decoding pipelines no longer accept the `prompt` input, and the image generation process is conditioned with only `image_embeds` and `negative_image_embeds`.
|
||||
|
||||
Let's look at an example of how to perform text-to-image generation using Kandinsky 2.2.
|
||||
|
||||
First, let's create the prior pipeline and text-to-image pipeline with Kandinsky 2.2 checkpoints.
|
||||
|
||||
```python
|
||||
from diffusers import DiffusionPipeline
|
||||
import torch
|
||||
|
||||
pipe_prior = DiffusionPipeline.from_pretrained("kandinsky-community/kandinsky-2-2-prior", torch_dtype=torch.float16)
|
||||
pipe_prior.to("cuda")
|
||||
|
||||
t2i_pipe = DiffusionPipeline.from_pretrained("kandinsky-community/kandinsky-2-2-decoder", torch_dtype=torch.float16)
|
||||
t2i_pipe.to("cuda")
|
||||
```
|
||||
|
||||
You can then use `pipe_prior` to generate image embeddings.
|
||||
|
||||
```python
|
||||
prompt = "portrait of a women, blue eyes, cinematic"
|
||||
negative_prompt = "low quality, bad quality"
|
||||
|
||||
image_embeds, negative_image_embeds = pipe_prior(prompt, guidance_scale=1.0).to_tuple()
|
||||
```
|
||||
|
||||
Now you can pass these embeddings to the text-to-image pipeline. When using Kandinsky 2.2 you don't need to pass the `prompt` (but you do with the previous version, Kandinsky 2.1).
|
||||
|
||||
```
|
||||
image = t2i_pipe(image_embeds=image_embeds, negative_image_embeds=negative_image_embeds, height=768, width=768).images[
|
||||
0
|
||||
]
|
||||
image.save("portrait.png")
|
||||
```
|
||||
|
||||
|
||||
We used the text-to-image pipeline as an example, but the same process applies to all decoding pipelines in Kandinsky 2.2. For more information, please refer to our API section for each pipeline.
|
||||
|
||||
|
||||
## Optimization
|
||||
|
||||
Running Kandinsky in inference requires running both a first prior pipeline: [`KandinskyPriorPipeline`]
|
||||
and a second image decoding pipeline which is one of [`KandinskyPipeline`], [`KandinskyImg2ImgPipeline`], or [`KandinskyInpaintPipeline`].
|
||||
|
||||
The bulk of the computation time will always be the second image decoding pipeline, so when looking
|
||||
into optimizing the model, one should look into the second image decoding pipeline.
|
||||
|
||||
When running with PyTorch < 2.0, we strongly recommend making use of [`xformers`](https://github.com/facebookresearch/xformers)
|
||||
to speed-up the optimization. This can be done by simply running:
|
||||
|
||||
```py
|
||||
from diffusers import DiffusionPipeline
|
||||
import torch
|
||||
|
||||
t2i_pipe = DiffusionPipeline.from_pretrained("kandinsky-community/kandinsky-2-1", torch_dtype=torch.float16)
|
||||
t2i_pipe.enable_xformers_memory_efficient_attention()
|
||||
```
|
||||
|
||||
When running on PyTorch >= 2.0, PyTorch's SDPA attention will automatically be used. For more information on
|
||||
PyTorch's SDPA, feel free to have a look at [this blog post](https://pytorch.org/blog/accelerated-diffusers-pt-20/).
|
||||
|
||||
To have explicit control , you can also manually set the pipeline to use PyTorch's 2.0 efficient attention:
|
||||
|
||||
```py
|
||||
from diffusers.models.attention_processor import AttnAddedKVProcessor2_0
|
||||
|
||||
t2i_pipe.unet.set_attn_processor(AttnAddedKVProcessor2_0())
|
||||
```
|
||||
|
||||
The slowest and most memory intense attention processor is the default `AttnAddedKVProcessor` processor.
|
||||
We do **not** recommend using it except for testing purposes or cases where very high determistic behaviour is desired.
|
||||
You can set it with:
|
||||
|
||||
```py
|
||||
from diffusers.models.attention_processor import AttnAddedKVProcessor
|
||||
|
||||
t2i_pipe.unet.set_attn_processor(AttnAddedKVProcessor())
|
||||
```
|
||||
|
||||
With PyTorch >= 2.0, you can also use Kandinsky with `torch.compile` which depending
|
||||
on your hardware can signficantly speed-up your inference time once the model is compiled.
|
||||
To use Kandinsksy with `torch.compile`, you can do:
|
||||
|
||||
```py
|
||||
t2i_pipe.unet.to(memory_format=torch.channels_last)
|
||||
t2i_pipe.unet = torch.compile(t2i_pipe.unet, mode="reduce-overhead", fullgraph=True)
|
||||
```
|
||||
|
||||
After compilation you should see a very fast inference time. For more information,
|
||||
feel free to have a look at [Our PyTorch 2.0 benchmark](https://huggingface.co/docs/diffusers/main/en/optimization/torch2.0).
|
||||
|
||||
## Available Pipelines:
|
||||
|
||||
| Pipeline | Tasks |
|
||||
|---|---|
|
||||
| [pipeline_kandinsky2_2.py](https://github.com/huggingface/diffusers/blob/main/src/diffusers/pipelines/kandinsky2_2/pipeline_kandinsky2_2.py) | *Text-to-Image Generation* |
|
||||
| [pipeline_kandinsky.py](https://github.com/huggingface/diffusers/blob/main/src/diffusers/pipelines/kandinsky/pipeline_kandinsky.py) | *Text-to-Image Generation* |
|
||||
| [pipeline_kandinsky2_2_inpaint.py](https://github.com/huggingface/diffusers/blob/main/src/diffusers/pipelines/kandinsky2_2/pipeline_kandinsky2_2_inpaint.py) | *Image-Guided Image Generation* |
|
||||
| [pipeline_kandinsky_inpaint.py](https://github.com/huggingface/diffusers/blob/main/src/diffusers/pipelines/kandinsky/pipeline_kandinsky_inpaint.py) | *Image-Guided Image Generation* |
|
||||
| [pipeline_kandinsky2_2_img2img.py](https://github.com/huggingface/diffusers/blob/main/src/diffusers/pipelines/kandinsky2_2/pipeline_kandinsky2_2_img2img.py) | *Image-Guided Image Generation* |
|
||||
| [pipeline_kandinsky_img2img.py](https://github.com/huggingface/diffusers/blob/main/src/diffusers/pipelines/kandinsky/pipeline_kandinsky_img2img.py) | *Image-Guided Image Generation* |
|
||||
| [pipeline_kandinsky2_2_controlnet.py](https://github.com/huggingface/diffusers/blob/main/src/diffusers/pipelines/kandinsky2_2/pipeline_kandinsky2_2_controlnet.py) | *Image-Guided Image Generation* |
|
||||
| [pipeline_kandinsky2_2_controlnet_img2img.py](https://github.com/huggingface/diffusers/blob/main/src/diffusers/pipelines/kandinsky2_2/pipeline_kandinsky2_2_controlnet_img2img.py) | *Image-Guided Image Generation* |
|
||||
|
||||
|
||||
### KandinskyV22Pipeline
|
||||
|
||||
[[autodoc]] KandinskyV22Pipeline
|
||||
- all
|
||||
- __call__
|
||||
|
||||
### KandinskyV22ControlnetPipeline
|
||||
|
||||
[[autodoc]] KandinskyV22ControlnetPipeline
|
||||
- all
|
||||
- __call__
|
||||
|
||||
### KandinskyV22ControlnetImg2ImgPipeline
|
||||
|
||||
[[autodoc]] KandinskyV22ControlnetImg2ImgPipeline
|
||||
- all
|
||||
- __call__
|
||||
|
||||
### KandinskyV22Img2ImgPipeline
|
||||
|
||||
[[autodoc]] KandinskyV22Img2ImgPipeline
|
||||
- all
|
||||
- __call__
|
||||
|
||||
### KandinskyV22InpaintPipeline
|
||||
|
||||
[[autodoc]] KandinskyV22InpaintPipeline
|
||||
- all
|
||||
- __call__
|
||||
|
||||
### KandinskyV22PriorPipeline
|
||||
|
||||
[[autodoc]] ## KandinskyV22PriorPipeline
|
||||
- all
|
||||
- __call__
|
||||
- interpolate
|
||||
|
||||
### KandinskyV22PriorEmb2EmbPipeline
|
||||
|
||||
[[autodoc]] KandinskyV22PriorEmb2EmbPipeline
|
||||
- all
|
||||
- __call__
|
||||
- interpolate
|
||||
|
||||
### KandinskyPriorPipeline
|
||||
|
||||
[[autodoc]] KandinskyPriorPipeline
|
||||
- all
|
||||
- __call__
|
||||
- interpolate
|
||||
|
||||
### KandinskyPipeline
|
||||
|
||||
[[autodoc]] KandinskyPipeline
|
||||
- all
|
||||
- __call__
|
||||
|
||||
### KandinskyImg2ImgPipeline
|
||||
|
||||
[[autodoc]] KandinskyImg2ImgPipeline
|
||||
- all
|
||||
- __call__
|
||||
|
||||
### KandinskyInpaintPipeline
|
||||
|
||||
[[autodoc]] KandinskyInpaintPipeline
|
||||
- all
|
||||
- __call__
|
||||
@@ -46,27 +46,19 @@ available a colab notebook to directly try them out.
|
||||
|---|---|:---:|:---:|
|
||||
| [alt_diffusion](./alt_diffusion) | [**AltDiffusion**](https://arxiv.org/abs/2211.06679) | Image-to-Image Text-Guided Generation | -
|
||||
| [audio_diffusion](./audio_diffusion) | [**Audio Diffusion**](https://github.com/teticio/audio_diffusion.git) | Unconditional Audio Generation |
|
||||
| [controlnet](./api/pipelines/controlnet) | [**ControlNet with Stable Diffusion**](https://arxiv.org/abs/2302.05543) | Image-to-Image Text-Guided Generation | [](https://colab.research.google.com/github/huggingface/notebooks/blob/main/diffusers/controlnet.ipynb)
|
||||
| [controlnet](./api/pipelines/stable_diffusion/controlnet) | [**ControlNet with Stable Diffusion**](https://arxiv.org/abs/2302.05543) | Image-to-Image Text-Guided Generation | [](https://colab.research.google.com/github/huggingface/notebooks/blob/main/diffusers/controlnet.ipynb)
|
||||
| [cycle_diffusion](./cycle_diffusion) | [**Cycle Diffusion**](https://arxiv.org/abs/2210.05559) | Image-to-Image Text-Guided Generation |
|
||||
| [dance_diffusion](./dance_diffusion) | [**Dance Diffusion**](https://github.com/williamberman/diffusers.git) | Unconditional Audio Generation |
|
||||
| [ddpm](./ddpm) | [**Denoising Diffusion Probabilistic Models**](https://arxiv.org/abs/2006.11239) | Unconditional Image Generation |
|
||||
| [ddim](./ddim) | [**Denoising Diffusion Implicit Models**](https://arxiv.org/abs/2010.02502) | Unconditional Image Generation |
|
||||
| [if](./if) | [**IF**](https://github.com/deep-floyd/IF) | Image Generation | [](https://colab.research.google.com/github/huggingface/notebooks/blob/main/diffusers/deepfloyd_if_free_tier_google_colab.ipynb)
|
||||
| [if_img2img](./if) | [**IF**](https://github.com/deep-floyd/IF) | Image-to-Image Generation | [](https://colab.research.google.com/github/huggingface/notebooks/blob/main/diffusers/deepfloyd_if_free_tier_google_colab.ipynb)
|
||||
| [if_inpainting](./if) | [**IF**](https://github.com/deep-floyd/IF) | Image-to-Image Generation | [](https://colab.research.google.com/github/huggingface/notebooks/blob/main/diffusers/deepfloyd_if_free_tier_google_colab.ipynb)
|
||||
| [kandinsky](./kandinsky) | **Kandinsky** | Text-to-Image Generation |
|
||||
| [kandinsky_inpaint](./kandinsky) | **Kandinsky** | Image-to-Image Generation |
|
||||
| [kandinsky_img2img](./kandinsky) | **Kandinsksy** | Image-to-Image Generation |
|
||||
| [latent_diffusion](./latent_diffusion) | [**High-Resolution Image Synthesis with Latent Diffusion Models**](https://arxiv.org/abs/2112.10752)| Text-to-Image Generation |
|
||||
| [latent_diffusion](./latent_diffusion) | [**High-Resolution Image Synthesis with Latent Diffusion Models**](https://arxiv.org/abs/2112.10752)| Super Resolution Image-to-Image |
|
||||
| [latent_diffusion_uncond](./latent_diffusion_uncond) | [**High-Resolution Image Synthesis with Latent Diffusion Models**](https://arxiv.org/abs/2112.10752) | Unconditional Image Generation |
|
||||
| [paint_by_example](./paint_by_example) | [**Paint by Example: Exemplar-based Image Editing with Diffusion Models**](https://arxiv.org/abs/2211.13227) | Image-Guided Image Inpainting |
|
||||
| [paradigms](./paradigms) | [**Parallel Sampling of Diffusion Models**](https://arxiv.org/abs/2305.16317) | Text-to-Image Generation |
|
||||
| [pndm](./pndm) | [**Pseudo Numerical Methods for Diffusion Models on Manifolds**](https://arxiv.org/abs/2202.09778) | Unconditional Image Generation |
|
||||
| [score_sde_ve](./score_sde_ve) | [**Score-Based Generative Modeling through Stochastic Differential Equations**](https://openreview.net/forum?id=PxTIG12RRHS) | Unconditional Image Generation |
|
||||
| [score_sde_vp](./score_sde_vp) | [**Score-Based Generative Modeling through Stochastic Differential Equations**](https://openreview.net/forum?id=PxTIG12RRHS) | Unconditional Image Generation |
|
||||
| [semantic_stable_diffusion](./semantic_stable_diffusion) | [**SEGA: Instructing Diffusion using Semantic Dimensions**](https://arxiv.org/abs/2301.12247) | Text-to-Image Generation |
|
||||
| [stable_diffusion_adapter](./stable_diffusion/adapter) | [**T2I-Adapter**](https://arxiv.org/abs/2302.08453) | Image-to-Image Text-Guided Generation with Adapters | -
|
||||
| [stable_diffusion_text2img](./stable_diffusion/text2img) | [**Stable Diffusion**](https://stability.ai/blog/stable-diffusion-public-release) | Text-to-Image Generation | [](https://colab.research.google.com/github/huggingface/notebooks/blob/main/diffusers/training_example.ipynb)
|
||||
| [stable_diffusion_img2img](./stable_diffusion/img2img) | [**Stable Diffusion**](https://stability.ai/blog/stable-diffusion-public-release) | Image-to-Image Text-Guided Generation | [](https://colab.research.google.com/github/huggingface/notebooks/blob/main/diffusers/image_2_image_using_diffusers.ipynb)
|
||||
| [stable_diffusion_inpaint](./stable_diffusion/inpaint) | [**Stable Diffusion**](https://stability.ai/blog/stable-diffusion-public-release) | Text-Guided Image Inpainting | [](https://colab.research.google.com/github/huggingface/notebooks/blob/main/diffusers/in_painting_with_stable_diffusion_using_diffusers.ipynb)
|
||||
@@ -77,20 +69,21 @@ available a colab notebook to directly try them out.
|
||||
| [stable_diffusion_self_attention_guidance](./stable_diffusion/self_attention_guidance) | [**Self-Attention Guidance**](https://arxiv.org/abs/2210.00939) | Text-to-Image Generation |
|
||||
| [stable_diffusion_image_variation](./stable_diffusion/image_variation) | [**Stable Diffusion Image Variations**](https://github.com/LambdaLabsML/lambda-diffusers#stable-diffusion-image-variations) | Image-to-Image Generation |
|
||||
| [stable_diffusion_latent_upscale](./stable_diffusion/latent_upscale) | [**Stable Diffusion Latent Upscaler**](https://twitter.com/StabilityAI/status/1590531958815064065) | Text-Guided Super Resolution Image-to-Image |
|
||||
| [stable_diffusion_2](./stable_diffusion/stable_diffusion_2) | [**Stable Diffusion 2**](https://stability.ai/blog/stable-diffusion-v2-release) | Text-Guided Image Inpainting |
|
||||
| [stable_diffusion_2](./stable_diffusion/stable_diffusion_2) | [**Stable Diffusion 2**](https://stability.ai/blog/stable-diffusion-v2-release) | Depth-to-Image Text-Guided Generation |
|
||||
| [stable_diffusion_2](./stable_diffusion/stable_diffusion_2) | [**Stable Diffusion 2**](https://stability.ai/blog/stable-diffusion-v2-release) | Text-Guided Super Resolution Image-to-Image |
|
||||
| [stable_diffusion_2](./stable_diffusion_2/) | [**Stable Diffusion 2**](https://stability.ai/blog/stable-diffusion-v2-release) | Text-to-Image Generation |
|
||||
| [stable_diffusion_2](./stable_diffusion_2) | [**Stable Diffusion 2**](https://stability.ai/blog/stable-diffusion-v2-release) | Text-Guided Image Inpainting |
|
||||
| [stable_diffusion_2](./stable_diffusion_2) | [**Stable Diffusion 2**](https://stability.ai/blog/stable-diffusion-v2-release) | Depth-to-Image Text-Guided Generation |
|
||||
| [stable_diffusion_2](./stable_diffusion_2) | [**Stable Diffusion 2**](https://stability.ai/blog/stable-diffusion-v2-release) | Text-Guided Super Resolution Image-to-Image |
|
||||
| [stable_diffusion_safe](./stable_diffusion_safe) | [**Safe Stable Diffusion**](https://arxiv.org/abs/2211.05105) | Text-Guided Generation | [](https://colab.research.google.com/github/ml-research/safe-latent-diffusion/blob/main/examples/Safe%20Latent%20Diffusion.ipynb)
|
||||
| [stable_unclip](./stable_unclip) | **Stable unCLIP** | Text-to-Image Generation |
|
||||
| [stable_unclip](./stable_unclip) | **Stable unCLIP** | Image-to-Image Text-Guided Generation |
|
||||
| [stochastic_karras_ve](./stochastic_karras_ve) | [**Elucidating the Design Space of Diffusion-Based Generative Models**](https://arxiv.org/abs/2206.00364) | Unconditional Image Generation |
|
||||
| [text_to_video_sd](./api/pipelines/text_to_video) | [**Modelscope's Text-to-video-synthesis Model in Open Domain**](https://modelscope.cn/models/damo/text-to-video-synthesis/summary) | Text-to-Video Generation |
|
||||
| [unclip](./unclip) | [**Hierarchical Text-Conditional Image Generation with CLIP Latents](https://arxiv.org/abs/2204.06125) | Text-to-Image Generation |
|
||||
| [versatile_diffusion](./versatile_diffusion) | [**Versatile Diffusion: Text, Images and Variations All in One Diffusion Model**](https://arxiv.org/abs/2211.08332) | Text-to-Image Generation |
|
||||
| [versatile_diffusion](./versatile_diffusion) | [**Versatile Diffusion: Text, Images and Variations All in One Diffusion Model**](https://arxiv.org/abs/2211.08332) | Image Variations Generation |
|
||||
| [versatile_diffusion](./versatile_diffusion) | [**Versatile Diffusion: Text, Images and Variations All in One Diffusion Model**](https://arxiv.org/abs/2211.08332) | Dual Image and Text Guided Generation |
|
||||
| [vq_diffusion](./vq_diffusion) | [**Vector Quantized Diffusion Model for Text-to-Image Synthesis**](https://arxiv.org/abs/2111.14822) | Text-to-Image Generation |
|
||||
| [text_to_video_zero](./text_to_video_zero) | [**Text2Video-Zero: Text-to-Image Diffusion Models are Zero-Shot Video Generators**](https://arxiv.org/abs/2303.13439) | Text-to-Video Generation |
|
||||
| [text_to_video_sd](./api/pipelines/text_to_video) | [Modelscope's Text-to-video-synthesis Model in Open Domain](https://modelscope.cn/models/damo/text-to-video-synthesis/summary) | Text-to-Video Generation |
|
||||
| [unclip](./unclip) | [Hierarchical Text-Conditional Image Generation with CLIP Latents](https://arxiv.org/abs/2204.06125) | Text-to-Image Generation |
|
||||
| [versatile_diffusion](./versatile_diffusion) | [Versatile Diffusion: Text, Images and Variations All in One Diffusion Model](https://arxiv.org/abs/2211.08332) | Text-to-Image Generation |
|
||||
| [versatile_diffusion](./versatile_diffusion) | [Versatile Diffusion: Text, Images and Variations All in One Diffusion Model](https://arxiv.org/abs/2211.08332) | Image Variations Generation |
|
||||
| [versatile_diffusion](./versatile_diffusion) | [Versatile Diffusion: Text, Images and Variations All in One Diffusion Model](https://arxiv.org/abs/2211.08332) | Dual Image and Text Guided Generation |
|
||||
| [vq_diffusion](./vq_diffusion) | [Vector Quantized Diffusion Model for Text-to-Image Synthesis](https://arxiv.org/abs/2111.14822) | Text-to-Image Generation |
|
||||
| [text_to_video_zero](./text_to_video_zero) | [Text2Video-Zero: Text-to-Image Diffusion Models are Zero-Shot Video Generators](https://arxiv.org/abs/2303.13439) | Text-to-Video Generation |
|
||||
|
||||
|
||||
**Note**: Pipelines are simple examples of how to play around with the diffusion systems as described in the corresponding papers.
|
||||
@@ -117,3 +110,105 @@ each pipeline, one should look directly into the respective pipeline.
|
||||
|
||||
**Note**: All pipelines have PyTorch's autograd disabled by decorating the `__call__` method with a [`torch.no_grad`](https://pytorch.org/docs/stable/generated/torch.no_grad.html) decorator because pipelines should
|
||||
not be used for training. If you want to store the gradients during the forward pass, we recommend writing your own pipeline, see also our [community-examples](https://github.com/huggingface/diffusers/tree/main/examples/community).
|
||||
|
||||
## Contribution
|
||||
|
||||
We are more than happy about any contribution to the officially supported pipelines 🤗. We aspire
|
||||
all of our pipelines to be **self-contained**, **easy-to-tweak**, **beginner-friendly** and for **one-purpose-only**.
|
||||
|
||||
- **Self-contained**: A pipeline shall be as self-contained as possible. More specifically, this means that all functionality should be either directly defined in the pipeline file itself, should be inherited from (and only from) the [`DiffusionPipeline` class](.../diffusion_pipeline) or be directly attached to the model and scheduler components of the pipeline.
|
||||
- **Easy-to-use**: Pipelines should be extremely easy to use - one should be able to load the pipeline and
|
||||
use it for its designated task, *e.g.* text-to-image generation, in just a couple of lines of code. Most
|
||||
logic including pre-processing, an unrolled diffusion loop, and post-processing should all happen inside the `__call__` method.
|
||||
- **Easy-to-tweak**: Certain pipelines will not be able to handle all use cases and tasks that you might like them to. If you want to use a certain pipeline for a specific use case that is not yet supported, you might have to copy the pipeline file and tweak the code to your needs. We try to make the pipeline code as readable as possible so that each part –from pre-processing to diffusing to post-processing– can easily be adapted. If you would like the community to benefit from your customized pipeline, we would love to see a contribution to our [community-examples](https://github.com/huggingface/diffusers/tree/main/examples/community). If you feel that an important pipeline should be part of the official pipelines but isn't, a contribution to the [official pipelines](./overview) would be even better.
|
||||
- **One-purpose-only**: Pipelines should be used for one task and one task only. Even if two tasks are very similar from a modeling point of view, *e.g.* image2image translation and in-painting, pipelines shall be used for one task only to keep them *easy-to-tweak* and *readable*.
|
||||
|
||||
## Examples
|
||||
|
||||
### Text-to-Image generation with Stable Diffusion
|
||||
|
||||
```python
|
||||
# make sure you're logged in with `huggingface-cli login`
|
||||
from diffusers import StableDiffusionPipeline, LMSDiscreteScheduler
|
||||
|
||||
pipe = StableDiffusionPipeline.from_pretrained("runwayml/stable-diffusion-v1-5")
|
||||
pipe = pipe.to("cuda")
|
||||
|
||||
prompt = "a photo of an astronaut riding a horse on mars"
|
||||
image = pipe(prompt).images[0]
|
||||
|
||||
image.save("astronaut_rides_horse.png")
|
||||
```
|
||||
|
||||
### Image-to-Image text-guided generation with Stable Diffusion
|
||||
|
||||
The `StableDiffusionImg2ImgPipeline` lets you pass a text prompt and an initial image to condition the generation of new images.
|
||||
|
||||
```python
|
||||
import requests
|
||||
from PIL import Image
|
||||
from io import BytesIO
|
||||
|
||||
from diffusers import StableDiffusionImg2ImgPipeline
|
||||
|
||||
# load the pipeline
|
||||
device = "cuda"
|
||||
pipe = StableDiffusionImg2ImgPipeline.from_pretrained("runwayml/stable-diffusion-v1-5", torch_dtype=torch.float16).to(
|
||||
device
|
||||
)
|
||||
|
||||
# let's download an initial image
|
||||
url = "https://raw.githubusercontent.com/CompVis/stable-diffusion/main/assets/stable-samples/img2img/sketch-mountains-input.jpg"
|
||||
|
||||
response = requests.get(url)
|
||||
init_image = Image.open(BytesIO(response.content)).convert("RGB")
|
||||
init_image = init_image.resize((768, 512))
|
||||
|
||||
prompt = "A fantasy landscape, trending on artstation"
|
||||
|
||||
images = pipe(prompt=prompt, image=init_image, strength=0.75, guidance_scale=7.5).images
|
||||
|
||||
images[0].save("fantasy_landscape.png")
|
||||
```
|
||||
You can also run this example on colab [](https://colab.research.google.com/github/huggingface/notebooks/blob/main/diffusers/image_2_image_using_diffusers.ipynb)
|
||||
|
||||
### Tweak prompts reusing seeds and latents
|
||||
|
||||
You can generate your own latents to reproduce results, or tweak your prompt on a specific result you liked. [This notebook](https://github.com/pcuenca/diffusers-examples/blob/main/notebooks/stable-diffusion-seeds.ipynb) shows how to do it step by step. You can also run it in Google Colab [](https://colab.research.google.com/github/pcuenca/diffusers-examples/blob/main/notebooks/stable-diffusion-seeds.ipynb)
|
||||
|
||||
|
||||
### In-painting using Stable Diffusion
|
||||
|
||||
The `StableDiffusionInpaintPipeline` lets you edit specific parts of an image by providing a mask and text prompt.
|
||||
|
||||
```python
|
||||
import PIL
|
||||
import requests
|
||||
import torch
|
||||
from io import BytesIO
|
||||
|
||||
from diffusers import StableDiffusionInpaintPipeline
|
||||
|
||||
|
||||
def download_image(url):
|
||||
response = requests.get(url)
|
||||
return PIL.Image.open(BytesIO(response.content)).convert("RGB")
|
||||
|
||||
|
||||
img_url = "https://raw.githubusercontent.com/CompVis/latent-diffusion/main/data/inpainting_examples/overture-creations-5sI6fQgYIuo.png"
|
||||
mask_url = "https://raw.githubusercontent.com/CompVis/latent-diffusion/main/data/inpainting_examples/overture-creations-5sI6fQgYIuo_mask.png"
|
||||
|
||||
init_image = download_image(img_url).resize((512, 512))
|
||||
mask_image = download_image(mask_url).resize((512, 512))
|
||||
|
||||
pipe = StableDiffusionInpaintPipeline.from_pretrained(
|
||||
"runwayml/stable-diffusion-inpainting",
|
||||
torch_dtype=torch.float16,
|
||||
)
|
||||
pipe = pipe.to("cuda")
|
||||
|
||||
prompt = "Face of a yellow cat, high resolution, sitting on a park bench"
|
||||
image = pipe(prompt=prompt, image=init_image, mask_image=mask_image).images[0]
|
||||
```
|
||||
|
||||
You can also run this example on colab [](https://colab.research.google.com/github/huggingface/notebooks/blob/main/diffusers/in_painting_with_stable_diffusion_using_diffusers.ipynb)
|
||||
|
||||
@@ -1,83 +0,0 @@
|
||||
<!--Copyright 2023 ParaDiGMS authors and The HuggingFace Team. All rights reserved.
|
||||
|
||||
Licensed under the Apache License, Version 2.0 (the "License"); you may not use this file except in compliance with
|
||||
the License. You may obtain a copy of the License at
|
||||
|
||||
http://www.apache.org/licenses/LICENSE-2.0
|
||||
|
||||
Unless required by applicable law or agreed to in writing, software distributed under the License is distributed on
|
||||
an "AS IS" BASIS, WITHOUT WARRANTIES OR CONDITIONS OF ANY KIND, either express or implied. See the License for the
|
||||
specific language governing permissions and limitations under the License.
|
||||
-->
|
||||
|
||||
# Parallel Sampling of Diffusion Models (ParaDiGMS)
|
||||
|
||||
## Overview
|
||||
|
||||
[Parallel Sampling of Diffusion Models](https://arxiv.org/abs/2305.16317) by Andy Shih, Suneel Belkhale, Stefano Ermon, Dorsa Sadigh, Nima Anari.
|
||||
|
||||
The abstract of the paper is the following:
|
||||
|
||||
*Diffusion models are powerful generative models but suffer from slow sampling, often taking 1000 sequential denoising steps for one sample. As a result, considerable efforts have been directed toward reducing the number of denoising steps, but these methods hurt sample quality. Instead of reducing the number of denoising steps (trading quality for speed), in this paper we explore an orthogonal approach: can we run the denoising steps in parallel (trading compute for speed)? In spite of the sequential nature of the denoising steps, we show that surprisingly it is possible to parallelize sampling via Picard iterations, by guessing the solution of future denoising steps and iteratively refining until convergence. With this insight, we present ParaDiGMS, a novel method to accelerate the sampling of pretrained diffusion models by denoising multiple steps in parallel. ParaDiGMS is the first diffusion sampling method that enables trading compute for speed and is even compatible with existing fast sampling techniques such as DDIM and DPMSolver. Using ParaDiGMS, we improve sampling speed by 2-4x across a range of robotics and image generation models, giving state-of-the-art sampling speeds of 0.2s on 100-step DiffusionPolicy and 16s on 1000-step StableDiffusion-v2 with no measurable degradation of task reward, FID score, or CLIP score.*
|
||||
|
||||
Resources:
|
||||
|
||||
* [Paper](https://arxiv.org/abs/2305.16317).
|
||||
* [Original Code](https://github.com/AndyShih12/paradigms).
|
||||
|
||||
## Available Pipelines:
|
||||
|
||||
| Pipeline | Tasks | Demo
|
||||
|---|---|:---:|
|
||||
| [StableDiffusionParadigmsPipeline](https://github.com/huggingface/diffusers/blob/main/src/diffusers/pipelines/stable_diffusion/pipeline_stable_diffusion_paradigms.py) | *Faster Text-to-Image Generation* | |
|
||||
|
||||
This pipeline was contributed by [`AndyShih12`](https://github.com/AndyShih12) in this [PR](https://github.com/huggingface/diffusers/pull/3716/).
|
||||
|
||||
## Usage example
|
||||
|
||||
```python
|
||||
import torch
|
||||
from diffusers import DDPMParallelScheduler
|
||||
from diffusers import StableDiffusionParadigmsPipeline
|
||||
|
||||
scheduler = DDPMParallelScheduler.from_pretrained("runwayml/stable-diffusion-v1-5", subfolder="scheduler")
|
||||
|
||||
pipe = StableDiffusionParadigmsPipeline.from_pretrained(
|
||||
"runwayml/stable-diffusion-v1-5", scheduler=scheduler, torch_dtype=torch.float16
|
||||
)
|
||||
pipe = pipe.to("cuda")
|
||||
|
||||
ngpu, batch_per_device = torch.cuda.device_count(), 5
|
||||
pipe.wrapped_unet = torch.nn.DataParallel(pipe.unet, device_ids=[d for d in range(ngpu)])
|
||||
|
||||
prompt = "a photo of an astronaut riding a horse on mars"
|
||||
image = pipe(prompt, parallel=ngpu * batch_per_device, num_inference_steps=1000).images[0]
|
||||
```
|
||||
|
||||
<Tip>
|
||||
This pipeline improves sampling speed by running denoising steps in parallel, at the cost of increased total FLOPs.
|
||||
Therefore, it is better to call this pipeline when running on multiple GPUs. Otherwise, without enough GPU bandwidth
|
||||
sampling may be even slower than sequential sampling.
|
||||
|
||||
The two parameters to play with are `parallel` (batch size) and `tolerance`.
|
||||
- If it fits in memory, for 1000-step DDPM you can aim for a batch size of around 100
|
||||
(e.g. 8 GPUs and batch_per_device=12 to get parallel=96). Higher batch size
|
||||
may not fit in memory, and lower batch size gives less parallelism.
|
||||
- For tolerance, using a higher tolerance may get better speedups but can risk sample quality degradation.
|
||||
If there is quality degradation with the default tolerance, then use a lower tolerance (e.g. 0.001).
|
||||
|
||||
For 1000-step DDPM on 8 A100 GPUs, you can expect around a 3x speedup by StableDiffusionParadigmsPipeline instead of StableDiffusionPipeline
|
||||
by setting parallel=80 and tolerance=0.1.
|
||||
</Tip>
|
||||
|
||||
<Tip>
|
||||
Diffusers also offers distributed inference support for generating multiple prompts
|
||||
in parallel on multiple GPUs. Check out the docs [here](https://huggingface.co/docs/diffusers/main/en/training/distributed_inference).
|
||||
|
||||
In contrast, this pipeline is designed for speeding up sampling of a single prompt (by using multiple GPUs).
|
||||
</Tip>
|
||||
|
||||
## StableDiffusionParadigmsPipeline
|
||||
[[autodoc]] StableDiffusionParadigmsPipeline
|
||||
- __call__
|
||||
- all
|
||||
@@ -60,7 +60,7 @@ pipe = pipe.to("cuda")
|
||||
|
||||
generator = torch.Generator(device="cuda").manual_seed(0)
|
||||
output = pipe(
|
||||
image=original_image,
|
||||
original_image=original_image,
|
||||
mask_image=mask_image,
|
||||
num_inference_steps=250,
|
||||
eta=0.0,
|
||||
|
||||
@@ -1,196 +0,0 @@
|
||||
<!--Copyright 2023 The HuggingFace Team. All rights reserved.
|
||||
Licensed under the Apache License, Version 2.0 (the "License"); you may not use this file except in compliance with
|
||||
the License. You may obtain a copy of the License at
|
||||
http://www.apache.org/licenses/LICENSE-2.0
|
||||
Unless required by applicable law or agreed to in writing, software distributed under the License is distributed on
|
||||
an "AS IS" BASIS, WITHOUT WARRANTIES OR CONDITIONS OF ANY KIND, either express or implied. See the License for the
|
||||
specific language governing permissions and limitations under the License.
|
||||
-->
|
||||
|
||||
# Shap-E
|
||||
|
||||
## Overview
|
||||
|
||||
|
||||
The Shap-E model was proposed in [Shap-E: Generating Conditional 3D Implicit Functions](https://arxiv.org/abs/2305.02463) by Alex Nichol and Heewon Jun from [OpenAI](https://github.com/openai).
|
||||
|
||||
The abstract of the paper is the following:
|
||||
|
||||
*We present Shap-E, a conditional generative model for 3D assets. Unlike recent work on 3D generative models which produce a single output representation, Shap-E directly generates the parameters of implicit functions that can be rendered as both textured meshes and neural radiance fields. We train Shap-E in two stages: first, we train an encoder that deterministically maps 3D assets into the parameters of an implicit function; second, we train a conditional diffusion model on outputs of the encoder. When trained on a large dataset of paired 3D and text data, our resulting models are capable of generating complex and diverse 3D assets in a matter of seconds. When compared to Point-E, an explicit generative model over point clouds, Shap-E converges faster and reaches comparable or better sample quality despite modeling a higher-dimensional, multi-representation output space.*
|
||||
|
||||
The original codebase can be found [here](https://github.com/openai/shap-e).
|
||||
|
||||
## Available Pipelines:
|
||||
|
||||
| Pipeline | Tasks |
|
||||
|---|---|
|
||||
| [pipeline_shap_e.py](https://github.com/huggingface/diffusers/blob/main/src/diffusers/pipelines/shap_e/pipeline_shap_e.py) | *Text-to-Image Generation* |
|
||||
| [pipeline_shap_e_img2img.py](https://github.com/huggingface/diffusers/blob/main/src/diffusers/pipelines/shap_e/pipeline_shap_e_img2img.py) | *Image-to-Image Generation* |
|
||||
|
||||
## Available checkpoints
|
||||
|
||||
* [`openai/shap-e`](https://huggingface.co/openai/shap-e)
|
||||
* [`openai/shap-e-img2img`](https://huggingface.co/openai/shap-e-img2img)
|
||||
|
||||
## Usage Examples
|
||||
|
||||
In the following, we will walk you through some examples of how to use Shap-E pipelines to create 3D objects in gif format.
|
||||
|
||||
### Text-to-3D image generation
|
||||
|
||||
We can use [`ShapEPipeline`] to create 3D object based on a text prompt. In this example, we will make a birthday cupcake for :firecracker: diffusers library's 1 year birthday. The workflow to use the Shap-E text-to-image pipeline is same as how you would use other text-to-image pipelines in diffusers.
|
||||
|
||||
```python
|
||||
import torch
|
||||
|
||||
from diffusers import DiffusionPipeline
|
||||
|
||||
device = torch.device("cuda" if torch.cuda.is_available() else "cpu")
|
||||
|
||||
repo = "openai/shap-e"
|
||||
pipe = DiffusionPipeline.from_pretrained(repo, torch_dtype=torch.float16)
|
||||
pipe = pipe.to(device)
|
||||
|
||||
guidance_scale = 15.0
|
||||
prompt = ["A firecracker", "A birthday cupcake"]
|
||||
|
||||
images = pipe(
|
||||
prompt,
|
||||
guidance_scale=guidance_scale,
|
||||
num_inference_steps=64,
|
||||
frame_size=256,
|
||||
).images
|
||||
```
|
||||
|
||||
The output of [`ShapEPipeline`] is a list of lists of images frames. Each list of frames can be used to create a 3D object. Let's use the `export_to_gif` utility function in diffusers to make a 3D cupcake!
|
||||
|
||||
```python
|
||||
from diffusers.utils import export_to_gif
|
||||
|
||||
export_to_gif(images[0], "firecracker_3d.gif")
|
||||
export_to_gif(images[1], "cake_3d.gif")
|
||||
```
|
||||

|
||||
|
||||
|
||||
|
||||
### Image-to-Image generation
|
||||
|
||||
You can use [`ShapEImg2ImgPipeline`] along with other text-to-image pipelines in diffusers and turn your 2D generation into 3D.
|
||||
|
||||
In this example, We will first genrate a cheeseburger with a simple prompt "A cheeseburger, white background"
|
||||
|
||||
```python
|
||||
from diffusers import DiffusionPipeline
|
||||
import torch
|
||||
|
||||
pipe_prior = DiffusionPipeline.from_pretrained("kandinsky-community/kandinsky-2-1-prior", torch_dtype=torch.float16)
|
||||
pipe_prior.to("cuda")
|
||||
|
||||
t2i_pipe = DiffusionPipeline.from_pretrained("kandinsky-community/kandinsky-2-1", torch_dtype=torch.float16)
|
||||
t2i_pipe.to("cuda")
|
||||
|
||||
prompt = "A cheeseburger, white background"
|
||||
|
||||
image_embeds, negative_image_embeds = pipe_prior(prompt, guidance_scale=1.0).to_tuple()
|
||||
image = t2i_pipe(
|
||||
prompt,
|
||||
image_embeds=image_embeds,
|
||||
negative_image_embeds=negative_image_embeds,
|
||||
).images[0]
|
||||
|
||||
image.save("burger.png")
|
||||
```
|
||||
|
||||
|
||||
|
||||
we will then use the Shap-E image-to-image pipeline to turn it into a 3D cheeseburger :)
|
||||
|
||||
```python
|
||||
from PIL import Image
|
||||
from diffusers.utils import export_to_gif
|
||||
|
||||
repo = "openai/shap-e-img2img"
|
||||
pipe = DiffusionPipeline.from_pretrained(repo, torch_dtype=torch.float16)
|
||||
pipe = pipe.to("cuda")
|
||||
|
||||
guidance_scale = 3.0
|
||||
image = Image.open("burger.png").resize((256, 256))
|
||||
|
||||
images = pipe(
|
||||
image,
|
||||
guidance_scale=guidance_scale,
|
||||
num_inference_steps=64,
|
||||
frame_size=256,
|
||||
).images
|
||||
|
||||
gif_path = export_to_gif(images[0], "burger_3d.gif")
|
||||
```
|
||||
|
||||
|
||||
### Generate mesh
|
||||
|
||||
For both [`ShapEPipeline`] and [`ShapEImg2ImgPipeline`], you can generate mesh output by passing `output_type` as `mesh` to the pipeline, and then use the [`ShapEPipeline.export_to_ply`] utility function to save the output as a `ply` file. We also provide a [`ShapEPipeline.export_to_obj`] function that you can use to save mesh outputs as `obj` files.
|
||||
|
||||
```python
|
||||
import torch
|
||||
|
||||
from diffusers import DiffusionPipeline
|
||||
from diffusers.utils import export_to_ply
|
||||
|
||||
device = torch.device("cuda" if torch.cuda.is_available() else "cpu")
|
||||
|
||||
repo = "openai/shap-e"
|
||||
pipe = DiffusionPipeline.from_pretrained(repo, torch_dtype=torch.float16, variant="fp16")
|
||||
pipe = pipe.to(device)
|
||||
|
||||
guidance_scale = 15.0
|
||||
prompt = "A birthday cupcake"
|
||||
|
||||
images = pipe(prompt, guidance_scale=guidance_scale, num_inference_steps=64, frame_size=256, output_type="mesh").images
|
||||
|
||||
ply_path = export_to_ply(images[0], "3d_cake.ply")
|
||||
print(f"saved to folder: {ply_path}")
|
||||
```
|
||||
|
||||
Huggingface Datasets supports mesh visualization for mesh files in `glb` format. Below we will show you how to convert your mesh file into `glb` format so that you can use the Dataset viewer to render 3D objects.
|
||||
|
||||
We need to install `trimesh` library.
|
||||
|
||||
```
|
||||
pip install trimesh
|
||||
```
|
||||
|
||||
To convert the mesh file into `glb` format,
|
||||
|
||||
```python
|
||||
import trimesh
|
||||
|
||||
mesh = trimesh.load("3d_cake.ply")
|
||||
mesh.export("3d_cake.glb", file_type="glb")
|
||||
```
|
||||
|
||||
By default, the mesh output of Shap-E is from the bottom viewpoint; you can change the default viewpoint by applying a rotation transformation
|
||||
|
||||
```python
|
||||
import trimesh
|
||||
import numpy as np
|
||||
|
||||
mesh = trimesh.load("3d_cake.ply")
|
||||
rot = trimesh.transformations.rotation_matrix(-np.pi / 2, [1, 0, 0])
|
||||
mesh = mesh.apply_transform(rot)
|
||||
mesh.export("3d_cake.glb", file_type="glb")
|
||||
```
|
||||
|
||||
Now you can upload your mesh file to your dataset and visualize it! Here is the link to the 3D cake we just generated
|
||||
https://huggingface.co/datasets/hf-internal-testing/diffusers-images/blob/main/shap_e/3d_cake.glb
|
||||
|
||||
## ShapEPipeline
|
||||
[[autodoc]] ShapEPipeline
|
||||
- all
|
||||
- __call__
|
||||
|
||||
## ShapEImg2ImgPipeline
|
||||
[[autodoc]] ShapEImg2ImgPipeline
|
||||
- all
|
||||
- __call__
|
||||
@@ -1,187 +0,0 @@
|
||||
<!--Copyright 2023 The HuggingFace Team. All rights reserved.
|
||||
|
||||
Licensed under the Apache License, Version 2.0 (the "License"); you may not use this file except in compliance with
|
||||
the License. You may obtain a copy of the License at
|
||||
|
||||
http://www.apache.org/licenses/LICENSE-2.0
|
||||
|
||||
Unless required by applicable law or agreed to in writing, software distributed under the License is distributed on
|
||||
an "AS IS" BASIS, WITHOUT WARRANTIES OR CONDITIONS OF ANY KIND, either express or implied. See the License for the
|
||||
specific language governing permissions and limitations under the License.
|
||||
-->
|
||||
|
||||
# Text-to-Image Generation with Adapter Conditioning
|
||||
|
||||
## Overview
|
||||
|
||||
[T2I-Adapter: Learning Adapters to Dig out More Controllable Ability for Text-to-Image Diffusion Models](https://arxiv.org/abs/2302.08453) by Chong Mou, Xintao Wang, Liangbin Xie, Jian Zhang, Zhongang Qi, Ying Shan, Xiaohu Qie.
|
||||
|
||||
Using the pretrained models we can provide control images (for example, a depth map) to control Stable Diffusion text-to-image generation so that it follows the structure of the depth image and fills in the details.
|
||||
|
||||
The abstract of the paper is the following:
|
||||
|
||||
*The incredible generative ability of large-scale text-to-image (T2I) models has demonstrated strong power of learning complex structures and meaningful semantics. However, relying solely on text prompts cannot fully take advantage of the knowledge learned by the model, especially when flexible and accurate structure control is needed. In this paper, we aim to ``dig out" the capabilities that T2I models have implicitly learned, and then explicitly use them to control the generation more granularly. Specifically, we propose to learn simple and small T2I-Adapters to align internal knowledge in T2I models with external control signals, while freezing the original large T2I models. In this way, we can train various adapters according to different conditions, and achieve rich control and editing effects. Further, the proposed T2I-Adapters have attractive properties of practical value, such as composability and generalization ability. Extensive experiments demonstrate that our T2I-Adapter has promising generation quality and a wide range of applications.*
|
||||
|
||||
This model was contributed by the community contributor [HimariO](https://github.com/HimariO) ❤️ .
|
||||
|
||||
## Available Pipelines:
|
||||
|
||||
| Pipeline | Tasks | Demo
|
||||
|---|---|:---:|
|
||||
| [StableDiffusionAdapterPipeline](https://github.com/huggingface/diffusers/blob/main/src/diffusers/pipelines/stable_diffusion/pipeline_stable_diffusion_adapter.py) | *Text-to-Image Generation with T2I-Adapter Conditioning* | -
|
||||
|
||||
## Usage example
|
||||
|
||||
In the following we give a simple example of how to use a *T2IAdapter* checkpoint with Diffusers for inference.
|
||||
All adapters use the same pipeline.
|
||||
|
||||
1. Images are first converted into the appropriate *control image* format.
|
||||
2. The *control image* and *prompt* are passed to the [`StableDiffusionAdapterPipeline`].
|
||||
|
||||
Let's have a look at a simple example using the [Color Adapter](https://huggingface.co/TencentARC/t2iadapter_color_sd14v1).
|
||||
|
||||
```python
|
||||
from diffusers.utils import load_image
|
||||
|
||||
image = load_image("https://huggingface.co/datasets/diffusers/docs-images/resolve/main/t2i-adapter/color_ref.png")
|
||||
```
|
||||
|
||||
|
||||
|
||||
|
||||
Then we can create our color palette by simply resizing it to 8 by 8 pixels and then scaling it back to original size.
|
||||
|
||||
```python
|
||||
from PIL import Image
|
||||
|
||||
color_palette = image.resize((8, 8))
|
||||
color_palette = color_palette.resize((512, 512), resample=Image.Resampling.NEAREST)
|
||||
```
|
||||
|
||||
Let's take a look at the processed image.
|
||||
|
||||

|
||||
|
||||
|
||||
Next, create the adapter pipeline
|
||||
|
||||
```py
|
||||
import torch
|
||||
from diffusers import StableDiffusionAdapterPipeline, T2IAdapter
|
||||
|
||||
adapter = T2IAdapter.from_pretrained("TencentARC/t2iadapter_color_sd14v1")
|
||||
pipe = StableDiffusionAdapterPipeline.from_pretrained(
|
||||
"CompVis/stable-diffusion-v1-4",
|
||||
adapter=adapter,
|
||||
torch_dtype=torch.float16,
|
||||
)
|
||||
pipe.to("cuda")
|
||||
```
|
||||
|
||||
Finally, pass the prompt and control image to the pipeline
|
||||
|
||||
```py
|
||||
# fix the random seed, so you will get the same result as the example
|
||||
generator = torch.manual_seed(7)
|
||||
|
||||
out_image = pipe(
|
||||
"At night, glowing cubes in front of the beach",
|
||||
image=color_palette,
|
||||
generator=generator,
|
||||
).images[0]
|
||||
```
|
||||
|
||||
|
||||
|
||||
|
||||
## Available checkpoints
|
||||
|
||||
Non-diffusers checkpoints can be found under [TencentARC/T2I-Adapter](https://huggingface.co/TencentARC/T2I-Adapter/tree/main/models).
|
||||
|
||||
### T2I-Adapter with Stable Diffusion 1.4
|
||||
|
||||
| Model Name | Control Image Overview| Control Image Example | Generated Image Example |
|
||||
|---|---|---|---|
|
||||
|[TencentARC/t2iadapter_color_sd14v1](https://huggingface.co/TencentARC/t2iadapter_color_sd14v1)<br/> *Trained with spatial color palette* | A image with 8x8 color palette.|<a href="https://huggingface.co/datasets/diffusers/docs-images/resolve/main/t2i-adapter/color_sample_input.png"><img width="64" style="margin:0;padding:0;" src="https://huggingface.co/datasets/diffusers/docs-images/resolve/main/t2i-adapter/color_sample_input.png"/></a>|<a href="https://huggingface.co/datasets/diffusers/docs-images/resolve/main/t2i-adapter/color_sample_output.png"><img width="64" src="https://huggingface.co/datasets/diffusers/docs-images/resolve/main/t2i-adapter/color_sample_output.png"/></a>|
|
||||
|[TencentARC/t2iadapter_canny_sd14v1](https://huggingface.co/TencentARC/t2iadapter_canny_sd14v1)<br/> *Trained with canny edge detection* | A monochrome image with white edges on a black background.|<a href="https://huggingface.co/datasets/diffusers/docs-images/resolve/main/t2i-adapter/canny_sample_input.png"><img width="64" style="margin:0;padding:0;" src="https://huggingface.co/datasets/diffusers/docs-images/resolve/main/t2i-adapter/canny_sample_input.png"/></a>|<a href="https://huggingface.co/datasets/diffusers/docs-images/resolve/main/t2i-adapter/canny_sample_output.png"><img width="64" src="https://huggingface.co/datasets/diffusers/docs-images/resolve/main/t2i-adapter/canny_sample_output.png"/></a>|
|
||||
|[TencentARC/t2iadapter_sketch_sd14v1](https://huggingface.co/TencentARC/t2iadapter_sketch_sd14v1)<br/> *Trained with [PidiNet](https://github.com/zhuoinoulu/pidinet) edge detection* | A hand-drawn monochrome image with white outlines on a black background.|<a href="https://huggingface.co/datasets/diffusers/docs-images/resolve/main/t2i-adapter/sketch_sample_input.png"><img width="64" style="margin:0;padding:0;" src="https://huggingface.co/datasets/diffusers/docs-images/resolve/main/t2i-adapter/sketch_sample_input.png"/></a>|<a href="https://huggingface.co/datasets/diffusers/docs-images/resolve/main/t2i-adapter/sketch_sample_output.png"><img width="64" src="https://huggingface.co/datasets/diffusers/docs-images/resolve/main/t2i-adapter/sketch_sample_output.png"/></a>|
|
||||
|[TencentARC/t2iadapter_depth_sd14v1](https://huggingface.co/TencentARC/t2iadapter_depth_sd14v1)<br/> *Trained with Midas depth estimation* | A grayscale image with black representing deep areas and white representing shallow areas.|<a href="https://huggingface.co/datasets/diffusers/docs-images/resolve/main/t2i-adapter/depth_sample_input.png"><img width="64" src="https://huggingface.co/datasets/diffusers/docs-images/resolve/main/t2i-adapter/depth_sample_input.png"/></a>|<a href="https://huggingface.co/datasets/diffusers/docs-images/resolve/main/t2i-adapter/depth_sample_output.png"><img width="64" src="https://huggingface.co/datasets/diffusers/docs-images/resolve/main/t2i-adapter/depth_sample_output.png"/></a>|
|
||||
|[TencentARC/t2iadapter_openpose_sd14v1](https://huggingface.co/TencentARC/t2iadapter_openpose_sd14v1)<br/> *Trained with OpenPose bone image* | A [OpenPose bone](https://github.com/CMU-Perceptual-Computing-Lab/openpose) image.|<a href="https://huggingface.co/datasets/diffusers/docs-images/resolve/main/t2i-adapter/openpose_sample_input.png"><img width="64" src="https://huggingface.co/datasets/diffusers/docs-images/resolve/main/t2i-adapter/openpose_sample_input.png"/></a>|<a href="https://huggingface.co/datasets/diffusers/docs-images/resolve/main/t2i-adapter/openpose_sample_output.png"><img width="64" src="https://huggingface.co/datasets/diffusers/docs-images/resolve/main/t2i-adapter/openpose_sample_output.png"/></a>|
|
||||
|[TencentARC/t2iadapter_keypose_sd14v1](https://huggingface.co/TencentARC/t2iadapter_keypose_sd14v1)<br/> *Trained with mmpose skeleton image* | A [mmpose skeleton](https://github.com/open-mmlab/mmpose) image.|<a href="https://huggingface.co/datasets/diffusers/docs-images/resolve/main/t2i-adapter/keypose_sample_input.png"><img width="64" src="https://huggingface.co/datasets/diffusers/docs-images/resolve/main/t2i-adapter/keypose_sample_input.png"/></a>|<a href="https://huggingface.co/datasets/diffusers/docs-images/resolve/main/t2i-adapter/keypose_sample_output.png"><img width="64" src="https://huggingface.co/datasets/diffusers/docs-images/resolve/main/t2i-adapter/keypose_sample_output.png"/></a>|
|
||||
|[TencentARC/t2iadapter_seg_sd14v1](https://huggingface.co/TencentARC/t2iadapter_seg_sd14v1)<br/>*Trained with semantic segmentation* | An [custom](https://github.com/TencentARC/T2I-Adapter/discussions/25) segmentation protocol image.|<a href="https://huggingface.co/datasets/diffusers/docs-images/resolve/main/t2i-adapter/seg_sample_input.png"><img width="64" src="https://huggingface.co/datasets/diffusers/docs-images/resolve/main/t2i-adapter/seg_sample_input.png"/></a>|<a href="https://huggingface.co/datasets/diffusers/docs-images/resolve/main/t2i-adapter/seg_sample_output.png"><img width="64" src="https://huggingface.co/datasets/diffusers/docs-images/resolve/main/t2i-adapter/seg_sample_output.png"/></a> |
|
||||
|[TencentARC/t2iadapter_canny_sd15v2](https://huggingface.co/TencentARC/t2iadapter_canny_sd15v2)||
|
||||
|[TencentARC/t2iadapter_depth_sd15v2](https://huggingface.co/TencentARC/t2iadapter_depth_sd15v2)||
|
||||
|[TencentARC/t2iadapter_sketch_sd15v2](https://huggingface.co/TencentARC/t2iadapter_sketch_sd15v2)||
|
||||
|[TencentARC/t2iadapter_zoedepth_sd15v1](https://huggingface.co/TencentARC/t2iadapter_zoedepth_sd15v1)||
|
||||
|
||||
## Combining multiple adapters
|
||||
|
||||
[`MultiAdapter`] can be used for applying multiple conditionings at once.
|
||||
|
||||
Here we use the keypose adapter for the character posture and the depth adapter for creating the scene.
|
||||
|
||||
```py
|
||||
import torch
|
||||
from PIL import Image
|
||||
from diffusers.utils import load_image
|
||||
|
||||
cond_keypose = load_image(
|
||||
"https://huggingface.co/datasets/diffusers/docs-images/resolve/main/t2i-adapter/keypose_sample_input.png"
|
||||
)
|
||||
cond_depth = load_image(
|
||||
"https://huggingface.co/datasets/diffusers/docs-images/resolve/main/t2i-adapter/depth_sample_input.png"
|
||||
)
|
||||
cond = [[cond_keypose, cond_depth]]
|
||||
|
||||
prompt = ["A man walking in an office room with a nice view"]
|
||||
```
|
||||
|
||||
The two control images look as such:
|
||||
|
||||
|
||||
|
||||
|
||||
|
||||
`MultiAdapter` combines keypose and depth adapters.
|
||||
|
||||
`adapter_conditioning_scale` balances the relative influence of the different adapters.
|
||||
|
||||
```py
|
||||
from diffusers import StableDiffusionAdapterPipeline, MultiAdapter
|
||||
|
||||
adapters = MultiAdapter(
|
||||
[
|
||||
T2IAdapter.from_pretrained("TencentARC/t2iadapter_keypose_sd14v1"),
|
||||
T2IAdapter.from_pretrained("TencentARC/t2iadapter_depth_sd14v1"),
|
||||
]
|
||||
)
|
||||
adapters = adapters.to(torch.float16)
|
||||
|
||||
pipe = StableDiffusionAdapterPipeline.from_pretrained(
|
||||
"CompVis/stable-diffusion-v1-4",
|
||||
torch_dtype=torch.float16,
|
||||
adapter=adapters,
|
||||
)
|
||||
|
||||
images = pipe(prompt, cond, adapter_conditioning_scale=[0.8, 0.8])
|
||||
```
|
||||
|
||||

|
||||
|
||||
|
||||
## T2I Adapter vs ControlNet
|
||||
|
||||
T2I-Adapter is similar to [ControlNet](https://huggingface.co/docs/diffusers/main/en/api/pipelines/controlnet).
|
||||
T2i-Adapter uses a smaller auxiliary network which is only run once for the entire diffusion process.
|
||||
However, T2I-Adapter performs slightly worse than ControlNet.
|
||||
|
||||
## StableDiffusionAdapterPipeline
|
||||
[[autodoc]] StableDiffusionAdapterPipeline
|
||||
- all
|
||||
- __call__
|
||||
- enable_attention_slicing
|
||||
- disable_attention_slicing
|
||||
- enable_vae_slicing
|
||||
- disable_vae_slicing
|
||||
- enable_xformers_memory_efficient_attention
|
||||
- disable_xformers_memory_efficient_attention
|
||||
@@ -22,7 +22,7 @@ The abstract of the paper is the following:
|
||||
|
||||
*We present a neural network structure, ControlNet, to control pretrained large diffusion models to support additional input conditions. The ControlNet learns task-specific conditions in an end-to-end way, and the learning is robust even when the training dataset is small (< 50k). Moreover, training a ControlNet is as fast as fine-tuning a diffusion model, and the model can be trained on a personal devices. Alternatively, if powerful computation clusters are available, the model can scale to large amounts (millions to billions) of data. We report that large diffusion models like Stable Diffusion can be augmented with ControlNets to enable conditional inputs like edge maps, segmentation maps, keypoints, etc. This may enrich the methods to control large diffusion models and further facilitate related applications.*
|
||||
|
||||
This model was contributed by the community contributor [takuma104](https://huggingface.co/takuma104) ❤️ .
|
||||
This model was contributed by the amazing community contributor [takuma104](https://huggingface.co/takuma104) ❤️ .
|
||||
|
||||
Resources:
|
||||
|
||||
@@ -33,9 +33,7 @@ Resources:
|
||||
|
||||
| Pipeline | Tasks | Demo
|
||||
|---|---|:---:|
|
||||
| [StableDiffusionControlNetPipeline](https://github.com/huggingface/diffusers/blob/main/src/diffusers/pipelines/controlnet/pipeline_controlnet.py) | *Text-to-Image Generation with ControlNet Conditioning* | [Colab Example](https://colab.research.google.com/github/huggingface/notebooks/blob/main/diffusers/controlnet.ipynb)
|
||||
| [StableDiffusionControlNetImg2ImgPipeline](https://github.com/huggingface/diffusers/blob/main/src/diffusers/pipelines/controlnet/pipeline_controlnet_img2img.py) | *Image-to-Image Generation with ControlNet Conditioning* |
|
||||
| [StableDiffusionControlNetInpaintPipeline](https://github.com/huggingface/diffusers/blob/main/src/diffusers/pipelines/stable_diffusion/pipeline_controlnet_inpaint.py) | *Inpainting Generation with ControlNet Conditioning* |
|
||||
| [StableDiffusionControlNetPipeline](https://github.com/huggingface/diffusers/blob/main/src/diffusers/pipelines/stable_diffusion/pipeline_stable_diffusion_controlnet.py) | *Text-to-Image Generation with ControlNet Conditioning* | [Colab Example](https://colab.research.google.com/github/huggingface/notebooks/blob/main/diffusers/controlnet.ipynb)
|
||||
|
||||
## Usage example
|
||||
|
||||
@@ -279,6 +277,7 @@ Canny Control Example
|
||||
|<a href="https://huggingface.co/takuma104/controlnet_dev/resolve/main/gen_compare_guess_mode/output_images/diffusers/output_bird_canny_0.png"><img width="128" src="https://huggingface.co/takuma104/controlnet_dev/resolve/main/gen_compare_guess_mode/output_images/diffusers/output_bird_canny_0.png"/></a>|<a href="https://huggingface.co/takuma104/controlnet_dev/resolve/main/gen_compare_guess_mode/output_images/diffusers/output_bird_canny_0_gm.png"><img width="128" src="https://huggingface.co/takuma104/controlnet_dev/resolve/main/gen_compare_guess_mode/output_images/diffusers/output_bird_canny_0_gm.png"/></a>|
|
||||
|
||||
|
||||
|
||||
## Available checkpoints
|
||||
|
||||
ControlNet requires a *control image* in addition to the text-to-image *prompt*.
|
||||
@@ -286,9 +285,7 @@ Each pretrained model is trained using a different conditioning method that requ
|
||||
|
||||
All checkpoints can be found under the authors' namespace [lllyasviel](https://huggingface.co/lllyasviel).
|
||||
|
||||
**13.04.2024 Update**: The author has released improved controlnet checkpoints v1.1 - see [here](#controlnet-v1.1).
|
||||
|
||||
### ControlNet v1.0
|
||||
### ControlNet with Stable Diffusion 1.5
|
||||
|
||||
| Model Name | Control Image Overview| Control Image Example | Generated Image Example |
|
||||
|---|---|---|---|
|
||||
@@ -301,25 +298,6 @@ All checkpoints can be found under the authors' namespace [lllyasviel](https://h
|
||||
|[lllyasviel/sd-controlnet-scribble](https://huggingface.co/lllyasviel/sd-controlnet_scribble)<br/> *Trained with human scribbles* |A hand-drawn monochrome image with white outlines on a black background.|<a href="https://huggingface.co/takuma104/controlnet_dev/blob/main/gen_compare/control_images/converted/control_vermeer_scribble.png"><img width="64" src="https://huggingface.co/takuma104/controlnet_dev/resolve/main/gen_compare/control_images/converted/control_vermeer_scribble.png"/></a>|<a href="https://huggingface.co/takuma104/controlnet_dev/resolve/main/gen_compare/output_images/diffusers/output_vermeer_scribble_0.png"><img width="64" src="https://huggingface.co/takuma104/controlnet_dev/resolve/main/gen_compare/output_images/diffusers/output_vermeer_scribble_0.png"/></a> |
|
||||
|[lllyasviel/sd-controlnet-seg](https://huggingface.co/lllyasviel/sd-controlnet_seg)<br/>*Trained with semantic segmentation* |An [ADE20K](https://groups.csail.mit.edu/vision/datasets/ADE20K/)'s segmentation protocol image.|<a href="https://huggingface.co/takuma104/controlnet_dev/blob/main/gen_compare/control_images/converted/control_room_seg.png"><img width="64" src="https://huggingface.co/takuma104/controlnet_dev/resolve/main/gen_compare/control_images/converted/control_room_seg.png"/></a>|<a href="https://huggingface.co/takuma104/controlnet_dev/resolve/main/gen_compare/output_images/diffusers/output_room_seg_1.png"><img width="64" src="https://huggingface.co/takuma104/controlnet_dev/resolve/main/gen_compare/output_images/diffusers/output_room_seg_1.png"/></a> |
|
||||
|
||||
### ControlNet v1.1
|
||||
|
||||
| Model Name | Control Image Overview| Condition Image | Control Image Example | Generated Image Example |
|
||||
|---|---|---|---|---|
|
||||
|[lllyasviel/control_v11p_sd15_canny](https://huggingface.co/lllyasviel/control_v11p_sd15_canny)<br/> | *Trained with canny edge detection* | A monochrome image with white edges on a black background.|<a href="https://huggingface.co/lllyasviel/control_v11p_sd15_canny/resolve/main/images/control.png"><img width="64" style="margin:0;padding:0;" src="https://huggingface.co/lllyasviel/control_v11p_sd15_canny/resolve/main/images/control.png"/></a>|<a href="https://huggingface.co/lllyasviel/control_v11p_sd15_canny/resolve/main/images/image_out.png"><img width="64" src="https://huggingface.co/lllyasviel/control_v11p_sd15_canny/resolve/main/images/image_out.png"/></a>|
|
||||
|[lllyasviel/control_v11e_sd15_ip2p](https://huggingface.co/lllyasviel/control_v11e_sd15_ip2p)<br/> | *Trained with pixel to pixel instruction* | No condition .|<a href="https://huggingface.co/lllyasviel/control_v11e_sd15_ip2p/resolve/main/images/control.png"><img width="64" style="margin:0;padding:0;" src="https://huggingface.co/lllyasviel/control_v11e_sd15_ip2p/resolve/main/images/control.png"/></a>|<a href="https://huggingface.co/lllyasviel/control_v11e_sd15_ip2p/resolve/main/images/image_out.png"><img width="64" src="https://huggingface.co/lllyasviel/control_v11e_sd15_ip2p/resolve/main/images/image_out.png"/></a>|
|
||||
|[lllyasviel/control_v11p_sd15_inpaint](https://huggingface.co/lllyasviel/control_v11p_sd15_inpaint)<br/> | Trained with image inpainting | No condition.|<a href="https://huggingface.co/lllyasviel/control_v11p_sd15_inpaint/resolve/main/images/control.png"><img width="64" style="margin:0;padding:0;" src="https://huggingface.co/lllyasviel/control_v11p_sd15_inpaint/resolve/main/images/control.png"/></a>|<a href="https://huggingface.co/lllyasviel/control_v11p_sd15_inpaint/resolve/main/images/output.png"><img width="64" src="https://huggingface.co/lllyasviel/control_v11p_sd15_inpaint/resolve/main/images/output.png"/></a>|
|
||||
|[lllyasviel/control_v11p_sd15_mlsd](https://huggingface.co/lllyasviel/control_v11p_sd15_mlsd)<br/> | Trained with multi-level line segment detection | An image with annotated line segments.|<a href="https://huggingface.co/lllyasviel/control_v11p_sd15_mlsd/resolve/main/images/control.png"><img width="64" style="margin:0;padding:0;" src="https://huggingface.co/lllyasviel/control_v11p_sd15_mlsd/resolve/main/images/control.png"/></a>|<a href="https://huggingface.co/lllyasviel/control_v11p_sd15_mlsd/resolve/main/images/image_out.png"><img width="64" src="https://huggingface.co/lllyasviel/control_v11p_sd15_mlsd/resolve/main/images/image_out.png"/></a>|
|
||||
|[lllyasviel/control_v11f1p_sd15_depth](https://huggingface.co/lllyasviel/control_v11f1p_sd15_depth)<br/> | Trained with depth estimation | An image with depth information, usually represented as a grayscale image.|<a href="https://huggingface.co/lllyasviel/control_v11f1p_sd15_depth/resolve/main/images/control.png"><img width="64" style="margin:0;padding:0;" src="https://huggingface.co/lllyasviel/control_v11f1p_sd15_depth/resolve/main/images/control.png"/></a>|<a href="https://huggingface.co/lllyasviel/control_v11f1p_sd15_depth/resolve/main/images/image_out.png"><img width="64" src="https://huggingface.co/lllyasviel/control_v11f1p_sd15_depth/resolve/main/images/image_out.png"/></a>|
|
||||
|[lllyasviel/control_v11p_sd15_normalbae](https://huggingface.co/lllyasviel/control_v11p_sd15_normalbae)<br/> | Trained with surface normal estimation | An image with surface normal information, usually represented as a color-coded image.|<a href="https://huggingface.co/lllyasviel/control_v11p_sd15_normalbae/resolve/main/images/control.png"><img width="64" style="margin:0;padding:0;" src="https://huggingface.co/lllyasviel/control_v11p_sd15_normalbae/resolve/main/images/control.png"/></a>|<a href="https://huggingface.co/lllyasviel/control_v11p_sd15_normalbae/resolve/main/images/image_out.png"><img width="64" src="https://huggingface.co/lllyasviel/control_v11p_sd15_normalbae/resolve/main/images/image_out.png"/></a>|
|
||||
|[lllyasviel/control_v11p_sd15_seg](https://huggingface.co/lllyasviel/control_v11p_sd15_seg)<br/> | Trained with image segmentation | An image with segmented regions, usually represented as a color-coded image.|<a href="https://huggingface.co/lllyasviel/control_v11p_sd15_seg/resolve/main/images/control.png"><img width="64" style="margin:0;padding:0;" src="https://huggingface.co/lllyasviel/control_v11p_sd15_seg/resolve/main/images/control.png"/></a>|<a href="https://huggingface.co/lllyasviel/control_v11p_sd15_seg/resolve/main/images/image_out.png"><img width="64" src="https://huggingface.co/lllyasviel/control_v11p_sd15_seg/resolve/main/images/image_out.png"/></a>|
|
||||
|[lllyasviel/control_v11p_sd15_lineart](https://huggingface.co/lllyasviel/control_v11p_sd15_lineart)<br/> | Trained with line art generation | An image with line art, usually black lines on a white background.|<a href="https://huggingface.co/lllyasviel/control_v11p_sd15_lineart/resolve/main/images/control.png"><img width="64" style="margin:0;padding:0;" src="https://huggingface.co/lllyasviel/control_v11p_sd15_lineart/resolve/main/images/control.png"/></a>|<a href="https://huggingface.co/lllyasviel/control_v11p_sd15_lineart/resolve/main/images/image_out.png"><img width="64" src="https://huggingface.co/lllyasviel/control_v11p_sd15_lineart/resolve/main/images/image_out.png"/></a>|
|
||||
|[lllyasviel/control_v11p_sd15s2_lineart_anime](https://huggingface.co/lllyasviel/control_v11p_sd15s2_lineart_anime)<br/> | Trained with anime line art generation | An image with anime-style line art.|<a href="https://huggingface.co/lllyasviel/control_v11p_sd15s2_lineart_anime/resolve/main/images/control.png"><img width="64" style="margin:0;padding:0;" src="https://huggingface.co/lllyasviel/control_v11p_sd15s2_lineart_anime/resolve/main/images/control.png"/></a>|<a href="https://huggingface.co/lllyasviel/control_v11p_sd15s2_lineart_anime/resolve/main/images/image_out.png"><img width="64" src="https://huggingface.co/lllyasviel/control_v11p_sd15s2_lineart_anime/resolve/main/images/image_out.png"/></a>|
|
||||
|[lllyasviel/control_v11p_sd15_openpose](https://huggingface.co/lllyasviel/control_v11p_sd15s2_lineart_anime)<br/> | Trained with human pose estimation | An image with human poses, usually represented as a set of keypoints or skeletons.|<a href="https://huggingface.co/lllyasviel/control_v11p_sd15_openpose/resolve/main/images/control.png"><img width="64" style="margin:0;padding:0;" src="https://huggingface.co/lllyasviel/control_v11p_sd15_openpose/resolve/main/images/control.png"/></a>|<a href="https://huggingface.co/lllyasviel/control_v11p_sd15_openpose/resolve/main/images/image_out.png"><img width="64" src="https://huggingface.co/lllyasviel/control_v11p_sd15_openpose/resolve/main/images/image_out.png"/></a>|
|
||||
|[lllyasviel/control_v11p_sd15_scribble](https://huggingface.co/lllyasviel/control_v11p_sd15_scribble)<br/> | Trained with scribble-based image generation | An image with scribbles, usually random or user-drawn strokes.|<a href="https://huggingface.co/lllyasviel/control_v11p_sd15_scribble/resolve/main/images/control.png"><img width="64" style="margin:0;padding:0;" src="https://huggingface.co/lllyasviel/control_v11p_sd15_scribble/resolve/main/images/control.png"/></a>|<a href="https://huggingface.co/lllyasviel/control_v11p_sd15_scribble/resolve/main/images/image_out.png"><img width="64" src="https://huggingface.co/lllyasviel/control_v11p_sd15_scribble/resolve/main/images/image_out.png"/></a>|
|
||||
|[lllyasviel/control_v11p_sd15_softedge](https://huggingface.co/lllyasviel/control_v11p_sd15_softedge)<br/> | Trained with soft edge image generation | An image with soft edges, usually to create a more painterly or artistic effect.|<a href="https://huggingface.co/lllyasviel/control_v11p_sd15_softedge/resolve/main/images/control.png"><img width="64" style="margin:0;padding:0;" src="https://huggingface.co/lllyasviel/control_v11p_sd15_softedge/resolve/main/images/control.png"/></a>|<a href="https://huggingface.co/lllyasviel/control_v11p_sd15_softedge/resolve/main/images/image_out.png"><img width="64" src="https://huggingface.co/lllyasviel/control_v11p_sd15_softedge/resolve/main/images/image_out.png"/></a>|
|
||||
|[lllyasviel/control_v11e_sd15_shuffle](https://huggingface.co/lllyasviel/control_v11e_sd15_shuffle)<br/> | Trained with image shuffling | An image with shuffled patches or regions.|<a href="https://huggingface.co/lllyasviel/control_v11e_sd15_shuffle/resolve/main/images/control.png"><img width="64" style="margin:0;padding:0;" src="https://huggingface.co/lllyasviel/control_v11e_sd15_shuffle/resolve/main/images/control.png"/></a>|<a href="https://huggingface.co/lllyasviel/control_v11e_sd15_shuffle/resolve/main/images/image_out.png"><img width="64" src="https://huggingface.co/lllyasviel/control_v11e_sd15_shuffle/resolve/main/images/image_out.png"/></a>|
|
||||
|[lllyasviel/control_v11f1e_sd15_tile](https://huggingface.co/lllyasviel/control_v11f1e_sd15_tile)<br/> | Trained with image tiling | A blurry image or part of an image .|<a href="https://huggingface.co/lllyasviel/control_v11f1e_sd15_tile/resolve/main/images/original.png"><img width="64" style="margin:0;padding:0;" src="https://huggingface.co/lllyasviel/control_v11f1e_sd15_tile/resolve/main/images/original.png"/></a>|<a href="https://huggingface.co/lllyasviel/control_v11f1e_sd15_tile/resolve/main/images/output.png"><img width="64" src="https://huggingface.co/lllyasviel/control_v11f1e_sd15_tile/resolve/main/images/output.png"/></a>|
|
||||
|
||||
## StableDiffusionControlNetPipeline
|
||||
[[autodoc]] StableDiffusionControlNetPipeline
|
||||
- all
|
||||
@@ -332,30 +310,6 @@ All checkpoints can be found under the authors' namespace [lllyasviel](https://h
|
||||
- disable_xformers_memory_efficient_attention
|
||||
- load_textual_inversion
|
||||
|
||||
## StableDiffusionControlNetImg2ImgPipeline
|
||||
[[autodoc]] StableDiffusionControlNetImg2ImgPipeline
|
||||
- all
|
||||
- __call__
|
||||
- enable_attention_slicing
|
||||
- disable_attention_slicing
|
||||
- enable_vae_slicing
|
||||
- disable_vae_slicing
|
||||
- enable_xformers_memory_efficient_attention
|
||||
- disable_xformers_memory_efficient_attention
|
||||
- load_textual_inversion
|
||||
|
||||
## StableDiffusionControlNetInpaintPipeline
|
||||
[[autodoc]] StableDiffusionControlNetInpaintPipeline
|
||||
- all
|
||||
- __call__
|
||||
- enable_attention_slicing
|
||||
- disable_attention_slicing
|
||||
- enable_vae_slicing
|
||||
- disable_vae_slicing
|
||||
- enable_xformers_memory_efficient_attention
|
||||
- disable_xformers_memory_efficient_attention
|
||||
- load_textual_inversion
|
||||
|
||||
## FlaxStableDiffusionControlNetPipeline
|
||||
[[autodoc]] FlaxStableDiffusionControlNetPipeline
|
||||
- all
|
||||
@@ -31,7 +31,7 @@ proposed by Chenlin Meng, Yutong He, Yang Song, Jiaming Song, Jiajun Wu, Jun-Yan
|
||||
- enable_xformers_memory_efficient_attention
|
||||
- disable_xformers_memory_efficient_attention
|
||||
- load_textual_inversion
|
||||
- from_single_file
|
||||
- from_ckpt
|
||||
- load_lora_weights
|
||||
- save_lora_weights
|
||||
|
||||
|
||||
@@ -1,55 +0,0 @@
|
||||
<!--Copyright 2023 The Intel Labs Team Authors and HuggingFace Team. All rights reserved.
|
||||
|
||||
Licensed under the Apache License, Version 2.0 (the "License"); you may not use this file except in compliance with
|
||||
the License. You may obtain a copy of the License at
|
||||
|
||||
http://www.apache.org/licenses/LICENSE-2.0
|
||||
|
||||
Unless required by applicable law or agreed to in writing, software distributed under the License is distributed on
|
||||
an "AS IS" BASIS, WITHOUT WARRANTIES OR CONDITIONS OF ANY KIND, either express or implied. See the License for the
|
||||
specific language governing permissions and limitations under the License.
|
||||
-->
|
||||
|
||||
# LDM3D
|
||||
|
||||
LDM3D was proposed in [LDM3D: Latent Diffusion Model for 3D](https://arxiv.org/abs/2305.10853) by Gabriela Ben Melech Stan, Diana Wofk, Scottie Fox, Alex Redden, Will Saxton, Jean Yu, Estelle Aflalo, Shao-Yen Tseng, Fabio Nonato, Matthias Muller, Vasudev Lal
|
||||
The abstract of the paper is the following:
|
||||
|
||||
*This research paper proposes a Latent Diffusion Model for 3D (LDM3D) that generates both image and depth map data from a given text prompt, allowing users to generate RGBD images from text prompts. The LDM3D model is fine-tuned on a dataset of tuples containing an RGB image, depth map and caption, and validated through extensive experiments. We also develop an application called DepthFusion, which uses the generated RGB images and depth maps to create immersive and interactive 360-degree-view experiences using TouchDesigner. This technology has the potential to transform a wide range of industries, from entertainment and gaming to architecture and design. Overall, this paper presents a significant contribution to the field of generative AI and computer vision, and showcases the potential of LDM3D and DepthFusion to revolutionize content creation and digital experiences. A short video summarizing the approach can be found at [this url](https://t.ly/tdi2).*
|
||||
|
||||
|
||||
*Overview*:
|
||||
|
||||
| Pipeline | Tasks | Colab | Demo
|
||||
|---|---|:---:|:---:|
|
||||
| [pipeline_stable_diffusion_ldm3d.py](https://github.com/huggingface/diffusers/blob/main/src/diffusers/pipelines/stable_diffusion/pipeline_stable_diffusion_ldm3d.py) | *Text-to-Image Generation* | - | -
|
||||
|
||||
## Tips
|
||||
|
||||
- LDM3D generates both an image and a depth map from a given text prompt, compared to the existing txt-to-img diffusion models such as [Stable Diffusion](./stable_diffusion/overview) that generates only an image.
|
||||
- With almost the same number of parameters, LDM3D achieves to create a latent space that can compress both the RGB images and the depth maps.
|
||||
|
||||
|
||||
Running LDM3D is straighforward with the [`StableDiffusionLDM3DPipeline`]:
|
||||
|
||||
```python
|
||||
>>> from diffusers import StableDiffusionLDM3DPipeline
|
||||
|
||||
>>> pipe = StableDiffusionLDM3DPipeline.from_pretrained("Intel/ldm3d")
|
||||
prompt ="A picture of some lemons on a table"
|
||||
output = pipe(prompt)
|
||||
rgb_image, depth_image = output.rgb, output.depth
|
||||
rgb_image[0].save("lemons_ldm3d_rgb.jpg")
|
||||
depth_image[0].save("lemons_ldm3d_depth.png")
|
||||
```
|
||||
|
||||
|
||||
## StableDiffusionPipelineOutput
|
||||
[[autodoc]] pipelines.stable_diffusion.StableDiffusionPipelineOutput
|
||||
- all
|
||||
- __call__
|
||||
|
||||
## StableDiffusionLDM3DPipeline
|
||||
[[autodoc]] StableDiffusionLDM3DPipeline
|
||||
- all
|
||||
- __call__
|
||||
@@ -26,17 +26,18 @@ For more details about how Stable Diffusion works and how it differs from the ba
|
||||
| Pipeline | Tasks | Colab | Demo
|
||||
|---|---|:---:|:---:|
|
||||
| [StableDiffusionPipeline](./text2img) | *Text-to-Image Generation* | [](https://colab.research.google.com/github/huggingface/notebooks/blob/main/diffusers/stable_diffusion.ipynb) | [🤗 Stable Diffusion](https://huggingface.co/spaces/stabilityai/stable-diffusion)
|
||||
| [StableDiffusionPipelineSafe](./stable_diffusion_safe) | *Text-to-Image Generation* | [](https://colab.research.google.com/github/ml-research/safe-latent-diffusion/blob/main/examples/Safe%20Latent%20Diffusion.ipynb) | [](https://huggingface.co/spaces/AIML-TUDA/unsafe-vs-safe-stable-diffusion)
|
||||
| [StableDiffusionImg2ImgPipeline](./img2img) | *Image-to-Image Text-Guided Generation* | [](https://colab.research.google.com/github/huggingface/notebooks/blob/main/diffusers/image_2_image_using_diffusers.ipynb) | [🤗 Diffuse the Rest](https://huggingface.co/spaces/huggingface/diffuse-the-rest)
|
||||
| [StableDiffusionInpaintPipeline](./inpaint) | **Experimental** – *Text-Guided Image Inpainting* | [](https://colab.research.google.com/github/huggingface/notebooks/blob/main/diffusers/in_painting_with_stable_diffusion_using_diffusers.ipynb) |
|
||||
| [StableDiffusionDepth2ImgPipeline](./depth2img) | **Experimental** – *Depth-to-Image Text-Guided Generation* | |
|
||||
| [StableDiffusionImageVariationPipeline](./image_variation) | **Experimental** – *Image Variation Generation* | | [🤗 Stable Diffusion Image Variations](https://huggingface.co/spaces/lambdalabs/stable-diffusion-image-variations)
|
||||
| [StableDiffusionUpscalePipeline](./upscale) | **Experimental** – *Text-Guided Image Super-Resolution* | |
|
||||
| [StableDiffusionLatentUpscalePipeline](./latent_upscale) | **Experimental** – *Text-Guided Image Super-Resolution* | |
|
||||
| [Stable Diffusion 2](./stable_diffusion_2) | *Text-Guided Image Inpainting* |
|
||||
| [Stable Diffusion 2](./stable_diffusion_2) | *Depth-to-Image Text-Guided Generation* |
|
||||
| [Stable Diffusion 2](./stable_diffusion_2) | *Text-Guided Super Resolution Image-to-Image* |
|
||||
| [StableDiffusionLDM3DPipeline](./ldm3d) | *Text-to-(RGB, Depth)* |
|
||||
| [StableDiffusionInpaintPipeline](./inpaint) | **Experimental** – *Text-Guided Image Inpainting* | [](https://colab.research.google.com/github/huggingface/notebooks/blob/main/diffusers/in_painting_with_stable_diffusion_using_diffusers.ipynb) | Coming soon
|
||||
| [StableDiffusionDepth2ImgPipeline](./depth2img) | **Experimental** – *Depth-to-Image Text-Guided Generation * | | Coming soon
|
||||
| [StableDiffusionImageVariationPipeline](./image_variation) | **Experimental** – *Image Variation Generation * | | [🤗 Stable Diffusion Image Variations](https://huggingface.co/spaces/lambdalabs/stable-diffusion-image-variations)
|
||||
| [StableDiffusionUpscalePipeline](./upscale) | **Experimental** – *Text-Guided Image Super-Resolution * | | Coming soon
|
||||
| [StableDiffusionLatentUpscalePipeline](./latent_upscale) | **Experimental** – *Text-Guided Image Super-Resolution * | | Coming soon
|
||||
| [StableDiffusionInstructPix2PixPipeline](./pix2pix) | **Experimental** – *Text-Based Image Editing * | | [InstructPix2Pix: Learning to Follow Image Editing Instructions](https://huggingface.co/spaces/timbrooks/instruct-pix2pix)
|
||||
| [StableDiffusionAttendAndExcitePipeline](./attend_and_excite) | **Experimental** – *Text-to-Image Generation * | | [Attend-and-Excite: Attention-Based Semantic Guidance for Text-to-Image Diffusion Models](https://huggingface.co/spaces/AttendAndExcite/Attend-and-Excite)
|
||||
| [StableDiffusionPix2PixZeroPipeline](./pix2pix_zero) | **Experimental** – *Text-Based Image Editing * | | [Zero-shot Image-to-Image Translation](https://arxiv.org/abs/2302.03027)
|
||||
| [StableDiffusionModelEditingPipeline](./model_editing) | **Experimental** – *Text-to-Image Model Editing * | | [Editing Implicit Assumptions in Text-to-Image Diffusion Models](https://arxiv.org/abs/2303.08084)
|
||||
|
||||
|
||||
|
||||
## Tips
|
||||
|
||||
|
||||
@@ -52,33 +52,6 @@ image = pipe(prompt).images[0]
|
||||
image.save("dolomites.png")
|
||||
```
|
||||
|
||||
<Tip>
|
||||
|
||||
While calling this pipeline, it's possible to specify the `view_batch_size` to have a >1 value.
|
||||
For some GPUs with high performance, higher a `view_batch_size`, can speedup the generation
|
||||
and increase the VRAM usage.
|
||||
|
||||
</Tip>
|
||||
|
||||
<Tip>
|
||||
|
||||
Circular padding is applied to ensure there are no stitching artifacts when working with
|
||||
panoramas that needs to seamlessly transition from the rightmost part to the leftmost part.
|
||||
By enabling circular padding (set `circular_padding=True`), the operation applies additional
|
||||
crops after the rightmost point of the image, allowing the model to "see” the transition
|
||||
from the rightmost part to the leftmost part. This helps maintain visual consistency in
|
||||
a 360-degree sense and creates a proper “panorama” that can be viewed using 360-degree
|
||||
panorama viewers. When decoding latents in StableDiffusion, circular padding is applied
|
||||
to ensure that the decoded latents match in the RGB space.
|
||||
|
||||
Without circular padding, there is a stitching artifact (default):
|
||||
|
||||
|
||||
With circular padding, the right and the left parts are matching (`circular_padding=True`):
|
||||
|
||||
|
||||
</Tip>
|
||||
|
||||
## StableDiffusionPanoramaPipeline
|
||||
[[autodoc]] StableDiffusionPanoramaPipeline
|
||||
- __call__
|
||||
@@ -1,364 +0,0 @@
|
||||
<!--Copyright 2023 The HuggingFace Team. All rights reserved.
|
||||
|
||||
Licensed under the Apache License, Version 2.0 (the "License"); you may not use this file except in compliance with
|
||||
the License. You may obtain a copy of the License at
|
||||
|
||||
http://www.apache.org/licenses/LICENSE-2.0
|
||||
|
||||
Unless required by applicable law or agreed to in writing, software distributed under the License is distributed on
|
||||
an "AS IS" BASIS, WITHOUT WARRANTIES OR CONDITIONS OF ANY KIND, either express or implied. See the License for the
|
||||
specific language governing permissions and limitations under the License.
|
||||
-->
|
||||
|
||||
# Stable diffusion XL
|
||||
|
||||
Stable Diffusion XL was proposed in [SDXL: Improving Latent Diffusion Models for High-Resolution Image Synthesis](https://arxiv.org/abs/2307.01952) by Dustin Podell, Zion English, Kyle Lacey, Andreas Blattmann, Tim Dockhorn, Jonas Müller, Joe Penna, Robin Rombach
|
||||
|
||||
The abstract of the paper is the following:
|
||||
|
||||
*We present SDXL, a latent diffusion model for text-to-image synthesis. Compared to previous versions of Stable Diffusion, SDXL leverages a three times larger UNet backbone: The increase of model parameters is mainly due to more attention blocks and a larger cross-attention context as SDXL uses a second text encoder. We design multiple novel conditioning schemes and train SDXL on multiple aspect ratios. We also introduce a refinement model which is used to improve the visual fidelity of samples generated by SDXL using a post-hoc image-to-image technique. We demonstrate that SDXL shows drastically improved performance compared the previous versions of Stable Diffusion and achieves results competitive with those of black-box state-of-the-art image generators.*
|
||||
|
||||
## Tips
|
||||
|
||||
- Stable Diffusion XL works especially well with images between 768 and 1024.
|
||||
- Stable Diffusion XL output image can be improved by making use of a refiner as shown below.
|
||||
|
||||
### Available checkpoints:
|
||||
|
||||
- *Text-to-Image (1024x1024 resolution)*: [stabilityai/stable-diffusion-xl-base-0.9](https://huggingface.co/stabilityai/stable-diffusion-xl-base-0.9) with [`StableDiffusionXLPipeline`]
|
||||
- *Image-to-Image / Refiner (1024x1024 resolution)*: [stabilityai/stable-diffusion-xl-refiner-0.9](https://huggingface.co/stabilityai/stable-diffusion-xl-refiner-0.9) with [`StableDiffusionXLImg2ImgPipeline`]
|
||||
|
||||
## Usage Example
|
||||
|
||||
Before using SDXL make sure to have `transformers`, `accelerate`, `safetensors` and `invisible_watermark` installed.
|
||||
You can install the libraries as follows:
|
||||
|
||||
```
|
||||
pip install transformers
|
||||
pip install accelerate
|
||||
pip install safetensors
|
||||
pip install invisible-watermark>=0.2.0
|
||||
```
|
||||
|
||||
### Text-to-Image
|
||||
|
||||
You can use SDXL as follows for *text-to-image*:
|
||||
|
||||
```py
|
||||
from diffusers import StableDiffusionXLPipeline
|
||||
import torch
|
||||
|
||||
pipe = StableDiffusionXLPipeline.from_pretrained(
|
||||
"stabilityai/stable-diffusion-xl-base-0.9", torch_dtype=torch.float16, variant="fp16", use_safetensors=True
|
||||
)
|
||||
pipe.to("cuda")
|
||||
|
||||
prompt = "Astronaut in a jungle, cold color palette, muted colors, detailed, 8k"
|
||||
image = pipe(prompt=prompt).images[0]
|
||||
```
|
||||
|
||||
### Image-to-image
|
||||
|
||||
You can use SDXL as follows for *image-to-image*:
|
||||
|
||||
```py
|
||||
import torch
|
||||
from diffusers import StableDiffusionXLImg2ImgPipeline
|
||||
from diffusers.utils import load_image
|
||||
|
||||
pipe = StableDiffusionXLImg2ImgPipeline.from_pretrained(
|
||||
"stabilityai/stable-diffusion-xl-refiner-0.9", torch_dtype=torch.float16, variant="fp16", use_safetensors=True
|
||||
)
|
||||
pipe = pipe.to("cuda")
|
||||
url = "https://huggingface.co/datasets/patrickvonplaten/images/resolve/main/aa_xl/000000009.png"
|
||||
|
||||
init_image = load_image(url).convert("RGB")
|
||||
prompt = "a photo of an astronaut riding a horse on mars"
|
||||
image = pipe(prompt, image=init_image).images[0]
|
||||
```
|
||||
|
||||
### Inpainting
|
||||
|
||||
You can use SDXL as follows for *inpainting*
|
||||
|
||||
```py
|
||||
import torch
|
||||
from diffusers import StableDiffusionXLInpaintPipeline
|
||||
from diffusers.utils import load_image
|
||||
|
||||
pipe = StableDiffusionXLInpaintPipeline.from_pretrained(
|
||||
"stabilityai/stable-diffusion-xl-base-0.9", torch_dtype=torch.float16, variant="fp16", use_safetensors=True
|
||||
)
|
||||
pipe.to("cuda")
|
||||
|
||||
img_url = "https://raw.githubusercontent.com/CompVis/latent-diffusion/main/data/inpainting_examples/overture-creations-5sI6fQgYIuo.png"
|
||||
mask_url = "https://raw.githubusercontent.com/CompVis/latent-diffusion/main/data/inpainting_examples/overture-creations-5sI6fQgYIuo_mask.png"
|
||||
|
||||
init_image = load_image(img_url).convert("RGB")
|
||||
mask_image = load_image(mask_url).convert("RGB")
|
||||
|
||||
prompt = "A majestic tiger sitting on a bench"
|
||||
image = pipe(prompt=prompt, image=init_image, mask_image=mask_image, num_inference_steps=50, strength=0.80).images[0]
|
||||
```
|
||||
|
||||
### Refining the image output
|
||||
|
||||
In addition to the [base model checkpoint](https://huggingface.co/stabilityai/stable-diffusion-xl-base-0.9),
|
||||
StableDiffusion-XL also includes a [refiner checkpoint](huggingface.co/stabilityai/stable-diffusion-xl-refiner-0.9)
|
||||
that is specialized in denoising low-noise stage images to generate images of improved high-frequency quality.
|
||||
This refiner checkpoint can be used as a "second-step" pipeline after having run the base checkpoint to improve
|
||||
image quality.
|
||||
|
||||
When using the refiner, one can easily
|
||||
- 1.) employ the base model and refiner as an *Ensemble of Expert Denoisers* as first proposed in [eDiff-I](https://research.nvidia.com/labs/dir/eDiff-I/) or
|
||||
- 2.) simply run the refiner in [SDEdit](https://arxiv.org/abs/2108.01073) fashion after the base model.
|
||||
|
||||
**Note**: The idea of using SD-XL base & refiner as an ensemble of experts was first brought forward by
|
||||
a couple community contributors which also helped shape the following `diffusers` implementation, namely:
|
||||
- [SytanSD](https://github.com/SytanSD)
|
||||
- [bghira](https://github.com/bghira)
|
||||
- [Birch-san](https://github.com/Birch-san)
|
||||
|
||||
#### 1.) Ensemble of Expert Denoisers
|
||||
|
||||
When using the base and refiner model as an ensemble of expert of denoisers, the base model should serve as the
|
||||
expert for the high-noise diffusion stage and the refiner serves as the expert for the low-noise diffusion stage.
|
||||
|
||||
The advantage of 1.) over 2.) is that it requires less overall denoising steps and therefore should be significantly
|
||||
faster. The drawback is that one cannot really inspect the output of the base model; it will still be heavily denoised.
|
||||
|
||||
To use the base model and refiner as an ensemble of expert denoisers, make sure to define the fraction
|
||||
of timesteps which should be run through the high-noise denoising stage (*i.e.* the base model) and the low-noise
|
||||
denoising stage (*i.e.* the refiner model) respectively. This fraction should be set as the [`denoising_end`](https://huggingface.co/docs/diffusers/main/en/api/pipelines/stable_diffusion/stable_diffusion_xl#diffusers.StableDiffusionXLPipeline.__call__.denoising_end) of the base model
|
||||
and as the [`denoising_start`](https://huggingface.co/docs/diffusers/main/en/api/pipelines/stable_diffusion/stable_diffusion_xl#diffusers.StableDiffusionXLImg2ImgPipeline.__call__.denoising_start) of the refiner model.
|
||||
|
||||
Let's look at an example.
|
||||
First, we import the two pipelines. Since the text encoders and variational autoencoder are the same
|
||||
you don't have to load those again for the refiner.
|
||||
|
||||
```py
|
||||
from diffusers import DiffusionPipeline
|
||||
import torch
|
||||
|
||||
base = DiffusionPipeline.from_pretrained(
|
||||
"stabilityai/stable-diffusion-xl-base-0.9", torch_dtype=torch.float16, variant="fp16", use_safetensors=True
|
||||
)
|
||||
pipe.to("cuda")
|
||||
|
||||
refiner = DiffusionPipeline.from_pretrained(
|
||||
"stabilityai/stable-diffusion-xl-refiner-0.9",
|
||||
text_encoder_2=base.text_encoder_2,
|
||||
vae=base.vae,
|
||||
torch_dtype=torch.float16,
|
||||
use_safetensors=True,
|
||||
variant="fp16",
|
||||
)
|
||||
refiner.to("cuda")
|
||||
```
|
||||
|
||||
Now we define the number of inference steps and the fraction at which the model shall be run through the
|
||||
high-noise denoising stage (*i.e.* the base model).
|
||||
|
||||
```py
|
||||
n_steps = 40
|
||||
high_noise_frac = 0.7
|
||||
```
|
||||
|
||||
A fraction of 0.7 means that 70% of the 40 inference steps (28 steps) are run through the base model
|
||||
and the remaining 12 steps are run through the refiner. Let's run the two pipelines now.
|
||||
Make sure to set `denoising_end` and `denoising_start` to the same values and keep `num_inference_steps`
|
||||
constant. Also remember that the output of the base model should be in latent space:
|
||||
|
||||
```py
|
||||
prompt = "A majestic lion jumping from a big stone at night"
|
||||
|
||||
image = base(prompt=prompt, num_inference_steps=n_steps, denoising_end=high_noise_frac, output_type="latent").images
|
||||
image = refiner(prompt=prompt, num_inference_steps=n_steps, denoising_start=high_noise_frac, image=image).images[0]
|
||||
```
|
||||
|
||||
Let's have a look at the image
|
||||
|
||||
| Original Image | Ensemble of Denoisers Experts |
|
||||
|---|---|
|
||||
|  | 
|
||||
|
||||
If we would have just run the base model on the same 40 steps, the image would have been arguably less detailed (e.g. the lion eyes and nose):
|
||||
|
||||
<Tip>
|
||||
|
||||
The ensemble-of-experts method works well on all available schedulers!
|
||||
|
||||
</Tip>
|
||||
|
||||
#### 2.) Refining the image output from fully denoised base image
|
||||
|
||||
In standard [`StableDiffusionImg2ImgPipeline`]-fashion, the fully-denoised image generated of the base model
|
||||
can be further improved using the [refiner checkpoint](huggingface.co/stabilityai/stable-diffusion-xl-refiner-0.9).
|
||||
|
||||
For this, you simply run the refiner as a normal image-to-image pipeline after the "base" text-to-image
|
||||
pipeline. You can leave the outputs of the base model in latent space.
|
||||
|
||||
```py
|
||||
from diffusers import DiffusionPipeline
|
||||
import torch
|
||||
|
||||
pipe = DiffusionPipeline.from_pretrained(
|
||||
"stabilityai/stable-diffusion-xl-base-0.9", torch_dtype=torch.float16, variant="fp16", use_safetensors=True
|
||||
)
|
||||
pipe.to("cuda")
|
||||
|
||||
refiner = DiffusionPipeline.from_pretrained(
|
||||
"stabilityai/stable-diffusion-xl-refiner-0.9",
|
||||
text_encoder_2=pipe.text_encoder_2,
|
||||
vae=pipe.vae,
|
||||
torch_dtype=torch.float16,
|
||||
use_safetensors=True,
|
||||
variant="fp16",
|
||||
)
|
||||
refiner.to("cuda")
|
||||
|
||||
prompt = "Astronaut in a jungle, cold color palette, muted colors, detailed, 8k"
|
||||
|
||||
image = pipe(prompt=prompt, output_type="latent" if use_refiner else "pil").images[0]
|
||||
image = refiner(prompt=prompt, image=image[None, :]).images[0]
|
||||
```
|
||||
|
||||
| Original Image | Refined Image |
|
||||
|---|---|
|
||||
| 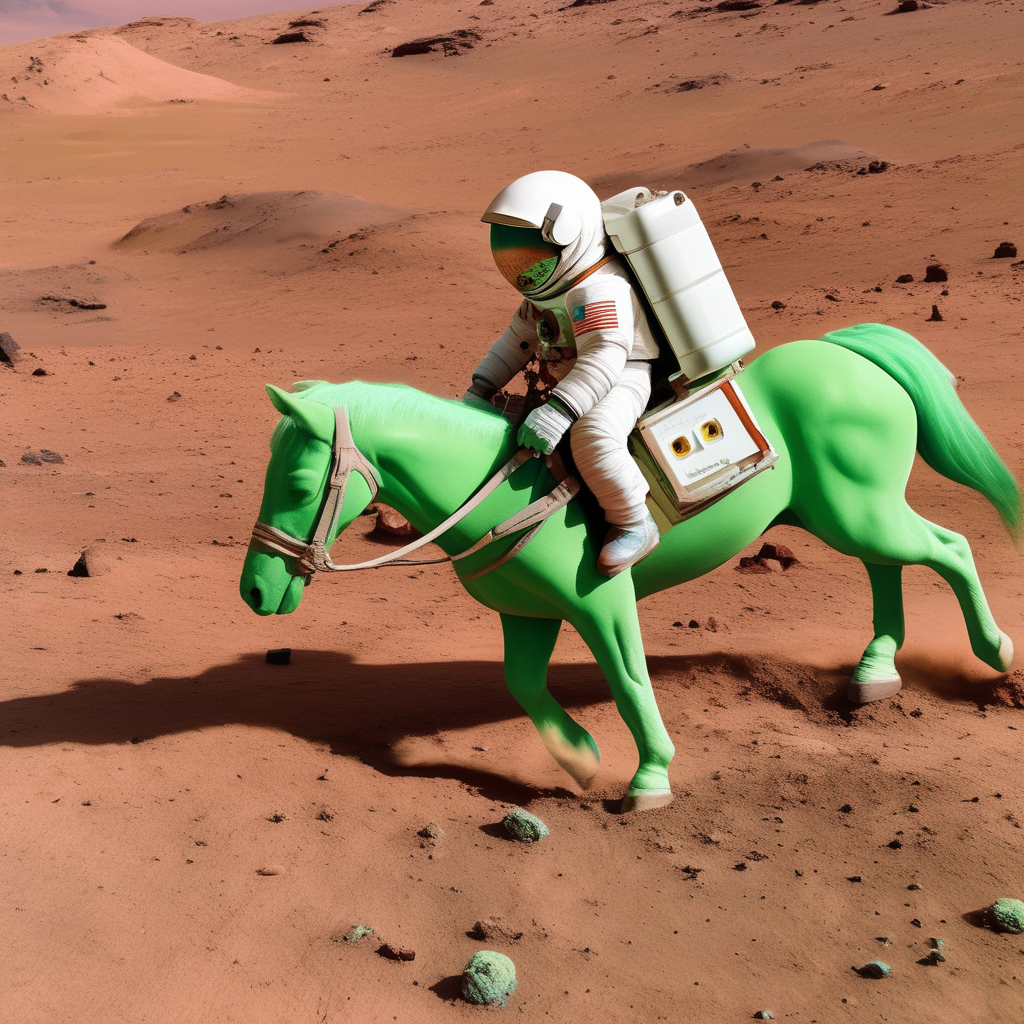 | 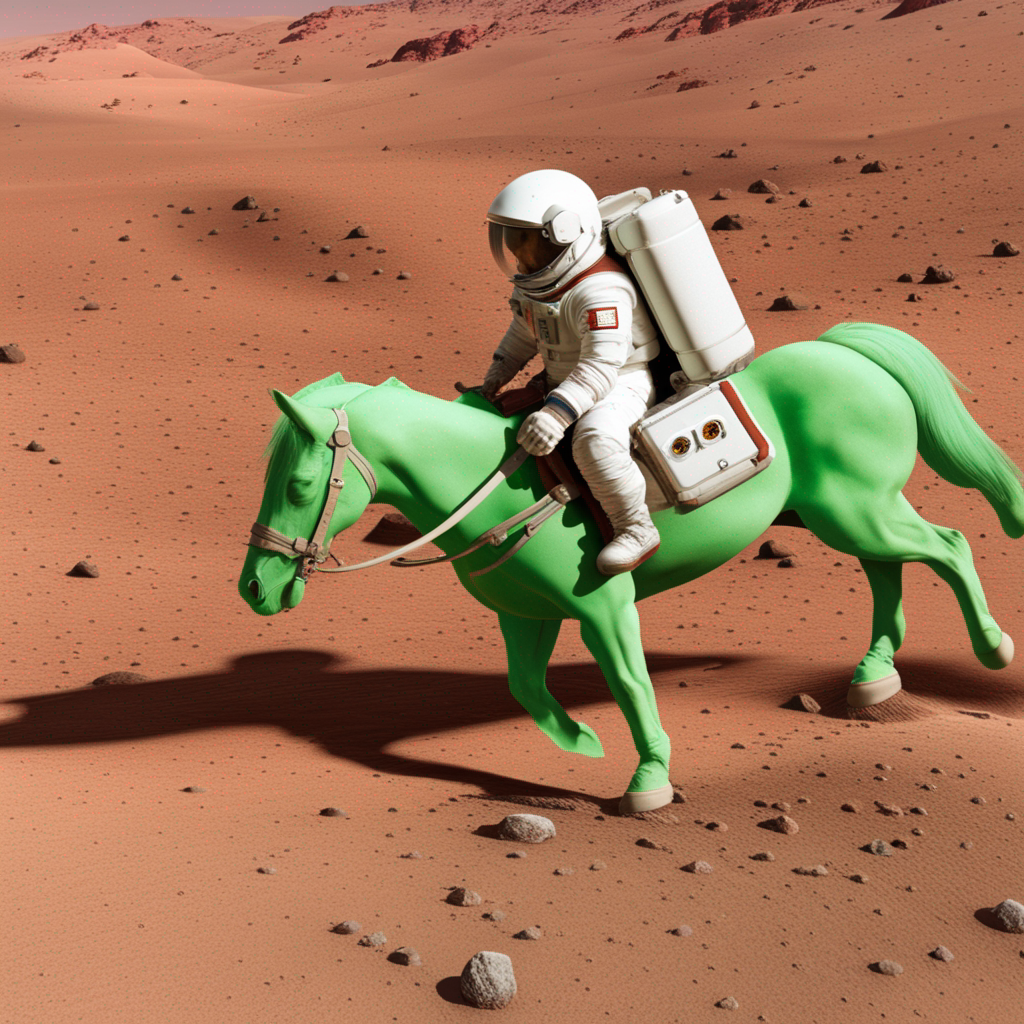 |
|
||||
|
||||
<Tip>
|
||||
|
||||
The refiner can also very well be used in an in-painting setting. To do so just make
|
||||
sure you use the [`StableDiffusionXLInpaintPipeline`] classes as shown below
|
||||
|
||||
</Tip>
|
||||
|
||||
To use the refiner for inpainting in the Ensemble of Expert Denoisers setting you can do the following:
|
||||
|
||||
```py
|
||||
from diffusers import StableDiffusionXLInpaintPipeline
|
||||
from diffusers.utils import load_image
|
||||
|
||||
pipe = StableDiffusionXLInpaintPipeline.from_pretrained(
|
||||
"stabilityai/stable-diffusion-xl-base-0.9", torch_dtype=torch.float16, variant="fp16", use_safetensors=True
|
||||
)
|
||||
pipe.to("cuda")
|
||||
|
||||
refiner = StableDiffusionXLInpaintPipeline.from_pretrained(
|
||||
"stabilityai/stable-diffusion-xl-refiner-0.9",
|
||||
text_encoder_2=pipe.text_encoder_2,
|
||||
vae=pipe.vae,
|
||||
torch_dtype=torch.float16,
|
||||
use_safetensors=True,
|
||||
variant="fp16",
|
||||
)
|
||||
refiner.to("cuda")
|
||||
|
||||
img_url = "https://raw.githubusercontent.com/CompVis/latent-diffusion/main/data/inpainting_examples/overture-creations-5sI6fQgYIuo.png"
|
||||
mask_url = "https://raw.githubusercontent.com/CompVis/latent-diffusion/main/data/inpainting_examples/overture-creations-5sI6fQgYIuo_mask.png"
|
||||
|
||||
init_image = load_image(img_url).convert("RGB")
|
||||
mask_image = load_image(mask_url).convert("RGB")
|
||||
|
||||
prompt = "A majestic tiger sitting on a bench"
|
||||
num_inference_steps = 75
|
||||
high_noise_frac = 0.7
|
||||
|
||||
image = pipe(
|
||||
prompt=prompt,
|
||||
image=init_image,
|
||||
mask_image=mask_image,
|
||||
num_inference_steps=num_inference_steps,
|
||||
strength=0.80,
|
||||
denoising_start=high_noise_frac,
|
||||
output_type="latent",
|
||||
).images
|
||||
image = refiner(
|
||||
prompt=prompt,
|
||||
image=image,
|
||||
mask_image=mask_image,
|
||||
num_inference_steps=num_inference_steps,
|
||||
denoising_start=high_noise_frac,
|
||||
).images[0]
|
||||
```
|
||||
|
||||
To use the refiner for inpainting in the standard SDE-style setting, simply remove `denoising_end` and `denoising_start` and choose a smaller
|
||||
number of inference steps for the refiner.
|
||||
|
||||
### Loading single file checkpoints / original file format
|
||||
|
||||
By making use of [`~diffusers.loaders.FromSingleFileMixin.from_single_file`] you can also load the
|
||||
original file format into `diffusers`:
|
||||
|
||||
```py
|
||||
from diffusers import StableDiffusionXLPipeline, StableDiffusionXLImg2ImgPipeline
|
||||
import torch
|
||||
|
||||
pipe = StableDiffusionXLPipeline.from_single_file(
|
||||
"./sd_xl_base_0.9.safetensors", torch_dtype=torch.float16, variant="fp16", use_safetensors=True
|
||||
)
|
||||
pipe.to("cuda")
|
||||
|
||||
refiner = StableDiffusionXLImg2ImgPipeline.from_single_file(
|
||||
"./sd_xl_refiner_0.9.safetensors", torch_dtype=torch.float16, use_safetensors=True, variant="fp16"
|
||||
)
|
||||
refiner.to("cuda")
|
||||
```
|
||||
|
||||
### Memory optimization via model offloading
|
||||
|
||||
If you are seeing out-of-memory errors, we recommend making use of [`StableDiffusionXLPipeline.enable_model_cpu_offload`].
|
||||
|
||||
```diff
|
||||
- pipe.to("cuda")
|
||||
+ pipe.enable_model_cpu_offload()
|
||||
```
|
||||
|
||||
and
|
||||
|
||||
```diff
|
||||
- refiner.to("cuda")
|
||||
+ refiner.enable_model_cpu_offload()
|
||||
```
|
||||
|
||||
### Speed-up inference with `torch.compile`
|
||||
|
||||
You can speed up inference by making use of `torch.compile`. This should give you **ca.** 20% speed-up.
|
||||
|
||||
```diff
|
||||
+ pipe.unet = torch.compile(pipe.unet, mode="reduce-overhead", fullgraph=True)
|
||||
+ refiner.unet = torch.compile(refiner.unet, mode="reduce-overhead", fullgraph=True)
|
||||
```
|
||||
|
||||
### Running with `torch < 2.0`
|
||||
|
||||
**Note** that if you want to run Stable Diffusion XL with `torch` < 2.0, please make sure to enable xformers
|
||||
attention:
|
||||
|
||||
```
|
||||
pip install xformers
|
||||
```
|
||||
|
||||
```diff
|
||||
+pipe.enable_xformers_memory_efficient_attention()
|
||||
+refiner.enable_xformers_memory_efficient_attention()
|
||||
```
|
||||
|
||||
## StableDiffusionXLPipeline
|
||||
|
||||
[[autodoc]] StableDiffusionXLPipeline
|
||||
- all
|
||||
- __call__
|
||||
|
||||
## StableDiffusionXLImg2ImgPipeline
|
||||
|
||||
[[autodoc]] StableDiffusionXLImg2ImgPipeline
|
||||
- all
|
||||
- __call__
|
||||
|
||||
## StableDiffusionXLInpaintPipeline
|
||||
|
||||
[[autodoc]] StableDiffusionXLInpaintPipeline
|
||||
- all
|
||||
- __call__
|
||||
@@ -40,7 +40,7 @@ Available Checkpoints are:
|
||||
- enable_vae_tiling
|
||||
- disable_vae_tiling
|
||||
- load_textual_inversion
|
||||
- from_single_file
|
||||
- from_ckpt
|
||||
- load_lora_weights
|
||||
- save_lora_weights
|
||||
|
||||
|
||||
@@ -71,64 +71,6 @@ image = pipe(prompt, guidance_scale=9, num_inference_steps=25).images[0]
|
||||
image.save("astronaut.png")
|
||||
```
|
||||
|
||||
#### Experimental: "Common Diffusion Noise Schedules and Sample Steps are Flawed":
|
||||
|
||||
The paper **[Common Diffusion Noise Schedules and Sample Steps are Flawed](https://arxiv.org/abs/2305.08891)**
|
||||
claims that a mismatch between the training and inference settings leads to suboptimal inference generation results for Stable Diffusion.
|
||||
|
||||
The abstract reads as follows:
|
||||
|
||||
*We discover that common diffusion noise schedules do not enforce the last timestep to have zero signal-to-noise ratio (SNR),
|
||||
and some implementations of diffusion samplers do not start from the last timestep.
|
||||
Such designs are flawed and do not reflect the fact that the model is given pure Gaussian noise at inference, creating a discrepancy between training and inference.
|
||||
We show that the flawed design causes real problems in existing implementations.
|
||||
In Stable Diffusion, it severely limits the model to only generate images with medium brightness and
|
||||
prevents it from generating very bright and dark samples. We propose a few simple fixes:
|
||||
- (1) rescale the noise schedule to enforce zero terminal SNR;
|
||||
- (2) train the model with v prediction;
|
||||
- (3) change the sampler to always start from the last timestep;
|
||||
- (4) rescale classifier-free guidance to prevent over-exposure.
|
||||
These simple changes ensure the diffusion process is congruent between training and inference and
|
||||
allow the model to generate samples more faithful to the original data distribution.*
|
||||
|
||||
You can apply all of these changes in `diffusers` when using [`DDIMScheduler`]:
|
||||
- (1) rescale the noise schedule to enforce zero terminal SNR;
|
||||
```py
|
||||
pipe.scheduler = DDIMScheduler.from_config(pipe.scheduler.config, rescale_betas_zero_snr=True)
|
||||
```
|
||||
- (2) train the model with v prediction;
|
||||
Continue fine-tuning a checkpoint with [`train_text_to_image.py`](https://github.com/huggingface/diffusers/blob/main/examples/text_to_image/train_text_to_image.py) or [`train_text_to_image_lora.py`](https://github.com/huggingface/diffusers/blob/main/examples/text_to_image/train_text_to_image_lora.py)
|
||||
and `--prediction_type="v_prediction"`.
|
||||
- (3) change the sampler to always start from the last timestep;
|
||||
```py
|
||||
pipe.scheduler = DDIMScheduler.from_config(pipe.scheduler.config, timestep_spacing="trailing")
|
||||
```
|
||||
- (4) rescale classifier-free guidance to prevent over-exposure.
|
||||
```py
|
||||
pipe(..., guidance_rescale=0.7)
|
||||
```
|
||||
|
||||
An example is to use [this checkpoint](https://huggingface.co/ptx0/pseudo-journey-v2)
|
||||
which has been fine-tuned using the `"v_prediction"`.
|
||||
|
||||
The checkpoint can then be run in inference as follows:
|
||||
|
||||
```py
|
||||
from diffusers import DiffusionPipeline, DDIMScheduler
|
||||
|
||||
pipe = DiffusionPipeline.from_pretrained("ptx0/pseudo-journey-v2", torch_dtype=torch.float16)
|
||||
pipe.scheduler = DDIMScheduler.from_config(
|
||||
pipe.scheduler.config, rescale_betas_zero_snr=True, timestep_spacing="trailing"
|
||||
)
|
||||
pipe.to("cuda")
|
||||
|
||||
prompt = "A lion in galaxies, spirals, nebulae, stars, smoke, iridescent, intricate detail, octane render, 8k"
|
||||
image = pipeline(prompt, guidance_rescale=0.7).images[0]
|
||||
```
|
||||
|
||||
## DDIMScheduler
|
||||
[[autodoc]] DDIMScheduler
|
||||
|
||||
### Image Inpainting
|
||||
|
||||
- *Image Inpainting (512x512 resolution)*: [stabilityai/stable-diffusion-2-inpainting](https://huggingface.co/stabilityai/stable-diffusion-2-inpainting) with [`StableDiffusionInpaintPipeline`]
|
||||
@@ -37,12 +37,9 @@ Resources:
|
||||
| Pipeline | Tasks | Demo
|
||||
|---|---|:---:|
|
||||
| [TextToVideoSDPipeline](https://github.com/huggingface/diffusers/blob/main/src/diffusers/pipelines/text_to_video_synthesis/pipeline_text_to_video_synth.py) | *Text-to-Video Generation* | [🤗 Spaces](https://huggingface.co/spaces/damo-vilab/modelscope-text-to-video-synthesis)
|
||||
| [VideoToVideoSDPipeline](https://github.com/huggingface/diffusers/blob/main/src/diffusers/pipelines/text_to_video_synthesis/pipeline_text_to_video_synth_img2img.py) | *Text-Guided Video-to-Video Generation* | [(TODO)🤗 Spaces]()
|
||||
|
||||
## Usage example
|
||||
|
||||
### `text-to-video-ms-1.7b`
|
||||
|
||||
Let's start by generating a short video with the default length of 16 frames (2s at 8 fps):
|
||||
|
||||
```python
|
||||
@@ -122,98 +119,12 @@ Here are some sample outputs:
|
||||
</tr>
|
||||
</table>
|
||||
|
||||
### `cerspense/zeroscope_v2_576w` & `cerspense/zeroscope_v2_XL`
|
||||
|
||||
Zeroscope are watermark-free model and have been trained on specific sizes such as `576x320` and `1024x576`.
|
||||
One should first generate a video using the lower resolution checkpoint [`cerspense/zeroscope_v2_576w`](https://huggingface.co/cerspense/zeroscope_v2_576w) with [`TextToVideoSDPipeline`],
|
||||
which can then be upscaled using [`VideoToVideoSDPipeline`] and [`cerspense/zeroscope_v2_XL`](https://huggingface.co/cerspense/zeroscope_v2_XL).
|
||||
|
||||
|
||||
```py
|
||||
import torch
|
||||
from diffusers import DiffusionPipeline
|
||||
from diffusers.utils import export_to_video
|
||||
|
||||
pipe = DiffusionPipeline.from_pretrained("cerspense/zeroscope_v2_576w", torch_dtype=torch.float16)
|
||||
pipe.enable_model_cpu_offload()
|
||||
|
||||
# memory optimization
|
||||
pipe.unet.enable_forward_chunking(chunk_size=1, dim=1)
|
||||
pipe.enable_vae_slicing()
|
||||
|
||||
prompt = "Darth Vader surfing a wave"
|
||||
video_frames = pipe(prompt, num_frames=24).frames
|
||||
video_path = export_to_video(video_frames)
|
||||
video_path
|
||||
```
|
||||
|
||||
Now the video can be upscaled:
|
||||
|
||||
```py
|
||||
pipe = DiffusionPipeline.from_pretrained("cerspense/zeroscope_v2_XL", torch_dtype=torch.float16)
|
||||
pipe.scheduler = DPMSolverMultistepScheduler.from_config(pipe.scheduler.config)
|
||||
pipe.enable_model_cpu_offload()
|
||||
|
||||
# memory optimization
|
||||
pipe.unet.enable_forward_chunking(chunk_size=1, dim=1)
|
||||
pipe.enable_vae_slicing()
|
||||
|
||||
video = [Image.fromarray(frame).resize((1024, 576)) for frame in video_frames]
|
||||
|
||||
video_frames = pipe(prompt, video=video, strength=0.6).frames
|
||||
video_path = export_to_video(video_frames)
|
||||
video_path
|
||||
```
|
||||
|
||||
Here are some sample outputs:
|
||||
|
||||
<table>
|
||||
<tr>
|
||||
<td ><center>
|
||||
Darth vader surfing in waves.
|
||||
<br>
|
||||
<img src="https://huggingface.co/datasets/huggingface/documentation-images/resolve/main/diffusers/darthvader_cerpense.gif"
|
||||
alt="Darth vader surfing in waves."
|
||||
style="width: 576px;" />
|
||||
</center></td>
|
||||
</tr>
|
||||
</table>
|
||||
|
||||
### Memory optimizations
|
||||
|
||||
Text-guided video generation with [`~TextToVideoSDPipeline`] and [`~VideoToVideoSDPipeline`] is very memory intensive both
|
||||
when denoising with [`~UNet3DConditionModel`] and when decoding with [`~AutoencoderKL`]. It is possible though to reduce
|
||||
memory usage at the cost of increased runtime to achieve the exact same result. To do so, it is recommended to enable
|
||||
**forward chunking** and **vae slicing**:
|
||||
|
||||
Forward chunking via [`~UNet3DConditionModel.enable_forward_chunking`]is explained in [this blog post](https://huggingface.co/blog/reformer#2-chunked-feed-forward-layers) and
|
||||
allows to significantly reduce the required memory for the unet. You can chunk the feed forward layer over the `num_frames`
|
||||
dimension by doing:
|
||||
|
||||
```py
|
||||
pipe.unet.enable_forward_chunking(chunk_size=1, dim=1)
|
||||
```
|
||||
|
||||
Vae slicing via [`~TextToVideoSDPipeline.enable_vae_slicing`] and [`~VideoToVideoSDPipeline.enable_vae_slicing`] also
|
||||
gives significant memory savings since the two pipelines decode all image frames at once.
|
||||
|
||||
```py
|
||||
pipe.enable_vae_slicing()
|
||||
```
|
||||
|
||||
## Available checkpoints
|
||||
|
||||
* [damo-vilab/text-to-video-ms-1.7b](https://huggingface.co/damo-vilab/text-to-video-ms-1.7b/)
|
||||
* [damo-vilab/text-to-video-ms-1.7b-legacy](https://huggingface.co/damo-vilab/text-to-video-ms-1.7b-legacy)
|
||||
* [cerspense/zeroscope_v2_576w](https://huggingface.co/cerspense/zeroscope_v2_576w)
|
||||
* [cerspense/zeroscope_v2_XL](https://huggingface.co/cerspense/zeroscope_v2_XL)
|
||||
|
||||
## TextToVideoSDPipeline
|
||||
[[autodoc]] TextToVideoSDPipeline
|
||||
- all
|
||||
- __call__
|
||||
|
||||
## VideoToVideoSDPipeline
|
||||
[[autodoc]] VideoToVideoSDPipeline
|
||||
- all
|
||||
- __call__
|
||||
|
||||
@@ -80,41 +80,6 @@ You can change these parameters in the pipeline call:
|
||||
* Video length:
|
||||
* `video_length`, the number of frames video_length to be generated. Default: `video_length=8`
|
||||
|
||||
We an also generate longer videos by doing the processing in a chunk-by-chunk manner:
|
||||
```python
|
||||
import torch
|
||||
import imageio
|
||||
from diffusers import TextToVideoZeroPipeline
|
||||
import numpy as np
|
||||
|
||||
model_id = "runwayml/stable-diffusion-v1-5"
|
||||
pipe = TextToVideoZeroPipeline.from_pretrained(model_id, torch_dtype=torch.float16).to("cuda")
|
||||
seed = 0
|
||||
video_length = 8
|
||||
chunk_size = 4
|
||||
prompt = "A panda is playing guitar on times square"
|
||||
|
||||
# Generate the video chunk-by-chunk
|
||||
result = []
|
||||
chunk_ids = np.arange(0, video_length, chunk_size - 1)
|
||||
generator = torch.Generator(device="cuda")
|
||||
for i in range(len(chunk_ids)):
|
||||
print(f"Processing chunk {i + 1} / {len(chunk_ids)}")
|
||||
ch_start = chunk_ids[i]
|
||||
ch_end = video_length if i == len(chunk_ids) - 1 else chunk_ids[i + 1]
|
||||
# Attach the first frame for Cross Frame Attention
|
||||
frame_ids = [0] + list(range(ch_start, ch_end))
|
||||
# Fix the seed for the temporal consistency
|
||||
generator.manual_seed(seed)
|
||||
output = pipe(prompt=prompt, video_length=len(frame_ids), generator=generator, frame_ids=frame_ids)
|
||||
result.append(output.images[1:])
|
||||
|
||||
# Concatenate chunks and save
|
||||
result = np.concatenate(result)
|
||||
result = [(r * 255).astype("uint8") for r in result]
|
||||
imageio.mimsave("video.mp4", result, fps=4)
|
||||
```
|
||||
|
||||
|
||||
### Text-To-Video with Pose Control
|
||||
To generate a video from prompt with additional pose control
|
||||
@@ -237,7 +202,7 @@ can run with custom [DreamBooth](../training/dreambooth) models, as shown below
|
||||
|
||||
reader = imageio.get_reader(video_path, "ffmpeg")
|
||||
frame_count = 8
|
||||
canny_edges = [Image.fromarray(reader.get_data(i)) for i in range(frame_count)]
|
||||
video = [Image.fromarray(reader.get_data(i)) for i in range(frame_count)]
|
||||
```
|
||||
|
||||
3. Run `StableDiffusionControlNetPipeline` with custom trained DreamBooth model
|
||||
@@ -258,10 +223,10 @@ can run with custom [DreamBooth](../training/dreambooth) models, as shown below
|
||||
pipe.controlnet.set_attn_processor(CrossFrameAttnProcessor(batch_size=2))
|
||||
|
||||
# fix latents for all frames
|
||||
latents = torch.randn((1, 4, 64, 64), device="cuda", dtype=torch.float16).repeat(len(canny_edges), 1, 1, 1)
|
||||
latents = torch.randn((1, 4, 64, 64), device="cuda", dtype=torch.float16).repeat(len(pose_images), 1, 1, 1)
|
||||
|
||||
prompt = "oil painting of a beautiful girl avatar style"
|
||||
result = pipe(prompt=[prompt] * len(canny_edges), image=canny_edges, latents=latents).images
|
||||
result = pipe(prompt=[prompt] * len(pose_images), image=pose_images, latents=latents).images
|
||||
imageio.mimsave("video.mp4", result, fps=4)
|
||||
```
|
||||
|
||||
|
||||
@@ -1,204 +0,0 @@
|
||||
<!--Copyright 2023 The HuggingFace Team. All rights reserved.
|
||||
|
||||
Licensed under the Apache License, Version 2.0 (the "License"); you may not use this file except in compliance with
|
||||
the License. You may obtain a copy of the License at
|
||||
|
||||
http://www.apache.org/licenses/LICENSE-2.0
|
||||
|
||||
Unless required by applicable law or agreed to in writing, software distributed under the License is distributed on
|
||||
an "AS IS" BASIS, WITHOUT WARRANTIES OR CONDITIONS OF ANY KIND, either express or implied. See the License for the
|
||||
specific language governing permissions and limitations under the License.
|
||||
-->
|
||||
|
||||
# UniDiffuser
|
||||
|
||||
The UniDiffuser model was proposed in [One Transformer Fits All Distributions in Multi-Modal Diffusion at Scale](https://arxiv.org/abs/2303.06555) by Fan Bao, Shen Nie, Kaiwen Xue, Chongxuan Li, Shi Pu, Yaole Wang, Gang Yue, Yue Cao, Hang Su, Jun Zhu.
|
||||
|
||||
The abstract of the [paper](https://arxiv.org/abs/2303.06555) is the following:
|
||||
|
||||
*This paper proposes a unified diffusion framework (dubbed UniDiffuser) to fit all distributions relevant to a set of multi-modal data in one model. Our key insight is -- learning diffusion models for marginal, conditional, and joint distributions can be unified as predicting the noise in the perturbed data, where the perturbation levels (i.e. timesteps) can be different for different modalities. Inspired by the unified view, UniDiffuser learns all distributions simultaneously with a minimal modification to the original diffusion model -- perturbs data in all modalities instead of a single modality, inputs individual timesteps in different modalities, and predicts the noise of all modalities instead of a single modality. UniDiffuser is parameterized by a transformer for diffusion models to handle input types of different modalities. Implemented on large-scale paired image-text data, UniDiffuser is able to perform image, text, text-to-image, image-to-text, and image-text pair generation by setting proper timesteps without additional overhead. In particular, UniDiffuser is able to produce perceptually realistic samples in all tasks and its quantitative results (e.g., the FID and CLIP score) are not only superior to existing general-purpose models but also comparable to the bespoken models (e.g., Stable Diffusion and DALL-E 2) in representative tasks (e.g., text-to-image generation).*
|
||||
|
||||
Resources:
|
||||
|
||||
* [Paper](https://arxiv.org/abs/2303.06555).
|
||||
* [Original Code](https://github.com/thu-ml/unidiffuser).
|
||||
|
||||
Available Checkpoints are:
|
||||
- *UniDiffuser-v0 (512x512 resolution)* [thu-ml/unidiffuser-v0](https://huggingface.co/thu-ml/unidiffuser-v0)
|
||||
- *UniDiffuser-v1 (512x512 resolution)* [thu-ml/unidiffuser-v1](https://huggingface.co/thu-ml/unidiffuser-v1)
|
||||
|
||||
This pipeline was contributed by our community member [dg845](https://github.com/dg845).
|
||||
|
||||
## Available Pipelines:
|
||||
|
||||
| Pipeline | Tasks | Demo | Colab |
|
||||
|:---:|:---:|:---:|:---:|
|
||||
| [UniDiffuserPipeline](https://github.com/huggingface/diffusers/blob/main/src/diffusers/pipelines/pipeline_unidiffuser.py) | *Joint Image-Text Gen*, *Text-to-Image*, *Image-to-Text*,<br> *Image Gen*, *Text Gen*, *Image Variation*, *Text Variation* | [🤗 Spaces](https://huggingface.co/spaces/thu-ml/unidiffuser) | [](https://colab.research.google.com/github/huggingface/notebooks/blob/main/diffusers/unidiffuser.ipynb) |
|
||||
|
||||
## Usage Examples
|
||||
|
||||
Because the UniDiffuser model is trained to model the joint distribution of (image, text) pairs, it is capable of performing a diverse range of generation tasks.
|
||||
|
||||
### Unconditional Image and Text Generation
|
||||
|
||||
Unconditional generation (where we start from only latents sampled from a standard Gaussian prior) from a [`UniDiffuserPipeline`] will produce a (image, text) pair:
|
||||
|
||||
```python
|
||||
import torch
|
||||
|
||||
from diffusers import UniDiffuserPipeline
|
||||
|
||||
device = "cuda"
|
||||
model_id_or_path = "thu-ml/unidiffuser-v1"
|
||||
pipe = UniDiffuserPipeline.from_pretrained(model_id_or_path, torch_dtype=torch.float16)
|
||||
pipe.to(device)
|
||||
|
||||
# Unconditional image and text generation. The generation task is automatically inferred.
|
||||
sample = pipe(num_inference_steps=20, guidance_scale=8.0)
|
||||
image = sample.images[0]
|
||||
text = sample.text[0]
|
||||
image.save("unidiffuser_joint_sample_image.png")
|
||||
print(text)
|
||||
```
|
||||
|
||||
This is also called "joint" generation in the UniDiffusers paper, since we are sampling from the joint image-text distribution.
|
||||
|
||||
Note that the generation task is inferred from the inputs used when calling the pipeline.
|
||||
It is also possible to manually specify the unconditional generation task ("mode") manually with [`UniDiffuserPipeline.set_joint_mode`]:
|
||||
|
||||
```python
|
||||
# Equivalent to the above.
|
||||
pipe.set_joint_mode()
|
||||
sample = pipe(num_inference_steps=20, guidance_scale=8.0)
|
||||
```
|
||||
|
||||
When the mode is set manually, subsequent calls to the pipeline will use the set mode without attempting the infer the mode.
|
||||
You can reset the mode with [`UniDiffuserPipeline.reset_mode`], after which the pipeline will once again infer the mode.
|
||||
|
||||
You can also generate only an image or only text (which the UniDiffuser paper calls "marginal" generation since we sample from the marginal distribution of images and text, respectively):
|
||||
|
||||
```python
|
||||
# Unlike other generation tasks, image-only and text-only generation don't use classifier-free guidance
|
||||
# Image-only generation
|
||||
pipe.set_image_mode()
|
||||
sample_image = pipe(num_inference_steps=20).images[0]
|
||||
# Text-only generation
|
||||
pipe.set_text_mode()
|
||||
sample_text = pipe(num_inference_steps=20).text[0]
|
||||
```
|
||||
|
||||
### Text-to-Image Generation
|
||||
|
||||
UniDiffuser is also capable of sampling from conditional distributions; that is, the distribution of images conditioned on a text prompt or the distribution of texts conditioned on an image.
|
||||
Here is an example of sampling from the conditional image distribution (text-to-image generation or text-conditioned image generation):
|
||||
|
||||
```python
|
||||
import torch
|
||||
|
||||
from diffusers import UniDiffuserPipeline
|
||||
|
||||
device = "cuda"
|
||||
model_id_or_path = "thu-ml/unidiffuser-v1"
|
||||
pipe = UniDiffuserPipeline.from_pretrained(model_id_or_path, torch_dtype=torch.float16)
|
||||
pipe.to(device)
|
||||
|
||||
# Text-to-image generation
|
||||
prompt = "an elephant under the sea"
|
||||
|
||||
sample = pipe(prompt=prompt, num_inference_steps=20, guidance_scale=8.0)
|
||||
t2i_image = sample.images[0]
|
||||
t2i_image.save("unidiffuser_text2img_sample_image.png")
|
||||
```
|
||||
|
||||
The `text2img` mode requires that either an input `prompt` or `prompt_embeds` be supplied. You can set the `text2img` mode manually with [`UniDiffuserPipeline.set_text_to_image_mode`].
|
||||
|
||||
### Image-to-Text Generation
|
||||
|
||||
Similarly, UniDiffuser can also produce text samples given an image (image-to-text or image-conditioned text generation):
|
||||
|
||||
```python
|
||||
import torch
|
||||
|
||||
from diffusers import UniDiffuserPipeline
|
||||
from diffusers.utils import load_image
|
||||
|
||||
device = "cuda"
|
||||
model_id_or_path = "thu-ml/unidiffuser-v1"
|
||||
pipe = UniDiffuserPipeline.from_pretrained(model_id_or_path, torch_dtype=torch.float16)
|
||||
pipe.to(device)
|
||||
|
||||
# Image-to-text generation
|
||||
image_url = "https://huggingface.co/datasets/hf-internal-testing/diffusers-images/resolve/main/unidiffuser/unidiffuser_example_image.jpg"
|
||||
init_image = load_image(image_url).resize((512, 512))
|
||||
|
||||
sample = pipe(image=init_image, num_inference_steps=20, guidance_scale=8.0)
|
||||
i2t_text = sample.text[0]
|
||||
print(i2t_text)
|
||||
```
|
||||
|
||||
The `img2text` mode requires that an input `image` be supplied. You can set the `img2text` mode manually with [`UniDiffuserPipeline.set_image_to_text_mode`].
|
||||
|
||||
### Image Variation
|
||||
|
||||
The UniDiffuser authors suggest performing image variation through a "round-trip" generation method, where given an input image, we first perform an image-to-text generation, and the perform a text-to-image generation on the outputs of the first generation.
|
||||
This produces a new image which is semantically similar to the input image:
|
||||
|
||||
```python
|
||||
import torch
|
||||
|
||||
from diffusers import UniDiffuserPipeline
|
||||
from diffusers.utils import load_image
|
||||
|
||||
device = "cuda"
|
||||
model_id_or_path = "thu-ml/unidiffuser-v1"
|
||||
pipe = UniDiffuserPipeline.from_pretrained(model_id_or_path, torch_dtype=torch.float16)
|
||||
pipe.to(device)
|
||||
|
||||
# Image variation can be performed with a image-to-text generation followed by a text-to-image generation:
|
||||
# 1. Image-to-text generation
|
||||
image_url = "https://huggingface.co/datasets/hf-internal-testing/diffusers-images/resolve/main/unidiffuser/unidiffuser_example_image.jpg"
|
||||
init_image = load_image(image_url).resize((512, 512))
|
||||
|
||||
sample = pipe(image=init_image, num_inference_steps=20, guidance_scale=8.0)
|
||||
i2t_text = sample.text[0]
|
||||
print(i2t_text)
|
||||
|
||||
# 2. Text-to-image generation
|
||||
sample = pipe(prompt=i2t_text, num_inference_steps=20, guidance_scale=8.0)
|
||||
final_image = sample.images[0]
|
||||
final_image.save("unidiffuser_image_variation_sample.png")
|
||||
```
|
||||
|
||||
### Text Variation
|
||||
|
||||
|
||||
Similarly, text variation can be performed on an input prompt with a text-to-image generation followed by a image-to-text generation:
|
||||
|
||||
```python
|
||||
import torch
|
||||
|
||||
from diffusers import UniDiffuserPipeline
|
||||
|
||||
device = "cuda"
|
||||
model_id_or_path = "thu-ml/unidiffuser-v1"
|
||||
pipe = UniDiffuserPipeline.from_pretrained(model_id_or_path, torch_dtype=torch.float16)
|
||||
pipe.to(device)
|
||||
|
||||
# Text variation can be performed with a text-to-image generation followed by a image-to-text generation:
|
||||
# 1. Text-to-image generation
|
||||
prompt = "an elephant under the sea"
|
||||
|
||||
sample = pipe(prompt=prompt, num_inference_steps=20, guidance_scale=8.0)
|
||||
t2i_image = sample.images[0]
|
||||
t2i_image.save("unidiffuser_text2img_sample_image.png")
|
||||
|
||||
# 2. Image-to-text generation
|
||||
sample = pipe(image=t2i_image, num_inference_steps=20, guidance_scale=8.0)
|
||||
final_prompt = sample.text[0]
|
||||
print(final_prompt)
|
||||
```
|
||||
|
||||
## UniDiffuserPipeline
|
||||
[[autodoc]] UniDiffuserPipeline
|
||||
- all
|
||||
- __call__
|
||||
@@ -1,11 +0,0 @@
|
||||
# Consistency Model Multistep Scheduler
|
||||
|
||||
## Overview
|
||||
|
||||
Multistep and onestep scheduler (Algorithm 1) introduced alongside consistency models in the paper [Consistency Models](https://arxiv.org/abs/2303.01469) by Yang Song, Prafulla Dhariwal, Mark Chen, and Ilya Sutskever.
|
||||
Based on the [original consistency models implementation](https://github.com/openai/consistency_models).
|
||||
Should generate good samples from [`ConsistencyModelPipeline`] in one or a small number of steps.
|
||||
|
||||
## CMStochasticIterativeScheduler
|
||||
[[autodoc]] CMStochasticIterativeScheduler
|
||||
|
||||
@@ -18,71 +18,10 @@ specific language governing permissions and limitations under the License.
|
||||
|
||||
The abstract of the paper is the following:
|
||||
|
||||
*Denoising diffusion probabilistic models (DDPMs) have achieved high quality image generation without adversarial training,
|
||||
yet they require simulating a Markov chain for many steps to produce a sample.
|
||||
To accelerate sampling, we present denoising diffusion implicit models (DDIMs), a more efficient class of iterative implicit probabilistic models
|
||||
with the same training procedure as DDPMs. In DDPMs, the generative process is defined as the reverse of a Markovian diffusion process.
|
||||
We construct a class of non-Markovian diffusion processes that lead to the same training objective, but whose reverse process can be much faster to sample from.
|
||||
We empirically demonstrate that DDIMs can produce high quality samples 10× to 50× faster in terms of wall-clock time compared to DDPMs, allow us to trade off
|
||||
computation for sample quality, and can perform semantically meaningful image interpolation directly in the latent space.*
|
||||
Denoising diffusion probabilistic models (DDPMs) have achieved high quality image generation without adversarial training, yet they require simulating a Markov chain for many steps to produce a sample. To accelerate sampling, we present denoising diffusion implicit models (DDIMs), a more efficient class of iterative implicit probabilistic models with the same training procedure as DDPMs. In DDPMs, the generative process is defined as the reverse of a Markovian diffusion process. We construct a class of non-Markovian diffusion processes that lead to the same training objective, but whose reverse process can be much faster to sample from. We empirically demonstrate that DDIMs can produce high quality samples 10× to 50× faster in terms of wall-clock time compared to DDPMs, allow us to trade off computation for sample quality, and can perform semantically meaningful image interpolation directly in the latent space.
|
||||
|
||||
The original codebase of this paper can be found here: [ermongroup/ddim](https://github.com/ermongroup/ddim).
|
||||
For questions, feel free to contact the author on [tsong.me](https://tsong.me/).
|
||||
|
||||
### Experimental: "Common Diffusion Noise Schedules and Sample Steps are Flawed":
|
||||
|
||||
The paper **[Common Diffusion Noise Schedules and Sample Steps are Flawed](https://arxiv.org/abs/2305.08891)**
|
||||
claims that a mismatch between the training and inference settings leads to suboptimal inference generation results for Stable Diffusion.
|
||||
|
||||
The abstract reads as follows:
|
||||
|
||||
*We discover that common diffusion noise schedules do not enforce the last timestep to have zero signal-to-noise ratio (SNR),
|
||||
and some implementations of diffusion samplers do not start from the last timestep.
|
||||
Such designs are flawed and do not reflect the fact that the model is given pure Gaussian noise at inference, creating a discrepancy between training and inference.
|
||||
We show that the flawed design causes real problems in existing implementations.
|
||||
In Stable Diffusion, it severely limits the model to only generate images with medium brightness and
|
||||
prevents it from generating very bright and dark samples. We propose a few simple fixes:
|
||||
- (1) rescale the noise schedule to enforce zero terminal SNR;
|
||||
- (2) train the model with v prediction;
|
||||
- (3) change the sampler to always start from the last timestep;
|
||||
- (4) rescale classifier-free guidance to prevent over-exposure.
|
||||
These simple changes ensure the diffusion process is congruent between training and inference and
|
||||
allow the model to generate samples more faithful to the original data distribution.*
|
||||
|
||||
You can apply all of these changes in `diffusers` when using [`DDIMScheduler`]:
|
||||
- (1) rescale the noise schedule to enforce zero terminal SNR;
|
||||
```py
|
||||
pipe.scheduler = DDIMScheduler.from_config(pipe.scheduler.config, rescale_betas_zero_snr=True)
|
||||
```
|
||||
- (2) train the model with v prediction;
|
||||
Continue fine-tuning a checkpoint with [`train_text_to_image.py`](https://github.com/huggingface/diffusers/blob/main/examples/text_to_image/train_text_to_image.py) or [`train_text_to_image_lora.py`](https://github.com/huggingface/diffusers/blob/main/examples/text_to_image/train_text_to_image_lora.py)
|
||||
and `--prediction_type="v_prediction"`.
|
||||
- (3) change the sampler to always start from the last timestep;
|
||||
```py
|
||||
pipe.scheduler = DDIMScheduler.from_config(pipe.scheduler.config, timestep_spacing="trailing")
|
||||
```
|
||||
- (4) rescale classifier-free guidance to prevent over-exposure.
|
||||
```py
|
||||
pipe(..., guidance_rescale=0.7)
|
||||
```
|
||||
|
||||
An example is to use [this checkpoint](https://huggingface.co/ptx0/pseudo-journey-v2)
|
||||
which has been fine-tuned using the `"v_prediction"`.
|
||||
|
||||
The checkpoint can then be run in inference as follows:
|
||||
|
||||
```py
|
||||
from diffusers import DiffusionPipeline, DDIMScheduler
|
||||
|
||||
pipe = DiffusionPipeline.from_pretrained("ptx0/pseudo-journey-v2", torch_dtype=torch.float16)
|
||||
pipe.scheduler = DDIMScheduler.from_config(
|
||||
pipe.scheduler.config, rescale_betas_zero_snr=True, timestep_spacing="trailing"
|
||||
)
|
||||
pipe.to("cuda")
|
||||
|
||||
prompt = "A lion in galaxies, spirals, nebulae, stars, smoke, iridescent, intricate detail, octane render, 8k"
|
||||
image = pipeline(prompt, guidance_rescale=0.7).images[0]
|
||||
```
|
||||
|
||||
## DDIMScheduler
|
||||
[[autodoc]] DDIMScheduler
|
||||
|
||||
@@ -1,23 +0,0 @@
|
||||
<!--Copyright 2023 The HuggingFace Team. All rights reserved.
|
||||
|
||||
Licensed under the Apache License, Version 2.0 (the "License"); you may not use this file except in compliance with
|
||||
the License. You may obtain a copy of the License at
|
||||
|
||||
http://www.apache.org/licenses/LICENSE-2.0
|
||||
|
||||
Unless required by applicable law or agreed to in writing, software distributed under the License is distributed on
|
||||
an "AS IS" BASIS, WITHOUT WARRANTIES OR CONDITIONS OF ANY KIND, either express or implied. See the License for the
|
||||
specific language governing permissions and limitations under the License.
|
||||
-->
|
||||
|
||||
# DPM Stochastic Scheduler inspired by Karras et. al paper
|
||||
|
||||
## Overview
|
||||
|
||||
Inspired by Stochastic Sampler from [Karras et. al](https://arxiv.org/abs/2206.00364).
|
||||
Scheduler ported from @crowsonkb's https://github.com/crowsonkb/k-diffusion library:
|
||||
|
||||
All credit for making this scheduler work goes to [Katherine Crowson](https://github.com/crowsonkb/)
|
||||
|
||||
## DPMSolverSDEScheduler
|
||||
[[autodoc]] DPMSolverSDEScheduler
|
||||
@@ -1,22 +0,0 @@
|
||||
<!--Copyright 2023 The HuggingFace Team. All rights reserved.
|
||||
|
||||
Licensed under the Apache License, Version 2.0 (the "License"); you may not use this file except in compliance with
|
||||
the License. You may obtain a copy of the License at
|
||||
|
||||
http://www.apache.org/licenses/LICENSE-2.0
|
||||
|
||||
Unless required by applicable law or agreed to in writing, software distributed under the License is distributed on
|
||||
an "AS IS" BASIS, WITHOUT WARRANTIES OR CONDITIONS OF ANY KIND, either express or implied. See the License for the
|
||||
specific language governing permissions and limitations under the License.
|
||||
-->
|
||||
|
||||
# Inverse Multistep DPM-Solver (DPMSolverMultistepInverse)
|
||||
|
||||
## Overview
|
||||
|
||||
This scheduler is the inverted scheduler of [DPM-Solver: A Fast ODE Solver for Diffusion Probabilistic Model Sampling in Around 10 Steps](https://arxiv.org/abs/2206.00927) and [DPM-Solver++: Fast Solver for Guided Sampling of Diffusion Probabilistic Models
|
||||
](https://arxiv.org/abs/2211.01095) by Cheng Lu, Yuhao Zhou, Fan Bao, Jianfei Chen, Chongxuan Li, and Jun Zhu.
|
||||
The implementation is mostly based on the DDIM inversion definition of [Null-text Inversion for Editing Real Images using Guided Diffusion Models](https://arxiv.org/pdf/2211.09794.pdf) and the ad-hoc notebook implementation for DiffEdit latent inversion [here](https://github.com/Xiang-cd/DiffEdit-stable-diffusion/blob/main/diffedit.ipynb).
|
||||
|
||||
## DPMSolverMultistepInverseScheduler
|
||||
[[autodoc]] DPMSolverMultistepInverseScheduler
|
||||
@@ -1,23 +0,0 @@
|
||||
# Utilities
|
||||
|
||||
Utility and helper functions for working with 🤗 Diffusers.
|
||||
|
||||
## randn_tensor
|
||||
|
||||
[[autodoc]] diffusers.utils.randn_tensor
|
||||
|
||||
## numpy_to_pil
|
||||
|
||||
[[autodoc]] utils.pil_utils.numpy_to_pil
|
||||
|
||||
## pt_to_pil
|
||||
|
||||
[[autodoc]] utils.pil_utils.pt_to_pil
|
||||
|
||||
## load_image
|
||||
|
||||
[[autodoc]] utils.testing_utils.load_image
|
||||
|
||||
## export_to_video
|
||||
|
||||
[[autodoc]] utils.testing_utils.export_to_video
|
||||
@@ -14,7 +14,7 @@ specific language governing permissions and limitations under the License.
|
||||
|
||||
We ❤️ contributions from the open-source community! Everyone is welcome, and all types of participation –not just code– are valued and appreciated. Answering questions, helping others, reaching out, and improving the documentation are all immensely valuable to the community, so don't be afraid and get involved if you're up for it!
|
||||
|
||||
Everyone is encouraged to start by saying 👋 in our public Discord channel. We discuss the latest trends in diffusion models, ask questions, show off personal projects, help each other with contributions, or just hang out ☕. <a href="https://Discord.gg/G7tWnz98XR"><img alt="Join us on Discord" src="https://img.shields.io/discord/823813159592001537?color=5865F2&logo=discord&logoColor=white"></a>
|
||||
Everyone is encouraged to start by saying 👋 in our public Discord channel. We discuss the latest trends in diffusion models, ask questions, show off personal projects, help each other with contributions, or just hang out ☕. <a href="https://Discord.gg/G7tWnz98XR"><img alt="Join us on Discord" src="https://img.shields.io/Discord/823813159592001537?color=5865F2&logo=Discord&logoColor=white"></a>
|
||||
|
||||
Whichever way you choose to contribute, we strive to be part of an open, welcoming, and kind community. Please, read our [code of conduct](https://github.com/huggingface/diffusers/blob/main/CODE_OF_CONDUCT.md) and be mindful to respect it during your interactions. We also recommend you become familiar with the [ethical guidelines](https://huggingface.co/docs/diffusers/conceptual/ethical_guidelines) that guide our project and ask you to adhere to the same principles of transparency and responsibility.
|
||||
|
||||
|
||||
@@ -37,8 +37,7 @@ We cover Diffusion models with the following pipelines:
|
||||
|
||||
## Qualitative Evaluation
|
||||
|
||||
Qualitative evaluation typically involves human assessment of generated images. Quality is measured across aspects such as compositionality, image-text alignment, and spatial relations. Common prompts provide a degree of uniformity for subjective metrics.
|
||||
DrawBench and PartiPrompts are prompt datasets used for qualitative benchmarking. DrawBench and PartiPrompts were introduced by [Imagen](https://imagen.research.google/) and [Parti](https://parti.research.google/) respectively.
|
||||
Qualitative evaluation typically involves human assessment of generated images. Quality is measured across aspects such as compositionality, image-text alignment, and spatial relations. Common prompts provide a degree of uniformity for subjective metrics. DrawBench and PartiPrompts are prompt datasets used for qualitative benchmarking. DrawBench and PartiPrompts were introduced by [Imagen](https://imagen.research.google/) and [Parti](https://parti.research.google/) respectively.
|
||||
|
||||
From the [official Parti website](https://parti.research.google/):
|
||||
|
||||
@@ -52,13 +51,7 @@ PartiPrompts has the following columns:
|
||||
- Category of the prompt (such as “Abstract”, “World Knowledge”, etc.)
|
||||
- Challenge reflecting the difficulty (such as “Basic”, “Complex”, “Writing & Symbols”, etc.)
|
||||
|
||||
These benchmarks allow for side-by-side human evaluation of different image generation models.
|
||||
|
||||
For this, the 🧨 Diffusers team has built **Open Parti Prompts**, which is a community-driven qualitative benchmark based on Parti Prompts to compare state-of-the-art open-source diffusion models:
|
||||
- [Open Parti Prompts Game](https://huggingface.co/spaces/OpenGenAI/open-parti-prompts): For 10 parti prompts, 4 generated images are shown and the user selects the image that suits the prompt best.
|
||||
- [Open Parti Prompts Leaderboard](https://huggingface.co/spaces/OpenGenAI/parti-prompts-leaderboard): The leaderboard comparing the currently best open-sourced diffusion models to each other.
|
||||
|
||||
To manually compare images, let’s see how we can use `diffusers` on a couple of PartiPrompts.
|
||||
These benchmarks allow for side-by-side human evaluation of different image generation models. Let’s see how we can use `diffusers` on a couple of PartiPrompts.
|
||||
|
||||
Below we show some prompts sampled across different challenges: Basic, Complex, Linguistic Structures, Imagination, and Writing & Symbols. Here we are using PartiPrompts as a [dataset](https://huggingface.co/datasets/nateraw/parti-prompts).
|
||||
|
||||
|
||||
@@ -40,7 +40,7 @@ The library has three main components:
|
||||
><div class="w-full text-center bg-gradient-to-br from-pink-400 to-pink-500 rounded-lg py-1.5 font-semibold mb-5 text-white text-lg leading-relaxed">Conceptual guides</div>
|
||||
<p class="text-gray-700">Understand why the library was designed the way it was, and learn more about the ethical guidelines and safety implementations for using the library.</p>
|
||||
</a>
|
||||
<a class="!no-underline border dark:border-gray-700 p-5 rounded-lg shadow hover:shadow-lg" href="./api/models/overview"
|
||||
<a class="!no-underline border dark:border-gray-700 p-5 rounded-lg shadow hover:shadow-lg" href="./api/models"
|
||||
><div class="w-full text-center bg-gradient-to-br from-purple-400 to-purple-500 rounded-lg py-1.5 font-semibold mb-5 text-white text-lg leading-relaxed">Reference</div>
|
||||
<p class="text-gray-700">Technical descriptions of how 🤗 Diffusers classes and methods work.</p>
|
||||
</a>
|
||||
@@ -53,14 +53,11 @@ The library has three main components:
|
||||
|---|---|:---:|
|
||||
| [alt_diffusion](./api/pipelines/alt_diffusion) | [AltCLIP: Altering the Language Encoder in CLIP for Extended Language Capabilities](https://arxiv.org/abs/2211.06679) | Image-to-Image Text-Guided Generation |
|
||||
| [audio_diffusion](./api/pipelines/audio_diffusion) | [Audio Diffusion](https://github.com/teticio/audio-diffusion.git) | Unconditional Audio Generation |
|
||||
| [controlnet](./api/pipelines/controlnet) | [Adding Conditional Control to Text-to-Image Diffusion Models](https://arxiv.org/abs/2302.05543) | Image-to-Image Text-Guided Generation |
|
||||
| [controlnet](./api/pipelines/stable_diffusion/controlnet) | [Adding Conditional Control to Text-to-Image Diffusion Models](https://arxiv.org/abs/2302.05543) | Image-to-Image Text-Guided Generation |
|
||||
| [cycle_diffusion](./api/pipelines/cycle_diffusion) | [Unifying Diffusion Models' Latent Space, with Applications to CycleDiffusion and Guidance](https://arxiv.org/abs/2210.05559) | Image-to-Image Text-Guided Generation |
|
||||
| [dance_diffusion](./api/pipelines/dance_diffusion) | [Dance Diffusion](https://github.com/williamberman/diffusers.git) | Unconditional Audio Generation |
|
||||
| [ddpm](./api/pipelines/ddpm) | [Denoising Diffusion Probabilistic Models](https://arxiv.org/abs/2006.11239) | Unconditional Image Generation |
|
||||
| [ddim](./api/pipelines/ddim) | [Denoising Diffusion Implicit Models](https://arxiv.org/abs/2010.02502) | Unconditional Image Generation |
|
||||
| [if](./if) | [**IF**](./api/pipelines/if) | Image Generation |
|
||||
| [if_img2img](./if) | [**IF**](./api/pipelines/if) | Image-to-Image Generation |
|
||||
| [if_inpainting](./if) | [**IF**](./api/pipelines/if) | Image-to-Image Generation |
|
||||
| [latent_diffusion](./api/pipelines/latent_diffusion) | [High-Resolution Image Synthesis with Latent Diffusion Models](https://arxiv.org/abs/2112.10752)| Text-to-Image Generation |
|
||||
| [latent_diffusion](./api/pipelines/latent_diffusion) | [High-Resolution Image Synthesis with Latent Diffusion Models](https://arxiv.org/abs/2112.10752)| Super Resolution Image-to-Image |
|
||||
| [latent_diffusion_uncond](./api/pipelines/latent_diffusion_uncond) | [High-Resolution Image Synthesis with Latent Diffusion Models](https://arxiv.org/abs/2112.10752) | Unconditional Image Generation |
|
||||
@@ -69,7 +66,6 @@ The library has three main components:
|
||||
| [score_sde_ve](./api/pipelines/score_sde_ve) | [Score-Based Generative Modeling through Stochastic Differential Equations](https://openreview.net/forum?id=PxTIG12RRHS) | Unconditional Image Generation |
|
||||
| [score_sde_vp](./api/pipelines/score_sde_vp) | [Score-Based Generative Modeling through Stochastic Differential Equations](https://openreview.net/forum?id=PxTIG12RRHS) | Unconditional Image Generation |
|
||||
| [semantic_stable_diffusion](./api/pipelines/semantic_stable_diffusion) | [Semantic Guidance](https://arxiv.org/abs/2301.12247) | Text-Guided Generation |
|
||||
| [stable_diffusion_adapter](./api/pipelines/stable_diffusion/adapter) | [**T2I-Adapter**](https://arxiv.org/abs/2302.08453) | Image-to-Image Text-Guided Generation | -
|
||||
| [stable_diffusion_text2img](./api/pipelines/stable_diffusion/text2img) | [Stable Diffusion](https://stability.ai/blog/stable-diffusion-public-release) | Text-to-Image Generation |
|
||||
| [stable_diffusion_img2img](./api/pipelines/stable_diffusion/img2img) | [Stable Diffusion](https://stability.ai/blog/stable-diffusion-public-release) | Image-to-Image Text-Guided Generation |
|
||||
| [stable_diffusion_inpaint](./api/pipelines/stable_diffusion/inpaint) | [Stable Diffusion](https://stability.ai/blog/stable-diffusion-public-release) | Text-Guided Image Inpainting |
|
||||
@@ -95,4 +91,3 @@ The library has three main components:
|
||||
| [versatile_diffusion](./api/pipelines/versatile_diffusion) | [Versatile Diffusion: Text, Images and Variations All in One Diffusion Model](https://arxiv.org/abs/2211.08332) | Image Variations Generation |
|
||||
| [versatile_diffusion](./api/pipelines/versatile_diffusion) | [Versatile Diffusion: Text, Images and Variations All in One Diffusion Model](https://arxiv.org/abs/2211.08332) | Dual Image and Text Guided Generation |
|
||||
| [vq_diffusion](./api/pipelines/vq_diffusion) | [Vector Quantized Diffusion Model for Text-to-Image Synthesis](https://arxiv.org/abs/2111.14822) | Text-to-Image Generation |
|
||||
| [stable_diffusion_ldm3d](./api/pipelines/stable_diffusion/ldm3d_diffusion) | [LDM3D: Latent Diffusion Model for 3D](https://arxiv.org/abs/2305.10853) | Text to Image and Depth Generation |
|
||||
|
||||
@@ -12,9 +12,9 @@ specific language governing permissions and limitations under the License.
|
||||
|
||||
# Installation
|
||||
|
||||
Install 🤗 Diffusers for whichever deep learning library you're working with.
|
||||
Install 🤗 Diffusers for whichever deep learning library you’re working with.
|
||||
|
||||
🤗 Diffusers is tested on Python 3.7+, PyTorch 1.7.0+ and Flax. Follow the installation instructions below for the deep learning library you are using:
|
||||
🤗 Diffusers is tested on Python 3.7+, PyTorch 1.7.0+ and flax. Follow the installation instructions below for the deep learning library you are using:
|
||||
|
||||
- [PyTorch](https://pytorch.org/get-started/locally/) installation instructions.
|
||||
- [Flax](https://flax.readthedocs.io/en/latest/) installation instructions.
|
||||
@@ -23,7 +23,7 @@ Install 🤗 Diffusers for whichever deep learning library you're working with.
|
||||
|
||||
You should install 🤗 Diffusers in a [virtual environment](https://docs.python.org/3/library/venv.html).
|
||||
If you're unfamiliar with Python virtual environments, take a look at this [guide](https://packaging.python.org/guides/installing-using-pip-and-virtual-environments/).
|
||||
A virtual environment makes it easier to manage different projects and avoid compatibility issues between dependencies.
|
||||
A virtual environment makes it easier to manage different projects, and avoid compatibility issues between dependencies.
|
||||
|
||||
Start by creating a virtual environment in your project directory:
|
||||
|
||||
@@ -37,28 +37,27 @@ Activate the virtual environment:
|
||||
source .env/bin/activate
|
||||
```
|
||||
|
||||
🤗 Diffusers also relies on the 🤗 Transformers library, and you can install both with the following command:
|
||||
Now you're ready to install 🤗 Diffusers with the following command:
|
||||
|
||||
**For PyTorch**
|
||||
|
||||
<frameworkcontent>
|
||||
<pt>
|
||||
```bash
|
||||
pip install diffusers["torch"] transformers
|
||||
pip install diffusers["torch"]
|
||||
```
|
||||
</pt>
|
||||
<jax>
|
||||
|
||||
**For Flax**
|
||||
|
||||
```bash
|
||||
pip install diffusers["flax"] transformers
|
||||
pip install diffusers["flax"]
|
||||
```
|
||||
</jax>
|
||||
</frameworkcontent>
|
||||
|
||||
## Install from source
|
||||
|
||||
Before installing 🤗 Diffusers from source, make sure you have `torch` and 🤗 Accelerate installed.
|
||||
Before intsalling `diffusers` from source, make sure you have `torch` and `accelerate` installed.
|
||||
|
||||
For `torch` installation, refer to the `torch` [installation](https://pytorch.org/get-started/locally/#start-locally) guide.
|
||||
For `torch` installation refer to the `torch` [docs](https://pytorch.org/get-started/locally/#start-locally).
|
||||
|
||||
To install 🤗 Accelerate:
|
||||
To install `accelerate`
|
||||
|
||||
```bash
|
||||
pip install accelerate
|
||||
@@ -75,7 +74,7 @@ The `main` version is useful for staying up-to-date with the latest developments
|
||||
For instance, if a bug has been fixed since the last official release but a new release hasn't been rolled out yet.
|
||||
However, this means the `main` version may not always be stable.
|
||||
We strive to keep the `main` version operational, and most issues are usually resolved within a few hours or a day.
|
||||
If you run into a problem, please open an [Issue](https://github.com/huggingface/diffusers/issues/new/choose), so we can fix it even sooner!
|
||||
If you run into a problem, please open an [Issue](https://github.com/huggingface/transformers/issues), so we can fix it even sooner!
|
||||
|
||||
## Editable install
|
||||
|
||||
@@ -91,22 +90,21 @@ git clone https://github.com/huggingface/diffusers.git
|
||||
cd diffusers
|
||||
```
|
||||
|
||||
<frameworkcontent>
|
||||
<pt>
|
||||
```bash
|
||||
**For PyTorch**
|
||||
|
||||
```
|
||||
pip install -e ".[torch]"
|
||||
```
|
||||
</pt>
|
||||
<jax>
|
||||
```bash
|
||||
|
||||
**For Flax**
|
||||
|
||||
```
|
||||
pip install -e ".[flax]"
|
||||
```
|
||||
</jax>
|
||||
</frameworkcontent>
|
||||
|
||||
These commands will link the folder you cloned the repository to and your Python library paths.
|
||||
Python will now look inside the folder you cloned to in addition to the normal library paths.
|
||||
For example, if your Python packages are typically installed in `~/anaconda3/envs/main/lib/python3.7/site-packages/`, Python will also search the `~/diffusers/` folder you cloned to.
|
||||
For example, if your Python packages are typically installed in `~/anaconda3/envs/main/lib/python3.7/site-packages/`, Python will also search the folder you cloned to: `~/diffusers/`.
|
||||
|
||||
<Tip warning={true}>
|
||||
|
||||
@@ -127,7 +125,7 @@ Your Python environment will find the `main` version of 🤗 Diffusers on the ne
|
||||
|
||||
Our library gathers telemetry information during `from_pretrained()` requests.
|
||||
This data includes the version of Diffusers and PyTorch/Flax, the requested model or pipeline class,
|
||||
and the path to a pre-trained checkpoint if it is hosted on the Hub.
|
||||
and the path to a pretrained checkpoint if it is hosted on the Hub.
|
||||
This usage data helps us debug issues and prioritize new features.
|
||||
Telemetry is only sent when loading models and pipelines from the HuggingFace Hub,
|
||||
and is not collected during local usage.
|
||||
@@ -143,4 +141,4 @@ export DISABLE_TELEMETRY=YES
|
||||
On Windows:
|
||||
```bash
|
||||
set DISABLE_TELEMETRY=YES
|
||||
```
|
||||
```
|
||||
@@ -1,200 +0,0 @@
|
||||
<!--Copyright 2023 The HuggingFace Team. All rights reserved.
|
||||
|
||||
Licensed under the Apache License, Version 2.0 (the "License"); you may not use this file except in compliance with
|
||||
the License. You may obtain a copy of the License at
|
||||
|
||||
http://www.apache.org/licenses/LICENSE-2.0
|
||||
|
||||
Unless required by applicable law or agreed to in writing, software distributed under the License is distributed on
|
||||
an "AS IS" BASIS, WITHOUT WARRANTIES OR CONDITIONS OF ANY KIND, either express or implied. See the License for the
|
||||
specific language governing permissions and limitations under the License.
|
||||
-->
|
||||
|
||||
# BentoML Integration Guide
|
||||
|
||||
[[open-in-colab]]
|
||||
|
||||
[BentoML](https://github.com/bentoml/BentoML/) is an open-source framework designed for building,
|
||||
shipping, and scaling AI applications. It allows users to easily package and serve diffusion models
|
||||
for production, ensuring reliable and efficient deployments. It features out-of-the-box operational
|
||||
management tools like monitoring and tracing, and facilitates the deployment to various cloud platforms
|
||||
with ease. BentoML's distributed architecture and the separation of API server logic from
|
||||
model inference logic enable efficient scaling of deployments, even with budget constraints.
|
||||
As a result, integrating it with Diffusers provides a valuable tool for real-world deployments.
|
||||
|
||||
This tutorial demonstrates how to integrate BentoML with Diffusers.
|
||||
|
||||
## Prerequisites
|
||||
|
||||
- Install [Diffusers](https://huggingface.co/docs/diffusers/installation).
|
||||
- Install BentoML by running `pip install bentoml`. For more information, see the [BentoML documentation](https://docs.bentoml.com).
|
||||
|
||||
## Import a diffusion model
|
||||
|
||||
First, you need to prepare the model. BentoML has its own [Model Store](https://docs.bentoml.com/en/latest/concepts/model.html)
|
||||
for model management. Create a `download_model.py` file as below to import a diffusion model into BentoML's Model
|
||||
Store:
|
||||
|
||||
```py
|
||||
import bentoml
|
||||
|
||||
bentoml.diffusers.import_model(
|
||||
"sd2.1", # Model tag in the BentoML Model Store
|
||||
"stabilityai/stable-diffusion-2-1", # Hugging Face model identifier
|
||||
)
|
||||
```
|
||||
|
||||
This code snippet downloads the Stable Diffusion 2.1 model (using it's repo id
|
||||
`stabilityai/stable-diffusion-2-1`) from the Hugging Face Hub (or use the cached download
|
||||
files if the model is already downloaded) and imports it into the BentoML Model
|
||||
Store with the name `sd2.1`.
|
||||
|
||||
For models already fine-tuned and stored on disk, you can provide the path instead of
|
||||
the repo id.
|
||||
|
||||
```py
|
||||
import bentoml
|
||||
|
||||
bentoml.diffusers.import_model(
|
||||
"sd2.1-local",
|
||||
"./local_stable_diffusion_2.1/",
|
||||
)
|
||||
```
|
||||
|
||||
You can view the model in the Model Store:
|
||||
|
||||
```
|
||||
bentoml models list
|
||||
|
||||
Tag Module Size Creation Time
|
||||
sd2.1:ysrlmubascajwnry bentoml.diffusers 33.85 GiB 2023-07-12 16:47:44
|
||||
```
|
||||
|
||||
## Turn a diffusion model into a RESTful service with BentoML
|
||||
|
||||
Once the diffusion model is in BentoML's Model Store, you can implement a text-to-image
|
||||
service with it. The Stable Diffusion model accepts various arguments
|
||||
in addition to the required prompt to guide the image generation process.
|
||||
To validate these input arguments, use BentoML's [pydantic](https://github.com/pydantic/pydantic) integration.
|
||||
Create a `sdargs.py` file with an example pydantic model:
|
||||
|
||||
```py
|
||||
import typing as t
|
||||
|
||||
from pydantic import BaseModel
|
||||
|
||||
|
||||
class SDArgs(BaseModel):
|
||||
prompt: str
|
||||
negative_prompt: t.Optional[str] = None
|
||||
height: t.Optional[int] = 512
|
||||
width: t.Optional[int] = 512
|
||||
|
||||
class Config:
|
||||
extra = "allow"
|
||||
```
|
||||
|
||||
This pydantic model requires a string field `prompt` and three optional fields: `height`, `width`, and `negative_prompt`,
|
||||
each with corresponding types. The `extra = "allow"` line supports adding additional fields not defined in the `SDArgs` class.
|
||||
In a real-world scenario, you may define all the desired fields and not allow extra ones.
|
||||
|
||||
Next, create a BentoML Service file that defines a Stable Diffusion service:
|
||||
|
||||
```py
|
||||
import bentoml
|
||||
from bentoml.io import Image, JSON
|
||||
|
||||
from sdargs import SDArgs
|
||||
|
||||
bento_model = bentoml.diffusers.get("sd2.1:latest")
|
||||
sd21_runner = bento_model.to_runner(name="sd21-runner")
|
||||
|
||||
svc = bentoml.Service("stable-diffusion-21", runners=[sd21_runner])
|
||||
|
||||
|
||||
@svc.api(input=JSON(pydantic_model=SDArgs), output=Image())
|
||||
async def txt2img(input_data):
|
||||
kwargs = input_data.dict()
|
||||
res = await sd21_runner.async_run(**kwargs)
|
||||
images = res[0]
|
||||
return images[0]
|
||||
```
|
||||
|
||||
Save the file as `service.py`, and spin up a BentoML Service endpoint using:
|
||||
|
||||
```
|
||||
bentoml serve service:svc
|
||||
```
|
||||
|
||||
An HTTP server with `/txt2img` endpoint that accepts a JSON dictionary should be up at
|
||||
port 3000. Go to <http://127.0.0.1:3000> in your web browser to access the Swagger UI.
|
||||
|
||||
You can also test the text-to-image generation using `curl` and write the returned image to
|
||||
`output.jpg`.
|
||||
|
||||
```
|
||||
curl -X POST http://127.0.0.1:3000/txt2img \
|
||||
-H 'Content-Type: application/json' \
|
||||
-d "{\"prompt\":\"a black cat\", \"height\":768, \"width\":768}" \
|
||||
--output output.jpg
|
||||
```
|
||||
|
||||
## Package a BentoML Service for cloud deployment
|
||||
|
||||
To deploy a BentoML Service, you need to pack it into a BentoML
|
||||
[Bento](https://docs.bentoml.com/en/latest/concepts/bento.html), a file archive with all the source code,
|
||||
models, data files, and dependencies. This can be done by providing a `bentofile.yaml` file as follows:
|
||||
|
||||
```yaml
|
||||
service: "service.py:svc"
|
||||
include:
|
||||
- "service.py"
|
||||
python:
|
||||
packages:
|
||||
- torch
|
||||
- transformers
|
||||
- accelerate
|
||||
- diffusers
|
||||
- triton
|
||||
- xformers
|
||||
- pydantic
|
||||
docker:
|
||||
distro: debian
|
||||
cuda_version: "11.6"
|
||||
```
|
||||
|
||||
The `bentofile.yaml` file contains [Bento build
|
||||
options](https://docs.bentoml.com/en/latest/concepts/bento.html#bento-build-options),
|
||||
such as package dependencies and Docker options.
|
||||
|
||||
Then you build a Bento using:
|
||||
|
||||
```
|
||||
bentoml build
|
||||
```
|
||||
|
||||
The output looks like:
|
||||
|
||||
```
|
||||
Successfully built Bento(tag="stable-diffusion-21:crkuh7a7rw5bcasc").
|
||||
|
||||
Possible next steps:
|
||||
|
||||
* Containerize your Bento with `bentoml containerize`:
|
||||
$ bentoml containerize stable-diffusion-21:crkuh7a7rw5bcasc
|
||||
|
||||
* Push to BentoCloud with `bentoml push`:
|
||||
$ bentoml push stable-diffusion-21:crkuh7a7rw5bcasc
|
||||
```
|
||||
|
||||
You can create a Docker image based on the Bento by running the following command and deploy it to a cloud provider.
|
||||
|
||||
```
|
||||
bentoml containerize stable-diffusion-21:crkuh7a7rw5bcasc
|
||||
```
|
||||
|
||||
If you want an end-to-end solution for deploying and managing models, you can push the Bento to [Yatai](https://github.com/bentoml/Yatai) or
|
||||
[BentoCloud](https://bentoml.com/cloud) for a distributed deployment.
|
||||
|
||||
For more information about BentoML's integration with Diffusers, see the [BentoML Diffusers
|
||||
Guide](https://docs.bentoml.com/en/latest/frameworks/diffusers.html).
|
||||
@@ -50,6 +50,7 @@ from diffusers import DiffusionPipeline
|
||||
|
||||
pipe = DiffusionPipeline.from_pretrained(
|
||||
"runwayml/stable-diffusion-v1-5",
|
||||
|
||||
torch_dtype=torch.float16,
|
||||
)
|
||||
pipe = pipe.to("cuda")
|
||||
@@ -59,10 +60,8 @@ image = pipe(prompt).images[0]
|
||||
```
|
||||
|
||||
<Tip warning={true}>
|
||||
|
||||
It is strongly discouraged to make use of [`torch.autocast`](https://pytorch.org/docs/stable/amp.html#torch.autocast) in any of the pipelines as it can lead to black images and is always slower than using pure
|
||||
float16 precision.
|
||||
|
||||
</Tip>
|
||||
|
||||
## Sliced attention for additional memory savings
|
||||
@@ -84,6 +83,7 @@ from diffusers import DiffusionPipeline
|
||||
|
||||
pipe = DiffusionPipeline.from_pretrained(
|
||||
"runwayml/stable-diffusion-v1-5",
|
||||
|
||||
torch_dtype=torch.float16,
|
||||
)
|
||||
pipe = pipe.to("cuda")
|
||||
@@ -110,6 +110,7 @@ from diffusers import StableDiffusionPipeline
|
||||
|
||||
pipe = StableDiffusionPipeline.from_pretrained(
|
||||
"runwayml/stable-diffusion-v1-5",
|
||||
|
||||
torch_dtype=torch.float16,
|
||||
)
|
||||
pipe = pipe.to("cuda")
|
||||
@@ -163,6 +164,7 @@ from diffusers import StableDiffusionPipeline
|
||||
|
||||
pipe = StableDiffusionPipeline.from_pretrained(
|
||||
"runwayml/stable-diffusion-v1-5",
|
||||
|
||||
torch_dtype=torch.float16,
|
||||
)
|
||||
|
||||
@@ -187,6 +189,7 @@ from diffusers import StableDiffusionPipeline
|
||||
|
||||
pipe = StableDiffusionPipeline.from_pretrained(
|
||||
"runwayml/stable-diffusion-v1-5",
|
||||
|
||||
torch_dtype=torch.float16,
|
||||
)
|
||||
|
||||
@@ -199,8 +202,6 @@ image = pipe(prompt).images[0]
|
||||
|
||||
**Note**: When using `enable_sequential_cpu_offload()`, it is important to **not** move the pipeline to CUDA beforehand or else the gain in memory consumption will only be minimal. See [this issue](https://github.com/huggingface/diffusers/issues/1934) for more information.
|
||||
|
||||
**Note**: `enable_sequential_cpu_offload()` is a stateful operation that installs hooks on the models.
|
||||
|
||||
|
||||
<a name="model_offloading"></a>
|
||||
## Model offloading for fast inference and memory savings
|
||||
@@ -250,11 +251,6 @@ image = pipe(prompt).images[0]
|
||||
This feature requires `accelerate` version 0.17.0 or larger.
|
||||
</Tip>
|
||||
|
||||
**Note**: `enable_model_cpu_offload()` is a stateful operation that installs hooks on the models and state on the pipeline. In order to properly offload
|
||||
models after they are called, it is required that the entire pipeline is run and models are called in the order the pipeline expects them to be. Exercise caution
|
||||
if models are re-used outside the context of the pipeline after hooks have been installed. See [accelerate](https://huggingface.co/docs/accelerate/v0.18.0/en/package_reference/big_modeling#accelerate.hooks.remove_hook_from_module)
|
||||
for further docs on removing hooks.
|
||||
|
||||
## Using Channels Last memory format
|
||||
|
||||
Channels last memory format is an alternative way of ordering NCHW tensors in memory preserving dimensions ordering. Channels last tensors ordered in such a way that channels become the densest dimension (aka storing images pixel-per-pixel). Since not all operators currently support channels last format it may result in a worst performance, so it's better to try it and see if it works for your model.
|
||||
@@ -404,14 +400,7 @@ Here are the speedups we obtain on a few Nvidia GPUs when running the inference
|
||||
| A100-SXM4-40GB | 18.6it/s | 29.it/s |
|
||||
| A100-SXM-80GB | 18.7it/s | 29.5it/s |
|
||||
|
||||
To leverage it just make sure you have:
|
||||
|
||||
<Tip warning={true}>
|
||||
|
||||
If you have PyTorch 2.0 installed, you shouldn't use xFormers!
|
||||
|
||||
</Tip>
|
||||
|
||||
To leverage it just make sure you have:
|
||||
- PyTorch > 1.12
|
||||
- Cuda available
|
||||
- [Installed the xformers library](xformers).
|
||||
|
||||
@@ -16,8 +16,8 @@ specific language governing permissions and limitations under the License.
|
||||
|
||||
## Requirements
|
||||
|
||||
- Optimum Habana 1.6 or later, [here](https://huggingface.co/docs/optimum/habana/installation) is how to install it.
|
||||
- SynapseAI 1.10.
|
||||
- Optimum Habana 1.4 or later, [here](https://huggingface.co/docs/optimum/habana/installation) is how to install it.
|
||||
- SynapseAI 1.8.
|
||||
|
||||
|
||||
## Inference Pipeline
|
||||
@@ -41,7 +41,7 @@ pipeline = GaudiStableDiffusionPipeline.from_pretrained(
|
||||
scheduler=scheduler,
|
||||
use_habana=True,
|
||||
use_hpu_graphs=True,
|
||||
gaudi_config="Habana/stable-diffusion-2",
|
||||
gaudi_config="Habana/stable-diffusion",
|
||||
)
|
||||
```
|
||||
|
||||
@@ -62,18 +62,9 @@ For more information, check out Optimum Habana's [documentation](https://hugging
|
||||
|
||||
## Benchmark
|
||||
|
||||
Here are the latencies for Habana first-generation Gaudi and Gaudi2 with the [Habana/stable-diffusion](https://huggingface.co/Habana/stable-diffusion) and [Habana/stable-diffusion-2](https://huggingface.co/Habana/stable-diffusion-2) Gaudi configurations (mixed precision bf16/fp32):
|
||||
|
||||
- [Stable Diffusion v1.5](https://huggingface.co/runwayml/stable-diffusion-v1-5) (512x512 resolution):
|
||||
Here are the latencies for Habana first-generation Gaudi and Gaudi2 with the [Habana/stable-diffusion](https://huggingface.co/Habana/stable-diffusion) Gaudi configuration (mixed precision bf16/fp32):
|
||||
|
||||
| | Latency (batch size = 1) | Throughput (batch size = 8) |
|
||||
| ---------------------- |:------------------------:|:---------------------------:|
|
||||
| first-generation Gaudi | 3.80s | 0.308 images/s |
|
||||
| Gaudi2 | 1.33s | 1.081 images/s |
|
||||
|
||||
- [Stable Diffusion v2.1](https://huggingface.co/stabilityai/stable-diffusion-2-1) (768x768 resolution):
|
||||
|
||||
| | Latency (batch size = 1) | Throughput |
|
||||
| ---------------------- |:------------------------:|:-------------------------------:|
|
||||
| first-generation Gaudi | 10.2s | 0.108 images/s (batch size = 4) |
|
||||
| Gaudi2 | 3.17s | 0.379 images/s (batch size = 8) |
|
||||
| first-generation Gaudi | 4.29s | 0.283 images/s |
|
||||
| Gaudi2 | 1.54s | 0.904 images/s |
|
||||
|
||||
@@ -1,116 +0,0 @@
|
||||
<!--Copyright 2023 The HuggingFace Team. All rights reserved.
|
||||
|
||||
Licensed under the Apache License, Version 2.0 (the "License"); you may not use this file except in compliance with
|
||||
the License. You may obtain a copy of the License at
|
||||
|
||||
http://www.apache.org/licenses/LICENSE-2.0
|
||||
|
||||
Unless required by applicable law or agreed to in writing, software distributed under the License is distributed on
|
||||
an "AS IS" BASIS, WITHOUT WARRANTIES OR CONDITIONS OF ANY KIND, either express or implied. See the License for the
|
||||
specific language governing permissions and limitations under the License.
|
||||
-->
|
||||
|
||||
# Token Merging
|
||||
|
||||
Token Merging (introduced in [Token Merging: Your ViT But Faster](https://arxiv.org/abs/2210.09461)) works by merging the redundant tokens / patches progressively in the forward pass of a Transformer-based network. It can speed up the inference latency of the underlying network.
|
||||
|
||||
After Token Merging (ToMe) was released, the authors released [Token Merging for Fast Stable Diffusion](https://arxiv.org/abs/2303.17604), which introduced a version of ToMe which is more compatible with Stable Diffusion. We can use ToMe to gracefully speed up the inference latency of a [`DiffusionPipeline`]. This doc discusses how to apply ToMe to the [`StableDiffusionPipeline`], the expected speedups, and the qualitative aspects of using ToMe on the [`StableDiffusionPipeline`].
|
||||
|
||||
## Using ToMe
|
||||
|
||||
The authors of ToMe released a convenient Python library called [`tomesd`](https://github.com/dbolya/tomesd) that lets us apply ToMe to a [`DiffusionPipeline`] like so:
|
||||
|
||||
```diff
|
||||
from diffusers import StableDiffusionPipeline
|
||||
import tomesd
|
||||
|
||||
pipeline = StableDiffusionPipeline.from_pretrained(
|
||||
"runwayml/stable-diffusion-v1-5", torch_dtype=torch.float16
|
||||
).to("cuda")
|
||||
+ tomesd.apply_patch(pipeline, ratio=0.5)
|
||||
|
||||
image = pipeline("a photo of an astronaut riding a horse on mars").images[0]
|
||||
```
|
||||
|
||||
And that’s it!
|
||||
|
||||
`tomesd.apply_patch()` exposes [a number of arguments](https://github.com/dbolya/tomesd#usage) to let us strike a balance between the pipeline inference speed and the quality of the generated tokens. Amongst those arguments, the most important one is `ratio`. `ratio` controls the number of tokens that will be merged during the forward pass. For more details on `tomesd`, please refer to the original repository https://github.com/dbolya/tomesd and [the paper](https://arxiv.org/abs/2303.17604).
|
||||
|
||||
## Benchmarking `tomesd` with `StableDiffusionPipeline`
|
||||
|
||||
We benchmarked the impact of using `tomesd` on [`StableDiffusionPipeline`] along with [xformers](https://huggingface.co/docs/diffusers/optimization/xformers) across different image resolutions. We used A100 and V100 as our test GPU devices with the following development environment (with Python 3.8.5):
|
||||
|
||||
```bash
|
||||
- `diffusers` version: 0.15.1
|
||||
- Python version: 3.8.16
|
||||
- PyTorch version (GPU?): 1.13.1+cu116 (True)
|
||||
- Huggingface_hub version: 0.13.2
|
||||
- Transformers version: 4.27.2
|
||||
- Accelerate version: 0.18.0
|
||||
- xFormers version: 0.0.16
|
||||
- tomesd version: 0.1.2
|
||||
```
|
||||
|
||||
We used this script for benchmarking: [https://gist.github.com/sayakpaul/27aec6bca7eb7b0e0aa4112205850335](https://gist.github.com/sayakpaul/27aec6bca7eb7b0e0aa4112205850335). Following are our findings:
|
||||
|
||||
### A100
|
||||
|
||||
| Resolution | Batch size | Vanilla | ToMe | ToMe + xFormers | ToMe speedup (%) | ToMe + xFormers speedup (%) |
|
||||
| --- | --- | --- | --- | --- | --- | --- |
|
||||
| 512 | 10 | 6.88 | 5.26 | 4.69 | 23.54651163 | 31.83139535 |
|
||||
| | | | | | | |
|
||||
| 768 | 10 | OOM | 14.71 | 11 | | |
|
||||
| | 8 | OOM | 11.56 | 8.84 | | |
|
||||
| | 4 | OOM | 5.98 | 4.66 | | |
|
||||
| | 2 | 4.99 | 3.24 | 3.1 | 35.07014028 | 37.8757515 |
|
||||
| | 1 | 3.29 | 2.24 | 2.03 | 31.91489362 | 38.29787234 |
|
||||
| | | | | | | |
|
||||
| 1024 | 10 | OOM | OOM | OOM | | |
|
||||
| | 8 | OOM | OOM | OOM | | |
|
||||
| | 4 | OOM | 12.51 | 9.09 | | |
|
||||
| | 2 | OOM | 6.52 | 4.96 | | |
|
||||
| | 1 | 6.4 | 3.61 | 2.81 | 43.59375 | 56.09375 |
|
||||
|
||||
***The timings reported here are in seconds. Speedups are calculated over the `Vanilla` timings.***
|
||||
|
||||
### V100
|
||||
|
||||
| Resolution | Batch size | Vanilla | ToMe | ToMe + xFormers | ToMe speedup (%) | ToMe + xFormers speedup (%) |
|
||||
| --- | --- | --- | --- | --- | --- | --- |
|
||||
| 512 | 10 | OOM | 10.03 | 9.29 | | |
|
||||
| | 8 | OOM | 8.05 | 7.47 | | |
|
||||
| | 4 | 5.7 | 4.3 | 3.98 | 24.56140351 | 30.1754386 |
|
||||
| | 2 | 3.14 | 2.43 | 2.27 | 22.61146497 | 27.70700637 |
|
||||
| | 1 | 1.88 | 1.57 | 1.57 | 16.4893617 | 16.4893617 |
|
||||
| | | | | | | |
|
||||
| 768 | 10 | OOM | OOM | 23.67 | | |
|
||||
| | 8 | OOM | OOM | 18.81 | | |
|
||||
| | 4 | OOM | 11.81 | 9.7 | | |
|
||||
| | 2 | OOM | 6.27 | 5.2 | | |
|
||||
| | 1 | 5.43 | 3.38 | 2.82 | 37.75322284 | 48.06629834 |
|
||||
| | | | | | | |
|
||||
| 1024 | 10 | OOM | OOM | OOM | | |
|
||||
| | 8 | OOM | OOM | OOM | | |
|
||||
| | 4 | OOM | OOM | 19.35 | | |
|
||||
| | 2 | OOM | 13 | 10.78 | | |
|
||||
| | 1 | OOM | 6.66 | 5.54 | | |
|
||||
|
||||
As seen in the tables above, the speedup with `tomesd` becomes more pronounced for larger image resolutions. It is also interesting to note that with `tomesd`, it becomes possible to run the pipeline on a higher resolution, like 1024x1024.
|
||||
|
||||
It might be possible to speed up inference even further with [`torch.compile()`](https://huggingface.co/docs/diffusers/optimization/torch2.0).
|
||||
|
||||
## Quality
|
||||
|
||||
As reported in [the paper](https://arxiv.org/abs/2303.17604), ToMe can preserve the quality of the generated images to a great extent while speeding up inference. By increasing the `ratio`, it is possible to further speed up inference, but that might come at the cost of a deterioration in the image quality.
|
||||
|
||||
To test the quality of the generated samples using our setup, we sampled a few prompts from the “Parti Prompts” (introduced in [Parti](https://parti.research.google/)) and performed inference with the [`StableDiffusionPipeline`] in the following settings:
|
||||
|
||||
- Vanilla [`StableDiffusionPipeline`]
|
||||
- [`StableDiffusionPipeline`] + ToMe
|
||||
- [`StableDiffusionPipeline`] + ToMe + xformers
|
||||
|
||||
We didn’t notice any significant decrease in the quality of the generated samples. Here are samples:
|
||||
|
||||
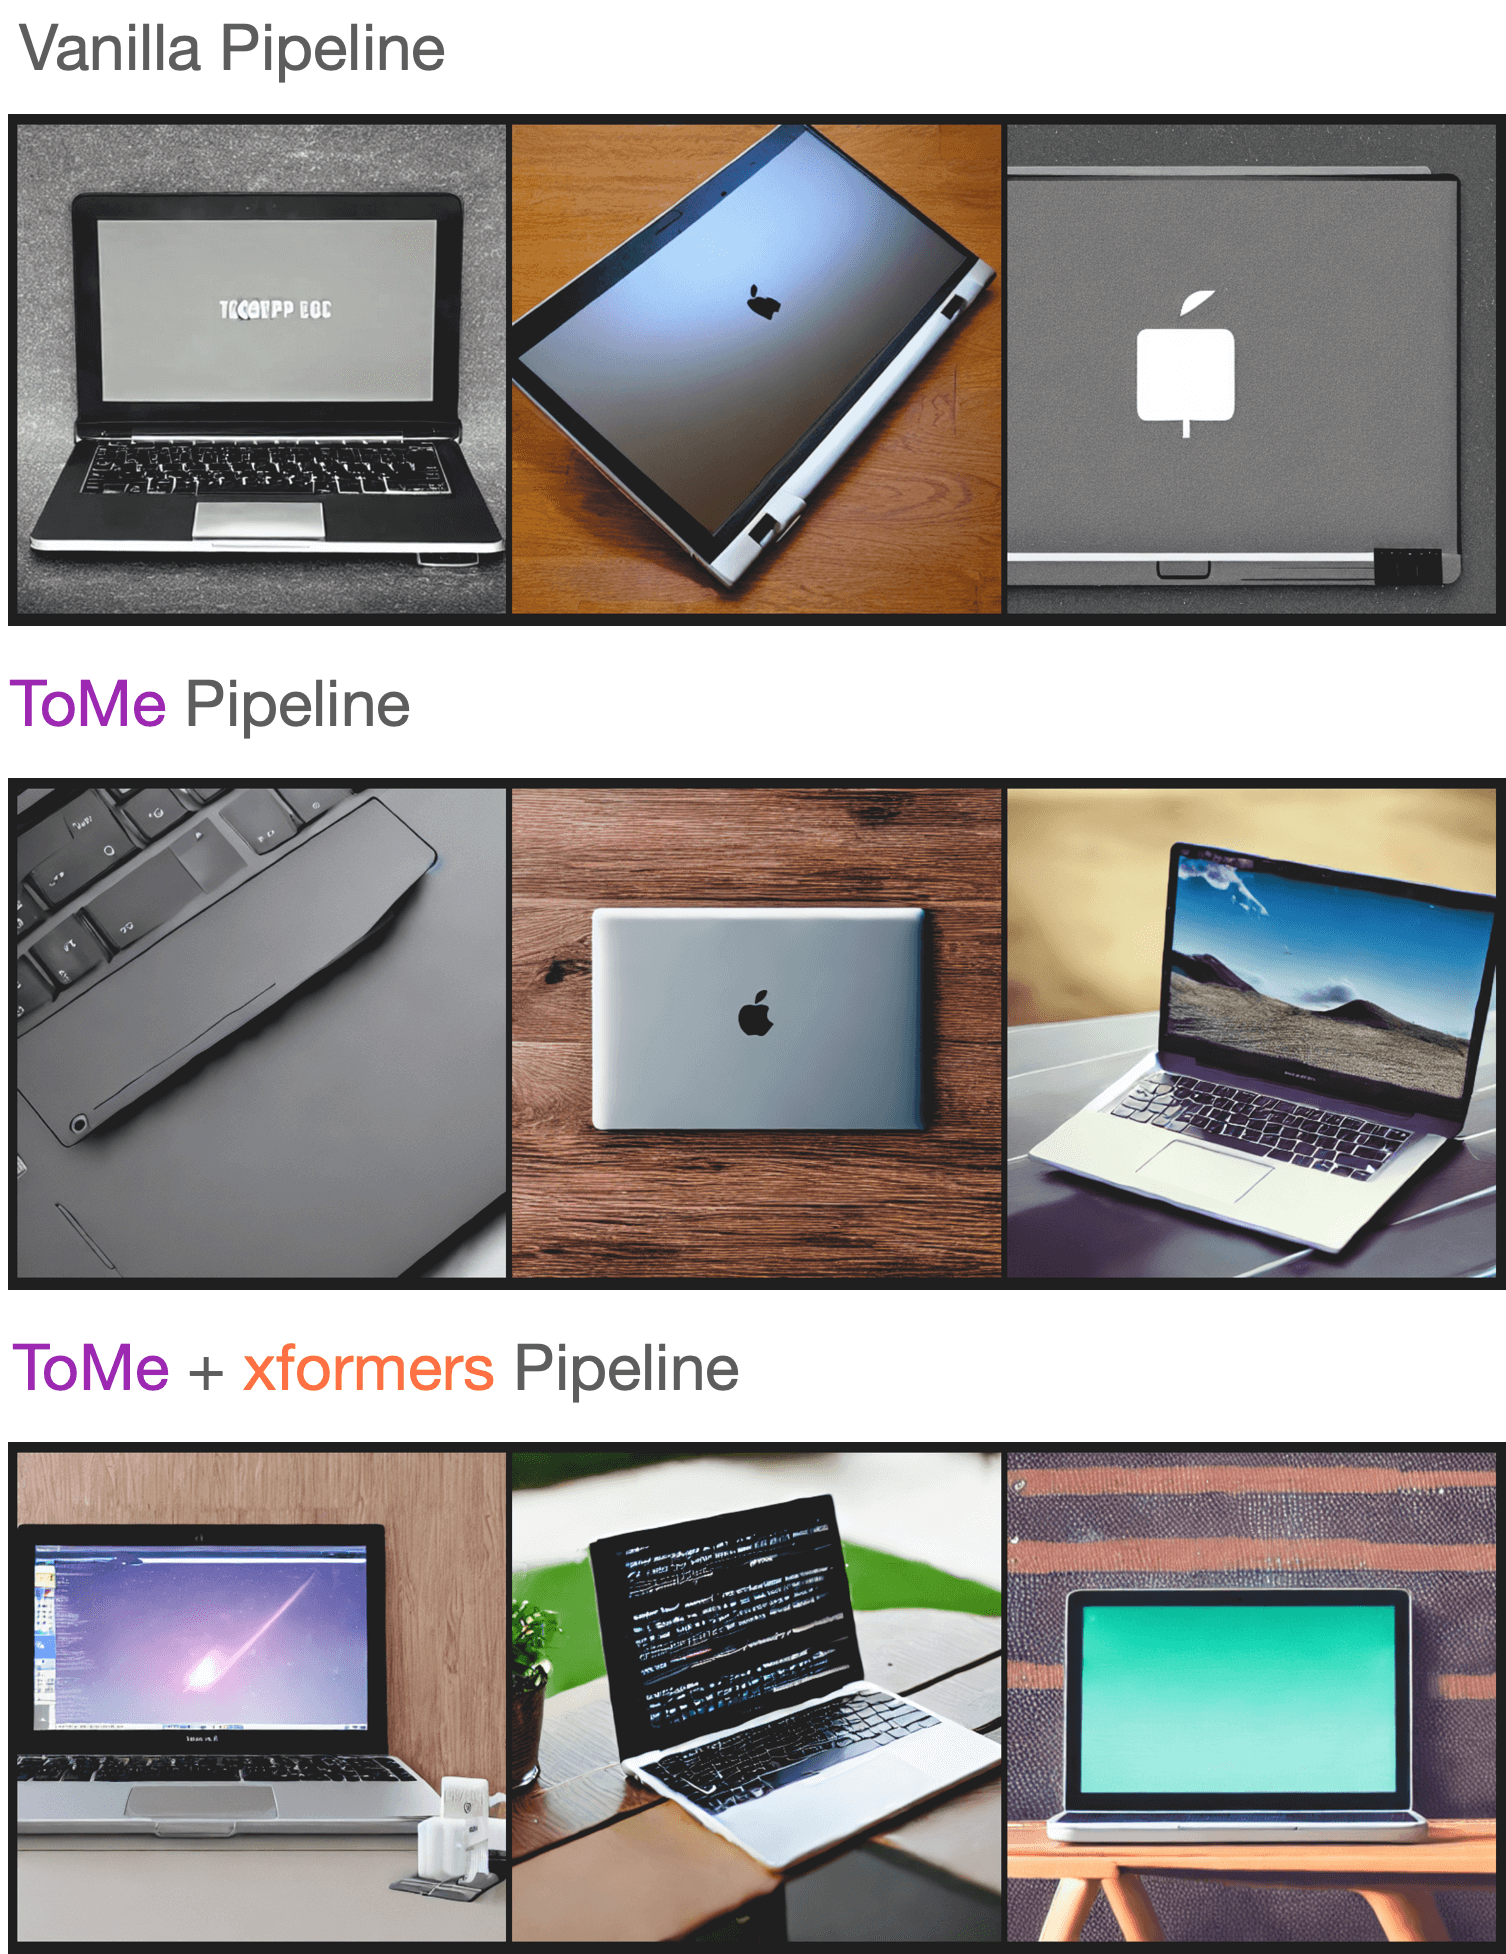
|
||||
|
||||
You can check out the generated samples [here](https://wandb.ai/sayakpaul/tomesd-results/runs/23j4bj3i?workspace=). We used [this script](https://gist.github.com/sayakpaul/8cac98d7f22399085a060992f411ecbd) for conducting this experiment.
|
||||
@@ -12,21 +12,19 @@ specific language governing permissions and limitations under the License.
|
||||
|
||||
# Accelerated PyTorch 2.0 support in Diffusers
|
||||
|
||||
Starting from version `0.13.0`, Diffusers supports the latest optimization from [PyTorch 2.0](https://pytorch.org/get-started/pytorch-2.0/). These include:
|
||||
1. Support for accelerated transformers implementation with memory-efficient attention – no extra dependencies (such as `xformers`) required.
|
||||
Starting from version `0.13.0`, Diffusers supports the latest optimization from the upcoming [PyTorch 2.0](https://pytorch.org/get-started/pytorch-2.0/) release. These include:
|
||||
1. Support for accelerated transformers implementation with memory-efficient attention – no extra dependencies required.
|
||||
2. [torch.compile](https://pytorch.org/tutorials/intermediate/torch_compile_tutorial.html) support for extra performance boost when individual models are compiled.
|
||||
|
||||
|
||||
## Installation
|
||||
|
||||
To benefit from the accelerated attention implementation and `torch.compile()`, you just need to install the latest versions of PyTorch 2.0 from pip, and make sure you are on diffusers 0.13.0 or later. As explained below, diffusers automatically uses the optimized attention processor ([`AttnProcessor2_0`](https://github.com/huggingface/diffusers/blob/1a5797c6d4491a879ea5285c4efc377664e0332d/src/diffusers/models/attention_processor.py#L798)) (but not `torch.compile()`)
|
||||
when PyTorch 2.0 is available.
|
||||
To benefit from the accelerated attention implementation and `torch.compile`, you just need to install the latest versions of PyTorch 2.0 from `pip`, and make sure you are on diffusers 0.13.0 or later. As explained below, `diffusers` automatically uses the attention optimizations (but not `torch.compile`) when available.
|
||||
|
||||
```bash
|
||||
pip install --upgrade torch diffusers
|
||||
pip install --upgrade torch torchvision diffusers
|
||||
```
|
||||
|
||||
## Using accelerated transformers and `torch.compile`.
|
||||
## Using accelerated transformers and torch.compile.
|
||||
|
||||
|
||||
1. **Accelerated Transformers implementation**
|
||||
@@ -48,13 +46,13 @@ pip install --upgrade torch diffusers
|
||||
|
||||
If you want to enable it explicitly (which is not required), you can do so as shown below.
|
||||
|
||||
```diff
|
||||
```Python
|
||||
import torch
|
||||
from diffusers import DiffusionPipeline
|
||||
+ from diffusers.models.attention_processor import AttnProcessor2_0
|
||||
from diffusers.models.attention_processor import AttnProcessor2_0
|
||||
|
||||
pipe = DiffusionPipeline.from_pretrained("runwayml/stable-diffusion-v1-5", torch_dtype=torch.float16).to("cuda")
|
||||
+ pipe.unet.set_attn_processor(AttnProcessor2_0())
|
||||
pipe.unet.set_attn_processor(AttnProcessor2_0())
|
||||
|
||||
prompt = "a photo of an astronaut riding a horse on mars"
|
||||
image = pipe(prompt).images[0]
|
||||
@@ -62,383 +60,151 @@ pip install --upgrade torch diffusers
|
||||
|
||||
This should be as fast and memory efficient as `xFormers`. More details [in our benchmark](#benchmark).
|
||||
|
||||
It is possible to revert to the vanilla attention processor ([`AttnProcessor`](https://github.com/huggingface/diffusers/blob/1a5797c6d4491a879ea5285c4efc377664e0332d/src/diffusers/models/attention_processor.py#L402)), which can be helpful to make the pipeline more deterministic, or if you need to convert a fine-tuned model to other formats such as [Core ML](https://huggingface.co/docs/diffusers/v0.16.0/en/optimization/coreml#how-to-run-stable-diffusion-with-core-ml). To use the normal attention processor you can use the [`~diffusers.UNet2DConditionModel.set_default_attn_processor`] function:
|
||||
|
||||
```Python
|
||||
import torch
|
||||
from diffusers import DiffusionPipeline
|
||||
from diffusers.models.attention_processor import AttnProcessor
|
||||
|
||||
pipe = DiffusionPipeline.from_pretrained("runwayml/stable-diffusion-v1-5", torch_dtype=torch.float16).to("cuda")
|
||||
pipe.unet.set_default_attn_processor()
|
||||
|
||||
prompt = "a photo of an astronaut riding a horse on mars"
|
||||
image = pipe(prompt).images[0]
|
||||
```
|
||||
|
||||
2. **torch.compile**
|
||||
|
||||
To get an additional speedup, we can use the new `torch.compile` feature. Since the UNet of the pipeline is usually the most computationally expensive, we wrap the `unet` with `torch.compile` leaving rest of the sub-models (text encoder and VAE) as is. For more information and different options, refer to the
|
||||
To get an additional speedup, we can use the new `torch.compile` feature. To do so, we simply wrap our `unet` with `torch.compile`. For more information and different options, refer to the
|
||||
[torch compile docs](https://pytorch.org/tutorials/intermediate/torch_compile_tutorial.html).
|
||||
|
||||
```python
|
||||
pipe.unet = torch.compile(pipe.unet, mode="reduce-overhead", fullgraph=True)
|
||||
import torch
|
||||
from diffusers import DiffusionPipeline
|
||||
|
||||
pipe = DiffusionPipeline.from_pretrained("runwayml/stable-diffusion-v1-5", torch_dtype=torch.float16).to("cuda")
|
||||
pipe.unet = torch.compile(pipe.unet)
|
||||
|
||||
batch_size = 10
|
||||
prompt = "A photo of an astronaut riding a horse on marse."
|
||||
images = pipe(prompt, num_inference_steps=steps, num_images_per_prompt=batch_size).images
|
||||
```
|
||||
|
||||
Depending on the type of GPU, `compile()` can yield between **5% - 300%** of _additional speed-up_ over the accelerated transformer optimizations. Note, however, that compilation is able to squeeze more performance improvements in more recent GPU architectures such as Ampere (A100, 3090), Ada (4090) and Hopper (H100).
|
||||
Depending on the type of GPU, `compile()` can yield between 2-9% of _additional speed-up_ over the accelerated transformer optimizations. Note, however, that compilation is able to squeeze more performance improvements in more recent GPU architectures such as Ampere (A100, 3090), Ada (4090) and Hopper (H100).
|
||||
|
||||
Compilation takes some time to complete, so it is best suited for situations where you need to prepare your pipeline once and then perform the same type of inference operations multiple times. Calling the compiled pipeline on a different image size will re-trigger compilation which can be expensive.
|
||||
Compilation takes some time to complete, so it is best suited for situations where you need to prepare your pipeline once and then perform the same type of inference operations multiple times.
|
||||
|
||||
|
||||
## Benchmark
|
||||
|
||||
We conducted a comprehensive benchmark with PyTorch 2.0's efficient attention implementation and `torch.compile` across different GPUs and batch sizes for five of our most used pipelines. We used `diffusers 0.17.0.dev0`, which [makes sure `torch.compile()` is leveraged optimally](https://github.com/huggingface/diffusers/pull/3313).
|
||||
|
||||
### Benchmarking code
|
||||
|
||||
#### Stable Diffusion text-to-image
|
||||
|
||||
```python
|
||||
from diffusers import DiffusionPipeline
|
||||
import torch
|
||||
|
||||
path = "runwayml/stable-diffusion-v1-5"
|
||||
|
||||
run_compile = True # Set True / False
|
||||
|
||||
pipe = DiffusionPipeline.from_pretrained(path, torch_dtype=torch.float16)
|
||||
pipe = pipe.to("cuda")
|
||||
pipe.unet.to(memory_format=torch.channels_last)
|
||||
|
||||
if run_compile:
|
||||
print("Run torch compile")
|
||||
pipe.unet = torch.compile(pipe.unet, mode="reduce-overhead", fullgraph=True)
|
||||
|
||||
prompt = "ghibli style, a fantasy landscape with castles"
|
||||
|
||||
for _ in range(3):
|
||||
images = pipe(prompt=prompt).images
|
||||
```
|
||||
|
||||
#### Stable Diffusion image-to-image
|
||||
|
||||
```python
|
||||
from diffusers import StableDiffusionImg2ImgPipeline
|
||||
import requests
|
||||
import torch
|
||||
from PIL import Image
|
||||
from io import BytesIO
|
||||
|
||||
url = "https://raw.githubusercontent.com/CompVis/stable-diffusion/main/assets/stable-samples/img2img/sketch-mountains-input.jpg"
|
||||
|
||||
response = requests.get(url)
|
||||
init_image = Image.open(BytesIO(response.content)).convert("RGB")
|
||||
init_image = init_image.resize((512, 512))
|
||||
|
||||
path = "runwayml/stable-diffusion-v1-5"
|
||||
|
||||
run_compile = True # Set True / False
|
||||
|
||||
pipe = StableDiffusionImg2ImgPipeline.from_pretrained(path, torch_dtype=torch.float16)
|
||||
pipe = pipe.to("cuda")
|
||||
pipe.unet.to(memory_format=torch.channels_last)
|
||||
|
||||
if run_compile:
|
||||
print("Run torch compile")
|
||||
pipe.unet = torch.compile(pipe.unet, mode="reduce-overhead", fullgraph=True)
|
||||
|
||||
prompt = "ghibli style, a fantasy landscape with castles"
|
||||
|
||||
for _ in range(3):
|
||||
image = pipe(prompt=prompt, image=init_image).images[0]
|
||||
```
|
||||
|
||||
#### Stable Diffusion - inpainting
|
||||
|
||||
```python
|
||||
from diffusers import StableDiffusionInpaintPipeline
|
||||
import requests
|
||||
import torch
|
||||
from PIL import Image
|
||||
from io import BytesIO
|
||||
|
||||
url = "https://raw.githubusercontent.com/CompVis/stable-diffusion/main/assets/stable-samples/img2img/sketch-mountains-input.jpg"
|
||||
|
||||
def download_image(url):
|
||||
response = requests.get(url)
|
||||
return Image.open(BytesIO(response.content)).convert("RGB")
|
||||
|
||||
|
||||
img_url = "https://raw.githubusercontent.com/CompVis/latent-diffusion/main/data/inpainting_examples/overture-creations-5sI6fQgYIuo.png"
|
||||
mask_url = "https://raw.githubusercontent.com/CompVis/latent-diffusion/main/data/inpainting_examples/overture-creations-5sI6fQgYIuo_mask.png"
|
||||
|
||||
init_image = download_image(img_url).resize((512, 512))
|
||||
mask_image = download_image(mask_url).resize((512, 512))
|
||||
|
||||
path = "runwayml/stable-diffusion-inpainting"
|
||||
|
||||
run_compile = True # Set True / False
|
||||
|
||||
pipe = StableDiffusionInpaintPipeline.from_pretrained(path, torch_dtype=torch.float16)
|
||||
pipe = pipe.to("cuda")
|
||||
pipe.unet.to(memory_format=torch.channels_last)
|
||||
|
||||
if run_compile:
|
||||
print("Run torch compile")
|
||||
pipe.unet = torch.compile(pipe.unet, mode="reduce-overhead", fullgraph=True)
|
||||
|
||||
prompt = "ghibli style, a fantasy landscape with castles"
|
||||
|
||||
for _ in range(3):
|
||||
image = pipe(prompt=prompt, image=init_image, mask_image=mask_image).images[0]
|
||||
```
|
||||
|
||||
#### ControlNet
|
||||
|
||||
```python
|
||||
from diffusers import StableDiffusionControlNetPipeline, ControlNetModel
|
||||
import requests
|
||||
import torch
|
||||
from PIL import Image
|
||||
from io import BytesIO
|
||||
|
||||
url = "https://raw.githubusercontent.com/CompVis/stable-diffusion/main/assets/stable-samples/img2img/sketch-mountains-input.jpg"
|
||||
|
||||
response = requests.get(url)
|
||||
init_image = Image.open(BytesIO(response.content)).convert("RGB")
|
||||
init_image = init_image.resize((512, 512))
|
||||
|
||||
path = "runwayml/stable-diffusion-v1-5"
|
||||
|
||||
run_compile = True # Set True / False
|
||||
controlnet = ControlNetModel.from_pretrained("lllyasviel/sd-controlnet-canny", torch_dtype=torch.float16)
|
||||
pipe = StableDiffusionControlNetPipeline.from_pretrained(
|
||||
path, controlnet=controlnet, torch_dtype=torch.float16
|
||||
)
|
||||
|
||||
pipe = pipe.to("cuda")
|
||||
pipe.unet.to(memory_format=torch.channels_last)
|
||||
pipe.controlnet.to(memory_format=torch.channels_last)
|
||||
|
||||
if run_compile:
|
||||
print("Run torch compile")
|
||||
pipe.unet = torch.compile(pipe.unet, mode="reduce-overhead", fullgraph=True)
|
||||
pipe.controlnet = torch.compile(pipe.controlnet, mode="reduce-overhead", fullgraph=True)
|
||||
|
||||
prompt = "ghibli style, a fantasy landscape with castles"
|
||||
|
||||
for _ in range(3):
|
||||
image = pipe(prompt=prompt, image=init_image).images[0]
|
||||
```
|
||||
|
||||
#### IF text-to-image + upscaling
|
||||
|
||||
```python
|
||||
from diffusers import DiffusionPipeline
|
||||
import torch
|
||||
|
||||
run_compile = True # Set True / False
|
||||
|
||||
pipe = DiffusionPipeline.from_pretrained("DeepFloyd/IF-I-M-v1.0", variant="fp16", text_encoder=None, torch_dtype=torch.float16)
|
||||
pipe.to("cuda")
|
||||
pipe_2 = DiffusionPipeline.from_pretrained("DeepFloyd/IF-II-M-v1.0", variant="fp16", text_encoder=None, torch_dtype=torch.float16)
|
||||
pipe_2.to("cuda")
|
||||
pipe_3 = DiffusionPipeline.from_pretrained("stabilityai/stable-diffusion-x4-upscaler", torch_dtype=torch.float16)
|
||||
pipe_3.to("cuda")
|
||||
|
||||
|
||||
pipe.unet.to(memory_format=torch.channels_last)
|
||||
pipe_2.unet.to(memory_format=torch.channels_last)
|
||||
pipe_3.unet.to(memory_format=torch.channels_last)
|
||||
|
||||
if run_compile:
|
||||
pipe.unet = torch.compile(pipe.unet, mode="reduce-overhead", fullgraph=True)
|
||||
pipe_2.unet = torch.compile(pipe_2.unet, mode="reduce-overhead", fullgraph=True)
|
||||
pipe_3.unet = torch.compile(pipe_3.unet, mode="reduce-overhead", fullgraph=True)
|
||||
|
||||
prompt = "the blue hulk"
|
||||
|
||||
prompt_embeds = torch.randn((1, 2, 4096), dtype=torch.float16)
|
||||
neg_prompt_embeds = torch.randn((1, 2, 4096), dtype=torch.float16)
|
||||
|
||||
for _ in range(3):
|
||||
image = pipe(prompt_embeds=prompt_embeds, negative_prompt_embeds=neg_prompt_embeds, output_type="pt").images
|
||||
image_2 = pipe_2(image=image, prompt_embeds=prompt_embeds, negative_prompt_embeds=neg_prompt_embeds, output_type="pt").images
|
||||
image_3 = pipe_3(prompt=prompt, image=image, noise_level=100).images
|
||||
```
|
||||
|
||||
To give you a pictorial overview of the possible speed-ups that can be obtained with PyTorch 2.0 and `torch.compile()`,
|
||||
here is a plot that shows relative speed-ups for the [Stable Diffusion text-to-image pipeline](StableDiffusionPipeline) across five
|
||||
different GPU families (with a batch size of 4):
|
||||
|
||||
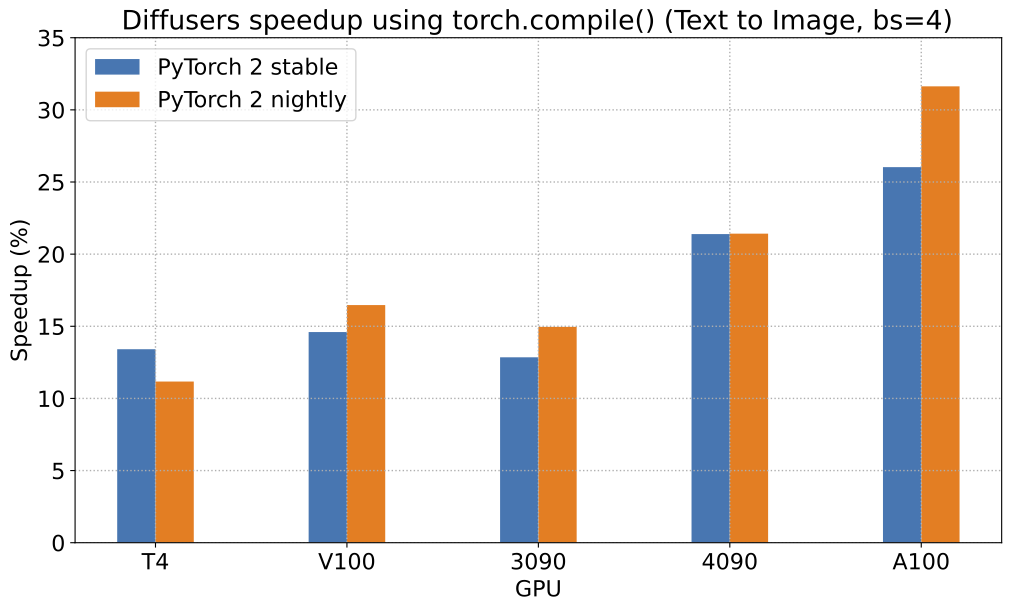
|
||||
|
||||
To give you an even better idea of how this speed-up holds for the other pipelines presented above, consider the following
|
||||
plot that shows the benchmarking numbers from an A100 across three different batch sizes
|
||||
(with PyTorch 2.0 nightly and `torch.compile()`):
|
||||
|
||||
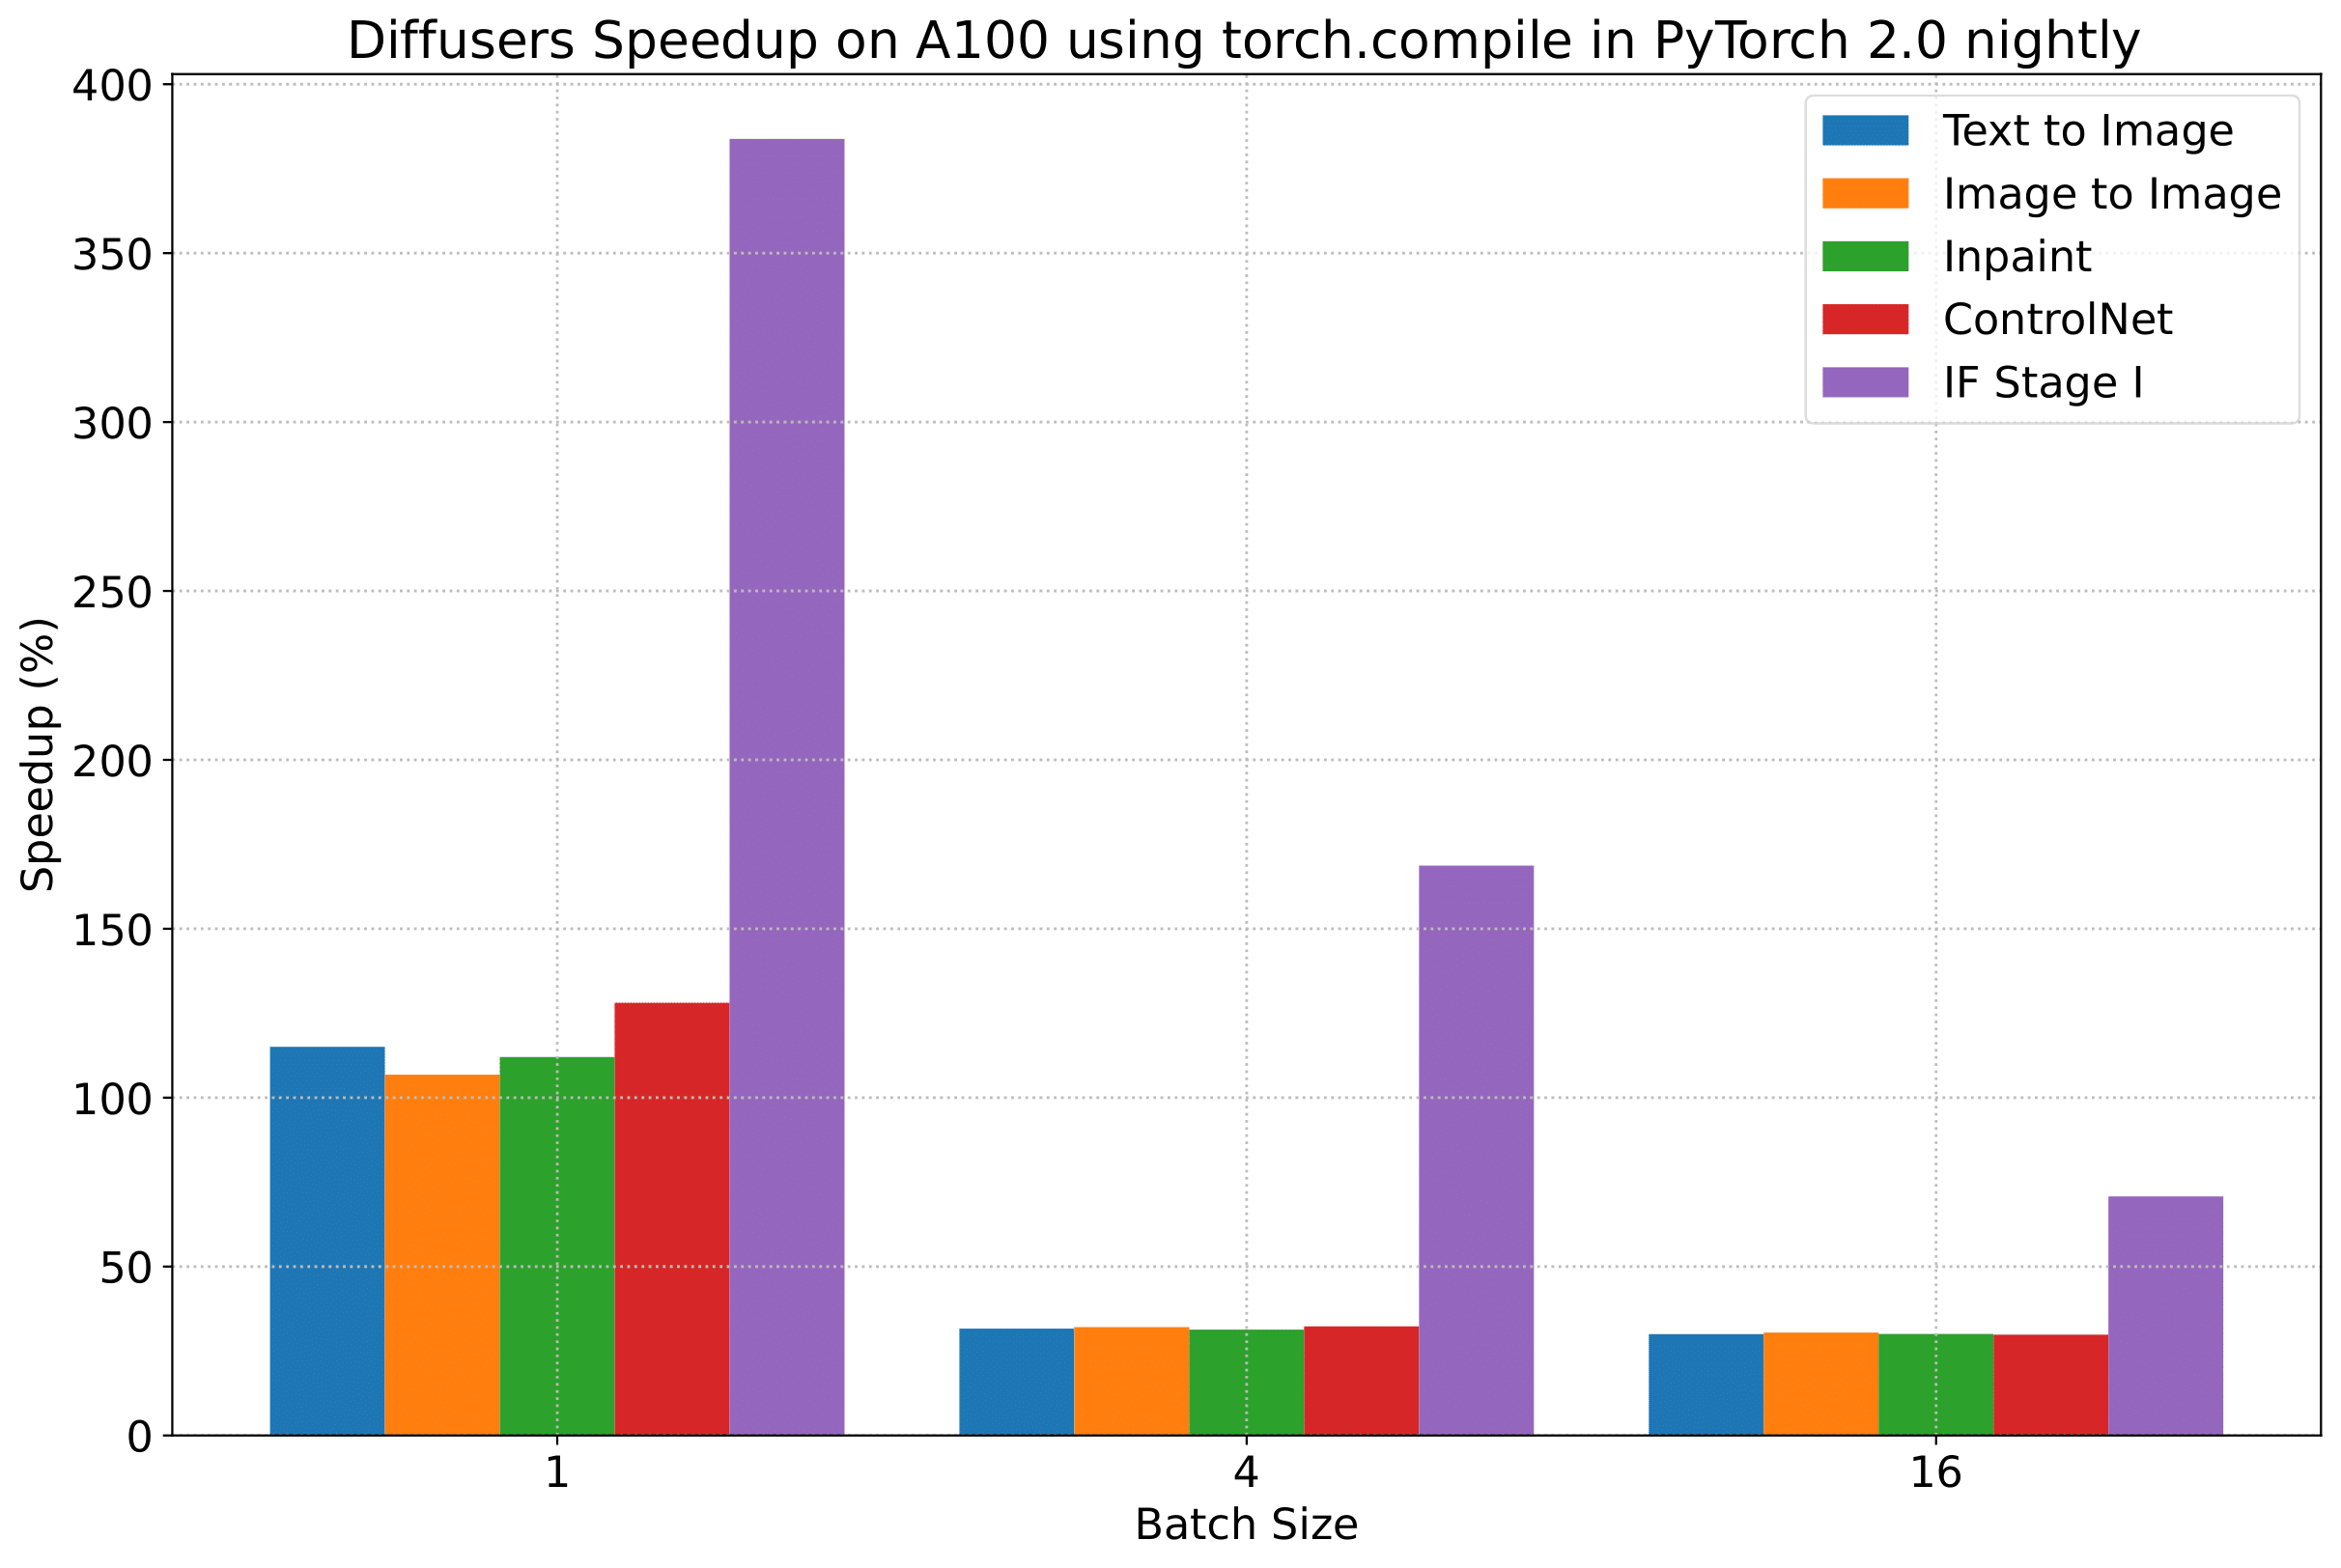
|
||||
|
||||
_(Our benchmarking metric for the plots above is **number of iterations/second**)_
|
||||
|
||||
But we reveal all the benchmarking numbers in the interest of transparency!
|
||||
|
||||
In the following tables, we report our findings in terms of the number of **_iterations processed per second_**.
|
||||
|
||||
### A100 (batch size: 1)
|
||||
|
||||
| **Pipeline** | **torch 2.0 - <br>no compile** | **torch nightly - <br>no compile** | **torch 2.0 - <br>compile** | **torch nightly - <br>compile** |
|
||||
|:---:|:---:|:---:|:---:|:---:|
|
||||
| SD - txt2img | 21.66 | 23.13 | 44.03 | 49.74 |
|
||||
| SD - img2img | 21.81 | 22.40 | 43.92 | 46.32 |
|
||||
| SD - inpaint | 22.24 | 23.23 | 43.76 | 49.25 |
|
||||
| SD - controlnet | 15.02 | 15.82 | 32.13 | 36.08 |
|
||||
| IF | 20.21 / <br>13.84 / <br>24.00 | 20.12 / <br>13.70 / <br>24.03 | ❌ | 97.34 / <br>27.23 / <br>111.66 |
|
||||
|
||||
### A100 (batch size: 4)
|
||||
|
||||
| **Pipeline** | **torch 2.0 - <br>no compile** | **torch nightly - <br>no compile** | **torch 2.0 - <br>compile** | **torch nightly - <br>compile** |
|
||||
|:---:|:---:|:---:|:---:|:---:|
|
||||
| SD - txt2img | 11.6 | 13.12 | 14.62 | 17.27 |
|
||||
| SD - img2img | 11.47 | 13.06 | 14.66 | 17.25 |
|
||||
| SD - inpaint | 11.67 | 13.31 | 14.88 | 17.48 |
|
||||
| SD - controlnet | 8.28 | 9.38 | 10.51 | 12.41 |
|
||||
| IF | 25.02 | 18.04 | ❌ | 48.47 |
|
||||
|
||||
### A100 (batch size: 16)
|
||||
|
||||
| **Pipeline** | **torch 2.0 - <br>no compile** | **torch nightly - <br>no compile** | **torch 2.0 - <br>compile** | **torch nightly - <br>compile** |
|
||||
|:---:|:---:|:---:|:---:|:---:|
|
||||
| SD - txt2img | 3.04 | 3.6 | 3.83 | 4.68 |
|
||||
| SD - img2img | 2.98 | 3.58 | 3.83 | 4.67 |
|
||||
| SD - inpaint | 3.04 | 3.66 | 3.9 | 4.76 |
|
||||
| SD - controlnet | 2.15 | 2.58 | 2.74 | 3.35 |
|
||||
| IF | 8.78 | 9.82 | ❌ | 16.77 |
|
||||
|
||||
### V100 (batch size: 1)
|
||||
|
||||
| **Pipeline** | **torch 2.0 - <br>no compile** | **torch nightly - <br>no compile** | **torch 2.0 - <br>compile** | **torch nightly - <br>compile** |
|
||||
|:---:|:---:|:---:|:---:|:---:|
|
||||
| SD - txt2img | 18.99 | 19.14 | 20.95 | 22.17 |
|
||||
| SD - img2img | 18.56 | 19.18 | 20.95 | 22.11 |
|
||||
| SD - inpaint | 19.14 | 19.06 | 21.08 | 22.20 |
|
||||
| SD - controlnet | 13.48 | 13.93 | 15.18 | 15.88 |
|
||||
| IF | 20.01 / <br>9.08 / <br>23.34 | 19.79 / <br>8.98 / <br>24.10 | ❌ | 55.75 / <br>11.57 / <br>57.67 |
|
||||
|
||||
### V100 (batch size: 4)
|
||||
|
||||
| **Pipeline** | **torch 2.0 - <br>no compile** | **torch nightly - <br>no compile** | **torch 2.0 - <br>compile** | **torch nightly - <br>compile** |
|
||||
|:---:|:---:|:---:|:---:|:---:|
|
||||
| SD - txt2img | 5.96 | 5.89 | 6.83 | 6.86 |
|
||||
| SD - img2img | 5.90 | 5.91 | 6.81 | 6.82 |
|
||||
| SD - inpaint | 5.99 | 6.03 | 6.93 | 6.95 |
|
||||
| SD - controlnet | 4.26 | 4.29 | 4.92 | 4.93 |
|
||||
| IF | 15.41 | 14.76 | ❌ | 22.95 |
|
||||
|
||||
### V100 (batch size: 16)
|
||||
|
||||
| **Pipeline** | **torch 2.0 - <br>no compile** | **torch nightly - <br>no compile** | **torch 2.0 - <br>compile** | **torch nightly - <br>compile** |
|
||||
|:---:|:---:|:---:|:---:|:---:|
|
||||
| SD - txt2img | 1.66 | 1.66 | 1.92 | 1.90 |
|
||||
| SD - img2img | 1.65 | 1.65 | 1.91 | 1.89 |
|
||||
| SD - inpaint | 1.69 | 1.69 | 1.95 | 1.93 |
|
||||
| SD - controlnet | 1.19 | 1.19 | OOM after warmup | 1.36 |
|
||||
| IF | 5.43 | 5.29 | ❌ | 7.06 |
|
||||
|
||||
### T4 (batch size: 1)
|
||||
|
||||
| **Pipeline** | **torch 2.0 - <br>no compile** | **torch nightly - <br>no compile** | **torch 2.0 - <br>compile** | **torch nightly - <br>compile** |
|
||||
|:---:|:---:|:---:|:---:|:---:|
|
||||
| SD - txt2img | 6.9 | 6.95 | 7.3 | 7.56 |
|
||||
| SD - img2img | 6.84 | 6.99 | 7.04 | 7.55 |
|
||||
| SD - inpaint | 6.91 | 6.7 | 7.01 | 7.37 |
|
||||
| SD - controlnet | 4.89 | 4.86 | 5.35 | 5.48 |
|
||||
| IF | 17.42 / <br>2.47 / <br>18.52 | 16.96 / <br>2.45 / <br>18.69 | ❌ | 24.63 / <br>2.47 / <br>23.39 |
|
||||
|
||||
### T4 (batch size: 4)
|
||||
|
||||
| **Pipeline** | **torch 2.0 - <br>no compile** | **torch nightly - <br>no compile** | **torch 2.0 - <br>compile** | **torch nightly - <br>compile** |
|
||||
|:---:|:---:|:---:|:---:|:---:|
|
||||
| SD - txt2img | 1.79 | 1.79 | 2.03 | 1.99 |
|
||||
| SD - img2img | 1.77 | 1.77 | 2.05 | 2.04 |
|
||||
| SD - inpaint | 1.81 | 1.82 | 2.09 | 2.09 |
|
||||
| SD - controlnet | 1.34 | 1.27 | 1.47 | 1.46 |
|
||||
| IF | 5.79 | 5.61 | ❌ | 7.39 |
|
||||
|
||||
### T4 (batch size: 16)
|
||||
|
||||
| **Pipeline** | **torch 2.0 - <br>no compile** | **torch nightly - <br>no compile** | **torch 2.0 - <br>compile** | **torch nightly - <br>compile** |
|
||||
|:---:|:---:|:---:|:---:|:---:|
|
||||
| SD - txt2img | 2.34s | 2.30s | OOM after 2nd iteration | 1.99s |
|
||||
| SD - img2img | 2.35s | 2.31s | OOM after warmup | 2.00s |
|
||||
| SD - inpaint | 2.30s | 2.26s | OOM after 2nd iteration | 1.95s |
|
||||
| SD - controlnet | OOM after 2nd iteration | OOM after 2nd iteration | OOM after warmup | OOM after warmup |
|
||||
| IF * | 1.44 | 1.44 | ❌ | 1.94 |
|
||||
|
||||
### RTX 3090 (batch size: 1)
|
||||
|
||||
| **Pipeline** | **torch 2.0 - <br>no compile** | **torch nightly - <br>no compile** | **torch 2.0 - <br>compile** | **torch nightly - <br>compile** |
|
||||
|:---:|:---:|:---:|:---:|:---:|
|
||||
| SD - txt2img | 22.56 | 22.84 | 23.84 | 25.69 |
|
||||
| SD - img2img | 22.25 | 22.61 | 24.1 | 25.83 |
|
||||
| SD - inpaint | 22.22 | 22.54 | 24.26 | 26.02 |
|
||||
| SD - controlnet | 16.03 | 16.33 | 17.38 | 18.56 |
|
||||
| IF | 27.08 / <br>9.07 / <br>31.23 | 26.75 / <br>8.92 / <br>31.47 | ❌ | 68.08 / <br>11.16 / <br>65.29 |
|
||||
|
||||
### RTX 3090 (batch size: 4)
|
||||
|
||||
| **Pipeline** | **torch 2.0 - <br>no compile** | **torch nightly - <br>no compile** | **torch 2.0 - <br>compile** | **torch nightly - <br>compile** |
|
||||
|:---:|:---:|:---:|:---:|:---:|
|
||||
| SD - txt2img | 6.46 | 6.35 | 7.29 | 7.3 |
|
||||
| SD - img2img | 6.33 | 6.27 | 7.31 | 7.26 |
|
||||
| SD - inpaint | 6.47 | 6.4 | 7.44 | 7.39 |
|
||||
| SD - controlnet | 4.59 | 4.54 | 5.27 | 5.26 |
|
||||
| IF | 16.81 | 16.62 | ❌ | 21.57 |
|
||||
|
||||
### RTX 3090 (batch size: 16)
|
||||
|
||||
| **Pipeline** | **torch 2.0 - <br>no compile** | **torch nightly - <br>no compile** | **torch 2.0 - <br>compile** | **torch nightly - <br>compile** |
|
||||
|:---:|:---:|:---:|:---:|:---:|
|
||||
| SD - txt2img | 1.7 | 1.69 | 1.93 | 1.91 |
|
||||
| SD - img2img | 1.68 | 1.67 | 1.93 | 1.9 |
|
||||
| SD - inpaint | 1.72 | 1.71 | 1.97 | 1.94 |
|
||||
| SD - controlnet | 1.23 | 1.22 | 1.4 | 1.38 |
|
||||
| IF | 5.01 | 5.00 | ❌ | 6.33 |
|
||||
|
||||
### RTX 4090 (batch size: 1)
|
||||
|
||||
| **Pipeline** | **torch 2.0 - <br>no compile** | **torch nightly - <br>no compile** | **torch 2.0 - <br>compile** | **torch nightly - <br>compile** |
|
||||
|:---:|:---:|:---:|:---:|:---:|
|
||||
| SD - txt2img | 40.5 | 41.89 | 44.65 | 49.81 |
|
||||
| SD - img2img | 40.39 | 41.95 | 44.46 | 49.8 |
|
||||
| SD - inpaint | 40.51 | 41.88 | 44.58 | 49.72 |
|
||||
| SD - controlnet | 29.27 | 30.29 | 32.26 | 36.03 |
|
||||
| IF | 69.71 / <br>18.78 / <br>85.49 | 69.13 / <br>18.80 / <br>85.56 | ❌ | 124.60 / <br>26.37 / <br>138.79 |
|
||||
|
||||
### RTX 4090 (batch size: 4)
|
||||
|
||||
| **Pipeline** | **torch 2.0 - <br>no compile** | **torch nightly - <br>no compile** | **torch 2.0 - <br>compile** | **torch nightly - <br>compile** |
|
||||
|:---:|:---:|:---:|:---:|:---:|
|
||||
| SD - txt2img | 12.62 | 12.84 | 15.32 | 15.59 |
|
||||
| SD - img2img | 12.61 | 12,.79 | 15.35 | 15.66 |
|
||||
| SD - inpaint | 12.65 | 12.81 | 15.3 | 15.58 |
|
||||
| SD - controlnet | 9.1 | 9.25 | 11.03 | 11.22 |
|
||||
| IF | 31.88 | 31.14 | ❌ | 43.92 |
|
||||
|
||||
### RTX 4090 (batch size: 16)
|
||||
|
||||
| **Pipeline** | **torch 2.0 - <br>no compile** | **torch nightly - <br>no compile** | **torch 2.0 - <br>compile** | **torch nightly - <br>compile** |
|
||||
|:---:|:---:|:---:|:---:|:---:|
|
||||
| SD - txt2img | 3.17 | 3.2 | 3.84 | 3.85 |
|
||||
| SD - img2img | 3.16 | 3.2 | 3.84 | 3.85 |
|
||||
| SD - inpaint | 3.17 | 3.2 | 3.85 | 3.85 |
|
||||
| SD - controlnet | 2.23 | 2.3 | 2.7 | 2.75 |
|
||||
| IF | 9.26 | 9.2 | ❌ | 13.31 |
|
||||
|
||||
## Notes
|
||||
|
||||
* Follow [this PR](https://github.com/huggingface/diffusers/pull/3313) for more details on the environment used for conducting the benchmarks.
|
||||
* For the IF pipeline and batch sizes > 1, we only used a batch size of >1 in the first IF pipeline for text-to-image generation and NOT for upscaling. So, that means the two upscaling pipelines received a batch size of 1.
|
||||
|
||||
*Thanks to [Horace He](https://github.com/Chillee) from the PyTorch team for their support in improving our support of `torch.compile()` in Diffusers.*
|
||||
We conducted a simple benchmark on different GPUs to compare vanilla attention, xFormers, `torch.nn.functional.scaled_dot_product_attention` and `torch.compile+torch.nn.functional.scaled_dot_product_attention`.
|
||||
For the benchmark we used the [stable-diffusion-v1-4](https://huggingface.co/CompVis/stable-diffusion-v1-4) model with 50 steps. The `xFormers` benchmark is done using the `torch==1.13.1` version, while the accelerated transformers optimizations are tested using nightly versions of PyTorch 2.0. The tables below summarize the results we got.
|
||||
|
||||
Please refer to [our featured blog post in the PyTorch site](https://pytorch.org/blog/accelerated-diffusers-pt-20/) for more details.
|
||||
|
||||
### FP16 benchmark
|
||||
|
||||
The table below shows the benchmark results for inference using `fp16`. As we can see, `torch.nn.functional.scaled_dot_product_attention` is as fast as `xFormers` (sometimes slightly faster/slower) on all the GPUs we tested.
|
||||
And using `torch.compile` gives further speed-up of up of 10% over `xFormers`, but it's mostly noticeable on the A100 GPU.
|
||||
|
||||
___The time reported is in seconds.___
|
||||
|
||||
| GPU | Batch Size | Vanilla Attention | xFormers | PyTorch2.0 SDPA | SDPA + torch.compile | Speed over xformers (%) |
|
||||
| --- | --- | --- | --- | --- | --- | --- |
|
||||
| A100 | 1 | 2.69 | 2.7 | 1.98 | 2.47 | 8.52 |
|
||||
| A100 | 2 | 3.21 | 3.04 | 2.38 | 2.78 | 8.55 |
|
||||
| A100 | 4 | 5.27 | 3.91 | 3.89 | 3.53 | 9.72 |
|
||||
| A100 | 8 | 9.74 | 7.03 | 7.04 | 6.62 | 5.83 |
|
||||
| A100 | 10 | 12.02 | 8.7 | 8.67 | 8.45 | 2.87 |
|
||||
| A100 | 16 | 18.95 | 13.57 | 13.55 | 13.20 | 2.73 |
|
||||
| A100 | 32 (1) | OOM | 26.56 | 26.68 | 25.85 | 2.67 |
|
||||
| A100 | 64 | | 52.51 | 53.03 | 50.93 | 3.01 |
|
||||
| | | | | | | |
|
||||
| A10 | 4 | 13.94 | 9.81 | 10.01 | 9.35 | 4.69 |
|
||||
| A10 | 8 | 27.09 | 19 | 19.53 | 18.33 | 3.53 |
|
||||
| A10 | 10 | 33.69 | 23.53 | 24.19 | 22.52 | 4.29 |
|
||||
| A10 | 16 | OOM | 37.55 | 38.31 | 36.81 | 1.97 |
|
||||
| A10 | 32 (1) | | 77.19 | 78.43 | 76.64 | 0.71 |
|
||||
| A10 | 64 (1) | | 173.59 | 158.99 | 155.14 | 10.63 |
|
||||
| | | | | | | |
|
||||
| T4 | 4 | 38.81 | 30.09 | 29.74 | 27.55 | 8.44 |
|
||||
| T4 | 8 | OOM | 55.71 | 55.99 | 53.85 | 3.34 |
|
||||
| T4 | 10 | OOM | 68.96 | 69.86 | 65.35 | 5.23 |
|
||||
| T4 | 16 | OOM | 111.47 | 113.26 | 106.93 | 4.07 |
|
||||
| | | | | | | |
|
||||
| V100 | 4 | 9.84 | 8.16 | 8.09 | 7.65 | 6.25 |
|
||||
| V100 | 8 | OOM | 15.62 | 15.44 | 14.59 | 6.59 |
|
||||
| V100 | 10 | OOM | 19.52 | 19.28 | 18.18 | 6.86 |
|
||||
| V100 | 16 | OOM | 30.29 | 29.84 | 28.22 | 6.83 |
|
||||
| | | | | | | |
|
||||
| 3090 | 1 | 2.94 | 2.5 | 2.42 | 2.33 | 6.80 |
|
||||
| 3090 | 4 | 10.04 | 7.82 | 7.72 | 7.38 | 5.63 |
|
||||
| 3090 | 8 | 19.27 | 14.97 | 14.88 | 14.15 | 5.48 |
|
||||
| 3090 | 10| 24.08 | 18.7 | 18.62 | 18.12 | 3.10 |
|
||||
| 3090 | 16 | OOM | 29.06 | 28.88 | 28.2 | 2.96 |
|
||||
| 3090 | 32 (1) | | 58.05 | 57.42 | 56.28 | 3.05 |
|
||||
| 3090 | 64 (1) | | 126.54 | 114.27 | 112.21 | 11.32 |
|
||||
| | | | | | | |
|
||||
| 3090 Ti | 1 | 2.7 | 2.26 | 2.19 | 2.12 | 6.19 |
|
||||
| 3090 Ti | 4 | 9.07 | 7.14 | 7.00 | 6.71 | 6.02 |
|
||||
| 3090 Ti | 8 | 17.51 | 13.65 | 13.53 | 12.94 | 5.20 |
|
||||
| 3090 Ti | 10 (2) | 21.79 | 16.85 | 16.77 | 16.44 | 2.43 |
|
||||
| 3090 Ti | 16 | OOM | 26.1 | 26.04 | 25.53 | 2.18 |
|
||||
| 3090 Ti | 32 (1) | | 51.78 | 51.71 | 50.91 | 1.68 |
|
||||
| 3090 Ti | 64 (1) | | 112.02 | 102.78 | 100.89 | 9.94 |
|
||||
| | | | | | | |
|
||||
| 4090 | 1 | 4.47 | 3.98 | 1.28 | 1.21 | 69.60 |
|
||||
| 4090 | 4 | 10.48 | 8.37 | 3.76 | 3.56 | 57.47 |
|
||||
| 4090 | 8 | 14.33 | 10.22 | 7.43 | 6.99 | 31.60 |
|
||||
| 4090 | 16 | | 17.07 | 14.98 | 14.58 | 14.59 |
|
||||
| 4090 | 32 (1) | | 39.03 | 30.18 | 29.49 | 24.44 |
|
||||
| 4090 | 64 (1) | | 77.29 | 61.34 | 59.96 | 22.42 |
|
||||
|
||||
|
||||
|
||||
### FP32 benchmark
|
||||
|
||||
The table below shows the benchmark results for inference using `fp32`. In this case, `torch.nn.functional.scaled_dot_product_attention` is faster than `xFormers` on all the GPUs we tested.
|
||||
|
||||
Using `torch.compile` in addition to the accelerated transformers implementation can yield up to 19% performance improvement over `xFormers` in Ampere and Ada cards, and up to 20% (Ampere) or 28% (Ada) over vanilla attention.
|
||||
|
||||
| GPU | Batch Size | Vanilla Attention | xFormers | PyTorch2.0 SDPA | SDPA + torch.compile | Speed over xformers (%) | Speed over vanilla (%) |
|
||||
| --- | --- | --- | --- | --- | --- | --- | --- |
|
||||
| A100 | 1 | 4.97 | 3.86 | 2.6 | 2.86 | 25.91 | 42.45 |
|
||||
| A100 | 2 | 9.03 | 6.76 | 4.41 | 4.21 | 37.72 | 53.38 |
|
||||
| A100 | 4 | 16.70 | 12.42 | 7.94 | 7.54 | 39.29 | 54.85 |
|
||||
| A100 | 10 | OOM | 29.93 | 18.70 | 18.46 | 38.32 | |
|
||||
| A100 | 16 | | 47.08 | 29.41 | 29.04 | 38.32 | |
|
||||
| A100 | 32 | | 92.89 | 57.55 | 56.67 | 38.99 | |
|
||||
| A100 | 64 | | 185.3 | 114.8 | 112.98 | 39.03 | |
|
||||
| | | | | | | |
|
||||
| A10 | 1 | 10.59 | 8.81 | 7.51 | 7.35 | 16.57 | 30.59 |
|
||||
| A10 | 4 | 34.77 | 27.63 | 22.77 | 22.07 | 20.12 | 36.53 |
|
||||
| A10 | 8 | | 56.19 | 43.53 | 43.86 | 21.94 | |
|
||||
| A10 | 16 | | 116.49 | 88.56 | 86.64 | 25.62 | |
|
||||
| A10 | 32 | | 221.95 | 175.74 | 168.18 | 24.23 | |
|
||||
| A10 | 48 | | 333.23 | 264.84 | | 20.52 | |
|
||||
| | | | | | | |
|
||||
| T4 | 1 | 28.2 | 24.49 | 23.93 | 23.56 | 3.80 | 16.45 |
|
||||
| T4 | 2 | 52.77 | 45.7 | 45.88 | 45.06 | 1.40 | 14.61 |
|
||||
| T4 | 4 | OOM | 85.72 | 85.78 | 84.48 | 1.45 | |
|
||||
| T4 | 8 | | 149.64 | 150.75 | 148.4 | 0.83 | |
|
||||
| | | | | | | |
|
||||
| V100 | 1 | 7.4 | 6.84 | 6.8 | 6.66 | 2.63 | 10.00 |
|
||||
| V100 | 2 | 13.85 | 12.81 | 12.66 | 12.35 | 3.59 | 10.83 |
|
||||
| V100 | 4 | OOM | 25.73 | 25.31 | 24.78 | 3.69 | |
|
||||
| V100 | 8 | | 43.95 | 43.37 | 42.25 | 3.87 | |
|
||||
| V100 | 16 | | 84.99 | 84.73 | 82.55 | 2.87 | |
|
||||
| | | | | | | |
|
||||
| 3090 | 1 | 7.09 | 6.78 | 5.34 | 5.35 | 21.09 | 24.54 |
|
||||
| 3090 | 4 | 22.69 | 21.45 | 18.56 | 18.18 | 15.24 | 19.88 |
|
||||
| 3090 | 8 | | 42.59 | 36.68 | 35.61 | 16.39 | |
|
||||
| 3090 | 16 | | 85.35 | 72.93 | 70.18 | 17.77 | |
|
||||
| 3090 | 32 (1) | | 162.05 | 143.46 | 138.67 | 14.43 | |
|
||||
| | | | | | | |
|
||||
| 3090 Ti | 1 | 6.45 | 6.19 | 4.99 | 4.89 | 21.00 | 24.19 |
|
||||
| 3090 Ti | 4 | 20.32 | 19.31 | 17.02 | 16.48 | 14.66 | 18.90 |
|
||||
| 3090 Ti | 8 | | 37.93 | 33.21 | 32.24 | 15.00 | |
|
||||
| 3090 Ti | 16 | | 75.37 | 66.63 | 64.5 | 14.42 | |
|
||||
| 3090 Ti | 32 (1) | | 142.55 | 128.89 | 124.92 | 12.37 | |
|
||||
| | | | | | | |
|
||||
| 4090 | 1 | 5.54 | 4.99 | 2.66 | 2.58 | 48.30 | 53.43 |
|
||||
| 4090 | 4 | 13.67 | 11.4 | 8.81 | 8.46 | 25.79 | 38.11 |
|
||||
| 4090 | 8 | | 19.79 | 17.55 | 16.62 | 16.02 | |
|
||||
| 4090 | 16 | | 38.62 | 35.65 | 34.07 | 11.78 | |
|
||||
| 4090 | 32 (1) | | 76.57 | 69.48 | 65.35 | 14.65 | |
|
||||
| 4090 | 48 | | 114.44 | 106.3 | | 7.11 | |
|
||||
|
||||
|
||||
(1) Batch Size >= 32 requires enable_vae_slicing() because of https://github.com/pytorch/pytorch/issues/81665.
|
||||
This is required for PyTorch 1.13.1, and also for PyTorch 2.0 and large batch sizes.
|
||||
|
||||
For more details about how this benchmark was run, please refer to [this PR](https://github.com/huggingface/diffusers/pull/2303) and to [the blog post](https://pytorch.org/blog/accelerated-diffusers-pt-20/).
|
||||
|
||||
@@ -32,9 +32,8 @@ The quicktour is a simplified version of the introductory 🧨 Diffusers [notebo
|
||||
|
||||
Before you begin, make sure you have all the necessary libraries installed:
|
||||
|
||||
```py
|
||||
# uncomment to install the necessary libraries in Colab
|
||||
#!pip install --upgrade diffusers accelerate transformers
|
||||
```bash
|
||||
pip install --upgrade diffusers accelerate transformers
|
||||
```
|
||||
|
||||
- [🤗 Accelerate](https://huggingface.co/docs/accelerate/index) speeds up model loading for inference and training.
|
||||
@@ -122,9 +121,9 @@ Save the image by calling `save`:
|
||||
|
||||
You can also use the pipeline locally. The only difference is you need to download the weights first:
|
||||
|
||||
```bash
|
||||
!git lfs install
|
||||
!git clone https://huggingface.co/runwayml/stable-diffusion-v1-5
|
||||
```
|
||||
git lfs install
|
||||
git clone https://huggingface.co/runwayml/stable-diffusion-v1-5
|
||||
```
|
||||
|
||||
Then load the saved weights into the pipeline:
|
||||
|
||||
@@ -52,8 +52,6 @@ pipeline = pipeline.to("cuda")
|
||||
To make sure you can use the same image and improve on it, use a [`Generator`](https://pytorch.org/docs/stable/generated/torch.Generator.html) and set a seed for [reproducibility](./using-diffusers/reproducibility):
|
||||
|
||||
```python
|
||||
import torch
|
||||
|
||||
generator = torch.Generator("cuda").manual_seed(0)
|
||||
```
|
||||
|
||||
@@ -155,7 +153,7 @@ def get_inputs(batch_size=1):
|
||||
You'll also need a function that'll display each batch of images:
|
||||
|
||||
```python
|
||||
from PIL import Image
|
||||
from PIL import image
|
||||
|
||||
|
||||
def image_grid(imgs, rows=2, cols=2):
|
||||
@@ -248,7 +246,7 @@ image_grid(images, rows=2, cols=4)
|
||||
Pretty impressive! Let's tweak the second image - corresponding to the `Generator` with a seed of `1` - a bit more by adding some text about the age of the subject:
|
||||
|
||||
```python
|
||||
prompts = [
|
||||
prommpts = [
|
||||
"portrait photo of the oldest warrior chief, tribal panther make up, blue on red, side profile, looking away, serious eyes 50mm portrait photography, hard rim lighting photography--beta --ar 2:3 --beta --upbeta",
|
||||
"portrait photo of a old warrior chief, tribal panther make up, blue on red, side profile, looking away, serious eyes 50mm portrait photography, hard rim lighting photography--beta --ar 2:3 --beta --upbeta",
|
||||
"portrait photo of a warrior chief, tribal panther make up, blue on red, side profile, looking away, serious eyes 50mm portrait photography, hard rim lighting photography--beta --ar 2:3 --beta --upbeta",
|
||||
@@ -268,6 +266,6 @@ image_grid(images)
|
||||
|
||||
In this tutorial, you learned how to optimize a [`DiffusionPipeline`] for computational and memory efficiency as well as improving the quality of generated outputs. If you're interested in making your pipeline even faster, take a look at the following resources:
|
||||
|
||||
- Learn how [PyTorch 2.0](./optimization/torch2.0) and [`torch.compile`](https://pytorch.org/docs/stable/generated/torch.compile.html) can yield 5 - 300% faster inference speed. On an A100 GPU, inference can be up to 50% faster!
|
||||
- If you can't use PyTorch 2, we recommend you install [xFormers](./optimization/xformers). Its memory-efficient attention mechanism works great with PyTorch 1.13.1 for faster speed and reduced memory consumption.
|
||||
- Other optimization techniques, such as model offloading, are covered in [this guide](./optimization/fp16).
|
||||
- Enable [xFormers](./optimization/xformers) memory efficient attention mechanism for faster speed and reduced memory consumption.
|
||||
- Learn how in [PyTorch 2.0](./optimization/torch2.0), [`torch.compile`](https://pytorch.org/docs/stable/generated/torch.compile.html) can yield 2-9% faster inference speed.
|
||||
- Many optimization techniques for inference are also included in this memory and speed [guide](./optimization/fp16), such as memory offloading.
|
||||
@@ -1,42 +0,0 @@
|
||||
# Adapt a model to a new task
|
||||
|
||||
Many diffusion systems share the same components, allowing you to adapt a pretrained model for one task to an entirely different task.
|
||||
|
||||
This guide will show you how to adapt a pretrained text-to-image model for inpainting by initializing and modifying the architecture of a pretrained [`UNet2DConditionModel`].
|
||||
|
||||
## Configure UNet2DConditionModel parameters
|
||||
|
||||
A [`UNet2DConditionModel`] by default accepts 4 channels in the [input sample](https://huggingface.co/docs/diffusers/v0.16.0/en/api/models#diffusers.UNet2DConditionModel.in_channels). For example, load a pretrained text-to-image model like [`runwayml/stable-diffusion-v1-5`](https://huggingface.co/runwayml/stable-diffusion-v1-5) and take a look at the number of `in_channels`:
|
||||
|
||||
```py
|
||||
from diffusers import StableDiffusionPipeline
|
||||
|
||||
pipeline = StableDiffusionPipeline.from_pretrained("runwayml/stable-diffusion-v1-5")
|
||||
pipeline.unet.config["in_channels"]
|
||||
4
|
||||
```
|
||||
|
||||
Inpainting requires 9 channels in the input sample. You can check this value in a pretrained inpainting model like [`runwayml/stable-diffusion-inpainting`](https://huggingface.co/runwayml/stable-diffusion-inpainting):
|
||||
|
||||
```py
|
||||
from diffusers import StableDiffusionPipeline
|
||||
|
||||
pipeline = StableDiffusionPipeline.from_pretrained("runwayml/stable-diffusion-inpainting")
|
||||
pipeline.unet.config["in_channels"]
|
||||
9
|
||||
```
|
||||
|
||||
To adapt your text-to-image model for inpainting, you'll need to change the number of `in_channels` from 4 to 9.
|
||||
|
||||
Initialize a [`UNet2DConditionModel`] with the pretrained text-to-image model weights, and change `in_channels` to 9. Changing the number of `in_channels` means you need to set `ignore_mismatched_sizes=True` and `low_cpu_mem_usage=False` to avoid a size mismatch error because the shape is different now.
|
||||
|
||||
```py
|
||||
from diffusers import UNet2DConditionModel
|
||||
|
||||
model_id = "runwayml/stable-diffusion-v1-5"
|
||||
unet = UNet2DConditionModel.from_pretrained(
|
||||
model_id, subfolder="unet", in_channels=9, low_cpu_mem_usage=False, ignore_mismatched_sizes=True
|
||||
)
|
||||
```
|
||||
|
||||
The pretrained weights of the other components from the text-to-image model are initialized from their checkpoints, but the input channel weights (`conv_in.weight`) of the `unet` are randomly initialized. It is important to finetune the model for inpainting because otherwise the model returns noise.
|
||||
@@ -33,12 +33,7 @@ cd diffusers
|
||||
pip install -e .
|
||||
```
|
||||
|
||||
Then navigate into the [example folder](https://github.com/huggingface/diffusers/tree/main/examples/controlnet)
|
||||
```bash
|
||||
cd examples/controlnet
|
||||
```
|
||||
|
||||
Now run:
|
||||
Then navigate into the example folder and run:
|
||||
```bash
|
||||
pip install -r requirements.txt
|
||||
```
|
||||
@@ -69,8 +64,6 @@ The original dataset is hosted in the ControlNet [repo](https://huggingface.co/l
|
||||
|
||||
Our training examples use [`runwayml/stable-diffusion-v1-5`](https://huggingface.co/runwayml/stable-diffusion-v1-5) because that is what the original set of ControlNet models was trained on. However, ControlNet can be trained to augment any compatible Stable Diffusion model (such as [`CompVis/stable-diffusion-v1-4`](https://huggingface.co/CompVis/stable-diffusion-v1-4)) or [`stabilityai/stable-diffusion-2-1`](https://huggingface.co/stabilityai/stable-diffusion-2-1).
|
||||
|
||||
To use your own dataset, take a look at the [Create a dataset for training](create_dataset) guide.
|
||||
|
||||
## Training
|
||||
|
||||
Download the following images to condition our training with:
|
||||
@@ -81,9 +74,6 @@ wget https://huggingface.co/datasets/huggingface/documentation-images/resolve/ma
|
||||
wget https://huggingface.co/datasets/huggingface/documentation-images/resolve/main/diffusers/controlnet_training/conditioning_image_2.png
|
||||
```
|
||||
|
||||
Specify the `MODEL_NAME` environment variable (either a Hub model repository id or a path to the directory containing the model weights) and pass it to the [`pretrained_model_name_or_path`](https://huggingface.co/docs/diffusers/en/api/diffusion_pipeline#diffusers.DiffusionPipeline.from_pretrained.pretrained_model_name_or_path) argument.
|
||||
|
||||
The training script creates and saves a `diffusion_pytorch_model.bin` file in your repository.
|
||||
|
||||
```bash
|
||||
export MODEL_DIR="runwayml/stable-diffusion-v1-5"
|
||||
@@ -97,8 +87,7 @@ accelerate launch train_controlnet.py \
|
||||
--learning_rate=1e-5 \
|
||||
--validation_image "./conditioning_image_1.png" "./conditioning_image_2.png" \
|
||||
--validation_prompt "red circle with blue background" "cyan circle with brown floral background" \
|
||||
--train_batch_size=4 \
|
||||
--push_to_hub
|
||||
--train_batch_size=4
|
||||
```
|
||||
|
||||
This default configuration requires ~38GB VRAM.
|
||||
@@ -121,8 +110,7 @@ accelerate launch train_controlnet.py \
|
||||
--validation_image "./conditioning_image_1.png" "./conditioning_image_2.png" \
|
||||
--validation_prompt "red circle with blue background" "cyan circle with brown floral background" \
|
||||
--train_batch_size=1 \
|
||||
--gradient_accumulation_steps=4 \
|
||||
--push_to_hub
|
||||
--gradient_accumulation_steps=4
|
||||
```
|
||||
|
||||
## Training with multiple GPUs
|
||||
@@ -145,8 +133,7 @@ accelerate launch --mixed_precision="fp16" --multi_gpu train_controlnet.py \
|
||||
--train_batch_size=4 \
|
||||
--mixed_precision="fp16" \
|
||||
--tracker_project_name="controlnet-demo" \
|
||||
--report_to=wandb \
|
||||
--push_to_hub
|
||||
--report_to=wandb
|
||||
```
|
||||
|
||||
## Example results
|
||||
@@ -194,8 +181,7 @@ accelerate launch train_controlnet.py \
|
||||
--train_batch_size=1 \
|
||||
--gradient_accumulation_steps=4 \
|
||||
--gradient_checkpointing \
|
||||
--use_8bit_adam \
|
||||
--push_to_hub
|
||||
--use_8bit_adam
|
||||
```
|
||||
|
||||
## Training on a 12 GB GPU
|
||||
@@ -223,8 +209,7 @@ accelerate launch train_controlnet.py \
|
||||
--gradient_checkpointing \
|
||||
--use_8bit_adam \
|
||||
--enable_xformers_memory_efficient_attention \
|
||||
--set_grads_to_none \
|
||||
--push_to_hub
|
||||
--set_grads_to_none
|
||||
```
|
||||
|
||||
When using `enable_xformers_memory_efficient_attention`, please make sure to install `xformers` by `pip install xformers`.
|
||||
@@ -288,8 +273,7 @@ accelerate launch train_controlnet.py \
|
||||
--gradient_checkpointing \
|
||||
--enable_xformers_memory_efficient_attention \
|
||||
--set_grads_to_none \
|
||||
--mixed_precision fp16 \
|
||||
--push_to_hub
|
||||
--mixed_precision fp16
|
||||
```
|
||||
|
||||
## Inference
|
||||
|
||||
@@ -1,90 +0,0 @@
|
||||
# Create a dataset for training
|
||||
|
||||
There are many datasets on the [Hub](https://huggingface.co/datasets?task_categories=task_categories:text-to-image&sort=downloads) to train a model on, but if you can't find one you're interested in or want to use your own, you can create a dataset with the 🤗 [Datasets](hf.co/docs/datasets) library. The dataset structure depends on the task you want to train your model on. The most basic dataset structure is a directory of images for tasks like unconditional image generation. Another dataset structure may be a directory of images and a text file containing their corresponding text captions for tasks like text-to-image generation.
|
||||
|
||||
This guide will show you two ways to create a dataset to finetune on:
|
||||
|
||||
- provide a folder of images to the `--train_data_dir` argument
|
||||
- upload a dataset to the Hub and pass the dataset repository id to the `--dataset_name` argument
|
||||
|
||||
<Tip>
|
||||
|
||||
💡 Learn more about how to create an image dataset for training in the [Create an image dataset](https://huggingface.co/docs/datasets/image_dataset) guide.
|
||||
|
||||
</Tip>
|
||||
|
||||
## Provide a dataset as a folder
|
||||
|
||||
For unconditional generation, you can provide your own dataset as a folder of images. The training script uses the [`ImageFolder`](https://huggingface.co/docs/datasets/en/image_dataset#imagefolder) builder from 🤗 Datasets to automatically build a dataset from the folder. Your directory structure should look like:
|
||||
|
||||
```bash
|
||||
data_dir/xxx.png
|
||||
data_dir/xxy.png
|
||||
data_dir/[...]/xxz.png
|
||||
```
|
||||
|
||||
Pass the path to the dataset directory to the `--train_data_dir` argument, and then you can start training:
|
||||
|
||||
```bash
|
||||
accelerate launch train_unconditional.py \
|
||||
--train_data_dir <path-to-train-directory> \
|
||||
<other-arguments>
|
||||
```
|
||||
|
||||
## Upload your data to the Hub
|
||||
|
||||
<Tip>
|
||||
|
||||
💡 For more details and context about creating and uploading a dataset to the Hub, take a look at the [Image search with 🤗 Datasets](https://huggingface.co/blog/image-search-datasets) post.
|
||||
|
||||
</Tip>
|
||||
|
||||
Start by creating a dataset with the [`ImageFolder`](https://huggingface.co/docs/datasets/image_load#imagefolder) feature, which creates an `image` column containing the PIL-encoded images.
|
||||
|
||||
You can use the `data_dir` or `data_files` parameters to specify the location of the dataset. The `data_files` parameter supports mapping specific files to dataset splits like `train` or `test`:
|
||||
|
||||
```python
|
||||
from datasets import load_dataset
|
||||
|
||||
# example 1: local folder
|
||||
dataset = load_dataset("imagefolder", data_dir="path_to_your_folder")
|
||||
|
||||
# example 2: local files (supported formats are tar, gzip, zip, xz, rar, zstd)
|
||||
dataset = load_dataset("imagefolder", data_files="path_to_zip_file")
|
||||
|
||||
# example 3: remote files (supported formats are tar, gzip, zip, xz, rar, zstd)
|
||||
dataset = load_dataset(
|
||||
"imagefolder",
|
||||
data_files="https://download.microsoft.com/download/3/E/1/3E1C3F21-ECDB-4869-8368-6DEBA77B919F/kagglecatsanddogs_3367a.zip",
|
||||
)
|
||||
|
||||
# example 4: providing several splits
|
||||
dataset = load_dataset(
|
||||
"imagefolder", data_files={"train": ["path/to/file1", "path/to/file2"], "test": ["path/to/file3", "path/to/file4"]}
|
||||
)
|
||||
```
|
||||
|
||||
Then use the [`~datasets.Dataset.push_to_hub`] method to upload the dataset to the Hub:
|
||||
|
||||
```python
|
||||
# assuming you have ran the huggingface-cli login command in a terminal
|
||||
dataset.push_to_hub("name_of_your_dataset")
|
||||
|
||||
# if you want to push to a private repo, simply pass private=True:
|
||||
dataset.push_to_hub("name_of_your_dataset", private=True)
|
||||
```
|
||||
|
||||
Now the dataset is available for training by passing the dataset name to the `--dataset_name` argument:
|
||||
|
||||
```bash
|
||||
accelerate launch --mixed_precision="fp16" train_text_to_image.py \
|
||||
--pretrained_model_name_or_path="runwayml/stable-diffusion-v1-5" \
|
||||
--dataset_name="name_of_your_dataset" \
|
||||
<other-arguments>
|
||||
```
|
||||
|
||||
## Next steps
|
||||
|
||||
Now that you've created a dataset, you can plug it into the `train_data_dir` (if your dataset is local) or `dataset_name` (if your dataset is on the Hub) arguments of a training script.
|
||||
|
||||
For your next steps, feel free to try and use your dataset to train a model for [unconditional generation](uncondtional_training) or [text-to-image generation](text2image)!
|
||||
@@ -15,8 +15,6 @@ specific language governing permissions and limitations under the License.
|
||||
[Custom Diffusion](https://arxiv.org/abs/2212.04488) is a method to customize text-to-image models like Stable Diffusion given just a few (4~5) images of a subject.
|
||||
The `train_custom_diffusion.py` script shows how to implement the training procedure and adapt it for stable diffusion.
|
||||
|
||||
This training example was contributed by [Nupur Kumari](https://nupurkmr9.github.io/) (one of the authors of Custom Diffusion).
|
||||
|
||||
## Running locally with PyTorch
|
||||
|
||||
### Installing the dependencies
|
||||
@@ -33,13 +31,7 @@ cd diffusers
|
||||
pip install -e .
|
||||
```
|
||||
|
||||
Then cd into the [example folder](https://github.com/huggingface/diffusers/tree/main/examples/custom_diffusion)
|
||||
|
||||
```
|
||||
cd examples/custom_diffusion
|
||||
```
|
||||
|
||||
Now run
|
||||
Then cd in the example folder and run
|
||||
|
||||
```bash
|
||||
pip install -r requirements.txt
|
||||
@@ -67,7 +59,7 @@ write_basic_config()
|
||||
```
|
||||
### Cat example 😺
|
||||
|
||||
Now let's get our dataset. Download dataset from [here](https://www.cs.cmu.edu/~custom-diffusion/assets/data.zip) and unzip it. To use your own dataset, take a look at the [Create a dataset for training](create_dataset) guide.
|
||||
Now let's get our dataset. Download dataset from [here](https://www.cs.cmu.edu/~custom-diffusion/assets/data.zip) and unzip it.
|
||||
|
||||
We also collect 200 real images using `clip-retrieval` which are combined with the target images in the training dataset as a regularization. This prevents overfitting to the the given target image. The following flags enable the regularization `with_prior_preservation`, `real_prior` with `prior_loss_weight=1.`.
|
||||
The `class_prompt` should be the category name same as target image. The collected real images are with text captions similar to the `class_prompt`. The retrieved image are saved in `class_data_dir`. You can disable `real_prior` to use generated images as regularization. To collect the real images use this command first before training.
|
||||
@@ -79,8 +71,6 @@ python retrieve.py --class_prompt cat --class_data_dir real_reg/samples_cat --nu
|
||||
|
||||
**___Note: Change the `resolution` to 768 if you are using the [stable-diffusion-2](https://huggingface.co/stabilityai/stable-diffusion-2) 768x768 model.___**
|
||||
|
||||
The script creates and saves model checkpoints and a `pytorch_custom_diffusion_weights.bin` file in your repository.
|
||||
|
||||
```bash
|
||||
export MODEL_NAME="CompVis/stable-diffusion-v1-4"
|
||||
export OUTPUT_DIR="path-to-save-model"
|
||||
@@ -100,8 +90,7 @@ accelerate launch train_custom_diffusion.py \
|
||||
--lr_warmup_steps=0 \
|
||||
--max_train_steps=250 \
|
||||
--scale_lr --hflip \
|
||||
--modifier_token "<new1>" \
|
||||
--push_to_hub
|
||||
--modifier_token "<new1>"
|
||||
```
|
||||
|
||||
**Use `--enable_xformers_memory_efficient_attention` for faster training with lower VRAM requirement (16GB per GPU). Follow [this guide](https://github.com/facebookresearch/xformers) for installation instructions.**
|
||||
@@ -133,8 +122,7 @@ accelerate launch train_custom_diffusion.py \
|
||||
--scale_lr --hflip \
|
||||
--modifier_token "<new1>" \
|
||||
--validation_prompt="<new1> cat sitting in a bucket" \
|
||||
--report_to="wandb" \
|
||||
--push_to_hub
|
||||
--report_to="wandb"
|
||||
```
|
||||
|
||||
Here is an example [Weights and Biases page](https://wandb.ai/sayakpaul/custom-diffusion/runs/26ghrcau) where you can check out the intermediate results along with other training details.
|
||||
@@ -170,8 +158,7 @@ accelerate launch train_custom_diffusion.py \
|
||||
--max_train_steps=500 \
|
||||
--num_class_images=200 \
|
||||
--scale_lr --hflip \
|
||||
--modifier_token "<new1>+<new2>" \
|
||||
--push_to_hub
|
||||
--modifier_token "<new1>+<new2>"
|
||||
```
|
||||
|
||||
Here is an example [Weights and Biases page](https://wandb.ai/sayakpaul/custom-diffusion/runs/3990tzkg) where you can check out the intermediate results along with other training details.
|
||||
@@ -210,8 +197,7 @@ accelerate launch train_custom_diffusion.py \
|
||||
--scale_lr --hflip --noaug \
|
||||
--freeze_model crossattn \
|
||||
--modifier_token "<new1>" \
|
||||
--enable_xformers_memory_efficient_attention \
|
||||
--push_to_hub
|
||||
--enable_xformers_memory_efficient_attention
|
||||
```
|
||||
|
||||
## Inference
|
||||
|
||||
@@ -1,91 +0,0 @@
|
||||
# Distributed inference with multiple GPUs
|
||||
|
||||
On distributed setups, you can run inference across multiple GPUs with 🤗 [Accelerate](https://huggingface.co/docs/accelerate/index) or [PyTorch Distributed](https://pytorch.org/tutorials/beginner/dist_overview.html), which is useful for generating with multiple prompts in parallel.
|
||||
|
||||
This guide will show you how to use 🤗 Accelerate and PyTorch Distributed for distributed inference.
|
||||
|
||||
## 🤗 Accelerate
|
||||
|
||||
🤗 [Accelerate](https://huggingface.co/docs/accelerate/index) is a library designed to make it easy to train or run inference across distributed setups. It simplifies the process of setting up the distributed environment, allowing you to focus on your PyTorch code.
|
||||
|
||||
To begin, create a Python file and initialize an [`accelerate.PartialState`] to create a distributed environment; your setup is automatically detected so you don't need to explicitly define the `rank` or `world_size`. Move the [`DiffusionPipeline`] to `distributed_state.device` to assign a GPU to each process.
|
||||
|
||||
Now use the [`~accelerate.PartialState.split_between_processes`] utility as a context manager to automatically distribute the prompts between the number of processes.
|
||||
|
||||
```py
|
||||
from accelerate import PartialState
|
||||
from diffusers import DiffusionPipeline
|
||||
|
||||
pipeline = DiffusionPipeline.from_pretrained("runwayml/stable-diffusion-v1-5", torch_dtype=torch.float16)
|
||||
distributed_state = PartialState()
|
||||
pipeline.to(distributed_state.device)
|
||||
|
||||
with distributed_state.split_between_processes(["a dog", "a cat"]) as prompt:
|
||||
result = pipeline(prompt).images[0]
|
||||
result.save(f"result_{distributed_state.process_index}.png")
|
||||
```
|
||||
|
||||
Use the `--num_processes` argument to specify the number of GPUs to use, and call `accelerate launch` to run the script:
|
||||
|
||||
```bash
|
||||
accelerate launch run_distributed.py --num_processes=2
|
||||
```
|
||||
|
||||
<Tip>
|
||||
|
||||
To learn more, take a look at the [Distributed Inference with 🤗 Accelerate](https://huggingface.co/docs/accelerate/en/usage_guides/distributed_inference#distributed-inference-with-accelerate) guide.
|
||||
|
||||
</Tip>
|
||||
|
||||
## PyTorch Distributed
|
||||
|
||||
PyTorch supports [`DistributedDataParallel`](https://pytorch.org/docs/stable/generated/torch.nn.parallel.DistributedDataParallel.html) which enables data parallelism.
|
||||
|
||||
To start, create a Python file and import `torch.distributed` and `torch.multiprocessing` to set up the distributed process group and to spawn the processes for inference on each GPU. You should also initialize a [`DiffusionPipeline`]:
|
||||
|
||||
```py
|
||||
import torch
|
||||
import torch.distributed as dist
|
||||
import torch.multiprocessing as mp
|
||||
|
||||
from diffusers import DiffusionPipeline
|
||||
|
||||
sd = DiffusionPipeline.from_pretrained("runwayml/stable-diffusion-v1-5", torch_dtype=torch.float16)
|
||||
```
|
||||
|
||||
You'll want to create a function to run inference; [`init_process_group`](https://pytorch.org/docs/stable/distributed.html?highlight=init_process_group#torch.distributed.init_process_group) handles creating a distributed environment with the type of backend to use, the `rank` of the current process, and the `world_size` or the number of processes participating. If you're running inference in parallel over 2 GPUs, then the `world_size` is 2.
|
||||
|
||||
Move the [`DiffusionPipeline`] to `rank` and use `get_rank` to assign a GPU to each process, where each process handles a different prompt:
|
||||
|
||||
```py
|
||||
def run_inference(rank, world_size):
|
||||
dist.init_process_group("nccl", rank=rank, world_size=world_size)
|
||||
|
||||
sd.to(rank)
|
||||
|
||||
if torch.distributed.get_rank() == 0:
|
||||
prompt = "a dog"
|
||||
elif torch.distributed.get_rank() == 1:
|
||||
prompt = "a cat"
|
||||
|
||||
image = sd(prompt).images[0]
|
||||
image.save(f"./{'_'.join(prompt)}.png")
|
||||
```
|
||||
|
||||
To run the distributed inference, call [`mp.spawn`](https://pytorch.org/docs/stable/multiprocessing.html#torch.multiprocessing.spawn) to run the `run_inference` function on the number of GPUs defined in `world_size`:
|
||||
|
||||
```py
|
||||
def main():
|
||||
world_size = 2
|
||||
mp.spawn(run_inference, args=(world_size,), nprocs=world_size, join=True)
|
||||
|
||||
|
||||
if __name__ == "__main__":
|
||||
main()
|
||||
```
|
||||
|
||||
Once you've completed the inference script, use the `--nproc_per_node` argument to specify the number of GPUs to use and call `torchrun` to run the script:
|
||||
|
||||
```bash
|
||||
torchrun run_distributed.py --nproc_per_node=2
|
||||
```
|
||||
@@ -12,6 +12,8 @@ specific language governing permissions and limitations under the License.
|
||||
|
||||
# DreamBooth
|
||||
|
||||
[[open-in-colab]]
|
||||
|
||||
[DreamBooth](https://arxiv.org/abs/2208.12242) is a method to personalize text-to-image models like Stable Diffusion given just a few (3-5) images of a subject. It allows the model to generate contextualized images of the subject in different scenes, poses, and views.
|
||||
|
||||
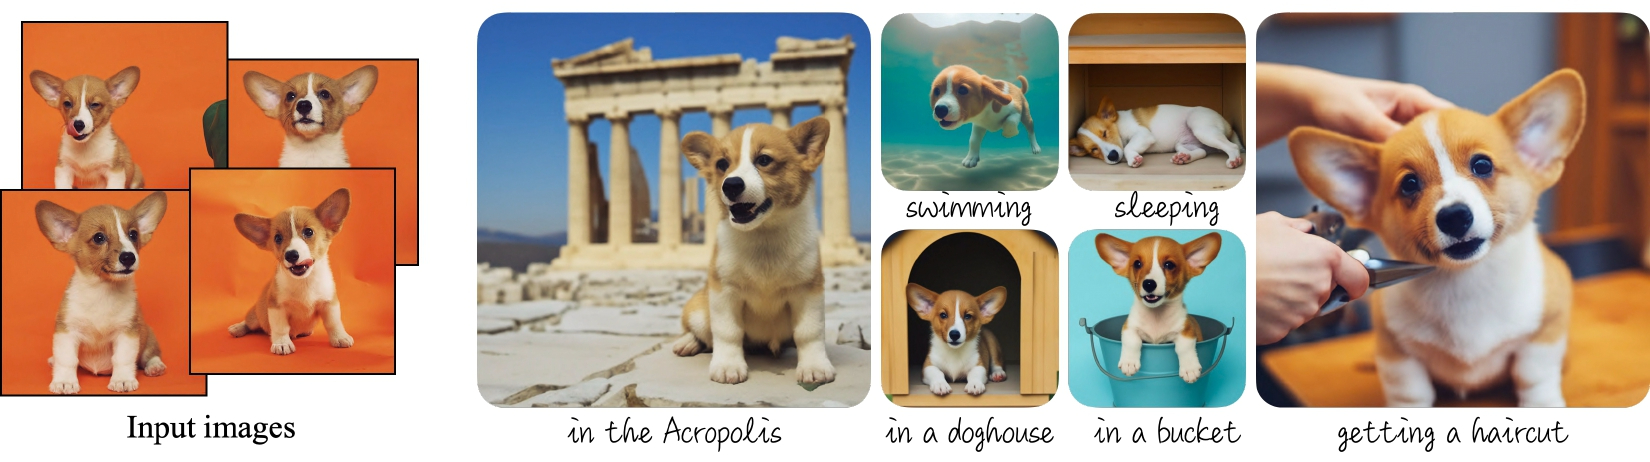
|
||||
@@ -48,22 +50,6 @@ from accelerate.utils import write_basic_config
|
||||
write_basic_config()
|
||||
```
|
||||
|
||||
Finally, download a [few images of a dog](https://huggingface.co/datasets/diffusers/dog-example) to DreamBooth with:
|
||||
|
||||
```py
|
||||
from huggingface_hub import snapshot_download
|
||||
|
||||
local_dir = "./dog"
|
||||
snapshot_download(
|
||||
"diffusers/dog-example",
|
||||
local_dir=local_dir,
|
||||
repo_type="dataset",
|
||||
ignore_patterns=".gitattributes",
|
||||
)
|
||||
```
|
||||
|
||||
To use your own dataset, take a look at the [Create a dataset for training](create_dataset) guide.
|
||||
|
||||
## Finetuning
|
||||
|
||||
<Tip warning={true}>
|
||||
@@ -74,13 +60,22 @@ DreamBooth finetuning is very sensitive to hyperparameters and easy to overfit.
|
||||
|
||||
<frameworkcontent>
|
||||
<pt>
|
||||
Set the `INSTANCE_DIR` environment variable to the path of the directory containing the dog images.
|
||||
Let's try DreamBooth with a
|
||||
[few images of a dog](https://huggingface.co/datasets/diffusers/dog-example);
|
||||
download and save them to a directory and then set the `INSTANCE_DIR` environment variable to that path:
|
||||
|
||||
Specify the `MODEL_NAME` environment variable (either a Hub model repository id or a path to the directory containing the model weights) and pass it to the [`pretrained_model_name_or_path`] argument. The `instance_prompt` argument is a text prompt that contains a unique identifier, such as `sks`, and the class the image belongs to, which in this example is `a photo of a sks dog`.
|
||||
```python
|
||||
local_dir = "./path_to_training_images"
|
||||
snapshot_download(
|
||||
"diffusers/dog-example",
|
||||
local_dir=local_dir, repo_type="dataset",
|
||||
ignore_patterns=".gitattributes",
|
||||
)
|
||||
```
|
||||
|
||||
```bash
|
||||
export MODEL_NAME="CompVis/stable-diffusion-v1-4"
|
||||
export INSTANCE_DIR="./dog"
|
||||
export INSTANCE_DIR="path_to_training_images"
|
||||
export OUTPUT_DIR="path_to_saved_model"
|
||||
```
|
||||
|
||||
@@ -98,8 +93,7 @@ accelerate launch train_dreambooth.py \
|
||||
--learning_rate=5e-6 \
|
||||
--lr_scheduler="constant" \
|
||||
--lr_warmup_steps=0 \
|
||||
--max_train_steps=400 \
|
||||
--push_to_hub
|
||||
--max_train_steps=400
|
||||
```
|
||||
</pt>
|
||||
<jax>
|
||||
@@ -111,13 +105,11 @@ Before running the script, make sure you have the requirements installed:
|
||||
pip install -U -r requirements.txt
|
||||
```
|
||||
|
||||
Specify the `MODEL_NAME` environment variable (either a Hub model repository id or a path to the directory containing the model weights) and pass it to the [`pretrained_model_name_or_path`] argument. The `instance_prompt` argument is a text prompt that contains a unique identifier, such as `sks`, and the class the image belongs to, which in this example is `a photo of a sks dog`.
|
||||
|
||||
Now you can launch the training script with the following command:
|
||||
|
||||
```bash
|
||||
export MODEL_NAME="duongna/stable-diffusion-v1-4-flax"
|
||||
export INSTANCE_DIR="./dog"
|
||||
export INSTANCE_DIR="path-to-instance-images"
|
||||
export OUTPUT_DIR="path-to-save-model"
|
||||
|
||||
python train_dreambooth_flax.py \
|
||||
@@ -128,8 +120,7 @@ python train_dreambooth_flax.py \
|
||||
--resolution=512 \
|
||||
--train_batch_size=1 \
|
||||
--learning_rate=5e-6 \
|
||||
--max_train_steps=400 \
|
||||
--push_to_hub
|
||||
--max_train_steps=400
|
||||
```
|
||||
</jax>
|
||||
</frameworkcontent>
|
||||
@@ -144,7 +135,7 @@ The authors recommend generating `num_epochs * num_samples` images for prior pre
|
||||
<pt>
|
||||
```bash
|
||||
export MODEL_NAME="CompVis/stable-diffusion-v1-4"
|
||||
export INSTANCE_DIR="./dog"
|
||||
export INSTANCE_DIR="path_to_training_images"
|
||||
export CLASS_DIR="path_to_class_images"
|
||||
export OUTPUT_DIR="path_to_saved_model"
|
||||
|
||||
@@ -163,14 +154,13 @@ accelerate launch train_dreambooth.py \
|
||||
--lr_scheduler="constant" \
|
||||
--lr_warmup_steps=0 \
|
||||
--num_class_images=200 \
|
||||
--max_train_steps=800 \
|
||||
--push_to_hub
|
||||
--max_train_steps=800
|
||||
```
|
||||
</pt>
|
||||
<jax>
|
||||
```bash
|
||||
export MODEL_NAME="duongna/stable-diffusion-v1-4-flax"
|
||||
export INSTANCE_DIR="./dog"
|
||||
export INSTANCE_DIR="path-to-instance-images"
|
||||
export CLASS_DIR="path-to-class-images"
|
||||
export OUTPUT_DIR="path-to-save-model"
|
||||
|
||||
@@ -186,8 +176,7 @@ python train_dreambooth_flax.py \
|
||||
--train_batch_size=1 \
|
||||
--learning_rate=5e-6 \
|
||||
--num_class_images=200 \
|
||||
--max_train_steps=800 \
|
||||
--push_to_hub
|
||||
--max_train_steps=800
|
||||
```
|
||||
</jax>
|
||||
</frameworkcontent>
|
||||
@@ -208,7 +197,7 @@ Pass the `--train_text_encoder` argument to the training script to enable finetu
|
||||
<pt>
|
||||
```bash
|
||||
export MODEL_NAME="CompVis/stable-diffusion-v1-4"
|
||||
export INSTANCE_DIR="./dog"
|
||||
export INSTANCE_DIR="path_to_training_images"
|
||||
export CLASS_DIR="path_to_class_images"
|
||||
export OUTPUT_DIR="path_to_saved_model"
|
||||
|
||||
@@ -223,20 +212,19 @@ accelerate launch train_dreambooth.py \
|
||||
--class_prompt="a photo of dog" \
|
||||
--resolution=512 \
|
||||
--train_batch_size=1 \
|
||||
--use_8bit_adam \
|
||||
--use_8bit_adam
|
||||
--gradient_checkpointing \
|
||||
--learning_rate=2e-6 \
|
||||
--lr_scheduler="constant" \
|
||||
--lr_warmup_steps=0 \
|
||||
--num_class_images=200 \
|
||||
--max_train_steps=800 \
|
||||
--push_to_hub
|
||||
--max_train_steps=800
|
||||
```
|
||||
</pt>
|
||||
<jax>
|
||||
```bash
|
||||
export MODEL_NAME="duongna/stable-diffusion-v1-4-flax"
|
||||
export INSTANCE_DIR="./dog"
|
||||
export INSTANCE_DIR="path-to-instance-images"
|
||||
export CLASS_DIR="path-to-class-images"
|
||||
export OUTPUT_DIR="path-to-save-model"
|
||||
|
||||
@@ -253,8 +241,7 @@ python train_dreambooth_flax.py \
|
||||
--train_batch_size=1 \
|
||||
--learning_rate=2e-6 \
|
||||
--num_class_images=200 \
|
||||
--max_train_steps=800 \
|
||||
--push_to_hub
|
||||
--max_train_steps=800
|
||||
```
|
||||
</jax>
|
||||
</frameworkcontent>
|
||||
@@ -373,7 +360,7 @@ Then pass the `--use_8bit_adam` option to the training script:
|
||||
|
||||
```bash
|
||||
export MODEL_NAME="CompVis/stable-diffusion-v1-4"
|
||||
export INSTANCE_DIR="./dog"
|
||||
export INSTANCE_DIR="path_to_training_images"
|
||||
export CLASS_DIR="path_to_class_images"
|
||||
export OUTPUT_DIR="path_to_saved_model"
|
||||
|
||||
@@ -393,8 +380,7 @@ accelerate launch train_dreambooth.py \
|
||||
--lr_scheduler="constant" \
|
||||
--lr_warmup_steps=0 \
|
||||
--num_class_images=200 \
|
||||
--max_train_steps=800 \
|
||||
--push_to_hub
|
||||
--max_train_steps=800
|
||||
```
|
||||
|
||||
### 12GB GPU
|
||||
@@ -403,7 +389,7 @@ To run DreamBooth on a 12GB GPU, you'll need to enable gradient checkpointing, t
|
||||
|
||||
```bash
|
||||
export MODEL_NAME="CompVis/stable-diffusion-v1-4"
|
||||
export INSTANCE_DIR="./dog"
|
||||
export INSTANCE_DIR="path-to-instance-images"
|
||||
export CLASS_DIR="path-to-class-images"
|
||||
export OUTPUT_DIR="path-to-save-model"
|
||||
|
||||
@@ -425,8 +411,7 @@ accelerate launch train_dreambooth.py \
|
||||
--lr_scheduler="constant" \
|
||||
--lr_warmup_steps=0 \
|
||||
--num_class_images=200 \
|
||||
--max_train_steps=800 \
|
||||
--push_to_hub
|
||||
--max_train_steps=800
|
||||
```
|
||||
|
||||
### 8 GB GPU
|
||||
@@ -451,7 +436,7 @@ Launch training with the following command:
|
||||
|
||||
```bash
|
||||
export MODEL_NAME="CompVis/stable-diffusion-v1-4"
|
||||
export INSTANCE_DIR="./dog"
|
||||
export INSTANCE_DIR="path_to_training_images"
|
||||
export CLASS_DIR="path_to_class_images"
|
||||
export OUTPUT_DIR="path_to_saved_model"
|
||||
|
||||
@@ -472,8 +457,7 @@ accelerate launch train_dreambooth.py \
|
||||
--lr_warmup_steps=0 \
|
||||
--num_class_images=200 \
|
||||
--max_train_steps=800 \
|
||||
--mixed_precision=fp16 \
|
||||
--push_to_hub
|
||||
--mixed_precision=fp16
|
||||
```
|
||||
|
||||
## Inference
|
||||
@@ -497,211 +481,3 @@ image.save("dog-bucket.png")
|
||||
```
|
||||
|
||||
You may also run inference from any of the [saved training checkpoints](#inference-from-a-saved-checkpoint).
|
||||
|
||||
## IF
|
||||
|
||||
You can use the lora and full dreambooth scripts to train the text to image [IF model](https://huggingface.co/DeepFloyd/IF-I-XL-v1.0) and the stage II upscaler
|
||||
[IF model](https://huggingface.co/DeepFloyd/IF-II-L-v1.0).
|
||||
|
||||
Note that IF has a predicted variance, and our finetuning scripts only train the models predicted error, so for finetuned IF models we switch to a fixed
|
||||
variance schedule. The full finetuning scripts will update the scheduler config for the full saved model. However, when loading saved LoRA weights, you
|
||||
must also update the pipeline's scheduler config.
|
||||
|
||||
```py
|
||||
from diffusers import DiffusionPipeline
|
||||
|
||||
pipe = DiffusionPipeline.from_pretrained("DeepFloyd/IF-I-XL-v1.0")
|
||||
|
||||
pipe.load_lora_weights("<lora weights path>")
|
||||
|
||||
# Update scheduler config to fixed variance schedule
|
||||
pipe.scheduler = pipe.scheduler.__class__.from_config(pipe.scheduler.config, variance_type="fixed_small")
|
||||
```
|
||||
|
||||
Additionally, a few alternative cli flags are needed for IF.
|
||||
|
||||
`--resolution=64`: IF is a pixel space diffusion model. In order to operate on un-compressed pixels, the input images are of a much smaller resolution.
|
||||
|
||||
`--pre_compute_text_embeddings`: IF uses [T5](https://huggingface.co/docs/transformers/model_doc/t5) for its text encoder. In order to save GPU memory, we pre compute all text embeddings and then de-allocate
|
||||
T5.
|
||||
|
||||
`--tokenizer_max_length=77`: T5 has a longer default text length, but the default IF encoding procedure uses a smaller number.
|
||||
|
||||
`--text_encoder_use_attention_mask`: T5 passes the attention mask to the text encoder.
|
||||
|
||||
### Tips and Tricks
|
||||
We find LoRA to be sufficient for finetuning the stage I model as the low resolution of the model makes representing finegrained detail hard regardless.
|
||||
|
||||
For common and/or not-visually complex object concepts, you can get away with not-finetuning the upscaler. Just be sure to adjust the prompt passed to the
|
||||
upscaler to remove the new token from the instance prompt. I.e. if your stage I prompt is "a sks dog", use "a dog" for your stage II prompt.
|
||||
|
||||
For finegrained detail like faces that aren't present in the original training set, we find that full finetuning of the stage II upscaler is better than
|
||||
LoRA finetuning stage II.
|
||||
|
||||
For finegrained detail like faces, we find that lower learning rates along with larger batch sizes work best.
|
||||
|
||||
For stage II, we find that lower learning rates are also needed.
|
||||
|
||||
We found experimentally that the DDPM scheduler with the default larger number of denoising steps to sometimes work better than the DPM Solver scheduler
|
||||
used in the training scripts.
|
||||
|
||||
### Stage II additional validation images
|
||||
|
||||
The stage II validation requires images to upscale, we can download a downsized version of the training set:
|
||||
|
||||
```py
|
||||
from huggingface_hub import snapshot_download
|
||||
|
||||
local_dir = "./dog_downsized"
|
||||
snapshot_download(
|
||||
"diffusers/dog-example-downsized",
|
||||
local_dir=local_dir,
|
||||
repo_type="dataset",
|
||||
ignore_patterns=".gitattributes",
|
||||
)
|
||||
```
|
||||
|
||||
### IF stage I LoRA Dreambooth
|
||||
This training configuration requires ~28 GB VRAM.
|
||||
|
||||
```sh
|
||||
export MODEL_NAME="DeepFloyd/IF-I-XL-v1.0"
|
||||
export INSTANCE_DIR="dog"
|
||||
export OUTPUT_DIR="dreambooth_dog_lora"
|
||||
|
||||
accelerate launch train_dreambooth_lora.py \
|
||||
--report_to wandb \
|
||||
--pretrained_model_name_or_path=$MODEL_NAME \
|
||||
--instance_data_dir=$INSTANCE_DIR \
|
||||
--output_dir=$OUTPUT_DIR \
|
||||
--instance_prompt="a sks dog" \
|
||||
--resolution=64 \
|
||||
--train_batch_size=4 \
|
||||
--gradient_accumulation_steps=1 \
|
||||
--learning_rate=5e-6 \
|
||||
--scale_lr \
|
||||
--max_train_steps=1200 \
|
||||
--validation_prompt="a sks dog" \
|
||||
--validation_epochs=25 \
|
||||
--checkpointing_steps=100 \
|
||||
--pre_compute_text_embeddings \
|
||||
--tokenizer_max_length=77 \
|
||||
--text_encoder_use_attention_mask
|
||||
```
|
||||
|
||||
### IF stage II LoRA Dreambooth
|
||||
|
||||
`--validation_images`: These images are upscaled during validation steps.
|
||||
|
||||
`--class_labels_conditioning=timesteps`: Pass additional conditioning to the UNet needed for stage II.
|
||||
|
||||
`--learning_rate=1e-6`: Lower learning rate than stage I.
|
||||
|
||||
`--resolution=256`: The upscaler expects higher resolution inputs
|
||||
|
||||
```sh
|
||||
export MODEL_NAME="DeepFloyd/IF-II-L-v1.0"
|
||||
export INSTANCE_DIR="dog"
|
||||
export OUTPUT_DIR="dreambooth_dog_upscale"
|
||||
export VALIDATION_IMAGES="dog_downsized/image_1.png dog_downsized/image_2.png dog_downsized/image_3.png dog_downsized/image_4.png"
|
||||
|
||||
python train_dreambooth_lora.py \
|
||||
--report_to wandb \
|
||||
--pretrained_model_name_or_path=$MODEL_NAME \
|
||||
--instance_data_dir=$INSTANCE_DIR \
|
||||
--output_dir=$OUTPUT_DIR \
|
||||
--instance_prompt="a sks dog" \
|
||||
--resolution=256 \
|
||||
--train_batch_size=4 \
|
||||
--gradient_accumulation_steps=1 \
|
||||
--learning_rate=1e-6 \
|
||||
--max_train_steps=2000 \
|
||||
--validation_prompt="a sks dog" \
|
||||
--validation_epochs=100 \
|
||||
--checkpointing_steps=500 \
|
||||
--pre_compute_text_embeddings \
|
||||
--tokenizer_max_length=77 \
|
||||
--text_encoder_use_attention_mask \
|
||||
--validation_images $VALIDATION_IMAGES \
|
||||
--class_labels_conditioning=timesteps
|
||||
```
|
||||
|
||||
### IF Stage I Full Dreambooth
|
||||
`--skip_save_text_encoder`: When training the full model, this will skip saving the entire T5 with the finetuned model. You can still load the pipeline
|
||||
with a T5 loaded from the original model.
|
||||
|
||||
`use_8bit_adam`: Due to the size of the optimizer states, we recommend training the full XL IF model with 8bit adam.
|
||||
|
||||
`--learning_rate=1e-7`: For full dreambooth, IF requires very low learning rates. With higher learning rates model quality will degrade. Note that it is
|
||||
likely the learning rate can be increased with larger batch sizes.
|
||||
|
||||
Using 8bit adam and a batch size of 4, the model can be trained in ~48 GB VRAM.
|
||||
|
||||
```sh
|
||||
export MODEL_NAME="DeepFloyd/IF-I-XL-v1.0"
|
||||
|
||||
export INSTANCE_DIR="dog"
|
||||
export OUTPUT_DIR="dreambooth_if"
|
||||
|
||||
accelerate launch train_dreambooth.py \
|
||||
--pretrained_model_name_or_path=$MODEL_NAME \
|
||||
--instance_data_dir=$INSTANCE_DIR \
|
||||
--output_dir=$OUTPUT_DIR \
|
||||
--instance_prompt="a photo of sks dog" \
|
||||
--resolution=64 \
|
||||
--train_batch_size=4 \
|
||||
--gradient_accumulation_steps=1 \
|
||||
--learning_rate=1e-7 \
|
||||
--max_train_steps=150 \
|
||||
--validation_prompt "a photo of sks dog" \
|
||||
--validation_steps 25 \
|
||||
--text_encoder_use_attention_mask \
|
||||
--tokenizer_max_length 77 \
|
||||
--pre_compute_text_embeddings \
|
||||
--use_8bit_adam \
|
||||
--set_grads_to_none \
|
||||
--skip_save_text_encoder \
|
||||
--push_to_hub
|
||||
```
|
||||
|
||||
### IF Stage II Full Dreambooth
|
||||
|
||||
`--learning_rate=5e-6`: With a smaller effective batch size of 4, we found that we required learning rates as low as
|
||||
1e-8.
|
||||
|
||||
`--resolution=256`: The upscaler expects higher resolution inputs
|
||||
|
||||
`--train_batch_size=2` and `--gradient_accumulation_steps=6`: We found that full training of stage II particularly with
|
||||
faces required large effective batch sizes.
|
||||
|
||||
```sh
|
||||
export MODEL_NAME="DeepFloyd/IF-II-L-v1.0"
|
||||
export INSTANCE_DIR="dog"
|
||||
export OUTPUT_DIR="dreambooth_dog_upscale"
|
||||
export VALIDATION_IMAGES="dog_downsized/image_1.png dog_downsized/image_2.png dog_downsized/image_3.png dog_downsized/image_4.png"
|
||||
|
||||
accelerate launch train_dreambooth.py \
|
||||
--report_to wandb \
|
||||
--pretrained_model_name_or_path=$MODEL_NAME \
|
||||
--instance_data_dir=$INSTANCE_DIR \
|
||||
--output_dir=$OUTPUT_DIR \
|
||||
--instance_prompt="a sks dog" \
|
||||
--resolution=256 \
|
||||
--train_batch_size=2 \
|
||||
--gradient_accumulation_steps=6 \
|
||||
--learning_rate=5e-6 \
|
||||
--max_train_steps=2000 \
|
||||
--validation_prompt="a sks dog" \
|
||||
--validation_steps=150 \
|
||||
--checkpointing_steps=500 \
|
||||
--pre_compute_text_embeddings \
|
||||
--tokenizer_max_length=77 \
|
||||
--text_encoder_use_attention_mask \
|
||||
--validation_images $VALIDATION_IMAGES \
|
||||
--class_labels_conditioning timesteps \
|
||||
--push_to_hub
|
||||
```
|
||||
|
||||
## Stable Diffusion XL
|
||||
|
||||
We support fine-tuning of the UNet shipped in [Stable Diffusion XL](https://huggingface.co/papers/2307.01952) with DreamBooth and LoRA via the `train_dreambooth_lora_sdxl.py` script. Please refer to the docs [here](https://github.com/huggingface/diffusers/blob/main/examples/dreambooth/README_sdxl.md).
|
||||
@@ -24,7 +24,7 @@ The output is an "edited" image that reflects the edit instruction applied on th
|
||||
<img src="https://huggingface.co/datasets/diffusers/docs-images/resolve/main/output-gs%407-igs%401-steps%4050.png" alt="instructpix2pix-output" width=600/>
|
||||
</p>
|
||||
|
||||
The `train_instruct_pix2pix.py` script (you can find the it [here](https://github.com/huggingface/diffusers/blob/main/examples/instruct_pix2pix/train_instruct_pix2pix.py)) shows how to implement the training procedure and adapt it for Stable Diffusion.
|
||||
The `train_instruct_pix2pix.py` script shows how to implement the training procedure and adapt it for Stable Diffusion.
|
||||
|
||||
***Disclaimer: Even though `train_instruct_pix2pix.py` implements the InstructPix2Pix
|
||||
training procedure while being faithful to the [original implementation](https://github.com/timothybrooks/instruct-pix2pix) we have only tested it on a [small-scale dataset](https://huggingface.co/datasets/fusing/instructpix2pix-1000-samples). This can impact the end results. For better results, we recommend longer training runs with a larger dataset. [Here](https://huggingface.co/datasets/timbrooks/instructpix2pix-clip-filtered) you can find a large dataset for InstructPix2Pix training.***
|
||||
@@ -44,12 +44,7 @@ cd diffusers
|
||||
pip install -e .
|
||||
```
|
||||
|
||||
Then cd in the example folder
|
||||
```bash
|
||||
cd examples/instruct_pix2pix
|
||||
```
|
||||
|
||||
Now run
|
||||
Then cd in the example folder and run
|
||||
```bash
|
||||
pip install -r requirements.txt
|
||||
```
|
||||
@@ -77,16 +72,17 @@ write_basic_config()
|
||||
### Toy example
|
||||
|
||||
As mentioned before, we'll use a [small toy dataset](https://huggingface.co/datasets/fusing/instructpix2pix-1000-samples) for training. The dataset
|
||||
is a smaller version of the [original dataset](https://huggingface.co/datasets/timbrooks/instructpix2pix-clip-filtered) used in the InstructPix2Pix paper. To use your own dataset, take a look at the [Create a dataset for training](create_dataset) guide.
|
||||
is a smaller version of the [original dataset](https://huggingface.co/datasets/timbrooks/instructpix2pix-clip-filtered) used in the InstructPix2Pix paper.
|
||||
|
||||
Specify the `MODEL_NAME` environment variable (either a Hub model repository id or a path to the directory containing the model weights) and pass it to the [`pretrained_model_name_or_path`](https://huggingface.co/docs/diffusers/en/api/diffusion_pipeline#diffusers.DiffusionPipeline.from_pretrained.pretrained_model_name_or_path) argument. You'll also need to specify the dataset name in `DATASET_ID`:
|
||||
Configure environment variables such as the dataset identifier and the Stable Diffusion
|
||||
checkpoint:
|
||||
|
||||
```bash
|
||||
export MODEL_NAME="runwayml/stable-diffusion-v1-5"
|
||||
export DATASET_ID="fusing/instructpix2pix-1000-samples"
|
||||
```
|
||||
|
||||
Now, we can launch training. The script saves all the components (`feature_extractor`, `scheduler`, `text_encoder`, `unet`, etc) in a subfolder in your repository.
|
||||
Now, we can launch training:
|
||||
|
||||
```bash
|
||||
accelerate launch --mixed_precision="fp16" train_instruct_pix2pix.py \
|
||||
@@ -100,8 +96,7 @@ accelerate launch --mixed_precision="fp16" train_instruct_pix2pix.py \
|
||||
--learning_rate=5e-05 --max_grad_norm=1 --lr_warmup_steps=0 \
|
||||
--conditioning_dropout_prob=0.05 \
|
||||
--mixed_precision=fp16 \
|
||||
--seed=42 \
|
||||
--push_to_hub
|
||||
--seed=42
|
||||
```
|
||||
|
||||
Additionally, we support performing validation inference to monitor training progress
|
||||
@@ -122,8 +117,7 @@ accelerate launch --mixed_precision="fp16" train_instruct_pix2pix.py \
|
||||
--val_image_url="https://hf.co/datasets/diffusers/diffusers-images-docs/resolve/main/mountain.png" \
|
||||
--validation_prompt="make the mountains snowy" \
|
||||
--seed=42 \
|
||||
--report_to=wandb \
|
||||
--push_to_hub
|
||||
--report_to=wandb
|
||||
```
|
||||
|
||||
We recommend this type of validation as it can be useful for model debugging. Note that you need `wandb` installed to use this. You can install `wandb` by running `pip install wandb`.
|
||||
@@ -150,8 +144,7 @@ accelerate launch --mixed_precision="fp16" --multi_gpu train_instruct_pix2pix.py
|
||||
--learning_rate=5e-05 --lr_warmup_steps=0 \
|
||||
--conditioning_dropout_prob=0.05 \
|
||||
--mixed_precision=fp16 \
|
||||
--seed=42 \
|
||||
--push_to_hub
|
||||
--seed=42
|
||||
```
|
||||
|
||||
## Inference
|
||||
@@ -207,5 +200,3 @@ speed and quality during performance:
|
||||
|
||||
Particularly, `image_guidance_scale` and `guidance_scale` can have a profound impact
|
||||
on the generated ("edited") image (see [here](https://twitter.com/RisingSayak/status/1628392199196151808?s=20) for an example).
|
||||
|
||||
If you're looking for some interesting ways to use the InstructPix2Pix training methodology, we welcome you to check out this blog post: [Instruction-tuning Stable Diffusion with InstructPix2Pix](https://huggingface.co/blog/instruction-tuning-sd).
|
||||
@@ -12,10 +12,13 @@ specific language governing permissions and limitations under the License.
|
||||
|
||||
# Low-Rank Adaptation of Large Language Models (LoRA)
|
||||
|
||||
[[open-in-colab]]
|
||||
|
||||
<Tip warning={true}>
|
||||
|
||||
Currently, LoRA is only supported for the attention layers of the [`UNet2DConditionalModel`]. We also
|
||||
support fine-tuning the text encoder for DreamBooth with LoRA in a limited capacity. Fine-tuning the text encoder for DreamBooth generally yields better results, but it can increase compute usage.
|
||||
support LoRA fine-tuning of the text encoder for DreamBooth in a limited capacity. For more details on how we support
|
||||
LoRA fine-tuning of the text encoder, refer to the discussion on [this PR](https://github.com/huggingface/diffusers/pull/2918).
|
||||
|
||||
</Tip>
|
||||
|
||||
@@ -49,9 +52,7 @@ Finetuning a model like Stable Diffusion, which has billions of parameters, can
|
||||
|
||||
Let's finetune [`stable-diffusion-v1-5`](https://huggingface.co/runwayml/stable-diffusion-v1-5) on the [Pokémon BLIP captions](https://huggingface.co/datasets/lambdalabs/pokemon-blip-captions) dataset to generate your own Pokémon.
|
||||
|
||||
Specify the `MODEL_NAME` environment variable (either a Hub model repository id or a path to the directory containing the model weights) and pass it to the [`pretrained_model_name_or_path`](https://huggingface.co/docs/diffusers/en/api/diffusion_pipeline#diffusers.DiffusionPipeline.from_pretrained.pretrained_model_name_or_path) argument. You'll also need to set the `DATASET_NAME` environment variable to the name of the dataset you want to train on. To use your own dataset, take a look at the [Create a dataset for training](create_dataset) guide.
|
||||
|
||||
The `OUTPUT_DIR` and `HUB_MODEL_ID` variables are optional and specify where to save the model to on the Hub:
|
||||
To start, make sure you have the `MODEL_NAME` and `DATASET_NAME` environment variables set. The `OUTPUT_DIR` and `HUB_MODEL_ID` variables are optional and specify where to save the model to on the Hub:
|
||||
|
||||
```bash
|
||||
export MODEL_NAME="runwayml/stable-diffusion-v1-5"
|
||||
@@ -66,7 +67,7 @@ There are some flags to be aware of before you start training:
|
||||
* `--report_to=wandb` reports and logs the training results to your Weights & Biases dashboard (as an example, take a look at this [report](https://wandb.ai/pcuenq/text2image-fine-tune/runs/b4k1w0tn?workspace=user-pcuenq)).
|
||||
* `--learning_rate=1e-04`, you can afford to use a higher learning rate than you normally would with LoRA.
|
||||
|
||||
Now you're ready to launch the training (you can find the full training script [here](https://github.com/huggingface/diffusers/blob/main/examples/text_to_image/train_text_to_image_lora.py)). Training takes about 5 hours on a 2080 Ti GPU with 11GB of RAM, and it'll create and save model checkpoints and the `pytorch_lora_weights` in your repository.
|
||||
Now you're ready to launch the training (you can find the full training script [here](https://github.com/huggingface/diffusers/blob/main/examples/text_to_image/train_text_to_image_lora.py)):
|
||||
|
||||
```bash
|
||||
accelerate launch --mixed_precision="fp16" train_text_to_image_lora.py \
|
||||
@@ -112,7 +113,7 @@ Load the LoRA weights from your finetuned model *on top of the base model weight
|
||||
</Tip>
|
||||
|
||||
```py
|
||||
>>> pipe.unet.load_attn_procs(lora_model_path)
|
||||
>>> pipe.unet.load_attn_procs(model_path)
|
||||
>>> pipe.to("cuda")
|
||||
# use half the weights from the LoRA finetuned model and half the weights from the base model
|
||||
|
||||
@@ -125,26 +126,6 @@ Load the LoRA weights from your finetuned model *on top of the base model weight
|
||||
>>> image.save("blue_pokemon.png")
|
||||
```
|
||||
|
||||
<Tip>
|
||||
|
||||
If you are loading the LoRA parameters from the Hub and if the Hub repository has
|
||||
a `base_model` tag (such as [this](https://huggingface.co/sayakpaul/sd-model-finetuned-lora-t4/blob/main/README.md?code=true#L4)), then
|
||||
you can do:
|
||||
|
||||
```py
|
||||
from huggingface_hub.repocard import RepoCard
|
||||
|
||||
lora_model_id = "sayakpaul/sd-model-finetuned-lora-t4"
|
||||
card = RepoCard.load(lora_model_id)
|
||||
base_model_id = card.data.to_dict()["base_model"]
|
||||
|
||||
pipe = StableDiffusionPipeline.from_pretrained(base_model_id, torch_dtype=torch.float16)
|
||||
...
|
||||
```
|
||||
|
||||
</Tip>
|
||||
|
||||
|
||||
## DreamBooth
|
||||
|
||||
[DreamBooth](https://arxiv.org/abs/2208.12242) is a finetuning technique for personalizing a text-to-image model like Stable Diffusion to generate photorealistic images of a subject in different contexts, given a few images of the subject. However, DreamBooth is very sensitive to hyperparameters and it is easy to overfit. Some important hyperparameters to consider include those that affect the training time (learning rate, number of training steps), and inference time (number of steps, scheduler type).
|
||||
@@ -157,11 +138,9 @@ pipe = StableDiffusionPipeline.from_pretrained(base_model_id, torch_dtype=torch.
|
||||
|
||||
### Training[[dreambooth-training]]
|
||||
|
||||
Let's finetune [`stable-diffusion-v1-5`](https://huggingface.co/runwayml/stable-diffusion-v1-5) with DreamBooth and LoRA with some 🐶 [dog images](https://drive.google.com/drive/folders/1BO_dyz-p65qhBRRMRA4TbZ8qW4rB99JZ). Download and save these images to a directory. To use your own dataset, take a look at the [Create a dataset for training](create_dataset) guide.
|
||||
Let's finetune [`stable-diffusion-v1-5`](https://huggingface.co/runwayml/stable-diffusion-v1-5) with DreamBooth and LoRA with some 🐶 [dog images](https://drive.google.com/drive/folders/1BO_dyz-p65qhBRRMRA4TbZ8qW4rB99JZ). Download and save these images to a directory.
|
||||
|
||||
To start, specify the `MODEL_NAME` environment variable (either a Hub model repository id or a path to the directory containing the model weights) and pass it to the [`pretrained_model_name_or_path`](https://huggingface.co/docs/diffusers/en/api/diffusion_pipeline#diffusers.DiffusionPipeline.from_pretrained.pretrained_model_name_or_path) argument. You'll also need to set `INSTANCE_DIR` to the path of the directory containing the images.
|
||||
|
||||
The `OUTPUT_DIR` variables is optional and specifies where to save the model to on the Hub:
|
||||
To start, make sure you have the `MODEL_NAME` and `INSTANCE_DIR` (path to directory containing images) environment variables set. The `OUTPUT_DIR` variables is optional and specifies where to save the model to on the Hub:
|
||||
|
||||
```bash
|
||||
export MODEL_NAME="runwayml/stable-diffusion-v1-5"
|
||||
@@ -175,11 +154,7 @@ There are some flags to be aware of before you start training:
|
||||
* `--report_to=wandb` reports and logs the training results to your Weights & Biases dashboard (as an example, take a look at this [report](https://wandb.ai/pcuenq/text2image-fine-tune/runs/b4k1w0tn?workspace=user-pcuenq)).
|
||||
* `--learning_rate=1e-04`, you can afford to use a higher learning rate than you normally would with LoRA.
|
||||
|
||||
Now you're ready to launch the training (you can find the full training script [here](https://github.com/huggingface/diffusers/blob/main/examples/dreambooth/train_dreambooth_lora.py)). The script creates and saves model checkpoints and the `pytorch_lora_weights.bin` file in your repository.
|
||||
|
||||
It's also possible to additionally fine-tune the text encoder with LoRA. This, in most cases, leads
|
||||
to better results with a slight increase in the compute. To allow fine-tuning the text encoder with LoRA,
|
||||
specify the `--train_text_encoder` while launching the `train_dreambooth_lora.py` script.
|
||||
Now you're ready to launch the training (you can find the full training script [here](https://github.com/huggingface/diffusers/blob/main/examples/dreambooth/train_dreambooth_lora.py)):
|
||||
|
||||
```bash
|
||||
accelerate launch train_dreambooth_lora.py \
|
||||
@@ -200,7 +175,12 @@ accelerate launch train_dreambooth_lora.py \
|
||||
--validation_epochs=50 \
|
||||
--seed="0" \
|
||||
--push_to_hub
|
||||
```
|
||||
```
|
||||
|
||||
It's also possible to additionally fine-tune the text encoder with LoRA. This, in most cases, leads
|
||||
to better results with a slight increase in the compute. To allow fine-tuning the text encoder with LoRA,
|
||||
specify the `--train_text_encoder` while launching the `train_dreambooth_lora.py` script.
|
||||
|
||||
|
||||
### Inference[[dreambooth-inference]]
|
||||
|
||||
@@ -224,7 +204,7 @@ Load the LoRA weights from your finetuned DreamBooth model *on top of the base m
|
||||
</Tip>
|
||||
|
||||
```py
|
||||
>>> pipe.unet.load_attn_procs(lora_model_path)
|
||||
>>> pipe.unet.load_attn_procs(model_path)
|
||||
>>> pipe.to("cuda")
|
||||
# use half the weights from the LoRA finetuned model and half the weights from the base model
|
||||
|
||||
@@ -238,119 +218,4 @@ Load the LoRA weights from your finetuned DreamBooth model *on top of the base m
|
||||
|
||||
>>> image = pipe("A picture of a sks dog in a bucket.", num_inference_steps=25, guidance_scale=7.5).images[0]
|
||||
>>> image.save("bucket-dog.png")
|
||||
```
|
||||
|
||||
If you used `--train_text_encoder` during training, then use `pipe.load_lora_weights()` to load the LoRA
|
||||
weights. For example:
|
||||
|
||||
```python
|
||||
from huggingface_hub.repocard import RepoCard
|
||||
from diffusers import StableDiffusionPipeline
|
||||
import torch
|
||||
|
||||
lora_model_id = "sayakpaul/dreambooth-text-encoder-test"
|
||||
card = RepoCard.load(lora_model_id)
|
||||
base_model_id = card.data.to_dict()["base_model"]
|
||||
|
||||
pipe = StableDiffusionPipeline.from_pretrained(base_model_id, torch_dtype=torch.float16)
|
||||
pipe = pipe.to("cuda")
|
||||
pipe.load_lora_weights(lora_model_id)
|
||||
image = pipe("A picture of a sks dog in a bucket", num_inference_steps=25).images[0]
|
||||
```
|
||||
|
||||
<Tip>
|
||||
|
||||
If your LoRA parameters involve the UNet as well as the Text Encoder, then passing
|
||||
`cross_attention_kwargs={"scale": 0.5}` will apply the `scale` value to both the UNet
|
||||
and the Text Encoder.
|
||||
|
||||
</Tip>
|
||||
|
||||
Note that the use of [`~diffusers.loaders.LoraLoaderMixin.load_lora_weights`] is preferred to [`~diffusers.loaders.UNet2DConditionLoadersMixin.load_attn_procs`] for loading LoRA parameters. This is because
|
||||
[`~diffusers.loaders.LoraLoaderMixin.load_lora_weights`] can handle the following situations:
|
||||
|
||||
* LoRA parameters that don't have separate identifiers for the UNet and the text encoder (such as [`"patrickvonplaten/lora_dreambooth_dog_example"`](https://huggingface.co/patrickvonplaten/lora_dreambooth_dog_example)). So, you can just do:
|
||||
|
||||
```py
|
||||
pipe.load_lora_weights(lora_model_path)
|
||||
```
|
||||
|
||||
* LoRA parameters that have separate identifiers for the UNet and the text encoder such as: [`"sayakpaul/dreambooth"`](https://huggingface.co/sayakpaul/dreambooth).
|
||||
|
||||
**Note** that it is possible to provide a local directory path to [`~diffusers.loaders.LoraLoaderMixin.load_lora_weights`] as well as [`~diffusers.loaders.UNet2DConditionLoadersMixin.load_attn_procs`]. To know about the supported inputs,
|
||||
refer to the respective docstrings.
|
||||
|
||||
## Unloading LoRA parameters
|
||||
|
||||
You can call [`~diffusers.loaders.LoraLoaderMixin.unload_lora_weights`] on a pipeline to unload the LoRA parameters.
|
||||
|
||||
## Supporting A1111 themed LoRA checkpoints from Diffusers
|
||||
|
||||
To provide seamless interoperability with A1111 to our users, we support loading A1111 formatted
|
||||
LoRA checkpoints using [`~diffusers.loaders.LoraLoaderMixin.load_lora_weights`] in a limited capacity.
|
||||
In this section, we explain how to load an A1111 formatted LoRA checkpoint from [CivitAI](https://civitai.com/)
|
||||
in Diffusers and perform inference with it.
|
||||
|
||||
First, download a checkpoint. We'll use
|
||||
[this one](https://civitai.com/models/13239/light-and-shadow) for demonstration purposes.
|
||||
|
||||
```bash
|
||||
wget https://civitai.com/api/download/models/15603 -O light_and_shadow.safetensors
|
||||
```
|
||||
|
||||
Next, we initialize a [`~DiffusionPipeline`]:
|
||||
|
||||
```python
|
||||
import torch
|
||||
|
||||
from diffusers import StableDiffusionPipeline, DPMSolverMultistepScheduler
|
||||
|
||||
pipeline = StableDiffusionPipeline.from_pretrained(
|
||||
"gsdf/Counterfeit-V2.5", torch_dtype=torch.float16, safety_checker=None
|
||||
).to("cuda")
|
||||
pipeline.scheduler = DPMSolverMultistepScheduler.from_config(
|
||||
pipeline.scheduler.config, use_karras_sigmas=True
|
||||
)
|
||||
```
|
||||
|
||||
We then load the checkpoint downloaded from CivitAI:
|
||||
|
||||
```python
|
||||
pipeline.load_lora_weights(".", weight_name="light_and_shadow.safetensors")
|
||||
```
|
||||
|
||||
<Tip warning={true}>
|
||||
|
||||
If you're loading a checkpoint in the `safetensors` format, please ensure you have `safetensors` installed.
|
||||
|
||||
</Tip>
|
||||
|
||||
And then it's time for running inference:
|
||||
|
||||
```python
|
||||
prompt = "masterpiece, best quality, 1girl, at dusk"
|
||||
negative_prompt = ("(low quality, worst quality:1.4), (bad anatomy), (inaccurate limb:1.2), "
|
||||
"bad composition, inaccurate eyes, extra digit, fewer digits, (extra arms:1.2), large breasts")
|
||||
|
||||
images = pipeline(prompt=prompt,
|
||||
negative_prompt=negative_prompt,
|
||||
width=512,
|
||||
height=768,
|
||||
num_inference_steps=15,
|
||||
num_images_per_prompt=4,
|
||||
generator=torch.manual_seed(0)
|
||||
).images
|
||||
```
|
||||
|
||||
Below is a comparison between the LoRA and the non-LoRA results:
|
||||
|
||||
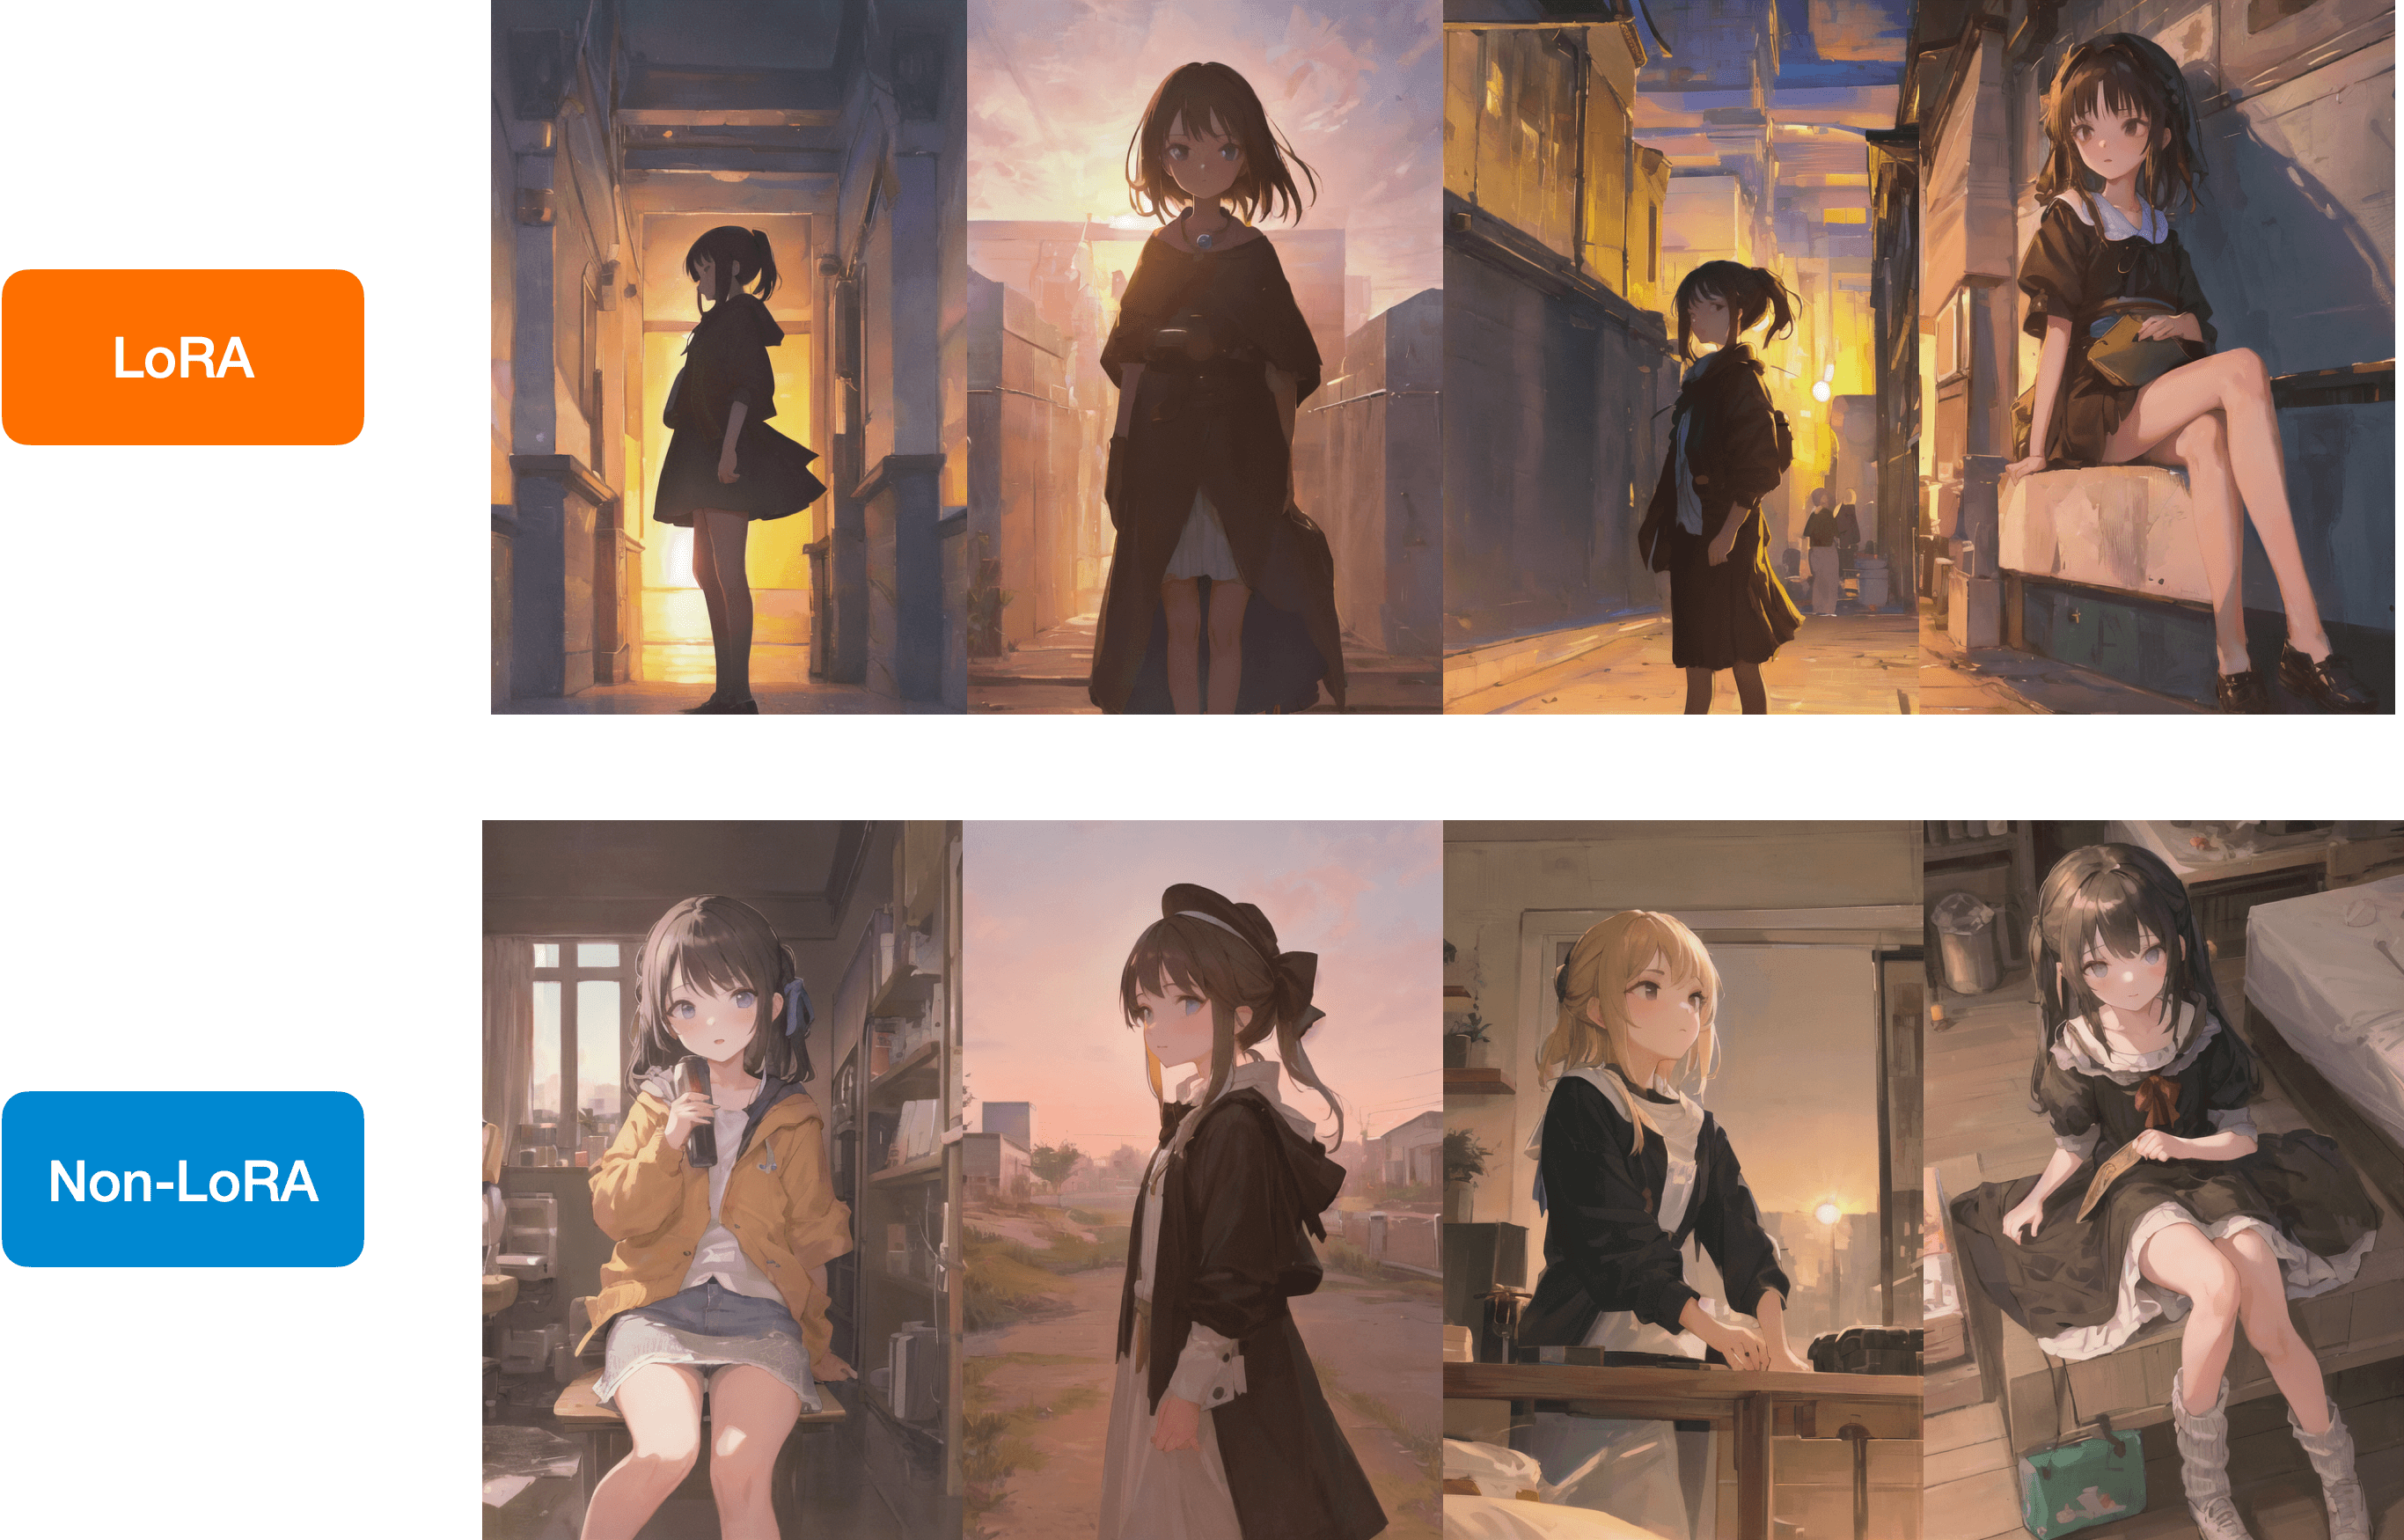
|
||||
|
||||
You have a similar checkpoint stored on the Hugging Face Hub, you can load it
|
||||
directly with [`~diffusers.loaders.LoraLoaderMixin.load_lora_weights`] like so:
|
||||
|
||||
```python
|
||||
lora_model_id = "sayakpaul/civitai-light-shadow-lora"
|
||||
lora_filename = "light_and_shadow.safetensors"
|
||||
pipeline.load_lora_weights(lora_model_id, weight_name=lora_filename)
|
||||
```
|
||||
@@ -72,29 +72,15 @@ To load a checkpoint to resume training, pass the argument `--resume_from_checkp
|
||||
|
||||
<frameworkcontent>
|
||||
<pt>
|
||||
Launch the [PyTorch training script](https://github.com/huggingface/diffusers/blob/main/examples/text_to_image/train_text_to_image.py) for a fine-tuning run on the [Pokémon BLIP captions](https://huggingface.co/datasets/lambdalabs/pokemon-blip-captions) dataset like this.
|
||||
Launch the [PyTorch training script](https://github.com/huggingface/diffusers/blob/main/examples/text_to_image/train_text_to_image.py) for a fine-tuning run on the [Pokémon BLIP captions](https://huggingface.co/datasets/lambdalabs/pokemon-blip-captions) dataset like this:
|
||||
|
||||
Specify the `MODEL_NAME` environment variable (either a Hub model repository id or a path to the directory containing the model weights) and pass it to the [`pretrained_model_name_or_path`](https://huggingface.co/docs/diffusers/en/api/diffusion_pipeline#diffusers.DiffusionPipeline.from_pretrained.pretrained_model_name_or_path) argument.
|
||||
|
||||
```bash
|
||||
export MODEL_NAME="CompVis/stable-diffusion-v1-4"
|
||||
export dataset_name="lambdalabs/pokemon-blip-captions"
|
||||
|
||||
accelerate launch --mixed_precision="fp16" train_text_to_image.py \
|
||||
--pretrained_model_name_or_path=$MODEL_NAME \
|
||||
--dataset_name=$dataset_name \
|
||||
--use_ema \
|
||||
--resolution=512 --center_crop --random_flip \
|
||||
--train_batch_size=1 \
|
||||
--gradient_accumulation_steps=4 \
|
||||
--gradient_checkpointing \
|
||||
--max_train_steps=15000 \
|
||||
--learning_rate=1e-05 \
|
||||
--max_grad_norm=1 \
|
||||
--lr_scheduler="constant" --lr_warmup_steps=0 \
|
||||
--output_dir="sd-pokemon-model" \
|
||||
--push_to_hub
|
||||
```
|
||||
<literalinclude>
|
||||
{"path": "../../../../examples/text_to_image/README.md",
|
||||
"language": "bash",
|
||||
"start-after": "accelerate_snippet_start",
|
||||
"end-before": "accelerate_snippet_end",
|
||||
"dedent": 0}
|
||||
</literalinclude>
|
||||
|
||||
To finetune on your own dataset, prepare the dataset according to the format required by 🤗 [Datasets](https://huggingface.co/docs/datasets/index). You can [upload your dataset to the Hub](https://huggingface.co/docs/datasets/image_dataset#upload-dataset-to-the-hub), or you can [prepare a local folder with your files](https://huggingface.co/docs/datasets/image_dataset#imagefolder).
|
||||
|
||||
@@ -117,10 +103,8 @@ accelerate launch train_text_to_image.py \
|
||||
--max_train_steps=15000 \
|
||||
--learning_rate=1e-05 \
|
||||
--max_grad_norm=1 \
|
||||
--lr_scheduler="constant"
|
||||
--lr_warmup_steps=0 \
|
||||
--output_dir=${OUTPUT_DIR} \
|
||||
--push_to_hub
|
||||
--lr_scheduler="constant" --lr_warmup_steps=0 \
|
||||
--output_dir=${OUTPUT_DIR}
|
||||
```
|
||||
|
||||
#### Training with multiple GPUs
|
||||
@@ -143,10 +127,8 @@ accelerate launch --mixed_precision="fp16" --multi_gpu train_text_to_image.py \
|
||||
--max_train_steps=15000 \
|
||||
--learning_rate=1e-05 \
|
||||
--max_grad_norm=1 \
|
||||
--lr_scheduler="constant" \
|
||||
--lr_warmup_steps=0 \
|
||||
--output_dir="sd-pokemon-model" \
|
||||
--push_to_hub
|
||||
--lr_scheduler="constant" --lr_warmup_steps=0 \
|
||||
--output_dir="sd-pokemon-model"
|
||||
```
|
||||
|
||||
</pt>
|
||||
@@ -159,8 +141,6 @@ Before running the script, make sure you have the requirements installed:
|
||||
pip install -U -r requirements_flax.txt
|
||||
```
|
||||
|
||||
Specify the `MODEL_NAME` environment variable (either a Hub model repository id or a path to the directory containing the model weights) and pass it to the [`pretrained_model_name_or_path`](https://huggingface.co/docs/diffusers/en/api/diffusion_pipeline#diffusers.DiffusionPipeline.from_pretrained.pretrained_model_name_or_path) argument.
|
||||
|
||||
Now you can launch the [Flax training script](https://github.com/huggingface/diffusers/blob/main/examples/text_to_image/train_text_to_image_flax.py) like this:
|
||||
|
||||
```bash
|
||||
@@ -175,8 +155,7 @@ python train_text_to_image_flax.py \
|
||||
--max_train_steps=15000 \
|
||||
--learning_rate=1e-05 \
|
||||
--max_grad_norm=1 \
|
||||
--output_dir="sd-pokemon-model" \
|
||||
--push_to_hub
|
||||
--output_dir="sd-pokemon-model"
|
||||
```
|
||||
|
||||
To finetune on your own dataset, prepare the dataset according to the format required by 🤗 [Datasets](https://huggingface.co/docs/datasets/index). You can [upload your dataset to the Hub](https://huggingface.co/docs/datasets/image_dataset#upload-dataset-to-the-hub), or you can [prepare a local folder with your files](https://huggingface.co/docs/datasets/image_dataset#imagefolder).
|
||||
@@ -196,8 +175,7 @@ python train_text_to_image_flax.py \
|
||||
--max_train_steps=15000 \
|
||||
--learning_rate=1e-05 \
|
||||
--max_grad_norm=1 \
|
||||
--output_dir="sd-pokemon-model" \
|
||||
--push_to_hub
|
||||
--output_dir="sd-pokemon-model"
|
||||
```
|
||||
</jax>
|
||||
</frameworkcontent>
|
||||
|
||||
@@ -1,4 +1,4 @@
|
||||
<!--Copyright 2023 The HuggingFace Team. All rights reserved.
|
||||
<!--Copyright 2023 The HuggingFace Team. All rights reserved.
|
||||
|
||||
Licensed under the Apache License, Version 2.0 (the "License"); you may not use this file except in compliance with
|
||||
the License. You may obtain a copy of the License at
|
||||
@@ -14,6 +14,8 @@ specific language governing permissions and limitations under the License.
|
||||
|
||||
# Textual Inversion
|
||||
|
||||
[[open-in-colab]]
|
||||
|
||||
[Textual Inversion](https://arxiv.org/abs/2208.01618) is a technique for capturing novel concepts from a small number of example images. While the technique was originally demonstrated with a [latent diffusion model](https://github.com/CompVis/latent-diffusion), it has since been applied to other model variants like [Stable Diffusion](https://huggingface.co/docs/diffusers/main/en/conceptual/stable_diffusion). The learned concepts can be used to better control the images generated from text-to-image pipelines. It learns new "words" in the text encoder's embedding space, which are used within text prompts for personalized image generation.
|
||||
|
||||
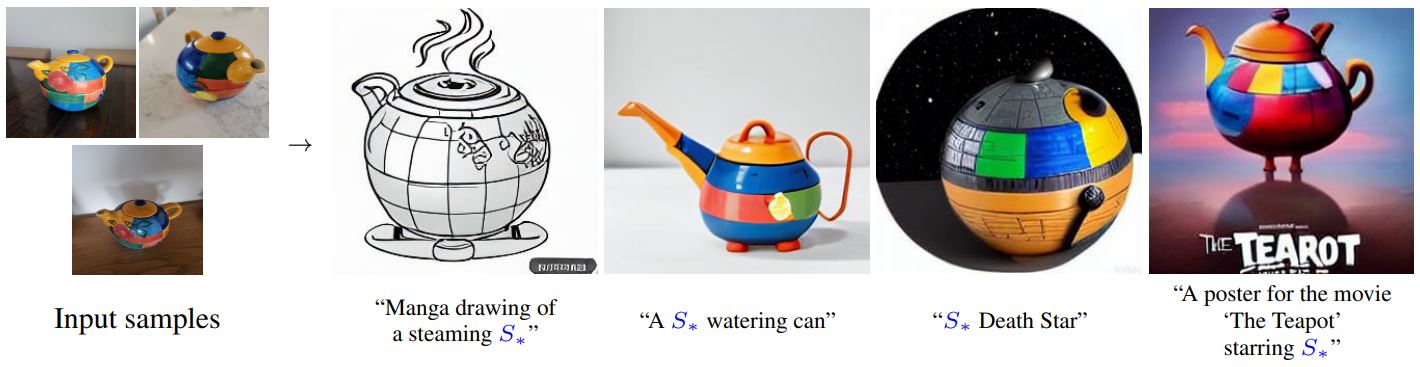
|
||||
@@ -79,20 +81,9 @@ To resume training from a saved checkpoint, pass the following argument to the t
|
||||
|
||||
## Finetuning
|
||||
|
||||
For your training dataset, download these [images of a cat toy](https://huggingface.co/datasets/diffusers/cat_toy_example) and store them in a directory. To use your own dataset, take a look at the [Create a dataset for training](create_dataset) guide.
|
||||
For your training dataset, download these [images of a cat statue](https://drive.google.com/drive/folders/1fmJMs25nxS_rSNqS5hTcRdLem_YQXbq5) and store them in a directory.
|
||||
|
||||
```py
|
||||
from huggingface_hub import snapshot_download
|
||||
|
||||
local_dir = "./cat"
|
||||
snapshot_download(
|
||||
"diffusers/cat_toy_example", local_dir=local_dir, repo_type="dataset", ignore_patterns=".gitattributes"
|
||||
)
|
||||
```
|
||||
|
||||
Specify the `MODEL_NAME` environment variable (either a Hub model repository id or a path to the directory containing the model weights) and pass it to the [`pretrained_model_name_or_path`](https://huggingface.co/docs/diffusers/en/api/diffusion_pipeline#diffusers.DiffusionPipeline.from_pretrained.pretrained_model_name_or_path) argument, and the `DATA_DIR` environment variable to the path of the directory containing the images.
|
||||
|
||||
Now you can launch the [training script](https://github.com/huggingface/diffusers/blob/main/examples/textual_inversion/textual_inversion.py). The script creates and saves the following files to your repository: `learned_embeds.bin`, `token_identifier.txt`, and `type_of_concept.txt`.
|
||||
Set the `MODEL_NAME` environment variable to the model repository id, and the `DATA_DIR` environment variable to the path of the directory containing the images. Now you can launch the [training script](https://github.com/huggingface/diffusers/blob/main/examples/textual_inversion/textual_inversion.py):
|
||||
|
||||
<Tip>
|
||||
|
||||
@@ -104,7 +95,7 @@ Now you can launch the [training script](https://github.com/huggingface/diffuser
|
||||
<pt>
|
||||
```bash
|
||||
export MODEL_NAME="runwayml/stable-diffusion-v1-5"
|
||||
export DATA_DIR="./cat"
|
||||
export DATA_DIR="path-to-dir-containing-images"
|
||||
|
||||
accelerate launch textual_inversion.py \
|
||||
--pretrained_model_name_or_path=$MODEL_NAME \
|
||||
@@ -118,21 +109,8 @@ accelerate launch textual_inversion.py \
|
||||
--learning_rate=5.0e-04 --scale_lr \
|
||||
--lr_scheduler="constant" \
|
||||
--lr_warmup_steps=0 \
|
||||
--output_dir="textual_inversion_cat" \
|
||||
--push_to_hub
|
||||
--output_dir="textual_inversion_cat"
|
||||
```
|
||||
|
||||
<Tip>
|
||||
|
||||
💡 If you want to increase the trainable capacity, you can associate your placeholder token, *e.g.* `<cat-toy>` to
|
||||
multiple embedding vectors. This can help the model to better capture the style of more (complex) images.
|
||||
To enable training multiple embedding vectors, simply pass:
|
||||
|
||||
```bash
|
||||
--num_vectors=5
|
||||
```
|
||||
|
||||
</Tip>
|
||||
</pt>
|
||||
<jax>
|
||||
If you have access to TPUs, try out the [Flax training script](https://github.com/huggingface/diffusers/blob/main/examples/textual_inversion/textual_inversion_flax.py) to train even faster (this'll also work for GPUs). With the same configuration settings, the Flax training script should be at least 70% faster than the PyTorch training script! ⚡️
|
||||
@@ -143,13 +121,11 @@ Before you begin, make sure you install the Flax specific dependencies:
|
||||
pip install -U -r requirements_flax.txt
|
||||
```
|
||||
|
||||
Specify the `MODEL_NAME` environment variable (either a Hub model repository id or a path to the directory containing the model weights) and pass it to the [`pretrained_model_name_or_path`](https://huggingface.co/docs/diffusers/en/api/diffusion_pipeline#diffusers.DiffusionPipeline.from_pretrained.pretrained_model_name_or_path) argument.
|
||||
|
||||
Then you can launch the [training script](https://github.com/huggingface/diffusers/blob/main/examples/textual_inversion/textual_inversion_flax.py):
|
||||
|
||||
```bash
|
||||
export MODEL_NAME="duongna/stable-diffusion-v1-4-flax"
|
||||
export DATA_DIR="./cat"
|
||||
export DATA_DIR="path-to-dir-containing-images"
|
||||
|
||||
python textual_inversion_flax.py \
|
||||
--pretrained_model_name_or_path=$MODEL_NAME \
|
||||
@@ -160,8 +136,7 @@ python textual_inversion_flax.py \
|
||||
--train_batch_size=1 \
|
||||
--max_train_steps=3000 \
|
||||
--learning_rate=5.0e-04 --scale_lr \
|
||||
--output_dir="textual_inversion_cat" \
|
||||
--push_to_hub
|
||||
--output_dir="textual_inversion_cat"
|
||||
```
|
||||
</jax>
|
||||
</frameworkcontent>
|
||||
@@ -245,7 +220,7 @@ from flax.training.common_utils import shard
|
||||
from diffusers import FlaxStableDiffusionPipeline
|
||||
|
||||
model_path = "path-to-your-trained-model"
|
||||
pipeline, params = FlaxStableDiffusionPipeline.from_pretrained(model_path, dtype=jax.numpy.bfloat16)
|
||||
pipe, params = FlaxStableDiffusionPipeline.from_pretrained(model_path, dtype=jax.numpy.bfloat16)
|
||||
|
||||
prompt = "A <cat-toy> backpack"
|
||||
prng_seed = jax.random.PRNGKey(0)
|
||||
|
||||
@@ -74,9 +74,7 @@ The full training state is saved in a subfolder in the `output_dir` every 500 st
|
||||
|
||||
## Finetuning
|
||||
|
||||
You're ready to launch the [training script](https://github.com/huggingface/diffusers/blob/main/examples/unconditional_image_generation/train_unconditional.py) now! Specify the dataset name to finetune on with the `--dataset_name` argument and then save it to the path in `--output_dir`. To use your own dataset, take a look at the [Create a dataset for training](create_dataset) guide.
|
||||
|
||||
The training script creates and saves a `diffusion_pytorch_model.bin` file in your repository.
|
||||
You're ready to launch the [training script](https://github.com/huggingface/diffusers/blob/main/examples/unconditional_image_generation/train_unconditional.py) now! Specify the dataset name to finetune on with the `--dataset_name` argument and then save it to the path in `--output_dir`.
|
||||
|
||||
<Tip>
|
||||
|
||||
@@ -141,6 +139,83 @@ accelerate launch --mixed_precision="fp16" --multi_gpu train_unconditional.py \
|
||||
--learning_rate=1e-4 \
|
||||
--lr_warmup_steps=500 \
|
||||
--mixed_precision="fp16" \
|
||||
--logger="wandb" \
|
||||
--push_to_hub
|
||||
```
|
||||
--logger="wandb"
|
||||
```
|
||||
|
||||
## Finetuning with your own data
|
||||
|
||||
There are two ways to finetune a model on your own dataset:
|
||||
|
||||
- provide your own folder of images to the `--train_data_dir` argument
|
||||
- upload your dataset to the Hub and pass the dataset repository id to the `--dataset_name` argument.
|
||||
|
||||
<Tip>
|
||||
|
||||
💡 Learn more about how to create an image dataset for training in the [Create an image dataset](https://huggingface.co/docs/datasets/image_dataset) guide.
|
||||
|
||||
</Tip>
|
||||
|
||||
Below, we explain both in more detail.
|
||||
|
||||
### Provide the dataset as a folder
|
||||
|
||||
If you provide your own dataset as a folder, the script expects the following directory structure:
|
||||
|
||||
```bash
|
||||
data_dir/xxx.png
|
||||
data_dir/xxy.png
|
||||
data_dir/[...]/xxz.png
|
||||
```
|
||||
|
||||
Pass the path to the folder containing the images to the `--train_data_dir` argument and launch the training:
|
||||
|
||||
```bash
|
||||
accelerate launch train_unconditional.py \
|
||||
--train_data_dir <path-to-train-directory> \
|
||||
<other-arguments>
|
||||
```
|
||||
|
||||
Internally, the script uses the [`ImageFolder`](https://huggingface.co/docs/datasets/image_load#imagefolder) to automatically build a dataset from the folder.
|
||||
|
||||
### Upload your data to the Hub
|
||||
|
||||
<Tip>
|
||||
|
||||
💡 For more details and context about creating and uploading a dataset to the Hub, take a look at the [Image search with 🤗 Datasets](https://huggingface.co/blog/image-search-datasets) post.
|
||||
|
||||
</Tip>
|
||||
|
||||
To upload your dataset to the Hub, you can start by creating one with the [`ImageFolder`](https://huggingface.co/docs/datasets/image_load#imagefolder) feature, which creates an `image` column containing the PIL-encoded images, from 🤗 Datasets:
|
||||
|
||||
```python
|
||||
from datasets import load_dataset
|
||||
|
||||
# example 1: local folder
|
||||
dataset = load_dataset("imagefolder", data_dir="path_to_your_folder")
|
||||
|
||||
# example 2: local files (supported formats are tar, gzip, zip, xz, rar, zstd)
|
||||
dataset = load_dataset("imagefolder", data_files="path_to_zip_file")
|
||||
|
||||
# example 3: remote files (supported formats are tar, gzip, zip, xz, rar, zstd)
|
||||
dataset = load_dataset(
|
||||
"imagefolder",
|
||||
data_files="https://download.microsoft.com/download/3/E/1/3E1C3F21-ECDB-4869-8368-6DEBA77B919F/kagglecatsanddogs_3367a.zip",
|
||||
)
|
||||
|
||||
# example 4: providing several splits
|
||||
dataset = load_dataset(
|
||||
"imagefolder", data_files={"train": ["path/to/file1", "path/to/file2"], "test": ["path/to/file3", "path/to/file4"]}
|
||||
)
|
||||
```
|
||||
|
||||
Then you can use the [`~datasets.Dataset.push_to_hub`] method to upload it to the Hub:
|
||||
|
||||
```python
|
||||
# assuming you have ran the huggingface-cli login command in a terminal
|
||||
dataset.push_to_hub("name_of_your_dataset")
|
||||
|
||||
# if you want to push to a private repo, simply pass private=True:
|
||||
dataset.push_to_hub("name_of_your_dataset", private=True)
|
||||
```
|
||||
|
||||
Now train your model by simply setting the `--dataset_name` argument to the name of your dataset on the Hub.
|
||||
@@ -26,9 +26,8 @@ This tutorial will teach you how to train a [`UNet2DModel`] from scratch on a su
|
||||
|
||||
Before you begin, make sure you have 🤗 Datasets installed to load and preprocess image datasets, and 🤗 Accelerate, to simplify training on any number of GPUs. The following command will also install [TensorBoard](https://www.tensorflow.org/tensorboard) to visualize training metrics (you can also use [Weights & Biases](https://docs.wandb.ai/) to track your training).
|
||||
|
||||
```py
|
||||
# uncomment to install the necessary libraries in Colab
|
||||
#!pip install diffusers[training]
|
||||
```bash
|
||||
!pip install diffusers[training]
|
||||
```
|
||||
|
||||
We encourage you to share your model with the community, and in order to do that, you'll need to login to your Hugging Face account (create one [here](https://hf.co/join) if you don't already have one!). You can login from a notebook and enter your token when prompted:
|
||||
@@ -313,7 +312,7 @@ Now you can wrap all these components together in a training loop with 🤗 Acce
|
||||
... mixed_precision=config.mixed_precision,
|
||||
... gradient_accumulation_steps=config.gradient_accumulation_steps,
|
||||
... log_with="tensorboard",
|
||||
... project_dir=os.path.join(config.output_dir, "logs"),
|
||||
... logging_dir=os.path.join(config.output_dir, "logs"),
|
||||
... )
|
||||
... if accelerator.is_main_process:
|
||||
... if config.push_to_hub:
|
||||
@@ -408,9 +407,9 @@ Once training is complete, take a look at the final 🦋 images 🦋 generated b
|
||||
|
||||
## Next steps
|
||||
|
||||
Unconditional image generation is one example of a task that can be trained. You can explore other tasks and training techniques by visiting the [🧨 Diffusers Training Examples](../training/overview) page. Here are some examples of what you can learn:
|
||||
Unconditional image generation is one example of a task that can be trained. You can explore other tasks and training techniques by visiting the [🧨 Diffusers Training Examples](./training/overview) page. Here are some examples of what you can learn:
|
||||
|
||||
* [Textual Inversion](../training/text_inversion), an algorithm that teaches a model a specific visual concept and integrates it into the generated image.
|
||||
* [DreamBooth](../training/dreambooth), a technique for generating personalized images of a subject given several input images of the subject.
|
||||
* [Guide](../training/text2image) to finetuning a Stable Diffusion model on your own dataset.
|
||||
* [Guide](../training/lora) to using LoRA, a memory-efficient technique for finetuning really large models faster.
|
||||
* [Textual Inversion](./training/text_inversion), an algorithm that teaches a model a specific visual concept and integrates it into the generated image.
|
||||
* [DreamBooth](./training/dreambooth), a technique for generating personalized images of a subject given several input images of the subject.
|
||||
* [Guide](./training/text2image) to finetuning a Stable Diffusion model on your own dataset.
|
||||
* [Guide](./training/lora) to using LoRA, a memory-efficient technique for finetuning really large models faster.
|
||||
|
||||
@@ -20,12 +20,12 @@ The [`DiffusionPipeline`] is the easiest way to use a pre-trained diffusion syst
|
||||
|
||||
Start by creating an instance of [`DiffusionPipeline`] and specify which pipeline [checkpoint](https://huggingface.co/models?library=diffusers&sort=downloads) you would like to download.
|
||||
|
||||
In this guide, you'll use [`DiffusionPipeline`] for text-to-image generation with [`runwayml/stable-diffusion-v1-5`](https://huggingface.co/runwayml/stable-diffusion-v1-5):
|
||||
In this guide, you'll use [`DiffusionPipeline`] for text-to-image generation with [Latent Diffusion](https://huggingface.co/CompVis/ldm-text2im-large-256):
|
||||
|
||||
```python
|
||||
>>> from diffusers import DiffusionPipeline
|
||||
|
||||
>>> generator = DiffusionPipeline.from_pretrained("runwayml/stable-diffusion-v1-5")
|
||||
>>> generator = DiffusionPipeline.from_pretrained("CompVis/ldm-text2im-large-256")
|
||||
```
|
||||
|
||||
The [`DiffusionPipeline`] downloads and caches all modeling, tokenization, and scheduling components.
|
||||
|
||||
@@ -1,45 +0,0 @@
|
||||
# Control image brightness
|
||||
|
||||
The Stable Diffusion pipeline is mediocre at generating images that are either very bright or dark as explained in the [Common Diffusion Noise Schedules and Sample Steps are Flawed](https://huggingface.co/papers/2305.08891) paper. The solutions proposed in the paper are currently implemented in the [`DDIMScheduler`] which you can use to improve the lighting in your images.
|
||||
|
||||
<Tip>
|
||||
|
||||
💡 Take a look at the paper linked above for more details about the proposed solutions!
|
||||
|
||||
</Tip>
|
||||
|
||||
One of the solutions is to train a model with *v prediction* and *v loss*. Add the following flag to the [`train_text_to_image.py`](https://github.com/huggingface/diffusers/blob/main/examples/text_to_image/train_text_to_image.py) or [`train_text_to_image_lora.py`](https://github.com/huggingface/diffusers/blob/main/examples/text_to_image/train_text_to_image_lora.py) scripts to enable `v_prediction`:
|
||||
|
||||
```bash
|
||||
--prediction_type="v_prediction"
|
||||
```
|
||||
|
||||
For example, let's use the [`ptx0/pseudo-journey-v2`](https://huggingface.co/ptx0/pseudo-journey-v2) checkpoint which has been finetuned with `v_prediction`.
|
||||
|
||||
Next, configure the following parameters in the [`DDIMScheduler`]:
|
||||
|
||||
1. `rescale_betas_zero_snr=True`, rescales the noise schedule to zero terminal signal-to-noise ratio (SNR)
|
||||
2. `timestep_spacing="trailing"`, starts sampling from the last timestep
|
||||
|
||||
```py
|
||||
>>> from diffusers import DiffusionPipeline, DDIMScheduler
|
||||
|
||||
>>> pipeline = DiffusionPipeline.from_pretrained("ptx0/pseudo-journey-v2")
|
||||
# switch the scheduler in the pipeline to use the DDIMScheduler
|
||||
|
||||
>>> pipeline.scheduler = DDIMScheduler.from_config(
|
||||
... pipeline.scheduler.config, rescale_betas_zero_snr=True, timestep_spacing="trailing"
|
||||
... )
|
||||
>>> pipeline.to("cuda")
|
||||
```
|
||||
|
||||
Finally, in your call to the pipeline, set `guidance_rescale` to prevent overexposure:
|
||||
|
||||
```py
|
||||
prompt = "A lion in galaxies, spirals, nebulae, stars, smoke, iridescent, intricate detail, octane render, 8k"
|
||||
image = pipeline(prompt, guidance_rescale=0.7).images[0]
|
||||
```
|
||||
|
||||
<div class="flex justify-center">
|
||||
<img src="https://huggingface.co/datasets/huggingface/documentation-images/resolve/main/diffusers/zero_snr.png"/>
|
||||
</div>
|
||||
@@ -37,29 +37,6 @@ Unless otherwise mentioned, these are techniques that work with existing models
|
||||
9. [Textual Inversion](#textual-inversion)
|
||||
10. [ControlNet](#controlnet)
|
||||
11. [Prompt Weighting](#prompt-weighting)
|
||||
12. [Custom Diffusion](#custom-diffusion)
|
||||
13. [Model Editing](#model-editing)
|
||||
14. [DiffEdit](#diffedit)
|
||||
|
||||
For convenience, we provide a table to denote which methods are inference-only and which require fine-tuning/training.
|
||||
|
||||
| **Method** | **Inference only** | **Requires training /<br> fine-tuning** | **Comments** |
|
||||
|:---:|:---:|:---:|:---:|
|
||||
| [Instruct Pix2Pix](#instruct-pix2pix) | ✅ | ❌ | Can additionally be<br>fine-tuned for better <br>performance on specific <br>edit instructions. |
|
||||
| [Pix2Pix Zero](#pix2pixzero) | ✅ | ❌ | |
|
||||
| [Attend and Excite](#attend-and-excite) | ✅ | ❌ | |
|
||||
| [Semantic Guidance](#semantic-guidance) | ✅ | ❌ | |
|
||||
| [Self-attention Guidance](#self-attention-guidance) | ✅ | ❌ | |
|
||||
| [Depth2Image](#depth2image) | ✅ | ❌ | |
|
||||
| [MultiDiffusion Panorama](#multidiffusion-panorama) | ✅ | ❌ | |
|
||||
| [DreamBooth](#dreambooth) | ❌ | ✅ | |
|
||||
| [Textual Inversion](#textual-inversion) | ❌ | ✅ | |
|
||||
| [ControlNet](#controlnet) | ✅ | ❌ | A ControlNet can be <br>trained/fine-tuned on<br>a custom conditioning. |
|
||||
| [Prompt Weighting](#prompt-weighting) | ✅ | ❌ | |
|
||||
| [Custom Diffusion](#custom-diffusion) | ❌ | ✅ | |
|
||||
| [Model Editing](#model-editing) | ✅ | ❌ | |
|
||||
| [DiffEdit](#diffedit) | ✅ | ❌ | |
|
||||
| [T2I-Adapter](#t2i-adapter) | ✅ | ❌ | |
|
||||
|
||||
## Instruct Pix2Pix
|
||||
|
||||
@@ -160,13 +137,13 @@ See [here](../api/pipelines/stable_diffusion/panorama) for more information on h
|
||||
|
||||
In addition to pre-trained models, Diffusers has training scripts for fine-tuning models on user-provided data.
|
||||
|
||||
## DreamBooth
|
||||
### DreamBooth
|
||||
|
||||
[DreamBooth](../training/dreambooth) fine-tunes a model to teach it about a new subject. I.e. a few pictures of a person can be used to generate images of that person in different styles.
|
||||
|
||||
See [here](../training/dreambooth) for more information on how to use it.
|
||||
|
||||
## Textual Inversion
|
||||
### Textual Inversion
|
||||
|
||||
[Textual Inversion](../training/text_inversion) fine-tunes a model to teach it about a new concept. I.e. a few pictures of a style of artwork can be used to generate images in that style.
|
||||
|
||||
@@ -188,41 +165,3 @@ Prompt weighting is a simple technique that puts more attention weight on certai
|
||||
input.
|
||||
|
||||
For a more in-detail explanation and examples, see [here](../using-diffusers/weighted_prompts).
|
||||
|
||||
## Custom Diffusion
|
||||
|
||||
[Custom Diffusion](../training/custom_diffusion) only fine-tunes the cross-attention maps of a pre-trained
|
||||
text-to-image diffusion model. It also allows for additionally performing textual inversion. It supports
|
||||
multi-concept training by design. Like DreamBooth and Textual Inversion, Custom Diffusion is also used to
|
||||
teach a pre-trained text-to-image diffusion model about new concepts to generate outputs involving the
|
||||
concept(s) of interest.
|
||||
|
||||
For more details, check out our [official doc](../training/custom_diffusion).
|
||||
|
||||
## Model Editing
|
||||
|
||||
[Paper](https://arxiv.org/abs/2303.08084)
|
||||
|
||||
The [text-to-image model editing pipeline](../api/pipelines/stable_diffusion/model_editing) helps you mitigate some of the incorrect implicit assumptions a pre-trained text-to-image
|
||||
diffusion model might make about the subjects present in the input prompt. For example, if you prompt Stable Diffusion to generate images for "A pack of roses", the roses in the generated images
|
||||
are more likely to be red. This pipeline helps you change that assumption.
|
||||
|
||||
To know more details, check out the [official doc](../api/pipelines/stable_diffusion/model_editing).
|
||||
|
||||
## DiffEdit
|
||||
|
||||
[Paper](https://arxiv.org/abs/2210.11427)
|
||||
|
||||
[DiffEdit](../api/pipelines/stable_diffusion/diffedit) allows for semantic editing of input images along with
|
||||
input prompts while preserving the original input images as much as possible.
|
||||
|
||||
To know more details, check out the [official doc](../api/pipelines/stable_diffusion/model_editing).
|
||||
## T2I-Adapter
|
||||
|
||||
[Paper](https://arxiv.org/abs/2302.08453)
|
||||
|
||||
[T2I-Adapter](../api/pipelines/stable_diffusion/adapter) is an auxiliary network which adds an extra condition.
|
||||
There are 8 canonical pre-trained adapters trained on different conditionings such as edge detection, sketch,
|
||||
depth maps, and semantic segmentations.
|
||||
|
||||
See [here](../api/pipelines/stable_diffusion/adapter) for more information on how to use it.
|
||||
|
||||
@@ -12,8 +12,6 @@ specific language governing permissions and limitations under the License.
|
||||
|
||||
# Community pipelines
|
||||
|
||||
[[open-in-colab]]
|
||||
|
||||
> **For more information about community pipelines, please have a look at [this issue](https://github.com/huggingface/diffusers/issues/841).**
|
||||
|
||||
**Community** examples consist of both inference and training examples that have been added by the community.
|
||||
|
||||
Some files were not shown because too many files have changed in this diff Show More
Reference in New Issue
Block a user