mirror of
https://github.com/huggingface/diffusers.git
synced 2026-02-14 23:05:20 +08:00
* Docs kr update 3

controlnet, reproducibility 업로드

generator 그대로 사용
seamless multi-GPU 그대로 사용

create_dataset 번역 1차

stable_diffusion_jax

new translation

Add coreml, tome

kr docs minor fix

translate training/instructpix2pix

fix training/instructpix2pix.mdx

using-diffusers/weighting_prompts 번역 1차

add SDXL docs

Translate using-diffuers/loading_overview.md

translate using-diffusers/textual_inversion_inference.md

Conditional image generation (#37)

* stable_diffusion_jax

* index_update

* index_update

* condition_image_generation

---------

Co-authored-by: Seongsu Park <tjdtnsu@gmail.com>

jihwan/stable_diffusion.mdx

custom_diffusion 작업 완료

quicktour 작업 완료

distributed inference & control brightness (#40)

* distributed_inference.mdx

* control_brightness

---------

Co-authored-by: idra79haza <idra79haza@github.com>
Co-authored-by: Seongsu Park <tjdtnsu@gmail.com>

using_safetensors (#41)

* distributed_inference.mdx

* control_brightness

* using_safetensors.mdx

---------

Co-authored-by: idra79haza <idra79haza@github.com>
Co-authored-by: Seongsu Park <tjdtnsu@gmail.com>

delete safetensor short

* Repace mdx to md

* toctree update

* Add controlling_generation

* toctree fix

* colab link, minor fix

* docs name typo fix

* frontmatter fix

* translation fix
3.9 KiB
3.9 KiB
텍스트 기반 image-to-image 생성
[StableDiffusionImg2ImgPipeline]을 사용하면 텍스트 프롬프트와 시작 이미지를 전달하여 새 이미지 생성의 조건을 지정할 수 있습니다.
시작하기 전에 필요한 라이브러리가 모두 설치되어 있는지 확인하세요:
!pip install diffusers transformers ftfy accelerate
nitrosocke/Ghibli-Diffusion과 같은 사전학습된 stable diffusion 모델로 [StableDiffusionImg2ImgPipeline]을 생성하여 시작하세요.
import torch
import requests
from PIL import Image
from io import BytesIO
from diffusers import StableDiffusionImg2ImgPipeline

device = "cuda"
pipe = StableDiffusionImg2ImgPipeline.from_pretrained("nitrosocke/Ghibli-Diffusion", torch_dtype=torch.float16).to(
    device
)
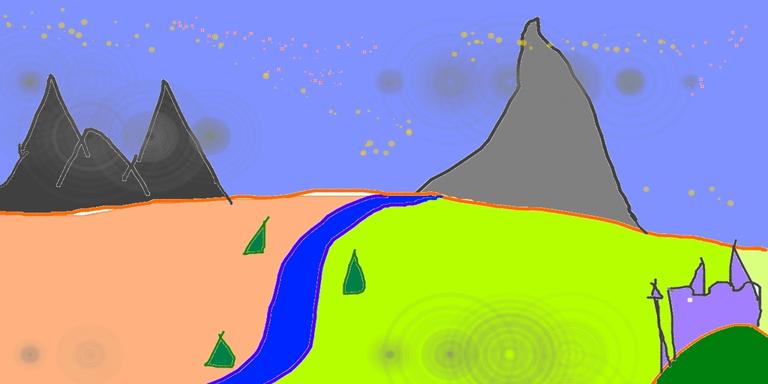
초기 이미지를 다운로드하고 사전 처리하여 파이프라인에 전달할 수 있습니다:
url = "https://raw.githubusercontent.com/CompVis/stable-diffusion/main/assets/stable-samples/img2img/sketch-mountains-input.jpg"

response = requests.get(url)
init_image = Image.open(BytesIO(response.content)).convert("RGB")
init_image.thumbnail((768, 768))
init_image
💡 strength는 입력 이미지에 추가되는 노이즈의 양을 제어하는 0.0에서 1.0 사이의 값입니다. 1.0에 가까운 값은 다양한 변형을 허용하지만 입력 이미지와 의미적으로 일치하지 않는 이미지를 생성합니다.
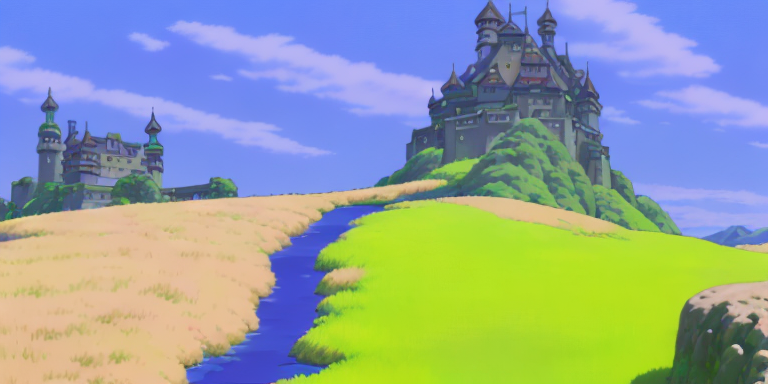
프롬프트를 정의하고(지브리 스타일(Ghibli-style)에 맞게 조정된 이 체크포인트의 경우 프롬프트 앞에 ghibli style 토큰을 붙여야 합니다) 파이프라인을 실행합니다:
prompt = "ghibli style, a fantasy landscape with castles"
generator = torch.Generator(device=device).manual_seed(1024)
image = pipe(prompt=prompt, image=init_image, strength=0.75, guidance_scale=7.5, generator=generator).images[0]
image
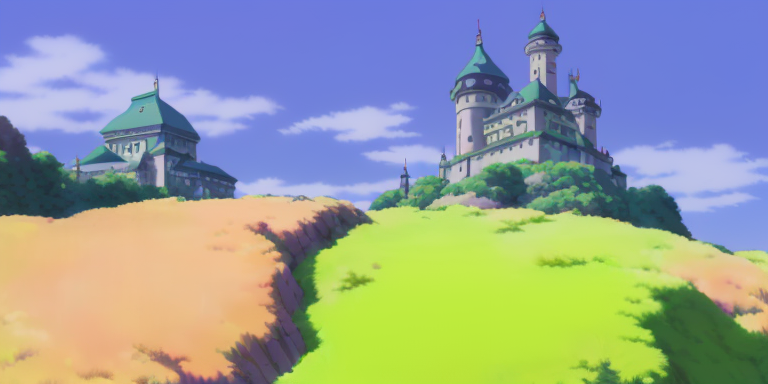
다른 스케줄러로 실험하여 출력에 어떤 영향을 미치는지 확인할 수도 있습니다:
from diffusers import LMSDiscreteScheduler

lms = LMSDiscreteScheduler.from_config(pipe.scheduler.config)
pipe.scheduler = lms
generator = torch.Generator(device=device).manual_seed(1024)
image = pipe(prompt=prompt, image=init_image, strength=0.75, guidance_scale=7.5, generator=generator).images[0]
image
아래 공백을 확인하고 strength 값을 다르게 설정하여 이미지를 생성해 보세요. strength를 낮게 설정하면 원본 이미지와 더 유사한 이미지가 생성되는 것을 확인할 수 있습니다.
자유롭게 스케줄러를 [LMSDiscreteScheduler]로 전환하여 출력에 어떤 영향을 미치는지 확인해 보세요.