mirror of
https://github.com/huggingface/diffusers.git
synced 2025-12-06 20:44:33 +08:00
Compare commits
2 Commits
attn-refac
...
save-load-
| Author | SHA1 | Date | |
|---|---|---|---|
|
|
4133545a15 | ||
|
|
d34dbbd05a |
3
.github/workflows/benchmark.yml
vendored
3
.github/workflows/benchmark.yml
vendored
@@ -23,7 +23,7 @@ jobs:
|
||||
runs-on:
|
||||
group: aws-g6-4xlarge-plus
|
||||
container:
|
||||
image: diffusers/diffusers-pytorch-cuda
|
||||
image: diffusers/diffusers-pytorch-compile-cuda
|
||||
options: --shm-size "16gb" --ipc host --gpus 0
|
||||
steps:
|
||||
- name: Checkout diffusers
|
||||
@@ -38,7 +38,6 @@ jobs:
|
||||
python -m venv /opt/venv && export PATH="/opt/venv/bin:$PATH"
|
||||
python -m uv pip install -e [quality,test]
|
||||
python -m uv pip install pandas peft
|
||||
python -m uv pip uninstall transformers && python -m uv pip install transformers==4.48.0
|
||||
- name: Environment
|
||||
run: |
|
||||
python utils/print_env.py
|
||||
|
||||
13
.github/workflows/build_docker_images.yml
vendored
13
.github/workflows/build_docker_images.yml
vendored
@@ -38,16 +38,9 @@ jobs:
|
||||
token: ${{ secrets.GITHUB_TOKEN }}
|
||||
|
||||
- name: Build Changed Docker Images
|
||||
env:
|
||||
CHANGED_FILES: ${{ steps.file_changes.outputs.all }}
|
||||
run: |
|
||||
echo "$CHANGED_FILES"
|
||||
for FILE in $CHANGED_FILES; do
|
||||
# skip anything that isn't still on disk
|
||||
if [[ ! -f "$FILE" ]]; then
|
||||
echo "Skipping removed file $FILE"
|
||||
continue
|
||||
fi
|
||||
CHANGED_FILES="${{ steps.file_changes.outputs.all }}"
|
||||
for FILE in $CHANGED_FILES; do
|
||||
if [[ "$FILE" == docker/*Dockerfile ]]; then
|
||||
DOCKER_PATH="${FILE%/Dockerfile}"
|
||||
DOCKER_TAG=$(basename "$DOCKER_PATH")
|
||||
@@ -72,7 +65,7 @@ jobs:
|
||||
image-name:
|
||||
- diffusers-pytorch-cpu
|
||||
- diffusers-pytorch-cuda
|
||||
- diffusers-pytorch-cuda
|
||||
- diffusers-pytorch-compile-cuda
|
||||
- diffusers-pytorch-xformers-cuda
|
||||
- diffusers-pytorch-minimum-cuda
|
||||
- diffusers-flax-cpu
|
||||
|
||||
380
.github/workflows/nightly_tests.yml
vendored
380
.github/workflows/nightly_tests.yml
vendored
@@ -13,9 +13,8 @@ env:
|
||||
PYTEST_TIMEOUT: 600
|
||||
RUN_SLOW: yes
|
||||
RUN_NIGHTLY: yes
|
||||
PIPELINE_USAGE_CUTOFF: 0
|
||||
PIPELINE_USAGE_CUTOFF: 5000
|
||||
SLACK_API_TOKEN: ${{ secrets.SLACK_CIFEEDBACK_BOT_TOKEN }}
|
||||
CONSOLIDATED_REPORT_PATH: consolidated_test_report.md
|
||||
|
||||
jobs:
|
||||
setup_torch_cuda_pipeline_matrix:
|
||||
@@ -100,6 +99,11 @@ jobs:
|
||||
with:
|
||||
name: pipeline_${{ matrix.module }}_test_reports
|
||||
path: reports
|
||||
- name: Generate Report and Notify Channel
|
||||
if: always()
|
||||
run: |
|
||||
pip install slack_sdk tabulate
|
||||
python utils/log_reports.py >> $GITHUB_STEP_SUMMARY
|
||||
|
||||
run_nightly_tests_for_other_torch_modules:
|
||||
name: Nightly Torch CUDA Tests
|
||||
@@ -170,48 +174,11 @@ jobs:
|
||||
name: torch_${{ matrix.module }}_cuda_test_reports
|
||||
path: reports
|
||||
|
||||
run_torch_compile_tests:
|
||||
name: PyTorch Compile CUDA tests
|
||||
|
||||
runs-on:
|
||||
group: aws-g4dn-2xlarge
|
||||
|
||||
container:
|
||||
image: diffusers/diffusers-pytorch-cuda
|
||||
options: --gpus 0 --shm-size "16gb" --ipc host
|
||||
|
||||
steps:
|
||||
- name: Checkout diffusers
|
||||
uses: actions/checkout@v3
|
||||
with:
|
||||
fetch-depth: 2
|
||||
|
||||
- name: NVIDIA-SMI
|
||||
- name: Generate Report and Notify Channel
|
||||
if: always()
|
||||
run: |
|
||||
nvidia-smi
|
||||
- name: Install dependencies
|
||||
run: |
|
||||
python -m venv /opt/venv && export PATH="/opt/venv/bin:$PATH"
|
||||
python -m uv pip install -e [quality,test,training]
|
||||
- name: Environment
|
||||
run: |
|
||||
python utils/print_env.py
|
||||
- name: Run torch compile tests on GPU
|
||||
env:
|
||||
HF_TOKEN: ${{ secrets.DIFFUSERS_HF_HUB_READ_TOKEN }}
|
||||
RUN_COMPILE: yes
|
||||
run: |
|
||||
python -m pytest -n 1 --max-worker-restart=0 --dist=loadfile -s -v -k "compile" --make-reports=tests_torch_compile_cuda tests/
|
||||
- name: Failure short reports
|
||||
if: ${{ failure() }}
|
||||
run: cat reports/tests_torch_compile_cuda_failures_short.txt
|
||||
|
||||
- name: Test suite reports artifacts
|
||||
if: ${{ always() }}
|
||||
uses: actions/upload-artifact@v4
|
||||
with:
|
||||
name: torch_compile_test_reports
|
||||
path: reports
|
||||
pip install slack_sdk tabulate
|
||||
python utils/log_reports.py >> $GITHUB_STEP_SUMMARY
|
||||
|
||||
run_big_gpu_torch_tests:
|
||||
name: Torch tests on big GPU
|
||||
@@ -263,7 +230,12 @@ jobs:
|
||||
with:
|
||||
name: torch_cuda_big_gpu_test_reports
|
||||
path: reports
|
||||
|
||||
- name: Generate Report and Notify Channel
|
||||
if: always()
|
||||
run: |
|
||||
pip install slack_sdk tabulate
|
||||
python utils/log_reports.py >> $GITHUB_STEP_SUMMARY
|
||||
|
||||
torch_minimum_version_cuda_tests:
|
||||
name: Torch Minimum Version CUDA Tests
|
||||
runs-on:
|
||||
@@ -320,171 +292,7 @@ jobs:
|
||||
with:
|
||||
name: torch_minimum_version_cuda_test_reports
|
||||
path: reports
|
||||
|
||||
run_nightly_onnx_tests:
|
||||
name: Nightly ONNXRuntime CUDA tests on Ubuntu
|
||||
runs-on:
|
||||
group: aws-g4dn-2xlarge
|
||||
container:
|
||||
image: diffusers/diffusers-onnxruntime-cuda
|
||||
options: --gpus 0 --shm-size "16gb" --ipc host
|
||||
|
||||
steps:
|
||||
- name: Checkout diffusers
|
||||
uses: actions/checkout@v3
|
||||
with:
|
||||
fetch-depth: 2
|
||||
|
||||
- name: NVIDIA-SMI
|
||||
run: nvidia-smi
|
||||
|
||||
- name: Install dependencies
|
||||
run: |
|
||||
python -m venv /opt/venv && export PATH="/opt/venv/bin:$PATH"
|
||||
python -m uv pip install -e [quality,test]
|
||||
pip uninstall accelerate -y && python -m uv pip install -U accelerate@git+https://github.com/huggingface/accelerate.git
|
||||
python -m uv pip install pytest-reportlog
|
||||
- name: Environment
|
||||
run: python utils/print_env.py
|
||||
|
||||
- name: Run Nightly ONNXRuntime CUDA tests
|
||||
env:
|
||||
HF_TOKEN: ${{ secrets.DIFFUSERS_HF_HUB_READ_TOKEN }}
|
||||
run: |
|
||||
python -m pytest -n 1 --max-worker-restart=0 --dist=loadfile \
|
||||
-s -v -k "Onnx" \
|
||||
--make-reports=tests_onnx_cuda \
|
||||
--report-log=tests_onnx_cuda.log \
|
||||
tests/
|
||||
|
||||
- name: Failure short reports
|
||||
if: ${{ failure() }}
|
||||
run: |
|
||||
cat reports/tests_onnx_cuda_stats.txt
|
||||
cat reports/tests_onnx_cuda_failures_short.txt
|
||||
|
||||
- name: Test suite reports artifacts
|
||||
if: ${{ always() }}
|
||||
uses: actions/upload-artifact@v4
|
||||
with:
|
||||
name: tests_onnx_cuda_reports
|
||||
path: reports
|
||||
|
||||
run_nightly_quantization_tests:
|
||||
name: Torch quantization nightly tests
|
||||
strategy:
|
||||
fail-fast: false
|
||||
max-parallel: 2
|
||||
matrix:
|
||||
config:
|
||||
- backend: "bitsandbytes"
|
||||
test_location: "bnb"
|
||||
additional_deps: ["peft"]
|
||||
- backend: "gguf"
|
||||
test_location: "gguf"
|
||||
additional_deps: ["peft"]
|
||||
- backend: "torchao"
|
||||
test_location: "torchao"
|
||||
additional_deps: []
|
||||
- backend: "optimum_quanto"
|
||||
test_location: "quanto"
|
||||
additional_deps: []
|
||||
runs-on:
|
||||
group: aws-g6e-xlarge-plus
|
||||
container:
|
||||
image: diffusers/diffusers-pytorch-cuda
|
||||
options: --shm-size "20gb" --ipc host --gpus 0
|
||||
steps:
|
||||
- name: Checkout diffusers
|
||||
uses: actions/checkout@v3
|
||||
with:
|
||||
fetch-depth: 2
|
||||
- name: NVIDIA-SMI
|
||||
run: nvidia-smi
|
||||
- name: Install dependencies
|
||||
run: |
|
||||
python -m venv /opt/venv && export PATH="/opt/venv/bin:$PATH"
|
||||
python -m uv pip install -e [quality,test]
|
||||
python -m uv pip install -U ${{ matrix.config.backend }}
|
||||
if [ "${{ join(matrix.config.additional_deps, ' ') }}" != "" ]; then
|
||||
python -m uv pip install ${{ join(matrix.config.additional_deps, ' ') }}
|
||||
fi
|
||||
python -m uv pip install pytest-reportlog
|
||||
- name: Environment
|
||||
run: |
|
||||
python utils/print_env.py
|
||||
- name: ${{ matrix.config.backend }} quantization tests on GPU
|
||||
env:
|
||||
HF_TOKEN: ${{ secrets.DIFFUSERS_HF_HUB_READ_TOKEN }}
|
||||
# https://pytorch.org/docs/stable/notes/randomness.html#avoiding-nondeterministic-algorithms
|
||||
CUBLAS_WORKSPACE_CONFIG: :16:8
|
||||
BIG_GPU_MEMORY: 40
|
||||
run: |
|
||||
python -m pytest -n 1 --max-worker-restart=0 --dist=loadfile \
|
||||
--make-reports=tests_${{ matrix.config.backend }}_torch_cuda \
|
||||
--report-log=tests_${{ matrix.config.backend }}_torch_cuda.log \
|
||||
tests/quantization/${{ matrix.config.test_location }}
|
||||
- name: Failure short reports
|
||||
if: ${{ failure() }}
|
||||
run: |
|
||||
cat reports/tests_${{ matrix.config.backend }}_torch_cuda_stats.txt
|
||||
cat reports/tests_${{ matrix.config.backend }}_torch_cuda_failures_short.txt
|
||||
- name: Test suite reports artifacts
|
||||
if: ${{ always() }}
|
||||
uses: actions/upload-artifact@v4
|
||||
with:
|
||||
name: torch_cuda_${{ matrix.config.backend }}_reports
|
||||
path: reports
|
||||
|
||||
run_nightly_pipeline_level_quantization_tests:
|
||||
name: Torch quantization nightly tests
|
||||
strategy:
|
||||
fail-fast: false
|
||||
max-parallel: 2
|
||||
runs-on:
|
||||
group: aws-g6e-xlarge-plus
|
||||
container:
|
||||
image: diffusers/diffusers-pytorch-cuda
|
||||
options: --shm-size "20gb" --ipc host --gpus 0
|
||||
steps:
|
||||
- name: Checkout diffusers
|
||||
uses: actions/checkout@v3
|
||||
with:
|
||||
fetch-depth: 2
|
||||
- name: NVIDIA-SMI
|
||||
run: nvidia-smi
|
||||
- name: Install dependencies
|
||||
run: |
|
||||
python -m venv /opt/venv && export PATH="/opt/venv/bin:$PATH"
|
||||
python -m uv pip install -e [quality,test]
|
||||
python -m uv pip install -U bitsandbytes optimum_quanto
|
||||
python -m uv pip install pytest-reportlog
|
||||
- name: Environment
|
||||
run: |
|
||||
python utils/print_env.py
|
||||
- name: Pipeline-level quantization tests on GPU
|
||||
env:
|
||||
HF_TOKEN: ${{ secrets.DIFFUSERS_HF_HUB_READ_TOKEN }}
|
||||
# https://pytorch.org/docs/stable/notes/randomness.html#avoiding-nondeterministic-algorithms
|
||||
CUBLAS_WORKSPACE_CONFIG: :16:8
|
||||
BIG_GPU_MEMORY: 40
|
||||
run: |
|
||||
python -m pytest -n 1 --max-worker-restart=0 --dist=loadfile \
|
||||
--make-reports=tests_pipeline_level_quant_torch_cuda \
|
||||
--report-log=tests_pipeline_level_quant_torch_cuda.log \
|
||||
tests/quantization/test_pipeline_level_quantization.py
|
||||
- name: Failure short reports
|
||||
if: ${{ failure() }}
|
||||
run: |
|
||||
cat reports/tests_pipeline_level_quant_torch_cuda_stats.txt
|
||||
cat reports/tests_pipeline_level_quant_torch_cuda_failures_short.txt
|
||||
- name: Test suite reports artifacts
|
||||
if: ${{ always() }}
|
||||
uses: actions/upload-artifact@v4
|
||||
with:
|
||||
name: torch_cuda_pipeline_level_quant_reports
|
||||
path: reports
|
||||
|
||||
|
||||
run_flax_tpu_tests:
|
||||
name: Nightly Flax TPU Tests
|
||||
runs-on:
|
||||
@@ -536,64 +344,128 @@ jobs:
|
||||
name: flax_tpu_test_reports
|
||||
path: reports
|
||||
|
||||
generate_consolidated_report:
|
||||
name: Generate Consolidated Test Report
|
||||
needs: [
|
||||
run_nightly_tests_for_torch_pipelines,
|
||||
run_nightly_tests_for_other_torch_modules,
|
||||
run_torch_compile_tests,
|
||||
run_big_gpu_torch_tests,
|
||||
run_nightly_quantization_tests,
|
||||
run_nightly_pipeline_level_quantization_tests,
|
||||
run_nightly_onnx_tests,
|
||||
torch_minimum_version_cuda_tests,
|
||||
run_flax_tpu_tests
|
||||
]
|
||||
if: always()
|
||||
- name: Generate Report and Notify Channel
|
||||
if: always()
|
||||
run: |
|
||||
pip install slack_sdk tabulate
|
||||
python utils/log_reports.py >> $GITHUB_STEP_SUMMARY
|
||||
|
||||
run_nightly_onnx_tests:
|
||||
name: Nightly ONNXRuntime CUDA tests on Ubuntu
|
||||
runs-on:
|
||||
group: aws-general-8-plus
|
||||
group: aws-g4dn-2xlarge
|
||||
container:
|
||||
image: diffusers/diffusers-pytorch-cpu
|
||||
image: diffusers/diffusers-onnxruntime-cuda
|
||||
options: --gpus 0 --shm-size "16gb" --ipc host
|
||||
|
||||
steps:
|
||||
- name: Checkout diffusers
|
||||
uses: actions/checkout@v3
|
||||
with:
|
||||
fetch-depth: 2
|
||||
|
||||
- name: NVIDIA-SMI
|
||||
run: nvidia-smi
|
||||
|
||||
- name: Install dependencies
|
||||
run: |
|
||||
python -m venv /opt/venv && export PATH="/opt/venv/bin:$PATH"
|
||||
python -m uv pip install -e [quality,test]
|
||||
pip uninstall accelerate -y && python -m uv pip install -U accelerate@git+https://github.com/huggingface/accelerate.git
|
||||
python -m uv pip install pytest-reportlog
|
||||
- name: Environment
|
||||
run: python utils/print_env.py
|
||||
|
||||
- name: Run Nightly ONNXRuntime CUDA tests
|
||||
env:
|
||||
HF_TOKEN: ${{ secrets.DIFFUSERS_HF_HUB_READ_TOKEN }}
|
||||
run: |
|
||||
python -m pytest -n 1 --max-worker-restart=0 --dist=loadfile \
|
||||
-s -v -k "Onnx" \
|
||||
--make-reports=tests_onnx_cuda \
|
||||
--report-log=tests_onnx_cuda.log \
|
||||
tests/
|
||||
|
||||
- name: Failure short reports
|
||||
if: ${{ failure() }}
|
||||
run: |
|
||||
cat reports/tests_onnx_cuda_stats.txt
|
||||
cat reports/tests_onnx_cuda_failures_short.txt
|
||||
|
||||
- name: Test suite reports artifacts
|
||||
if: ${{ always() }}
|
||||
uses: actions/upload-artifact@v4
|
||||
with:
|
||||
name: tests_onnx_cuda_reports
|
||||
path: reports
|
||||
|
||||
- name: Generate Report and Notify Channel
|
||||
if: always()
|
||||
run: |
|
||||
pip install slack_sdk tabulate
|
||||
python utils/log_reports.py >> $GITHUB_STEP_SUMMARY
|
||||
|
||||
run_nightly_quantization_tests:
|
||||
name: Torch quantization nightly tests
|
||||
strategy:
|
||||
fail-fast: false
|
||||
max-parallel: 2
|
||||
matrix:
|
||||
config:
|
||||
- backend: "bitsandbytes"
|
||||
test_location: "bnb"
|
||||
- backend: "gguf"
|
||||
test_location: "gguf"
|
||||
- backend: "torchao"
|
||||
test_location: "torchao"
|
||||
runs-on:
|
||||
group: aws-g6e-xlarge-plus
|
||||
container:
|
||||
image: diffusers/diffusers-pytorch-cuda
|
||||
options: --shm-size "20gb" --ipc host --gpus 0
|
||||
steps:
|
||||
- name: Checkout diffusers
|
||||
uses: actions/checkout@v3
|
||||
with:
|
||||
fetch-depth: 2
|
||||
|
||||
- name: Create reports directory
|
||||
run: mkdir -p combined_reports
|
||||
|
||||
- name: Download all test reports
|
||||
uses: actions/download-artifact@v4
|
||||
with:
|
||||
path: artifacts
|
||||
|
||||
- name: Prepare reports
|
||||
run: |
|
||||
# Move all report files to a single directory for processing
|
||||
find artifacts -name "*.txt" -exec cp {} combined_reports/ \;
|
||||
|
||||
- name: NVIDIA-SMI
|
||||
run: nvidia-smi
|
||||
- name: Install dependencies
|
||||
run: |
|
||||
pip install -e .[test]
|
||||
pip install slack_sdk tabulate
|
||||
|
||||
- name: Generate consolidated report
|
||||
python -m venv /opt/venv && export PATH="/opt/venv/bin:$PATH"
|
||||
python -m uv pip install -e [quality,test]
|
||||
python -m uv pip install -U ${{ matrix.config.backend }}
|
||||
python -m uv pip install pytest-reportlog
|
||||
- name: Environment
|
||||
run: |
|
||||
python utils/consolidated_test_report.py \
|
||||
--reports_dir combined_reports \
|
||||
--output_file $CONSOLIDATED_REPORT_PATH \
|
||||
--slack_channel_name diffusers-ci-nightly
|
||||
|
||||
- name: Show consolidated report
|
||||
python utils/print_env.py
|
||||
- name: ${{ matrix.config.backend }} quantization tests on GPU
|
||||
env:
|
||||
HF_TOKEN: ${{ secrets.DIFFUSERS_HF_HUB_READ_TOKEN }}
|
||||
# https://pytorch.org/docs/stable/notes/randomness.html#avoiding-nondeterministic-algorithms
|
||||
CUBLAS_WORKSPACE_CONFIG: :16:8
|
||||
BIG_GPU_MEMORY: 40
|
||||
run: |
|
||||
cat $CONSOLIDATED_REPORT_PATH >> $GITHUB_STEP_SUMMARY
|
||||
|
||||
- name: Upload consolidated report
|
||||
python -m pytest -n 1 --max-worker-restart=0 --dist=loadfile \
|
||||
--make-reports=tests_${{ matrix.config.backend }}_torch_cuda \
|
||||
--report-log=tests_${{ matrix.config.backend }}_torch_cuda.log \
|
||||
tests/quantization/${{ matrix.config.test_location }}
|
||||
- name: Failure short reports
|
||||
if: ${{ failure() }}
|
||||
run: |
|
||||
cat reports/tests_${{ matrix.config.backend }}_torch_cuda_stats.txt
|
||||
cat reports/tests_${{ matrix.config.backend }}_torch_cuda_failures_short.txt
|
||||
- name: Test suite reports artifacts
|
||||
if: ${{ always() }}
|
||||
uses: actions/upload-artifact@v4
|
||||
with:
|
||||
name: consolidated_test_report
|
||||
path: ${{ env.CONSOLIDATED_REPORT_PATH }}
|
||||
name: torch_cuda_${{ matrix.config.backend }}_reports
|
||||
path: reports
|
||||
- name: Generate Report and Notify Channel
|
||||
if: always()
|
||||
run: |
|
||||
pip install slack_sdk tabulate
|
||||
python utils/log_reports.py >> $GITHUB_STEP_SUMMARY
|
||||
|
||||
# M1 runner currently not well supported
|
||||
# TODO: (Dhruv) add these back when we setup better testing for Apple Silicon
|
||||
|
||||
34
.github/workflows/pr_style_bot.yml
vendored
34
.github/workflows/pr_style_bot.yml
vendored
@@ -13,5 +13,39 @@ jobs:
|
||||
uses: huggingface/huggingface_hub/.github/workflows/style-bot-action.yml@main
|
||||
with:
|
||||
python_quality_dependencies: "[quality]"
|
||||
pre_commit_script_name: "Download and Compare files from the main branch"
|
||||
pre_commit_script: |
|
||||
echo "Downloading the files from the main branch"
|
||||
|
||||
curl -o main_Makefile https://raw.githubusercontent.com/huggingface/diffusers/main/Makefile
|
||||
curl -o main_setup.py https://raw.githubusercontent.com/huggingface/diffusers/refs/heads/main/setup.py
|
||||
curl -o main_check_doc_toc.py https://raw.githubusercontent.com/huggingface/diffusers/refs/heads/main/utils/check_doc_toc.py
|
||||
|
||||
echo "Compare the files and raise error if needed"
|
||||
|
||||
diff_failed=0
|
||||
if ! diff -q main_Makefile Makefile; then
|
||||
echo "Error: The Makefile has changed. Please ensure it matches the main branch."
|
||||
diff_failed=1
|
||||
fi
|
||||
|
||||
if ! diff -q main_setup.py setup.py; then
|
||||
echo "Error: The setup.py has changed. Please ensure it matches the main branch."
|
||||
diff_failed=1
|
||||
fi
|
||||
|
||||
if ! diff -q main_check_doc_toc.py utils/check_doc_toc.py; then
|
||||
echo "Error: The utils/check_doc_toc.py has changed. Please ensure it matches the main branch."
|
||||
diff_failed=1
|
||||
fi
|
||||
|
||||
if [ $diff_failed -eq 1 ]; then
|
||||
echo "❌ Error happened as we detected changes in the files that should not be changed ❌"
|
||||
exit 1
|
||||
fi
|
||||
|
||||
echo "No changes in the files. Proceeding..."
|
||||
rm -rf main_Makefile main_setup.py main_check_doc_toc.py
|
||||
style_command: "make style && make quality"
|
||||
secrets:
|
||||
bot_token: ${{ secrets.GITHUB_TOKEN }}
|
||||
6
.github/workflows/pr_tests.yml
vendored
6
.github/workflows/pr_tests.yml
vendored
@@ -3,6 +3,7 @@ name: Fast tests for PRs
|
||||
on:
|
||||
pull_request:
|
||||
branches: [main]
|
||||
types: [synchronize]
|
||||
paths:
|
||||
- "src/diffusers/**.py"
|
||||
- "benchmarks/**.py"
|
||||
@@ -11,7 +12,6 @@ on:
|
||||
- "tests/**.py"
|
||||
- ".github/**.yml"
|
||||
- "utils/**.py"
|
||||
- "setup.py"
|
||||
push:
|
||||
branches:
|
||||
- ci-*
|
||||
@@ -291,8 +291,8 @@ jobs:
|
||||
- name: Failure short reports
|
||||
if: ${{ failure() }}
|
||||
run: |
|
||||
cat reports/tests_peft_main_failures_short.txt
|
||||
cat reports/tests_models_lora_peft_main_failures_short.txt
|
||||
cat reports/tests_lora_failures_short.txt
|
||||
cat reports/tests_models_lora_failures_short.txt
|
||||
|
||||
- name: Test suite reports artifacts
|
||||
if: ${{ always() }}
|
||||
|
||||
48
.github/workflows/pr_tests_gpu.yml
vendored
48
.github/workflows/pr_tests_gpu.yml
vendored
@@ -28,51 +28,7 @@ env:
|
||||
PIPELINE_USAGE_CUTOFF: 1000000000 # set high cutoff so that only always-test pipelines run
|
||||
|
||||
jobs:
|
||||
check_code_quality:
|
||||
runs-on: ubuntu-22.04
|
||||
steps:
|
||||
- uses: actions/checkout@v3
|
||||
- name: Set up Python
|
||||
uses: actions/setup-python@v4
|
||||
with:
|
||||
python-version: "3.8"
|
||||
- name: Install dependencies
|
||||
run: |
|
||||
python -m pip install --upgrade pip
|
||||
pip install .[quality]
|
||||
- name: Check quality
|
||||
run: make quality
|
||||
- name: Check if failure
|
||||
if: ${{ failure() }}
|
||||
run: |
|
||||
echo "Quality check failed. Please ensure the right dependency versions are installed with 'pip install -e .[quality]' and run 'make style && make quality'" >> $GITHUB_STEP_SUMMARY
|
||||
|
||||
check_repository_consistency:
|
||||
needs: check_code_quality
|
||||
runs-on: ubuntu-22.04
|
||||
steps:
|
||||
- uses: actions/checkout@v3
|
||||
- name: Set up Python
|
||||
uses: actions/setup-python@v4
|
||||
with:
|
||||
python-version: "3.8"
|
||||
- name: Install dependencies
|
||||
run: |
|
||||
python -m pip install --upgrade pip
|
||||
pip install .[quality]
|
||||
- name: Check repo consistency
|
||||
run: |
|
||||
python utils/check_copies.py
|
||||
python utils/check_dummies.py
|
||||
python utils/check_support_list.py
|
||||
make deps_table_check_updated
|
||||
- name: Check if failure
|
||||
if: ${{ failure() }}
|
||||
run: |
|
||||
echo "Repo consistency check failed. Please ensure the right dependency versions are installed with 'pip install -e .[quality]' and run 'make fix-copies'" >> $GITHUB_STEP_SUMMARY
|
||||
|
||||
setup_torch_cuda_pipeline_matrix:
|
||||
needs: [check_code_quality, check_repository_consistency]
|
||||
name: Setup Torch Pipelines CUDA Slow Tests Matrix
|
||||
runs-on:
|
||||
group: aws-general-8-plus
|
||||
@@ -177,7 +133,6 @@ jobs:
|
||||
|
||||
torch_cuda_tests:
|
||||
name: Torch CUDA Tests
|
||||
needs: [check_code_quality, check_repository_consistency]
|
||||
runs-on:
|
||||
group: aws-g4dn-2xlarge
|
||||
container:
|
||||
@@ -246,7 +201,7 @@ jobs:
|
||||
|
||||
run_examples_tests:
|
||||
name: Examples PyTorch CUDA tests on Ubuntu
|
||||
needs: [check_code_quality, check_repository_consistency]
|
||||
pip uninstall transformers -y && python -m uv pip install -U transformers@git+https://github.com/huggingface/transformers.git --no-deps
|
||||
runs-on:
|
||||
group: aws-g4dn-2xlarge
|
||||
|
||||
@@ -265,7 +220,6 @@ jobs:
|
||||
- name: Install dependencies
|
||||
run: |
|
||||
python -m venv /opt/venv && export PATH="/opt/venv/bin:$PATH"
|
||||
pip uninstall transformers -y && python -m uv pip install -U transformers@git+https://github.com/huggingface/transformers.git --no-deps
|
||||
python -m uv pip install -e [quality,test,training]
|
||||
|
||||
- name: Environment
|
||||
|
||||
2
.github/workflows/push_tests.yml
vendored
2
.github/workflows/push_tests.yml
vendored
@@ -262,7 +262,7 @@ jobs:
|
||||
group: aws-g4dn-2xlarge
|
||||
|
||||
container:
|
||||
image: diffusers/diffusers-pytorch-cuda
|
||||
image: diffusers/diffusers-pytorch-compile-cuda
|
||||
options: --gpus 0 --shm-size "16gb" --ipc host
|
||||
|
||||
steps:
|
||||
|
||||
4
.github/workflows/release_tests_fast.yml
vendored
4
.github/workflows/release_tests_fast.yml
vendored
@@ -316,7 +316,7 @@ jobs:
|
||||
group: aws-g4dn-2xlarge
|
||||
|
||||
container:
|
||||
image: diffusers/diffusers-pytorch-cuda
|
||||
image: diffusers/diffusers-pytorch-compile-cuda
|
||||
options: --gpus 0 --shm-size "16gb" --ipc host
|
||||
|
||||
steps:
|
||||
@@ -335,7 +335,7 @@ jobs:
|
||||
- name: Environment
|
||||
run: |
|
||||
python utils/print_env.py
|
||||
- name: Run torch compile tests on GPU
|
||||
- name: Run example tests on GPU
|
||||
env:
|
||||
HF_TOKEN: ${{ secrets.DIFFUSERS_HF_HUB_READ_TOKEN }}
|
||||
RUN_COMPILE: yes
|
||||
|
||||
@@ -28,9 +28,9 @@ ENV PATH="/opt/venv/bin:$PATH"
|
||||
# pre-install the heavy dependencies (these can later be overridden by the deps from setup.py)
|
||||
RUN python3 -m pip install --no-cache-dir --upgrade pip uv==0.1.11 && \
|
||||
python3 -m uv pip install --no-cache-dir \
|
||||
torch \
|
||||
torchvision \
|
||||
torchaudio\
|
||||
torch==2.1.2 \
|
||||
torchvision==0.16.2 \
|
||||
torchaudio==2.1.2 \
|
||||
onnxruntime \
|
||||
--extra-index-url https://download.pytorch.org/whl/cpu && \
|
||||
python3 -m uv pip install --no-cache-dir \
|
||||
|
||||
50
docker/diffusers-pytorch-compile-cuda/Dockerfile
Normal file
50
docker/diffusers-pytorch-compile-cuda/Dockerfile
Normal file
@@ -0,0 +1,50 @@
|
||||
FROM nvidia/cuda:12.1.0-runtime-ubuntu20.04
|
||||
LABEL maintainer="Hugging Face"
|
||||
LABEL repository="diffusers"
|
||||
|
||||
ENV DEBIAN_FRONTEND=noninteractive
|
||||
|
||||
RUN apt-get -y update \
|
||||
&& apt-get install -y software-properties-common \
|
||||
&& add-apt-repository ppa:deadsnakes/ppa
|
||||
|
||||
RUN apt install -y bash \
|
||||
build-essential \
|
||||
git \
|
||||
git-lfs \
|
||||
curl \
|
||||
ca-certificates \
|
||||
libsndfile1-dev \
|
||||
libgl1 \
|
||||
python3.10 \
|
||||
python3.10-dev \
|
||||
python3-pip \
|
||||
python3.10-venv && \
|
||||
rm -rf /var/lib/apt/lists
|
||||
|
||||
# make sure to use venv
|
||||
RUN python3.10 -m venv /opt/venv
|
||||
ENV PATH="/opt/venv/bin:$PATH"
|
||||
|
||||
# pre-install the heavy dependencies (these can later be overridden by the deps from setup.py)
|
||||
RUN python3.10 -m pip install --no-cache-dir --upgrade pip uv==0.1.11 && \
|
||||
python3.10 -m uv pip install --no-cache-dir \
|
||||
torch \
|
||||
torchvision \
|
||||
torchaudio \
|
||||
invisible_watermark && \
|
||||
python3.10 -m pip install --no-cache-dir \
|
||||
accelerate \
|
||||
datasets \
|
||||
hf-doc-builder \
|
||||
huggingface-hub \
|
||||
hf_transfer \
|
||||
Jinja2 \
|
||||
librosa \
|
||||
numpy==1.26.4 \
|
||||
scipy \
|
||||
tensorboard \
|
||||
transformers \
|
||||
hf_transfer
|
||||
|
||||
CMD ["/bin/bash"]
|
||||
@@ -17,6 +17,12 @@
|
||||
title: AutoPipeline
|
||||
- local: tutorials/basic_training
|
||||
title: Train a diffusion model
|
||||
- local: tutorials/using_peft_for_inference
|
||||
title: Load LoRAs for inference
|
||||
- local: tutorials/fast_diffusion
|
||||
title: Accelerate inference of text-to-image diffusion models
|
||||
- local: tutorials/inference_with_big_models
|
||||
title: Working with big models
|
||||
title: Tutorials
|
||||
- sections:
|
||||
- local: using-diffusers/loading
|
||||
@@ -27,24 +33,11 @@
|
||||
title: Load schedulers and models
|
||||
- local: using-diffusers/other-formats
|
||||
title: Model files and layouts
|
||||
- local: using-diffusers/loading_adapters
|
||||
title: Load adapters
|
||||
- local: using-diffusers/push_to_hub
|
||||
title: Push files to the Hub
|
||||
title: Load pipelines and adapters
|
||||
- sections:
|
||||
- local: tutorials/using_peft_for_inference
|
||||
title: LoRA
|
||||
- local: using-diffusers/ip_adapter
|
||||
title: IP-Adapter
|
||||
- local: using-diffusers/controlnet
|
||||
title: ControlNet
|
||||
- local: using-diffusers/t2i_adapter
|
||||
title: T2I-Adapter
|
||||
- local: using-diffusers/dreambooth
|
||||
title: DreamBooth
|
||||
- local: using-diffusers/textual_inversion_inference
|
||||
title: Textual inversion
|
||||
title: Adapters
|
||||
isExpanded: false
|
||||
- sections:
|
||||
- local: using-diffusers/unconditional_image_generation
|
||||
title: Unconditional image generation
|
||||
@@ -66,6 +59,8 @@
|
||||
title: Create a server
|
||||
- local: training/distributed_inference
|
||||
title: Distributed inference
|
||||
- local: using-diffusers/merge_loras
|
||||
title: Merge LoRAs
|
||||
- local: using-diffusers/scheduler_features
|
||||
title: Scheduler features
|
||||
- local: using-diffusers/callback
|
||||
@@ -86,12 +81,12 @@
|
||||
title: Overview
|
||||
- local: hybrid_inference/vae_decode
|
||||
title: VAE Decode
|
||||
- local: hybrid_inference/vae_encode
|
||||
title: VAE Encode
|
||||
- local: hybrid_inference/api_reference
|
||||
title: API Reference
|
||||
title: Hybrid Inference
|
||||
- sections:
|
||||
- local: using-diffusers/cogvideox
|
||||
title: CogVideoX
|
||||
- local: using-diffusers/consisid
|
||||
title: ConsisID
|
||||
- local: using-diffusers/sdxl
|
||||
@@ -100,12 +95,20 @@
|
||||
title: SDXL Turbo
|
||||
- local: using-diffusers/kandinsky
|
||||
title: Kandinsky
|
||||
- local: using-diffusers/ip_adapter
|
||||
title: IP-Adapter
|
||||
- local: using-diffusers/omnigen
|
||||
title: OmniGen
|
||||
- local: using-diffusers/pag
|
||||
title: PAG
|
||||
- local: using-diffusers/controlnet
|
||||
title: ControlNet
|
||||
- local: using-diffusers/t2i_adapter
|
||||
title: T2I-Adapter
|
||||
- local: using-diffusers/inference_with_lcm
|
||||
title: Latent Consistency Model
|
||||
- local: using-diffusers/textual_inversion_inference
|
||||
title: Textual inversion
|
||||
- local: using-diffusers/shap-e
|
||||
title: Shap-E
|
||||
- local: using-diffusers/diffedit
|
||||
@@ -170,16 +173,14 @@
|
||||
title: gguf
|
||||
- local: quantization/torchao
|
||||
title: torchao
|
||||
- local: quantization/quanto
|
||||
title: quanto
|
||||
title: Quantization Methods
|
||||
- sections:
|
||||
- local: optimization/fp16
|
||||
title: Accelerate inference
|
||||
- local: optimization/cache
|
||||
title: Caching
|
||||
title: Speed up inference
|
||||
- local: optimization/memory
|
||||
title: Reduce memory usage
|
||||
- local: optimization/torch2.0
|
||||
title: PyTorch 2.0
|
||||
- local: optimization/xformers
|
||||
title: xFormers
|
||||
- local: optimization/tome
|
||||
@@ -206,7 +207,7 @@
|
||||
- local: optimization/mps
|
||||
title: Metal Performance Shaders (MPS)
|
||||
- local: optimization/habana
|
||||
title: Intel Gaudi
|
||||
title: Habana Gaudi
|
||||
- local: optimization/neuron
|
||||
title: AWS Neuron
|
||||
title: Optimized hardware
|
||||
@@ -260,23 +261,19 @@
|
||||
sections:
|
||||
- local: api/models/overview
|
||||
title: Overview
|
||||
- local: api/models/auto_model
|
||||
title: AutoModel
|
||||
- sections:
|
||||
- local: api/models/controlnet
|
||||
title: ControlNetModel
|
||||
- local: api/models/controlnet_union
|
||||
title: ControlNetUnionModel
|
||||
- local: api/models/controlnet_flux
|
||||
title: FluxControlNetModel
|
||||
- local: api/models/controlnet_hunyuandit
|
||||
title: HunyuanDiT2DControlNetModel
|
||||
- local: api/models/controlnet_sana
|
||||
title: SanaControlNetModel
|
||||
- local: api/models/controlnet_sd3
|
||||
title: SD3ControlNetModel
|
||||
- local: api/models/controlnet_sparsectrl
|
||||
title: SparseControlNetModel
|
||||
- local: api/models/controlnet_union
|
||||
title: ControlNetUnionModel
|
||||
title: ControlNets
|
||||
- sections:
|
||||
- local: api/models/allegro_transformer3d
|
||||
@@ -285,34 +282,30 @@
|
||||
title: AuraFlowTransformer2DModel
|
||||
- local: api/models/cogvideox_transformer3d
|
||||
title: CogVideoXTransformer3DModel
|
||||
- local: api/models/consisid_transformer3d
|
||||
title: ConsisIDTransformer3DModel
|
||||
- local: api/models/cogview3plus_transformer2d
|
||||
title: CogView3PlusTransformer2DModel
|
||||
- local: api/models/cogview4_transformer2d
|
||||
title: CogView4Transformer2DModel
|
||||
- local: api/models/consisid_transformer3d
|
||||
title: ConsisIDTransformer3DModel
|
||||
- local: api/models/cosmos_transformer3d
|
||||
title: CosmosTransformer3DModel
|
||||
- local: api/models/dit_transformer2d
|
||||
title: DiTTransformer2DModel
|
||||
- local: api/models/easyanimate_transformer3d
|
||||
title: EasyAnimateTransformer3DModel
|
||||
- local: api/models/flux_transformer
|
||||
title: FluxTransformer2DModel
|
||||
- local: api/models/hidream_image_transformer
|
||||
title: HiDreamImageTransformer2DModel
|
||||
- local: api/models/hunyuan_transformer2d
|
||||
title: HunyuanDiT2DModel
|
||||
- local: api/models/hunyuan_video_transformer_3d
|
||||
title: HunyuanVideoTransformer3DModel
|
||||
- local: api/models/latte_transformer3d
|
||||
title: LatteTransformer3DModel
|
||||
- local: api/models/ltx_video_transformer3d
|
||||
title: LTXVideoTransformer3DModel
|
||||
- local: api/models/lumina2_transformer2d
|
||||
title: Lumina2Transformer2DModel
|
||||
- local: api/models/lumina_nextdit2d
|
||||
title: LuminaNextDiT2DModel
|
||||
- local: api/models/lumina2_transformer2d
|
||||
title: Lumina2Transformer2DModel
|
||||
- local: api/models/ltx_video_transformer3d
|
||||
title: LTXVideoTransformer3DModel
|
||||
- local: api/models/mochi_transformer3d
|
||||
title: MochiTransformer3DModel
|
||||
- local: api/models/omnigen_transformer
|
||||
@@ -321,10 +314,10 @@
|
||||
title: PixArtTransformer2DModel
|
||||
- local: api/models/prior_transformer
|
||||
title: PriorTransformer
|
||||
- local: api/models/sana_transformer2d
|
||||
title: SanaTransformer2DModel
|
||||
- local: api/models/sd3_transformer2d
|
||||
title: SD3Transformer2DModel
|
||||
- local: api/models/sana_transformer2d
|
||||
title: SanaTransformer2DModel
|
||||
- local: api/models/stable_audio_transformer
|
||||
title: StableAudioDiTModel
|
||||
- local: api/models/transformer2d
|
||||
@@ -339,10 +332,10 @@
|
||||
title: StableCascadeUNet
|
||||
- local: api/models/unet
|
||||
title: UNet1DModel
|
||||
- local: api/models/unet2d-cond
|
||||
title: UNet2DConditionModel
|
||||
- local: api/models/unet2d
|
||||
title: UNet2DModel
|
||||
- local: api/models/unet2d-cond
|
||||
title: UNet2DConditionModel
|
||||
- local: api/models/unet3d-cond
|
||||
title: UNet3DConditionModel
|
||||
- local: api/models/unet-motion
|
||||
@@ -351,18 +344,12 @@
|
||||
title: UViT2DModel
|
||||
title: UNets
|
||||
- sections:
|
||||
- local: api/models/asymmetricautoencoderkl
|
||||
title: AsymmetricAutoencoderKL
|
||||
- local: api/models/autoencoder_dc
|
||||
title: AutoencoderDC
|
||||
- local: api/models/autoencoderkl
|
||||
title: AutoencoderKL
|
||||
- local: api/models/autoencoderkl_allegro
|
||||
title: AutoencoderKLAllegro
|
||||
- local: api/models/autoencoderkl_cogvideox
|
||||
title: AutoencoderKLCogVideoX
|
||||
- local: api/models/autoencoderkl_cosmos
|
||||
title: AutoencoderKLCosmos
|
||||
- local: api/models/autoencoder_kl_hunyuan_video
|
||||
title: AutoencoderKLHunyuanVideo
|
||||
- local: api/models/autoencoderkl_ltx_video
|
||||
@@ -373,6 +360,10 @@
|
||||
title: AutoencoderKLMochi
|
||||
- local: api/models/autoencoder_kl_wan
|
||||
title: AutoencoderKLWan
|
||||
- local: api/models/asymmetricautoencoderkl
|
||||
title: AsymmetricAutoencoderKL
|
||||
- local: api/models/autoencoder_dc
|
||||
title: AutoencoderDC
|
||||
- local: api/models/consistency_decoder_vae
|
||||
title: ConsistencyDecoderVAE
|
||||
- local: api/models/autoencoder_oobleck
|
||||
@@ -425,16 +416,12 @@
|
||||
title: ControlNet with Stable Diffusion 3
|
||||
- local: api/pipelines/controlnet_sdxl
|
||||
title: ControlNet with Stable Diffusion XL
|
||||
- local: api/pipelines/controlnet_sana
|
||||
title: ControlNet-Sana
|
||||
- local: api/pipelines/controlnetxs
|
||||
title: ControlNet-XS
|
||||
- local: api/pipelines/controlnetxs_sdxl
|
||||
title: ControlNet-XS with Stable Diffusion XL
|
||||
- local: api/pipelines/controlnet_union
|
||||
title: ControlNetUnion
|
||||
- local: api/pipelines/cosmos
|
||||
title: Cosmos
|
||||
- local: api/pipelines/dance_diffusion
|
||||
title: Dance Diffusion
|
||||
- local: api/pipelines/ddim
|
||||
@@ -453,10 +440,6 @@
|
||||
title: Flux
|
||||
- local: api/pipelines/control_flux_inpaint
|
||||
title: FluxControlInpaint
|
||||
- local: api/pipelines/framepack
|
||||
title: Framepack
|
||||
- local: api/pipelines/hidream
|
||||
title: HiDream-I1
|
||||
- local: api/pipelines/hunyuandit
|
||||
title: Hunyuan-DiT
|
||||
- local: api/pipelines/hunyuan_video
|
||||
@@ -509,8 +492,6 @@
|
||||
title: PixArt-Σ
|
||||
- local: api/pipelines/sana
|
||||
title: Sana
|
||||
- local: api/pipelines/sana_sprint
|
||||
title: Sana Sprint
|
||||
- local: api/pipelines/self_attention_guidance
|
||||
title: Self-Attention Guidance
|
||||
- local: api/pipelines/semantic_stable_diffusion
|
||||
@@ -524,40 +505,40 @@
|
||||
- sections:
|
||||
- local: api/pipelines/stable_diffusion/overview
|
||||
title: Overview
|
||||
- local: api/pipelines/stable_diffusion/depth2img
|
||||
title: Depth-to-image
|
||||
- local: api/pipelines/stable_diffusion/gligen
|
||||
title: GLIGEN (Grounded Language-to-Image Generation)
|
||||
- local: api/pipelines/stable_diffusion/image_variation
|
||||
title: Image variation
|
||||
- local: api/pipelines/stable_diffusion/text2img
|
||||
title: Text-to-image
|
||||
- local: api/pipelines/stable_diffusion/img2img
|
||||
title: Image-to-image
|
||||
- local: api/pipelines/stable_diffusion/svd
|
||||
title: Image-to-video
|
||||
- local: api/pipelines/stable_diffusion/inpaint
|
||||
title: Inpainting
|
||||
- local: api/pipelines/stable_diffusion/k_diffusion
|
||||
title: K-Diffusion
|
||||
- local: api/pipelines/stable_diffusion/latent_upscale
|
||||
title: Latent upscaler
|
||||
- local: api/pipelines/stable_diffusion/ldm3d_diffusion
|
||||
title: LDM3D Text-to-(RGB, Depth), Text-to-(RGB-pano, Depth-pano), LDM3D Upscaler
|
||||
- local: api/pipelines/stable_diffusion/depth2img
|
||||
title: Depth-to-image
|
||||
- local: api/pipelines/stable_diffusion/image_variation
|
||||
title: Image variation
|
||||
- local: api/pipelines/stable_diffusion/stable_diffusion_safe
|
||||
title: Safe Stable Diffusion
|
||||
- local: api/pipelines/stable_diffusion/sdxl_turbo
|
||||
title: SDXL Turbo
|
||||
- local: api/pipelines/stable_diffusion/stable_diffusion_2
|
||||
title: Stable Diffusion 2
|
||||
- local: api/pipelines/stable_diffusion/stable_diffusion_3
|
||||
title: Stable Diffusion 3
|
||||
- local: api/pipelines/stable_diffusion/stable_diffusion_xl
|
||||
title: Stable Diffusion XL
|
||||
- local: api/pipelines/stable_diffusion/sdxl_turbo
|
||||
title: SDXL Turbo
|
||||
- local: api/pipelines/stable_diffusion/latent_upscale
|
||||
title: Latent upscaler
|
||||
- local: api/pipelines/stable_diffusion/upscale
|
||||
title: Super-resolution
|
||||
- local: api/pipelines/stable_diffusion/k_diffusion
|
||||
title: K-Diffusion
|
||||
- local: api/pipelines/stable_diffusion/ldm3d_diffusion
|
||||
title: LDM3D Text-to-(RGB, Depth), Text-to-(RGB-pano, Depth-pano), LDM3D Upscaler
|
||||
- local: api/pipelines/stable_diffusion/adapter
|
||||
title: T2I-Adapter
|
||||
- local: api/pipelines/stable_diffusion/text2img
|
||||
title: Text-to-image
|
||||
- local: api/pipelines/stable_diffusion/gligen
|
||||
title: GLIGEN (Grounded Language-to-Image Generation)
|
||||
title: Stable Diffusion
|
||||
- local: api/pipelines/stable_unclip
|
||||
title: Stable unCLIP
|
||||
@@ -571,8 +552,6 @@
|
||||
title: UniDiffuser
|
||||
- local: api/pipelines/value_guided_sampling
|
||||
title: Value-guided sampling
|
||||
- local: api/pipelines/visualcloze
|
||||
title: VisualCloze
|
||||
- local: api/pipelines/wan
|
||||
title: Wan
|
||||
- local: api/pipelines/wuerstchen
|
||||
|
||||
@@ -11,20 +11,39 @@ specific language governing permissions and limitations under the License. -->
|
||||
|
||||
# Caching methods
|
||||
|
||||
Cache methods speedup diffusion transformers by storing and reusing intermediate outputs of specific layers, such as attention and feedforward layers, instead of recalculating them at each inference step.
|
||||
## Pyramid Attention Broadcast
|
||||
|
||||
## CacheMixin
|
||||
[Pyramid Attention Broadcast](https://huggingface.co/papers/2408.12588) from Xuanlei Zhao, Xiaolong Jin, Kai Wang, Yang You.
|
||||
|
||||
Pyramid Attention Broadcast (PAB) is a method that speeds up inference in diffusion models by systematically skipping attention computations between successive inference steps and reusing cached attention states. The attention states are not very different between successive inference steps. The most prominent difference is in the spatial attention blocks, not as much in the temporal attention blocks, and finally the least in the cross attention blocks. Therefore, many cross attention computation blocks can be skipped, followed by the temporal and spatial attention blocks. By combining other techniques like sequence parallelism and classifier-free guidance parallelism, PAB achieves near real-time video generation.
|
||||
|
||||
Enable PAB with [`~PyramidAttentionBroadcastConfig`] on any pipeline. For some benchmarks, refer to [this](https://github.com/huggingface/diffusers/pull/9562) pull request.
|
||||
|
||||
```python
|
||||
import torch
|
||||
from diffusers import CogVideoXPipeline, PyramidAttentionBroadcastConfig
|
||||
|
||||
pipe = CogVideoXPipeline.from_pretrained("THUDM/CogVideoX-5b", torch_dtype=torch.bfloat16)
|
||||
pipe.to("cuda")
|
||||
|
||||
# Increasing the value of `spatial_attention_timestep_skip_range[0]` or decreasing the value of
|
||||
# `spatial_attention_timestep_skip_range[1]` will decrease the interval in which pyramid attention
|
||||
# broadcast is active, leader to slower inference speeds. However, large intervals can lead to
|
||||
# poorer quality of generated videos.
|
||||
config = PyramidAttentionBroadcastConfig(
|
||||
spatial_attention_block_skip_range=2,
|
||||
spatial_attention_timestep_skip_range=(100, 800),
|
||||
current_timestep_callback=lambda: pipe.current_timestep,
|
||||
)
|
||||
pipe.transformer.enable_cache(config)
|
||||
```
|
||||
|
||||
### CacheMixin
|
||||
|
||||
[[autodoc]] CacheMixin
|
||||
|
||||
## PyramidAttentionBroadcastConfig
|
||||
### PyramidAttentionBroadcastConfig
|
||||
|
||||
[[autodoc]] PyramidAttentionBroadcastConfig
|
||||
|
||||
[[autodoc]] apply_pyramid_attention_broadcast
|
||||
|
||||
## FasterCacheConfig
|
||||
|
||||
[[autodoc]] FasterCacheConfig
|
||||
|
||||
[[autodoc]] apply_faster_cache
|
||||
|
||||
@@ -20,15 +20,11 @@ LoRA is a fast and lightweight training method that inserts and trains a signifi
|
||||
- [`FluxLoraLoaderMixin`] provides similar functions for [Flux](https://huggingface.co/docs/diffusers/main/en/api/pipelines/flux).
|
||||
- [`CogVideoXLoraLoaderMixin`] provides similar functions for [CogVideoX](https://huggingface.co/docs/diffusers/main/en/api/pipelines/cogvideox).
|
||||
- [`Mochi1LoraLoaderMixin`] provides similar functions for [Mochi](https://huggingface.co/docs/diffusers/main/en/api/pipelines/mochi).
|
||||
- [`AuraFlowLoraLoaderMixin`] provides similar functions for [AuraFlow](https://huggingface.co/fal/AuraFlow).
|
||||
- [`LTXVideoLoraLoaderMixin`] provides similar functions for [LTX-Video](https://huggingface.co/docs/diffusers/main/en/api/pipelines/ltx_video).
|
||||
- [`SanaLoraLoaderMixin`] provides similar functions for [Sana](https://huggingface.co/docs/diffusers/main/en/api/pipelines/sana).
|
||||
- [`HunyuanVideoLoraLoaderMixin`] provides similar functions for [HunyuanVideo](https://huggingface.co/docs/diffusers/main/en/api/pipelines/hunyuan_video).
|
||||
- [`Lumina2LoraLoaderMixin`] provides similar functions for [Lumina2](https://huggingface.co/docs/diffusers/main/en/api/pipelines/lumina2).
|
||||
- [`WanLoraLoaderMixin`] provides similar functions for [Wan](https://huggingface.co/docs/diffusers/main/en/api/pipelines/wan).
|
||||
- [`CogView4LoraLoaderMixin`] provides similar functions for [CogView4](https://huggingface.co/docs/diffusers/main/en/api/pipelines/cogview4).
|
||||
- [`AmusedLoraLoaderMixin`] is for the [`AmusedPipeline`].
|
||||
- [`HiDreamImageLoraLoaderMixin`] provides similar functions for [HiDream Image](https://huggingface.co/docs/diffusers/main/en/api/pipelines/hidream)
|
||||
- [`LoraBaseMixin`] provides a base class with several utility methods to fuse, unfuse, unload, LoRAs and more.
|
||||
|
||||
<Tip>
|
||||
@@ -60,9 +56,6 @@ To learn more about how to load LoRA weights, see the [LoRA](../../using-diffuse
|
||||
## Mochi1LoraLoaderMixin
|
||||
|
||||
[[autodoc]] loaders.lora_pipeline.Mochi1LoraLoaderMixin
|
||||
## AuraFlowLoraLoaderMixin
|
||||
|
||||
[[autodoc]] loaders.lora_pipeline.AuraFlowLoraLoaderMixin
|
||||
|
||||
## LTXVideoLoraLoaderMixin
|
||||
|
||||
@@ -80,26 +73,10 @@ To learn more about how to load LoRA weights, see the [LoRA](../../using-diffuse
|
||||
|
||||
[[autodoc]] loaders.lora_pipeline.Lumina2LoraLoaderMixin
|
||||
|
||||
## CogView4LoraLoaderMixin
|
||||
|
||||
[[autodoc]] loaders.lora_pipeline.CogView4LoraLoaderMixin
|
||||
|
||||
## WanLoraLoaderMixin
|
||||
|
||||
[[autodoc]] loaders.lora_pipeline.WanLoraLoaderMixin
|
||||
|
||||
## AmusedLoraLoaderMixin
|
||||
|
||||
[[autodoc]] loaders.lora_pipeline.AmusedLoraLoaderMixin
|
||||
|
||||
## HiDreamImageLoraLoaderMixin
|
||||
|
||||
[[autodoc]] loaders.lora_pipeline.HiDreamImageLoraLoaderMixin
|
||||
|
||||
## LoraBaseMixin
|
||||
|
||||
[[autodoc]] loaders.lora_base.LoraBaseMixin
|
||||
|
||||
## WanLoraLoaderMixin
|
||||
|
||||
[[autodoc]] loaders.lora_pipeline.WanLoraLoaderMixin
|
||||
[[autodoc]] loaders.lora_base.LoraBaseMixin
|
||||
@@ -12,7 +12,7 @@ specific language governing permissions and limitations under the License.
|
||||
|
||||
# AsymmetricAutoencoderKL
|
||||
|
||||
Improved larger variational autoencoder (VAE) model with KL loss for inpainting task: [Designing a Better Asymmetric VQGAN for StableDiffusion](https://huggingface.co/papers/2306.04632) by Zixin Zhu, Xuelu Feng, Dongdong Chen, Jianmin Bao, Le Wang, Yinpeng Chen, Lu Yuan, Gang Hua.
|
||||
Improved larger variational autoencoder (VAE) model with KL loss for inpainting task: [Designing a Better Asymmetric VQGAN for StableDiffusion](https://arxiv.org/abs/2306.04632) by Zixin Zhu, Xuelu Feng, Dongdong Chen, Jianmin Bao, Le Wang, Yinpeng Chen, Lu Yuan, Gang Hua.
|
||||
|
||||
The abstract from the paper is:
|
||||
|
||||
|
||||
@@ -1,29 +0,0 @@
|
||||
<!--Copyright 2024 The HuggingFace Team. All rights reserved.
|
||||
|
||||
Licensed under the Apache License, Version 2.0 (the "License"); you may not use this file except in compliance with
|
||||
the License. You may obtain a copy of the License at
|
||||
|
||||
http://www.apache.org/licenses/LICENSE-2.0
|
||||
|
||||
Unless required by applicable law or agreed to in writing, software distributed under the License is distributed on
|
||||
an "AS IS" BASIS, WITHOUT WARRANTIES OR CONDITIONS OF ANY KIND, either express or implied. See the License for the
|
||||
specific language governing permissions and limitations under the License.
|
||||
-->
|
||||
|
||||
# AutoModel
|
||||
|
||||
The `AutoModel` is designed to make it easy to load a checkpoint without needing to know the specific model class. `AutoModel` automatically retrieves the correct model class from the checkpoint `config.json` file.
|
||||
|
||||
```python
|
||||
from diffusers import AutoModel, AutoPipelineForText2Image
|
||||
|
||||
unet = AutoModel.from_pretrained("stable-diffusion-v1-5/stable-diffusion-v1-5", subfolder="unet")
|
||||
pipe = AutoPipelineForText2Image.from_pretrained("stable-diffusion-v1-5/stable-diffusion-v1-5", unet=unet)
|
||||
```
|
||||
|
||||
|
||||
## AutoModel
|
||||
|
||||
[[autodoc]] AutoModel
|
||||
- all
|
||||
- from_pretrained
|
||||
@@ -12,7 +12,7 @@ specific language governing permissions and limitations under the License.
|
||||
|
||||
# AutoencoderKL
|
||||
|
||||
The variational autoencoder (VAE) model with KL loss was introduced in [Auto-Encoding Variational Bayes](https://huggingface.co/papers/1312.6114v11) by Diederik P. Kingma and Max Welling. The model is used in 🤗 Diffusers to encode images into latents and to decode latent representations into images.
|
||||
The variational autoencoder (VAE) model with KL loss was introduced in [Auto-Encoding Variational Bayes](https://arxiv.org/abs/1312.6114v11) by Diederik P. Kingma and Max Welling. The model is used in 🤗 Diffusers to encode images into latents and to decode latent representations into images.
|
||||
|
||||
The abstract from the paper is:
|
||||
|
||||
|
||||
@@ -18,7 +18,7 @@ The model can be loaded with the following code snippet.
|
||||
```python
|
||||
from diffusers import AutoencoderKLAllegro
|
||||
|
||||
vae = AutoencoderKLAllegro.from_pretrained("rhymes-ai/Allegro", subfolder="vae", torch_dtype=torch.float32).to("cuda")
|
||||
vae = AutoencoderKLCogVideoX.from_pretrained("rhymes-ai/Allegro", subfolder="vae", torch_dtype=torch.float32).to("cuda")
|
||||
```
|
||||
|
||||
## AutoencoderKLAllegro
|
||||
|
||||
@@ -1,40 +0,0 @@
|
||||
<!-- Copyright 2024 The HuggingFace Team. All rights reserved.
|
||||
|
||||
Licensed under the Apache License, Version 2.0 (the "License"); you may not use this file except in compliance with
|
||||
the License. You may obtain a copy of the License at
|
||||
|
||||
http://www.apache.org/licenses/LICENSE-2.0
|
||||
|
||||
Unless required by applicable law or agreed to in writing, software distributed under the License is distributed on
|
||||
an "AS IS" BASIS, WITHOUT WARRANTIES OR CONDITIONS OF ANY KIND, either express or implied. See the License for the
|
||||
specific language governing permissions and limitations under the License. -->
|
||||
|
||||
# AutoencoderKLCosmos
|
||||
|
||||
[Cosmos Tokenizers](https://github.com/NVIDIA/Cosmos-Tokenizer).
|
||||
|
||||
Supported models:
|
||||
- [nvidia/Cosmos-1.0-Tokenizer-CV8x8x8](https://huggingface.co/nvidia/Cosmos-1.0-Tokenizer-CV8x8x8)
|
||||
|
||||
The model can be loaded with the following code snippet.
|
||||
|
||||
```python
|
||||
from diffusers import AutoencoderKLCosmos
|
||||
|
||||
vae = AutoencoderKLCosmos.from_pretrained("nvidia/Cosmos-1.0-Tokenizer-CV8x8x8", subfolder="vae")
|
||||
```
|
||||
|
||||
## AutoencoderKLCosmos
|
||||
|
||||
[[autodoc]] AutoencoderKLCosmos
|
||||
- decode
|
||||
- encode
|
||||
- all
|
||||
|
||||
## AutoencoderKLOutput
|
||||
|
||||
[[autodoc]] models.autoencoders.autoencoder_kl.AutoencoderKLOutput
|
||||
|
||||
## DecoderOutput
|
||||
|
||||
[[autodoc]] models.autoencoders.vae.DecoderOutput
|
||||
@@ -11,7 +11,7 @@ specific language governing permissions and limitations under the License. -->
|
||||
|
||||
# ConsisIDTransformer3DModel
|
||||
|
||||
A Diffusion Transformer model for 3D data from [ConsisID](https://github.com/PKU-YuanGroup/ConsisID) was introduced in [Identity-Preserving Text-to-Video Generation by Frequency Decomposition](https://huggingface.co/papers/2411.17440) by Peking University & University of Rochester & etc.
|
||||
A Diffusion Transformer model for 3D data from [ConsisID](https://github.com/PKU-YuanGroup/ConsisID) was introduced in [Identity-Preserving Text-to-Video Generation by Frequency Decomposition](https://arxiv.org/pdf/2411.17440) by Peking University & University of Rochester & etc.
|
||||
|
||||
The model can be loaded with the following code snippet.
|
||||
|
||||
|
||||
@@ -12,7 +12,7 @@ specific language governing permissions and limitations under the License.
|
||||
|
||||
# HunyuanDiT2DControlNetModel
|
||||
|
||||
HunyuanDiT2DControlNetModel is an implementation of ControlNet for [Hunyuan-DiT](https://huggingface.co/papers/2405.08748).
|
||||
HunyuanDiT2DControlNetModel is an implementation of ControlNet for [Hunyuan-DiT](https://arxiv.org/abs/2405.08748).
|
||||
|
||||
ControlNet was introduced in [Adding Conditional Control to Text-to-Image Diffusion Models](https://huggingface.co/papers/2302.05543) by Lvmin Zhang, Anyi Rao, and Maneesh Agrawala.
|
||||
|
||||
|
||||
@@ -1,29 +0,0 @@
|
||||
<!--Copyright 2024 The HuggingFace Team. All rights reserved.
|
||||
|
||||
Licensed under the Apache License, Version 2.0 (the "License"); you may not use this file except in compliance with
|
||||
the License. You may obtain a copy of the License at
|
||||
|
||||
http://www.apache.org/licenses/LICENSE-2.0
|
||||
|
||||
Unless required by applicable law or agreed to in writing, software distributed under the License is distributed on
|
||||
an "AS IS" BASIS, WITHOUT WARRANTIES OR CONDITIONS OF ANY KIND, either express or implied. See the License for the
|
||||
specific language governing permissions and limitations under the License.
|
||||
-->
|
||||
|
||||
# SanaControlNetModel
|
||||
|
||||
The ControlNet model was introduced in [Adding Conditional Control to Text-to-Image Diffusion Models](https://huggingface.co/papers/2302.05543) by Lvmin Zhang, Anyi Rao, Maneesh Agrawala. It provides a greater degree of control over text-to-image generation by conditioning the model on additional inputs such as edge maps, depth maps, segmentation maps, and keypoints for pose detection.
|
||||
|
||||
The abstract from the paper is:
|
||||
|
||||
*We present ControlNet, a neural network architecture to add spatial conditioning controls to large, pretrained text-to-image diffusion models. ControlNet locks the production-ready large diffusion models, and reuses their deep and robust encoding layers pretrained with billions of images as a strong backbone to learn a diverse set of conditional controls. The neural architecture is connected with "zero convolutions" (zero-initialized convolution layers) that progressively grow the parameters from zero and ensure that no harmful noise could affect the finetuning. We test various conditioning controls, eg, edges, depth, segmentation, human pose, etc, with Stable Diffusion, using single or multiple conditions, with or without prompts. We show that the training of ControlNets is robust with small (<50k) and large (>1m) datasets. Extensive results show that ControlNet may facilitate wider applications to control image diffusion models.*
|
||||
|
||||
This model was contributed by [ishan24](https://huggingface.co/ishan24). ❤️
|
||||
The original codebase can be found at [NVlabs/Sana](https://github.com/NVlabs/Sana), and you can find official ControlNet checkpoints on [Efficient-Large-Model's](https://huggingface.co/Efficient-Large-Model) Hub profile.
|
||||
|
||||
## SanaControlNetModel
|
||||
[[autodoc]] SanaControlNetModel
|
||||
|
||||
## SanaControlNetOutput
|
||||
[[autodoc]] models.controlnets.controlnet_sana.SanaControlNetOutput
|
||||
|
||||
@@ -11,11 +11,11 @@ specific language governing permissions and limitations under the License. -->
|
||||
|
||||
# SparseControlNetModel
|
||||
|
||||
SparseControlNetModel is an implementation of ControlNet for [AnimateDiff](https://huggingface.co/papers/2307.04725).
|
||||
SparseControlNetModel is an implementation of ControlNet for [AnimateDiff](https://arxiv.org/abs/2307.04725).
|
||||
|
||||
ControlNet was introduced in [Adding Conditional Control to Text-to-Image Diffusion Models](https://huggingface.co/papers/2302.05543) by Lvmin Zhang, Anyi Rao, and Maneesh Agrawala.
|
||||
|
||||
The SparseCtrl version of ControlNet was introduced in [SparseCtrl: Adding Sparse Controls to Text-to-Video Diffusion Models](https://huggingface.co/papers/2311.16933) for achieving controlled generation in text-to-video diffusion models by Yuwei Guo, Ceyuan Yang, Anyi Rao, Maneesh Agrawala, Dahua Lin, and Bo Dai.
|
||||
The SparseCtrl version of ControlNet was introduced in [SparseCtrl: Adding Sparse Controls to Text-to-Video Diffusion Models](https://arxiv.org/abs/2311.16933) for achieving controlled generation in text-to-video diffusion models by Yuwei Guo, Ceyuan Yang, Anyi Rao, Maneesh Agrawala, Dahua Lin, and Bo Dai.
|
||||
|
||||
The abstract from the paper is:
|
||||
|
||||
|
||||
@@ -1,30 +0,0 @@
|
||||
<!-- Copyright 2024 The HuggingFace Team. All rights reserved.
|
||||
|
||||
Licensed under the Apache License, Version 2.0 (the "License"); you may not use this file except in compliance with
|
||||
the License. You may obtain a copy of the License at
|
||||
|
||||
http://www.apache.org/licenses/LICENSE-2.0
|
||||
|
||||
Unless required by applicable law or agreed to in writing, software distributed under the License is distributed on
|
||||
an "AS IS" BASIS, WITHOUT WARRANTIES OR CONDITIONS OF ANY KIND, either express or implied. See the License for the
|
||||
specific language governing permissions and limitations under the License. -->
|
||||
|
||||
# CosmosTransformer3DModel
|
||||
|
||||
A Diffusion Transformer model for 3D video-like data was introduced in [Cosmos World Foundation Model Platform for Physical AI](https://huggingface.co/papers/2501.03575) by NVIDIA.
|
||||
|
||||
The model can be loaded with the following code snippet.
|
||||
|
||||
```python
|
||||
from diffusers import CosmosTransformer3DModel
|
||||
|
||||
transformer = CosmosTransformer3DModel.from_pretrained("nvidia/Cosmos-1.0-Diffusion-7B-Text2World", subfolder="transformer", torch_dtype=torch.bfloat16)
|
||||
```
|
||||
|
||||
## CosmosTransformer3DModel
|
||||
|
||||
[[autodoc]] CosmosTransformer3DModel
|
||||
|
||||
## Transformer2DModelOutput
|
||||
|
||||
[[autodoc]] models.modeling_outputs.Transformer2DModelOutput
|
||||
@@ -1,46 +0,0 @@
|
||||
<!-- Copyright 2024 The HuggingFace Team. All rights reserved.
|
||||
|
||||
Licensed under the Apache License, Version 2.0 (the "License"); you may not use this file except in compliance with
|
||||
the License. You may obtain a copy of the License at
|
||||
|
||||
http://www.apache.org/licenses/LICENSE-2.0
|
||||
|
||||
Unless required by applicable law or agreed to in writing, software distributed under the License is distributed on
|
||||
an "AS IS" BASIS, WITHOUT WARRANTIES OR CONDITIONS OF ANY KIND, either express or implied. See the License for the
|
||||
specific language governing permissions and limitations under the License. -->
|
||||
|
||||
# HiDreamImageTransformer2DModel
|
||||
|
||||
A Transformer model for image-like data from [HiDream-I1](https://huggingface.co/HiDream-ai).
|
||||
|
||||
The model can be loaded with the following code snippet.
|
||||
|
||||
```python
|
||||
from diffusers import HiDreamImageTransformer2DModel
|
||||
|
||||
transformer = HiDreamImageTransformer2DModel.from_pretrained("HiDream-ai/HiDream-I1-Full", subfolder="transformer", torch_dtype=torch.bfloat16)
|
||||
```
|
||||
|
||||
## Loading GGUF quantized checkpoints for HiDream-I1
|
||||
|
||||
GGUF checkpoints for the `HiDreamImageTransformer2DModel` can be loaded using `~FromOriginalModelMixin.from_single_file`
|
||||
|
||||
```python
|
||||
import torch
|
||||
from diffusers import GGUFQuantizationConfig, HiDreamImageTransformer2DModel
|
||||
|
||||
ckpt_path = "https://huggingface.co/city96/HiDream-I1-Dev-gguf/blob/main/hidream-i1-dev-Q2_K.gguf"
|
||||
transformer = HiDreamImageTransformer2DModel.from_single_file(
|
||||
ckpt_path,
|
||||
quantization_config=GGUFQuantizationConfig(compute_dtype=torch.bfloat16),
|
||||
torch_dtype=torch.bfloat16
|
||||
)
|
||||
```
|
||||
|
||||
## HiDreamImageTransformer2DModel
|
||||
|
||||
[[autodoc]] HiDreamImageTransformer2DModel
|
||||
|
||||
## Transformer2DModelOutput
|
||||
|
||||
[[autodoc]] models.modeling_outputs.Transformer2DModelOutput
|
||||
@@ -14,7 +14,7 @@ specific language governing permissions and limitations under the License.
|
||||
|
||||
aMUSEd was introduced in [aMUSEd: An Open MUSE Reproduction](https://huggingface.co/papers/2401.01808) by Suraj Patil, William Berman, Robin Rombach, and Patrick von Platen.
|
||||
|
||||
Amused is a lightweight text to image model based off of the [MUSE](https://huggingface.co/papers/2301.00704) architecture. Amused is particularly useful in applications that require a lightweight and fast model such as generating many images quickly at once.
|
||||
Amused is a lightweight text to image model based off of the [MUSE](https://arxiv.org/abs/2301.00704) architecture. Amused is particularly useful in applications that require a lightweight and fast model such as generating many images quickly at once.
|
||||
|
||||
Amused is a vqvae token based transformer that can generate an image in fewer forward passes than many diffusion models. In contrast with muse, it uses the smaller text encoder CLIP-L/14 instead of t5-xxl. Due to its small parameter count and few forward pass generation process, amused can generate many images quickly. This benefit is seen particularly at larger batch sizes.
|
||||
|
||||
|
||||
@@ -18,7 +18,7 @@ specific language governing permissions and limitations under the License.
|
||||
|
||||
## Overview
|
||||
|
||||
[AnimateDiff: Animate Your Personalized Text-to-Image Diffusion Models without Specific Tuning](https://huggingface.co/papers/2307.04725) by Yuwei Guo, Ceyuan Yang, Anyi Rao, Yaohui Wang, Yu Qiao, Dahua Lin, Bo Dai.
|
||||
[AnimateDiff: Animate Your Personalized Text-to-Image Diffusion Models without Specific Tuning](https://arxiv.org/abs/2307.04725) by Yuwei Guo, Ceyuan Yang, Anyi Rao, Yaohui Wang, Yu Qiao, Dahua Lin, Bo Dai.
|
||||
|
||||
The abstract of the paper is the following:
|
||||
|
||||
@@ -187,7 +187,7 @@ Here are some sample outputs:
|
||||
|
||||
### AnimateDiffSparseControlNetPipeline
|
||||
|
||||
[SparseCtrl: Adding Sparse Controls to Text-to-Video Diffusion Models](https://huggingface.co/papers/2311.16933) for achieving controlled generation in text-to-video diffusion models by Yuwei Guo, Ceyuan Yang, Anyi Rao, Maneesh Agrawala, Dahua Lin, and Bo Dai.
|
||||
[SparseCtrl: Adding Sparse Controls to Text-to-Video Diffusion Models](https://arxiv.org/abs/2311.16933) for achieving controlled generation in text-to-video diffusion models by Yuwei Guo, Ceyuan Yang, Anyi Rao, Maneesh Agrawala, Dahua Lin, and Bo Dai.
|
||||
|
||||
The abstract from the paper is:
|
||||
|
||||
@@ -751,7 +751,7 @@ export_to_gif(frames, "animation.gif")
|
||||
|
||||
## Using FreeInit
|
||||
|
||||
[FreeInit: Bridging Initialization Gap in Video Diffusion Models](https://huggingface.co/papers/2312.07537) by Tianxing Wu, Chenyang Si, Yuming Jiang, Ziqi Huang, Ziwei Liu.
|
||||
[FreeInit: Bridging Initialization Gap in Video Diffusion Models](https://arxiv.org/abs/2312.07537) by Tianxing Wu, Chenyang Si, Yuming Jiang, Ziqi Huang, Ziwei Liu.
|
||||
|
||||
FreeInit is an effective method that improves temporal consistency and overall quality of videos generated using video-diffusion-models without any addition training. It can be applied to AnimateDiff, ModelScope, VideoCrafter and various other video generation models seamlessly at inference time, and works by iteratively refining the latent-initialization noise. More details can be found it the paper.
|
||||
|
||||
@@ -920,7 +920,7 @@ export_to_gif(frames, "animatelcm-motion-lora.gif")
|
||||
|
||||
## Using FreeNoise
|
||||
|
||||
[FreeNoise: Tuning-Free Longer Video Diffusion via Noise Rescheduling](https://huggingface.co/papers/2310.15169) by Haonan Qiu, Menghan Xia, Yong Zhang, Yingqing He, Xintao Wang, Ying Shan, Ziwei Liu.
|
||||
[FreeNoise: Tuning-Free Longer Video Diffusion via Noise Rescheduling](https://arxiv.org/abs/2310.15169) by Haonan Qiu, Menghan Xia, Yong Zhang, Yingqing He, Xintao Wang, Ying Shan, Ziwei Liu.
|
||||
|
||||
FreeNoise is a sampling mechanism that can generate longer videos with short-video generation models by employing noise-rescheduling, temporal attention over sliding windows, and weighted averaging of latent frames. It also can be used with multiple prompts to allow for interpolated video generations. More details are available in the paper.
|
||||
|
||||
@@ -966,7 +966,7 @@ pipe.to("cuda")
|
||||
prompt = {
|
||||
0: "A caterpillar on a leaf, high quality, photorealistic",
|
||||
40: "A caterpillar transforming into a cocoon, on a leaf, near flowers, photorealistic",
|
||||
80: "A cocoon on a leaf, flowers in the background, photorealistic",
|
||||
80: "A cocoon on a leaf, flowers in the backgrond, photorealistic",
|
||||
120: "A cocoon maturing and a butterfly being born, flowers and leaves visible in the background, photorealistic",
|
||||
160: "A beautiful butterfly, vibrant colors, sitting on a leaf, flowers in the background, photorealistic",
|
||||
200: "A beautiful butterfly, flying away in a forest, photorealistic",
|
||||
|
||||
@@ -12,7 +12,7 @@ specific language governing permissions and limitations under the License.
|
||||
|
||||
# AudioLDM 2
|
||||
|
||||
AudioLDM 2 was proposed in [AudioLDM 2: Learning Holistic Audio Generation with Self-supervised Pretraining](https://huggingface.co/papers/2308.05734) by Haohe Liu et al. AudioLDM 2 takes a text prompt as input and predicts the corresponding audio. It can generate text-conditional sound effects, human speech and music.
|
||||
AudioLDM 2 was proposed in [AudioLDM 2: Learning Holistic Audio Generation with Self-supervised Pretraining](https://arxiv.org/abs/2308.05734) by Haohe Liu et al. AudioLDM 2 takes a text prompt as input and predicts the corresponding audio. It can generate text-conditional sound effects, human speech and music.
|
||||
|
||||
Inspired by [Stable Diffusion](https://huggingface.co/docs/diffusers/api/pipelines/stable_diffusion/overview), AudioLDM 2 is a text-to-audio _latent diffusion model (LDM)_ that learns continuous audio representations from text embeddings. Two text encoder models are used to compute the text embeddings from a prompt input: the text-branch of [CLAP](https://huggingface.co/docs/transformers/main/en/model_doc/clap) and the encoder of [Flan-T5](https://huggingface.co/docs/transformers/main/en/model_doc/flan-t5). These text embeddings are then projected to a shared embedding space by an [AudioLDM2ProjectionModel](https://huggingface.co/docs/diffusers/main/api/pipelines/audioldm2#diffusers.AudioLDM2ProjectionModel). A [GPT2](https://huggingface.co/docs/transformers/main/en/model_doc/gpt2) _language model (LM)_ is used to auto-regressively predict eight new embedding vectors, conditional on the projected CLAP and Flan-T5 embeddings. The generated embedding vectors and Flan-T5 text embeddings are used as cross-attention conditioning in the LDM. The [UNet](https://huggingface.co/docs/diffusers/main/en/api/pipelines/audioldm2#diffusers.AudioLDM2UNet2DConditionModel) of AudioLDM 2 is unique in the sense that it takes **two** cross-attention embeddings, as opposed to one cross-attention conditioning, as in most other LDMs.
|
||||
|
||||
|
||||
@@ -89,23 +89,6 @@ image = pipeline(prompt).images[0]
|
||||
image.save("auraflow.png")
|
||||
```
|
||||
|
||||
## Support for `torch.compile()`
|
||||
|
||||
AuraFlow can be compiled with `torch.compile()` to speed up inference latency even for different resolutions. First, install PyTorch nightly following the instructions from [here](https://pytorch.org/). The snippet below shows the changes needed to enable this:
|
||||
|
||||
```diff
|
||||
+ torch.fx.experimental._config.use_duck_shape = False
|
||||
+ pipeline.transformer = torch.compile(
|
||||
pipeline.transformer, fullgraph=True, dynamic=True
|
||||
)
|
||||
```
|
||||
|
||||
Specifying `use_duck_shape` to be `False` instructs the compiler if it should use the same symbolic variable to represent input sizes that are the same. For more details, check out [this comment](https://github.com/huggingface/diffusers/pull/11327#discussion_r2047659790).
|
||||
|
||||
This enables from 100% (on low resolutions) to a 30% (on 1536x1536 resolution) speed improvements.
|
||||
|
||||
Thanks to [AstraliteHeart](https://github.com/huggingface/diffusers/pull/11297/) who helped us rewrite the [`AuraFlowTransformer2DModel`] class so that the above works for different resolutions ([PR](https://github.com/huggingface/diffusers/pull/11297/)).
|
||||
|
||||
## AuraFlowPipeline
|
||||
|
||||
[[autodoc]] AuraFlowPipeline
|
||||
|
||||
@@ -12,7 +12,7 @@ specific language governing permissions and limitations under the License.
|
||||
|
||||
# BLIP-Diffusion
|
||||
|
||||
BLIP-Diffusion was proposed in [BLIP-Diffusion: Pre-trained Subject Representation for Controllable Text-to-Image Generation and Editing](https://huggingface.co/papers/2305.14720). It enables zero-shot subject-driven generation and control-guided zero-shot generation.
|
||||
BLIP-Diffusion was proposed in [BLIP-Diffusion: Pre-trained Subject Representation for Controllable Text-to-Image Generation and Editing](https://arxiv.org/abs/2305.14720). It enables zero-shot subject-driven generation and control-guided zero-shot generation.
|
||||
|
||||
|
||||
The abstract from the paper is:
|
||||
|
||||
@@ -13,181 +13,150 @@
|
||||
# limitations under the License.
|
||||
-->
|
||||
|
||||
<div style="float: right;">
|
||||
<div class="flex flex-wrap space-x-1">
|
||||
<a href="https://huggingface.co/docs/diffusers/main/en/tutorials/using_peft_for_inference" target="_blank" rel="noopener">
|
||||
<img alt="LoRA" src="https://img.shields.io/badge/LoRA-d8b4fe?style=flat"/>
|
||||
</a>
|
||||
</div>
|
||||
</div>
|
||||
|
||||
# CogVideoX
|
||||
|
||||
[CogVideoX](https://huggingface.co/papers/2408.06072) is a large diffusion transformer model - available in 2B and 5B parameters - designed to generate longer and more consistent videos from text. This model uses a 3D causal variational autoencoder to more efficiently process video data by reducing sequence length (and associated training compute) and preventing flickering in generated videos. An "expert" transformer with adaptive LayerNorm improves alignment between text and video, and 3D full attention helps accurately capture motion and time in generated videos.
|
||||
<div class="flex flex-wrap space-x-1">
|
||||
<img alt="LoRA" src="https://img.shields.io/badge/LoRA-d8b4fe?style=flat"/>
|
||||
</div>
|
||||
|
||||
You can find all the original CogVideoX checkpoints under the [CogVideoX](https://huggingface.co/collections/THUDM/cogvideo-66c08e62f1685a3ade464cce) collection.
|
||||
[CogVideoX: Text-to-Video Diffusion Models with An Expert Transformer](https://arxiv.org/abs/2408.06072) from Tsinghua University & ZhipuAI, by Zhuoyi Yang, Jiayan Teng, Wendi Zheng, Ming Ding, Shiyu Huang, Jiazheng Xu, Yuanming Yang, Wenyi Hong, Xiaohan Zhang, Guanyu Feng, Da Yin, Xiaotao Gu, Yuxuan Zhang, Weihan Wang, Yean Cheng, Ting Liu, Bin Xu, Yuxiao Dong, Jie Tang.
|
||||
|
||||
> [!TIP]
|
||||
> Click on the CogVideoX models in the right sidebar for more examples of other video generation tasks.
|
||||
The abstract from the paper is:
|
||||
|
||||
The example below demonstrates how to generate a video optimized for memory or inference speed.
|
||||
*We introduce CogVideoX, a large-scale diffusion transformer model designed for generating videos based on text prompts. To efficently model video data, we propose to levearge a 3D Variational Autoencoder (VAE) to compresses videos along both spatial and temporal dimensions. To improve the text-video alignment, we propose an expert transformer with the expert adaptive LayerNorm to facilitate the deep fusion between the two modalities. By employing a progressive training technique, CogVideoX is adept at producing coherent, long-duration videos characterized by significant motion. In addition, we develop an effectively text-video data processing pipeline that includes various data preprocessing strategies and a video captioning method. It significantly helps enhance the performance of CogVideoX, improving both generation quality and semantic alignment. Results show that CogVideoX demonstrates state-of-the-art performance across both multiple machine metrics and human evaluations. The model weight of CogVideoX-2B is publicly available at https://github.com/THUDM/CogVideo.*
|
||||
|
||||
<hfoptions id="usage">
|
||||
<hfoption id="memory">
|
||||
<Tip>
|
||||
|
||||
Refer to the [Reduce memory usage](../../optimization/memory) guide for more details about the various memory saving techniques.
|
||||
Make sure to check out the Schedulers [guide](../../using-diffusers/schedulers) to learn how to explore the tradeoff between scheduler speed and quality, and see the [reuse components across pipelines](../../using-diffusers/loading#reuse-a-pipeline) section to learn how to efficiently load the same components into multiple pipelines.
|
||||
|
||||
The quantized CogVideoX 5B model below requires ~16GB of VRAM.
|
||||
</Tip>
|
||||
|
||||
```py
|
||||
This pipeline was contributed by [zRzRzRzRzRzRzR](https://github.com/zRzRzRzRzRzRzR). The original codebase can be found [here](https://huggingface.co/THUDM). The original weights can be found under [hf.co/THUDM](https://huggingface.co/THUDM).
|
||||
|
||||
There are three official CogVideoX checkpoints for text-to-video and video-to-video.
|
||||
|
||||
| checkpoints | recommended inference dtype |
|
||||
|:---:|:---:|
|
||||
| [`THUDM/CogVideoX-2b`](https://huggingface.co/THUDM/CogVideoX-2b) | torch.float16 |
|
||||
| [`THUDM/CogVideoX-5b`](https://huggingface.co/THUDM/CogVideoX-5b) | torch.bfloat16 |
|
||||
| [`THUDM/CogVideoX1.5-5b`](https://huggingface.co/THUDM/CogVideoX1.5-5b) | torch.bfloat16 |
|
||||
|
||||
There are two official CogVideoX checkpoints available for image-to-video.
|
||||
|
||||
| checkpoints | recommended inference dtype |
|
||||
|:---:|:---:|
|
||||
| [`THUDM/CogVideoX-5b-I2V`](https://huggingface.co/THUDM/CogVideoX-5b-I2V) | torch.bfloat16 |
|
||||
| [`THUDM/CogVideoX-1.5-5b-I2V`](https://huggingface.co/THUDM/CogVideoX-1.5-5b-I2V) | torch.bfloat16 |
|
||||
|
||||
For the CogVideoX 1.5 series:
|
||||
- Text-to-video (T2V) works best at a resolution of 1360x768 because it was trained with that specific resolution.
|
||||
- Image-to-video (I2V) works for multiple resolutions. The width can vary from 768 to 1360, but the height must be 768. The height/width must be divisible by 16.
|
||||
- Both T2V and I2V models support generation with 81 and 161 frames and work best at this value. Exporting videos at 16 FPS is recommended.
|
||||
|
||||
There are two official CogVideoX checkpoints that support pose controllable generation (by the [Alibaba-PAI](https://huggingface.co/alibaba-pai) team).
|
||||
|
||||
| checkpoints | recommended inference dtype |
|
||||
|:---:|:---:|
|
||||
| [`alibaba-pai/CogVideoX-Fun-V1.1-2b-Pose`](https://huggingface.co/alibaba-pai/CogVideoX-Fun-V1.1-2b-Pose) | torch.bfloat16 |
|
||||
| [`alibaba-pai/CogVideoX-Fun-V1.1-5b-Pose`](https://huggingface.co/alibaba-pai/CogVideoX-Fun-V1.1-5b-Pose) | torch.bfloat16 |
|
||||
|
||||
## Inference
|
||||
|
||||
Use [`torch.compile`](https://huggingface.co/docs/diffusers/main/en/tutorials/fast_diffusion#torchcompile) to reduce the inference latency.
|
||||
|
||||
First, load the pipeline:
|
||||
|
||||
```python
|
||||
import torch
|
||||
from diffusers import CogVideoXPipeline, AutoModel
|
||||
from diffusers.quantizers import PipelineQuantizationConfig
|
||||
from diffusers.hooks import apply_group_offloading
|
||||
from diffusers.utils import export_to_video
|
||||
|
||||
# quantize weights to int8 with torchao
|
||||
pipeline_quant_config = PipelineQuantizationConfig(
|
||||
quant_backend="torchao",
|
||||
quant_kwargs={"quant_type": "int8wo"},
|
||||
components_to_quantize=["transformer"]
|
||||
)
|
||||
|
||||
# fp8 layerwise weight-casting
|
||||
transformer = AutoModel.from_pretrained(
|
||||
"THUDM/CogVideoX-5b",
|
||||
subfolder="transformer",
|
||||
torch_dtype=torch.bfloat16
|
||||
)
|
||||
transformer.enable_layerwise_casting(
|
||||
storage_dtype=torch.float8_e4m3fn, compute_dtype=torch.bfloat16
|
||||
)
|
||||
|
||||
pipeline = CogVideoXPipeline.from_pretrained(
|
||||
"THUDM/CogVideoX-5b",
|
||||
transformer=transformer,
|
||||
quantization_config=pipeline_quant_config,
|
||||
torch_dtype=torch.bfloat16
|
||||
)
|
||||
pipeline.to("cuda")
|
||||
|
||||
# model-offloading
|
||||
pipeline.enable_model_cpu_offload()
|
||||
|
||||
prompt = """
|
||||
A detailed wooden toy ship with intricately carved masts and sails is seen gliding smoothly over a plush, blue carpet that mimics the waves of the sea.
|
||||
The ship's hull is painted a rich brown, with tiny windows. The carpet, soft and textured, provides a perfect backdrop, resembling an oceanic expanse.
|
||||
Surrounding the ship are various other toys and children's items, hinting at a playful environment. The scene captures the innocence and imagination of childhood,
|
||||
with the toy ship's journey symbolizing endless adventures in a whimsical, indoor setting.
|
||||
"""
|
||||
|
||||
video = pipeline(
|
||||
prompt=prompt,
|
||||
guidance_scale=6,
|
||||
num_inference_steps=50
|
||||
).frames[0]
|
||||
export_to_video(video, "output.mp4", fps=8)
|
||||
from diffusers import CogVideoXPipeline, CogVideoXImageToVideoPipeline
|
||||
from diffusers.utils import export_to_video,load_image
|
||||
pipe = CogVideoXPipeline.from_pretrained("THUDM/CogVideoX-5b").to("cuda") # or "THUDM/CogVideoX-2b"
|
||||
```
|
||||
|
||||
</hfoption>
|
||||
<hfoption id="inference speed">
|
||||
If you are using the image-to-video pipeline, load it as follows:
|
||||
|
||||
[Compilation](../../optimization/fp16#torchcompile) is slow the first time but subsequent calls to the pipeline are faster.
|
||||
```python
|
||||
pipe = CogVideoXImageToVideoPipeline.from_pretrained("THUDM/CogVideoX-5b-I2V").to("cuda")
|
||||
```
|
||||
|
||||
The average inference time with torch.compile on a 80GB A100 is 76.27 seconds compared to 96.89 seconds for an uncompiled model.
|
||||
Then change the memory layout of the pipelines `transformer` component to `torch.channels_last`:
|
||||
|
||||
```python
|
||||
pipe.transformer.to(memory_format=torch.channels_last)
|
||||
```
|
||||
|
||||
Compile the components and run inference:
|
||||
|
||||
```python
|
||||
pipe.transformer = torch.compile(pipeline.transformer, mode="max-autotune", fullgraph=True)
|
||||
|
||||
# CogVideoX works well with long and well-described prompts
|
||||
prompt = "A panda, dressed in a small, red jacket and a tiny hat, sits on a wooden stool in a serene bamboo forest. The panda's fluffy paws strum a miniature acoustic guitar, producing soft, melodic tunes. Nearby, a few other pandas gather, watching curiously and some clapping in rhythm. Sunlight filters through the tall bamboo, casting a gentle glow on the scene. The panda's face is expressive, showing concentration and joy as it plays. The background includes a small, flowing stream and vibrant green foliage, enhancing the peaceful and magical atmosphere of this unique musical performance."
|
||||
video = pipe(prompt=prompt, guidance_scale=6, num_inference_steps=50).frames[0]
|
||||
```
|
||||
|
||||
The [T2V benchmark](https://gist.github.com/a-r-r-o-w/5183d75e452a368fd17448fcc810bd3f) results on an 80GB A100 machine are:
|
||||
|
||||
```
|
||||
Without torch.compile(): Average inference time: 96.89 seconds.
|
||||
With torch.compile(): Average inference time: 76.27 seconds.
|
||||
```
|
||||
|
||||
### Memory optimization
|
||||
|
||||
CogVideoX-2b requires about 19 GB of GPU memory to decode 49 frames (6 seconds of video at 8 FPS) with output resolution 720x480 (W x H), which makes it not possible to run on consumer GPUs or free-tier T4 Colab. The following memory optimizations could be used to reduce the memory footprint. For replication, you can refer to [this](https://gist.github.com/a-r-r-o-w/3959a03f15be5c9bd1fe545b09dfcc93) script.
|
||||
|
||||
- `pipe.enable_model_cpu_offload()`:
|
||||
- Without enabling cpu offloading, memory usage is `33 GB`
|
||||
- With enabling cpu offloading, memory usage is `19 GB`
|
||||
- `pipe.enable_sequential_cpu_offload()`:
|
||||
- Similar to `enable_model_cpu_offload` but can significantly reduce memory usage at the cost of slow inference
|
||||
- When enabled, memory usage is under `4 GB`
|
||||
- `pipe.vae.enable_tiling()`:
|
||||
- With enabling cpu offloading and tiling, memory usage is `11 GB`
|
||||
- `pipe.vae.enable_slicing()`
|
||||
|
||||
## Quantization
|
||||
|
||||
Quantization helps reduce the memory requirements of very large models by storing model weights in a lower precision data type. However, quantization may have varying impact on video quality depending on the video model.
|
||||
|
||||
Refer to the [Quantization](../../quantization/overview) overview to learn more about supported quantization backends and selecting a quantization backend that supports your use case. The example below demonstrates how to load a quantized [`CogVideoXPipeline`] for inference with bitsandbytes.
|
||||
|
||||
```py
|
||||
import torch
|
||||
from diffusers import CogVideoXPipeline
|
||||
from diffusers import BitsAndBytesConfig as DiffusersBitsAndBytesConfig, CogVideoXTransformer3DModel, CogVideoXPipeline
|
||||
from diffusers.utils import export_to_video
|
||||
from transformers import BitsAndBytesConfig as BitsAndBytesConfig, T5EncoderModel
|
||||
|
||||
quant_config = BitsAndBytesConfig(load_in_8bit=True)
|
||||
text_encoder_8bit = T5EncoderModel.from_pretrained(
|
||||
"THUDM/CogVideoX-2b",
|
||||
subfolder="text_encoder",
|
||||
quantization_config=quant_config,
|
||||
torch_dtype=torch.float16,
|
||||
)
|
||||
|
||||
quant_config = DiffusersBitsAndBytesConfig(load_in_8bit=True)
|
||||
transformer_8bit = CogVideoXTransformer3DModel.from_pretrained(
|
||||
"THUDM/CogVideoX-2b",
|
||||
subfolder="transformer",
|
||||
quantization_config=quant_config,
|
||||
torch_dtype=torch.float16,
|
||||
)
|
||||
|
||||
pipeline = CogVideoXPipeline.from_pretrained(
|
||||
"THUDM/CogVideoX-2b",
|
||||
torch_dtype=torch.float16
|
||||
).to("cuda")
|
||||
|
||||
# torch.compile
|
||||
pipeline.transformer.to(memory_format=torch.channels_last)
|
||||
pipeline.transformer = torch.compile(
|
||||
pipeline.transformer, mode="max-autotune", fullgraph=True
|
||||
text_encoder=text_encoder_8bit,
|
||||
transformer=transformer_8bit,
|
||||
torch_dtype=torch.float16,
|
||||
device_map="balanced",
|
||||
)
|
||||
|
||||
prompt = """
|
||||
A detailed wooden toy ship with intricately carved masts and sails is seen gliding smoothly over a plush, blue carpet that mimics the waves of the sea.
|
||||
The ship's hull is painted a rich brown, with tiny windows. The carpet, soft and textured, provides a perfect backdrop, resembling an oceanic expanse.
|
||||
Surrounding the ship are various other toys and children's items, hinting at a playful environment. The scene captures the innocence and imagination of childhood,
|
||||
with the toy ship's journey symbolizing endless adventures in a whimsical, indoor setting.
|
||||
"""
|
||||
|
||||
video = pipeline(
|
||||
prompt=prompt,
|
||||
guidance_scale=6,
|
||||
num_inference_steps=50
|
||||
).frames[0]
|
||||
export_to_video(video, "output.mp4", fps=8)
|
||||
prompt = "A detailed wooden toy ship with intricately carved masts and sails is seen gliding smoothly over a plush, blue carpet that mimics the waves of the sea. The ship's hull is painted a rich brown, with tiny windows. The carpet, soft and textured, provides a perfect backdrop, resembling an oceanic expanse. Surrounding the ship are various other toys and children's items, hinting at a playful environment. The scene captures the innocence and imagination of childhood, with the toy ship's journey symbolizing endless adventures in a whimsical, indoor setting."
|
||||
video = pipeline(prompt=prompt, guidance_scale=6, num_inference_steps=50).frames[0]
|
||||
export_to_video(video, "ship.mp4", fps=8)
|
||||
```
|
||||
|
||||
</hfoption>
|
||||
</hfoptions>
|
||||
|
||||
## Notes
|
||||
|
||||
- CogVideoX supports LoRAs with [`~loaders.CogVideoXLoraLoaderMixin.load_lora_weights`].
|
||||
|
||||
<details>
|
||||
<summary>Show example code</summary>
|
||||
|
||||
```py
|
||||
import torch
|
||||
from diffusers import CogVideoXPipeline
|
||||
from diffusers.hooks import apply_group_offloading
|
||||
from diffusers.utils import export_to_video
|
||||
|
||||
pipeline = CogVideoXPipeline.from_pretrained(
|
||||
"THUDM/CogVideoX-5b",
|
||||
torch_dtype=torch.bfloat16
|
||||
)
|
||||
pipeline.to("cuda")
|
||||
|
||||
# load LoRA weights
|
||||
pipeline.load_lora_weights("finetrainers/CogVideoX-1.5-crush-smol-v0", adapter_name="crush-lora")
|
||||
pipeline.set_adapters("crush-lora", 0.9)
|
||||
|
||||
# model-offloading
|
||||
pipeline.enable_model_cpu_offload()
|
||||
|
||||
prompt = """
|
||||
PIKA_CRUSH A large metal cylinder is seen pressing down on a pile of Oreo cookies, flattening them as if they were under a hydraulic press.
|
||||
"""
|
||||
negative_prompt = "inconsistent motion, blurry motion, worse quality, degenerate outputs, deformed outputs"
|
||||
|
||||
video = pipeline(
|
||||
prompt=prompt,
|
||||
negative_prompt=negative_prompt,
|
||||
num_frames=81,
|
||||
height=480,
|
||||
width=768,
|
||||
num_inference_steps=50
|
||||
).frames[0]
|
||||
export_to_video(video, "output.mp4", fps=16)
|
||||
```
|
||||
|
||||
</details>
|
||||
|
||||
- The text-to-video (T2V) checkpoints work best with a resolution of 1360x768 because that was the resolution it was pretrained on.
|
||||
|
||||
- The image-to-video (I2V) checkpoints work with multiple resolutions. The width can vary from 768 to 1360, but the height must be 758. Both height and width must be divisible by 16.
|
||||
|
||||
- Both T2V and I2V checkpoints work best with 81 and 161 frames. It is recommended to export the generated video at 16fps.
|
||||
|
||||
- Refer to the table below to view memory usage when various memory-saving techniques are enabled.
|
||||
|
||||
| method | memory usage (enabled) | memory usage (disabled) |
|
||||
|---|---|---|
|
||||
| enable_model_cpu_offload | 19GB | 33GB |
|
||||
| enable_sequential_cpu_offload | <4GB | ~33GB (very slow inference speed) |
|
||||
| enable_tiling | 11GB (with enable_model_cpu_offload) | --- |
|
||||
|
||||
## CogVideoXPipeline
|
||||
|
||||
[[autodoc]] CogVideoXPipeline
|
||||
|
||||
@@ -19,7 +19,7 @@
|
||||
<img alt="LoRA" src="https://img.shields.io/badge/LoRA-d8b4fe?style=flat"/>
|
||||
</div>
|
||||
|
||||
[Identity-Preserving Text-to-Video Generation by Frequency Decomposition](https://huggingface.co/papers/2411.17440) from Peking University & University of Rochester & etc, by Shenghai Yuan, Jinfa Huang, Xianyi He, Yunyang Ge, Yujun Shi, Liuhan Chen, Jiebo Luo, Li Yuan.
|
||||
[Identity-Preserving Text-to-Video Generation by Frequency Decomposition](https://arxiv.org/abs/2411.17440) from Peking University & University of Rochester & etc, by Shenghai Yuan, Jinfa Huang, Xianyi He, Yunyang Ge, Yujun Shi, Liuhan Chen, Jiebo Luo, Li Yuan.
|
||||
|
||||
The abstract from the paper is:
|
||||
|
||||
|
||||
@@ -12,7 +12,7 @@ specific language governing permissions and limitations under the License.
|
||||
|
||||
# ControlNet with Hunyuan-DiT
|
||||
|
||||
HunyuanDiTControlNetPipeline is an implementation of ControlNet for [Hunyuan-DiT](https://huggingface.co/papers/2405.08748).
|
||||
HunyuanDiTControlNetPipeline is an implementation of ControlNet for [Hunyuan-DiT](https://arxiv.org/abs/2405.08748).
|
||||
|
||||
ControlNet was introduced in [Adding Conditional Control to Text-to-Image Diffusion Models](https://huggingface.co/papers/2302.05543) by Lvmin Zhang, Anyi Rao, and Maneesh Agrawala.
|
||||
|
||||
|
||||
@@ -1,36 +0,0 @@
|
||||
<!--Copyright 2024 The HuggingFace Team. All rights reserved.
|
||||
|
||||
Licensed under the Apache License, Version 2.0 (the "License"); you may not use this file except in compliance with
|
||||
the License. You may obtain a copy of the License at
|
||||
|
||||
http://www.apache.org/licenses/LICENSE-2.0
|
||||
|
||||
Unless required by applicable law or agreed to in writing, software distributed under the License is distributed on
|
||||
an "AS IS" BASIS, WITHOUT WARRANTIES OR CONDITIONS OF ANY KIND, either express or implied. See the License for the
|
||||
specific language governing permissions and limitations under the License.
|
||||
-->
|
||||
|
||||
# ControlNet
|
||||
|
||||
<div class="flex flex-wrap space-x-1">
|
||||
<img alt="LoRA" src="https://img.shields.io/badge/LoRA-d8b4fe?style=flat"/>
|
||||
</div>
|
||||
|
||||
ControlNet was introduced in [Adding Conditional Control to Text-to-Image Diffusion Models](https://huggingface.co/papers/2302.05543) by Lvmin Zhang, Anyi Rao, and Maneesh Agrawala.
|
||||
|
||||
With a ControlNet model, you can provide an additional control image to condition and control Stable Diffusion generation. For example, if you provide a depth map, the ControlNet model generates an image that'll preserve the spatial information from the depth map. It is a more flexible and accurate way to control the image generation process.
|
||||
|
||||
The abstract from the paper is:
|
||||
|
||||
*We present ControlNet, a neural network architecture to add spatial conditioning controls to large, pretrained text-to-image diffusion models. ControlNet locks the production-ready large diffusion models, and reuses their deep and robust encoding layers pretrained with billions of images as a strong backbone to learn a diverse set of conditional controls. The neural architecture is connected with "zero convolutions" (zero-initialized convolution layers) that progressively grow the parameters from zero and ensure that no harmful noise could affect the finetuning. We test various conditioning controls, eg, edges, depth, segmentation, human pose, etc, with Stable Diffusion, using single or multiple conditions, with or without prompts. We show that the training of ControlNets is robust with small (<50k) and large (>1m) datasets. Extensive results show that ControlNet may facilitate wider applications to control image diffusion models.*
|
||||
|
||||
This pipeline was contributed by [ishan24](https://huggingface.co/ishan24). ❤️
|
||||
The original codebase can be found at [NVlabs/Sana](https://github.com/NVlabs/Sana), and you can find official ControlNet checkpoints on [Efficient-Large-Model's](https://huggingface.co/Efficient-Large-Model) Hub profile.
|
||||
|
||||
## SanaControlNetPipeline
|
||||
[[autodoc]] SanaControlNetPipeline
|
||||
- all
|
||||
- __call__
|
||||
|
||||
## SanaPipelineOutput
|
||||
[[autodoc]] pipelines.sana.pipeline_output.SanaPipelineOutput
|
||||
@@ -1,41 +0,0 @@
|
||||
<!-- Copyright 2024 The HuggingFace Team. All rights reserved.
|
||||
#
|
||||
# Licensed under the Apache License, Version 2.0 (the "License");
|
||||
# you may not use this file except in compliance with the License.
|
||||
# You may obtain a copy of the License at
|
||||
#
|
||||
# http://www.apache.org/licenses/LICENSE-2.0
|
||||
#
|
||||
# Unless required by applicable law or agreed to in writing, software
|
||||
# distributed under the License is distributed on an "AS IS" BASIS,
|
||||
# WITHOUT WARRANTIES OR CONDITIONS OF ANY KIND, either express or implied.
|
||||
# See the License for the specific language governing permissions and
|
||||
# limitations under the License. -->
|
||||
|
||||
# Cosmos
|
||||
|
||||
[Cosmos World Foundation Model Platform for Physical AI](https://huggingface.co/papers/2501.03575) by NVIDIA.
|
||||
|
||||
*Physical AI needs to be trained digitally first. It needs a digital twin of itself, the policy model, and a digital twin of the world, the world model. In this paper, we present the Cosmos World Foundation Model Platform to help developers build customized world models for their Physical AI setups. We position a world foundation model as a general-purpose world model that can be fine-tuned into customized world models for downstream applications. Our platform covers a video curation pipeline, pre-trained world foundation models, examples of post-training of pre-trained world foundation models, and video tokenizers. To help Physical AI builders solve the most critical problems of our society, we make our platform open-source and our models open-weight with permissive licenses available via https://github.com/NVIDIA/Cosmos.*
|
||||
|
||||
<Tip>
|
||||
|
||||
Make sure to check out the Schedulers [guide](../../using-diffusers/schedulers) to learn how to explore the tradeoff between scheduler speed and quality, and see the [reuse components across pipelines](../../using-diffusers/loading#reuse-a-pipeline) section to learn how to efficiently load the same components into multiple pipelines.
|
||||
|
||||
</Tip>
|
||||
|
||||
## CosmosTextToWorldPipeline
|
||||
|
||||
[[autodoc]] CosmosTextToWorldPipeline
|
||||
- all
|
||||
- __call__
|
||||
|
||||
## CosmosVideoToWorldPipeline
|
||||
|
||||
[[autodoc]] CosmosVideoToWorldPipeline
|
||||
- all
|
||||
- __call__
|
||||
|
||||
## CosmosPipelineOutput
|
||||
|
||||
[[autodoc]] pipelines.cosmos.pipeline_output.CosmosPipelineOutput
|
||||
@@ -14,7 +14,6 @@ specific language governing permissions and limitations under the License.
|
||||
|
||||
<div class="flex flex-wrap space-x-1">
|
||||
<img alt="LoRA" src="https://img.shields.io/badge/LoRA-d8b4fe?style=flat"/>
|
||||
<img alt="MPS" src="https://img.shields.io/badge/MPS-000000?style=flat&logo=apple&logoColor=white%22">
|
||||
</div>
|
||||
|
||||
## Overview
|
||||
@@ -347,7 +346,7 @@ pipe.to("cuda")
|
||||
image = pipe(image=image, prompt="<prompt>", strength=0.3).images
|
||||
```
|
||||
|
||||
You can also use [`torch.compile`](../../optimization/fp16#torchcompile). Note that we have not exhaustively tested `torch.compile`
|
||||
You can also use [`torch.compile`](../../optimization/torch2.0). Note that we have not exhaustively tested `torch.compile`
|
||||
with IF and it might not give expected results.
|
||||
|
||||
```py
|
||||
|
||||
@@ -14,7 +14,6 @@ specific language governing permissions and limitations under the License.
|
||||
|
||||
<div class="flex flex-wrap space-x-1">
|
||||
<img alt="LoRA" src="https://img.shields.io/badge/LoRA-d8b4fe?style=flat"/>
|
||||
<img alt="MPS" src="https://img.shields.io/badge/MPS-000000?style=flat&logo=apple&logoColor=white%22">
|
||||
</div>
|
||||
|
||||
Flux is a series of text-to-image generation models based on diffusion transformers. To know more about Flux, check out the original [blog post](https://blackforestlabs.ai/announcing-black-forest-labs/) by the creators of Flux, Black Forest Labs.
|
||||
@@ -347,7 +346,7 @@ image = pipe(
|
||||
height=1024,
|
||||
prompt="wearing sunglasses",
|
||||
negative_prompt="",
|
||||
true_cfg_scale=4.0,
|
||||
true_cfg=4.0,
|
||||
generator=torch.Generator().manual_seed(4444),
|
||||
ip_adapter_image=image,
|
||||
).images[0]
|
||||
|
||||
@@ -1,209 +0,0 @@
|
||||
<!-- Copyright 2025 The HuggingFace Team. All rights reserved.
|
||||
#
|
||||
# Licensed under the Apache License, Version 2.0 (the "License");
|
||||
# you may not use this file except in compliance with the License.
|
||||
# You may obtain a copy of the License at
|
||||
#
|
||||
# http://www.apache.org/licenses/LICENSE-2.0
|
||||
#
|
||||
# Unless required by applicable law or agreed to in writing, software
|
||||
# distributed under the License is distributed on an "AS IS" BASIS,
|
||||
# WITHOUT WARRANTIES OR CONDITIONS OF ANY KIND, either express or implied.
|
||||
# See the License for the specific language governing permissions and
|
||||
# limitations under the License. -->
|
||||
|
||||
# Framepack
|
||||
|
||||
<div class="flex flex-wrap space-x-1">
|
||||
<img alt="LoRA" src="https://img.shields.io/badge/LoRA-d8b4fe?style=flat"/>
|
||||
</div>
|
||||
|
||||
[Packing Input Frame Context in Next-Frame Prediction Models for Video Generation](https://huggingface.co/papers/2504.12626) by Lvmin Zhang and Maneesh Agrawala.
|
||||
|
||||
*We present a neural network structure, FramePack, to train next-frame (or next-frame-section) prediction models for video generation. The FramePack compresses input frames to make the transformer context length a fixed number regardless of the video length. As a result, we are able to process a large number of frames using video diffusion with computation bottleneck similar to image diffusion. This also makes the training video batch sizes significantly higher (batch sizes become comparable to image diffusion training). We also propose an anti-drifting sampling method that generates frames in inverted temporal order with early-established endpoints to avoid exposure bias (error accumulation over iterations). Finally, we show that existing video diffusion models can be finetuned with FramePack, and their visual quality may be improved because the next-frame prediction supports more balanced diffusion schedulers with less extreme flow shift timesteps.*
|
||||
|
||||
<Tip>
|
||||
|
||||
Make sure to check out the Schedulers [guide](../../using-diffusers/schedulers) to learn how to explore the tradeoff between scheduler speed and quality, and see the [reuse components across pipelines](../../using-diffusers/loading#reuse-a-pipeline) section to learn how to efficiently load the same components into multiple pipelines.
|
||||
|
||||
</Tip>
|
||||
|
||||
## Available models
|
||||
|
||||
| Model name | Description |
|
||||
|:---|:---|
|
||||
- [`lllyasviel/FramePackI2V_HY`](https://huggingface.co/lllyasviel/FramePackI2V_HY) | Trained with the "inverted anti-drifting" strategy as described in the paper. Inference requires setting `sampling_type="inverted_anti_drifting"` when running the pipeline. |
|
||||
- [`lllyasviel/FramePack_F1_I2V_HY_20250503`](https://huggingface.co/lllyasviel/FramePack_F1_I2V_HY_20250503) | Trained with a novel anti-drifting strategy but inference is performed in "vanilla" strategy as described in the paper. Inference requires setting `sampling_type="vanilla"` when running the pipeline. |
|
||||
|
||||
## Usage
|
||||
|
||||
Refer to the pipeline documentation for basic usage examples. The following section contains examples of offloading, different sampling methods, quantization, and more.
|
||||
|
||||
### First and last frame to video
|
||||
|
||||
The following example shows how to use Framepack with start and end image controls, using the inverted anti-drifiting sampling model.
|
||||
|
||||
```python
|
||||
import torch
|
||||
from diffusers import HunyuanVideoFramepackPipeline, HunyuanVideoFramepackTransformer3DModel
|
||||
from diffusers.utils import export_to_video, load_image
|
||||
from transformers import SiglipImageProcessor, SiglipVisionModel
|
||||
|
||||
transformer = HunyuanVideoFramepackTransformer3DModel.from_pretrained(
|
||||
"lllyasviel/FramePackI2V_HY", torch_dtype=torch.bfloat16
|
||||
)
|
||||
feature_extractor = SiglipImageProcessor.from_pretrained(
|
||||
"lllyasviel/flux_redux_bfl", subfolder="feature_extractor"
|
||||
)
|
||||
image_encoder = SiglipVisionModel.from_pretrained(
|
||||
"lllyasviel/flux_redux_bfl", subfolder="image_encoder", torch_dtype=torch.float16
|
||||
)
|
||||
pipe = HunyuanVideoFramepackPipeline.from_pretrained(
|
||||
"hunyuanvideo-community/HunyuanVideo",
|
||||
transformer=transformer,
|
||||
feature_extractor=feature_extractor,
|
||||
image_encoder=image_encoder,
|
||||
torch_dtype=torch.float16,
|
||||
)
|
||||
|
||||
# Enable memory optimizations
|
||||
pipe.enable_model_cpu_offload()
|
||||
pipe.vae.enable_tiling()
|
||||
|
||||
prompt = "CG animation style, a small blue bird takes off from the ground, flapping its wings. The bird's feathers are delicate, with a unique pattern on its chest. The background shows a blue sky with white clouds under bright sunshine. The camera follows the bird upward, capturing its flight and the vastness of the sky from a close-up, low-angle perspective."
|
||||
first_image = load_image(
|
||||
"https://huggingface.co/datasets/huggingface/documentation-images/resolve/main/diffusers/flf2v_input_first_frame.png"
|
||||
)
|
||||
last_image = load_image(
|
||||
"https://huggingface.co/datasets/huggingface/documentation-images/resolve/main/diffusers/flf2v_input_last_frame.png"
|
||||
)
|
||||
output = pipe(
|
||||
image=first_image,
|
||||
last_image=last_image,
|
||||
prompt=prompt,
|
||||
height=512,
|
||||
width=512,
|
||||
num_frames=91,
|
||||
num_inference_steps=30,
|
||||
guidance_scale=9.0,
|
||||
generator=torch.Generator().manual_seed(0),
|
||||
sampling_type="inverted_anti_drifting",
|
||||
).frames[0]
|
||||
export_to_video(output, "output.mp4", fps=30)
|
||||
```
|
||||
|
||||
### Vanilla sampling
|
||||
|
||||
The following example shows how to use Framepack with the F1 model trained with vanilla sampling but new regulation approach for anti-drifting.
|
||||
|
||||
```python
|
||||
import torch
|
||||
from diffusers import HunyuanVideoFramepackPipeline, HunyuanVideoFramepackTransformer3DModel
|
||||
from diffusers.utils import export_to_video, load_image
|
||||
from transformers import SiglipImageProcessor, SiglipVisionModel
|
||||
|
||||
transformer = HunyuanVideoFramepackTransformer3DModel.from_pretrained(
|
||||
"lllyasviel/FramePack_F1_I2V_HY_20250503", torch_dtype=torch.bfloat16
|
||||
)
|
||||
feature_extractor = SiglipImageProcessor.from_pretrained(
|
||||
"lllyasviel/flux_redux_bfl", subfolder="feature_extractor"
|
||||
)
|
||||
image_encoder = SiglipVisionModel.from_pretrained(
|
||||
"lllyasviel/flux_redux_bfl", subfolder="image_encoder", torch_dtype=torch.float16
|
||||
)
|
||||
pipe = HunyuanVideoFramepackPipeline.from_pretrained(
|
||||
"hunyuanvideo-community/HunyuanVideo",
|
||||
transformer=transformer,
|
||||
feature_extractor=feature_extractor,
|
||||
image_encoder=image_encoder,
|
||||
torch_dtype=torch.float16,
|
||||
)
|
||||
|
||||
# Enable memory optimizations
|
||||
pipe.enable_model_cpu_offload()
|
||||
pipe.vae.enable_tiling()
|
||||
|
||||
image = load_image(
|
||||
"https://huggingface.co/datasets/huggingface/documentation-images/resolve/main/diffusers/penguin.png"
|
||||
)
|
||||
output = pipe(
|
||||
image=image,
|
||||
prompt="A penguin dancing in the snow",
|
||||
height=832,
|
||||
width=480,
|
||||
num_frames=91,
|
||||
num_inference_steps=30,
|
||||
guidance_scale=9.0,
|
||||
generator=torch.Generator().manual_seed(0),
|
||||
sampling_type="vanilla",
|
||||
).frames[0]
|
||||
export_to_video(output, "output.mp4", fps=30)
|
||||
```
|
||||
|
||||
### Group offloading
|
||||
|
||||
Group offloading ([`~hooks.apply_group_offloading`]) provides aggressive memory optimizations for offloading internal parts of any model to the CPU, with possibly no additional overhead to generation time. If you have very low VRAM available, this approach may be suitable for you depending on the amount of CPU RAM available.
|
||||
|
||||
```python
|
||||
import torch
|
||||
from diffusers import HunyuanVideoFramepackPipeline, HunyuanVideoFramepackTransformer3DModel
|
||||
from diffusers.hooks import apply_group_offloading
|
||||
from diffusers.utils import export_to_video, load_image
|
||||
from transformers import SiglipImageProcessor, SiglipVisionModel
|
||||
|
||||
transformer = HunyuanVideoFramepackTransformer3DModel.from_pretrained(
|
||||
"lllyasviel/FramePack_F1_I2V_HY_20250503", torch_dtype=torch.bfloat16
|
||||
)
|
||||
feature_extractor = SiglipImageProcessor.from_pretrained(
|
||||
"lllyasviel/flux_redux_bfl", subfolder="feature_extractor"
|
||||
)
|
||||
image_encoder = SiglipVisionModel.from_pretrained(
|
||||
"lllyasviel/flux_redux_bfl", subfolder="image_encoder", torch_dtype=torch.float16
|
||||
)
|
||||
pipe = HunyuanVideoFramepackPipeline.from_pretrained(
|
||||
"hunyuanvideo-community/HunyuanVideo",
|
||||
transformer=transformer,
|
||||
feature_extractor=feature_extractor,
|
||||
image_encoder=image_encoder,
|
||||
torch_dtype=torch.float16,
|
||||
)
|
||||
|
||||
# Enable group offloading
|
||||
onload_device = torch.device("cuda")
|
||||
offload_device = torch.device("cpu")
|
||||
list(map(
|
||||
lambda x: apply_group_offloading(x, onload_device, offload_device, offload_type="leaf_level", use_stream=True, low_cpu_mem_usage=True),
|
||||
[pipe.text_encoder, pipe.text_encoder_2, pipe.transformer]
|
||||
))
|
||||
pipe.image_encoder.to(onload_device)
|
||||
pipe.vae.to(onload_device)
|
||||
pipe.vae.enable_tiling()
|
||||
|
||||
image = load_image(
|
||||
"https://huggingface.co/datasets/huggingface/documentation-images/resolve/main/diffusers/penguin.png"
|
||||
)
|
||||
output = pipe(
|
||||
image=image,
|
||||
prompt="A penguin dancing in the snow",
|
||||
height=832,
|
||||
width=480,
|
||||
num_frames=91,
|
||||
num_inference_steps=30,
|
||||
guidance_scale=9.0,
|
||||
generator=torch.Generator().manual_seed(0),
|
||||
sampling_type="vanilla",
|
||||
).frames[0]
|
||||
print(f"Max memory: {torch.cuda.max_memory_allocated() / 1024**3:.3f} GB")
|
||||
export_to_video(output, "output.mp4", fps=30)
|
||||
```
|
||||
|
||||
## HunyuanVideoFramepackPipeline
|
||||
|
||||
[[autodoc]] HunyuanVideoFramepackPipeline
|
||||
- all
|
||||
- __call__
|
||||
|
||||
## HunyuanVideoPipelineOutput
|
||||
|
||||
[[autodoc]] pipelines.hunyuan_video.pipeline_output.HunyuanVideoPipelineOutput
|
||||
|
||||
@@ -1,43 +0,0 @@
|
||||
<!-- Copyright 2024 The HuggingFace Team. All rights reserved.
|
||||
#
|
||||
# Licensed under the Apache License, Version 2.0 (the "License");
|
||||
# you may not use this file except in compliance with the License.
|
||||
# You may obtain a copy of the License at
|
||||
#
|
||||
# http://www.apache.org/licenses/LICENSE-2.0
|
||||
#
|
||||
# Unless required by applicable law or agreed to in writing, software
|
||||
# distributed under the License is distributed on an "AS IS" BASIS,
|
||||
# WITHOUT WARRANTIES OR CONDITIONS OF ANY KIND, either express or implied.
|
||||
# See the License for the specific language governing permissions and
|
||||
# limitations under the License. -->
|
||||
|
||||
# HiDreamImage
|
||||
|
||||
[HiDream-I1](https://huggingface.co/HiDream-ai) by HiDream.ai
|
||||
|
||||
<Tip>
|
||||
|
||||
Make sure to check out the Schedulers [guide](../../using-diffusers/schedulers) to learn how to explore the tradeoff between scheduler speed and quality, and see the [reuse components across pipelines](../../using-diffusers/loading#reuse-a-pipeline) section to learn how to efficiently load the same components into multiple pipelines.
|
||||
|
||||
</Tip>
|
||||
|
||||
## Available models
|
||||
|
||||
The following models are available for the [`HiDreamImagePipeline`](text-to-image) pipeline:
|
||||
|
||||
| Model name | Description |
|
||||
|:---|:---|
|
||||
| [`HiDream-ai/HiDream-I1-Full`](https://huggingface.co/HiDream-ai/HiDream-I1-Full) | - |
|
||||
| [`HiDream-ai/HiDream-I1-Dev`](https://huggingface.co/HiDream-ai/HiDream-I1-Dev) | - |
|
||||
| [`HiDream-ai/HiDream-I1-Fast`](https://huggingface.co/HiDream-ai/HiDream-I1-Fast) | - |
|
||||
|
||||
## HiDreamImagePipeline
|
||||
|
||||
[[autodoc]] HiDreamImagePipeline
|
||||
- all
|
||||
- __call__
|
||||
|
||||
## HiDreamImagePipelineOutput
|
||||
|
||||
[[autodoc]] pipelines.hidream_image.pipeline_output.HiDreamImagePipelineOutput
|
||||
@@ -12,171 +12,76 @@
|
||||
# See the License for the specific language governing permissions and
|
||||
# limitations under the License. -->
|
||||
|
||||
<div style="float: right;">
|
||||
<div class="flex flex-wrap space-x-1">
|
||||
<a href="https://huggingface.co/docs/diffusers/main/en/tutorials/using_peft_for_inference" target="_blank" rel="noopener">
|
||||
<img alt="LoRA" src="https://img.shields.io/badge/LoRA-d8b4fe?style=flat"/>
|
||||
</a>
|
||||
</div>
|
||||
</div>
|
||||
|
||||
# HunyuanVideo
|
||||
|
||||
[HunyuanVideo](https://huggingface.co/papers/2412.03603) is a 13B parameter diffusion transformer model designed to be competitive with closed-source video foundation models and enable wider community access. This model uses a "dual-stream to single-stream" architecture to separately process the video and text tokens first, before concatenating and feeding them to the transformer to fuse the multimodal information. A pretrained multimodal large language model (MLLM) is used as the encoder because it has better image-text alignment, better image detail description and reasoning, and it can be used as a zero-shot learner if system instructions are added to user prompts. Finally, HunyuanVideo uses a 3D causal variational autoencoder to more efficiently process video data at the original resolution and frame rate.
|
||||
<div class="flex flex-wrap space-x-1">
|
||||
<img alt="LoRA" src="https://img.shields.io/badge/LoRA-d8b4fe?style=flat"/>
|
||||
</div>
|
||||
|
||||
You can find all the original HunyuanVideo checkpoints under the [Tencent](https://huggingface.co/tencent) organization.
|
||||
[HunyuanVideo](https://www.arxiv.org/abs/2412.03603) by Tencent.
|
||||
|
||||
> [!TIP]
|
||||
> Click on the HunyuanVideo models in the right sidebar for more examples of video generation tasks.
|
||||
>
|
||||
> The examples below use a checkpoint from [hunyuanvideo-community](https://huggingface.co/hunyuanvideo-community) because the weights are stored in a layout compatible with Diffusers.
|
||||
*Recent advancements in video generation have significantly impacted daily life for both individuals and industries. However, the leading video generation models remain closed-source, resulting in a notable performance gap between industry capabilities and those available to the public. In this report, we introduce HunyuanVideo, an innovative open-source video foundation model that demonstrates performance in video generation comparable to, or even surpassing, that of leading closed-source models. HunyuanVideo encompasses a comprehensive framework that integrates several key elements, including data curation, advanced architectural design, progressive model scaling and training, and an efficient infrastructure tailored for large-scale model training and inference. As a result, we successfully trained a video generative model with over 13 billion parameters, making it the largest among all open-source models. We conducted extensive experiments and implemented a series of targeted designs to ensure high visual quality, motion dynamics, text-video alignment, and advanced filming techniques. According to evaluations by professionals, HunyuanVideo outperforms previous state-of-the-art models, including Runway Gen-3, Luma 1.6, and three top-performing Chinese video generative models. By releasing the code for the foundation model and its applications, we aim to bridge the gap between closed-source and open-source communities. This initiative will empower individuals within the community to experiment with their ideas, fostering a more dynamic and vibrant video generation ecosystem. The code is publicly available at [this https URL](https://github.com/tencent/HunyuanVideo).*
|
||||
|
||||
The example below demonstrates how to generate a video optimized for memory or inference speed.
|
||||
<Tip>
|
||||
|
||||
<hfoptions id="usage">
|
||||
<hfoption id="memory">
|
||||
Make sure to check out the Schedulers [guide](../../using-diffusers/schedulers) to learn how to explore the tradeoff between scheduler speed and quality, and see the [reuse components across pipelines](../../using-diffusers/loading#reuse-a-pipeline) section to learn how to efficiently load the same components into multiple pipelines.
|
||||
|
||||
Refer to the [Reduce memory usage](../../optimization/memory) guide for more details about the various memory saving techniques.
|
||||
</Tip>
|
||||
|
||||
The quantized HunyuanVideo model below requires ~14GB of VRAM.
|
||||
Recommendations for inference:
|
||||
- Both text encoders should be in `torch.float16`.
|
||||
- Transformer should be in `torch.bfloat16`.
|
||||
- VAE should be in `torch.float16`.
|
||||
- `num_frames` should be of the form `4 * k + 1`, for example `49` or `129`.
|
||||
- For smaller resolution videos, try lower values of `shift` (between `2.0` to `5.0`) in the [Scheduler](https://huggingface.co/docs/diffusers/main/en/api/schedulers/flow_match_euler_discrete#diffusers.FlowMatchEulerDiscreteScheduler.shift). For larger resolution images, try higher values (between `7.0` and `12.0`). The default value is `7.0` for HunyuanVideo.
|
||||
- For more information about supported resolutions and other details, please refer to the original repository [here](https://github.com/Tencent/HunyuanVideo/).
|
||||
|
||||
## Available models
|
||||
|
||||
The following models are available for the [`HunyuanVideoPipeline`](text-to-video) pipeline:
|
||||
|
||||
| Model name | Description |
|
||||
|:---|:---|
|
||||
| [`hunyuanvideo-community/HunyuanVideo`](https://huggingface.co/hunyuanvideo-community/HunyuanVideo) | Official HunyuanVideo (guidance-distilled). Performs best at multiple resolutions and frames. Performs best with `guidance_scale=6.0`, `true_cfg_scale=1.0` and without a negative prompt. |
|
||||
| [`https://huggingface.co/Skywork/SkyReels-V1-Hunyuan-T2V`](https://huggingface.co/Skywork/SkyReels-V1-Hunyuan-T2V) | Skywork's custom finetune of HunyuanVideo (de-distilled). Performs best with `97x544x960` resolution, `guidance_scale=1.0`, `true_cfg_scale=6.0` and a negative prompt. |
|
||||
|
||||
The following models are available for the image-to-video pipeline:
|
||||
|
||||
| Model name | Description |
|
||||
|:---|:---|
|
||||
| [`https://huggingface.co/Skywork/SkyReels-V1-Hunyuan-I2V`](https://huggingface.co/Skywork/SkyReels-V1-Hunyuan-I2V) | Skywork's custom finetune of HunyuanVideo (de-distilled). Performs best with `97x544x960` resolution. Performs best at `97x544x960` resolution, `guidance_scale=1.0`, `true_cfg_scale=6.0` and a negative prompt. |
|
||||
|
||||
## Quantization
|
||||
|
||||
Quantization helps reduce the memory requirements of very large models by storing model weights in a lower precision data type. However, quantization may have varying impact on video quality depending on the video model.
|
||||
|
||||
Refer to the [Quantization](../../quantization/overview) overview to learn more about supported quantization backends and selecting a quantization backend that supports your use case. The example below demonstrates how to load a quantized [`HunyuanVideoPipeline`] for inference with bitsandbytes.
|
||||
|
||||
```py
|
||||
import torch
|
||||
from diffusers import AutoModel, HunyuanVideoPipeline
|
||||
from diffusers.quantizers import PipelineQuantizationConfig
|
||||
from diffusers import BitsAndBytesConfig as DiffusersBitsAndBytesConfig, HunyuanVideoTransformer3DModel, HunyuanVideoPipeline
|
||||
from diffusers.utils import export_to_video
|
||||
|
||||
# quantize weights to int4 with bitsandbytes
|
||||
pipeline_quant_config = PipelineQuantizationConfig(
|
||||
quant_backend="bitsandbytes_4bit",
|
||||
quant_kwargs={
|
||||
"load_in_4bit": True,
|
||||
"bnb_4bit_quant_type": "nf4",
|
||||
"bnb_4bit_compute_dtype": torch.bfloat16
|
||||
},
|
||||
components_to_quantize=["transformer"]
|
||||
quant_config = DiffusersBitsAndBytesConfig(load_in_8bit=True)
|
||||
transformer_8bit = HunyuanVideoTransformer3DModel.from_pretrained(
|
||||
"hunyuanvideo-community/HunyuanVideo",
|
||||
subfolder="transformer",
|
||||
quantization_config=quant_config,
|
||||
torch_dtype=torch.bfloat16,
|
||||
)
|
||||
|
||||
pipeline = HunyuanVideoPipeline.from_pretrained(
|
||||
"hunyuanvideo-community/HunyuanVideo",
|
||||
quantization_config=pipeline_quant_config,
|
||||
torch_dtype=torch.bfloat16,
|
||||
transformer=transformer_8bit,
|
||||
torch_dtype=torch.float16,
|
||||
device_map="balanced",
|
||||
)
|
||||
|
||||
# model-offloading and tiling
|
||||
pipeline.enable_model_cpu_offload()
|
||||
pipeline.vae.enable_tiling()
|
||||
|
||||
prompt = "A fluffy teddy bear sits on a bed of soft pillows surrounded by children's toys."
|
||||
prompt = "A cat walks on the grass, realistic style."
|
||||
video = pipeline(prompt=prompt, num_frames=61, num_inference_steps=30).frames[0]
|
||||
export_to_video(video, "output.mp4", fps=15)
|
||||
export_to_video(video, "cat.mp4", fps=15)
|
||||
```
|
||||
|
||||
</hfoption>
|
||||
<hfoption id="inference speed">
|
||||
|
||||
[Compilation](../../optimization/fp16#torchcompile) is slow the first time but subsequent calls to the pipeline are faster.
|
||||
|
||||
```py
|
||||
import torch
|
||||
from diffusers import AutoModel, HunyuanVideoPipeline
|
||||
from diffusers.quantizers import PipelineQuantizationConfig
|
||||
from diffusers.utils import export_to_video
|
||||
|
||||
# quantize weights to int4 with bitsandbytes
|
||||
pipeline_quant_config = PipelineQuantizationConfig(
|
||||
quant_backend="bitsandbytes_4bit",
|
||||
quant_kwargs={
|
||||
"load_in_4bit": True,
|
||||
"bnb_4bit_quant_type": "nf4",
|
||||
"bnb_4bit_compute_dtype": torch.bfloat16
|
||||
},
|
||||
components_to_quantize=["transformer"]
|
||||
)
|
||||
|
||||
pipeline = HunyuanVideoPipeline.from_pretrained(
|
||||
"hunyuanvideo-community/HunyuanVideo",
|
||||
quantization_config=pipeline_quant_config,
|
||||
torch_dtype=torch.bfloat16,
|
||||
)
|
||||
|
||||
# model-offloading and tiling
|
||||
pipeline.enable_model_cpu_offload()
|
||||
pipeline.vae.enable_tiling()
|
||||
|
||||
# torch.compile
|
||||
pipeline.transformer.to(memory_format=torch.channels_last)
|
||||
pipeline.transformer = torch.compile(
|
||||
pipeline.transformer, mode="max-autotune", fullgraph=True
|
||||
)
|
||||
|
||||
prompt = "A fluffy teddy bear sits on a bed of soft pillows surrounded by children's toys."
|
||||
video = pipeline(prompt=prompt, num_frames=61, num_inference_steps=30).frames[0]
|
||||
export_to_video(video, "output.mp4", fps=15)
|
||||
```
|
||||
|
||||
</hfoption>
|
||||
</hfoptions>
|
||||
|
||||
## Notes
|
||||
|
||||
- HunyuanVideo supports LoRAs with [`~loaders.HunyuanVideoLoraLoaderMixin.load_lora_weights`].
|
||||
|
||||
<details>
|
||||
<summary>Show example code</summary>
|
||||
|
||||
```py
|
||||
import torch
|
||||
from diffusers import AutoModel, HunyuanVideoPipeline
|
||||
from diffusers.quantizers import PipelineQuantizationConfig
|
||||
from diffusers.utils import export_to_video
|
||||
|
||||
# quantize weights to int4 with bitsandbytes
|
||||
pipeline_quant_config = PipelineQuantizationConfig(
|
||||
quant_backend="bitsandbytes_4bit",
|
||||
quant_kwargs={
|
||||
"load_in_4bit": True,
|
||||
"bnb_4bit_quant_type": "nf4",
|
||||
"bnb_4bit_compute_dtype": torch.bfloat16
|
||||
},
|
||||
components_to_quantize=["transformer"]
|
||||
)
|
||||
|
||||
pipeline = HunyuanVideoPipeline.from_pretrained(
|
||||
"hunyuanvideo-community/HunyuanVideo",
|
||||
quantization_config=pipeline_quant_config,
|
||||
torch_dtype=torch.bfloat16,
|
||||
)
|
||||
|
||||
# load LoRA weights
|
||||
pipeline.load_lora_weights("https://huggingface.co/lucataco/hunyuan-steamboat-willie-10", adapter_name="steamboat-willie")
|
||||
pipeline.set_adapters("steamboat-willie", 0.9)
|
||||
|
||||
# model-offloading and tiling
|
||||
pipeline.enable_model_cpu_offload()
|
||||
pipeline.vae.enable_tiling()
|
||||
|
||||
# use "In the style of SWR" to trigger the LoRA
|
||||
prompt = """
|
||||
In the style of SWR. A black and white animated scene featuring a fluffy teddy bear sits on a bed of soft pillows surrounded by children's toys.
|
||||
"""
|
||||
video = pipeline(prompt=prompt, num_frames=61, num_inference_steps=30).frames[0]
|
||||
export_to_video(video, "output.mp4", fps=15)
|
||||
```
|
||||
|
||||
</details>
|
||||
|
||||
- Refer to the table below for recommended inference values.
|
||||
|
||||
| parameter | recommended value |
|
||||
|---|---|
|
||||
| text encoder dtype | `torch.float16` |
|
||||
| transformer dtype | `torch.bfloat16` |
|
||||
| vae dtype | `torch.float16` |
|
||||
| `num_frames (k)` | 4 * `k` + 1 |
|
||||
|
||||
- Try lower `shift` values (`2.0` to `5.0`) for lower resolution videos and higher `shift` values (`7.0` to `12.0`) for higher resolution images.
|
||||
|
||||
## HunyuanVideoPipeline
|
||||
|
||||
[[autodoc]] HunyuanVideoPipeline
|
||||
|
||||
@@ -13,7 +13,7 @@ specific language governing permissions and limitations under the License.
|
||||
# Hunyuan-DiT
|
||||

|
||||
|
||||
[Hunyuan-DiT : A Powerful Multi-Resolution Diffusion Transformer with Fine-Grained Chinese Understanding](https://huggingface.co/papers/2405.08748) from Tencent Hunyuan.
|
||||
[Hunyuan-DiT : A Powerful Multi-Resolution Diffusion Transformer with Fine-Grained Chinese Understanding](https://arxiv.org/abs/2405.08748) from Tencent Hunyuan.
|
||||
|
||||
The abstract from the paper is:
|
||||
|
||||
|
||||
@@ -47,7 +47,7 @@ Sample output with I2VGenXL:
|
||||
* Unlike SVD, it additionally accepts text prompts as inputs.
|
||||
* It can generate higher resolution videos.
|
||||
* When using the [`DDIMScheduler`] (which is default for this pipeline), less than 50 steps for inference leads to bad results.
|
||||
* This implementation is 1-stage variant of I2VGenXL. The main figure in the [I2VGen-XL](https://huggingface.co/papers/2311.04145) paper shows a 2-stage variant, however, 1-stage variant works well. See [this discussion](https://github.com/huggingface/diffusers/discussions/7952) for more details.
|
||||
* This implementation is 1-stage variant of I2VGenXL. The main figure in the [I2VGen-XL](https://arxiv.org/abs/2311.04145) paper shows a 2-stage variant, however, 1-stage variant works well. See [this discussion](https://github.com/huggingface/diffusers/discussions/7952) for more details.
|
||||
|
||||
## I2VGenXLPipeline
|
||||
[[autodoc]] I2VGenXLPipeline
|
||||
|
||||
@@ -14,7 +14,6 @@ specific language governing permissions and limitations under the License.
|
||||
|
||||
<div class="flex flex-wrap space-x-1">
|
||||
<img alt="LoRA" src="https://img.shields.io/badge/LoRA-d8b4fe?style=flat"/>
|
||||
<img alt="MPS" src="https://img.shields.io/badge/MPS-000000?style=flat&logo=apple&logoColor=white%22">
|
||||
</div>
|
||||
|
||||

|
||||
|
||||
@@ -16,13 +16,13 @@
|
||||
|
||||

|
||||
|
||||
[Latte: Latent Diffusion Transformer for Video Generation](https://huggingface.co/papers/2401.03048) from Monash University, Shanghai AI Lab, Nanjing University, and Nanyang Technological University.
|
||||
[Latte: Latent Diffusion Transformer for Video Generation](https://arxiv.org/abs/2401.03048) from Monash University, Shanghai AI Lab, Nanjing University, and Nanyang Technological University.
|
||||
|
||||
The abstract from the paper is:
|
||||
|
||||
*We propose a novel Latent Diffusion Transformer, namely Latte, for video generation. Latte first extracts spatio-temporal tokens from input videos and then adopts a series of Transformer blocks to model video distribution in the latent space. In order to model a substantial number of tokens extracted from videos, four efficient variants are introduced from the perspective of decomposing the spatial and temporal dimensions of input videos. To improve the quality of generated videos, we determine the best practices of Latte through rigorous experimental analysis, including video clip patch embedding, model variants, timestep-class information injection, temporal positional embedding, and learning strategies. Our comprehensive evaluation demonstrates that Latte achieves state-of-the-art performance across four standard video generation datasets, i.e., FaceForensics, SkyTimelapse, UCF101, and Taichi-HD. In addition, we extend Latte to text-to-video generation (T2V) task, where Latte achieves comparable results compared to recent T2V models. We strongly believe that Latte provides valuable insights for future research on incorporating Transformers into diffusion models for video generation.*
|
||||
|
||||
**Highlights**: Latte is a latent diffusion transformer proposed as a backbone for modeling different modalities (trained for text-to-video generation here). It achieves state-of-the-art performance across four standard video benchmarks - [FaceForensics](https://huggingface.co/papers/1803.09179), [SkyTimelapse](https://huggingface.co/papers/1709.07592), [UCF101](https://huggingface.co/papers/1212.0402) and [Taichi-HD](https://huggingface.co/papers/2003.00196). To prepare and download the datasets for evaluation, please refer to [this https URL](https://github.com/Vchitect/Latte/blob/main/docs/datasets_evaluation.md).
|
||||
**Highlights**: Latte is a latent diffusion transformer proposed as a backbone for modeling different modalities (trained for text-to-video generation here). It achieves state-of-the-art performance across four standard video benchmarks - [FaceForensics](https://arxiv.org/abs/1803.09179), [SkyTimelapse](https://arxiv.org/abs/1709.07592), [UCF101](https://arxiv.org/abs/1212.0402) and [Taichi-HD](https://arxiv.org/abs/2003.00196). To prepare and download the datasets for evaluation, please refer to [this https URL](https://github.com/Vchitect/Latte/blob/main/docs/datasets_evaluation.md).
|
||||
|
||||
This pipeline was contributed by [maxin-cn](https://github.com/maxin-cn). The original codebase can be found [here](https://github.com/Vchitect/Latte). The original weights can be found under [hf.co/maxin-cn](https://huggingface.co/maxin-cn).
|
||||
|
||||
|
||||
@@ -29,7 +29,7 @@ You can find additional information about LEDITS++ on the [project page](https:/
|
||||
</Tip>
|
||||
|
||||
<Tip warning={true}>
|
||||
Due to some backward compatibility issues with the current diffusers implementation of [`~schedulers.DPMSolverMultistepScheduler`] this implementation of LEdits++ can no longer guarantee perfect inversion.
|
||||
Due to some backward compatability issues with the current diffusers implementation of [`~schedulers.DPMSolverMultistepScheduler`] this implementation of LEdits++ can no longer guarantee perfect inversion.
|
||||
This issue is unlikely to have any noticeable effects on applied use-cases. However, we provide an alternative implementation that guarantees perfect inversion in a dedicated [GitHub repo](https://github.com/ml-research/ledits_pp).
|
||||
</Tip>
|
||||
|
||||
|
||||
@@ -12,108 +12,123 @@
|
||||
# See the License for the specific language governing permissions and
|
||||
# limitations under the License. -->
|
||||
|
||||
<div style="float: right;">
|
||||
<div class="flex flex-wrap space-x-1">
|
||||
<a href="https://huggingface.co/docs/diffusers/main/en/tutorials/using_peft_for_inference" target="_blank" rel="noopener">
|
||||
<img alt="LoRA" src="https://img.shields.io/badge/LoRA-d8b4fe?style=flat"/>
|
||||
</a>
|
||||
<img alt="MPS" src="https://img.shields.io/badge/MPS-000000?style=flat&logo=apple&logoColor=white%22">
|
||||
</div>
|
||||
# LTX Video
|
||||
|
||||
<div class="flex flex-wrap space-x-1">
|
||||
<img alt="LoRA" src="https://img.shields.io/badge/LoRA-d8b4fe?style=flat"/>
|
||||
</div>
|
||||
|
||||
# LTX-Video
|
||||
[LTX Video](https://huggingface.co/Lightricks/LTX-Video) is the first DiT-based video generation model capable of generating high-quality videos in real-time. It produces 24 FPS videos at a 768x512 resolution faster than they can be watched. Trained on a large-scale dataset of diverse videos, the model generates high-resolution videos with realistic and varied content. We provide a model for both text-to-video as well as image + text-to-video usecases.
|
||||
|
||||
[LTX-Video](https://huggingface.co/Lightricks/LTX-Video) is a diffusion transformer designed for fast and real-time generation of high-resolution videos from text and images. The main feature of LTX-Video is the Video-VAE. The Video-VAE has a higher pixel to latent compression ratio (1:192) which enables more efficient video data processing and faster generation speed. To support and prevent finer details from being lost during generation, the Video-VAE decoder performs the latent to pixel conversion *and* the last denoising step.
|
||||
<Tip>
|
||||
|
||||
You can find all the original LTX-Video checkpoints under the [Lightricks](https://huggingface.co/Lightricks) organization.
|
||||
Make sure to check out the Schedulers [guide](../../using-diffusers/schedulers) to learn how to explore the tradeoff between scheduler speed and quality, and see the [reuse components across pipelines](../../using-diffusers/loading#reuse-a-pipeline) section to learn how to efficiently load the same components into multiple pipelines.
|
||||
|
||||
> [!TIP]
|
||||
> Click on the LTX-Video models in the right sidebar for more examples of other video generation tasks.
|
||||
</Tip>
|
||||
|
||||
The example below demonstrates how to generate a video optimized for memory or inference speed.
|
||||
Available models:
|
||||
|
||||
<hfoptions id="usage">
|
||||
<hfoption id="memory">
|
||||
| Model name | Recommended dtype |
|
||||
|:-------------:|:-----------------:|
|
||||
| [`LTX Video 0.9.0`](https://huggingface.co/Lightricks/LTX-Video/blob/main/ltx-video-2b-v0.9.safetensors) | `torch.bfloat16` |
|
||||
| [`LTX Video 0.9.1`](https://huggingface.co/Lightricks/LTX-Video/blob/main/ltx-video-2b-v0.9.1.safetensors) | `torch.bfloat16` |
|
||||
|
||||
Refer to the [Reduce memory usage](../../optimization/memory) guide for more details about the various memory saving techniques.
|
||||
Note: The recommended dtype is for the transformer component. The VAE and text encoders can be either `torch.float32`, `torch.bfloat16` or `torch.float16` but the recommended dtype is `torch.bfloat16` as used in the original repository.
|
||||
|
||||
The LTX-Video model below requires ~10GB of VRAM.
|
||||
## Loading Single Files
|
||||
|
||||
Loading the original LTX Video checkpoints is also possible with [`~ModelMixin.from_single_file`]. We recommend using `from_single_file` for the Lightricks series of models, as they plan to release multiple models in the future in the single file format.
|
||||
|
||||
```python
|
||||
import torch
|
||||
from diffusers import AutoencoderKLLTXVideo, LTXImageToVideoPipeline, LTXVideoTransformer3DModel
|
||||
|
||||
# `single_file_url` could also be https://huggingface.co/Lightricks/LTX-Video/ltx-video-2b-v0.9.1.safetensors
|
||||
single_file_url = "https://huggingface.co/Lightricks/LTX-Video/ltx-video-2b-v0.9.safetensors"
|
||||
transformer = LTXVideoTransformer3DModel.from_single_file(
|
||||
single_file_url, torch_dtype=torch.bfloat16
|
||||
)
|
||||
vae = AutoencoderKLLTXVideo.from_single_file(single_file_url, torch_dtype=torch.bfloat16)
|
||||
pipe = LTXImageToVideoPipeline.from_pretrained(
|
||||
"Lightricks/LTX-Video", transformer=transformer, vae=vae, torch_dtype=torch.bfloat16
|
||||
)
|
||||
|
||||
# ... inference code ...
|
||||
```
|
||||
|
||||
Alternatively, the pipeline can be used to load the weights with [`~FromSingleFileMixin.from_single_file`].
|
||||
|
||||
```python
|
||||
import torch
|
||||
from diffusers import LTXImageToVideoPipeline
|
||||
from transformers import T5EncoderModel, T5Tokenizer
|
||||
|
||||
single_file_url = "https://huggingface.co/Lightricks/LTX-Video/ltx-video-2b-v0.9.safetensors"
|
||||
text_encoder = T5EncoderModel.from_pretrained(
|
||||
"Lightricks/LTX-Video", subfolder="text_encoder", torch_dtype=torch.bfloat16
|
||||
)
|
||||
tokenizer = T5Tokenizer.from_pretrained(
|
||||
"Lightricks/LTX-Video", subfolder="tokenizer", torch_dtype=torch.bfloat16
|
||||
)
|
||||
pipe = LTXImageToVideoPipeline.from_single_file(
|
||||
single_file_url, text_encoder=text_encoder, tokenizer=tokenizer, torch_dtype=torch.bfloat16
|
||||
)
|
||||
```
|
||||
|
||||
Loading [LTX GGUF checkpoints](https://huggingface.co/city96/LTX-Video-gguf) are also supported:
|
||||
|
||||
```py
|
||||
import torch
|
||||
from diffusers import LTXPipeline, AutoModel
|
||||
from diffusers.hooks import apply_group_offloading
|
||||
from diffusers.utils import export_to_video
|
||||
from diffusers import LTXPipeline, LTXVideoTransformer3DModel, GGUFQuantizationConfig
|
||||
|
||||
# fp8 layerwise weight-casting
|
||||
transformer = AutoModel.from_pretrained(
|
||||
ckpt_path = (
|
||||
"https://huggingface.co/city96/LTX-Video-gguf/blob/main/ltx-video-2b-v0.9-Q3_K_S.gguf"
|
||||
)
|
||||
transformer = LTXVideoTransformer3DModel.from_single_file(
|
||||
ckpt_path,
|
||||
quantization_config=GGUFQuantizationConfig(compute_dtype=torch.bfloat16),
|
||||
torch_dtype=torch.bfloat16,
|
||||
)
|
||||
pipe = LTXPipeline.from_pretrained(
|
||||
"Lightricks/LTX-Video",
|
||||
subfolder="transformer",
|
||||
torch_dtype=torch.bfloat16
|
||||
)
|
||||
transformer.enable_layerwise_casting(
|
||||
storage_dtype=torch.float8_e4m3fn, compute_dtype=torch.bfloat16
|
||||
transformer=transformer,
|
||||
torch_dtype=torch.bfloat16,
|
||||
)
|
||||
pipe.enable_model_cpu_offload()
|
||||
|
||||
pipeline = LTXPipeline.from_pretrained("Lightricks/LTX-Video", transformer=transformer, torch_dtype=torch.bfloat16)
|
||||
|
||||
# group-offloading
|
||||
onload_device = torch.device("cuda")
|
||||
offload_device = torch.device("cpu")
|
||||
pipeline.transformer.enable_group_offload(onload_device=onload_device, offload_device=offload_device, offload_type="leaf_level", use_stream=True)
|
||||
apply_group_offloading(pipeline.text_encoder, onload_device=onload_device, offload_type="block_level", num_blocks_per_group=2)
|
||||
apply_group_offloading(pipeline.vae, onload_device=onload_device, offload_type="leaf_level")
|
||||
|
||||
prompt = """
|
||||
A woman with long brown hair and light skin smiles at another woman with long blonde hair.
|
||||
The woman with brown hair wears a black jacket and has a small, barely noticeable mole on her right cheek.
|
||||
The camera angle is a close-up, focused on the woman with brown hair's face. The lighting is warm and
|
||||
natural, likely from the setting sun, casting a soft glow on the scene. The scene appears to be real-life footage
|
||||
"""
|
||||
prompt = "A woman with long brown hair and light skin smiles at another woman with long blonde hair. The woman with brown hair wears a black jacket and has a small, barely noticeable mole on her right cheek. The camera angle is a close-up, focused on the woman with brown hair's face. The lighting is warm and natural, likely from the setting sun, casting a soft glow on the scene. The scene appears to be real-life footage"
|
||||
negative_prompt = "worst quality, inconsistent motion, blurry, jittery, distorted"
|
||||
|
||||
video = pipeline(
|
||||
video = pipe(
|
||||
prompt=prompt,
|
||||
negative_prompt=negative_prompt,
|
||||
width=768,
|
||||
height=512,
|
||||
width=704,
|
||||
height=480,
|
||||
num_frames=161,
|
||||
decode_timestep=0.03,
|
||||
decode_noise_scale=0.025,
|
||||
num_inference_steps=50,
|
||||
).frames[0]
|
||||
export_to_video(video, "output.mp4", fps=24)
|
||||
export_to_video(video, "output_gguf_ltx.mp4", fps=24)
|
||||
```
|
||||
|
||||
</hfoption>
|
||||
<hfoption id="inference speed">
|
||||
Make sure to read the [documentation on GGUF](../../quantization/gguf) to learn more about our GGUF support.
|
||||
|
||||
[Compilation](../../optimization/fp16#torchcompile) is slow the first time but subsequent calls to the pipeline are faster.
|
||||
<!-- TODO(aryan): Update this when official weights are supported -->
|
||||
|
||||
```py
|
||||
Loading and running inference with [LTX Video 0.9.1](https://huggingface.co/Lightricks/LTX-Video/blob/main/ltx-video-2b-v0.9.1.safetensors) weights.
|
||||
|
||||
```python
|
||||
import torch
|
||||
from diffusers import LTXPipeline
|
||||
from diffusers.utils import export_to_video
|
||||
|
||||
pipeline = LTXPipeline.from_pretrained(
|
||||
"Lightricks/LTX-Video", torch_dtype=torch.bfloat16
|
||||
)
|
||||
pipe = LTXPipeline.from_pretrained("a-r-r-o-w/LTX-Video-0.9.1-diffusers", torch_dtype=torch.bfloat16)
|
||||
pipe.to("cuda")
|
||||
|
||||
# torch.compile
|
||||
pipeline.transformer.to(memory_format=torch.channels_last)
|
||||
pipeline.transformer = torch.compile(
|
||||
pipeline.transformer, mode="max-autotune", fullgraph=True
|
||||
)
|
||||
|
||||
prompt = """
|
||||
A woman with long brown hair and light skin smiles at another woman with long blonde hair.
|
||||
The woman with brown hair wears a black jacket and has a small, barely noticeable mole on her right cheek.
|
||||
The camera angle is a close-up, focused on the woman with brown hair's face. The lighting is warm and
|
||||
natural, likely from the setting sun, casting a soft glow on the scene. The scene appears to be real-life footage
|
||||
"""
|
||||
prompt = "A woman with long brown hair and light skin smiles at another woman with long blonde hair. The woman with brown hair wears a black jacket and has a small, barely noticeable mole on her right cheek. The camera angle is a close-up, focused on the woman with brown hair's face. The lighting is warm and natural, likely from the setting sun, casting a soft glow on the scene. The scene appears to be real-life footage"
|
||||
negative_prompt = "worst quality, inconsistent motion, blurry, jittery, distorted"
|
||||
|
||||
video = pipeline(
|
||||
video = pipe(
|
||||
prompt=prompt,
|
||||
negative_prompt=negative_prompt,
|
||||
width=768,
|
||||
@@ -126,264 +141,48 @@ video = pipeline(
|
||||
export_to_video(video, "output.mp4", fps=24)
|
||||
```
|
||||
|
||||
</hfoption>
|
||||
</hfoptions>
|
||||
Refer to [this section](https://huggingface.co/docs/diffusers/main/en/api/pipelines/cogvideox#memory-optimization) to learn more about optimizing memory consumption.
|
||||
|
||||
## Notes
|
||||
## Quantization
|
||||
|
||||
- Refer to the following recommended settings for generation from the [LTX-Video](https://github.com/Lightricks/LTX-Video) repository.
|
||||
Quantization helps reduce the memory requirements of very large models by storing model weights in a lower precision data type. However, quantization may have varying impact on video quality depending on the video model.
|
||||
|
||||
- The recommended dtype for the transformer, VAE, and text encoder is `torch.bfloat16`. The VAE and text encoder can also be `torch.float32` or `torch.float16`.
|
||||
- For guidance-distilled variants of LTX-Video, set `guidance_scale` to `1.0`. The `guidance_scale` for any other model should be set higher, like `5.0`, for good generation quality.
|
||||
- For timestep-aware VAE variants (LTX-Video 0.9.1 and above), set `decode_timestep` to `0.05` and `image_cond_noise_scale` to `0.025`.
|
||||
- For variants that support interpolation between multiple conditioning images and videos (LTX-Video 0.9.5 and above), use similar images and videos for the best results. Divergence from the conditioning inputs may lead to abrupt transitionts in the generated video.
|
||||
Refer to the [Quantization](../../quantization/overview) overview to learn more about supported quantization backends and selecting a quantization backend that supports your use case. The example below demonstrates how to load a quantized [`LTXPipeline`] for inference with bitsandbytes.
|
||||
|
||||
- LTX-Video 0.9.7 includes a spatial latent upscaler and a 13B parameter transformer. During inference, a low resolution video is quickly generated first and then upscaled and refined.
|
||||
```py
|
||||
import torch
|
||||
from diffusers import BitsAndBytesConfig as DiffusersBitsAndBytesConfig, LTXVideoTransformer3DModel, LTXPipeline
|
||||
from diffusers.utils import export_to_video
|
||||
from transformers import BitsAndBytesConfig as BitsAndBytesConfig, T5EncoderModel
|
||||
|
||||
<details>
|
||||
<summary>Show example code</summary>
|
||||
quant_config = BitsAndBytesConfig(load_in_8bit=True)
|
||||
text_encoder_8bit = T5EncoderModel.from_pretrained(
|
||||
"Lightricks/LTX-Video",
|
||||
subfolder="text_encoder",
|
||||
quantization_config=quant_config,
|
||||
torch_dtype=torch.float16,
|
||||
)
|
||||
|
||||
```py
|
||||
import torch
|
||||
from diffusers import LTXConditionPipeline, LTXLatentUpsamplePipeline
|
||||
from diffusers.pipelines.ltx.pipeline_ltx_condition import LTXVideoCondition
|
||||
from diffusers.utils import export_to_video, load_video
|
||||
quant_config = DiffusersBitsAndBytesConfig(load_in_8bit=True)
|
||||
transformer_8bit = LTXVideoTransformer3DModel.from_pretrained(
|
||||
"Lightricks/LTX-Video",
|
||||
subfolder="transformer",
|
||||
quantization_config=quant_config,
|
||||
torch_dtype=torch.float16,
|
||||
)
|
||||
|
||||
pipeline = LTXConditionPipeline.from_pretrained("Lightricks/LTX-Video-0.9.7-dev", torch_dtype=torch.bfloat16)
|
||||
pipeline_upsample = LTXLatentUpsamplePipeline.from_pretrained("Lightricks/ltxv-spatial-upscaler-0.9.7", vae=pipeline.vae, torch_dtype=torch.bfloat16)
|
||||
pipeline.to("cuda")
|
||||
pipe_upsample.to("cuda")
|
||||
pipeline.vae.enable_tiling()
|
||||
pipeline = LTXPipeline.from_pretrained(
|
||||
"Lightricks/LTX-Video",
|
||||
text_encoder=text_encoder_8bit,
|
||||
transformer=transformer_8bit,
|
||||
torch_dtype=torch.float16,
|
||||
device_map="balanced",
|
||||
)
|
||||
|
||||
def round_to_nearest_resolution_acceptable_by_vae(height, width):
|
||||
height = height - (height % pipeline.vae_temporal_compression_ratio)
|
||||
width = width - (width % pipeline.vae_temporal_compression_ratio)
|
||||
return height, width
|
||||
|
||||
video = load_video(
|
||||
"https://huggingface.co/datasets/huggingface/documentation-images/resolve/main/diffusers/cosmos/cosmos-video2world-input-vid.mp4"
|
||||
)[:21] # only use the first 21 frames as conditioning
|
||||
condition1 = LTXVideoCondition(video=video, frame_index=0)
|
||||
|
||||
prompt = """
|
||||
The video depicts a winding mountain road covered in snow, with a single vehicle
|
||||
traveling along it. The road is flanked by steep, rocky cliffs and sparse vegetation.
|
||||
The landscape is characterized by rugged terrain and a river visible in the distance.
|
||||
The scene captures the solitude and beauty of a winter drive through a mountainous region.
|
||||
"""
|
||||
negative_prompt = "worst quality, inconsistent motion, blurry, jittery, distorted"
|
||||
expected_height, expected_width = 768, 1152
|
||||
downscale_factor = 2 / 3
|
||||
num_frames = 161
|
||||
|
||||
# 1. Generate video at smaller resolution
|
||||
# Text-only conditioning is also supported without the need to pass `conditions`
|
||||
downscaled_height, downscaled_width = int(expected_height * downscale_factor), int(expected_width * downscale_factor)
|
||||
downscaled_height, downscaled_width = round_to_nearest_resolution_acceptable_by_vae(downscaled_height, downscaled_width)
|
||||
latents = pipeline(
|
||||
conditions=[condition1],
|
||||
prompt=prompt,
|
||||
negative_prompt=negative_prompt,
|
||||
width=downscaled_width,
|
||||
height=downscaled_height,
|
||||
num_frames=num_frames,
|
||||
num_inference_steps=30,
|
||||
decode_timestep=0.05,
|
||||
decode_noise_scale=0.025,
|
||||
image_cond_noise_scale=0.0,
|
||||
guidance_scale=5.0,
|
||||
guidance_rescale=0.7,
|
||||
generator=torch.Generator().manual_seed(0),
|
||||
output_type="latent",
|
||||
).frames
|
||||
|
||||
# 2. Upscale generated video using latent upsampler with fewer inference steps
|
||||
# The available latent upsampler upscales the height/width by 2x
|
||||
upscaled_height, upscaled_width = downscaled_height * 2, downscaled_width * 2
|
||||
upscaled_latents = pipe_upsample(
|
||||
latents=latents,
|
||||
output_type="latent"
|
||||
).frames
|
||||
|
||||
# 3. Denoise the upscaled video with few steps to improve texture (optional, but recommended)
|
||||
video = pipeline(
|
||||
conditions=[condition1],
|
||||
prompt=prompt,
|
||||
negative_prompt=negative_prompt,
|
||||
width=upscaled_width,
|
||||
height=upscaled_height,
|
||||
num_frames=num_frames,
|
||||
denoise_strength=0.4, # Effectively, 4 inference steps out of 10
|
||||
num_inference_steps=10,
|
||||
latents=upscaled_latents,
|
||||
decode_timestep=0.05,
|
||||
decode_noise_scale=0.025,
|
||||
image_cond_noise_scale=0.0,
|
||||
guidance_scale=5.0,
|
||||
guidance_rescale=0.7,
|
||||
generator=torch.Generator().manual_seed(0),
|
||||
output_type="pil",
|
||||
).frames[0]
|
||||
|
||||
# 4. Downscale the video to the expected resolution
|
||||
video = [frame.resize((expected_width, expected_height)) for frame in video]
|
||||
|
||||
export_to_video(video, "output.mp4", fps=24)
|
||||
```
|
||||
|
||||
</details>
|
||||
|
||||
- LTX-Video 0.9.7 distilled model is guidance and timestep-distilled to speedup generation. It requires `guidance_scale` to be set to `1.0` and `num_inference_steps` should be set between `4` and `10` for good generation quality. You should also use the following custom timesteps for the best results.
|
||||
|
||||
- Base model inference to prepare for upscaling: `[1000, 993, 987, 981, 975, 909, 725, 0.03]`.
|
||||
- Upscaling: `[1000, 909, 725, 421, 0]`.
|
||||
|
||||
<details>
|
||||
<summary>Show example code</summary>
|
||||
|
||||
```py
|
||||
import torch
|
||||
from diffusers import LTXConditionPipeline, LTXLatentUpsamplePipeline
|
||||
from diffusers.pipelines.ltx.pipeline_ltx_condition import LTXVideoCondition
|
||||
from diffusers.utils import export_to_video, load_video
|
||||
|
||||
pipeline = LTXConditionPipeline.from_pretrained("Lightricks/LTX-Video-0.9.7-distilled", torch_dtype=torch.bfloat16)
|
||||
pipe_upsample = LTXLatentUpsamplePipeline.from_pretrained("Lightricks/ltxv-spatial-upscaler-0.9.7", vae=pipeline.vae, torch_dtype=torch.bfloat16)
|
||||
pipeline.to("cuda")
|
||||
pipe_upsample.to("cuda")
|
||||
pipeline.vae.enable_tiling()
|
||||
|
||||
def round_to_nearest_resolution_acceptable_by_vae(height, width):
|
||||
height = height - (height % pipeline.vae_temporal_compression_ratio)
|
||||
width = width - (width % pipeline.vae_temporal_compression_ratio)
|
||||
return height, width
|
||||
|
||||
prompt = """
|
||||
artistic anatomical 3d render, utlra quality, human half full male body with transparent
|
||||
skin revealing structure instead of organs, muscular, intricate creative patterns,
|
||||
monochromatic with backlighting, lightning mesh, scientific concept art, blending biology
|
||||
with botany, surreal and ethereal quality, unreal engine 5, ray tracing, ultra realistic,
|
||||
16K UHD, rich details. camera zooms out in a rotating fashion
|
||||
"""
|
||||
negative_prompt = "worst quality, inconsistent motion, blurry, jittery, distorted"
|
||||
expected_height, expected_width = 768, 1152
|
||||
downscale_factor = 2 / 3
|
||||
num_frames = 161
|
||||
|
||||
# 1. Generate video at smaller resolution
|
||||
downscaled_height, downscaled_width = int(expected_height * downscale_factor), int(expected_width * downscale_factor)
|
||||
downscaled_height, downscaled_width = round_to_nearest_resolution_acceptable_by_vae(downscaled_height, downscaled_width)
|
||||
latents = pipeline(
|
||||
prompt=prompt,
|
||||
negative_prompt=negative_prompt,
|
||||
width=downscaled_width,
|
||||
height=downscaled_height,
|
||||
num_frames=num_frames,
|
||||
timesteps=[1000, 993, 987, 981, 975, 909, 725, 0.03],
|
||||
decode_timestep=0.05,
|
||||
decode_noise_scale=0.025,
|
||||
image_cond_noise_scale=0.0,
|
||||
guidance_scale=1.0,
|
||||
guidance_rescale=0.7,
|
||||
generator=torch.Generator().manual_seed(0),
|
||||
output_type="latent",
|
||||
).frames
|
||||
|
||||
# 2. Upscale generated video using latent upsampler with fewer inference steps
|
||||
# The available latent upsampler upscales the height/width by 2x
|
||||
upscaled_height, upscaled_width = downscaled_height * 2, downscaled_width * 2
|
||||
upscaled_latents = pipe_upsample(
|
||||
latents=latents,
|
||||
adain_factor=1.0,
|
||||
output_type="latent"
|
||||
).frames
|
||||
|
||||
# 3. Denoise the upscaled video with few steps to improve texture (optional, but recommended)
|
||||
video = pipeline(
|
||||
prompt=prompt,
|
||||
negative_prompt=negative_prompt,
|
||||
width=upscaled_width,
|
||||
height=upscaled_height,
|
||||
num_frames=num_frames,
|
||||
denoise_strength=0.999, # Effectively, 4 inference steps out of 5
|
||||
timesteps=[1000, 909, 725, 421, 0],
|
||||
latents=upscaled_latents,
|
||||
decode_timestep=0.05,
|
||||
decode_noise_scale=0.025,
|
||||
image_cond_noise_scale=0.0,
|
||||
guidance_scale=1.0,
|
||||
guidance_rescale=0.7,
|
||||
generator=torch.Generator().manual_seed(0),
|
||||
output_type="pil",
|
||||
).frames[0]
|
||||
|
||||
# 4. Downscale the video to the expected resolution
|
||||
video = [frame.resize((expected_width, expected_height)) for frame in video]
|
||||
|
||||
export_to_video(video, "output.mp4", fps=24)
|
||||
```
|
||||
|
||||
</details>
|
||||
|
||||
- LTX-Video supports LoRAs with [`~loaders.LTXVideoLoraLoaderMixin.load_lora_weights`].
|
||||
|
||||
<details>
|
||||
<summary>Show example code</summary>
|
||||
|
||||
```py
|
||||
import torch
|
||||
from diffusers import LTXConditionPipeline
|
||||
from diffusers.utils import export_to_video, load_image
|
||||
|
||||
pipeline = LTXConditionPipeline.from_pretrained(
|
||||
"Lightricks/LTX-Video-0.9.5", torch_dtype=torch.bfloat16
|
||||
)
|
||||
|
||||
pipeline.load_lora_weights("Lightricks/LTX-Video-Cakeify-LoRA", adapter_name="cakeify")
|
||||
pipeline.set_adapters("cakeify")
|
||||
|
||||
# use "CAKEIFY" to trigger the LoRA
|
||||
prompt = "CAKEIFY a person using a knife to cut a cake shaped like a Pikachu plushie"
|
||||
image = load_image("https://huggingface.co/Lightricks/LTX-Video-Cakeify-LoRA/resolve/main/assets/images/pikachu.png")
|
||||
|
||||
video = pipeline(
|
||||
prompt=prompt,
|
||||
image=image,
|
||||
width=576,
|
||||
height=576,
|
||||
num_frames=161,
|
||||
decode_timestep=0.03,
|
||||
decode_noise_scale=0.025,
|
||||
num_inference_steps=50,
|
||||
).frames[0]
|
||||
export_to_video(video, "output.mp4", fps=26)
|
||||
```
|
||||
|
||||
</details>
|
||||
|
||||
- LTX-Video supports loading from single files, such as [GGUF checkpoints](../../quantization/gguf), with [`loaders.FromOriginalModelMixin.from_single_file`] or [`loaders.FromSingleFileMixin.from_single_file`].
|
||||
|
||||
<details>
|
||||
<summary>Show example code</summary>
|
||||
|
||||
```py
|
||||
import torch
|
||||
from diffusers.utils import export_to_video
|
||||
from diffusers import LTXPipeline, AutoModel, GGUFQuantizationConfig
|
||||
|
||||
transformer = AutoModel.from_single_file(
|
||||
"https://huggingface.co/city96/LTX-Video-gguf/blob/main/ltx-video-2b-v0.9-Q3_K_S.gguf"
|
||||
quantization_config=GGUFQuantizationConfig(compute_dtype=torch.bfloat16),
|
||||
torch_dtype=torch.bfloat16
|
||||
)
|
||||
pipeline = LTXPipeline.from_pretrained(
|
||||
"Lightricks/LTX-Video",
|
||||
transformer=transformer,
|
||||
torch_dtype=torch.bfloat16
|
||||
)
|
||||
```
|
||||
|
||||
</details>
|
||||
prompt = "A detailed wooden toy ship with intricately carved masts and sails is seen gliding smoothly over a plush, blue carpet that mimics the waves of the sea. The ship's hull is painted a rich brown, with tiny windows. The carpet, soft and textured, provides a perfect backdrop, resembling an oceanic expanse. Surrounding the ship are various other toys and children's items, hinting at a playful environment. The scene captures the innocence and imagination of childhood, with the toy ship's journey symbolizing endless adventures in a whimsical, indoor setting."
|
||||
video = pipeline(prompt=prompt, num_frames=161, num_inference_steps=50).frames[0]
|
||||
export_to_video(video, "ship.mp4", fps=24)
|
||||
```
|
||||
|
||||
## LTXPipeline
|
||||
|
||||
@@ -397,18 +196,6 @@ export_to_video(video, "output.mp4", fps=24)
|
||||
- all
|
||||
- __call__
|
||||
|
||||
## LTXConditionPipeline
|
||||
|
||||
[[autodoc]] LTXConditionPipeline
|
||||
- all
|
||||
- __call__
|
||||
|
||||
## LTXLatentUpsamplePipeline
|
||||
|
||||
[[autodoc]] LTXLatentUpsamplePipeline
|
||||
- all
|
||||
- __call__
|
||||
|
||||
## LTXPipelineOutput
|
||||
|
||||
[[autodoc]] pipelines.ltx.pipeline_output.LTXPipelineOutput
|
||||
|
||||
@@ -28,7 +28,7 @@ Lumina-Next has the following components:
|
||||
|
||||
---
|
||||
|
||||
[Lumina-T2X: Transforming Text into Any Modality, Resolution, and Duration via Flow-based Large Diffusion Transformers](https://huggingface.co/papers/2405.05945) from Alpha-VLLM, OpenGVLab, Shanghai AI Laboratory.
|
||||
[Lumina-T2X: Transforming Text into Any Modality, Resolution, and Duration via Flow-based Large Diffusion Transformers](https://arxiv.org/abs/2405.05945) from Alpha-VLLM, OpenGVLab, Shanghai AI Laboratory.
|
||||
|
||||
The abstract from the paper is:
|
||||
|
||||
@@ -58,10 +58,10 @@ Use [`torch.compile`](https://huggingface.co/docs/diffusers/main/en/tutorials/fa
|
||||
First, load the pipeline:
|
||||
|
||||
```python
|
||||
from diffusers import LuminaPipeline
|
||||
from diffusers import LuminaText2ImgPipeline
|
||||
import torch
|
||||
|
||||
pipeline = LuminaPipeline.from_pretrained(
|
||||
pipeline = LuminaText2ImgPipeline.from_pretrained(
|
||||
"Alpha-VLLM/Lumina-Next-SFT-diffusers", torch_dtype=torch.bfloat16
|
||||
).to("cuda")
|
||||
```
|
||||
@@ -86,11 +86,11 @@ image = pipeline(prompt="Upper body of a young woman in a Victorian-era outfit w
|
||||
|
||||
Quantization helps reduce the memory requirements of very large models by storing model weights in a lower precision data type. However, quantization may have varying impact on video quality depending on the video model.
|
||||
|
||||
Refer to the [Quantization](../../quantization/overview) overview to learn more about supported quantization backends and selecting a quantization backend that supports your use case. The example below demonstrates how to load a quantized [`LuminaPipeline`] for inference with bitsandbytes.
|
||||
Refer to the [Quantization](../../quantization/overview) overview to learn more about supported quantization backends and selecting a quantization backend that supports your use case. The example below demonstrates how to load a quantized [`LuminaText2ImgPipeline`] for inference with bitsandbytes.
|
||||
|
||||
```py
|
||||
import torch
|
||||
from diffusers import BitsAndBytesConfig as DiffusersBitsAndBytesConfig, Transformer2DModel, LuminaPipeline
|
||||
from diffusers import BitsAndBytesConfig as DiffusersBitsAndBytesConfig, Transformer2DModel, LuminaText2ImgPipeline
|
||||
from transformers import BitsAndBytesConfig as BitsAndBytesConfig, T5EncoderModel
|
||||
|
||||
quant_config = BitsAndBytesConfig(load_in_8bit=True)
|
||||
@@ -109,7 +109,7 @@ transformer_8bit = Transformer2DModel.from_pretrained(
|
||||
torch_dtype=torch.float16,
|
||||
)
|
||||
|
||||
pipeline = LuminaPipeline.from_pretrained(
|
||||
pipeline = LuminaText2ImgPipeline.from_pretrained(
|
||||
"Alpha-VLLM/Lumina-Next-SFT-diffusers",
|
||||
text_encoder=text_encoder_8bit,
|
||||
transformer=transformer_8bit,
|
||||
@@ -122,9 +122,9 @@ image = pipeline(prompt).images[0]
|
||||
image.save("lumina.png")
|
||||
```
|
||||
|
||||
## LuminaPipeline
|
||||
## LuminaText2ImgPipeline
|
||||
|
||||
[[autodoc]] LuminaPipeline
|
||||
[[autodoc]] LuminaText2ImgPipeline
|
||||
- all
|
||||
- __call__
|
||||
|
||||
|
||||
@@ -36,14 +36,14 @@ Single file loading for Lumina Image 2.0 is available for the `Lumina2Transforme
|
||||
|
||||
```python
|
||||
import torch
|
||||
from diffusers import Lumina2Transformer2DModel, Lumina2Pipeline
|
||||
from diffusers import Lumina2Transformer2DModel, Lumina2Text2ImgPipeline
|
||||
|
||||
ckpt_path = "https://huggingface.co/Alpha-VLLM/Lumina-Image-2.0/blob/main/consolidated.00-of-01.pth"
|
||||
transformer = Lumina2Transformer2DModel.from_single_file(
|
||||
ckpt_path, torch_dtype=torch.bfloat16
|
||||
)
|
||||
|
||||
pipe = Lumina2Pipeline.from_pretrained(
|
||||
pipe = Lumina2Text2ImgPipeline.from_pretrained(
|
||||
"Alpha-VLLM/Lumina-Image-2.0", transformer=transformer, torch_dtype=torch.bfloat16
|
||||
)
|
||||
pipe.enable_model_cpu_offload()
|
||||
@@ -60,7 +60,7 @@ image.save("lumina-single-file.png")
|
||||
GGUF Quantized checkpoints for the `Lumina2Transformer2DModel` can be loaded via `from_single_file` with the `GGUFQuantizationConfig`
|
||||
|
||||
```python
|
||||
from diffusers import Lumina2Transformer2DModel, Lumina2Pipeline, GGUFQuantizationConfig
|
||||
from diffusers import Lumina2Transformer2DModel, Lumina2Text2ImgPipeline, GGUFQuantizationConfig
|
||||
|
||||
ckpt_path = "https://huggingface.co/calcuis/lumina-gguf/blob/main/lumina2-q4_0.gguf"
|
||||
transformer = Lumina2Transformer2DModel.from_single_file(
|
||||
@@ -69,7 +69,7 @@ transformer = Lumina2Transformer2DModel.from_single_file(
|
||||
torch_dtype=torch.bfloat16,
|
||||
)
|
||||
|
||||
pipe = Lumina2Pipeline.from_pretrained(
|
||||
pipe = Lumina2Text2ImgPipeline.from_pretrained(
|
||||
"Alpha-VLLM/Lumina-Image-2.0", transformer=transformer, torch_dtype=torch.bfloat16
|
||||
)
|
||||
pipe.enable_model_cpu_offload()
|
||||
@@ -80,8 +80,8 @@ image = pipe(
|
||||
image.save("lumina-gguf.png")
|
||||
```
|
||||
|
||||
## Lumina2Pipeline
|
||||
## Lumina2Text2ImgPipeline
|
||||
|
||||
[[autodoc]] Lumina2Pipeline
|
||||
[[autodoc]] Lumina2Text2ImgPipeline
|
||||
- all
|
||||
- __call__
|
||||
|
||||
@@ -15,7 +15,7 @@
|
||||
|
||||
# OmniGen
|
||||
|
||||
[OmniGen: Unified Image Generation](https://huggingface.co/papers/2409.11340) from BAAI, by Shitao Xiao, Yueze Wang, Junjie Zhou, Huaying Yuan, Xingrun Xing, Ruiran Yan, Chaofan Li, Shuting Wang, Tiejun Huang, Zheng Liu.
|
||||
[OmniGen: Unified Image Generation](https://arxiv.org/pdf/2409.11340) from BAAI, by Shitao Xiao, Yueze Wang, Junjie Zhou, Huaying Yuan, Xingrun Xing, Ruiran Yan, Chaofan Li, Shuting Wang, Tiejun Huang, Zheng Liu.
|
||||
|
||||
The abstract from the paper is:
|
||||
|
||||
|
||||
@@ -89,7 +89,6 @@ The table below lists all the pipelines currently available in 🤗 Diffusers an
|
||||
| [UniDiffuser](unidiffuser) | text2image, image2text, image variation, text variation, unconditional image generation, unconditional audio generation |
|
||||
| [Value-guided planning](value_guided_sampling) | value guided sampling |
|
||||
| [Wuerstchen](wuerstchen) | text2image |
|
||||
| [VisualCloze](visualcloze) | text2image, image2image, subject driven generation, inpainting, style transfer, image restoration, image editing, [depth,normal,edge,pose]2image, [depth,normal,edge,pose]-estimation, virtual try-on, image relighting |
|
||||
|
||||
## DiffusionPipeline
|
||||
|
||||
|
||||
@@ -18,7 +18,7 @@ specific language governing permissions and limitations under the License.
|
||||
|
||||
## Overview
|
||||
|
||||
[PIA: Your Personalized Image Animator via Plug-and-Play Modules in Text-to-Image Models](https://huggingface.co/papers/2312.13964) by Yiming Zhang, Zhening Xing, Yanhong Zeng, Youqing Fang, Kai Chen
|
||||
[PIA: Your Personalized Image Animator via Plug-and-Play Modules in Text-to-Image Models](https://arxiv.org/abs/2312.13964) by Yiming Zhang, Zhening Xing, Yanhong Zeng, Youqing Fang, Kai Chen
|
||||
|
||||
Recent advancements in personalized text-to-image (T2I) models have revolutionized content creation, empowering non-experts to generate stunning images with unique styles. While promising, adding realistic motions into these personalized images by text poses significant challenges in preserving distinct styles, high-fidelity details, and achieving motion controllability by text. In this paper, we present PIA, a Personalized Image Animator that excels in aligning with condition images, achieving motion controllability by text, and the compatibility with various personalized T2I models without specific tuning. To achieve these goals, PIA builds upon a base T2I model with well-trained temporal alignment layers, allowing for the seamless transformation of any personalized T2I model into an image animation model. A key component of PIA is the introduction of the condition module, which utilizes the condition frame and inter-frame affinity as input to transfer appearance information guided by the affinity hint for individual frame synthesis in the latent space. This design mitigates the challenges of appearance-related image alignment within and allows for a stronger focus on aligning with motion-related guidance.
|
||||
|
||||
@@ -92,7 +92,7 @@ If you plan on using a scheduler that can clip samples, make sure to disable it
|
||||
|
||||
## Using FreeInit
|
||||
|
||||
[FreeInit: Bridging Initialization Gap in Video Diffusion Models](https://huggingface.co/papers/2312.07537) by Tianxing Wu, Chenyang Si, Yuming Jiang, Ziqi Huang, Ziwei Liu.
|
||||
[FreeInit: Bridging Initialization Gap in Video Diffusion Models](https://arxiv.org/abs/2312.07537) by Tianxing Wu, Chenyang Si, Yuming Jiang, Ziqi Huang, Ziwei Liu.
|
||||
|
||||
FreeInit is an effective method that improves temporal consistency and overall quality of videos generated using video-diffusion-models without any addition training. It can be applied to PIA, AnimateDiff, ModelScope, VideoCrafter and various other video generation models seamlessly at inference time, and works by iteratively refining the latent-initialization noise. More details can be found it the paper.
|
||||
|
||||
|
||||
@@ -16,7 +16,6 @@
|
||||
|
||||
<div class="flex flex-wrap space-x-1">
|
||||
<img alt="LoRA" src="https://img.shields.io/badge/LoRA-d8b4fe?style=flat"/>
|
||||
<img alt="MPS" src="https://img.shields.io/badge/MPS-000000?style=flat&logo=apple&logoColor=white%22">
|
||||
</div>
|
||||
|
||||
[SANA: Efficient High-Resolution Image Synthesis with Linear Diffusion Transformers](https://huggingface.co/papers/2410.10629) from NVIDIA and MIT HAN Lab, by Enze Xie, Junsong Chen, Junyu Chen, Han Cai, Haotian Tang, Yujun Lin, Zhekai Zhang, Muyang Li, Ligeng Zhu, Yao Lu, Song Han.
|
||||
|
||||
@@ -1,134 +0,0 @@
|
||||
<!-- Copyright 2024 The HuggingFace Team. All rights reserved.
|
||||
#
|
||||
# Licensed under the Apache License, Version 2.0 (the "License");
|
||||
# you may not use this file except in compliance with the License.
|
||||
# You may obtain a copy of the License at
|
||||
#
|
||||
# http://www.apache.org/licenses/LICENSE-2.0
|
||||
#
|
||||
# Unless required by applicable law or agreed to in writing, software
|
||||
# distributed under the License is distributed on an "AS IS" BASIS,
|
||||
# WITHOUT WARRANTIES OR CONDITIONS OF ANY KIND, either express or implied.
|
||||
# See the License for the specific language governing permissions and
|
||||
# limitations under the License. -->
|
||||
|
||||
# SANA-Sprint
|
||||
|
||||
<div class="flex flex-wrap space-x-1">
|
||||
<img alt="LoRA" src="https://img.shields.io/badge/LoRA-d8b4fe?style=flat"/>
|
||||
</div>
|
||||
|
||||
[SANA-Sprint: One-Step Diffusion with Continuous-Time Consistency Distillation](https://huggingface.co/papers/2503.09641) from NVIDIA, MIT HAN Lab, and Hugging Face by Junsong Chen, Shuchen Xue, Yuyang Zhao, Jincheng Yu, Sayak Paul, Junyu Chen, Han Cai, Enze Xie, Song Han
|
||||
|
||||
The abstract from the paper is:
|
||||
|
||||
*This paper presents SANA-Sprint, an efficient diffusion model for ultra-fast text-to-image (T2I) generation. SANA-Sprint is built on a pre-trained foundation model and augmented with hybrid distillation, dramatically reducing inference steps from 20 to 1-4. We introduce three key innovations: (1) We propose a training-free approach that transforms a pre-trained flow-matching model for continuous-time consistency distillation (sCM), eliminating costly training from scratch and achieving high training efficiency. Our hybrid distillation strategy combines sCM with latent adversarial distillation (LADD): sCM ensures alignment with the teacher model, while LADD enhances single-step generation fidelity. (2) SANA-Sprint is a unified step-adaptive model that achieves high-quality generation in 1-4 steps, eliminating step-specific training and improving efficiency. (3) We integrate ControlNet with SANA-Sprint for real-time interactive image generation, enabling instant visual feedback for user interaction. SANA-Sprint establishes a new Pareto frontier in speed-quality tradeoffs, achieving state-of-the-art performance with 7.59 FID and 0.74 GenEval in only 1 step — outperforming FLUX-schnell (7.94 FID / 0.71 GenEval) while being 10× faster (0.1s vs 1.1s on H100). It also achieves 0.1s (T2I) and 0.25s (ControlNet) latency for 1024×1024 images on H100, and 0.31s (T2I) on an RTX 4090, showcasing its exceptional efficiency and potential for AI-powered consumer applications (AIPC). Code and pre-trained models will be open-sourced.*
|
||||
|
||||
<Tip>
|
||||
|
||||
Make sure to check out the Schedulers [guide](../../using-diffusers/schedulers) to learn how to explore the tradeoff between scheduler speed and quality, and see the [reuse components across pipelines](../../using-diffusers/loading#reuse-a-pipeline) section to learn how to efficiently load the same components into multiple pipelines.
|
||||
|
||||
</Tip>
|
||||
|
||||
This pipeline was contributed by [lawrence-cj](https://github.com/lawrence-cj), [shuchen Xue](https://github.com/scxue) and [Enze Xie](https://github.com/xieenze). The original codebase can be found [here](https://github.com/NVlabs/Sana). The original weights can be found under [hf.co/Efficient-Large-Model](https://huggingface.co/Efficient-Large-Model/).
|
||||
|
||||
Available models:
|
||||
|
||||
| Model | Recommended dtype |
|
||||
|:-------------------------------------------------------------------------------------------------------------------------------------------:|:-----------------:|
|
||||
| [`Efficient-Large-Model/Sana_Sprint_1.6B_1024px_diffusers`](https://huggingface.co/Efficient-Large-Model/Sana_Sprint_1.6B_1024px_diffusers) | `torch.bfloat16` |
|
||||
| [`Efficient-Large-Model/Sana_Sprint_0.6B_1024px_diffusers`](https://huggingface.co/Efficient-Large-Model/Sana_Sprint_0.6B_1024px_diffusers) | `torch.bfloat16` |
|
||||
|
||||
Refer to [this](https://huggingface.co/collections/Efficient-Large-Model/sana-sprint-67d6810d65235085b3b17c76) collection for more information.
|
||||
|
||||
Note: The recommended dtype mentioned is for the transformer weights. The text encoder must stay in `torch.bfloat16` and VAE weights must stay in `torch.bfloat16` or `torch.float32` for the model to work correctly. Please refer to the inference example below to see how to load the model with the recommended dtype.
|
||||
|
||||
|
||||
## Quantization
|
||||
|
||||
Quantization helps reduce the memory requirements of very large models by storing model weights in a lower precision data type. However, quantization may have varying impact on video quality depending on the video model.
|
||||
|
||||
Refer to the [Quantization](../../quantization/overview) overview to learn more about supported quantization backends and selecting a quantization backend that supports your use case. The example below demonstrates how to load a quantized [`SanaSprintPipeline`] for inference with bitsandbytes.
|
||||
|
||||
```py
|
||||
import torch
|
||||
from diffusers import BitsAndBytesConfig as DiffusersBitsAndBytesConfig, SanaTransformer2DModel, SanaSprintPipeline
|
||||
from transformers import BitsAndBytesConfig as BitsAndBytesConfig, AutoModel
|
||||
|
||||
quant_config = BitsAndBytesConfig(load_in_8bit=True)
|
||||
text_encoder_8bit = AutoModel.from_pretrained(
|
||||
"Efficient-Large-Model/Sana_Sprint_1.6B_1024px_diffusers",
|
||||
subfolder="text_encoder",
|
||||
quantization_config=quant_config,
|
||||
torch_dtype=torch.bfloat16,
|
||||
)
|
||||
|
||||
quant_config = DiffusersBitsAndBytesConfig(load_in_8bit=True)
|
||||
transformer_8bit = SanaTransformer2DModel.from_pretrained(
|
||||
"Efficient-Large-Model/Sana_Sprint_1.6B_1024px_diffusers",
|
||||
subfolder="transformer",
|
||||
quantization_config=quant_config,
|
||||
torch_dtype=torch.bfloat16,
|
||||
)
|
||||
|
||||
pipeline = SanaSprintPipeline.from_pretrained(
|
||||
"Efficient-Large-Model/Sana_Sprint_1.6B_1024px_diffusers",
|
||||
text_encoder=text_encoder_8bit,
|
||||
transformer=transformer_8bit,
|
||||
torch_dtype=torch.bfloat16,
|
||||
device_map="balanced",
|
||||
)
|
||||
|
||||
prompt = "a tiny astronaut hatching from an egg on the moon"
|
||||
image = pipeline(prompt).images[0]
|
||||
image.save("sana.png")
|
||||
```
|
||||
|
||||
## Setting `max_timesteps`
|
||||
|
||||
Users can tweak the `max_timesteps` value for experimenting with the visual quality of the generated outputs. The default `max_timesteps` value was obtained with an inference-time search process. For more details about it, check out the paper.
|
||||
|
||||
## Image to Image
|
||||
|
||||
The [`SanaSprintImg2ImgPipeline`] is a pipeline for image-to-image generation. It takes an input image and a prompt, and generates a new image based on the input image and the prompt.
|
||||
|
||||
```py
|
||||
import torch
|
||||
from diffusers import SanaSprintImg2ImgPipeline
|
||||
from diffusers.utils.loading_utils import load_image
|
||||
|
||||
image = load_image(
|
||||
"https://huggingface.co/datasets/huggingface/documentation-images/resolve/main/diffusers/penguin.png"
|
||||
)
|
||||
|
||||
pipe = SanaSprintImg2ImgPipeline.from_pretrained(
|
||||
"Efficient-Large-Model/Sana_Sprint_1.6B_1024px_diffusers",
|
||||
torch_dtype=torch.bfloat16)
|
||||
pipe.to("cuda")
|
||||
|
||||
image = pipe(
|
||||
prompt="a cute pink bear",
|
||||
image=image,
|
||||
strength=0.5,
|
||||
height=832,
|
||||
width=480
|
||||
).images[0]
|
||||
image.save("output.png")
|
||||
```
|
||||
|
||||
## SanaSprintPipeline
|
||||
|
||||
[[autodoc]] SanaSprintPipeline
|
||||
- all
|
||||
- __call__
|
||||
|
||||
## SanaSprintImg2ImgPipeline
|
||||
|
||||
[[autodoc]] SanaSprintImg2ImgPipeline
|
||||
- all
|
||||
- __call__
|
||||
|
||||
|
||||
## SanaPipelineOutput
|
||||
|
||||
[[autodoc]] pipelines.sana.pipeline_output.SanaPipelineOutput
|
||||
@@ -12,7 +12,7 @@ specific language governing permissions and limitations under the License.
|
||||
|
||||
# Stable Audio
|
||||
|
||||
Stable Audio was proposed in [Stable Audio Open](https://huggingface.co/papers/2407.14358) by Zach Evans et al. . it takes a text prompt as input and predicts the corresponding sound or music sample.
|
||||
Stable Audio was proposed in [Stable Audio Open](https://arxiv.org/abs/2407.14358) by Zach Evans et al. . it takes a text prompt as input and predicts the corresponding sound or music sample.
|
||||
|
||||
Stable Audio Open generates variable-length (up to 47s) stereo audio at 44.1kHz from text prompts. It comprises three components: an autoencoder that compresses waveforms into a manageable sequence length, a T5-based text embedding for text conditioning, and a transformer-based diffusion (DiT) model that operates in the latent space of the autoencoder.
|
||||
|
||||
|
||||
@@ -12,7 +12,7 @@ specific language governing permissions and limitations under the License.
|
||||
|
||||
# T2I-Adapter
|
||||
|
||||
[T2I-Adapter: Learning Adapters to Dig out More Controllable Ability for Text-to-Image Diffusion Models](https://huggingface.co/papers/2302.08453) by Chong Mou, Xintao Wang, Liangbin Xie, Jian Zhang, Zhongang Qi, Ying Shan, Xiaohu Qie.
|
||||
[T2I-Adapter: Learning Adapters to Dig out More Controllable Ability for Text-to-Image Diffusion Models](https://arxiv.org/abs/2302.08453) by Chong Mou, Xintao Wang, Liangbin Xie, Jian Zhang, Zhongang Qi, Ying Shan, Xiaohu Qie.
|
||||
|
||||
Using the pretrained models we can provide control images (for example, a depth map) to control Stable Diffusion text-to-image generation so that it follows the structure of the depth image and fills in the details.
|
||||
|
||||
|
||||
@@ -19,7 +19,7 @@ specific language governing permissions and limitations under the License.
|
||||
LDM3D was proposed in [LDM3D: Latent Diffusion Model for 3D](https://huggingface.co/papers/2305.10853) by Gabriela Ben Melech Stan, Diana Wofk, Scottie Fox, Alex Redden, Will Saxton, Jean Yu, Estelle Aflalo, Shao-Yen Tseng, Fabio Nonato, Matthias Muller, and Vasudev Lal. LDM3D generates an image and a depth map from a given text prompt unlike the existing text-to-image diffusion models such as [Stable Diffusion](./overview) which only generates an image. With almost the same number of parameters, LDM3D achieves to create a latent space that can compress both the RGB images and the depth maps.
|
||||
|
||||
Two checkpoints are available for use:
|
||||
- [ldm3d-original](https://huggingface.co/Intel/ldm3d). The original checkpoint used in the [paper](https://huggingface.co/papers/2305.10853)
|
||||
- [ldm3d-original](https://huggingface.co/Intel/ldm3d). The original checkpoint used in the [paper](https://arxiv.org/pdf/2305.10853.pdf)
|
||||
- [ldm3d-4c](https://huggingface.co/Intel/ldm3d-4c). The new version of LDM3D using 4 channels inputs instead of 6-channels inputs and finetuned on higher resolution images.
|
||||
|
||||
|
||||
@@ -48,7 +48,7 @@ Make sure to check out the Stable Diffusion [Tips](overview#tips) section to lea
|
||||
|
||||
# Upscaler
|
||||
|
||||
[LDM3D-VR](https://huggingface.co/papers/2311.03226) is an extended version of LDM3D.
|
||||
[LDM3D-VR](https://arxiv.org/pdf/2311.03226.pdf) is an extended version of LDM3D.
|
||||
|
||||
The abstract from the paper is:
|
||||
*Latent diffusion models have proven to be state-of-the-art in the creation and manipulation of visual outputs. However, as far as we know, the generation of depth maps jointly with RGB is still limited. We introduce LDM3D-VR, a suite of diffusion models targeting virtual reality development that includes LDM3D-pano and LDM3D-SR. These models enable the generation of panoramic RGBD based on textual prompts and the upscaling of low-resolution inputs to high-resolution RGBD, respectively. Our models are fine-tuned from existing pretrained models on datasets containing panoramic/high-resolution RGB images, depth maps and captions. Both models are evaluated in comparison to existing related methods*
|
||||
|
||||
@@ -14,10 +14,9 @@ specific language governing permissions and limitations under the License.
|
||||
|
||||
<div class="flex flex-wrap space-x-1">
|
||||
<img alt="LoRA" src="https://img.shields.io/badge/LoRA-d8b4fe?style=flat"/>
|
||||
<img alt="MPS" src="https://img.shields.io/badge/MPS-000000?style=flat&logo=apple&logoColor=white%22">
|
||||
</div>
|
||||
|
||||
Stable Diffusion 3 (SD3) was proposed in [Scaling Rectified Flow Transformers for High-Resolution Image Synthesis](https://huggingface.co/papers/2403.03206) by Patrick Esser, Sumith Kulal, Andreas Blattmann, Rahim Entezari, Jonas Muller, Harry Saini, Yam Levi, Dominik Lorenz, Axel Sauer, Frederic Boesel, Dustin Podell, Tim Dockhorn, Zion English, Kyle Lacey, Alex Goodwin, Yannik Marek, and Robin Rombach.
|
||||
Stable Diffusion 3 (SD3) was proposed in [Scaling Rectified Flow Transformers for High-Resolution Image Synthesis](https://arxiv.org/pdf/2403.03206.pdf) by Patrick Esser, Sumith Kulal, Andreas Blattmann, Rahim Entezari, Jonas Muller, Harry Saini, Yam Levi, Dominik Lorenz, Axel Sauer, Frederic Boesel, Dustin Podell, Tim Dockhorn, Zion English, Kyle Lacey, Alex Goodwin, Yannik Marek, and Robin Rombach.
|
||||
|
||||
The abstract from the paper is:
|
||||
|
||||
|
||||
@@ -14,7 +14,6 @@ specific language governing permissions and limitations under the License.
|
||||
|
||||
<div class="flex flex-wrap space-x-1">
|
||||
<img alt="LoRA" src="https://img.shields.io/badge/LoRA-d8b4fe?style=flat"/>
|
||||
<img alt="MPS" src="https://img.shields.io/badge/MPS-000000?style=flat&logo=apple&logoColor=white%22">
|
||||
</div>
|
||||
|
||||
Stable Diffusion XL (SDXL) was proposed in [SDXL: Improving Latent Diffusion Models for High-Resolution Image Synthesis](https://huggingface.co/papers/2307.01952) by Dustin Podell, Zion English, Kyle Lacey, Andreas Blattmann, Tim Dockhorn, Jonas Müller, Joe Penna, and Robin Rombach.
|
||||
|
||||
@@ -22,7 +22,7 @@ specific language governing permissions and limitations under the License.
|
||||
<img alt="LoRA" src="https://img.shields.io/badge/LoRA-d8b4fe?style=flat"/>
|
||||
</div>
|
||||
|
||||
[ModelScope Text-to-Video Technical Report](https://huggingface.co/papers/2308.06571) is by Jiuniu Wang, Hangjie Yuan, Dayou Chen, Yingya Zhang, Xiang Wang, Shiwei Zhang.
|
||||
[ModelScope Text-to-Video Technical Report](https://arxiv.org/abs/2308.06571) is by Jiuniu Wang, Hangjie Yuan, Dayou Chen, Yingya Zhang, Xiang Wang, Shiwei Zhang.
|
||||
|
||||
The abstract from the paper is:
|
||||
|
||||
|
||||
@@ -34,7 +34,7 @@ Our key modifications include (i) enriching the latent codes of the generated fr
|
||||
Experiments show that this leads to low overhead, yet high-quality and remarkably consistent video generation. Moreover, our approach is not limited to text-to-video synthesis but is also applicable to other tasks such as conditional and content-specialized video generation, and Video Instruct-Pix2Pix, i.e., instruction-guided video editing.
|
||||
As experiments show, our method performs comparably or sometimes better than recent approaches, despite not being trained on additional video data.*
|
||||
|
||||
You can find additional information about Text2Video-Zero on the [project page](https://text2video-zero.github.io/), [paper](https://huggingface.co/papers/2303.13439), and [original codebase](https://github.com/Picsart-AI-Research/Text2Video-Zero).
|
||||
You can find additional information about Text2Video-Zero on the [project page](https://text2video-zero.github.io/), [paper](https://arxiv.org/abs/2303.13439), and [original codebase](https://github.com/Picsart-AI-Research/Text2Video-Zero).
|
||||
|
||||
## Usage example
|
||||
|
||||
@@ -55,9 +55,9 @@ result = [(r * 255).astype("uint8") for r in result]
|
||||
imageio.mimsave("video.mp4", result, fps=4)
|
||||
```
|
||||
You can change these parameters in the pipeline call:
|
||||
* Motion field strength (see the [paper](https://huggingface.co/papers/2303.13439), Sect. 3.3.1):
|
||||
* Motion field strength (see the [paper](https://arxiv.org/abs/2303.13439), Sect. 3.3.1):
|
||||
* `motion_field_strength_x` and `motion_field_strength_y`. Default: `motion_field_strength_x=12`, `motion_field_strength_y=12`
|
||||
* `T` and `T'` (see the [paper](https://huggingface.co/papers/2303.13439), Sect. 3.3.1)
|
||||
* `T` and `T'` (see the [paper](https://arxiv.org/abs/2303.13439), Sect. 3.3.1)
|
||||
* `t0` and `t1` in the range `{0, ..., num_inference_steps}`. Default: `t0=45`, `t1=48`
|
||||
* Video length:
|
||||
* `video_length`, the number of frames video_length to be generated. Default: `video_length=8`
|
||||
|
||||
@@ -1,300 +0,0 @@
|
||||
<!--Copyright 2025 The HuggingFace Team. All rights reserved.
|
||||
#
|
||||
# Licensed under the Apache License, Version 2.0 (the "License");
|
||||
# you may not use this file except in compliance with the License.
|
||||
# You may obtain a copy of the License at
|
||||
#
|
||||
# http://www.apache.org/licenses/LICENSE-2.0
|
||||
#
|
||||
# Unless required by applicable law or agreed to in writing, software
|
||||
# distributed under the License is distributed on an "AS IS" BASIS,
|
||||
# WITHOUT WARRANTIES OR CONDITIONS OF ANY KIND, either express or implied.
|
||||
# See the License for the specific language governing permissions and
|
||||
# limitations under the License.
|
||||
-->
|
||||
|
||||
# VisualCloze
|
||||
|
||||
[VisualCloze: A Universal Image Generation Framework via Visual In-Context Learning](https://huggingface.co/papers/2504.07960) is an innovative in-context learning based universal image generation framework that offers key capabilities:
|
||||
1. Support for various in-domain tasks
|
||||
2. Generalization to unseen tasks through in-context learning
|
||||
3. Unify multiple tasks into one step and generate both target image and intermediate results
|
||||
4. Support reverse-engineering conditions from target images
|
||||
|
||||
## Overview
|
||||
|
||||
The abstract from the paper is:
|
||||
|
||||
*Recent progress in diffusion models significantly advances various image generation tasks. However, the current mainstream approach remains focused on building task-specific models, which have limited efficiency when supporting a wide range of different needs. While universal models attempt to address this limitation, they face critical challenges, including generalizable task instruction, appropriate task distributions, and unified architectural design. To tackle these challenges, we propose VisualCloze, a universal image generation framework, which supports a wide range of in-domain tasks, generalization to unseen ones, unseen unification of multiple tasks, and reverse generation. Unlike existing methods that rely on language-based task instruction, leading to task ambiguity and weak generalization, we integrate visual in-context learning, allowing models to identify tasks from visual demonstrations. Meanwhile, the inherent sparsity of visual task distributions hampers the learning of transferable knowledge across tasks. To this end, we introduce Graph200K, a graph-structured dataset that establishes various interrelated tasks, enhancing task density and transferable knowledge. Furthermore, we uncover that our unified image generation formulation shared a consistent objective with image infilling, enabling us to leverage the strong generative priors of pre-trained infilling models without modifying the architectures. The codes, dataset, and models are available at https://visualcloze.github.io.*
|
||||
|
||||
## Inference
|
||||
|
||||
### Model loading
|
||||
|
||||
VisualCloze is a two-stage cascade pipeline, containing `VisualClozeGenerationPipeline` and `VisualClozeUpsamplingPipeline`.
|
||||
- In `VisualClozeGenerationPipeline`, each image is downsampled before concatenating images into a grid layout, avoiding excessively high resolutions. VisualCloze releases two models suitable for diffusers, i.e., [VisualClozePipeline-384](https://huggingface.co/VisualCloze/VisualClozePipeline-384) and [VisualClozePipeline-512](https://huggingface.co/VisualCloze/VisualClozePipeline-384), which downsample images to resolutions of 384 and 512, respectively.
|
||||
- `VisualClozeUpsamplingPipeline` uses [SDEdit](https://huggingface.co/papers/2108.01073) to enable high-resolution image synthesis.
|
||||
|
||||
The `VisualClozePipeline` integrates both stages to support convenient end-to-end sampling, while also allowing users to utilize each pipeline independently as needed.
|
||||
|
||||
### Input Specifications
|
||||
|
||||
#### Task and Content Prompts
|
||||
- Task prompt: Required to describe the generation task intention
|
||||
- Content prompt: Optional description or caption of the target image
|
||||
- When content prompt is not needed, pass `None`
|
||||
- For batch inference, pass `List[str|None]`
|
||||
|
||||
#### Image Input Format
|
||||
- Format: `List[List[Image|None]]`
|
||||
- Structure:
|
||||
- All rows except the last represent in-context examples
|
||||
- Last row represents the current query (target image set to `None`)
|
||||
- For batch inference, pass `List[List[List[Image|None]]]`
|
||||
|
||||
#### Resolution Control
|
||||
- Default behavior:
|
||||
- Initial generation in the first stage: area of ${pipe.resolution}^2$
|
||||
- Upsampling in the second stage: 3x factor
|
||||
- Custom resolution: Adjust using `upsampling_height` and `upsampling_width` parameters
|
||||
|
||||
### Examples
|
||||
|
||||
For comprehensive examples covering a wide range of tasks, please refer to the [Online Demo](https://huggingface.co/spaces/VisualCloze/VisualCloze) and [GitHub Repository](https://github.com/lzyhha/VisualCloze). Below are simple examples for three cases: mask-to-image conversion, edge detection, and subject-driven generation.
|
||||
|
||||
#### Example for mask2image
|
||||
|
||||
```python
|
||||
import torch
|
||||
from diffusers import VisualClozePipeline
|
||||
from diffusers.utils import load_image
|
||||
|
||||
pipe = VisualClozePipeline.from_pretrained("VisualCloze/VisualClozePipeline-384", resolution=384, torch_dtype=torch.bfloat16)
|
||||
pipe.to("cuda")
|
||||
|
||||
# Load in-context images (make sure the paths are correct and accessible)
|
||||
image_paths = [
|
||||
# in-context examples
|
||||
[
|
||||
load_image('https://huggingface.co/datasets/huggingface/documentation-images/resolve/main/diffusers/visualcloze/visualcloze_mask2image_incontext-example-1_mask.jpg'),
|
||||
load_image('https://huggingface.co/datasets/huggingface/documentation-images/resolve/main/diffusers/visualcloze/visualcloze_mask2image_incontext-example-1_image.jpg'),
|
||||
],
|
||||
# query with the target image
|
||||
[
|
||||
load_image('https://huggingface.co/datasets/huggingface/documentation-images/resolve/main/diffusers/visualcloze/visualcloze_mask2image_query_mask.jpg'),
|
||||
None, # No image needed for the target image
|
||||
],
|
||||
]
|
||||
|
||||
# Task and content prompt
|
||||
task_prompt = "In each row, a logical task is demonstrated to achieve [IMAGE2] an aesthetically pleasing photograph based on [IMAGE1] sam 2-generated masks with rich color coding."
|
||||
content_prompt = """Majestic photo of a golden eagle perched on a rocky outcrop in a mountainous landscape.
|
||||
The eagle is positioned in the right foreground, facing left, with its sharp beak and keen eyes prominently visible.
|
||||
Its plumage is a mix of dark brown and golden hues, with intricate feather details.
|
||||
The background features a soft-focus view of snow-capped mountains under a cloudy sky, creating a serene and grandiose atmosphere.
|
||||
The foreground includes rugged rocks and patches of green moss. Photorealistic, medium depth of field,
|
||||
soft natural lighting, cool color palette, high contrast, sharp focus on the eagle, blurred background,
|
||||
tranquil, majestic, wildlife photography."""
|
||||
|
||||
# Run the pipeline
|
||||
image_result = pipe(
|
||||
task_prompt=task_prompt,
|
||||
content_prompt=content_prompt,
|
||||
image=image_paths,
|
||||
upsampling_width=1344,
|
||||
upsampling_height=768,
|
||||
upsampling_strength=0.4,
|
||||
guidance_scale=30,
|
||||
num_inference_steps=30,
|
||||
max_sequence_length=512,
|
||||
generator=torch.Generator("cpu").manual_seed(0)
|
||||
).images[0][0]
|
||||
|
||||
# Save the resulting image
|
||||
image_result.save("visualcloze.png")
|
||||
```
|
||||
|
||||
#### Example for edge-detection
|
||||
|
||||
```python
|
||||
import torch
|
||||
from diffusers import VisualClozePipeline
|
||||
from diffusers.utils import load_image
|
||||
|
||||
pipe = VisualClozePipeline.from_pretrained("VisualCloze/VisualClozePipeline-384", resolution=384, torch_dtype=torch.bfloat16)
|
||||
pipe.to("cuda")
|
||||
|
||||
# Load in-context images (make sure the paths are correct and accessible)
|
||||
image_paths = [
|
||||
# in-context examples
|
||||
[
|
||||
load_image('https://huggingface.co/datasets/huggingface/documentation-images/resolve/main/diffusers/visualcloze/visualcloze_edgedetection_incontext-example-1_image.jpg'),
|
||||
load_image('https://huggingface.co/datasets/huggingface/documentation-images/resolve/main/diffusers/visualcloze/visualcloze_edgedetection_incontext-example-1_edge.jpg'),
|
||||
],
|
||||
[
|
||||
load_image('https://huggingface.co/datasets/huggingface/documentation-images/resolve/main/diffusers/visualcloze/visualcloze_edgedetection_incontext-example-2_image.jpg'),
|
||||
load_image('https://huggingface.co/datasets/huggingface/documentation-images/resolve/main/diffusers/visualcloze/visualcloze_edgedetection_incontext-example-2_edge.jpg'),
|
||||
],
|
||||
# query with the target image
|
||||
[
|
||||
load_image('https://huggingface.co/datasets/huggingface/documentation-images/resolve/main/diffusers/visualcloze/visualcloze_edgedetection_query_image.jpg'),
|
||||
None, # No image needed for the target image
|
||||
],
|
||||
]
|
||||
|
||||
# Task and content prompt
|
||||
task_prompt = "Each row illustrates a pathway from [IMAGE1] a sharp and beautifully composed photograph to [IMAGE2] edge map with natural well-connected outlines using a clear logical task."
|
||||
content_prompt = ""
|
||||
|
||||
# Run the pipeline
|
||||
image_result = pipe(
|
||||
task_prompt=task_prompt,
|
||||
content_prompt=content_prompt,
|
||||
image=image_paths,
|
||||
upsampling_width=864,
|
||||
upsampling_height=1152,
|
||||
upsampling_strength=0.4,
|
||||
guidance_scale=30,
|
||||
num_inference_steps=30,
|
||||
max_sequence_length=512,
|
||||
generator=torch.Generator("cpu").manual_seed(0)
|
||||
).images[0][0]
|
||||
|
||||
# Save the resulting image
|
||||
image_result.save("visualcloze.png")
|
||||
```
|
||||
|
||||
#### Example for subject-driven generation
|
||||
|
||||
```python
|
||||
import torch
|
||||
from diffusers import VisualClozePipeline
|
||||
from diffusers.utils import load_image
|
||||
|
||||
pipe = VisualClozePipeline.from_pretrained("VisualCloze/VisualClozePipeline-384", resolution=384, torch_dtype=torch.bfloat16)
|
||||
pipe.to("cuda")
|
||||
|
||||
# Load in-context images (make sure the paths are correct and accessible)
|
||||
image_paths = [
|
||||
# in-context examples
|
||||
[
|
||||
load_image('https://huggingface.co/datasets/huggingface/documentation-images/resolve/main/diffusers/visualcloze/visualcloze_subjectdriven_incontext-example-1_reference.jpg'),
|
||||
load_image('https://huggingface.co/datasets/huggingface/documentation-images/resolve/main/diffusers/visualcloze/visualcloze_subjectdriven_incontext-example-1_depth.jpg'),
|
||||
load_image('https://huggingface.co/datasets/huggingface/documentation-images/resolve/main/diffusers/visualcloze/visualcloze_subjectdriven_incontext-example-1_image.jpg'),
|
||||
],
|
||||
[
|
||||
load_image('https://huggingface.co/datasets/huggingface/documentation-images/resolve/main/diffusers/visualcloze/visualcloze_subjectdriven_incontext-example-2_reference.jpg'),
|
||||
load_image('https://huggingface.co/datasets/huggingface/documentation-images/resolve/main/diffusers/visualcloze/visualcloze_subjectdriven_incontext-example-2_depth.jpg'),
|
||||
load_image('https://huggingface.co/datasets/huggingface/documentation-images/resolve/main/diffusers/visualcloze/visualcloze_subjectdriven_incontext-example-2_image.jpg'),
|
||||
],
|
||||
# query with the target image
|
||||
[
|
||||
load_image('https://huggingface.co/datasets/huggingface/documentation-images/resolve/main/diffusers/visualcloze/visualcloze_subjectdriven_query_reference.jpg'),
|
||||
load_image('https://huggingface.co/datasets/huggingface/documentation-images/resolve/main/diffusers/visualcloze/visualcloze_subjectdriven_query_depth.jpg'),
|
||||
None, # No image needed for the target image
|
||||
],
|
||||
]
|
||||
|
||||
# Task and content prompt
|
||||
task_prompt = """Each row describes a process that begins with [IMAGE1] an image containing the key object,
|
||||
[IMAGE2] depth map revealing gray-toned spatial layers and results in
|
||||
[IMAGE3] an image with artistic qualitya high-quality image with exceptional detail."""
|
||||
content_prompt = """A vintage porcelain collector's item. Beneath a blossoming cherry tree in early spring,
|
||||
this treasure is photographed up close, with soft pink petals drifting through the air and vibrant blossoms framing the scene."""
|
||||
|
||||
# Run the pipeline
|
||||
image_result = pipe(
|
||||
task_prompt=task_prompt,
|
||||
content_prompt=content_prompt,
|
||||
image=image_paths,
|
||||
upsampling_width=1024,
|
||||
upsampling_height=1024,
|
||||
upsampling_strength=0.2,
|
||||
guidance_scale=30,
|
||||
num_inference_steps=30,
|
||||
max_sequence_length=512,
|
||||
generator=torch.Generator("cpu").manual_seed(0)
|
||||
).images[0][0]
|
||||
|
||||
# Save the resulting image
|
||||
image_result.save("visualcloze.png")
|
||||
```
|
||||
|
||||
#### Utilize each pipeline independently
|
||||
|
||||
```python
|
||||
import torch
|
||||
from diffusers import VisualClozeGenerationPipeline, FluxFillPipeline as VisualClozeUpsamplingPipeline
|
||||
from diffusers.utils import load_image
|
||||
from PIL import Image
|
||||
|
||||
pipe = VisualClozeGenerationPipeline.from_pretrained(
|
||||
"VisualCloze/VisualClozePipeline-384", resolution=384, torch_dtype=torch.bfloat16
|
||||
)
|
||||
pipe.to("cuda")
|
||||
|
||||
image_paths = [
|
||||
# in-context examples
|
||||
[
|
||||
load_image(
|
||||
"https://huggingface.co/datasets/huggingface/documentation-images/resolve/main/diffusers/visualcloze/visualcloze_mask2image_incontext-example-1_mask.jpg"
|
||||
),
|
||||
load_image(
|
||||
"https://huggingface.co/datasets/huggingface/documentation-images/resolve/main/diffusers/visualcloze/visualcloze_mask2image_incontext-example-1_image.jpg"
|
||||
),
|
||||
],
|
||||
# query with the target image
|
||||
[
|
||||
load_image(
|
||||
"https://huggingface.co/datasets/huggingface/documentation-images/resolve/main/diffusers/visualcloze/visualcloze_mask2image_query_mask.jpg"
|
||||
),
|
||||
None, # No image needed for the target image
|
||||
],
|
||||
]
|
||||
task_prompt = "In each row, a logical task is demonstrated to achieve [IMAGE2] an aesthetically pleasing photograph based on [IMAGE1] sam 2-generated masks with rich color coding."
|
||||
content_prompt = "Majestic photo of a golden eagle perched on a rocky outcrop in a mountainous landscape. The eagle is positioned in the right foreground, facing left, with its sharp beak and keen eyes prominently visible. Its plumage is a mix of dark brown and golden hues, with intricate feather details. The background features a soft-focus view of snow-capped mountains under a cloudy sky, creating a serene and grandiose atmosphere. The foreground includes rugged rocks and patches of green moss. Photorealistic, medium depth of field, soft natural lighting, cool color palette, high contrast, sharp focus on the eagle, blurred background, tranquil, majestic, wildlife photography."
|
||||
|
||||
# Stage 1: Generate initial image
|
||||
image = pipe(
|
||||
task_prompt=task_prompt,
|
||||
content_prompt=content_prompt,
|
||||
image=image_paths,
|
||||
guidance_scale=30,
|
||||
num_inference_steps=30,
|
||||
max_sequence_length=512,
|
||||
generator=torch.Generator("cpu").manual_seed(0),
|
||||
).images[0][0]
|
||||
|
||||
# Stage 2 (optional): Upsample the generated image
|
||||
pipe_upsample = VisualClozeUpsamplingPipeline.from_pipe(pipe)
|
||||
pipe_upsample.to("cuda")
|
||||
|
||||
mask_image = Image.new("RGB", image.size, (255, 255, 255))
|
||||
|
||||
image = pipe_upsample(
|
||||
image=image,
|
||||
mask_image=mask_image,
|
||||
prompt=content_prompt,
|
||||
width=1344,
|
||||
height=768,
|
||||
strength=0.4,
|
||||
guidance_scale=30,
|
||||
num_inference_steps=30,
|
||||
max_sequence_length=512,
|
||||
generator=torch.Generator("cpu").manual_seed(0),
|
||||
).images[0]
|
||||
|
||||
image.save("visualcloze.png")
|
||||
```
|
||||
|
||||
## VisualClozePipeline
|
||||
|
||||
[[autodoc]] VisualClozePipeline
|
||||
- all
|
||||
- __call__
|
||||
|
||||
## VisualClozeGenerationPipeline
|
||||
|
||||
[[autodoc]] VisualClozeGenerationPipeline
|
||||
- all
|
||||
- __call__
|
||||
@@ -12,321 +12,39 @@
|
||||
# See the License for the specific language governing permissions and
|
||||
# limitations under the License. -->
|
||||
|
||||
<div style="float: right;">
|
||||
<div class="flex flex-wrap space-x-1">
|
||||
<a href="https://huggingface.co/docs/diffusers/main/en/tutorials/using_peft_for_inference" target="_blank" rel="noopener">
|
||||
<img alt="LoRA" src="https://img.shields.io/badge/LoRA-d8b4fe?style=flat"/>
|
||||
</a>
|
||||
</div>
|
||||
</div>
|
||||
# Wan
|
||||
|
||||
# Wan2.1
|
||||
[Wan 2.1](https://github.com/Wan-Video/Wan2.1) by the Alibaba Wan Team.
|
||||
|
||||
[Wan-2.1](https://huggingface.co/papers/2503.20314) by the Wan Team.
|
||||
<!-- TODO(aryan): update abstract once paper is out -->
|
||||
|
||||
*This report presents Wan, a comprehensive and open suite of video foundation models designed to push the boundaries of video generation. Built upon the mainstream diffusion transformer paradigm, Wan achieves significant advancements in generative capabilities through a series of innovations, including our novel VAE, scalable pre-training strategies, large-scale data curation, and automated evaluation metrics. These contributions collectively enhance the model's performance and versatility. Specifically, Wan is characterized by four key features: Leading Performance: The 14B model of Wan, trained on a vast dataset comprising billions of images and videos, demonstrates the scaling laws of video generation with respect to both data and model size. It consistently outperforms the existing open-source models as well as state-of-the-art commercial solutions across multiple internal and external benchmarks, demonstrating a clear and significant performance superiority. Comprehensiveness: Wan offers two capable models, i.e., 1.3B and 14B parameters, for efficiency and effectiveness respectively. It also covers multiple downstream applications, including image-to-video, instruction-guided video editing, and personal video generation, encompassing up to eight tasks. Consumer-Grade Efficiency: The 1.3B model demonstrates exceptional resource efficiency, requiring only 8.19 GB VRAM, making it compatible with a wide range of consumer-grade GPUs. Openness: We open-source the entire series of Wan, including source code and all models, with the goal of fostering the growth of the video generation community. This openness seeks to significantly expand the creative possibilities of video production in the industry and provide academia with high-quality video foundation models. All the code and models are available at [this https URL](https://github.com/Wan-Video/Wan2.1).*
|
||||
<Tip>
|
||||
|
||||
You can find all the original Wan2.1 checkpoints under the [Wan-AI](https://huggingface.co/Wan-AI) organization.
|
||||
Make sure to check out the Schedulers [guide](../../using-diffusers/schedulers) to learn how to explore the tradeoff between scheduler speed and quality, and see the [reuse components across pipelines](../../using-diffusers/loading#reuse-a-pipeline) section to learn how to efficiently load the same components into multiple pipelines.
|
||||
|
||||
The following Wan models are supported in Diffusers:
|
||||
- [Wan 2.1 T2V 1.3B](https://huggingface.co/Wan-AI/Wan2.1-T2V-1.3B-Diffusers)
|
||||
- [Wan 2.1 T2V 14B](https://huggingface.co/Wan-AI/Wan2.1-T2V-14B-Diffusers)
|
||||
- [Wan 2.1 I2V 14B - 480P](https://huggingface.co/Wan-AI/Wan2.1-I2V-14B-480P-Diffusers)
|
||||
- [Wan 2.1 I2V 14B - 720P](https://huggingface.co/Wan-AI/Wan2.1-I2V-14B-720P-Diffusers)
|
||||
- [Wan 2.1 FLF2V 14B - 720P](https://huggingface.co/Wan-AI/Wan2.1-FLF2V-14B-720P-diffusers)
|
||||
- [Wan 2.1 VACE 1.3B](https://huggingface.co/Wan-AI/Wan2.1-VACE-1.3B-diffusers)
|
||||
- [Wan 2.1 VACE 14B](https://huggingface.co/Wan-AI/Wan2.1-VACE-14B-diffusers)
|
||||
</Tip>
|
||||
|
||||
> [!TIP]
|
||||
> Click on the Wan2.1 models in the right sidebar for more examples of video generation.
|
||||
Recommendations for inference:
|
||||
- VAE in `torch.float32` for better decoding quality.
|
||||
- `num_frames` should be of the form `4 * k + 1`, for example `49` or `81`.
|
||||
- For smaller resolution videos, try lower values of `shift` (between `2.0` to `5.0`) in the [Scheduler](https://huggingface.co/docs/diffusers/main/en/api/schedulers/flow_match_euler_discrete#diffusers.FlowMatchEulerDiscreteScheduler.shift). For larger resolution videos, try higher values (between `7.0` and `12.0`). The default value is `3.0` for Wan.
|
||||
|
||||
### Text-to-Video Generation
|
||||
### Using a custom scheduler
|
||||
|
||||
The example below demonstrates how to generate a video from text optimized for memory or inference speed.
|
||||
|
||||
<hfoptions id="T2V usage">
|
||||
<hfoption id="T2V memory">
|
||||
|
||||
Refer to the [Reduce memory usage](../../optimization/memory) guide for more details about the various memory saving techniques.
|
||||
|
||||
The Wan2.1 text-to-video model below requires ~13GB of VRAM.
|
||||
|
||||
```py
|
||||
# pip install ftfy
|
||||
import torch
|
||||
import numpy as np
|
||||
from diffusers import AutoModel, WanPipeline
|
||||
from diffusers.quantizers import PipelineQuantizationConfig
|
||||
from diffusers.hooks.group_offloading import apply_group_offloading
|
||||
from diffusers.utils import export_to_video, load_image
|
||||
from transformers import UMT5EncoderModel
|
||||
|
||||
text_encoder = UMT5EncoderModel.from_pretrained("Wan-AI/Wan2.1-T2V-14B-Diffusers", subfolder="text_encoder", torch_dtype=torch.bfloat16)
|
||||
vae = AutoModel.from_pretrained("Wan-AI/Wan2.1-T2V-14B-Diffusers", subfolder="vae", torch_dtype=torch.float32)
|
||||
transformer = AutoModel.from_pretrained("Wan-AI/Wan2.1-T2V-14B-Diffusers", subfolder="transformer", torch_dtype=torch.bfloat16)
|
||||
|
||||
# group-offloading
|
||||
onload_device = torch.device("cuda")
|
||||
offload_device = torch.device("cpu")
|
||||
apply_group_offloading(text_encoder,
|
||||
onload_device=onload_device,
|
||||
offload_device=offload_device,
|
||||
offload_type="block_level",
|
||||
num_blocks_per_group=4
|
||||
)
|
||||
transformer.enable_group_offload(
|
||||
onload_device=onload_device,
|
||||
offload_device=offload_device,
|
||||
offload_type="leaf_level",
|
||||
use_stream=True
|
||||
)
|
||||
|
||||
pipeline = WanPipeline.from_pretrained(
|
||||
"Wan-AI/Wan2.1-T2V-14B-Diffusers",
|
||||
vae=vae,
|
||||
transformer=transformer,
|
||||
text_encoder=text_encoder,
|
||||
torch_dtype=torch.bfloat16
|
||||
)
|
||||
pipeline.to("cuda")
|
||||
|
||||
prompt = """
|
||||
The camera rushes from far to near in a low-angle shot,
|
||||
revealing a white ferret on a log. It plays, leaps into the water, and emerges, as the camera zooms in
|
||||
for a close-up. Water splashes berry bushes nearby, while moss, snow, and leaves blanket the ground.
|
||||
Birch trees and a light blue sky frame the scene, with ferns in the foreground. Side lighting casts dynamic
|
||||
shadows and warm highlights. Medium composition, front view, low angle, with depth of field.
|
||||
"""
|
||||
negative_prompt = """
|
||||
Bright tones, overexposed, static, blurred details, subtitles, style, works, paintings, images, static, overall gray, worst quality,
|
||||
low quality, JPEG compression residue, ugly, incomplete, extra fingers, poorly drawn hands, poorly drawn faces, deformed, disfigured,
|
||||
misshapen limbs, fused fingers, still picture, messy background, three legs, many people in the background, walking backwards
|
||||
"""
|
||||
|
||||
output = pipeline(
|
||||
prompt=prompt,
|
||||
negative_prompt=negative_prompt,
|
||||
num_frames=81,
|
||||
guidance_scale=5.0,
|
||||
).frames[0]
|
||||
export_to_video(output, "output.mp4", fps=16)
|
||||
```
|
||||
|
||||
</hfoption>
|
||||
<hfoption id="T2V inference speed">
|
||||
|
||||
[Compilation](../../optimization/fp16#torchcompile) is slow the first time but subsequent calls to the pipeline are faster.
|
||||
|
||||
```py
|
||||
# pip install ftfy
|
||||
import torch
|
||||
import numpy as np
|
||||
from diffusers import AutoModel, WanPipeline
|
||||
from diffusers.hooks.group_offloading import apply_group_offloading
|
||||
from diffusers.utils import export_to_video, load_image
|
||||
from transformers import UMT5EncoderModel
|
||||
|
||||
text_encoder = UMT5EncoderModel.from_pretrained("Wan-AI/Wan2.1-T2V-14B-Diffusers", subfolder="text_encoder", torch_dtype=torch.bfloat16)
|
||||
vae = AutoModel.from_pretrained("Wan-AI/Wan2.1-T2V-14B-Diffusers", subfolder="vae", torch_dtype=torch.float32)
|
||||
transformer = AutoModel.from_pretrained("Wan-AI/Wan2.1-T2V-14B-Diffusers", subfolder="transformer", torch_dtype=torch.bfloat16)
|
||||
|
||||
pipeline = WanPipeline.from_pretrained(
|
||||
"Wan-AI/Wan2.1-T2V-14B-Diffusers",
|
||||
vae=vae,
|
||||
transformer=transformer,
|
||||
text_encoder=text_encoder,
|
||||
torch_dtype=torch.bfloat16
|
||||
)
|
||||
pipeline.to("cuda")
|
||||
|
||||
# torch.compile
|
||||
pipeline.transformer.to(memory_format=torch.channels_last)
|
||||
pipeline.transformer = torch.compile(
|
||||
pipeline.transformer, mode="max-autotune", fullgraph=True
|
||||
)
|
||||
|
||||
prompt = """
|
||||
The camera rushes from far to near in a low-angle shot,
|
||||
revealing a white ferret on a log. It plays, leaps into the water, and emerges, as the camera zooms in
|
||||
for a close-up. Water splashes berry bushes nearby, while moss, snow, and leaves blanket the ground.
|
||||
Birch trees and a light blue sky frame the scene, with ferns in the foreground. Side lighting casts dynamic
|
||||
shadows and warm highlights. Medium composition, front view, low angle, with depth of field.
|
||||
"""
|
||||
negative_prompt = """
|
||||
Bright tones, overexposed, static, blurred details, subtitles, style, works, paintings, images, static, overall gray, worst quality,
|
||||
low quality, JPEG compression residue, ugly, incomplete, extra fingers, poorly drawn hands, poorly drawn faces, deformed, disfigured,
|
||||
misshapen limbs, fused fingers, still picture, messy background, three legs, many people in the background, walking backwards
|
||||
"""
|
||||
|
||||
output = pipeline(
|
||||
prompt=prompt,
|
||||
negative_prompt=negative_prompt,
|
||||
num_frames=81,
|
||||
guidance_scale=5.0,
|
||||
).frames[0]
|
||||
export_to_video(output, "output.mp4", fps=16)
|
||||
```
|
||||
|
||||
</hfoption>
|
||||
</hfoptions>
|
||||
|
||||
### First-Last-Frame-to-Video Generation
|
||||
|
||||
The example below demonstrates how to use the image-to-video pipeline to generate a video using a text description, a starting frame, and an ending frame.
|
||||
|
||||
<hfoptions id="FLF2V usage">
|
||||
<hfoption id="usage">
|
||||
Wan can be used with many different schedulers, each with their own benefits regarding speed and generation quality. By default, Wan uses the `UniPCMultistepScheduler(prediction_type="flow_prediction", use_flow_sigmas=True, flow_shift=3.0)` scheduler. You can use a different scheduler as follows:
|
||||
|
||||
```python
|
||||
import numpy as np
|
||||
import torch
|
||||
import torchvision.transforms.functional as TF
|
||||
from diffusers import AutoencoderKLWan, WanImageToVideoPipeline
|
||||
from diffusers.utils import export_to_video, load_image
|
||||
from transformers import CLIPVisionModel
|
||||
from diffusers import FlowMatchEulerDiscreteScheduler, UniPCMultistepScheduler, WanPipeline
|
||||
|
||||
scheduler_a = FlowMatchEulerDiscreteScheduler(shift=5.0)
|
||||
scheduler_b = UniPCMultistepScheduler(prediction_type="flow_prediction", use_flow_sigmas=True, flow_shift=4.0)
|
||||
|
||||
model_id = "Wan-AI/Wan2.1-FLF2V-14B-720P-diffusers"
|
||||
image_encoder = CLIPVisionModel.from_pretrained(model_id, subfolder="image_encoder", torch_dtype=torch.float32)
|
||||
vae = AutoencoderKLWan.from_pretrained(model_id, subfolder="vae", torch_dtype=torch.float32)
|
||||
pipe = WanImageToVideoPipeline.from_pretrained(
|
||||
model_id, vae=vae, image_encoder=image_encoder, torch_dtype=torch.bfloat16
|
||||
)
|
||||
pipe.to("cuda")
|
||||
pipe = WanPipeline.from_pretrained("Wan-AI/Wan2.1-T2V-1.3B-Diffusers", scheduler=<CUSTOM_SCHEDULER_HERE>)
|
||||
|
||||
first_frame = load_image("https://huggingface.co/datasets/huggingface/documentation-images/resolve/main/diffusers/flf2v_input_first_frame.png")
|
||||
last_frame = load_image("https://huggingface.co/datasets/huggingface/documentation-images/resolve/main/diffusers/flf2v_input_last_frame.png")
|
||||
|
||||
def aspect_ratio_resize(image, pipe, max_area=720 * 1280):
|
||||
aspect_ratio = image.height / image.width
|
||||
mod_value = pipe.vae_scale_factor_spatial * pipe.transformer.config.patch_size[1]
|
||||
height = round(np.sqrt(max_area * aspect_ratio)) // mod_value * mod_value
|
||||
width = round(np.sqrt(max_area / aspect_ratio)) // mod_value * mod_value
|
||||
image = image.resize((width, height))
|
||||
return image, height, width
|
||||
|
||||
def center_crop_resize(image, height, width):
|
||||
# Calculate resize ratio to match first frame dimensions
|
||||
resize_ratio = max(width / image.width, height / image.height)
|
||||
|
||||
# Resize the image
|
||||
width = round(image.width * resize_ratio)
|
||||
height = round(image.height * resize_ratio)
|
||||
size = [width, height]
|
||||
image = TF.center_crop(image, size)
|
||||
|
||||
return image, height, width
|
||||
|
||||
first_frame, height, width = aspect_ratio_resize(first_frame, pipe)
|
||||
if last_frame.size != first_frame.size:
|
||||
last_frame, _, _ = center_crop_resize(last_frame, height, width)
|
||||
|
||||
prompt = "CG animation style, a small blue bird takes off from the ground, flapping its wings. The bird's feathers are delicate, with a unique pattern on its chest. The background shows a blue sky with white clouds under bright sunshine. The camera follows the bird upward, capturing its flight and the vastness of the sky from a close-up, low-angle perspective."
|
||||
|
||||
output = pipe(
|
||||
image=first_frame, last_image=last_frame, prompt=prompt, height=height, width=width, guidance_scale=5.5
|
||||
).frames[0]
|
||||
export_to_video(output, "output.mp4", fps=16)
|
||||
# or,
|
||||
pipe.scheduler = <CUSTOM_SCHEDULER_HERE>
|
||||
```
|
||||
|
||||
</hfoption>
|
||||
</hfoptions>
|
||||
|
||||
### Any-to-Video Controllable Generation
|
||||
|
||||
Wan VACE supports various generation techniques which achieve controllable video generation. Some of the capabilities include:
|
||||
- Control to Video (Depth, Pose, Sketch, Flow, Grayscale, Scribble, Layout, Boundary Box, etc.). Recommended library for preprocessing videos to obtain control videos: [huggingface/controlnet_aux]()
|
||||
- Image/Video to Video (first frame, last frame, starting clip, ending clip, random clips)
|
||||
- Inpainting and Outpainting
|
||||
- Subject to Video (faces, object, characters, etc.)
|
||||
- Composition to Video (reference anything, animate anything, swap anything, expand anything, move anything, etc.)
|
||||
|
||||
The code snippets available in [this](https://github.com/huggingface/diffusers/pull/11582) pull request demonstrate some examples of how videos can be generated with controllability signals.
|
||||
|
||||
The general rule of thumb to keep in mind when preparing inputs for the VACE pipeline is that the input images, or frames of a video that you want to use for conditioning, should have a corresponding mask that is black in color. The black mask signifies that the model will not generate new content for that area, and only use those parts for conditioning the generation process. For parts/frames that should be generated by the model, the mask should be white in color.
|
||||
|
||||
## Notes
|
||||
|
||||
- Wan2.1 supports LoRAs with [`~loaders.WanLoraLoaderMixin.load_lora_weights`].
|
||||
|
||||
<details>
|
||||
<summary>Show example code</summary>
|
||||
|
||||
```py
|
||||
# pip install ftfy
|
||||
import torch
|
||||
from diffusers import AutoModel, WanPipeline
|
||||
from diffusers.schedulers.scheduling_unipc_multistep import UniPCMultistepScheduler
|
||||
from diffusers.utils import export_to_video
|
||||
|
||||
vae = AutoModel.from_pretrained(
|
||||
"Wan-AI/Wan2.1-T2V-1.3B-Diffusers", subfolder="vae", torch_dtype=torch.float32
|
||||
)
|
||||
pipeline = WanPipeline.from_pretrained(
|
||||
"Wan-AI/Wan2.1-T2V-1.3B-Diffusers", vae=vae, torch_dtype=torch.bfloat16
|
||||
)
|
||||
pipeline.scheduler = UniPCMultistepScheduler.from_config(
|
||||
pipeline.scheduler.config, flow_shift=5.0
|
||||
)
|
||||
pipeline.to("cuda")
|
||||
|
||||
pipeline.load_lora_weights("benjamin-paine/steamboat-willie-1.3b", adapter_name="steamboat-willie")
|
||||
pipeline.set_adapters("steamboat-willie")
|
||||
|
||||
pipeline.enable_model_cpu_offload()
|
||||
|
||||
# use "steamboat willie style" to trigger the LoRA
|
||||
prompt = """
|
||||
steamboat willie style, golden era animation, The camera rushes from far to near in a low-angle shot,
|
||||
revealing a white ferret on a log. It plays, leaps into the water, and emerges, as the camera zooms in
|
||||
for a close-up. Water splashes berry bushes nearby, while moss, snow, and leaves blanket the ground.
|
||||
Birch trees and a light blue sky frame the scene, with ferns in the foreground. Side lighting casts dynamic
|
||||
shadows and warm highlights. Medium composition, front view, low angle, with depth of field.
|
||||
"""
|
||||
|
||||
output = pipeline(
|
||||
prompt=prompt,
|
||||
num_frames=81,
|
||||
guidance_scale=5.0,
|
||||
).frames[0]
|
||||
export_to_video(output, "output.mp4", fps=16)
|
||||
```
|
||||
|
||||
</details>
|
||||
|
||||
- [`WanTransformer3DModel`] and [`AutoencoderKLWan`] supports loading from single files with [`~loaders.FromSingleFileMixin.from_single_file`].
|
||||
|
||||
<details>
|
||||
<summary>Show example code</summary>
|
||||
|
||||
```py
|
||||
# pip install ftfy
|
||||
import torch
|
||||
from diffusers import WanPipeline, AutoModel
|
||||
|
||||
vae = AutoModel.from_single_file(
|
||||
"https://huggingface.co/Comfy-Org/Wan_2.1_ComfyUI_repackaged/blob/main/split_files/vae/wan_2.1_vae.safetensors"
|
||||
)
|
||||
transformer = AutoModel.from_single_file(
|
||||
"https://huggingface.co/Comfy-Org/Wan_2.1_ComfyUI_repackaged/blob/main/split_files/diffusion_models/wan2.1_t2v_1.3B_bf16.safetensors",
|
||||
torch_dtype=torch.bfloat16
|
||||
)
|
||||
pipeline = WanPipeline.from_pretrained(
|
||||
"Wan-AI/Wan2.1-T2V-1.3B-Diffusers",
|
||||
vae=vae,
|
||||
transformer=transformer,
|
||||
torch_dtype=torch.bfloat16
|
||||
)
|
||||
```
|
||||
|
||||
</details>
|
||||
|
||||
- Set the [`AutoencoderKLWan`] dtype to `torch.float32` for better decoding quality.
|
||||
|
||||
- The number of frames per second (fps) or `k` should be calculated by `4 * k + 1`.
|
||||
|
||||
- Try lower `shift` values (`2.0` to `5.0`) for lower resolution videos and higher `shift` values (`7.0` to `12.0`) for higher resolution images.
|
||||
|
||||
## WanPipeline
|
||||
|
||||
[[autodoc]] WanPipeline
|
||||
@@ -339,18 +57,6 @@ The general rule of thumb to keep in mind when preparing inputs for the VACE pip
|
||||
- all
|
||||
- __call__
|
||||
|
||||
## WanVACEPipeline
|
||||
|
||||
[[autodoc]] WanVACEPipeline
|
||||
- all
|
||||
- __call__
|
||||
|
||||
## WanVideoToVideoPipeline
|
||||
|
||||
[[autodoc]] WanVideoToVideoPipeline
|
||||
- all
|
||||
- __call__
|
||||
|
||||
## WanPipelineOutput
|
||||
|
||||
[[autodoc]] pipelines.wan.pipeline_output.WanPipelineOutput
|
||||
[[autodoc]] pipelines.wan.pipeline_output.WanPipelineOutput
|
||||
|
||||
@@ -13,7 +13,9 @@ specific language governing permissions and limitations under the License.
|
||||
|
||||
# Quantization
|
||||
|
||||
Quantization techniques reduce memory and computational costs by representing weights and activations with lower-precision data types like 8-bit integers (int8). This enables loading larger models you normally wouldn't be able to fit into memory, and speeding up inference.
|
||||
Quantization techniques reduce memory and computational costs by representing weights and activations with lower-precision data types like 8-bit integers (int8). This enables loading larger models you normally wouldn't be able to fit into memory, and speeding up inference. Diffusers supports 8-bit and 4-bit quantization with [bitsandbytes](https://huggingface.co/docs/bitsandbytes/en/index).
|
||||
|
||||
Quantization techniques that aren't supported in Transformers can be added with the [`DiffusersQuantizer`] class.
|
||||
|
||||
<Tip>
|
||||
|
||||
@@ -21,9 +23,6 @@ Learn how to quantize models in the [Quantization](../quantization/overview) gui
|
||||
|
||||
</Tip>
|
||||
|
||||
## PipelineQuantizationConfig
|
||||
|
||||
[[autodoc]] quantizers.PipelineQuantizationConfig
|
||||
|
||||
## BitsAndBytesConfig
|
||||
|
||||
@@ -32,11 +31,6 @@ Learn how to quantize models in the [Quantization](../quantization/overview) gui
|
||||
## GGUFQuantizationConfig
|
||||
|
||||
[[autodoc]] GGUFQuantizationConfig
|
||||
|
||||
## QuantoConfig
|
||||
|
||||
[[autodoc]] QuantoConfig
|
||||
|
||||
## TorchAoConfig
|
||||
|
||||
[[autodoc]] TorchAoConfig
|
||||
|
||||
@@ -13,7 +13,7 @@ specific language governing permissions and limitations under the License.
|
||||
# CosineDPMSolverMultistepScheduler
|
||||
|
||||
The [`CosineDPMSolverMultistepScheduler`] is a variant of [`DPMSolverMultistepScheduler`] with cosine schedule, proposed by Nichol and Dhariwal (2021).
|
||||
It is being used in the [Stable Audio Open](https://huggingface.co/papers/2407.14358) paper and the [Stability-AI/stable-audio-tool](https://github.com/Stability-AI/stable-audio-tools) codebase.
|
||||
It is being used in the [Stable Audio Open](https://arxiv.org/abs/2407.14358) paper and the [Stability-AI/stable-audio-tool](https://github.com/Stability-AI/stable-audio-tool) codebase.
|
||||
|
||||
This scheduler was contributed by [Yoach Lacombe](https://huggingface.co/ylacombe).
|
||||
|
||||
|
||||
@@ -12,7 +12,7 @@ specific language governing permissions and limitations under the License.
|
||||
|
||||
# FlowMatchEulerDiscreteScheduler
|
||||
|
||||
`FlowMatchEulerDiscreteScheduler` is based on the flow-matching sampling introduced in [Stable Diffusion 3](https://huggingface.co/papers/2403.03206).
|
||||
`FlowMatchEulerDiscreteScheduler` is based on the flow-matching sampling introduced in [Stable Diffusion 3](https://arxiv.org/abs/2403.03206).
|
||||
|
||||
## FlowMatchEulerDiscreteScheduler
|
||||
[[autodoc]] FlowMatchEulerDiscreteScheduler
|
||||
|
||||
@@ -12,7 +12,7 @@ specific language governing permissions and limitations under the License.
|
||||
|
||||
# FlowMatchHeunDiscreteScheduler
|
||||
|
||||
`FlowMatchHeunDiscreteScheduler` is based on the flow-matching sampling introduced in [EDM](https://huggingface.co/papers/2403.03206).
|
||||
`FlowMatchHeunDiscreteScheduler` is based on the flow-matching sampling introduced in [EDM](https://arxiv.org/abs/2403.03206).
|
||||
|
||||
## FlowMatchHeunDiscreteScheduler
|
||||
[[autodoc]] FlowMatchHeunDiscreteScheduler
|
||||
|
||||
@@ -14,7 +14,7 @@ specific language governing permissions and limitations under the License.
|
||||
|
||||
## Overview
|
||||
|
||||
Multistep and onestep scheduler (Algorithm 3) introduced alongside latent consistency models in the paper [Latent Consistency Models: Synthesizing High-Resolution Images with Few-Step Inference](https://huggingface.co/papers/2310.04378) by Simian Luo, Yiqin Tan, Longbo Huang, Jian Li, and Hang Zhao.
|
||||
Multistep and onestep scheduler (Algorithm 3) introduced alongside latent consistency models in the paper [Latent Consistency Models: Synthesizing High-Resolution Images with Few-Step Inference](https://arxiv.org/abs/2310.04378) by Simian Luo, Yiqin Tan, Longbo Huang, Jian Li, and Hang Zhao.
|
||||
This scheduler should be able to generate good samples from [`LatentConsistencyModelPipeline`] in 1-8 steps.
|
||||
|
||||
## LCMScheduler
|
||||
|
||||
@@ -83,8 +83,4 @@ Happy exploring, and thank you for being part of the Diffusers community!
|
||||
<td><a href="https://github.com/suzukimain/auto_diffusers"> Model Search </a></td>
|
||||
<td>Search models on Civitai and Hugging Face</td>
|
||||
</tr>
|
||||
<tr style="border-top: 2px solid black">
|
||||
<td><a href="https://github.com/beinsezii/skrample"> Skrample </a></td>
|
||||
<td>Fully modular scheduler functions with 1st class diffusers integration.</td>
|
||||
</tr>
|
||||
</table>
|
||||
|
||||
@@ -54,7 +54,7 @@ The team works daily to make the technical and non-technical tools available to
|
||||
|
||||
- **Encouraging safety in deployment**
|
||||
|
||||
- [**Safe Stable Diffusion**](https://huggingface.co/docs/diffusers/main/en/api/pipelines/stable_diffusion/stable_diffusion_safe): It mitigates the well-known issue that models, like Stable Diffusion, that are trained on unfiltered, web-crawled datasets tend to suffer from inappropriate degeneration. Related paper: [Safe Latent Diffusion: Mitigating Inappropriate Degeneration in Diffusion Models](https://huggingface.co/papers/2211.05105).
|
||||
- [**Safe Stable Diffusion**](https://huggingface.co/docs/diffusers/main/en/api/pipelines/stable_diffusion/stable_diffusion_safe): It mitigates the well-known issue that models, like Stable Diffusion, that are trained on unfiltered, web-crawled datasets tend to suffer from inappropriate degeneration. Related paper: [Safe Latent Diffusion: Mitigating Inappropriate Degeneration in Diffusion Models](https://arxiv.org/abs/2211.05105).
|
||||
|
||||
- [**Safety Checker**](https://github.com/huggingface/diffusers/blob/main/src/diffusers/pipelines/stable_diffusion/safety_checker.py): It checks and compares the class probability of a set of hard-coded harmful concepts in the embedding space against an image after it has been generated. The harmful concepts are intentionally hidden to prevent reverse engineering of the checker.
|
||||
|
||||
|
||||
@@ -18,8 +18,8 @@ specific language governing permissions and limitations under the License.
|
||||
|
||||
> [!TIP]
|
||||
> This document has now grown outdated given the emergence of existing evaluation frameworks for diffusion models for image generation. Please check
|
||||
> out works like [HEIM](https://crfm.stanford.edu/helm/heim/latest/), [T2I-Compbench](https://huggingface.co/papers/2307.06350),
|
||||
> [GenEval](https://huggingface.co/papers/2310.11513).
|
||||
> out works like [HEIM](https://crfm.stanford.edu/helm/heim/latest/), [T2I-Compbench](https://arxiv.org/abs/2307.06350),
|
||||
> [GenEval](https://arxiv.org/abs/2310.11513).
|
||||
|
||||
Evaluation of generative models like [Stable Diffusion](https://huggingface.co/docs/diffusers/stable_diffusion) is subjective in nature. But as practitioners and researchers, we often have to make careful choices amongst many different possibilities. So, when working with different generative models (like GANs, Diffusion, etc.), how do we choose one over the other?
|
||||
|
||||
@@ -122,7 +122,7 @@ In this section, we will walk you through how to evaluate three different diffus
|
||||
|
||||
### Text-guided image generation
|
||||
|
||||
[CLIP score](https://huggingface.co/papers/2104.08718) measures the compatibility of image-caption pairs. Higher CLIP scores imply higher compatibility 🔼. The CLIP score is a quantitative measurement of the qualitative concept "compatibility". Image-caption pair compatibility can also be thought of as the semantic similarity between the image and the caption. CLIP score was found to have high correlation with human judgement.
|
||||
[CLIP score](https://arxiv.org/abs/2104.08718) measures the compatibility of image-caption pairs. Higher CLIP scores imply higher compatibility 🔼. The CLIP score is a quantitative measurement of the qualitative concept "compatibility". Image-caption pair compatibility can also be thought of as the semantic similarity between the image and the caption. CLIP score was found to have high correlation with human judgement.
|
||||
|
||||
Let's first load a [`StableDiffusionPipeline`]:
|
||||
|
||||
@@ -222,7 +222,7 @@ Here is one example:
|
||||
|
||||
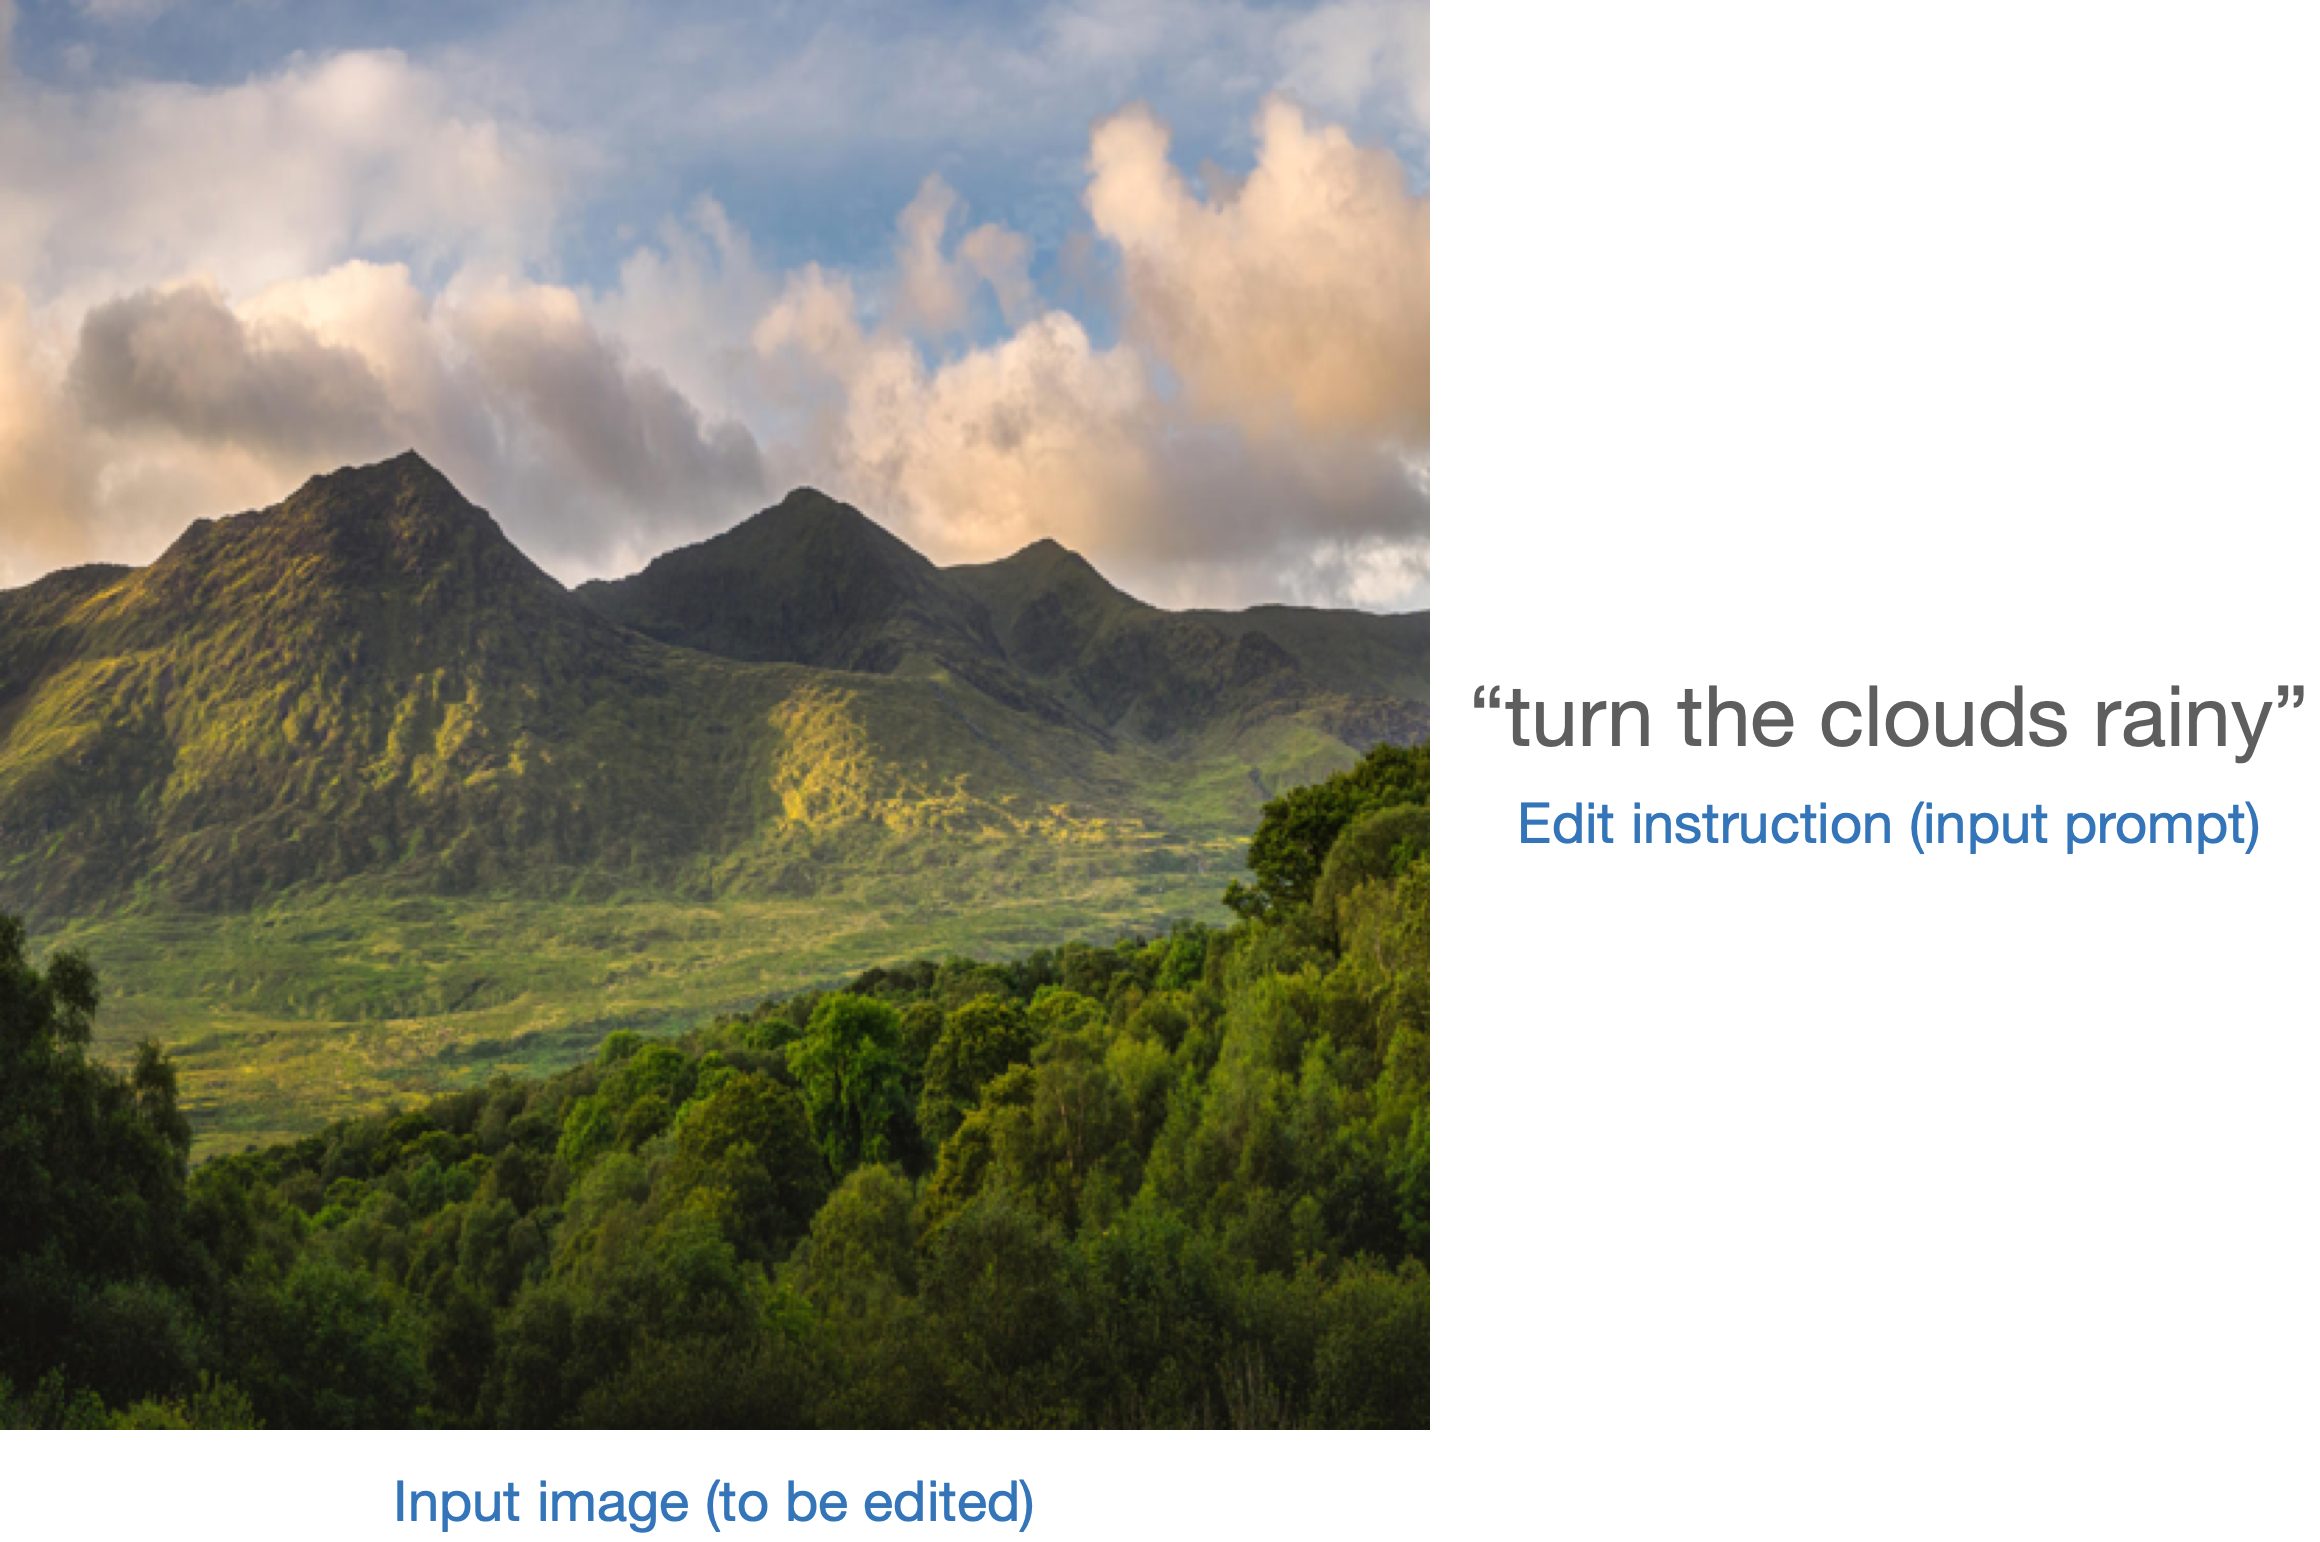
|
||||
|
||||
One strategy to evaluate such a model is to measure the consistency of the change between the two images (in [CLIP](https://huggingface.co/docs/transformers/model_doc/clip) space) with the change between the two image captions (as shown in [CLIP-Guided Domain Adaptation of Image Generators](https://huggingface.co/papers/2108.00946)). This is referred to as the "**CLIP directional similarity**".
|
||||
One strategy to evaluate such a model is to measure the consistency of the change between the two images (in [CLIP](https://huggingface.co/docs/transformers/model_doc/clip) space) with the change between the two image captions (as shown in [CLIP-Guided Domain Adaptation of Image Generators](https://arxiv.org/abs/2108.00946)). This is referred to as the "**CLIP directional similarity**".
|
||||
|
||||
- Caption 1 corresponds to the input image (image 1) that is to be edited.
|
||||
- Caption 2 corresponds to the edited image (image 2). It should reflect the edit instruction.
|
||||
@@ -433,7 +433,7 @@ Both CLIP score and CLIP direction similarity rely on the CLIP model, which can
|
||||
|
||||
### Class-conditioned image generation
|
||||
|
||||
Class-conditioned generative models are usually pre-trained on a class-labeled dataset such as [ImageNet-1k](https://huggingface.co/datasets/imagenet-1k). Popular metrics for evaluating these models include Fréchet Inception Distance (FID), Kernel Inception Distance (KID), and Inception Score (IS). In this document, we focus on FID ([Heusel et al.](https://huggingface.co/papers/1706.08500)). We show how to compute it with the [`DiTPipeline`](https://huggingface.co/docs/diffusers/api/pipelines/dit), which uses the [DiT model](https://huggingface.co/papers/2212.09748) under the hood.
|
||||
Class-conditioned generative models are usually pre-trained on a class-labeled dataset such as [ImageNet-1k](https://huggingface.co/datasets/imagenet-1k). Popular metrics for evaluating these models include Fréchet Inception Distance (FID), Kernel Inception Distance (KID), and Inception Score (IS). In this document, we focus on FID ([Heusel et al.](https://arxiv.org/abs/1706.08500)). We show how to compute it with the [`DiTPipeline`](https://huggingface.co/docs/diffusers/api/pipelines/dit), which uses the [DiT model](https://arxiv.org/abs/2212.09748) under the hood.
|
||||
|
||||
FID aims to measure how similar are two datasets of images. As per [this resource](https://mmgeneration.readthedocs.io/en/latest/quick_run.html#fid):
|
||||
|
||||
|
||||
@@ -3,7 +3,3 @@
|
||||
## Remote Decode
|
||||
|
||||
[[autodoc]] utils.remote_utils.remote_decode
|
||||
|
||||
## Remote Encode
|
||||
|
||||
[[autodoc]] utils.remote_utils.remote_encode
|
||||
|
||||
@@ -36,7 +36,7 @@ Hybrid Inference offers a fast and simple way to offload local generation requir
|
||||
## Available Models
|
||||
|
||||
* **VAE Decode 🖼️:** Quickly decode latent representations into high-quality images without compromising performance or workflow speed.
|
||||
* **VAE Encode 🔢:** Efficiently encode images into latent representations for generation and training.
|
||||
* **VAE Encode 🔢 (coming soon):** Efficiently encode images into latent representations for generation and training.
|
||||
* **Text Encoders 📃 (coming soon):** Compute text embeddings for your prompts quickly and accurately, ensuring a smooth and high-quality workflow.
|
||||
|
||||
---
|
||||
@@ -46,15 +46,9 @@ Hybrid Inference offers a fast and simple way to offload local generation requir
|
||||
* **[SD.Next](https://github.com/vladmandic/sdnext):** All-in-one UI with direct supports Hybrid Inference.
|
||||
* **[ComfyUI-HFRemoteVae](https://github.com/kijai/ComfyUI-HFRemoteVae):** ComfyUI node for Hybrid Inference.
|
||||
|
||||
## Changelog
|
||||
|
||||
- March 10 2025: Added VAE encode
|
||||
- March 2 2025: Initial release with VAE decoding
|
||||
|
||||
## Contents
|
||||
|
||||
The documentation is organized into three sections:
|
||||
The documentation is organized into two sections:
|
||||
|
||||
* **VAE Decode** Learn the basics of how to use VAE Decode with Hybrid Inference.
|
||||
* **VAE Encode** Learn the basics of how to use VAE Encode with Hybrid Inference.
|
||||
* **API Reference** Dive into task-specific settings and parameters.
|
||||
|
||||
@@ -1,183 +0,0 @@
|
||||
# Getting Started: VAE Encode with Hybrid Inference
|
||||
|
||||
VAE encode is used for training, image-to-image and image-to-video - turning into images or videos into latent representations.
|
||||
|
||||
## Memory
|
||||
|
||||
These tables demonstrate the VRAM requirements for VAE encode with SD v1 and SD XL on different GPUs.
|
||||
|
||||
For the majority of these GPUs the memory usage % dictates other models (text encoders, UNet/Transformer) must be offloaded, or tiled encoding has to be used which increases time taken and impacts quality.
|
||||
|
||||
<details><summary>SD v1.5</summary>
|
||||
|
||||
| GPU | Resolution | Time (seconds) | Memory (%) | Tiled Time (secs) | Tiled Memory (%) |
|
||||
|:------------------------------|:-------------|-----------------:|-------------:|--------------------:|-------------------:|
|
||||
| NVIDIA GeForce RTX 4090 | 512x512 | 0.015 | 3.51901 | 0.015 | 3.51901 |
|
||||
| NVIDIA GeForce RTX 4090 | 256x256 | 0.004 | 1.3154 | 0.005 | 1.3154 |
|
||||
| NVIDIA GeForce RTX 4090 | 2048x2048 | 0.402 | 47.1852 | 0.496 | 3.51901 |
|
||||
| NVIDIA GeForce RTX 4090 | 1024x1024 | 0.078 | 12.2658 | 0.094 | 3.51901 |
|
||||
| NVIDIA GeForce RTX 4080 SUPER | 512x512 | 0.023 | 5.30105 | 0.023 | 5.30105 |
|
||||
| NVIDIA GeForce RTX 4080 SUPER | 256x256 | 0.006 | 1.98152 | 0.006 | 1.98152 |
|
||||
| NVIDIA GeForce RTX 4080 SUPER | 2048x2048 | 0.574 | 71.08 | 0.656 | 5.30105 |
|
||||
| NVIDIA GeForce RTX 4080 SUPER | 1024x1024 | 0.111 | 18.4772 | 0.14 | 5.30105 |
|
||||
| NVIDIA GeForce RTX 3090 | 512x512 | 0.032 | 3.52782 | 0.032 | 3.52782 |
|
||||
| NVIDIA GeForce RTX 3090 | 256x256 | 0.01 | 1.31869 | 0.009 | 1.31869 |
|
||||
| NVIDIA GeForce RTX 3090 | 2048x2048 | 0.742 | 47.3033 | 0.954 | 3.52782 |
|
||||
| NVIDIA GeForce RTX 3090 | 1024x1024 | 0.136 | 12.2965 | 0.207 | 3.52782 |
|
||||
| NVIDIA GeForce RTX 3080 | 512x512 | 0.036 | 8.51761 | 0.036 | 8.51761 |
|
||||
| NVIDIA GeForce RTX 3080 | 256x256 | 0.01 | 3.18387 | 0.01 | 3.18387 |
|
||||
| NVIDIA GeForce RTX 3080 | 2048x2048 | 0.863 | 86.7424 | 1.191 | 8.51761 |
|
||||
| NVIDIA GeForce RTX 3080 | 1024x1024 | 0.157 | 29.6888 | 0.227 | 8.51761 |
|
||||
| NVIDIA GeForce RTX 3070 | 512x512 | 0.051 | 10.6941 | 0.051 | 10.6941 |
|
||||
| NVIDIA GeForce RTX 3070 | 256x256 | 0.015 | 3.99743 | 0.015 | 3.99743 |
|
||||
| NVIDIA GeForce RTX 3070 | 2048x2048 | 1.217 | 96.054 | 1.482 | 10.6941 |
|
||||
| NVIDIA GeForce RTX 3070 | 1024x1024 | 0.223 | 37.2751 | 0.327 | 10.6941 |
|
||||
|
||||
|
||||
</details>
|
||||
|
||||
<details><summary>SDXL</summary>
|
||||
|
||||
| GPU | Resolution | Time (seconds) | Memory Consumed (%) | Tiled Time (seconds) | Tiled Memory (%) |
|
||||
|:------------------------------|:-------------|-----------------:|----------------------:|-----------------------:|-------------------:|
|
||||
| NVIDIA GeForce RTX 4090 | 512x512 | 0.029 | 4.95707 | 0.029 | 4.95707 |
|
||||
| NVIDIA GeForce RTX 4090 | 256x256 | 0.007 | 2.29666 | 0.007 | 2.29666 |
|
||||
| NVIDIA GeForce RTX 4090 | 2048x2048 | 0.873 | 66.3452 | 0.863 | 15.5649 |
|
||||
| NVIDIA GeForce RTX 4090 | 1024x1024 | 0.142 | 15.5479 | 0.143 | 15.5479 |
|
||||
| NVIDIA GeForce RTX 4080 SUPER | 512x512 | 0.044 | 7.46735 | 0.044 | 7.46735 |
|
||||
| NVIDIA GeForce RTX 4080 SUPER | 256x256 | 0.01 | 3.4597 | 0.01 | 3.4597 |
|
||||
| NVIDIA GeForce RTX 4080 SUPER | 2048x2048 | 1.317 | 87.1615 | 1.291 | 23.447 |
|
||||
| NVIDIA GeForce RTX 4080 SUPER | 1024x1024 | 0.213 | 23.4215 | 0.214 | 23.4215 |
|
||||
| NVIDIA GeForce RTX 3090 | 512x512 | 0.058 | 5.65638 | 0.058 | 5.65638 |
|
||||
| NVIDIA GeForce RTX 3090 | 256x256 | 0.016 | 2.45081 | 0.016 | 2.45081 |
|
||||
| NVIDIA GeForce RTX 3090 | 2048x2048 | 1.755 | 77.8239 | 1.614 | 18.4193 |
|
||||
| NVIDIA GeForce RTX 3090 | 1024x1024 | 0.265 | 18.4023 | 0.265 | 18.4023 |
|
||||
| NVIDIA GeForce RTX 3080 | 512x512 | 0.064 | 13.6568 | 0.064 | 13.6568 |
|
||||
| NVIDIA GeForce RTX 3080 | 256x256 | 0.018 | 5.91728 | 0.018 | 5.91728 |
|
||||
| NVIDIA GeForce RTX 3080 | 2048x2048 | OOM | OOM | 1.866 | 44.4717 |
|
||||
| NVIDIA GeForce RTX 3080 | 1024x1024 | 0.302 | 44.4308 | 0.302 | 44.4308 |
|
||||
| NVIDIA GeForce RTX 3070 | 512x512 | 0.093 | 17.1465 | 0.093 | 17.1465 |
|
||||
| NVIDIA GeForce RTX 3070 | 256x256 | 0.025 | 7.42931 | 0.026 | 7.42931 |
|
||||
| NVIDIA GeForce RTX 3070 | 2048x2048 | OOM | OOM | 2.674 | 55.8355 |
|
||||
| NVIDIA GeForce RTX 3070 | 1024x1024 | 0.443 | 55.7841 | 0.443 | 55.7841 |
|
||||
|
||||
</details>
|
||||
|
||||
## Available VAEs
|
||||
|
||||
| | **Endpoint** | **Model** |
|
||||
|:-:|:-----------:|:--------:|
|
||||
| **Stable Diffusion v1** | [https://qc6479g0aac6qwy9.us-east-1.aws.endpoints.huggingface.cloud](https://qc6479g0aac6qwy9.us-east-1.aws.endpoints.huggingface.cloud) | [`stabilityai/sd-vae-ft-mse`](https://hf.co/stabilityai/sd-vae-ft-mse) |
|
||||
| **Stable Diffusion XL** | [https://xjqqhmyn62rog84g.us-east-1.aws.endpoints.huggingface.cloud](https://xjqqhmyn62rog84g.us-east-1.aws.endpoints.huggingface.cloud) | [`madebyollin/sdxl-vae-fp16-fix`](https://hf.co/madebyollin/sdxl-vae-fp16-fix) |
|
||||
| **Flux** | [https://ptccx55jz97f9zgo.us-east-1.aws.endpoints.huggingface.cloud](https://ptccx55jz97f9zgo.us-east-1.aws.endpoints.huggingface.cloud) | [`black-forest-labs/FLUX.1-schnell`](https://hf.co/black-forest-labs/FLUX.1-schnell) |
|
||||
|
||||
|
||||
> [!TIP]
|
||||
> Model support can be requested [here](https://github.com/huggingface/diffusers/issues/new?template=remote-vae-pilot-feedback.yml).
|
||||
|
||||
|
||||
## Code
|
||||
|
||||
> [!TIP]
|
||||
> Install `diffusers` from `main` to run the code: `pip install git+https://github.com/huggingface/diffusers@main`
|
||||
|
||||
|
||||
A helper method simplifies interacting with Hybrid Inference.
|
||||
|
||||
```python
|
||||
from diffusers.utils.remote_utils import remote_encode
|
||||
```
|
||||
|
||||
### Basic example
|
||||
|
||||
Let's encode an image, then decode it to demonstrate.
|
||||
|
||||
<figure class="image flex flex-col items-center justify-center text-center m-0 w-full">
|
||||
<img src="https://huggingface.co/datasets/huggingface/documentation-images/resolve/main/diffusers/astronaut.jpg"/>
|
||||
</figure>
|
||||
|
||||
<details><summary>Code</summary>
|
||||
|
||||
```python
|
||||
from diffusers.utils import load_image
|
||||
from diffusers.utils.remote_utils import remote_decode
|
||||
|
||||
image = load_image("https://huggingface.co/datasets/huggingface/documentation-images/resolve/main/diffusers/astronaut.jpg?download=true")
|
||||
|
||||
latent = remote_encode(
|
||||
endpoint="https://ptccx55jz97f9zgo.us-east-1.aws.endpoints.huggingface.cloud/",
|
||||
scaling_factor=0.3611,
|
||||
shift_factor=0.1159,
|
||||
)
|
||||
|
||||
decoded = remote_decode(
|
||||
endpoint="https://whhx50ex1aryqvw6.us-east-1.aws.endpoints.huggingface.cloud/",
|
||||
tensor=latent,
|
||||
scaling_factor=0.3611,
|
||||
shift_factor=0.1159,
|
||||
)
|
||||
```
|
||||
|
||||
</details>
|
||||
|
||||
<figure class="image flex flex-col items-center justify-center text-center m-0 w-full">
|
||||
<img src="https://huggingface.co/datasets/huggingface/documentation-images/resolve/main/blog/remote_vae/decoded.png"/>
|
||||
</figure>
|
||||
|
||||
|
||||
### Generation
|
||||
|
||||
Now let's look at a generation example, we'll encode the image, generate then remotely decode too!
|
||||
|
||||
<details><summary>Code</summary>
|
||||
|
||||
```python
|
||||
import torch
|
||||
from diffusers import StableDiffusionImg2ImgPipeline
|
||||
from diffusers.utils import load_image
|
||||
from diffusers.utils.remote_utils import remote_decode, remote_encode
|
||||
|
||||
pipe = StableDiffusionImg2ImgPipeline.from_pretrained(
|
||||
"stable-diffusion-v1-5/stable-diffusion-v1-5",
|
||||
torch_dtype=torch.float16,
|
||||
variant="fp16",
|
||||
vae=None,
|
||||
).to("cuda")
|
||||
|
||||
init_image = load_image(
|
||||
"https://raw.githubusercontent.com/CompVis/stable-diffusion/main/assets/stable-samples/img2img/sketch-mountains-input.jpg"
|
||||
)
|
||||
init_image = init_image.resize((768, 512))
|
||||
|
||||
init_latent = remote_encode(
|
||||
endpoint="https://qc6479g0aac6qwy9.us-east-1.aws.endpoints.huggingface.cloud/",
|
||||
image=init_image,
|
||||
scaling_factor=0.18215,
|
||||
)
|
||||
|
||||
prompt = "A fantasy landscape, trending on artstation"
|
||||
latent = pipe(
|
||||
prompt=prompt,
|
||||
image=init_latent,
|
||||
strength=0.75,
|
||||
output_type="latent",
|
||||
).images
|
||||
|
||||
image = remote_decode(
|
||||
endpoint="https://q1bj3bpq6kzilnsu.us-east-1.aws.endpoints.huggingface.cloud/",
|
||||
tensor=latent,
|
||||
scaling_factor=0.18215,
|
||||
)
|
||||
image.save("fantasy_landscape.jpg")
|
||||
```
|
||||
|
||||
</details>
|
||||
|
||||
<figure class="image flex flex-col items-center justify-center text-center m-0 w-full">
|
||||
<img src="https://huggingface.co/datasets/huggingface/documentation-images/resolve/main/blog/remote_vae/fantasy_landscape.png"/>
|
||||
</figure>
|
||||
|
||||
## Integrations
|
||||
|
||||
* **[SD.Next](https://github.com/vladmandic/sdnext):** All-in-one UI with direct supports Hybrid Inference.
|
||||
* **[ComfyUI-HFRemoteVae](https://github.com/kijai/ComfyUI-HFRemoteVae):** ComfyUI node for Hybrid Inference.
|
||||
@@ -161,10 +161,10 @@ Your Python environment will find the `main` version of 🤗 Diffusers on the ne
|
||||
|
||||
Model weights and files are downloaded from the Hub to a cache which is usually your home directory. You can change the cache location by specifying the `HF_HOME` or `HUGGINFACE_HUB_CACHE` environment variables or configuring the `cache_dir` parameter in methods like [`~DiffusionPipeline.from_pretrained`].
|
||||
|
||||
Cached files allow you to run 🤗 Diffusers offline. To prevent 🤗 Diffusers from connecting to the internet, set the `HF_HUB_OFFLINE` environment variable to `1` and 🤗 Diffusers will only load previously downloaded files in the cache.
|
||||
Cached files allow you to run 🤗 Diffusers offline. To prevent 🤗 Diffusers from connecting to the internet, set the `HF_HUB_OFFLINE` environment variable to `True` and 🤗 Diffusers will only load previously downloaded files in the cache.
|
||||
|
||||
```shell
|
||||
export HF_HUB_OFFLINE=1
|
||||
export HF_HUB_OFFLINE=True
|
||||
```
|
||||
|
||||
For more details about managing and cleaning the cache, take a look at the [caching](https://huggingface.co/docs/huggingface_hub/guides/manage-cache) guide.
|
||||
@@ -179,16 +179,14 @@ Telemetry is only sent when loading models and pipelines from the Hub,
|
||||
and it is not collected if you're loading local files.
|
||||
|
||||
We understand that not everyone wants to share additional information,and we respect your privacy.
|
||||
You can disable telemetry collection by setting the `HF_HUB_DISABLE_TELEMETRY` environment variable from your terminal:
|
||||
You can disable telemetry collection by setting the `DISABLE_TELEMETRY` environment variable from your terminal:
|
||||
|
||||
On Linux/MacOS:
|
||||
|
||||
```bash
|
||||
export HF_HUB_DISABLE_TELEMETRY=1
|
||||
export DISABLE_TELEMETRY=YES
|
||||
```
|
||||
|
||||
On Windows:
|
||||
|
||||
```bash
|
||||
set HF_HUB_DISABLE_TELEMETRY=1
|
||||
set DISABLE_TELEMETRY=YES
|
||||
```
|
||||
|
||||
@@ -1,69 +0,0 @@
|
||||
<!-- Copyright 2024 The HuggingFace Team. All rights reserved.
|
||||
|
||||
Licensed under the Apache License, Version 2.0 (the "License"); you may not use this file except in compliance with
|
||||
the License. You may obtain a copy of the License at
|
||||
|
||||
http://www.apache.org/licenses/LICENSE-2.0
|
||||
|
||||
Unless required by applicable law or agreed to in writing, software distributed under the License is distributed on
|
||||
an "AS IS" BASIS, WITHOUT WARRANTIES OR CONDITIONS OF ANY KIND, either express or implied. See the License for the
|
||||
specific language governing permissions and limitations under the License. -->
|
||||
|
||||
# Caching
|
||||
|
||||
Caching accelerates inference by storing and reusing intermediate outputs of different layers, such as attention and feedforward layers, instead of performing the entire computation at each inference step. It significantly improves generation speed at the expense of more memory and doesn't require additional training.
|
||||
|
||||
This guide shows you how to use the caching methods supported in Diffusers.
|
||||
|
||||
## Pyramid Attention Broadcast
|
||||
|
||||
[Pyramid Attention Broadcast (PAB)](https://huggingface.co/papers/2408.12588) is based on the observation that attention outputs aren't that different between successive timesteps of the generation process. The attention differences are smallest in the cross attention layers and are generally cached over a longer timestep range. This is followed by temporal attention and spatial attention layers.
|
||||
|
||||
> [!TIP]
|
||||
> Not all video models have three types of attention (cross, temporal, and spatial)!
|
||||
|
||||
PAB can be combined with other techniques like sequence parallelism and classifier-free guidance parallelism (data parallelism) for near real-time video generation.
|
||||
|
||||
Set up and pass a [`PyramidAttentionBroadcastConfig`] to a pipeline's transformer to enable it. The `spatial_attention_block_skip_range` controls how often to skip attention calculations in the spatial attention blocks and the `spatial_attention_timestep_skip_range` is the range of timesteps to skip. Take care to choose an appropriate range because a smaller interval can lead to slower inference speeds and a larger interval can result in lower generation quality.
|
||||
|
||||
```python
|
||||
import torch
|
||||
from diffusers import CogVideoXPipeline, PyramidAttentionBroadcastConfig
|
||||
|
||||
pipeline = CogVideoXPipeline.from_pretrained("THUDM/CogVideoX-5b", torch_dtype=torch.bfloat16)
|
||||
pipeline.to("cuda")
|
||||
|
||||
config = PyramidAttentionBroadcastConfig(
|
||||
spatial_attention_block_skip_range=2,
|
||||
spatial_attention_timestep_skip_range=(100, 800),
|
||||
current_timestep_callback=lambda: pipe.current_timestep,
|
||||
)
|
||||
pipeline.transformer.enable_cache(config)
|
||||
```
|
||||
|
||||
## FasterCache
|
||||
|
||||
[FasterCache](https://huggingface.co/papers/2410.19355) caches and reuses attention features similar to [PAB](#pyramid-attention-broadcast) since output differences are small for each successive timestep.
|
||||
|
||||
This method may also choose to skip the unconditional branch prediction, when using classifier-free guidance for sampling (common in most base models), and estimate it from the conditional branch prediction if there is significant redundancy in the predicted latent outputs between successive timesteps.
|
||||
|
||||
Set up and pass a [`FasterCacheConfig`] to a pipeline's transformer to enable it.
|
||||
|
||||
```python
|
||||
import torch
|
||||
from diffusers import CogVideoXPipeline, FasterCacheConfig
|
||||
|
||||
pipe line= CogVideoXPipeline.from_pretrained("THUDM/CogVideoX-5b", torch_dtype=torch.bfloat16)
|
||||
pipeline.to("cuda")
|
||||
|
||||
config = FasterCacheConfig(
|
||||
spatial_attention_block_skip_range=2,
|
||||
spatial_attention_timestep_skip_range=(-1, 681),
|
||||
current_timestep_callback=lambda: pipe.current_timestep,
|
||||
attention_weight_callback=lambda _: 0.3,
|
||||
unconditional_batch_skip_range=5,
|
||||
unconditional_batch_timestep_skip_range=(-1, 781),
|
||||
tensor_format="BFCHW",
|
||||
)
|
||||
pipeline.transformer.enable_cache(config)
|
||||
```
|
||||
@@ -37,7 +37,7 @@ Then load and enable the [`DeepCacheSDHelper`](https://github.com/horseee/DeepCa
|
||||
```
|
||||
|
||||
The `set_params` method accepts two arguments: `cache_interval` and `cache_branch_id`. `cache_interval` means the frequency of feature caching, specified as the number of steps between each cache operation. `cache_branch_id` identifies which branch of the network (ordered from the shallowest to the deepest layer) is responsible for executing the caching processes.
|
||||
Opting for a lower `cache_branch_id` or a larger `cache_interval` can lead to faster inference speed at the expense of reduced image quality (ablation experiments of these two hyperparameters can be found in the [paper](https://huggingface.co/papers/2312.00858)). Once those arguments are set, use the `enable` or `disable` methods to activate or deactivate the `DeepCacheSDHelper`.
|
||||
Opting for a lower `cache_branch_id` or a larger `cache_interval` can lead to faster inference speed at the expense of reduced image quality (ablation experiments of these two hyperparameters can be found in the [paper](https://arxiv.org/abs/2312.00858)). Once those arguments are set, use the `enable` or `disable` methods to activate or deactivate the `DeepCacheSDHelper`.
|
||||
|
||||
<div class="flex justify-center">
|
||||
<img src="https://github.com/horseee/Diffusion_DeepCache/raw/master/static/images/example.png">
|
||||
|
||||
@@ -10,235 +10,120 @@ an "AS IS" BASIS, WITHOUT WARRANTIES OR CONDITIONS OF ANY KIND, either express o
|
||||
specific language governing permissions and limitations under the License.
|
||||
-->
|
||||
|
||||
# Accelerate inference
|
||||
# Speed up inference
|
||||
|
||||
Diffusion models are slow at inference because generation is an iterative process where noise is gradually refined into an image or video over a certain number of "steps". To speedup this process, you can try experimenting with different [schedulers](../api/schedulers/overview), reduce the precision of the model weights for faster computations, use more memory-efficient attention mechanisms, and more.
|
||||
There are several ways to optimize Diffusers for inference speed, such as reducing the computational burden by lowering the data precision or using a lightweight distilled model. There are also memory-efficient attention implementations, [xFormers](xformers) and [scaled dot product attention](https://pytorch.org/docs/stable/generated/torch.nn.functional.scaled_dot_product_attention.html) in PyTorch 2.0, that reduce memory usage which also indirectly speeds up inference. Different speed optimizations can be stacked together to get the fastest inference times.
|
||||
|
||||
Combine and use these techniques together to make inference faster than using any single technique on its own.
|
||||
> [!TIP]
|
||||
> Optimizing for inference speed or reduced memory usage can lead to improved performance in the other category, so you should try to optimize for both whenever you can. This guide focuses on inference speed, but you can learn more about lowering memory usage in the [Reduce memory usage](memory) guide.
|
||||
|
||||
This guide will go over how to accelerate inference.
|
||||
The inference times below are obtained from generating a single 512x512 image from the prompt "a photo of an astronaut riding a horse on mars" with 50 DDIM steps on a NVIDIA A100.
|
||||
|
||||
## Model data type
|
||||
| setup | latency | speed-up |
|
||||
|----------|---------|----------|
|
||||
| baseline | 5.27s | x1 |
|
||||
| tf32 | 4.14s | x1.27 |
|
||||
| fp16 | 3.51s | x1.50 |
|
||||
| combined | 3.41s | x1.54 |
|
||||
|
||||
The precision and data type of the model weights affect inference speed because a higher precision requires more memory to load and more time to perform the computations. PyTorch loads model weights in float32 or full precision by default, so changing the data type is a simple way to quickly get faster inference.
|
||||
## TensorFloat-32
|
||||
|
||||
<hfoptions id="dtypes">
|
||||
<hfoption id="bfloat16">
|
||||
On Ampere and later CUDA devices, matrix multiplications and convolutions can use the [TensorFloat-32 (tf32)](https://blogs.nvidia.com/blog/2020/05/14/tensorfloat-32-precision-format/) mode for faster, but slightly less accurate computations. By default, PyTorch enables tf32 mode for convolutions but not matrix multiplications. Unless your network requires full float32 precision, we recommend enabling tf32 for matrix multiplications. It can significantly speed up computations with typically negligible loss in numerical accuracy.
|
||||
|
||||
bfloat16 is similar to float16 but it is more robust to numerical errors. Hardware support for bfloat16 varies, but most modern GPUs are capable of supporting bfloat16.
|
||||
|
||||
```py
|
||||
```python
|
||||
import torch
|
||||
from diffusers import StableDiffusionXLPipeline
|
||||
|
||||
pipeline = StableDiffusionXLPipeline.from_pretrained(
|
||||
"stabilityai/stable-diffusion-xl-base-1.0", torch_dtype=torch.bfloat16
|
||||
).to("cuda")
|
||||
|
||||
prompt = "Astronaut in a jungle, cold color palette, muted colors, detailed, 8k"
|
||||
pipeline(prompt, num_inference_steps=30).images[0]
|
||||
```
|
||||
|
||||
</hfoption>
|
||||
<hfoption id="float16">
|
||||
|
||||
float16 is similar to bfloat16 but may be more prone to numerical errors.
|
||||
|
||||
```py
|
||||
import torch
|
||||
from diffusers import StableDiffusionXLPipeline
|
||||
|
||||
pipeline = StableDiffusionXLPipeline.from_pretrained(
|
||||
"stabilityai/stable-diffusion-xl-base-1.0", torch_dtype=torch.float16
|
||||
).to("cuda")
|
||||
|
||||
prompt = "Astronaut in a jungle, cold color palette, muted colors, detailed, 8k"
|
||||
pipeline(prompt, num_inference_steps=30).images[0]
|
||||
```
|
||||
|
||||
</hfoption>
|
||||
<hfoption id="TensorFloat-32">
|
||||
|
||||
[TensorFloat-32 (tf32)](https://blogs.nvidia.com/blog/2020/05/14/tensorfloat-32-precision-format/) mode is supported on NVIDIA Ampere GPUs and it computes the convolution and matrix multiplication operations in tf32. Storage and other operations are kept in float32. This enables significantly faster computations when combined with bfloat16 or float16.
|
||||
|
||||
PyTorch only enables tf32 mode for convolutions by default and you'll need to explicitly enable it for matrix multiplications.
|
||||
|
||||
```py
|
||||
import torch
|
||||
from diffusers import StableDiffusionXLPipeline
|
||||
|
||||
torch.backends.cuda.matmul.allow_tf32 = True
|
||||
|
||||
pipeline = StableDiffusionXLPipeline.from_pretrained(
|
||||
"stabilityai/stable-diffusion-xl-base-1.0", torch_dtype=torch.bfloat16
|
||||
).to("cuda")
|
||||
|
||||
prompt = "Astronaut in a jungle, cold color palette, muted colors, detailed, 8k"
|
||||
pipeline(prompt, num_inference_steps=30).images[0]
|
||||
```
|
||||
|
||||
Refer to the [mixed precision training](https://huggingface.co/docs/transformers/en/perf_train_gpu_one#mixed-precision) docs for more details.
|
||||
Learn more about tf32 in the [Mixed precision training](https://huggingface.co/docs/transformers/en/perf_train_gpu_one#tf32) guide.
|
||||
|
||||
</hfoption>
|
||||
</hfoptions>
|
||||
## Half-precision weights
|
||||
|
||||
## Scaled dot product attention
|
||||
To save GPU memory and get more speed, set `torch_dtype=torch.float16` to load and run the model weights directly with half-precision weights.
|
||||
|
||||
> [!TIP]
|
||||
> Memory-efficient attention optimizes for inference speed *and* [memory usage](./memory#memory-efficient-attention)!
|
||||
|
||||
[Scaled dot product attention (SDPA)](https://pytorch.org/docs/stable/generated/torch.nn.functional.scaled_dot_product_attention.html) implements several attention backends, [FlashAttention](https://github.com/Dao-AILab/flash-attention), [xFormers](https://github.com/facebookresearch/xformers), and a native C++ implementation. It automatically selects the most optimal backend for your hardware.
|
||||
|
||||
SDPA is enabled by default if you're using PyTorch >= 2.0 and no additional changes are required to your code. You could try experimenting with other attention backends though if you'd like to choose your own. The example below uses the [torch.nn.attention.sdpa_kernel](https://pytorch.org/docs/stable/generated/torch.nn.attention.sdpa_kernel.html) context manager to enable efficient attention.
|
||||
|
||||
```py
|
||||
from torch.nn.attention import SDPBackend, sdpa_kernel
|
||||
```Python
|
||||
import torch
|
||||
from diffusers import StableDiffusionXLPipeline
|
||||
from diffusers import DiffusionPipeline
|
||||
|
||||
pipeline = StableDiffusionXLPipeline.from_pretrained(
|
||||
"stabilityai/stable-diffusion-xl-base-1.0", torch_dtype=torch.bfloat16
|
||||
).to("cuda")
|
||||
|
||||
prompt = "Astronaut in a jungle, cold color palette, muted colors, detailed, 8k"
|
||||
|
||||
with sdpa_kernel(SDPBackend.EFFICIENT_ATTENTION):
|
||||
image = pipeline(prompt, num_inference_steps=30).images[0]
|
||||
```
|
||||
|
||||
## torch.compile
|
||||
|
||||
[torch.compile](https://pytorch.org/tutorials/intermediate/torch_compile_tutorial.html) accelerates inference by compiling PyTorch code and operations into optimized kernels. Diffusers typically compiles the more compute-intensive models like the UNet, transformer, or VAE.
|
||||
|
||||
Enable the following compiler settings for maximum speed (refer to the [full list](https://github.com/pytorch/pytorch/blob/main/torch/_inductor/config.py) for more options).
|
||||
|
||||
```py
|
||||
import torch
|
||||
from diffusers import StableDiffusionXLPipeline
|
||||
|
||||
torch._inductor.config.conv_1x1_as_mm = True
|
||||
torch._inductor.config.coordinate_descent_tuning = True
|
||||
torch._inductor.config.epilogue_fusion = False
|
||||
torch._inductor.config.coordinate_descent_check_all_directions = True
|
||||
```
|
||||
|
||||
Load and compile the UNet and VAE. There are several different modes you can choose from, but `"max-autotune"` optimizes for the fastest speed by compiling to a CUDA graph. CUDA graphs effectively reduces the overhead by launching multiple GPU operations through a single CPU operation.
|
||||
|
||||
> [!TIP]
|
||||
> With PyTorch 2.3.1, you can control the caching behavior of torch.compile. This is particularly beneficial for compilation modes like `"max-autotune"` which performs a grid-search over several compilation flags to find the optimal configuration. Learn more in the [Compile Time Caching in torch.compile](https://pytorch.org/tutorials/recipes/torch_compile_caching_tutorial.html) tutorial.
|
||||
|
||||
Changing the memory layout to [channels_last](./memory#torchchannels_last) also optimizes memory and inference speed.
|
||||
|
||||
```py
|
||||
pipeline = StableDiffusionXLPipeline.from_pretrained(
|
||||
"stabilityai/stable-diffusion-xl-base-1.0", torch_dtype=torch.float16
|
||||
).to("cuda")
|
||||
pipeline.unet.to(memory_format=torch.channels_last)
|
||||
pipeline.vae.to(memory_format=torch.channels_last)
|
||||
pipeline.unet = torch.compile(
|
||||
pipeline.unet, mode="max-autotune", fullgraph=True
|
||||
pipe = DiffusionPipeline.from_pretrained(
|
||||
"stable-diffusion-v1-5/stable-diffusion-v1-5",
|
||||
torch_dtype=torch.float16,
|
||||
use_safetensors=True,
|
||||
)
|
||||
pipeline.vae.decode = torch.compile(
|
||||
pipeline.vae.decode,
|
||||
mode="max-autotune",
|
||||
fullgraph=True
|
||||
)
|
||||
|
||||
prompt = "Astronaut in a jungle, cold color palette, muted colors, detailed, 8k"
|
||||
pipeline(prompt, num_inference_steps=30).images[0]
|
||||
pipe = pipe.to("cuda")
|
||||
```
|
||||
|
||||
Compilation is slow the first time, but once compiled, it is significantly faster. Try to only use the compiled pipeline on the same type of inference operations. Calling the compiled pipeline on a different image size retriggers compilation which is slow and inefficient.
|
||||
|
||||
### Regional compilation
|
||||
|
||||
[Regional compilation](https://docs.pytorch.org/tutorials/recipes/regional_compilation.html) reduces the cold start compilation time by only compiling a specific repeated region (or block) of the model instead of the entire model. The compiler reuses the cached and compiled code for the other blocks.
|
||||
|
||||
[Accelerate](https://huggingface.co/docs/accelerate/index) provides the [compile_regions](https://github.com/huggingface/accelerate/blob/273799c85d849a1954a4f2e65767216eb37fa089/src/accelerate/utils/other.py#L78) method for automatically compiling the repeated blocks of a `nn.Module` sequentially. The rest of the model is compiled separately.
|
||||
|
||||
```py
|
||||
# pip install -U accelerate
|
||||
import torch
|
||||
from diffusers import StableDiffusionXLPipeline
|
||||
from accelerate.utils import compile regions
|
||||
|
||||
pipeline = StableDiffusionXLPipeline.from_pretrained(
|
||||
"stabilityai/stable-diffusion-xl-base-1.0", torch_dtype=torch.float16
|
||||
).to("cuda")
|
||||
pipeline.unet = compile_regions(pipeline.unet, mode="reduce-overhead", fullgraph=True)
|
||||
```
|
||||
|
||||
### Graph breaks
|
||||
|
||||
It is important to specify `fullgraph=True` in torch.compile to ensure there are no graph breaks in the underlying model. This allows you to take advantage of torch.compile without any performance degradation. For the UNet and VAE, this changes how you access the return variables.
|
||||
|
||||
```diff
|
||||
- latents = unet(
|
||||
- latents, timestep=timestep, encoder_hidden_states=prompt_embeds
|
||||
-).sample
|
||||
|
||||
+ latents = unet(
|
||||
+ latents, timestep=timestep, encoder_hidden_states=prompt_embeds, return_dict=False
|
||||
+)[0]
|
||||
```
|
||||
|
||||
### GPU sync
|
||||
|
||||
The `step()` function is [called](https://github.com/huggingface/diffusers/blob/1d686bac8146037e97f3fd8c56e4063230f71751/src/diffusers/pipelines/stable_diffusion_xl/pipeline_stable_diffusion_xl.py#L1228) on the scheduler each time after the denoiser makes a prediction, and the `sigmas` variable is [indexed](https://github.com/huggingface/diffusers/blob/1d686bac8146037e97f3fd8c56e4063230f71751/src/diffusers/schedulers/scheduling_euler_discrete.py#L476). When placed on the GPU, it introduces latency because of the communication sync between the CPU and GPU. It becomes more evident when the denoiser has already been compiled.
|
||||
|
||||
In general, the `sigmas` should [stay on the CPU](https://github.com/huggingface/diffusers/blob/35a969d297cba69110d175ee79c59312b9f49e1e/src/diffusers/schedulers/scheduling_euler_discrete.py#L240) to avoid the communication sync and latency.
|
||||
|
||||
### Benchmarks
|
||||
|
||||
Refer to the [diffusers/benchmarks](https://huggingface.co/datasets/diffusers/benchmarks) dataset to see inference latency and memory usage data for compiled pipelines.
|
||||
|
||||
The [diffusers-torchao](https://github.com/sayakpaul/diffusers-torchao#benchmarking-results) repository also contains benchmarking results for compiled versions of Flux and CogVideoX.
|
||||
|
||||
## Dynamic quantization
|
||||
|
||||
[Dynamic quantization](https://pytorch.org/tutorials/recipes/recipes/dynamic_quantization.html) improves inference speed by reducing precision to enable faster math operations. This particular type of quantization determines how to scale the activations based on the data at runtime rather than using a fixed scaling factor. As a result, the scaling factor is more accurately aligned with the data.
|
||||
|
||||
The example below applies [dynamic int8 quantization](https://pytorch.org/tutorials/recipes/recipes/dynamic_quantization.html) to the UNet and VAE with the [torchao](../quantization/torchao) library.
|
||||
|
||||
> [!TIP]
|
||||
> Refer to our [torchao](../quantization/torchao) docs to learn more about how to use the Diffusers torchao integration.
|
||||
|
||||
Configure the compiler tags for maximum speed.
|
||||
|
||||
```py
|
||||
import torch
|
||||
from torchao import apply_dynamic_quant
|
||||
from diffusers import StableDiffusionXLPipeline
|
||||
|
||||
torch._inductor.config.conv_1x1_as_mm = True
|
||||
torch._inductor.config.coordinate_descent_tuning = True
|
||||
torch._inductor.config.epilogue_fusion = False
|
||||
torch._inductor.config.coordinate_descent_check_all_directions = True
|
||||
torch._inductor.config.force_fuse_int_mm_with_mul = True
|
||||
torch._inductor.config.use_mixed_mm = True
|
||||
```
|
||||
|
||||
Filter out some linear layers in the UNet and VAE which don't benefit from dynamic quantization with the [dynamic_quant_filter_fn](https://github.com/huggingface/diffusion-fast/blob/0f169640b1db106fe6a479f78c1ed3bfaeba3386/utils/pipeline_utils.py#L16).
|
||||
|
||||
```py
|
||||
pipeline = StableDiffusionXLPipeline.from_pretrained(
|
||||
"stabilityai/stable-diffusion-xl-base-1.0", torch_dtype=torch.bfloat16
|
||||
).to("cuda")
|
||||
|
||||
apply_dynamic_quant(pipeline.unet, dynamic_quant_filter_fn)
|
||||
apply_dynamic_quant(pipeline.vae, dynamic_quant_filter_fn)
|
||||
|
||||
prompt = "Astronaut in a jungle, cold color palette, muted colors, detailed, 8k"
|
||||
pipeline(prompt, num_inference_steps=30).images[0]
|
||||
```
|
||||
|
||||
## Fused projection matrices
|
||||
|
||||
> [!WARNING]
|
||||
> The [fuse_qkv_projections](https://github.com/huggingface/diffusers/blob/58431f102cf39c3c8a569f32d71b2ea8caa461e1/src/diffusers/pipelines/pipeline_utils.py#L2034) method is experimental and support is limited to mostly Stable Diffusion pipelines. Take a look at this [PR](https://github.com/huggingface/diffusers/pull/6179) to learn more about how to enable it for other pipelines
|
||||
> Don't use [torch.autocast](https://pytorch.org/docs/stable/amp.html#torch.autocast) in any of the pipelines as it can lead to black images and is always slower than pure float16 precision.
|
||||
|
||||
An input is projected into three subspaces, represented by the projection matrices Q, K, and V, in an attention block. These projections are typically calculated separately, but you can horizontally combine these into a single matrix and perform the projection in a single step. It increases the size of the matrix multiplications of the input projections and also improves the impact of quantization.
|
||||
## Distilled model
|
||||
|
||||
You could also use a distilled Stable Diffusion model and autoencoder to speed up inference. During distillation, many of the UNet's residual and attention blocks are shed to reduce the model size by 51% and improve latency on CPU/GPU by 43%. The distilled model is faster and uses less memory while generating images of comparable quality to the full Stable Diffusion model.
|
||||
|
||||
> [!TIP]
|
||||
> Read the [Open-sourcing Knowledge Distillation Code and Weights of SD-Small and SD-Tiny](https://huggingface.co/blog/sd_distillation) blog post to learn more about how knowledge distillation training works to produce a faster, smaller, and cheaper generative model.
|
||||
|
||||
The inference times below are obtained from generating 4 images from the prompt "a photo of an astronaut riding a horse on mars" with 25 PNDM steps on a NVIDIA A100. Each generation is repeated 3 times with the distilled Stable Diffusion v1.4 model by [Nota AI](https://hf.co/nota-ai).
|
||||
|
||||
| setup | latency | speed-up |
|
||||
|------------------------------|---------|----------|
|
||||
| baseline | 6.37s | x1 |
|
||||
| distilled | 4.18s | x1.52 |
|
||||
| distilled + tiny autoencoder | 3.83s | x1.66 |
|
||||
|
||||
Let's load the distilled Stable Diffusion model and compare it against the original Stable Diffusion model.
|
||||
|
||||
```py
|
||||
pipeline.fuse_qkv_projections()
|
||||
```
|
||||
from diffusers import StableDiffusionPipeline
|
||||
import torch
|
||||
|
||||
distilled = StableDiffusionPipeline.from_pretrained(
|
||||
"nota-ai/bk-sdm-small", torch_dtype=torch.float16, use_safetensors=True,
|
||||
).to("cuda")
|
||||
prompt = "a golden vase with different flowers"
|
||||
generator = torch.manual_seed(2023)
|
||||
image = distilled("a golden vase with different flowers", num_inference_steps=25, generator=generator).images[0]
|
||||
image
|
||||
```
|
||||
|
||||
<div class="flex gap-4">
|
||||
<div>
|
||||
<img class="rounded-xl" src="https://huggingface.co/datasets/huggingface/documentation-images/resolve/main/diffusers/original_sd.png"/>
|
||||
<figcaption class="mt-2 text-center text-sm text-gray-500">original Stable Diffusion</figcaption>
|
||||
</div>
|
||||
<div>
|
||||
<img class="rounded-xl" src="https://huggingface.co/datasets/huggingface/documentation-images/resolve/main/diffusers/distilled_sd.png"/>
|
||||
<figcaption class="mt-2 text-center text-sm text-gray-500">distilled Stable Diffusion</figcaption>
|
||||
</div>
|
||||
</div>
|
||||
|
||||
### Tiny AutoEncoder
|
||||
|
||||
To speed inference up even more, replace the autoencoder with a [distilled version](https://huggingface.co/sayakpaul/taesdxl-diffusers) of it.
|
||||
|
||||
```py
|
||||
import torch
|
||||
from diffusers import AutoencoderTiny, StableDiffusionPipeline
|
||||
|
||||
distilled = StableDiffusionPipeline.from_pretrained(
|
||||
"nota-ai/bk-sdm-small", torch_dtype=torch.float16, use_safetensors=True,
|
||||
).to("cuda")
|
||||
distilled.vae = AutoencoderTiny.from_pretrained(
|
||||
"sayakpaul/taesd-diffusers", torch_dtype=torch.float16, use_safetensors=True,
|
||||
).to("cuda")
|
||||
|
||||
prompt = "a golden vase with different flowers"
|
||||
generator = torch.manual_seed(2023)
|
||||
image = distilled("a golden vase with different flowers", num_inference_steps=25, generator=generator).images[0]
|
||||
image
|
||||
```
|
||||
|
||||
<div class="flex justify-center">
|
||||
<div>
|
||||
<img class="rounded-xl" src="https://huggingface.co/datasets/huggingface/documentation-images/resolve/main/diffusers/distilled_sd_vae.png" />
|
||||
<figcaption class="mt-2 text-center text-sm text-gray-500">distilled Stable Diffusion + Tiny AutoEncoder</figcaption>
|
||||
</div>
|
||||
</div>
|
||||
|
||||
More tiny autoencoder models for other Stable Diffusion models, like Stable Diffusion 3, are available from [madebyollin](https://huggingface.co/madebyollin).
|
||||
@@ -10,22 +10,67 @@ an "AS IS" BASIS, WITHOUT WARRANTIES OR CONDITIONS OF ANY KIND, either express o
|
||||
specific language governing permissions and limitations under the License.
|
||||
-->
|
||||
|
||||
# Intel Gaudi
|
||||
# Habana Gaudi
|
||||
|
||||
The Intel Gaudi AI accelerator family includes [Intel Gaudi 1](https://habana.ai/products/gaudi/), [Intel Gaudi 2](https://habana.ai/products/gaudi2/), and [Intel Gaudi 3](https://habana.ai/products/gaudi3/). Each server is equipped with 8 devices, known as Habana Processing Units (HPUs), providing 128GB of memory on Gaudi 3, 96GB on Gaudi 2, and 32GB on the first-gen Gaudi. For more details on the underlying hardware architecture, check out the [Gaudi Architecture](https://docs.habana.ai/en/latest/Gaudi_Overview/Gaudi_Architecture.html) overview.
|
||||
🤗 Diffusers is compatible with Habana Gaudi through 🤗 [Optimum](https://huggingface.co/docs/optimum/habana/usage_guides/stable_diffusion). Follow the [installation](https://docs.habana.ai/en/latest/Installation_Guide/index.html) guide to install the SynapseAI and Gaudi drivers, and then install Optimum Habana:
|
||||
|
||||
Diffusers pipelines can take advantage of HPU acceleration, even if a pipeline hasn't been added to [Optimum for Intel Gaudi](https://huggingface.co/docs/optimum/main/en/habana/index) yet, with the [GPU Migration Toolkit](https://docs.habana.ai/en/latest/PyTorch/PyTorch_Model_Porting/GPU_Migration_Toolkit/GPU_Migration_Toolkit.html).
|
||||
|
||||
Call `.to("hpu")` on your pipeline to move it to a HPU device as shown below for Flux:
|
||||
```py
|
||||
import torch
|
||||
from diffusers import DiffusionPipeline
|
||||
|
||||
pipeline = DiffusionPipeline.from_pretrained("black-forest-labs/FLUX.1-schnell", torch_dtype=torch.bfloat16)
|
||||
pipeline.to("hpu")
|
||||
|
||||
image = pipeline("An image of a squirrel in Picasso style").images[0]
|
||||
```bash
|
||||
python -m pip install --upgrade-strategy eager optimum[habana]
|
||||
```
|
||||
|
||||
> [!TIP]
|
||||
> For Gaudi-optimized diffusion pipeline implementations, we recommend using [Optimum for Intel Gaudi](https://huggingface.co/docs/optimum/main/en/habana/index).
|
||||
To generate images with Stable Diffusion 1 and 2 on Gaudi, you need to instantiate two instances:
|
||||
|
||||
- [`~optimum.habana.diffusers.GaudiStableDiffusionPipeline`], a pipeline for text-to-image generation.
|
||||
- [`~optimum.habana.diffusers.GaudiDDIMScheduler`], a Gaudi-optimized scheduler.
|
||||
|
||||
When you initialize the pipeline, you have to specify `use_habana=True` to deploy it on HPUs and to get the fastest possible generation, you should enable **HPU graphs** with `use_hpu_graphs=True`.
|
||||
|
||||
Finally, specify a [`~optimum.habana.GaudiConfig`] which can be downloaded from the [Habana](https://huggingface.co/Habana) organization on the Hub.
|
||||
|
||||
```python
|
||||
from optimum.habana import GaudiConfig
|
||||
from optimum.habana.diffusers import GaudiDDIMScheduler, GaudiStableDiffusionPipeline
|
||||
|
||||
model_name = "stabilityai/stable-diffusion-2-base"
|
||||
scheduler = GaudiDDIMScheduler.from_pretrained(model_name, subfolder="scheduler")
|
||||
pipeline = GaudiStableDiffusionPipeline.from_pretrained(
|
||||
model_name,
|
||||
scheduler=scheduler,
|
||||
use_habana=True,
|
||||
use_hpu_graphs=True,
|
||||
gaudi_config="Habana/stable-diffusion-2",
|
||||
)
|
||||
```
|
||||
|
||||
Now you can call the pipeline to generate images by batches from one or several prompts:
|
||||
|
||||
```python
|
||||
outputs = pipeline(
|
||||
prompt=[
|
||||
"High quality photo of an astronaut riding a horse in space",
|
||||
"Face of a yellow cat, high resolution, sitting on a park bench",
|
||||
],
|
||||
num_images_per_prompt=10,
|
||||
batch_size=4,
|
||||
)
|
||||
```
|
||||
|
||||
For more information, check out 🤗 Optimum Habana's [documentation](https://huggingface.co/docs/optimum/habana/usage_guides/stable_diffusion) and the [example](https://github.com/huggingface/optimum-habana/tree/main/examples/stable-diffusion) provided in the official GitHub repository.
|
||||
|
||||
## Benchmark
|
||||
|
||||
We benchmarked Habana's first-generation Gaudi and Gaudi2 with the [Habana/stable-diffusion](https://huggingface.co/Habana/stable-diffusion) and [Habana/stable-diffusion-2](https://huggingface.co/Habana/stable-diffusion-2) Gaudi configurations (mixed precision bf16/fp32) to demonstrate their performance.
|
||||
|
||||
For [Stable Diffusion v1.5](https://huggingface.co/stable-diffusion-v1-5/stable-diffusion-v1-5) on 512x512 images:
|
||||
|
||||
| | Latency (batch size = 1) | Throughput |
|
||||
| ---------------------- |:------------------------:|:---------------------------:|
|
||||
| first-generation Gaudi | 3.80s | 0.308 images/s (batch size = 8) |
|
||||
| Gaudi2 | 1.33s | 1.081 images/s (batch size = 8) |
|
||||
|
||||
For [Stable Diffusion v2.1](https://huggingface.co/stabilityai/stable-diffusion-2-1) on 768x768 images:
|
||||
|
||||
| | Latency (batch size = 1) | Throughput |
|
||||
| ---------------------- |:------------------------:|:-------------------------------:|
|
||||
| first-generation Gaudi | 10.2s | 0.108 images/s (batch size = 4) |
|
||||
| Gaudi2 | 3.17s | 0.379 images/s (batch size = 8) |
|
||||
|
||||
@@ -12,258 +12,175 @@ specific language governing permissions and limitations under the License.
|
||||
|
||||
# Reduce memory usage
|
||||
|
||||
Modern diffusion models like [Flux](../api/pipelines/flux) and [Wan](../api/pipelines/wan) have billions of parameters that take up a lot of memory on your hardware for inference. This is challenging because common GPUs often don't have sufficient memory. To overcome the memory limitations, you can use more than one GPU (if available), offload some of the pipeline components to the CPU, and more.
|
||||
A barrier to using diffusion models is the large amount of memory required. To overcome this challenge, there are several memory-reducing techniques you can use to run even some of the largest models on free-tier or consumer GPUs. Some of these techniques can even be combined to further reduce memory usage.
|
||||
|
||||
This guide will show you how to reduce your memory usage.
|
||||
<Tip>
|
||||
|
||||
> [!TIP]
|
||||
> Keep in mind these techniques may need to be adjusted depending on the model! For example, a transformer-based diffusion model may not benefit equally from these inference speed optimizations as a UNet-based model.
|
||||
In many cases, optimizing for memory or speed leads to improved performance in the other, so you should try to optimize for both whenever you can. This guide focuses on minimizing memory usage, but you can also learn more about how to [Speed up inference](fp16).
|
||||
|
||||
## Multiple GPUs
|
||||
</Tip>
|
||||
|
||||
If you have access to more than one GPU, there a few options for efficiently loading and distributing a large model across your hardware. These features are supported by the [Accelerate](https://huggingface.co/docs/accelerate/index) library, so make sure it is installed first.
|
||||
The results below are obtained from generating a single 512x512 image from the prompt a photo of an astronaut riding a horse on mars with 50 DDIM steps on a Nvidia Titan RTX, demonstrating the speed-up you can expect as a result of reduced memory consumption.
|
||||
|
||||
```bash
|
||||
pip install -U accelerate
|
||||
```
|
||||
| | latency | speed-up |
|
||||
| ---------------- | ------- | ------- |
|
||||
| original | 9.50s | x1 |
|
||||
| fp16 | 3.61s | x2.63 |
|
||||
| channels last | 3.30s | x2.88 |
|
||||
| traced UNet | 3.21s | x2.96 |
|
||||
| memory-efficient attention | 2.63s | x3.61 |
|
||||
|
||||
### Sharded checkpoints
|
||||
## Sliced VAE
|
||||
|
||||
Loading large checkpoints in several shards in useful because the shards are loaded one at a time. This keeps memory usage low, only requiring enough memory for the model size and the largest shard size. We recommend sharding when the fp32 checkpoint is greater than 5GB. The default shard size is 5GB.
|
||||
Sliced VAE enables decoding large batches of images with limited VRAM or batches with 32 images or more by decoding the batches of latents one image at a time. You'll likely want to couple this with [`~ModelMixin.enable_xformers_memory_efficient_attention`] to reduce memory use further if you have xFormers installed.
|
||||
|
||||
Shard a checkpoint in [`~DiffusionPipeline.save_pretrained`] with the `max_shard_size` parameter.
|
||||
To use sliced VAE, call [`~StableDiffusionPipeline.enable_vae_slicing`] on your pipeline before inference:
|
||||
|
||||
```py
|
||||
from diffusers import AutoModel
|
||||
|
||||
unet = AutoModel.from_pretrained(
|
||||
"stabilityai/stable-diffusion-xl-base-1.0", subfolder="unet"
|
||||
)
|
||||
unet.save_pretrained("sdxl-unet-sharded", max_shard_size="5GB")
|
||||
```
|
||||
|
||||
Now you can use the sharded checkpoint, instead of the regular checkpoint, to save memory.
|
||||
|
||||
```py
|
||||
```python
|
||||
import torch
|
||||
from diffusers import AutoModel, StableDiffusionXLPipeline
|
||||
from diffusers import StableDiffusionPipeline
|
||||
|
||||
unet = AutoModel.from_pretrained(
|
||||
"username/sdxl-unet-sharded", torch_dtype=torch.float16
|
||||
)
|
||||
pipeline = StableDiffusionXLPipeline.from_pretrained(
|
||||
"stabilityai/stable-diffusion-xl-base-1.0",
|
||||
unet=unet,
|
||||
torch_dtype=torch.float16
|
||||
).to("cuda")
|
||||
```
|
||||
|
||||
### Device placement
|
||||
|
||||
> [!WARNING]
|
||||
> Device placement is an experimental feature and the API may change. Only the `balanced` strategy is supported at the moment. We plan to support additional mapping strategies in the future.
|
||||
|
||||
The `device_map` parameter controls how the model components in a pipeline are distributed across devices. The `balanced` device placement strategy evenly splits the pipeline across all available devices.
|
||||
|
||||
```py
|
||||
import torch
|
||||
from diffusers import AutoModel, StableDiffusionXLPipeline
|
||||
|
||||
pipeline = StableDiffusionXLPipeline.from_pretrained(
|
||||
"stabilityai/stable-diffusion-xl-base-1.0",
|
||||
pipe = StableDiffusionPipeline.from_pretrained(
|
||||
"stable-diffusion-v1-5/stable-diffusion-v1-5",
|
||||
torch_dtype=torch.float16,
|
||||
device_map="balanced"
|
||||
use_safetensors=True,
|
||||
)
|
||||
pipe = pipe.to("cuda")
|
||||
|
||||
prompt = "a photo of an astronaut riding a horse on mars"
|
||||
pipe.enable_vae_slicing()
|
||||
#pipe.enable_xformers_memory_efficient_attention()
|
||||
images = pipe([prompt] * 32).images
|
||||
```
|
||||
|
||||
You can inspect a pipeline's device map with `hf_device_map`.
|
||||
You may see a small performance boost in VAE decoding on multi-image batches, and there should be no performance impact on single-image batches.
|
||||
|
||||
```py
|
||||
print(pipeline.hf_device_map)
|
||||
{'unet': 1, 'vae': 1, 'safety_checker': 0, 'text_encoder': 0}
|
||||
```
|
||||
## Tiled VAE
|
||||
|
||||
The `device_map` parameter also works on the model-level. This is useful for loading large models, such as the Flux diffusion transformer which has 12.5B parameters. Instead of `balanced`, set it to `"auto"` to automatically distribute a model across the fastest device first before moving to slower devices. Refer to the [Model sharding](../training/distributed_inference#model-sharding) docs for more details.
|
||||
Tiled VAE processing also enables working with large images on limited VRAM (for example, generating 4k images on 8GB of VRAM) by splitting the image into overlapping tiles, decoding the tiles, and then blending the outputs together to compose the final image. You should also used tiled VAE with [`~ModelMixin.enable_xformers_memory_efficient_attention`] to reduce memory use further if you have xFormers installed.
|
||||
|
||||
```py
|
||||
To use tiled VAE processing, call [`~StableDiffusionPipeline.enable_vae_tiling`] on your pipeline before inference:
|
||||
|
||||
```python
|
||||
import torch
|
||||
from diffusers import AutoModel
|
||||
from diffusers import StableDiffusionPipeline, UniPCMultistepScheduler
|
||||
|
||||
transformer = AutoModel.from_pretrained(
|
||||
"black-forest-labs/FLUX.1-dev",
|
||||
subfolder="transformer",
|
||||
device_map="auto",
|
||||
torch_dtype=torch.bfloat16
|
||||
)
|
||||
```
|
||||
|
||||
For more fine-grained control, pass a dictionary to enforce the maximum GPU memory to use on each device. If a device is not in `max_memory`, it is ignored and pipeline components won't be distributed to it.
|
||||
|
||||
```py
|
||||
import torch
|
||||
from diffusers import AutoModel, StableDiffusionXLPipeline
|
||||
|
||||
max_memory = {0:"1GB", 1:"1GB"}
|
||||
pipeline = StableDiffusionXLPipeline.from_pretrained(
|
||||
"stabilityai/stable-diffusion-xl-base-1.0",
|
||||
pipe = StableDiffusionPipeline.from_pretrained(
|
||||
"stable-diffusion-v1-5/stable-diffusion-v1-5",
|
||||
torch_dtype=torch.float16,
|
||||
device_map="balanced",
|
||||
max_memory=max_memory
|
||||
use_safetensors=True,
|
||||
)
|
||||
pipe.scheduler = UniPCMultistepScheduler.from_config(pipe.scheduler.config)
|
||||
pipe = pipe.to("cuda")
|
||||
prompt = "a beautiful landscape photograph"
|
||||
pipe.enable_vae_tiling()
|
||||
#pipe.enable_xformers_memory_efficient_attention()
|
||||
|
||||
image = pipe([prompt], width=3840, height=2224, num_inference_steps=20).images[0]
|
||||
```
|
||||
|
||||
Diffusers uses the maxmium memory of all devices by default, but if they don't fit on the GPUs, then you'll need to use a single GPU and offload to the CPU with the methods below.
|
||||
|
||||
- [`~DiffusionPipeline.enable_model_cpu_offload`] only works on a single GPU but a very large model may not fit on it
|
||||
- [`~DiffusionPipeline.enable_sequential_cpu_offload`] may work but it is extremely slow and also limited to a single GPU
|
||||
|
||||
Use the [`~DiffusionPipeline.reset_device_map`] method to reset the `device_map`. This is necessary if you want to use methods like `.to()`, [`~DiffusionPipeline.enable_sequential_cpu_offload`], and [`~DiffusionPipeline.enable_model_cpu_offload`] on a pipeline that was device-mapped.
|
||||
|
||||
```py
|
||||
pipeline.reset_device_map()
|
||||
```
|
||||
|
||||
## VAE slicing
|
||||
|
||||
VAE slicing saves memory by splitting large batches of inputs into a single batch of data and separately processing them. This method works best when generating more than one image at a time.
|
||||
|
||||
For example, if you're generating 4 images at once, decoding would increase peak activation memory by 4x. VAE slicing reduces this by only decoding 1 image at a time instead of all 4 images at once.
|
||||
|
||||
Call [`~StableDiffusionPipeline.enable_vae_slicing`] to enable sliced VAE. You can expect a small increase in performance when decoding multi-image batches and no performance impact for single-image batches.
|
||||
|
||||
```py
|
||||
import torch
|
||||
from diffusers import AutoModel, StableDiffusionXLPipeline
|
||||
|
||||
pipeline = StableDiffusionXLPipeline.from_pretrained(
|
||||
"stabilityai/stable-diffusion-xl-base-1.0",
|
||||
torch_dtype=torch.float16,
|
||||
).to("cuda")
|
||||
pipeline.enable_vae_slicing()
|
||||
pipeline(["An astronaut riding a horse on Mars"]*32).images[0]
|
||||
print(f"Max memory reserved: {torch.cuda.max_memory_allocated() / 1024**3:.2f} GB")
|
||||
```
|
||||
|
||||
> [!WARNING]
|
||||
> [`AutoencoderKLWan`] and [`AsymmetricAutoencoderKL`] don't support slicing.
|
||||
|
||||
## VAE tiling
|
||||
|
||||
VAE tiling saves memory by dividing an image into smaller overlapping tiles instead of processing the entire image at once. This also reduces peak memory usage because the GPU is only processing a tile at a time.
|
||||
|
||||
Call [`~StableDiffusionPipeline.enable_vae_tiling`] to enable VAE tiling. The generated image may have some tone variation from tile-to-tile because they're decoded separately, but there shouldn't be any obvious seams between the tiles. Tiling is disabled for resolutions lower than a pre-specified (but configurable) limit. For example, this limit is 512x512 for the VAE in [`StableDiffusionPipeline`].
|
||||
|
||||
```py
|
||||
import torch
|
||||
from diffusers import AutoPipelineForImage2Image
|
||||
from diffusers.utils import load_image
|
||||
|
||||
pipeline = AutoPipelineForImage2Image.from_pretrained(
|
||||
"stabilityai/stable-diffusion-xl-base-1.0", torch_dtype=torch.float16
|
||||
).to("cuda")
|
||||
pipeline.enable_vae_tiling()
|
||||
|
||||
init_image = load_image("https://huggingface.co/datasets/huggingface/documentation-images/resolve/main/diffusers/img2img-sdxl-init.png")
|
||||
prompt = "Astronaut in a jungle, cold color palette, muted colors, detailed, 8k"
|
||||
pipeline(prompt, image=init_image, strength=0.5).images[0]
|
||||
print(f"Max memory reserved: {torch.cuda.max_memory_allocated() / 1024**3:.2f} GB")
|
||||
```
|
||||
|
||||
> [!WARNING]
|
||||
> [`AutoencoderKLWan`] and [`AsymmetricAutoencoderKL`] don't support tiling.
|
||||
The output image has some tile-to-tile tone variation because the tiles are decoded separately, but you shouldn't see any sharp and obvious seams between the tiles. Tiling is turned off for images that are 512x512 or smaller.
|
||||
|
||||
## CPU offloading
|
||||
|
||||
CPU offloading selectively moves weights from the GPU to the CPU. When a component is required, it is transferred to the GPU and when it isn't required, it is moved to the CPU. This method works on submodules rather than whole models. It saves memory by avoiding storing the entire model on the GPU.
|
||||
Offloading the weights to the CPU and only loading them on the GPU when performing the forward pass can also save memory. Often, this technique can reduce memory consumption to less than 3GB.
|
||||
|
||||
CPU offloading dramatically reduces memory usage, but it is also **extremely slow** because submodules are passed back and forth multiple times between devices. It can often be impractical due to how slow it is.
|
||||
To perform CPU offloading, call [`~StableDiffusionPipeline.enable_sequential_cpu_offload`]:
|
||||
|
||||
> [!WARNING]
|
||||
> Don't move the pipeline to CUDA before calling [`~DiffusionPipeline.enable_sequential_cpu_offload`], otherwise the amount of memory saved is only minimal (refer to this [issue](https://github.com/huggingface/diffusers/issues/1934) for more details). This is a stateful operation that installs hooks on the model.
|
||||
|
||||
Call [`~DiffusionPipeline.enable_sequential_cpu_offload`] to enable it on a pipeline.
|
||||
|
||||
```py
|
||||
```Python
|
||||
import torch
|
||||
from diffusers import DiffusionPipeline
|
||||
from diffusers import StableDiffusionPipeline
|
||||
|
||||
pipeline = DiffusionPipeline.from_pretrained(
|
||||
"black-forest-labs/FLUX.1-schnell", torch_dtype=torch.bfloat16
|
||||
pipe = StableDiffusionPipeline.from_pretrained(
|
||||
"stable-diffusion-v1-5/stable-diffusion-v1-5",
|
||||
torch_dtype=torch.float16,
|
||||
use_safetensors=True,
|
||||
)
|
||||
pipeline.enable_sequential_cpu_offload()
|
||||
|
||||
pipeline(
|
||||
prompt="An astronaut riding a horse on Mars",
|
||||
guidance_scale=0.,
|
||||
height=768,
|
||||
width=1360,
|
||||
num_inference_steps=4,
|
||||
max_sequence_length=256,
|
||||
).images[0]
|
||||
print(f"Max memory reserved: {torch.cuda.max_memory_allocated() / 1024**3:.2f} GB")
|
||||
prompt = "a photo of an astronaut riding a horse on mars"
|
||||
pipe.enable_sequential_cpu_offload()
|
||||
image = pipe(prompt).images[0]
|
||||
```
|
||||
|
||||
CPU offloading works on submodules rather than whole models. This is the best way to minimize memory consumption, but inference is much slower due to the iterative nature of the diffusion process. The UNet component of the pipeline runs several times (as many as `num_inference_steps`); each time, the different UNet submodules are sequentially onloaded and offloaded as needed, resulting in a large number of memory transfers.
|
||||
|
||||
<Tip>
|
||||
|
||||
Consider using [model offloading](#model-offloading) if you want to optimize for speed because it is much faster. The tradeoff is your memory savings won't be as large.
|
||||
|
||||
</Tip>
|
||||
|
||||
<Tip warning={true}>
|
||||
|
||||
When using [`~StableDiffusionPipeline.enable_sequential_cpu_offload`], don't move the pipeline to CUDA beforehand or else the gain in memory consumption will only be minimal (see this [issue](https://github.com/huggingface/diffusers/issues/1934) for more information).
|
||||
|
||||
[`~StableDiffusionPipeline.enable_sequential_cpu_offload`] is a stateful operation that installs hooks on the models.
|
||||
|
||||
</Tip>
|
||||
|
||||
## Model offloading
|
||||
|
||||
Model offloading moves entire models to the GPU instead of selectively moving *some* layers or model components. One of the main pipeline models, usually the text encoder, UNet, and VAE, is placed on the GPU while the other components are held on the CPU. Components like the UNet that run multiple times stays on the GPU until its completely finished and no longer needed. This eliminates the communication overhead of [CPU offloading](#cpu-offloading) and makes model offloading a faster alternative. The tradeoff is memory savings won't be as large.
|
||||
<Tip>
|
||||
|
||||
> [!WARNING]
|
||||
> Keep in mind that if models are reused outside the pipeline after hookes have been installed (see [Removing Hooks](https://huggingface.co/docs/accelerate/en/package_reference/big_modeling#accelerate.hooks.remove_hook_from_module) for more details), you need to run the entire pipeline and models in the expected order to properly offload them. This is a stateful operation that installs hooks on the model.
|
||||
Model offloading requires 🤗 Accelerate version 0.17.0 or higher.
|
||||
|
||||
Call [`~DiffusionPipeline.enable_model_cpu_offload`] to enable it on a pipeline.
|
||||
</Tip>
|
||||
|
||||
```py
|
||||
[Sequential CPU offloading](#cpu-offloading) preserves a lot of memory but it makes inference slower because submodules are moved to GPU as needed, and they're immediately returned to the CPU when a new module runs.
|
||||
|
||||
Full-model offloading is an alternative that moves whole models to the GPU, instead of handling each model's constituent *submodules*. There is a negligible impact on inference time (compared with moving the pipeline to `cuda`), and it still provides some memory savings.
|
||||
|
||||
During model offloading, only one of the main components of the pipeline (typically the text encoder, UNet and VAE)
|
||||
is placed on the GPU while the others wait on the CPU. Components like the UNet that run for multiple iterations stay on the GPU until they're no longer needed.
|
||||
|
||||
Enable model offloading by calling [`~StableDiffusionPipeline.enable_model_cpu_offload`] on the pipeline:
|
||||
|
||||
```Python
|
||||
import torch
|
||||
from diffusers import DiffusionPipeline
|
||||
from diffusers import StableDiffusionPipeline
|
||||
|
||||
pipeline = DiffusionPipeline.from_pretrained(
|
||||
"black-forest-labs/FLUX.1-schnell", torch_dtype=torch.bfloat16
|
||||
pipe = StableDiffusionPipeline.from_pretrained(
|
||||
"stable-diffusion-v1-5/stable-diffusion-v1-5",
|
||||
torch_dtype=torch.float16,
|
||||
use_safetensors=True,
|
||||
)
|
||||
pipline.enable_model_cpu_offload()
|
||||
|
||||
pipeline(
|
||||
prompt="An astronaut riding a horse on Mars",
|
||||
guidance_scale=0.,
|
||||
height=768,
|
||||
width=1360,
|
||||
num_inference_steps=4,
|
||||
max_sequence_length=256,
|
||||
).images[0]
|
||||
print(f"Max memory reserved: {torch.cuda.max_memory_allocated() / 1024**3:.2f} GB")
|
||||
prompt = "a photo of an astronaut riding a horse on mars"
|
||||
pipe.enable_model_cpu_offload()
|
||||
image = pipe(prompt).images[0]
|
||||
```
|
||||
|
||||
[`~DiffusionPipeline.enable_model_cpu_offload`] also helps when you're using the [`~StableDiffusionXLPipeline.encode_prompt`] method on its own to generate the text encoders hidden state.
|
||||
<Tip warning={true}>
|
||||
|
||||
In order to properly offload models after they're called, it is required to run the entire pipeline and models are called in the pipeline's expected order. Exercise caution if models are reused outside the context of the pipeline after hooks have been installed. See [Removing Hooks](https://huggingface.co/docs/accelerate/en/package_reference/big_modeling#accelerate.hooks.remove_hook_from_module) for more information.
|
||||
|
||||
[`~StableDiffusionPipeline.enable_model_cpu_offload`] is a stateful operation that installs hooks on the models and state on the pipeline.
|
||||
|
||||
</Tip>
|
||||
|
||||
## Group offloading
|
||||
|
||||
Group offloading moves groups of internal layers ([torch.nn.ModuleList](https://pytorch.org/docs/stable/generated/torch.nn.ModuleList.html) or [torch.nn.Sequential](https://pytorch.org/docs/stable/generated/torch.nn.Sequential.html)) to the CPU. It uses less memory than [model offloading](#model-offloading) and it is faster than [CPU offloading](#cpu-offloading) because it reduces communication overhead.
|
||||
Group offloading is the middle ground between sequential and model offloading. It works by offloading groups of internal layers (either `torch.nn.ModuleList` or `torch.nn.Sequential`), which uses less memory than model-level offloading. It is also faster than sequential-level offloading because the number of device synchronizations is reduced.
|
||||
|
||||
> [!WARNING]
|
||||
> Group offloading may not work with all models if the forward implementation contains weight-dependent device casting of inputs because it may clash with group offloading's device casting mechanism.
|
||||
To enable group offloading, call the [`~ModelMixin.enable_group_offload`] method on the model if it is a Diffusers model implementation. For any other model implementation, use [`~hooks.group_offloading.apply_group_offloading`]:
|
||||
|
||||
Call [`~ModelMixin.enable_group_offload`] to enable it for standard Diffusers model components that inherit from [`ModelMixin`]. For other model components that don't inherit from [`ModelMixin`], such as a generic [torch.nn.Module](https://pytorch.org/docs/stable/generated/torch.nn.Module.html), use [`~hooks.apply_group_offloading`] instead.
|
||||
|
||||
The `offload_type` parameter can be set to `block_level` or `leaf_level`.
|
||||
|
||||
- `block_level` offloads groups of layers based on the `num_blocks_per_group` parameter. For example, if `num_blocks_per_group=2` on a model with 40 layers, 2 layers are onloaded and offloaded at a time (20 total onloads/offloads). This drastically reduces memory requirements.
|
||||
- `leaf_level` offloads individual layers at the lowest level and is equivalent to [CPU offloading](#cpu-offloading). But it can be made faster if you use streams without giving up inference speed.
|
||||
|
||||
```py
|
||||
```python
|
||||
import torch
|
||||
from diffusers import CogVideoXPipeline
|
||||
from diffusers.hooks import apply_group_offloading
|
||||
from diffusers.utils import export_to_video
|
||||
|
||||
# Load the pipeline
|
||||
onload_device = torch.device("cuda")
|
||||
offload_device = torch.device("cpu")
|
||||
pipeline = CogVideoXPipeline.from_pretrained("THUDM/CogVideoX-5b", torch_dtype=torch.bfloat16)
|
||||
pipe = CogVideoXPipeline.from_pretrained("THUDM/CogVideoX-5b", torch_dtype=torch.bfloat16)
|
||||
|
||||
# Use the enable_group_offload method for Diffusers model implementations
|
||||
pipeline.transformer.enable_group_offload(onload_device=onload_device, offload_device=offload_device, offload_type="leaf_level")
|
||||
pipeline.vae.enable_group_offload(onload_device=onload_device, offload_type="leaf_level")
|
||||
# We can utilize the enable_group_offload method for Diffusers model implementations
|
||||
pipe.transformer.enable_group_offload(onload_device=onload_device, offload_device=offload_device, offload_type="leaf_level", use_stream=True)
|
||||
|
||||
# Use the apply_group_offloading method for other model components
|
||||
apply_group_offloading(pipeline.text_encoder, onload_device=onload_device, offload_type="block_level", num_blocks_per_group=2)
|
||||
# For any other model implementations, the apply_group_offloading function can be used
|
||||
apply_group_offloading(pipe.text_encoder, onload_device=onload_device, offload_type="block_level", num_blocks_per_group=2)
|
||||
apply_group_offloading(pipe.vae, onload_device=onload_device, offload_type="leaf_level")
|
||||
|
||||
prompt = (
|
||||
"A panda, dressed in a small, red jacket and a tiny hat, sits on a wooden stool in a serene bamboo forest. "
|
||||
@@ -273,62 +190,35 @@ prompt = (
|
||||
"The background includes a small, flowing stream and vibrant green foliage, enhancing the peaceful and magical "
|
||||
"atmosphere of this unique musical performance."
|
||||
)
|
||||
video = pipeline(prompt=prompt, guidance_scale=6, num_inference_steps=50).frames[0]
|
||||
video = pipe(prompt=prompt, guidance_scale=6, num_inference_steps=50).frames[0]
|
||||
# This utilized about 14.79 GB. It can be further reduced by using tiling and using leaf_level offloading throughout the pipeline.
|
||||
print(f"Max memory reserved: {torch.cuda.max_memory_allocated() / 1024**3:.2f} GB")
|
||||
export_to_video(video, "output.mp4", fps=8)
|
||||
```
|
||||
|
||||
### CUDA stream
|
||||
Group offloading (for CUDA devices with support for asynchronous data transfer streams) overlaps data transfer and computation to reduce the overall execution time compared to sequential offloading. This is enabled using layer prefetching with CUDA streams. The next layer to be executed is loaded onto the accelerator device while the current layer is being executed - this increases the memory requirements slightly. Group offloading also supports leaf-level offloading (equivalent to sequential CPU offloading) but can be made much faster when using streams.
|
||||
|
||||
The `use_stream` parameter can be activated for CUDA devices that support asynchronous data transfer streams to reduce overall execution time compared to [CPU offloading](#cpu-offloading). It overlaps data transfer and computation by using layer prefetching. The next layer to be executed is loaded onto the GPU while the current layer is still being executed. It can increase CPU memory significantly so ensure you have 2x the amount of memory as the model size.
|
||||
## FP8 layerwise weight-casting
|
||||
|
||||
Set `record_stream=True` for more of a speedup at the cost of slightly increased memory usage. Refer to the [torch.Tensor.record_stream](https://pytorch.org/docs/stable/generated/torch.Tensor.record_stream.html) docs to learn more.
|
||||
PyTorch supports `torch.float8_e4m3fn` and `torch.float8_e5m2` as weight storage dtypes, but they can't be used for computation in many different tensor operations due to unimplemented kernel support. However, you can use these dtypes to store model weights in fp8 precision and upcast them on-the-fly when the layers are used in the forward pass. This is known as layerwise weight-casting.
|
||||
|
||||
> [!TIP]
|
||||
> When `use_stream=True` on VAEs with tiling enabled, make sure to do a dummy forward pass (possible with dummy inputs as well) before inference to avoid device mismatch errors. This may not work on all implementations, so feel free to open an issue if you encounter any problems.
|
||||
Typically, inference on most models is done with `torch.float16` or `torch.bfloat16` weight/computation precision. Layerwise weight-casting cuts down the memory footprint of the model weights by approximately half.
|
||||
|
||||
If you're using `block_level` group offloading with `use_stream` enabled, the `num_blocks_per_group` parameter should be set to `1`, otherwise a warning will be raised.
|
||||
|
||||
```py
|
||||
pipeline.transformer.enable_group_offload(onload_device=onload_device, offload_device=offload_device, offload_type="leaf_level", use_stream=True, record_stream=True)
|
||||
```
|
||||
|
||||
The `low_cpu_mem_usage` parameter can be set to `True` to reduce CPU memory usage when using streams during group offloading. It is best for `leaf_level` offloading and when CPU memory is bottlenecked. Memory is saved by creating pinned tensors on the fly instead of pre-pinning them. However, this may increase overall execution time.
|
||||
|
||||
<Tip>
|
||||
|
||||
The offloading strategies can be combined with [quantization](../quantization/overview.md) to enable further memory savings. For image generation, combining [quantization and model offloading](#model-offloading) can often give the best trade-off between quality, speed, and memory. However, for video generation, as the models are more
|
||||
compute-bound, [group-offloading](#group-offloading) tends to be better. Group offloading provides considerable benefits when weight transfers can be overlapped with computation (must use streams). When applying group offloading with quantization on image generation models at typical resolutions (1024x1024, for example), it is usually not possible to *fully* overlap weight transfers if the compute kernel finishes faster, making it communication bound between CPU/GPU (due to device synchronizations).
|
||||
|
||||
</Tip>
|
||||
|
||||
## Layerwise casting
|
||||
|
||||
Layerwise casting stores weights in a smaller data format (for example, `torch.float8_e4m3fn` and `torch.float8_e5m2`) to use less memory and upcasts those weights to a higher precision like `torch.float16` or `torch.bfloat16` for computation. Certain layers (normalization and modulation related weights) are skipped because storing them in fp8 can degrade generation quality.
|
||||
|
||||
> [!WARNING]
|
||||
> Layerwise casting may not work with all models if the forward implementation contains internal typecasting of weights. The current implementation of layerwise casting assumes the forward pass is independent of the weight precision and the input datatypes are always specified in `compute_dtype` (see [here](https://github.com/huggingface/transformers/blob/7f5077e53682ca855afc826162b204ebf809f1f9/src/transformers/models/t5/modeling_t5.py#L294-L299) for an incompatible implementation).
|
||||
>
|
||||
> Layerwise casting may also fail on custom modeling implementations with [PEFT](https://huggingface.co/docs/peft/index) layers. There are some checks available but they are not extensively tested or guaranteed to work in all cases.
|
||||
|
||||
Call [`~ModelMixin.enable_layerwise_casting`] to set the storage and computation datatypes.
|
||||
|
||||
```py
|
||||
```python
|
||||
import torch
|
||||
from diffusers import CogVideoXPipeline, CogVideoXTransformer3DModel
|
||||
from diffusers.utils import export_to_video
|
||||
|
||||
transformer = CogVideoXTransformer3DModel.from_pretrained(
|
||||
"THUDM/CogVideoX-5b",
|
||||
subfolder="transformer",
|
||||
torch_dtype=torch.bfloat16
|
||||
)
|
||||
model_id = "THUDM/CogVideoX-5b"
|
||||
|
||||
# Load the model in bfloat16 and enable layerwise casting
|
||||
transformer = CogVideoXTransformer3DModel.from_pretrained(model_id, subfolder="transformer", torch_dtype=torch.bfloat16)
|
||||
transformer.enable_layerwise_casting(storage_dtype=torch.float8_e4m3fn, compute_dtype=torch.bfloat16)
|
||||
|
||||
pipeline = CogVideoXPipeline.from_pretrained("THUDM/CogVideoX-5b",
|
||||
transformer=transformer,
|
||||
torch_dtype=torch.bfloat16
|
||||
).to("cuda")
|
||||
# Load the pipeline
|
||||
pipe = CogVideoXPipeline.from_pretrained(model_id, transformer=transformer, torch_dtype=torch.bfloat16)
|
||||
pipe.to("cuda")
|
||||
|
||||
prompt = (
|
||||
"A panda, dressed in a small, red jacket and a tiny hat, sits on a wooden stool in a serene bamboo forest. "
|
||||
"The panda's fluffy paws strum a miniature acoustic guitar, producing soft, melodic tunes. Nearby, a few other "
|
||||
@@ -337,53 +227,35 @@ prompt = (
|
||||
"The background includes a small, flowing stream and vibrant green foliage, enhancing the peaceful and magical "
|
||||
"atmosphere of this unique musical performance."
|
||||
)
|
||||
video = pipeline(prompt=prompt, guidance_scale=6, num_inference_steps=50).frames[0]
|
||||
print(f"Max memory reserved: {torch.cuda.max_memory_allocated() / 1024**3:.2f} GB")
|
||||
video = pipe(prompt=prompt, guidance_scale=6, num_inference_steps=50).frames[0]
|
||||
export_to_video(video, "output.mp4", fps=8)
|
||||
```
|
||||
|
||||
The [`~hooks.apply_layerwise_casting`] method can also be used if you need more control and flexibility. It can be partially applied to model layers by calling it on specific internal modules. Use the `skip_modules_pattern` or `skip_modules_classes` parameters to specify modules to avoid, such as the normalization and modulation layers.
|
||||
In the above example, layerwise casting is enabled on the transformer component of the pipeline. By default, certain layers are skipped from the FP8 weight casting because it can lead to significant degradation of generation quality. The normalization and modulation related weight parameters are also skipped by default.
|
||||
|
||||
However, you gain more control and flexibility by directly utilizing the [`~hooks.layerwise_casting.apply_layerwise_casting`] function instead of [`~ModelMixin.enable_layerwise_casting`].
|
||||
|
||||
## Channels-last memory format
|
||||
|
||||
The channels-last memory format is an alternative way of ordering NCHW tensors in memory to preserve dimension ordering. Channels-last tensors are ordered in such a way that the channels become the densest dimension (storing images pixel-per-pixel). Since not all operators currently support the channels-last format, it may result in worst performance but you should still try and see if it works for your model.
|
||||
|
||||
For example, to set the pipeline's UNet to use the channels-last format:
|
||||
|
||||
```python
|
||||
import torch
|
||||
from diffusers import CogVideoXTransformer3DModel
|
||||
from diffusers.hooks import apply_layerwise_casting
|
||||
|
||||
transformer = CogVideoXTransformer3DModel.from_pretrained(
|
||||
"THUDM/CogVideoX-5b",
|
||||
subfolder="transformer",
|
||||
torch_dtype=torch.bfloat16
|
||||
)
|
||||
|
||||
# skip the normalization layer
|
||||
apply_layerwise_casting(
|
||||
transformer,
|
||||
storage_dtype=torch.float8_e4m3fn,
|
||||
compute_dtype=torch.bfloat16,
|
||||
skip_modules_classes=["norm"],
|
||||
non_blocking=True,
|
||||
)
|
||||
```
|
||||
|
||||
## torch.channels_last
|
||||
|
||||
[torch.channels_last](https://pytorch.org/tutorials/intermediate/memory_format_tutorial.html) flips how tensors are stored from `(batch size, channels, height, width)` to `(batch size, heigh, width, channels)`. This aligns the tensors with how the hardware sequentially accesses the tensors stored in memory and avoids skipping around in memory to access the pixel values.
|
||||
|
||||
Not all operators currently support the channels-last format and may result in worst performance, but it is still worth trying.
|
||||
|
||||
```py
|
||||
print(pipeline.unet.conv_out.state_dict()["weight"].stride()) # (2880, 9, 3, 1)
|
||||
pipeline.unet.to(memory_format=torch.channels_last) # in-place operation
|
||||
print(pipe.unet.conv_out.state_dict()["weight"].stride()) # (2880, 9, 3, 1)
|
||||
pipe.unet.to(memory_format=torch.channels_last) # in-place operation
|
||||
print(
|
||||
pipeline.unet.conv_out.state_dict()["weight"].stride()
|
||||
pipe.unet.conv_out.state_dict()["weight"].stride()
|
||||
) # (2880, 1, 960, 320) having a stride of 1 for the 2nd dimension proves that it works
|
||||
```
|
||||
|
||||
## torch.jit.trace
|
||||
## Tracing
|
||||
|
||||
[torch.jit.trace](https://pytorch.org/docs/stable/generated/torch.jit.trace.html) records the operations a model performs on a sample input and creates a new, optimized representation of the model based on the recorded execution path. During tracing, the model is optimized to reduce overhead from Python and dynamic control flows and operations are fused together for more efficiency. The returned executable or [ScriptFunction](https://pytorch.org/docs/stable/generated/torch.jit.ScriptFunction.html) can be compiled.
|
||||
Tracing runs an example input tensor through the model and captures the operations that are performed on it as that input makes its way through the model's layers. The executable or `ScriptFunction` that is returned is optimized with just-in-time compilation.
|
||||
|
||||
```py
|
||||
To trace a UNet:
|
||||
|
||||
```python
|
||||
import time
|
||||
import torch
|
||||
from diffusers import StableDiffusionPipeline
|
||||
@@ -396,7 +268,8 @@ torch.set_grad_enabled(False)
|
||||
n_experiments = 2
|
||||
unet_runs_per_experiment = 50
|
||||
|
||||
# load sample inputs
|
||||
|
||||
# load inputs
|
||||
def generate_inputs():
|
||||
sample = torch.randn((2, 4, 64, 64), device="cuda", dtype=torch.float16)
|
||||
timestep = torch.rand(1, device="cuda", dtype=torch.float16) * 999
|
||||
@@ -404,12 +277,12 @@ def generate_inputs():
|
||||
return sample, timestep, encoder_hidden_states
|
||||
|
||||
|
||||
pipeline = StableDiffusionPipeline.from_pretrained(
|
||||
pipe = StableDiffusionPipeline.from_pretrained(
|
||||
"stable-diffusion-v1-5/stable-diffusion-v1-5",
|
||||
torch_dtype=torch.float16,
|
||||
use_safetensors=True,
|
||||
).to("cuda")
|
||||
unet = pipeline.unet
|
||||
unet = pipe.unet
|
||||
unet.eval()
|
||||
unet.to(memory_format=torch.channels_last) # use channels_last memory format
|
||||
unet.forward = functools.partial(unet.forward, return_dict=False) # set return_dict=False as default
|
||||
@@ -426,12 +299,14 @@ unet_traced = torch.jit.trace(unet, inputs)
|
||||
unet_traced.eval()
|
||||
print("done tracing")
|
||||
|
||||
|
||||
# warmup and optimize graph
|
||||
for _ in range(5):
|
||||
with torch.inference_mode():
|
||||
inputs = generate_inputs()
|
||||
orig_output = unet_traced(*inputs)
|
||||
|
||||
|
||||
# benchmarking
|
||||
with torch.inference_mode():
|
||||
for _ in range(n_experiments):
|
||||
@@ -453,18 +328,20 @@ with torch.inference_mode():
|
||||
unet_traced.save("unet_traced.pt")
|
||||
```
|
||||
|
||||
Replace the pipeline's UNet with the traced version.
|
||||
Replace the `unet` attribute of the pipeline with the traced model:
|
||||
|
||||
```py
|
||||
import torch
|
||||
```python
|
||||
from diffusers import StableDiffusionPipeline
|
||||
import torch
|
||||
from dataclasses import dataclass
|
||||
|
||||
|
||||
@dataclass
|
||||
class UNet2DConditionOutput:
|
||||
sample: torch.Tensor
|
||||
|
||||
pipeline = StableDiffusionPipeline.from_pretrained(
|
||||
|
||||
pipe = StableDiffusionPipeline.from_pretrained(
|
||||
"stable-diffusion-v1-5/stable-diffusion-v1-5",
|
||||
torch_dtype=torch.float16,
|
||||
use_safetensors=True,
|
||||
@@ -473,7 +350,8 @@ pipeline = StableDiffusionPipeline.from_pretrained(
|
||||
# use jitted unet
|
||||
unet_traced = torch.jit.load("unet_traced.pt")
|
||||
|
||||
# del pipeline.unet
|
||||
|
||||
# del pipe.unet
|
||||
class TracedUNet(torch.nn.Module):
|
||||
def __init__(self):
|
||||
super().__init__()
|
||||
@@ -484,7 +362,8 @@ class TracedUNet(torch.nn.Module):
|
||||
sample = unet_traced(latent_model_input, t, encoder_hidden_states)[0]
|
||||
return UNet2DConditionOutput(sample=sample)
|
||||
|
||||
pipeline.unet = TracedUNet()
|
||||
|
||||
pipe.unet = TracedUNet()
|
||||
|
||||
with torch.inference_mode():
|
||||
image = pipe([prompt] * 1, num_inference_steps=50).images[0]
|
||||
@@ -492,31 +371,39 @@ with torch.inference_mode():
|
||||
|
||||
## Memory-efficient attention
|
||||
|
||||
> [!TIP]
|
||||
> Memory-efficient attention optimizes for memory usage *and* [inference speed](./fp16#scaled-dot-product-attention!
|
||||
Recent work on optimizing bandwidth in the attention block has generated huge speed-ups and reductions in GPU memory usage. The most recent type of memory-efficient attention is [Flash Attention](https://arxiv.org/abs/2205.14135) (you can check out the original code at [HazyResearch/flash-attention](https://github.com/HazyResearch/flash-attention)).
|
||||
|
||||
The Transformers attention mechanism is memory-intensive, especially for long sequences, so you can try using different and more memory-efficient attention types.
|
||||
<Tip>
|
||||
|
||||
By default, if PyTorch >= 2.0 is installed, [scaled dot-product attention (SDPA)](https://pytorch.org/docs/stable/generated/torch.nn.functional.scaled_dot_product_attention.html) is used. You don't need to make any additional changes to your code.
|
||||
If you have PyTorch >= 2.0 installed, you should not expect a speed-up for inference when enabling `xformers`.
|
||||
|
||||
SDPA supports [FlashAttention](https://github.com/Dao-AILab/flash-attention) and [xFormers](https://github.com/facebookresearch/xformers) as well as a native C++ PyTorch implementation. It automatically selects the most optimal implementation based on your input.
|
||||
</Tip>
|
||||
|
||||
You can explicitly use xFormers with the [`~ModelMixin.enable_xformers_memory_efficient_attention`] method.
|
||||
To use Flash Attention, install the following:
|
||||
|
||||
```py
|
||||
# pip install xformers
|
||||
- PyTorch > 1.12
|
||||
- CUDA available
|
||||
- [xFormers](xformers)
|
||||
|
||||
Then call [`~ModelMixin.enable_xformers_memory_efficient_attention`] on the pipeline:
|
||||
|
||||
```python
|
||||
from diffusers import DiffusionPipeline
|
||||
import torch
|
||||
from diffusers import StableDiffusionXLPipeline
|
||||
|
||||
pipeline = StableDiffusionXLPipeline.from_pretrained(
|
||||
"stabilityai/stable-diffusion-xl-base-1.0",
|
||||
pipe = DiffusionPipeline.from_pretrained(
|
||||
"stable-diffusion-v1-5/stable-diffusion-v1-5",
|
||||
torch_dtype=torch.float16,
|
||||
use_safetensors=True,
|
||||
).to("cuda")
|
||||
pipeline.enable_xformers_memory_efficient_attention()
|
||||
|
||||
pipe.enable_xformers_memory_efficient_attention()
|
||||
|
||||
with torch.inference_mode():
|
||||
sample = pipe("a small cat")
|
||||
|
||||
# optional: You can disable it via
|
||||
# pipe.disable_xformers_memory_efficient_attention()
|
||||
```
|
||||
|
||||
Call [`~ModelMixin.disable_xformers_memory_efficient_attention`] to disable it.
|
||||
|
||||
```py
|
||||
pipeline.disable_xformers_memory_efficient_attention()
|
||||
```
|
||||
The iteration speed when using `xformers` should match the iteration speed of PyTorch 2.0 as described [here](torch2.0).
|
||||
|
||||
@@ -12,9 +12,6 @@ specific language governing permissions and limitations under the License.
|
||||
|
||||
# Metal Performance Shaders (MPS)
|
||||
|
||||
> [!TIP]
|
||||
> Pipelines with a <img alt="MPS" src="https://img.shields.io/badge/MPS-000000?style=flat&logo=apple&logoColor=white%22"> badge indicate a model can take advantage of the MPS backend on Apple silicon devices for faster inference. Feel free to open a [Pull Request](https://github.com/huggingface/diffusers/compare) to add this badge to pipelines that are missing it.
|
||||
|
||||
🤗 Diffusers is compatible with Apple silicon (M1/M2 chips) using the PyTorch [`mps`](https://pytorch.org/docs/stable/notes/mps.html) device, which uses the Metal framework to leverage the GPU on MacOS devices. You'll need to have:
|
||||
|
||||
- macOS computer with Apple silicon (M1/M2) hardware
|
||||
@@ -40,7 +37,7 @@ image
|
||||
|
||||
<Tip warning={true}>
|
||||
|
||||
The PyTorch [mps](https://pytorch.org/docs/stable/notes/mps.html) backend does not support NDArray sizes greater than `2**32`. Please open an [Issue](https://github.com/huggingface/diffusers/issues/new/choose) if you encounter this problem so we can investigate.
|
||||
Generating multiple prompts in a batch can [crash](https://github.com/huggingface/diffusers/issues/363) or fail to work reliably. We believe this is related to the [`mps`](https://github.com/pytorch/pytorch/issues/84039) backend in PyTorch. While this is being investigated, you should iterate instead of batching.
|
||||
|
||||
</Tip>
|
||||
|
||||
@@ -62,10 +59,6 @@ If you're using **PyTorch 1.13**, you need to "prime" the pipeline with an addit
|
||||
|
||||
## Troubleshoot
|
||||
|
||||
This section lists some common issues with using the `mps` backend and how to solve them.
|
||||
|
||||
### Attention slicing
|
||||
|
||||
M1/M2 performance is very sensitive to memory pressure. When this occurs, the system automatically swaps if it needs to which significantly degrades performance.
|
||||
|
||||
To prevent this from happening, we recommend *attention slicing* to reduce memory pressure during inference and prevent swapping. This is especially relevant if your computer has less than 64GB of system RAM, or if you generate images at non-standard resolutions larger than 512×512 pixels. Call the [`~DiffusionPipeline.enable_attention_slicing`] function on your pipeline:
|
||||
@@ -79,7 +72,3 @@ pipeline.enable_attention_slicing()
|
||||
```
|
||||
|
||||
Attention slicing performs the costly attention operation in multiple steps instead of all at once. It usually improves performance by ~20% in computers without universal memory, but we've observed *better performance* in most Apple silicon computers unless you have 64GB of RAM or more.
|
||||
|
||||
### Batch inference
|
||||
|
||||
Generating multiple prompts in a batch can crash or fail to work reliably. If this is the case, try iterating instead of batching.
|
||||
@@ -93,4 +93,4 @@ To reproduce this benchmark, feel free to use this [script](https://gist.github.
|
||||
| | | 2 | OOM | 13 | 10.78 |
|
||||
| | | 1 | OOM | 6.66 | 5.54 |
|
||||
|
||||
As seen in the tables above, the speed-up from `tomesd` becomes more pronounced for larger image resolutions. It is also interesting to note that with `tomesd`, it is possible to run the pipeline on a higher resolution like 1024x1024. You may be able to speed-up inference even more with [`torch.compile`](fp16#torchcompile).
|
||||
As seen in the tables above, the speed-up from `tomesd` becomes more pronounced for larger image resolutions. It is also interesting to note that with `tomesd`, it is possible to run the pipeline on a higher resolution like 1024x1024. You may be able to speed-up inference even more with [`torch.compile`](torch2.0).
|
||||
|
||||
421
docs/source/en/optimization/torch2.0.md
Normal file
421
docs/source/en/optimization/torch2.0.md
Normal file
@@ -0,0 +1,421 @@
|
||||
<!--Copyright 2024 The HuggingFace Team. All rights reserved.
|
||||
|
||||
Licensed under the Apache License, Version 2.0 (the "License"); you may not use this file except in compliance with
|
||||
the License. You may obtain a copy of the License at
|
||||
|
||||
http://www.apache.org/licenses/LICENSE-2.0
|
||||
|
||||
Unless required by applicable law or agreed to in writing, software distributed under the License is distributed on
|
||||
an "AS IS" BASIS, WITHOUT WARRANTIES OR CONDITIONS OF ANY KIND, either express or implied. See the License for the
|
||||
specific language governing permissions and limitations under the License.
|
||||
-->
|
||||
|
||||
# PyTorch 2.0
|
||||
|
||||
🤗 Diffusers supports the latest optimizations from [PyTorch 2.0](https://pytorch.org/get-started/pytorch-2.0/) which include:
|
||||
|
||||
1. A memory-efficient attention implementation, scaled dot product attention, without requiring any extra dependencies such as xFormers.
|
||||
2. [`torch.compile`](https://pytorch.org/tutorials/intermediate/torch_compile_tutorial.html), a just-in-time (JIT) compiler to provide an extra performance boost when individual models are compiled.
|
||||
|
||||
Both of these optimizations require PyTorch 2.0 or later and 🤗 Diffusers > 0.13.0.
|
||||
|
||||
```bash
|
||||
pip install --upgrade torch diffusers
|
||||
```
|
||||
|
||||
## Scaled dot product attention
|
||||
|
||||
[`torch.nn.functional.scaled_dot_product_attention`](https://pytorch.org/docs/master/generated/torch.nn.functional.scaled_dot_product_attention) (SDPA) is an optimized and memory-efficient attention (similar to xFormers) that automatically enables several other optimizations depending on the model inputs and GPU type. SDPA is enabled by default if you're using PyTorch 2.0 and the latest version of 🤗 Diffusers, so you don't need to add anything to your code.
|
||||
|
||||
However, if you want to explicitly enable it, you can set a [`DiffusionPipeline`] to use [`~models.attention_processor.AttnProcessor2_0`]:
|
||||
|
||||
```diff
|
||||
import torch
|
||||
from diffusers import DiffusionPipeline
|
||||
+ from diffusers.models.attention_processor import AttnProcessor2_0
|
||||
|
||||
pipe = DiffusionPipeline.from_pretrained("stable-diffusion-v1-5/stable-diffusion-v1-5", torch_dtype=torch.float16, use_safetensors=True).to("cuda")
|
||||
+ pipe.unet.set_attn_processor(AttnProcessor2_0())
|
||||
|
||||
prompt = "a photo of an astronaut riding a horse on mars"
|
||||
image = pipe(prompt).images[0]
|
||||
```
|
||||
|
||||
SDPA should be as fast and memory efficient as `xFormers`; check the [benchmark](#benchmark) for more details.
|
||||
|
||||
In some cases - such as making the pipeline more deterministic or converting it to other formats - it may be helpful to use the vanilla attention processor, [`~models.attention_processor.AttnProcessor`]. To revert to [`~models.attention_processor.AttnProcessor`], call the [`~UNet2DConditionModel.set_default_attn_processor`] function on the pipeline:
|
||||
|
||||
```diff
|
||||
import torch
|
||||
from diffusers import DiffusionPipeline
|
||||
|
||||
pipe = DiffusionPipeline.from_pretrained("stable-diffusion-v1-5/stable-diffusion-v1-5", torch_dtype=torch.float16, use_safetensors=True).to("cuda")
|
||||
+ pipe.unet.set_default_attn_processor()
|
||||
|
||||
prompt = "a photo of an astronaut riding a horse on mars"
|
||||
image = pipe(prompt).images[0]
|
||||
```
|
||||
|
||||
## torch.compile
|
||||
|
||||
The `torch.compile` function can often provide an additional speed-up to your PyTorch code. In 🤗 Diffusers, it is usually best to wrap the UNet with `torch.compile` because it does most of the heavy lifting in the pipeline.
|
||||
|
||||
```python
|
||||
from diffusers import DiffusionPipeline
|
||||
import torch
|
||||
|
||||
pipe = DiffusionPipeline.from_pretrained("stable-diffusion-v1-5/stable-diffusion-v1-5", torch_dtype=torch.float16, use_safetensors=True).to("cuda")
|
||||
pipe.unet = torch.compile(pipe.unet, mode="reduce-overhead", fullgraph=True)
|
||||
images = pipe(prompt, num_inference_steps=steps, num_images_per_prompt=batch_size).images[0]
|
||||
```
|
||||
|
||||
Depending on GPU type, `torch.compile` can provide an *additional speed-up* of **5-300x** on top of SDPA! If you're using more recent GPU architectures such as Ampere (A100, 3090), Ada (4090), and Hopper (H100), `torch.compile` is able to squeeze even more performance out of these GPUs.
|
||||
|
||||
Compilation requires some time to complete, so it is best suited for situations where you prepare your pipeline once and then perform the same type of inference operations multiple times. For example, calling the compiled pipeline on a different image size triggers compilation again which can be expensive.
|
||||
|
||||
For more information and different options about `torch.compile`, refer to the [`torch_compile`](https://pytorch.org/tutorials/intermediate/torch_compile_tutorial.html) tutorial.
|
||||
|
||||
> [!TIP]
|
||||
> Learn more about other ways PyTorch 2.0 can help optimize your model in the [Accelerate inference of text-to-image diffusion models](../tutorials/fast_diffusion) tutorial.
|
||||
|
||||
## Benchmark
|
||||
|
||||
We conducted a comprehensive benchmark with PyTorch 2.0's efficient attention implementation and `torch.compile` across different GPUs and batch sizes for five of our most used pipelines. The code is benchmarked on 🤗 Diffusers v0.17.0.dev0 to optimize `torch.compile` usage (see [here](https://github.com/huggingface/diffusers/pull/3313) for more details).
|
||||
|
||||
Expand the dropdown below to find the code used to benchmark each pipeline:
|
||||
|
||||
<details>
|
||||
|
||||
### Stable Diffusion text-to-image
|
||||
|
||||
```python
|
||||
from diffusers import DiffusionPipeline
|
||||
import torch
|
||||
|
||||
path = "stable-diffusion-v1-5/stable-diffusion-v1-5"
|
||||
|
||||
run_compile = True # Set True / False
|
||||
|
||||
pipe = DiffusionPipeline.from_pretrained(path, torch_dtype=torch.float16, use_safetensors=True)
|
||||
pipe = pipe.to("cuda")
|
||||
pipe.unet.to(memory_format=torch.channels_last)
|
||||
|
||||
if run_compile:
|
||||
print("Run torch compile")
|
||||
pipe.unet = torch.compile(pipe.unet, mode="reduce-overhead", fullgraph=True)
|
||||
|
||||
prompt = "ghibli style, a fantasy landscape with castles"
|
||||
|
||||
for _ in range(3):
|
||||
images = pipe(prompt=prompt).images
|
||||
```
|
||||
|
||||
### Stable Diffusion image-to-image
|
||||
|
||||
```python
|
||||
from diffusers import StableDiffusionImg2ImgPipeline
|
||||
from diffusers.utils import load_image
|
||||
import torch
|
||||
|
||||
url = "https://raw.githubusercontent.com/CompVis/stable-diffusion/main/assets/stable-samples/img2img/sketch-mountains-input.jpg"
|
||||
|
||||
init_image = load_image(url)
|
||||
init_image = init_image.resize((512, 512))
|
||||
|
||||
path = "stable-diffusion-v1-5/stable-diffusion-v1-5"
|
||||
|
||||
run_compile = True # Set True / False
|
||||
|
||||
pipe = StableDiffusionImg2ImgPipeline.from_pretrained(path, torch_dtype=torch.float16, use_safetensors=True)
|
||||
pipe = pipe.to("cuda")
|
||||
pipe.unet.to(memory_format=torch.channels_last)
|
||||
|
||||
if run_compile:
|
||||
print("Run torch compile")
|
||||
pipe.unet = torch.compile(pipe.unet, mode="reduce-overhead", fullgraph=True)
|
||||
|
||||
prompt = "ghibli style, a fantasy landscape with castles"
|
||||
|
||||
for _ in range(3):
|
||||
image = pipe(prompt=prompt, image=init_image).images[0]
|
||||
```
|
||||
|
||||
### Stable Diffusion inpainting
|
||||
|
||||
```python
|
||||
from diffusers import StableDiffusionInpaintPipeline
|
||||
from diffusers.utils import load_image
|
||||
import torch
|
||||
|
||||
img_url = "https://raw.githubusercontent.com/CompVis/latent-diffusion/main/data/inpainting_examples/overture-creations-5sI6fQgYIuo.png"
|
||||
mask_url = "https://raw.githubusercontent.com/CompVis/latent-diffusion/main/data/inpainting_examples/overture-creations-5sI6fQgYIuo_mask.png"
|
||||
|
||||
init_image = load_image(img_url).resize((512, 512))
|
||||
mask_image = load_image(mask_url).resize((512, 512))
|
||||
|
||||
path = "runwayml/stable-diffusion-inpainting"
|
||||
|
||||
run_compile = True # Set True / False
|
||||
|
||||
pipe = StableDiffusionInpaintPipeline.from_pretrained(path, torch_dtype=torch.float16, use_safetensors=True)
|
||||
pipe = pipe.to("cuda")
|
||||
pipe.unet.to(memory_format=torch.channels_last)
|
||||
|
||||
if run_compile:
|
||||
print("Run torch compile")
|
||||
pipe.unet = torch.compile(pipe.unet, mode="reduce-overhead", fullgraph=True)
|
||||
|
||||
prompt = "ghibli style, a fantasy landscape with castles"
|
||||
|
||||
for _ in range(3):
|
||||
image = pipe(prompt=prompt, image=init_image, mask_image=mask_image).images[0]
|
||||
```
|
||||
|
||||
### ControlNet
|
||||
|
||||
```python
|
||||
from diffusers import StableDiffusionControlNetPipeline, ControlNetModel
|
||||
from diffusers.utils import load_image
|
||||
import torch
|
||||
|
||||
url = "https://raw.githubusercontent.com/CompVis/stable-diffusion/main/assets/stable-samples/img2img/sketch-mountains-input.jpg"
|
||||
|
||||
init_image = load_image(url)
|
||||
init_image = init_image.resize((512, 512))
|
||||
|
||||
path = "stable-diffusion-v1-5/stable-diffusion-v1-5"
|
||||
|
||||
run_compile = True # Set True / False
|
||||
controlnet = ControlNetModel.from_pretrained("lllyasviel/sd-controlnet-canny", torch_dtype=torch.float16, use_safetensors=True)
|
||||
pipe = StableDiffusionControlNetPipeline.from_pretrained(
|
||||
path, controlnet=controlnet, torch_dtype=torch.float16, use_safetensors=True
|
||||
)
|
||||
|
||||
pipe = pipe.to("cuda")
|
||||
pipe.unet.to(memory_format=torch.channels_last)
|
||||
pipe.controlnet.to(memory_format=torch.channels_last)
|
||||
|
||||
if run_compile:
|
||||
print("Run torch compile")
|
||||
pipe.unet = torch.compile(pipe.unet, mode="reduce-overhead", fullgraph=True)
|
||||
pipe.controlnet = torch.compile(pipe.controlnet, mode="reduce-overhead", fullgraph=True)
|
||||
|
||||
prompt = "ghibli style, a fantasy landscape with castles"
|
||||
|
||||
for _ in range(3):
|
||||
image = pipe(prompt=prompt, image=init_image).images[0]
|
||||
```
|
||||
|
||||
### DeepFloyd IF text-to-image + upscaling
|
||||
|
||||
```python
|
||||
from diffusers import DiffusionPipeline
|
||||
import torch
|
||||
|
||||
run_compile = True # Set True / False
|
||||
|
||||
pipe_1 = DiffusionPipeline.from_pretrained("DeepFloyd/IF-I-M-v1.0", variant="fp16", text_encoder=None, torch_dtype=torch.float16, use_safetensors=True)
|
||||
pipe_1.to("cuda")
|
||||
pipe_2 = DiffusionPipeline.from_pretrained("DeepFloyd/IF-II-M-v1.0", variant="fp16", text_encoder=None, torch_dtype=torch.float16, use_safetensors=True)
|
||||
pipe_2.to("cuda")
|
||||
pipe_3 = DiffusionPipeline.from_pretrained("stabilityai/stable-diffusion-x4-upscaler", torch_dtype=torch.float16, use_safetensors=True)
|
||||
pipe_3.to("cuda")
|
||||
|
||||
|
||||
pipe_1.unet.to(memory_format=torch.channels_last)
|
||||
pipe_2.unet.to(memory_format=torch.channels_last)
|
||||
pipe_3.unet.to(memory_format=torch.channels_last)
|
||||
|
||||
if run_compile:
|
||||
pipe_1.unet = torch.compile(pipe_1.unet, mode="reduce-overhead", fullgraph=True)
|
||||
pipe_2.unet = torch.compile(pipe_2.unet, mode="reduce-overhead", fullgraph=True)
|
||||
pipe_3.unet = torch.compile(pipe_3.unet, mode="reduce-overhead", fullgraph=True)
|
||||
|
||||
prompt = "the blue hulk"
|
||||
|
||||
prompt_embeds = torch.randn((1, 2, 4096), dtype=torch.float16)
|
||||
neg_prompt_embeds = torch.randn((1, 2, 4096), dtype=torch.float16)
|
||||
|
||||
for _ in range(3):
|
||||
image_1 = pipe_1(prompt_embeds=prompt_embeds, negative_prompt_embeds=neg_prompt_embeds, output_type="pt").images
|
||||
image_2 = pipe_2(image=image_1, prompt_embeds=prompt_embeds, negative_prompt_embeds=neg_prompt_embeds, output_type="pt").images
|
||||
image_3 = pipe_3(prompt=prompt, image=image_1, noise_level=100).images
|
||||
```
|
||||
</details>
|
||||
|
||||
The graph below highlights the relative speed-ups for the [`StableDiffusionPipeline`] across five GPU families with PyTorch 2.0 and `torch.compile` enabled. The benchmarks for the following graphs are measured in *number of iterations/second*.
|
||||
|
||||
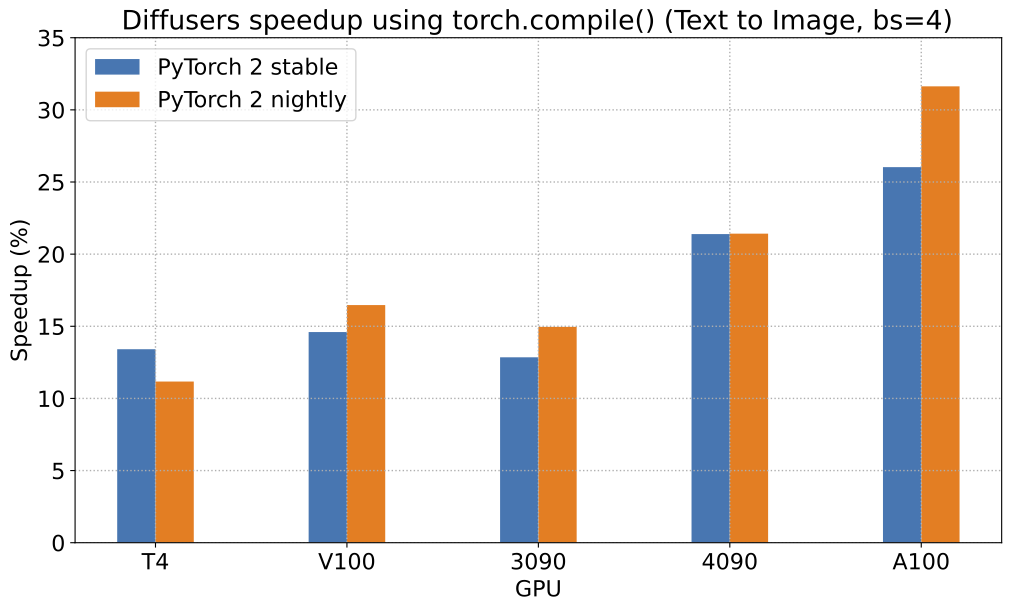
|
||||
|
||||
To give you an even better idea of how this speed-up holds for the other pipelines, consider the following
|
||||
graph for an A100 with PyTorch 2.0 and `torch.compile`:
|
||||
|
||||
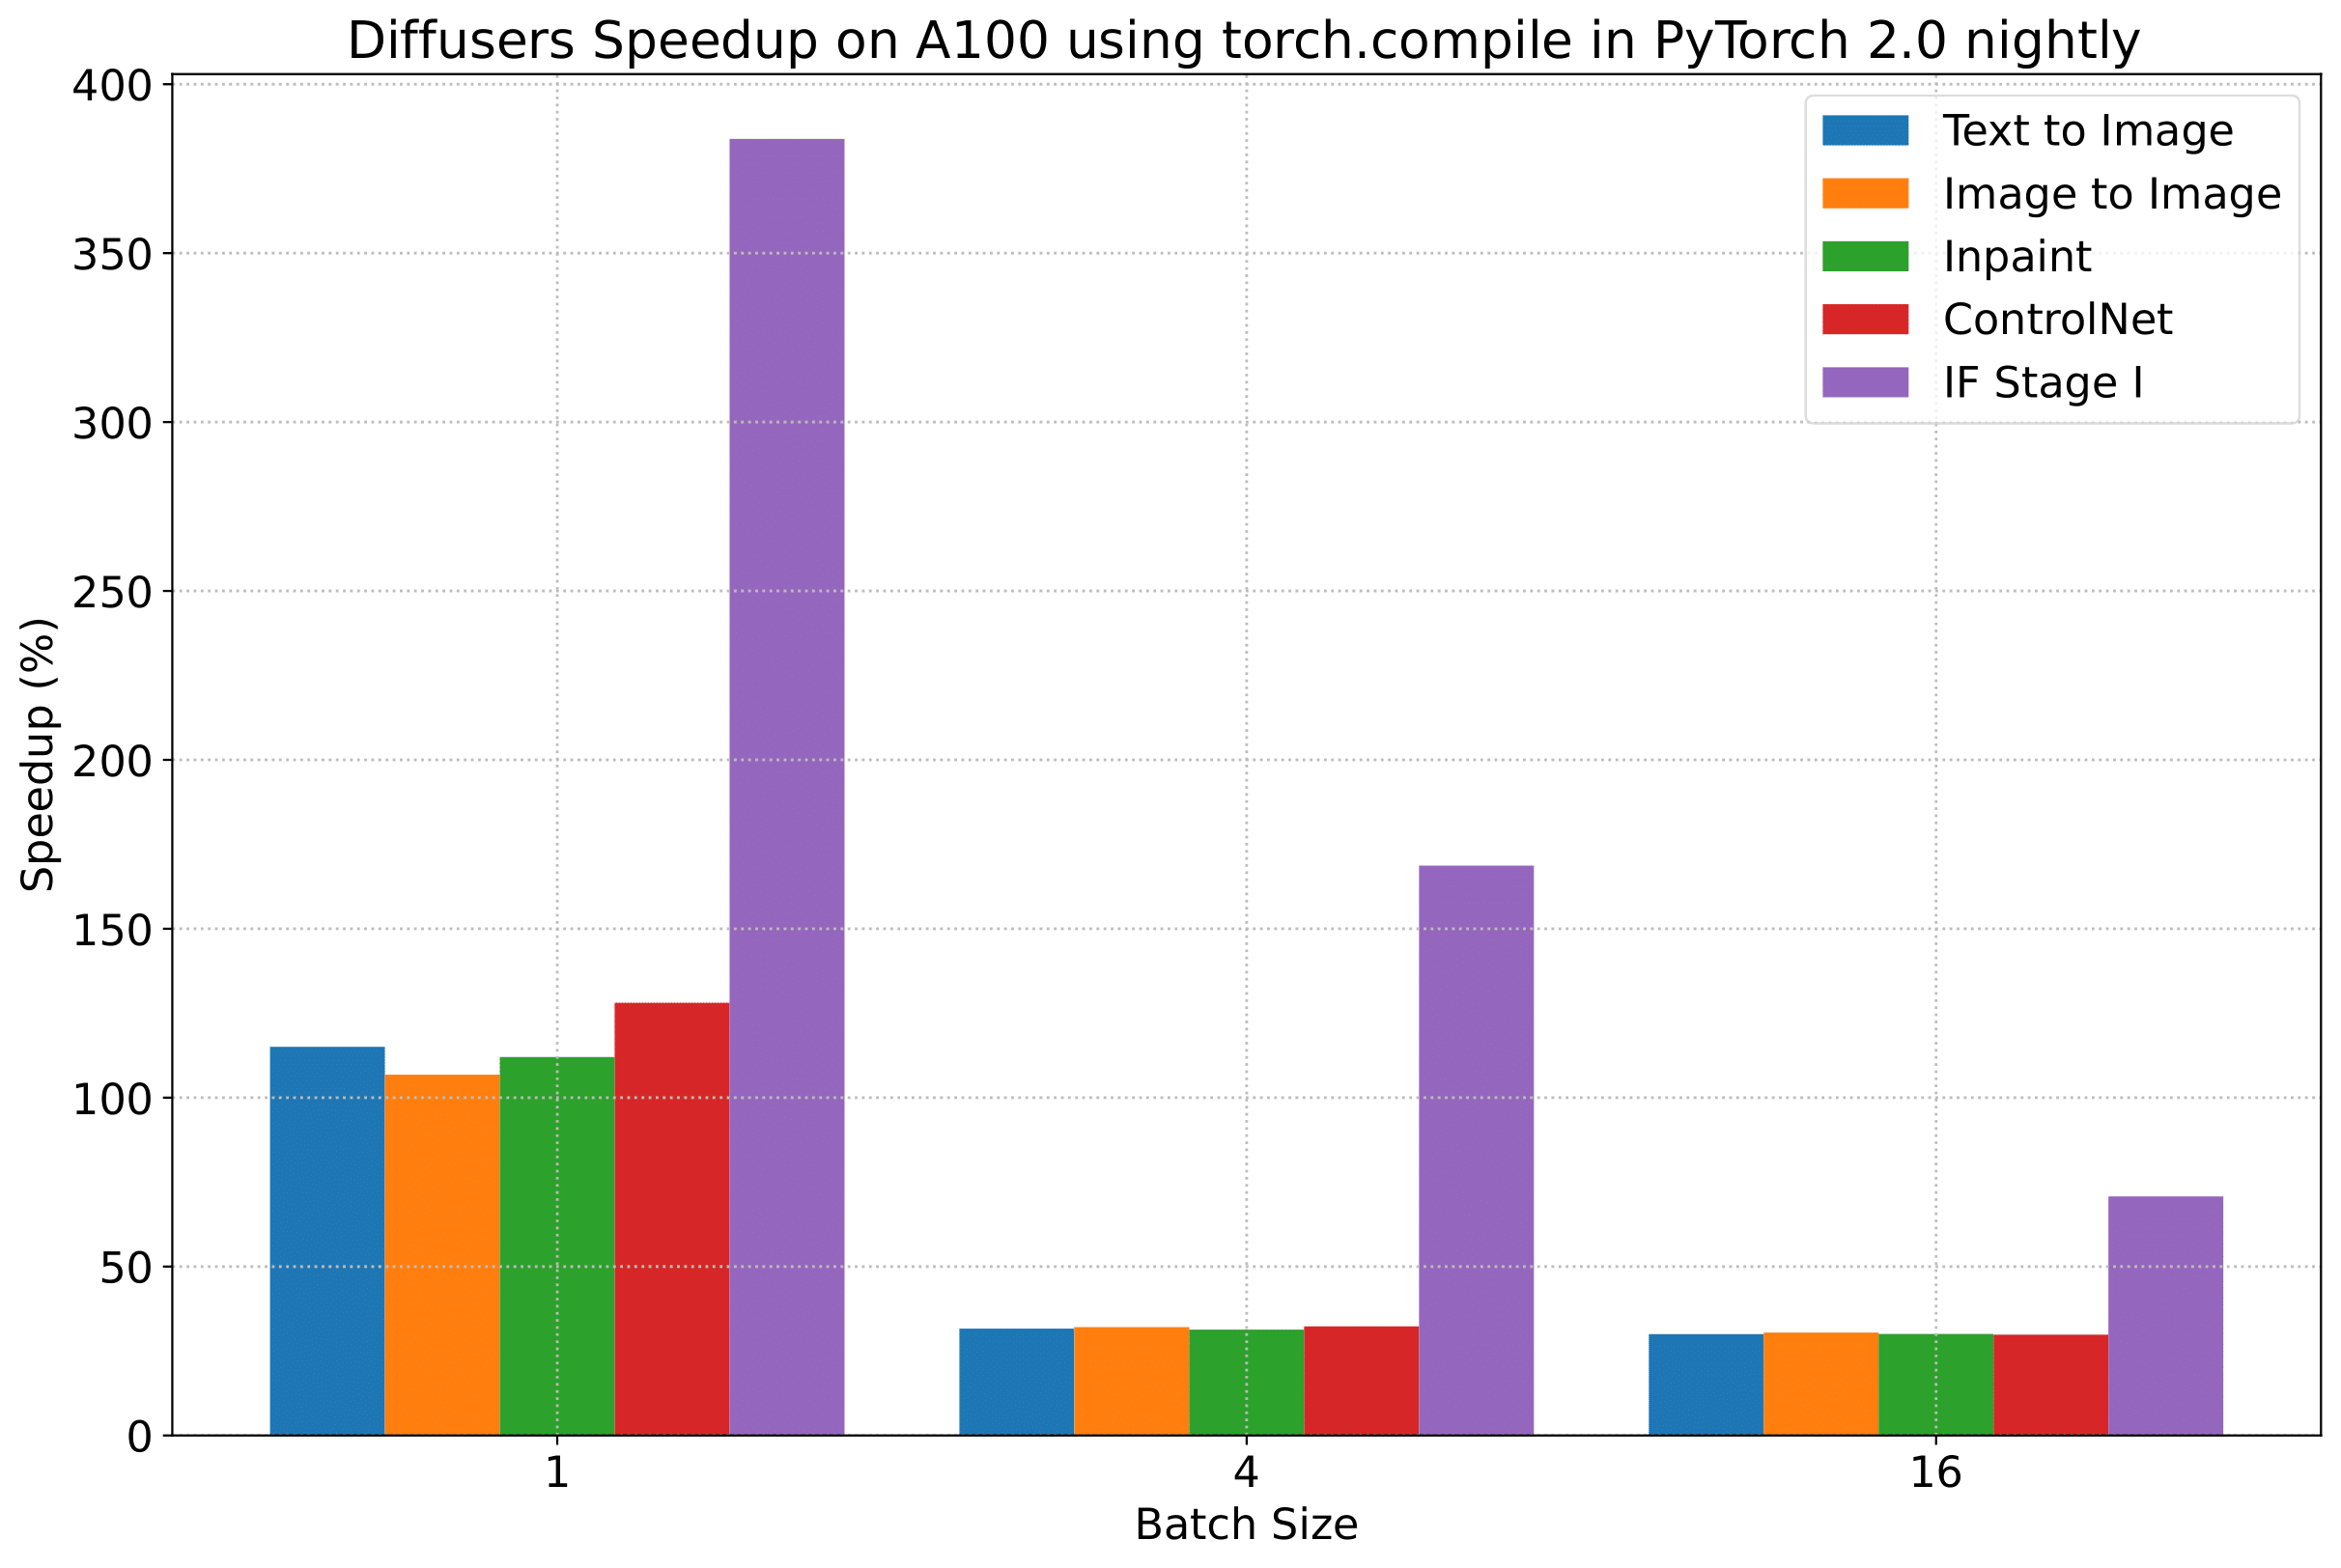
|
||||
|
||||
In the following tables, we report our findings in terms of the *number of iterations/second*.
|
||||
|
||||
### A100 (batch size: 1)
|
||||
|
||||
| **Pipeline** | **torch 2.0 - <br>no compile** | **torch nightly - <br>no compile** | **torch 2.0 - <br>compile** | **torch nightly - <br>compile** |
|
||||
|:---:|:---:|:---:|:---:|:---:|
|
||||
| SD - txt2img | 21.66 | 23.13 | 44.03 | 49.74 |
|
||||
| SD - img2img | 21.81 | 22.40 | 43.92 | 46.32 |
|
||||
| SD - inpaint | 22.24 | 23.23 | 43.76 | 49.25 |
|
||||
| SD - controlnet | 15.02 | 15.82 | 32.13 | 36.08 |
|
||||
| IF | 20.21 / <br>13.84 / <br>24.00 | 20.12 / <br>13.70 / <br>24.03 | ❌ | 97.34 / <br>27.23 / <br>111.66 |
|
||||
| SDXL - txt2img | 8.64 | 9.9 | - | - |
|
||||
|
||||
### A100 (batch size: 4)
|
||||
|
||||
| **Pipeline** | **torch 2.0 - <br>no compile** | **torch nightly - <br>no compile** | **torch 2.0 - <br>compile** | **torch nightly - <br>compile** |
|
||||
|:---:|:---:|:---:|:---:|:---:|
|
||||
| SD - txt2img | 11.6 | 13.12 | 14.62 | 17.27 |
|
||||
| SD - img2img | 11.47 | 13.06 | 14.66 | 17.25 |
|
||||
| SD - inpaint | 11.67 | 13.31 | 14.88 | 17.48 |
|
||||
| SD - controlnet | 8.28 | 9.38 | 10.51 | 12.41 |
|
||||
| IF | 25.02 | 18.04 | ❌ | 48.47 |
|
||||
| SDXL - txt2img | 2.44 | 2.74 | - | - |
|
||||
|
||||
### A100 (batch size: 16)
|
||||
|
||||
| **Pipeline** | **torch 2.0 - <br>no compile** | **torch nightly - <br>no compile** | **torch 2.0 - <br>compile** | **torch nightly - <br>compile** |
|
||||
|:---:|:---:|:---:|:---:|:---:|
|
||||
| SD - txt2img | 3.04 | 3.6 | 3.83 | 4.68 |
|
||||
| SD - img2img | 2.98 | 3.58 | 3.83 | 4.67 |
|
||||
| SD - inpaint | 3.04 | 3.66 | 3.9 | 4.76 |
|
||||
| SD - controlnet | 2.15 | 2.58 | 2.74 | 3.35 |
|
||||
| IF | 8.78 | 9.82 | ❌ | 16.77 |
|
||||
| SDXL - txt2img | 0.64 | 0.72 | - | - |
|
||||
|
||||
### V100 (batch size: 1)
|
||||
|
||||
| **Pipeline** | **torch 2.0 - <br>no compile** | **torch nightly - <br>no compile** | **torch 2.0 - <br>compile** | **torch nightly - <br>compile** |
|
||||
|:---:|:---:|:---:|:---:|:---:|
|
||||
| SD - txt2img | 18.99 | 19.14 | 20.95 | 22.17 |
|
||||
| SD - img2img | 18.56 | 19.18 | 20.95 | 22.11 |
|
||||
| SD - inpaint | 19.14 | 19.06 | 21.08 | 22.20 |
|
||||
| SD - controlnet | 13.48 | 13.93 | 15.18 | 15.88 |
|
||||
| IF | 20.01 / <br>9.08 / <br>23.34 | 19.79 / <br>8.98 / <br>24.10 | ❌ | 55.75 / <br>11.57 / <br>57.67 |
|
||||
|
||||
### V100 (batch size: 4)
|
||||
|
||||
| **Pipeline** | **torch 2.0 - <br>no compile** | **torch nightly - <br>no compile** | **torch 2.0 - <br>compile** | **torch nightly - <br>compile** |
|
||||
|:---:|:---:|:---:|:---:|:---:|
|
||||
| SD - txt2img | 5.96 | 5.89 | 6.83 | 6.86 |
|
||||
| SD - img2img | 5.90 | 5.91 | 6.81 | 6.82 |
|
||||
| SD - inpaint | 5.99 | 6.03 | 6.93 | 6.95 |
|
||||
| SD - controlnet | 4.26 | 4.29 | 4.92 | 4.93 |
|
||||
| IF | 15.41 | 14.76 | ❌ | 22.95 |
|
||||
|
||||
### V100 (batch size: 16)
|
||||
|
||||
| **Pipeline** | **torch 2.0 - <br>no compile** | **torch nightly - <br>no compile** | **torch 2.0 - <br>compile** | **torch nightly - <br>compile** |
|
||||
|:---:|:---:|:---:|:---:|:---:|
|
||||
| SD - txt2img | 1.66 | 1.66 | 1.92 | 1.90 |
|
||||
| SD - img2img | 1.65 | 1.65 | 1.91 | 1.89 |
|
||||
| SD - inpaint | 1.69 | 1.69 | 1.95 | 1.93 |
|
||||
| SD - controlnet | 1.19 | 1.19 | OOM after warmup | 1.36 |
|
||||
| IF | 5.43 | 5.29 | ❌ | 7.06 |
|
||||
|
||||
### T4 (batch size: 1)
|
||||
|
||||
| **Pipeline** | **torch 2.0 - <br>no compile** | **torch nightly - <br>no compile** | **torch 2.0 - <br>compile** | **torch nightly - <br>compile** |
|
||||
|:---:|:---:|:---:|:---:|:---:|
|
||||
| SD - txt2img | 6.9 | 6.95 | 7.3 | 7.56 |
|
||||
| SD - img2img | 6.84 | 6.99 | 7.04 | 7.55 |
|
||||
| SD - inpaint | 6.91 | 6.7 | 7.01 | 7.37 |
|
||||
| SD - controlnet | 4.89 | 4.86 | 5.35 | 5.48 |
|
||||
| IF | 17.42 / <br>2.47 / <br>18.52 | 16.96 / <br>2.45 / <br>18.69 | ❌ | 24.63 / <br>2.47 / <br>23.39 |
|
||||
| SDXL - txt2img | 1.15 | 1.16 | - | - |
|
||||
|
||||
### T4 (batch size: 4)
|
||||
|
||||
| **Pipeline** | **torch 2.0 - <br>no compile** | **torch nightly - <br>no compile** | **torch 2.0 - <br>compile** | **torch nightly - <br>compile** |
|
||||
|:---:|:---:|:---:|:---:|:---:|
|
||||
| SD - txt2img | 1.79 | 1.79 | 2.03 | 1.99 |
|
||||
| SD - img2img | 1.77 | 1.77 | 2.05 | 2.04 |
|
||||
| SD - inpaint | 1.81 | 1.82 | 2.09 | 2.09 |
|
||||
| SD - controlnet | 1.34 | 1.27 | 1.47 | 1.46 |
|
||||
| IF | 5.79 | 5.61 | ❌ | 7.39 |
|
||||
| SDXL - txt2img | 0.288 | 0.289 | - | - |
|
||||
|
||||
### T4 (batch size: 16)
|
||||
|
||||
| **Pipeline** | **torch 2.0 - <br>no compile** | **torch nightly - <br>no compile** | **torch 2.0 - <br>compile** | **torch nightly - <br>compile** |
|
||||
|:---:|:---:|:---:|:---:|:---:|
|
||||
| SD - txt2img | 2.34s | 2.30s | OOM after 2nd iteration | 1.99s |
|
||||
| SD - img2img | 2.35s | 2.31s | OOM after warmup | 2.00s |
|
||||
| SD - inpaint | 2.30s | 2.26s | OOM after 2nd iteration | 1.95s |
|
||||
| SD - controlnet | OOM after 2nd iteration | OOM after 2nd iteration | OOM after warmup | OOM after warmup |
|
||||
| IF * | 1.44 | 1.44 | ❌ | 1.94 |
|
||||
| SDXL - txt2img | OOM | OOM | - | - |
|
||||
|
||||
### RTX 3090 (batch size: 1)
|
||||
|
||||
| **Pipeline** | **torch 2.0 - <br>no compile** | **torch nightly - <br>no compile** | **torch 2.0 - <br>compile** | **torch nightly - <br>compile** |
|
||||
|:---:|:---:|:---:|:---:|:---:|
|
||||
| SD - txt2img | 22.56 | 22.84 | 23.84 | 25.69 |
|
||||
| SD - img2img | 22.25 | 22.61 | 24.1 | 25.83 |
|
||||
| SD - inpaint | 22.22 | 22.54 | 24.26 | 26.02 |
|
||||
| SD - controlnet | 16.03 | 16.33 | 17.38 | 18.56 |
|
||||
| IF | 27.08 / <br>9.07 / <br>31.23 | 26.75 / <br>8.92 / <br>31.47 | ❌ | 68.08 / <br>11.16 / <br>65.29 |
|
||||
|
||||
### RTX 3090 (batch size: 4)
|
||||
|
||||
| **Pipeline** | **torch 2.0 - <br>no compile** | **torch nightly - <br>no compile** | **torch 2.0 - <br>compile** | **torch nightly - <br>compile** |
|
||||
|:---:|:---:|:---:|:---:|:---:|
|
||||
| SD - txt2img | 6.46 | 6.35 | 7.29 | 7.3 |
|
||||
| SD - img2img | 6.33 | 6.27 | 7.31 | 7.26 |
|
||||
| SD - inpaint | 6.47 | 6.4 | 7.44 | 7.39 |
|
||||
| SD - controlnet | 4.59 | 4.54 | 5.27 | 5.26 |
|
||||
| IF | 16.81 | 16.62 | ❌ | 21.57 |
|
||||
|
||||
### RTX 3090 (batch size: 16)
|
||||
|
||||
| **Pipeline** | **torch 2.0 - <br>no compile** | **torch nightly - <br>no compile** | **torch 2.0 - <br>compile** | **torch nightly - <br>compile** |
|
||||
|:---:|:---:|:---:|:---:|:---:|
|
||||
| SD - txt2img | 1.7 | 1.69 | 1.93 | 1.91 |
|
||||
| SD - img2img | 1.68 | 1.67 | 1.93 | 1.9 |
|
||||
| SD - inpaint | 1.72 | 1.71 | 1.97 | 1.94 |
|
||||
| SD - controlnet | 1.23 | 1.22 | 1.4 | 1.38 |
|
||||
| IF | 5.01 | 5.00 | ❌ | 6.33 |
|
||||
|
||||
### RTX 4090 (batch size: 1)
|
||||
|
||||
| **Pipeline** | **torch 2.0 - <br>no compile** | **torch nightly - <br>no compile** | **torch 2.0 - <br>compile** | **torch nightly - <br>compile** |
|
||||
|:---:|:---:|:---:|:---:|:---:|
|
||||
| SD - txt2img | 40.5 | 41.89 | 44.65 | 49.81 |
|
||||
| SD - img2img | 40.39 | 41.95 | 44.46 | 49.8 |
|
||||
| SD - inpaint | 40.51 | 41.88 | 44.58 | 49.72 |
|
||||
| SD - controlnet | 29.27 | 30.29 | 32.26 | 36.03 |
|
||||
| IF | 69.71 / <br>18.78 / <br>85.49 | 69.13 / <br>18.80 / <br>85.56 | ❌ | 124.60 / <br>26.37 / <br>138.79 |
|
||||
| SDXL - txt2img | 6.8 | 8.18 | - | - |
|
||||
|
||||
### RTX 4090 (batch size: 4)
|
||||
|
||||
| **Pipeline** | **torch 2.0 - <br>no compile** | **torch nightly - <br>no compile** | **torch 2.0 - <br>compile** | **torch nightly - <br>compile** |
|
||||
|:---:|:---:|:---:|:---:|:---:|
|
||||
| SD - txt2img | 12.62 | 12.84 | 15.32 | 15.59 |
|
||||
| SD - img2img | 12.61 | 12,.79 | 15.35 | 15.66 |
|
||||
| SD - inpaint | 12.65 | 12.81 | 15.3 | 15.58 |
|
||||
| SD - controlnet | 9.1 | 9.25 | 11.03 | 11.22 |
|
||||
| IF | 31.88 | 31.14 | ❌ | 43.92 |
|
||||
| SDXL - txt2img | 2.19 | 2.35 | - | - |
|
||||
|
||||
### RTX 4090 (batch size: 16)
|
||||
|
||||
| **Pipeline** | **torch 2.0 - <br>no compile** | **torch nightly - <br>no compile** | **torch 2.0 - <br>compile** | **torch nightly - <br>compile** |
|
||||
|:---:|:---:|:---:|:---:|:---:|
|
||||
| SD - txt2img | 3.17 | 3.2 | 3.84 | 3.85 |
|
||||
| SD - img2img | 3.16 | 3.2 | 3.84 | 3.85 |
|
||||
| SD - inpaint | 3.17 | 3.2 | 3.85 | 3.85 |
|
||||
| SD - controlnet | 2.23 | 2.3 | 2.7 | 2.75 |
|
||||
| IF | 9.26 | 9.2 | ❌ | 13.31 |
|
||||
| SDXL - txt2img | 0.52 | 0.53 | - | - |
|
||||
|
||||
## Notes
|
||||
|
||||
* Follow this [PR](https://github.com/huggingface/diffusers/pull/3313) for more details on the environment used for conducting the benchmarks.
|
||||
* For the DeepFloyd IF pipeline where batch sizes > 1, we only used a batch size of > 1 in the first IF pipeline for text-to-image generation and NOT for upscaling. That means the two upscaling pipelines received a batch size of 1.
|
||||
|
||||
*Thanks to [Horace He](https://github.com/Chillee) from the PyTorch team for their support in improving our support of `torch.compile()` in Diffusers.*
|
||||
@@ -2,7 +2,7 @@
|
||||
|
||||
[xDiT](https://github.com/xdit-project/xDiT) is an inference engine designed for the large scale parallel deployment of Diffusion Transformers (DiTs). xDiT provides a suite of efficient parallel approaches for Diffusion Models, as well as GPU kernel accelerations.
|
||||
|
||||
There are four parallel methods supported in xDiT, including [Unified Sequence Parallelism](https://huggingface.co/papers/2405.07719), [PipeFusion](https://huggingface.co/papers/2405.14430), CFG parallelism and data parallelism. The four parallel methods in xDiT can be configured in a hybrid manner, optimizing communication patterns to best suit the underlying network hardware.
|
||||
There are four parallel methods supported in xDiT, including [Unified Sequence Parallelism](https://arxiv.org/abs/2405.07719), [PipeFusion](https://arxiv.org/abs/2405.14430), CFG parallelism and data parallelism. The four parallel methods in xDiT can be configured in a hybrid manner, optimizing communication patterns to best suit the underlying network hardware.
|
||||
|
||||
Optimization orthogonal to parallelization focuses on accelerating single GPU performance. In addition to utilizing well-known Attention optimization libraries, we leverage compilation acceleration technologies such as torch.compile and onediff.
|
||||
|
||||
@@ -116,6 +116,6 @@ More detailed performance metric can be found on our [github page](https://githu
|
||||
|
||||
[xDiT-project](https://github.com/xdit-project/xDiT)
|
||||
|
||||
[USP: A Unified Sequence Parallelism Approach for Long Context Generative AI](https://huggingface.co/papers/2405.07719)
|
||||
[USP: A Unified Sequence Parallelism Approach for Long Context Generative AI](https://arxiv.org/abs/2405.07719)
|
||||
|
||||
[PipeFusion: Displaced Patch Pipeline Parallelism for Inference of Diffusion Transformer Models](https://huggingface.co/papers/2405.14430)
|
||||
[PipeFusion: Displaced Patch Pipeline Parallelism for Inference of Diffusion Transformer Models](https://arxiv.org/abs/2405.14430)
|
||||
@@ -48,8 +48,8 @@ For Ada and higher-series GPUs. we recommend changing `torch_dtype` to `torch.bf
|
||||
```py
|
||||
from diffusers import BitsAndBytesConfig as DiffusersBitsAndBytesConfig
|
||||
from transformers import BitsAndBytesConfig as TransformersBitsAndBytesConfig
|
||||
import torch
|
||||
from diffusers import AutoModel
|
||||
|
||||
from diffusers import FluxTransformer2DModel
|
||||
from transformers import T5EncoderModel
|
||||
|
||||
quant_config = TransformersBitsAndBytesConfig(load_in_8bit=True,)
|
||||
@@ -63,7 +63,7 @@ text_encoder_2_8bit = T5EncoderModel.from_pretrained(
|
||||
|
||||
quant_config = DiffusersBitsAndBytesConfig(load_in_8bit=True,)
|
||||
|
||||
transformer_8bit = AutoModel.from_pretrained(
|
||||
transformer_8bit = FluxTransformer2DModel.from_pretrained(
|
||||
"black-forest-labs/FLUX.1-dev",
|
||||
subfolder="transformer",
|
||||
quantization_config=quant_config,
|
||||
@@ -74,7 +74,7 @@ transformer_8bit = AutoModel.from_pretrained(
|
||||
By default, all the other modules such as `torch.nn.LayerNorm` are converted to `torch.float16`. You can change the data type of these modules with the `torch_dtype` parameter.
|
||||
|
||||
```diff
|
||||
transformer_8bit = AutoModel.from_pretrained(
|
||||
transformer_8bit = FluxTransformer2DModel.from_pretrained(
|
||||
"black-forest-labs/FLUX.1-dev",
|
||||
subfolder="transformer",
|
||||
quantization_config=quant_config,
|
||||
@@ -88,8 +88,6 @@ Setting `device_map="auto"` automatically fills all available space on the GPU(s
|
||||
CPU, and finally, the hard drive (the absolute slowest option) if there is still not enough memory.
|
||||
|
||||
```py
|
||||
from diffusers import FluxPipeline
|
||||
|
||||
pipe = FluxPipeline.from_pretrained(
|
||||
"black-forest-labs/FLUX.1-dev",
|
||||
transformer=transformer_8bit,
|
||||
@@ -134,8 +132,8 @@ For Ada and higher-series GPUs. we recommend changing `torch_dtype` to `torch.bf
|
||||
```py
|
||||
from diffusers import BitsAndBytesConfig as DiffusersBitsAndBytesConfig
|
||||
from transformers import BitsAndBytesConfig as TransformersBitsAndBytesConfig
|
||||
import torch
|
||||
from diffusers import AutoModel
|
||||
|
||||
from diffusers import FluxTransformer2DModel
|
||||
from transformers import T5EncoderModel
|
||||
|
||||
quant_config = TransformersBitsAndBytesConfig(load_in_4bit=True,)
|
||||
@@ -149,7 +147,7 @@ text_encoder_2_4bit = T5EncoderModel.from_pretrained(
|
||||
|
||||
quant_config = DiffusersBitsAndBytesConfig(load_in_4bit=True,)
|
||||
|
||||
transformer_4bit = AutoModel.from_pretrained(
|
||||
transformer_4bit = FluxTransformer2DModel.from_pretrained(
|
||||
"black-forest-labs/FLUX.1-dev",
|
||||
subfolder="transformer",
|
||||
quantization_config=quant_config,
|
||||
@@ -160,7 +158,7 @@ transformer_4bit = AutoModel.from_pretrained(
|
||||
By default, all the other modules such as `torch.nn.LayerNorm` are converted to `torch.float16`. You can change the data type of these modules with the `torch_dtype` parameter.
|
||||
|
||||
```diff
|
||||
transformer_4bit = AutoModel.from_pretrained(
|
||||
transformer_4bit = FluxTransformer2DModel.from_pretrained(
|
||||
"black-forest-labs/FLUX.1-dev",
|
||||
subfolder="transformer",
|
||||
quantization_config=quant_config,
|
||||
@@ -173,8 +171,6 @@ Let's generate an image using our quantized models.
|
||||
Setting `device_map="auto"` automatically fills all available space on the GPU(s) first, then the CPU, and finally, the hard drive (the absolute slowest option) if there is still not enough memory.
|
||||
|
||||
```py
|
||||
from diffusers import FluxPipeline
|
||||
|
||||
pipe = FluxPipeline.from_pretrained(
|
||||
"black-forest-labs/FLUX.1-dev",
|
||||
transformer=transformer_4bit,
|
||||
@@ -218,16 +214,14 @@ Check your memory footprint with the `get_memory_footprint` method:
|
||||
print(model.get_memory_footprint())
|
||||
```
|
||||
|
||||
Note that this only tells you the memory footprint of the model params and does _not_ estimate the inference memory requirements.
|
||||
|
||||
Quantized models can be loaded from the [`~ModelMixin.from_pretrained`] method without needing to specify the `quantization_config` parameters:
|
||||
|
||||
```py
|
||||
from diffusers import AutoModel, BitsAndBytesConfig
|
||||
from diffusers import FluxTransformer2DModel, BitsAndBytesConfig
|
||||
|
||||
quantization_config = BitsAndBytesConfig(load_in_4bit=True)
|
||||
|
||||
model_4bit = AutoModel.from_pretrained(
|
||||
model_4bit = FluxTransformer2DModel.from_pretrained(
|
||||
"hf-internal-testing/flux.1-dev-nf4-pkg", subfolder="transformer"
|
||||
)
|
||||
```
|
||||
@@ -249,13 +243,13 @@ An "outlier" is a hidden state value greater than a certain threshold, and these
|
||||
To find the best threshold for your model, we recommend experimenting with the `llm_int8_threshold` parameter in [`BitsAndBytesConfig`]:
|
||||
|
||||
```py
|
||||
from diffusers import AutoModel, BitsAndBytesConfig
|
||||
from diffusers import FluxTransformer2DModel, BitsAndBytesConfig
|
||||
|
||||
quantization_config = BitsAndBytesConfig(
|
||||
load_in_8bit=True, llm_int8_threshold=10,
|
||||
)
|
||||
|
||||
model_8bit = AutoModel.from_pretrained(
|
||||
model_8bit = FluxTransformer2DModel.from_pretrained(
|
||||
"black-forest-labs/FLUX.1-dev",
|
||||
subfolder="transformer",
|
||||
quantization_config=quantization_config,
|
||||
@@ -311,7 +305,7 @@ NF4 is a 4-bit data type from the [QLoRA](https://hf.co/papers/2305.14314) paper
|
||||
from diffusers import BitsAndBytesConfig as DiffusersBitsAndBytesConfig
|
||||
from transformers import BitsAndBytesConfig as TransformersBitsAndBytesConfig
|
||||
|
||||
from diffusers import AutoModel
|
||||
from diffusers import FluxTransformer2DModel
|
||||
from transformers import T5EncoderModel
|
||||
|
||||
quant_config = TransformersBitsAndBytesConfig(
|
||||
@@ -331,7 +325,7 @@ quant_config = DiffusersBitsAndBytesConfig(
|
||||
bnb_4bit_quant_type="nf4",
|
||||
)
|
||||
|
||||
transformer_4bit = AutoModel.from_pretrained(
|
||||
transformer_4bit = FluxTransformer2DModel.from_pretrained(
|
||||
"black-forest-labs/FLUX.1-dev",
|
||||
subfolder="transformer",
|
||||
quantization_config=quant_config,
|
||||
@@ -349,7 +343,7 @@ Nested quantization is a technique that can save additional memory at no additio
|
||||
from diffusers import BitsAndBytesConfig as DiffusersBitsAndBytesConfig
|
||||
from transformers import BitsAndBytesConfig as TransformersBitsAndBytesConfig
|
||||
|
||||
from diffusers import AutoModel
|
||||
from diffusers import FluxTransformer2DModel
|
||||
from transformers import T5EncoderModel
|
||||
|
||||
quant_config = TransformersBitsAndBytesConfig(
|
||||
@@ -369,7 +363,7 @@ quant_config = DiffusersBitsAndBytesConfig(
|
||||
bnb_4bit_use_double_quant=True,
|
||||
)
|
||||
|
||||
transformer_4bit = AutoModel.from_pretrained(
|
||||
transformer_4bit = FluxTransformer2DModel.from_pretrained(
|
||||
"black-forest-labs/FLUX.1-dev",
|
||||
subfolder="transformer",
|
||||
quantization_config=quant_config,
|
||||
@@ -385,7 +379,7 @@ Once quantized, you can dequantize a model to its original precision, but this m
|
||||
from diffusers import BitsAndBytesConfig as DiffusersBitsAndBytesConfig
|
||||
from transformers import BitsAndBytesConfig as TransformersBitsAndBytesConfig
|
||||
|
||||
from diffusers import AutoModel
|
||||
from diffusers import FluxTransformer2DModel
|
||||
from transformers import T5EncoderModel
|
||||
|
||||
quant_config = TransformersBitsAndBytesConfig(
|
||||
@@ -405,7 +399,7 @@ quant_config = DiffusersBitsAndBytesConfig(
|
||||
bnb_4bit_use_double_quant=True,
|
||||
)
|
||||
|
||||
transformer_4bit = AutoModel.from_pretrained(
|
||||
transformer_4bit = FluxTransformer2DModel.from_pretrained(
|
||||
"black-forest-labs/FLUX.1-dev",
|
||||
subfolder="transformer",
|
||||
quantization_config=quant_config,
|
||||
@@ -419,4 +413,4 @@ transformer_4bit.dequantize()
|
||||
## Resources
|
||||
|
||||
* [End-to-end notebook showing Flux.1 Dev inference in a free-tier Colab](https://gist.github.com/sayakpaul/c76bd845b48759e11687ac550b99d8b4)
|
||||
* [Training](https://github.com/huggingface/diffusers/blob/8c661ea586bf11cb2440da740dd3c4cf84679b85/examples/dreambooth/README_hidream.md#using-quantization)
|
||||
* [Training](https://gist.github.com/sayakpaul/05afd428bc089b47af7c016e42004527)
|
||||
@@ -13,120 +13,28 @@ specific language governing permissions and limitations under the License.
|
||||
|
||||
# Quantization
|
||||
|
||||
Quantization focuses on representing data with fewer bits while also trying to preserve the precision of the original data. This often means converting a data type to represent the same information with fewer bits. For example, if your model weights are stored as 32-bit floating points and they're quantized to 16-bit floating points, this halves the model size which makes it easier to store and reduces memory usage. Lower precision can also speedup inference because it takes less time to perform calculations with fewer bits.
|
||||
Quantization techniques focus on representing data with less information while also trying to not lose too much accuracy. This often means converting a data type to represent the same information with fewer bits. For example, if your model weights are stored as 32-bit floating points and they're quantized to 16-bit floating points, this halves the model size which makes it easier to store and reduces memory-usage. Lower precision can also speedup inference because it takes less time to perform calculations with fewer bits.
|
||||
|
||||
Diffusers supports multiple quantization backends to make large diffusion models like [Flux](../api/pipelines/flux) more accessible. This guide shows how to use the [`~quantizers.PipelineQuantizationConfig`] class to quantize a pipeline during its initialization from a pretrained or non-quantized checkpoint.
|
||||
<Tip>
|
||||
|
||||
## Pipeline-level quantization
|
||||
Interested in adding a new quantization method to Diffusers? Refer to the [Contribute new quantization method guide](https://huggingface.co/docs/transformers/main/en/quantization/contribute) to learn more about adding a new quantization method.
|
||||
|
||||
There are two ways you can use [`~quantizers.PipelineQuantizationConfig`] depending on the level of control you want over the quantization specifications of each model in the pipeline.
|
||||
</Tip>
|
||||
|
||||
- for more basic and simple use cases, you only need to define the `quant_backend`, `quant_kwargs`, and `components_to_quantize`
|
||||
- for more granular quantization control, provide a `quant_mapping` that provides the quantization specifications for the individual model components
|
||||
<Tip>
|
||||
|
||||
### Simple quantization
|
||||
If you are new to the quantization field, we recommend you to check out these beginner-friendly courses about quantization in collaboration with DeepLearning.AI:
|
||||
|
||||
Initialize [`~quantizers.PipelineQuantizationConfig`] with the following parameters.
|
||||
* [Quantization Fundamentals with Hugging Face](https://www.deeplearning.ai/short-courses/quantization-fundamentals-with-hugging-face/)
|
||||
* [Quantization in Depth](https://www.deeplearning.ai/short-courses/quantization-in-depth/)
|
||||
|
||||
- `quant_backend` specifies which quantization backend to use. Currently supported backends include: `bitsandbytes_4bit`, `bitsandbytes_8bit`, `gguf`, `quanto`, and `torchao`.
|
||||
- `quant_kwargs` contains the specific quantization arguments to use.
|
||||
- `components_to_quantize` specifies which components of the pipeline to quantize. Typically, you should quantize the most compute intensive components like the transformer. The text encoder is another component to consider quantizing if a pipeline has more than one such as [`FluxPipeline`]. The example below quantizes the T5 text encoder in [`FluxPipeline`] while keeping the CLIP model intact.
|
||||
</Tip>
|
||||
|
||||
```py
|
||||
import torch
|
||||
from diffusers import DiffusionPipeline
|
||||
from diffusers.quantizers import PipelineQuantizationConfig
|
||||
## When to use what?
|
||||
|
||||
pipeline_quant_config = PipelineQuantizationConfig(
|
||||
quant_backend="bitsandbytes_4bit",
|
||||
quant_kwargs={"load_in_4bit": True, "bnb_4bit_quant_type": "nf4", "bnb_4bit_compute_dtype": torch.bfloat16},
|
||||
components_to_quantize=["transformer", "text_encoder_2"],
|
||||
)
|
||||
```
|
||||
Diffusers currently supports the following quantization methods.
|
||||
- [BitsandBytes](./bitsandbytes)
|
||||
- [TorchAO](./torchao)
|
||||
- [GGUF](./gguf)
|
||||
|
||||
Pass the `pipeline_quant_config` to [`~DiffusionPipeline.from_pretrained`] to quantize the pipeline.
|
||||
|
||||
```py
|
||||
pipe = DiffusionPipeline.from_pretrained(
|
||||
"black-forest-labs/FLUX.1-dev",
|
||||
quantization_config=pipeline_quant_config,
|
||||
torch_dtype=torch.bfloat16,
|
||||
).to("cuda")
|
||||
|
||||
image = pipe("photo of a cute dog").images[0]
|
||||
```
|
||||
|
||||
### quant_mapping
|
||||
|
||||
The `quant_mapping` argument provides more flexible options for how to quantize each individual component in a pipeline, like combining different quantization backends.
|
||||
|
||||
Initialize [`~quantizers.PipelineQuantizationConfig`] and pass a `quant_mapping` to it. The `quant_mapping` allows you to specify the quantization options for each component in the pipeline such as the transformer and text encoder.
|
||||
|
||||
The example below uses two quantization backends, [`~quantizers.QuantoConfig`] and [`transformers.BitsAndBytesConfig`], for the transformer and text encoder.
|
||||
|
||||
```py
|
||||
import torch
|
||||
from diffusers import DiffusionPipeline
|
||||
from diffusers import BitsAndBytesConfig as DiffusersBitsAndBytesConfig
|
||||
from diffusers.quantizers.quantization_config import QuantoConfig
|
||||
from diffusers.quantizers import PipelineQuantizationConfig
|
||||
from transformers import BitsAndBytesConfig as TransformersBitsAndBytesConfig
|
||||
|
||||
pipeline_quant_config = PipelineQuantizationConfig(
|
||||
quant_mapping={
|
||||
"transformer": QuantoConfig(weights_dtype="int8"),
|
||||
"text_encoder_2": TransformersBitsAndBytesConfig(
|
||||
load_in_4bit=True, compute_dtype=torch.bfloat16
|
||||
),
|
||||
}
|
||||
)
|
||||
```
|
||||
|
||||
There is a separate bitsandbytes backend in [Transformers](https://huggingface.co/docs/transformers/main_classes/quantization#transformers.BitsAndBytesConfig). You need to import and use [`transformers.BitsAndBytesConfig`] for components that come from Transformers. For example, `text_encoder_2` in [`FluxPipeline`] is a [`~transformers.T5EncoderModel`] from Transformers so you need to use [`transformers.BitsAndBytesConfig`] instead of [`diffusers.BitsAndBytesConfig`].
|
||||
|
||||
> [!TIP]
|
||||
> Use the [simple quantization](#simple-quantization) method above if you don't want to manage these distinct imports or aren't sure where each pipeline component comes from.
|
||||
|
||||
```py
|
||||
import torch
|
||||
from diffusers import DiffusionPipeline
|
||||
from diffusers import BitsAndBytesConfig as DiffusersBitsAndBytesConfig
|
||||
from diffusers.quantizers import PipelineQuantizationConfig
|
||||
from transformers import BitsAndBytesConfig as TransformersBitsAndBytesConfig
|
||||
|
||||
pipeline_quant_config = PipelineQuantizationConfig(
|
||||
quant_mapping={
|
||||
"transformer": DiffusersBitsAndBytesConfig(load_in_4bit=True, bnb_4bit_compute_dtype=torch.bfloat16),
|
||||
"text_encoder_2": TransformersBitsAndBytesConfig(
|
||||
load_in_4bit=True, compute_dtype=torch.bfloat16
|
||||
),
|
||||
}
|
||||
)
|
||||
```
|
||||
|
||||
Pass the `pipeline_quant_config` to [`~DiffusionPipeline.from_pretrained`] to quantize the pipeline.
|
||||
|
||||
```py
|
||||
pipe = DiffusionPipeline.from_pretrained(
|
||||
"black-forest-labs/FLUX.1-dev",
|
||||
quantization_config=pipeline_quant_config,
|
||||
torch_dtype=torch.bfloat16,
|
||||
).to("cuda")
|
||||
|
||||
image = pipe("photo of a cute dog").images[0]
|
||||
```
|
||||
|
||||
## Resources
|
||||
|
||||
Check out the resources below to learn more about quantization.
|
||||
|
||||
- If you are new to quantization, we recommend checking out the following beginner-friendly courses in collaboration with DeepLearning.AI.
|
||||
|
||||
- [Quantization Fundamentals with Hugging Face](https://www.deeplearning.ai/short-courses/quantization-fundamentals-with-hugging-face/)
|
||||
- [Quantization in Depth](https://www.deeplearning.ai/short-courses/quantization-in-depth/)
|
||||
|
||||
- Refer to the [Contribute new quantization method guide](https://huggingface.co/docs/transformers/main/en/quantization/contribute) if you're interested in adding a new quantization method.
|
||||
|
||||
- The Transformers quantization [Overview](https://huggingface.co/docs/transformers/quantization/overview#when-to-use-what) provides an overview of the pros and cons of different quantization backends.
|
||||
|
||||
- Read the [Exploring Quantization Backends in Diffusers](https://huggingface.co/blog/diffusers-quantization) blog post for a brief introduction to each quantization backend, how to choose a backend, and combining quantization with other memory optimizations.
|
||||
[This resource](https://huggingface.co/docs/transformers/main/en/quantization/overview#when-to-use-what) provides a good overview of the pros and cons of different quantization techniques.
|
||||
|
||||
@@ -1,148 +0,0 @@
|
||||
<!--Copyright 2025 The HuggingFace Team. All rights reserved.
|
||||
|
||||
Licensed under the Apache License, Version 2.0 (the "License"); you may not use this file except in compliance with
|
||||
the License. You may obtain a copy of the License at
|
||||
|
||||
http://www.apache.org/licenses/LICENSE-2.0
|
||||
|
||||
Unless required by applicable law or agreed to in writing, software distributed under the License is distributed on
|
||||
an "AS IS" BASIS, WITHOUT WARRANTIES OR CONDITIONS OF ANY KIND, either express or implied. See the License for the
|
||||
specific language governing permissions and limitations under the License.
|
||||
|
||||
-->
|
||||
|
||||
# Quanto
|
||||
|
||||
[Quanto](https://github.com/huggingface/optimum-quanto) is a PyTorch quantization backend for [Optimum](https://huggingface.co/docs/optimum/en/index). It has been designed with versatility and simplicity in mind:
|
||||
|
||||
- All features are available in eager mode (works with non-traceable models)
|
||||
- Supports quantization aware training
|
||||
- Quantized models are compatible with `torch.compile`
|
||||
- Quantized models are Device agnostic (e.g CUDA,XPU,MPS,CPU)
|
||||
|
||||
In order to use the Quanto backend, you will first need to install `optimum-quanto>=0.2.6` and `accelerate`
|
||||
|
||||
```shell
|
||||
pip install optimum-quanto accelerate
|
||||
```
|
||||
|
||||
Now you can quantize a model by passing the `QuantoConfig` object to the `from_pretrained()` method. Although the Quanto library does allow quantizing `nn.Conv2d` and `nn.LayerNorm` modules, currently, Diffusers only supports quantizing the weights in the `nn.Linear` layers of a model. The following snippet demonstrates how to apply `float8` quantization with Quanto.
|
||||
|
||||
```python
|
||||
import torch
|
||||
from diffusers import FluxTransformer2DModel, QuantoConfig
|
||||
|
||||
model_id = "black-forest-labs/FLUX.1-dev"
|
||||
quantization_config = QuantoConfig(weights_dtype="float8")
|
||||
transformer = FluxTransformer2DModel.from_pretrained(
|
||||
model_id,
|
||||
subfolder="transformer",
|
||||
quantization_config=quantization_config,
|
||||
torch_dtype=torch.bfloat16,
|
||||
)
|
||||
|
||||
pipe = FluxPipeline.from_pretrained(model_id, transformer=transformer, torch_dtype=torch_dtype)
|
||||
pipe.to("cuda")
|
||||
|
||||
prompt = "A cat holding a sign that says hello world"
|
||||
image = pipe(
|
||||
prompt, num_inference_steps=50, guidance_scale=4.5, max_sequence_length=512
|
||||
).images[0]
|
||||
image.save("output.png")
|
||||
```
|
||||
|
||||
## Skipping Quantization on specific modules
|
||||
|
||||
It is possible to skip applying quantization on certain modules using the `modules_to_not_convert` argument in the `QuantoConfig`. Please ensure that the modules passed in to this argument match the keys of the modules in the `state_dict`
|
||||
|
||||
```python
|
||||
import torch
|
||||
from diffusers import FluxTransformer2DModel, QuantoConfig
|
||||
|
||||
model_id = "black-forest-labs/FLUX.1-dev"
|
||||
quantization_config = QuantoConfig(weights_dtype="float8", modules_to_not_convert=["proj_out"])
|
||||
transformer = FluxTransformer2DModel.from_pretrained(
|
||||
model_id,
|
||||
subfolder="transformer",
|
||||
quantization_config=quantization_config,
|
||||
torch_dtype=torch.bfloat16,
|
||||
)
|
||||
```
|
||||
|
||||
## Using `from_single_file` with the Quanto Backend
|
||||
|
||||
`QuantoConfig` is compatible with `~FromOriginalModelMixin.from_single_file`.
|
||||
|
||||
```python
|
||||
import torch
|
||||
from diffusers import FluxTransformer2DModel, QuantoConfig
|
||||
|
||||
ckpt_path = "https://huggingface.co/black-forest-labs/FLUX.1-dev/blob/main/flux1-dev.safetensors"
|
||||
quantization_config = QuantoConfig(weights_dtype="float8")
|
||||
transformer = FluxTransformer2DModel.from_single_file(ckpt_path, quantization_config=quantization_config, torch_dtype=torch.bfloat16)
|
||||
```
|
||||
|
||||
## Saving Quantized models
|
||||
|
||||
Diffusers supports serializing Quanto models using the `~ModelMixin.save_pretrained` method.
|
||||
|
||||
The serialization and loading requirements are different for models quantized directly with the Quanto library and models quantized
|
||||
with Diffusers using Quanto as the backend. It is currently not possible to load models quantized directly with Quanto into Diffusers using `~ModelMixin.from_pretrained`
|
||||
|
||||
```python
|
||||
import torch
|
||||
from diffusers import FluxTransformer2DModel, QuantoConfig
|
||||
|
||||
model_id = "black-forest-labs/FLUX.1-dev"
|
||||
quantization_config = QuantoConfig(weights_dtype="float8")
|
||||
transformer = FluxTransformer2DModel.from_pretrained(
|
||||
model_id,
|
||||
subfolder="transformer",
|
||||
quantization_config=quantization_config,
|
||||
torch_dtype=torch.bfloat16,
|
||||
)
|
||||
# save quantized model to reuse
|
||||
transformer.save_pretrained("<your quantized model save path>")
|
||||
|
||||
# you can reload your quantized model with
|
||||
model = FluxTransformer2DModel.from_pretrained("<your quantized model save path>")
|
||||
```
|
||||
|
||||
## Using `torch.compile` with Quanto
|
||||
|
||||
Currently the Quanto backend supports `torch.compile` for the following quantization types:
|
||||
|
||||
- `int8` weights
|
||||
|
||||
```python
|
||||
import torch
|
||||
from diffusers import FluxPipeline, FluxTransformer2DModel, QuantoConfig
|
||||
|
||||
model_id = "black-forest-labs/FLUX.1-dev"
|
||||
quantization_config = QuantoConfig(weights_dtype="int8")
|
||||
transformer = FluxTransformer2DModel.from_pretrained(
|
||||
model_id,
|
||||
subfolder="transformer",
|
||||
quantization_config=quantization_config,
|
||||
torch_dtype=torch.bfloat16,
|
||||
)
|
||||
transformer = torch.compile(transformer, mode="max-autotune", fullgraph=True)
|
||||
|
||||
pipe = FluxPipeline.from_pretrained(
|
||||
model_id, transformer=transformer, torch_dtype=torch_dtype
|
||||
)
|
||||
pipe.to("cuda")
|
||||
images = pipe("A cat holding a sign that says hello").images[0]
|
||||
images.save("flux-quanto-compile.png")
|
||||
```
|
||||
|
||||
## Supported Quantization Types
|
||||
|
||||
### Weights
|
||||
|
||||
- float8
|
||||
- int8
|
||||
- int4
|
||||
- int2
|
||||
|
||||
|
||||
@@ -26,13 +26,13 @@ The example below only quantizes the weights to int8.
|
||||
|
||||
```python
|
||||
import torch
|
||||
from diffusers import FluxPipeline, AutoModel, TorchAoConfig
|
||||
from diffusers import FluxPipeline, FluxTransformer2DModel, TorchAoConfig
|
||||
|
||||
model_id = "black-forest-labs/FLUX.1-dev"
|
||||
dtype = torch.bfloat16
|
||||
|
||||
quantization_config = TorchAoConfig("int8wo")
|
||||
transformer = AutoModel.from_pretrained(
|
||||
transformer = FluxTransformer2DModel.from_pretrained(
|
||||
model_id,
|
||||
subfolder="transformer",
|
||||
quantization_config=quantization_config,
|
||||
@@ -56,7 +56,7 @@ image = pipe(
|
||||
image.save("output.png")
|
||||
```
|
||||
|
||||
TorchAO is fully compatible with [torch.compile](../optimization/fp16#torchcompile), setting it apart from other quantization methods. This makes it easy to speed up inference with just one line of code.
|
||||
TorchAO is fully compatible with [torch.compile](./optimization/torch2.0#torchcompile), setting it apart from other quantization methods. This makes it easy to speed up inference with just one line of code.
|
||||
|
||||
```python
|
||||
# In the above code, add the following after initializing the transformer
|
||||
@@ -85,13 +85,13 @@ The quantization methods supported are as follows:
|
||||
| **Category** | **Full Function Names** | **Shorthands** |
|
||||
|--------------|-------------------------|----------------|
|
||||
| **Integer quantization** | `int4_weight_only`, `int8_dynamic_activation_int4_weight`, `int8_weight_only`, `int8_dynamic_activation_int8_weight` | `int4wo`, `int4dq`, `int8wo`, `int8dq` |
|
||||
| **Floating point 8-bit quantization** | `float8_weight_only`, `float8_dynamic_activation_float8_weight`, `float8_static_activation_float8_weight` | `float8wo`, `float8wo_e5m2`, `float8wo_e4m3`, `float8dq`, `float8dq_e4m3`, `float8dq_e4m3_tensor`, `float8dq_e4m3_row` |
|
||||
| **Floating point 8-bit quantization** | `float8_weight_only`, `float8_dynamic_activation_float8_weight`, `float8_static_activation_float8_weight` | `float8wo`, `float8wo_e5m2`, `float8wo_e4m3`, `float8dq`, `float8dq_e4m3`, `float8_e4m3_tensor`, `float8_e4m3_row` |
|
||||
| **Floating point X-bit quantization** | `fpx_weight_only` | `fpX_eAwB` where `X` is the number of bits (1-7), `A` is exponent bits, and `B` is mantissa bits. Constraint: `X == A + B + 1` |
|
||||
| **Unsigned Integer quantization** | `uintx_weight_only` | `uint1wo`, `uint2wo`, `uint3wo`, `uint4wo`, `uint5wo`, `uint6wo`, `uint7wo` |
|
||||
|
||||
Some quantization methods are aliases (for example, `int8wo` is the commonly used shorthand for `int8_weight_only`). This allows using the quantization methods described in the torchao docs as-is, while also making it convenient to remember their shorthand notations.
|
||||
|
||||
Refer to the [official torchao documentation](https://docs.pytorch.org/ao/stable/index.html) for a better understanding of the available quantization methods and the exhaustive list of configuration options available.
|
||||
Refer to the official torchao documentation for a better understanding of the available quantization methods and the exhaustive list of configuration options available.
|
||||
|
||||
## Serializing and Deserializing quantized models
|
||||
|
||||
@@ -99,10 +99,10 @@ To serialize a quantized model in a given dtype, first load the model with the d
|
||||
|
||||
```python
|
||||
import torch
|
||||
from diffusers import AutoModel, TorchAoConfig
|
||||
from diffusers import FluxTransformer2DModel, TorchAoConfig
|
||||
|
||||
quantization_config = TorchAoConfig("int8wo")
|
||||
transformer = AutoModel.from_pretrained(
|
||||
transformer = FluxTransformer2DModel.from_pretrained(
|
||||
"black-forest-labs/Flux.1-Dev",
|
||||
subfolder="transformer",
|
||||
quantization_config=quantization_config,
|
||||
@@ -115,9 +115,9 @@ To load a serialized quantized model, use the [`~ModelMixin.from_pretrained`] me
|
||||
|
||||
```python
|
||||
import torch
|
||||
from diffusers import FluxPipeline, AutoModel
|
||||
from diffusers import FluxPipeline, FluxTransformer2DModel
|
||||
|
||||
transformer = AutoModel.from_pretrained("/path/to/flux_int8wo", torch_dtype=torch.bfloat16, use_safetensors=False)
|
||||
transformer = FluxTransformer2DModel.from_pretrained("/path/to/flux_int8wo", torch_dtype=torch.bfloat16, use_safetensors=False)
|
||||
pipe = FluxPipeline.from_pretrained("black-forest-labs/Flux.1-Dev", transformer=transformer, torch_dtype=torch.bfloat16)
|
||||
pipe.to("cuda")
|
||||
|
||||
@@ -126,15 +126,15 @@ image = pipe(prompt, num_inference_steps=30, guidance_scale=7.0).images[0]
|
||||
image.save("output.png")
|
||||
```
|
||||
|
||||
If you are using `torch<=2.6.0`, some quantization methods, such as `uint4wo`, cannot be loaded directly and may result in an `UnpicklingError` when trying to load the models, but work as expected when saving them. In order to work around this, one can load the state dict manually into the model. Note, however, that this requires using `weights_only=False` in `torch.load`, so it should be run only if the weights were obtained from a trustable source.
|
||||
Some quantization methods, such as `uint4wo`, cannot be loaded directly and may result in an `UnpicklingError` when trying to load the models, but work as expected when saving them. In order to work around this, one can load the state dict manually into the model. Note, however, that this requires using `weights_only=False` in `torch.load`, so it should be run only if the weights were obtained from a trustable source.
|
||||
|
||||
```python
|
||||
import torch
|
||||
from accelerate import init_empty_weights
|
||||
from diffusers import FluxPipeline, AutoModel, TorchAoConfig
|
||||
from diffusers import FluxPipeline, FluxTransformer2DModel, TorchAoConfig
|
||||
|
||||
# Serialize the model
|
||||
transformer = AutoModel.from_pretrained(
|
||||
transformer = FluxTransformer2DModel.from_pretrained(
|
||||
"black-forest-labs/Flux.1-Dev",
|
||||
subfolder="transformer",
|
||||
quantization_config=TorchAoConfig("uint4wo"),
|
||||
@@ -146,14 +146,11 @@ transformer.save_pretrained("/path/to/flux_uint4wo", safe_serialization=False, m
|
||||
# Load the model
|
||||
state_dict = torch.load("/path/to/flux_uint4wo/diffusion_pytorch_model.bin", weights_only=False, map_location="cpu")
|
||||
with init_empty_weights():
|
||||
transformer = AutoModel.from_config("/path/to/flux_uint4wo/config.json")
|
||||
transformer = FluxTransformer2DModel.from_config("/path/to/flux_uint4wo/config.json")
|
||||
transformer.load_state_dict(state_dict, strict=True, assign=True)
|
||||
```
|
||||
|
||||
> [!TIP]
|
||||
> The [`AutoModel`] API is supported for PyTorch >= 2.6 as shown in the examples below.
|
||||
|
||||
## Resources
|
||||
|
||||
- [TorchAO Quantization API](https://docs.pytorch.org/ao/stable/index.html)
|
||||
- [TorchAO Quantization API](https://github.com/pytorch/ao/blob/main/torchao/quantization/README.md)
|
||||
- [Diffusers-TorchAO examples](https://github.com/sayakpaul/diffusers-torchao)
|
||||
|
||||
@@ -163,9 +163,6 @@ Models are initiated with the [`~ModelMixin.from_pretrained`] method which also
|
||||
>>> model = UNet2DModel.from_pretrained(repo_id, use_safetensors=True)
|
||||
```
|
||||
|
||||
> [!TIP]
|
||||
> Use the [`AutoModel`] API to automatically select a model class if you're unsure of which one to use.
|
||||
|
||||
To access the model parameters, call `model.config`:
|
||||
|
||||
```py
|
||||
|
||||
@@ -256,6 +256,6 @@ make_image_grid(images, 2, 2)
|
||||
|
||||
In this tutorial, you learned how to optimize a [`DiffusionPipeline`] for computational and memory efficiency as well as improving the quality of generated outputs. If you're interested in making your pipeline even faster, take a look at the following resources:
|
||||
|
||||
- Learn how [PyTorch 2.0](./optimization/fp16) and [`torch.compile`](https://pytorch.org/docs/stable/generated/torch.compile.html) can yield 5 - 300% faster inference speed. On an A100 GPU, inference can be up to 50% faster!
|
||||
- Learn how [PyTorch 2.0](./optimization/torch2.0) and [`torch.compile`](https://pytorch.org/docs/stable/generated/torch.compile.html) can yield 5 - 300% faster inference speed. On an A100 GPU, inference can be up to 50% faster!
|
||||
- If you can't use PyTorch 2, we recommend you install [xFormers](./optimization/xformers). Its memory-efficient attention mechanism works great with PyTorch 1.13.1 for faster speed and reduced memory consumption.
|
||||
- Other optimization techniques, such as model offloading, are covered in [this guide](./optimization/fp16).
|
||||
|
||||
@@ -31,10 +31,10 @@ To adapt your text-to-image model for inpainting, you'll need to change the numb
|
||||
Initialize a [`UNet2DConditionModel`] with the pretrained text-to-image model weights, and change `in_channels` to 9. Changing the number of `in_channels` means you need to set `ignore_mismatched_sizes=True` and `low_cpu_mem_usage=False` to avoid a size mismatch error because the shape is different now.
|
||||
|
||||
```py
|
||||
from diffusers import AutoModel
|
||||
from diffusers import UNet2DConditionModel
|
||||
|
||||
model_id = "stable-diffusion-v1-5/stable-diffusion-v1-5"
|
||||
unet = AutoModel.from_pretrained(
|
||||
unet = UNet2DConditionModel.from_pretrained(
|
||||
model_id,
|
||||
subfolder="unet",
|
||||
in_channels=9,
|
||||
|
||||
@@ -216,7 +216,7 @@ Setting the `<ID_TOKEN>` is not necessary. From some limited experimentation, we
|
||||
> - The original repository uses a `lora_alpha` of `1`. We found this not suitable in many runs, possibly due to difference in modeling backends and training settings. Our recommendation is to set to the `lora_alpha` to either `rank` or `rank // 2`.
|
||||
> - If you're training on data whose captions generate bad results with the original model, a `rank` of 64 and above is good and also the recommendation by the team behind CogVideoX. If the generations are already moderately good on your training captions, a `rank` of 16/32 should work. We found that setting the rank too low, say `4`, is not ideal and doesn't produce promising results.
|
||||
> - The authors of CogVideoX recommend 4000 training steps and 100 training videos overall to achieve the best result. While that might yield the best results, we found from our limited experimentation that 2000 steps and 25 videos could also be sufficient.
|
||||
> - When using the Prodigy optimizer for training, one can follow the recommendations from [this](https://huggingface.co/blog/sdxl_lora_advanced_script) blog. Prodigy tends to overfit quickly. From my very limited testing, I found a learning rate of `0.5` to be suitable in addition to `--prodigy_use_bias_correction`, `prodigy_safeguard_warmup` and `--prodigy_decouple`.
|
||||
> - When using the Prodigy opitimizer for training, one can follow the recommendations from [this](https://huggingface.co/blog/sdxl_lora_advanced_script) blog. Prodigy tends to overfit quickly. From my very limited testing, I found a learning rate of `0.5` to be suitable in addition to `--prodigy_use_bias_correction`, `prodigy_safeguard_warmup` and `--prodigy_decouple`.
|
||||
> - The recommended learning rate by the CogVideoX authors and from our experimentation with Adam/AdamW is between `1e-3` and `1e-4` for a dataset of 25+ videos.
|
||||
>
|
||||
> Note that our testing is not exhaustive due to limited time for exploration. Our recommendation would be to play around with the different knobs and dials to find the best settings for your data.
|
||||
|
||||
@@ -12,6 +12,6 @@ specific language governing permissions and limitations under the License.
|
||||
|
||||
# Reinforcement learning training with DDPO
|
||||
|
||||
You can fine-tune Stable Diffusion on a reward function via reinforcement learning with the 🤗 TRL library and 🤗 Diffusers. This is done with the Denoising Diffusion Policy Optimization (DDPO) algorithm introduced by Black et al. in [Training Diffusion Models with Reinforcement Learning](https://huggingface.co/papers/2305.13301), which is implemented in 🤗 TRL with the [`~trl.DDPOTrainer`].
|
||||
You can fine-tune Stable Diffusion on a reward function via reinforcement learning with the 🤗 TRL library and 🤗 Diffusers. This is done with the Denoising Diffusion Policy Optimization (DDPO) algorithm introduced by Black et al. in [Training Diffusion Models with Reinforcement Learning](https://arxiv.org/abs/2305.13301), which is implemented in 🤗 TRL with the [`~trl.DDPOTrainer`].
|
||||
|
||||
For more information, check out the [`~trl.DDPOTrainer`] API reference and the [Finetune Stable Diffusion Models with DDPO via TRL](https://huggingface.co/blog/trl-ddpo) blog post.
|
||||
@@ -165,10 +165,10 @@ flush()
|
||||
Load the diffusion transformer next which has 12.5B parameters. This time, set `device_map="auto"` to automatically distribute the model across two 16GB GPUs. The `auto` strategy is backed by [Accelerate](https://hf.co/docs/accelerate/index) and available as a part of the [Big Model Inference](https://hf.co/docs/accelerate/concept_guides/big_model_inference) feature. It starts by distributing a model across the fastest device first (GPU) before moving to slower devices like the CPU and hard drive if needed. The trade-off of storing model parameters on slower devices is slower inference latency.
|
||||
|
||||
```py
|
||||
from diffusers import AutoModel
|
||||
from diffusers import FluxTransformer2DModel
|
||||
import torch
|
||||
|
||||
transformer = AutoModel.from_pretrained(
|
||||
transformer = FluxTransformer2DModel.from_pretrained(
|
||||
"black-forest-labs/FLUX.1-dev",
|
||||
subfolder="transformer",
|
||||
device_map="auto",
|
||||
|
||||
@@ -589,7 +589,7 @@ For stage 2 of DeepFloyd IF with DreamBooth, pay attention to these parameters:
|
||||
|
||||
* `--learning_rate=5e-6`, use a lower learning rate with a smaller effective batch size
|
||||
* `--resolution=256`, the expected resolution for the upscaler
|
||||
* `--train_batch_size=2` and `--gradient_accumulation_steps=6`, to effectively train on images with faces requires larger batch sizes
|
||||
* `--train_batch_size=2` and `--gradient_accumulation_steps=6`, to effectively train on images wiht faces requires larger batch sizes
|
||||
|
||||
```bash
|
||||
export MODEL_NAME="DeepFloyd/IF-II-L-v1.0"
|
||||
|
||||
@@ -87,7 +87,7 @@ Lastly, if you want to train a model on your own dataset, take a look at the [Cr
|
||||
|
||||
<Tip>
|
||||
|
||||
The following sections highlight parts of the training script that are important for understanding how to modify it, but it doesn't cover every aspect of the script in detail. If you're interested in learning more, feel free to read through the [script](https://github.com/huggingface/diffusers/blob/main/examples/text_to_image/train_text_to_image_lora.py) and let us know if you have any questions or concerns.
|
||||
The following sections highlight parts of the training script that are important for understanding how to modify it, but it doesn't cover every aspect of the script in detail. If you're interested in learning more, feel free to read through the [script](https://github.com/huggingface/diffusers/blob/main/examples/text_to_image/text_to_image_lora.py) and let us know if you have any questions or concerns.
|
||||
|
||||
</Tip>
|
||||
|
||||
|
||||
@@ -59,5 +59,5 @@ pip install -r requirements_sdxl.txt
|
||||
|
||||
To speedup training and reduce memory-usage, we recommend:
|
||||
|
||||
- using PyTorch 2.0 or higher to automatically use [scaled dot product attention](../optimization/fp16#scaled-dot-product-attention) during training (you don't need to make any changes to the training code)
|
||||
- using PyTorch 2.0 or higher to automatically use [scaled dot product attention](../optimization/torch2.0#scaled-dot-product-attention) during training (you don't need to make any changes to the training code)
|
||||
- installing [xFormers](../optimization/xformers) to enable memory-efficient attention
|
||||
@@ -89,7 +89,7 @@ Many of the basic and important parameters are described in the [Text-to-image](
|
||||
|
||||
As with the script parameters, a walkthrough of the training script is provided in the [Text-to-image](text2image#training-script) training guide. Instead, this guide takes a look at the T2I-Adapter relevant parts of the script.
|
||||
|
||||
The training script begins by preparing the dataset. This includes [tokenizing](https://github.com/huggingface/diffusers/blob/aab6de22c33cc01fb7bc81c0807d6109e2c998c9/examples/t2i_adapter/train_t2i_adapter_sdxl.py#L674) the prompt and [applying transforms](https://github.com/huggingface/diffusers/blob/aab6de22c33cc01fb7bc81c0807d6109e2c998c9/examples/t2i_adapter/train_t2i_adapter_sdxl.py#L714) to the images and conditioning images.
|
||||
The training script begins by preparing the dataset. This incudes [tokenizing](https://github.com/huggingface/diffusers/blob/aab6de22c33cc01fb7bc81c0807d6109e2c998c9/examples/t2i_adapter/train_t2i_adapter_sdxl.py#L674) the prompt and [applying transforms](https://github.com/huggingface/diffusers/blob/aab6de22c33cc01fb7bc81c0807d6109e2c998c9/examples/t2i_adapter/train_t2i_adapter_sdxl.py#L714) to the images and conditioning images.
|
||||
|
||||
```py
|
||||
conditioning_image_transforms = transforms.Compose(
|
||||
|
||||
322
docs/source/en/tutorials/fast_diffusion.md
Normal file
322
docs/source/en/tutorials/fast_diffusion.md
Normal file
@@ -0,0 +1,322 @@
|
||||
<!--Copyright 2024 The HuggingFace Team. All rights reserved.
|
||||
|
||||
Licensed under the Apache License, Version 2.0 (the "License"); you may not use this file except in compliance with
|
||||
the License. You may obtain a copy of the License at
|
||||
|
||||
http://www.apache.org/licenses/LICENSE-2.0
|
||||
|
||||
Unless required by applicable law or agreed to in writing, software distributed under the License is distributed on
|
||||
an "AS IS" BASIS, WITHOUT WARRANTIES OR CONDITIONS OF ANY KIND, either express or implied. See the License for the
|
||||
specific language governing permissions and limitations under the License.
|
||||
-->
|
||||
|
||||
# Accelerate inference of text-to-image diffusion models
|
||||
|
||||
Diffusion models are slower than their GAN counterparts because of the iterative and sequential reverse diffusion process. There are several techniques that can address this limitation such as progressive timestep distillation ([LCM LoRA](../using-diffusers/inference_with_lcm_lora)), model compression ([SSD-1B](https://huggingface.co/segmind/SSD-1B)), and reusing adjacent features of the denoiser ([DeepCache](../optimization/deepcache)).
|
||||
|
||||
However, you don't necessarily need to use these techniques to speed up inference. With PyTorch 2 alone, you can accelerate the inference latency of text-to-image diffusion pipelines by up to 3x. This tutorial will show you how to progressively apply the optimizations found in PyTorch 2 to reduce inference latency. You'll use the [Stable Diffusion XL (SDXL)](../using-diffusers/sdxl) pipeline in this tutorial, but these techniques are applicable to other text-to-image diffusion pipelines too.
|
||||
|
||||
Make sure you're using the latest version of Diffusers:
|
||||
|
||||
```bash
|
||||
pip install -U diffusers
|
||||
```
|
||||
|
||||
Then upgrade the other required libraries too:
|
||||
|
||||
```bash
|
||||
pip install -U transformers accelerate peft
|
||||
```
|
||||
|
||||
Install [PyTorch nightly](https://pytorch.org/) to benefit from the latest and fastest kernels:
|
||||
|
||||
```bash
|
||||
pip3 install --pre torch --index-url https://download.pytorch.org/whl/nightly/cu121
|
||||
```
|
||||
|
||||
> [!TIP]
|
||||
> The results reported below are from a 80GB 400W A100 with its clock rate set to the maximum.
|
||||
> If you're interested in the full benchmarking code, take a look at [huggingface/diffusion-fast](https://github.com/huggingface/diffusion-fast).
|
||||
|
||||
|
||||
## Baseline
|
||||
|
||||
Let's start with a baseline. Disable reduced precision and the [`scaled_dot_product_attention` (SDPA)](../optimization/torch2.0#scaled-dot-product-attention) function which is automatically used by Diffusers:
|
||||
|
||||
```python
|
||||
from diffusers import StableDiffusionXLPipeline
|
||||
|
||||
# Load the pipeline in full-precision and place its model components on CUDA.
|
||||
pipe = StableDiffusionXLPipeline.from_pretrained(
|
||||
"stabilityai/stable-diffusion-xl-base-1.0"
|
||||
).to("cuda")
|
||||
|
||||
# Run the attention ops without SDPA.
|
||||
pipe.unet.set_default_attn_processor()
|
||||
pipe.vae.set_default_attn_processor()
|
||||
|
||||
prompt = "Astronaut in a jungle, cold color palette, muted colors, detailed, 8k"
|
||||
image = pipe(prompt, num_inference_steps=30).images[0]
|
||||
```
|
||||
|
||||
This default setup takes 7.36 seconds.
|
||||
|
||||
<div class="flex justify-center">
|
||||
<img src="https://huggingface.co/datasets/sayakpaul/sample-datasets/resolve/main/progressive-acceleration-sdxl/SDXL%2C_Batch_Size%3A_1%2C_Steps%3A_30_0.png" width=500>
|
||||
</div>
|
||||
|
||||
## bfloat16
|
||||
|
||||
Enable the first optimization, reduced precision or more specifically bfloat16. There are several benefits of using reduced precision:
|
||||
|
||||
* Using a reduced numerical precision (such as float16 or bfloat16) for inference doesn’t affect the generation quality but significantly improves latency.
|
||||
* The benefits of using bfloat16 compared to float16 are hardware dependent, but modern GPUs tend to favor bfloat16.
|
||||
* bfloat16 is much more resilient when used with quantization compared to float16, but more recent versions of the quantization library ([torchao](https://github.com/pytorch-labs/ao)) we used don't have numerical issues with float16.
|
||||
|
||||
```python
|
||||
from diffusers import StableDiffusionXLPipeline
|
||||
import torch
|
||||
|
||||
pipe = StableDiffusionXLPipeline.from_pretrained(
|
||||
"stabilityai/stable-diffusion-xl-base-1.0", torch_dtype=torch.bfloat16
|
||||
).to("cuda")
|
||||
|
||||
# Run the attention ops without SDPA.
|
||||
pipe.unet.set_default_attn_processor()
|
||||
pipe.vae.set_default_attn_processor()
|
||||
|
||||
prompt = "Astronaut in a jungle, cold color palette, muted colors, detailed, 8k"
|
||||
image = pipe(prompt, num_inference_steps=30).images[0]
|
||||
```
|
||||
|
||||
bfloat16 reduces the latency from 7.36 seconds to 4.63 seconds.
|
||||
|
||||
<div class="flex justify-center">
|
||||
<img src="https://huggingface.co/datasets/sayakpaul/sample-datasets/resolve/main/progressive-acceleration-sdxl/SDXL%2C_Batch_Size%3A_1%2C_Steps%3A_30_1.png" width=500>
|
||||
</div>
|
||||
|
||||
<Tip>
|
||||
|
||||
In our later experiments with float16, recent versions of torchao do not incur numerical problems from float16.
|
||||
|
||||
</Tip>
|
||||
|
||||
Take a look at the [Speed up inference](../optimization/fp16) guide to learn more about running inference with reduced precision.
|
||||
|
||||
## SDPA
|
||||
|
||||
Attention blocks are intensive to run. But with PyTorch's [`scaled_dot_product_attention`](../optimization/torch2.0#scaled-dot-product-attention) function, it is a lot more efficient. This function is used by default in Diffusers so you don't need to make any changes to the code.
|
||||
|
||||
```python
|
||||
from diffusers import StableDiffusionXLPipeline
|
||||
import torch
|
||||
|
||||
pipe = StableDiffusionXLPipeline.from_pretrained(
|
||||
"stabilityai/stable-diffusion-xl-base-1.0", torch_dtype=torch.bfloat16
|
||||
).to("cuda")
|
||||
|
||||
prompt = "Astronaut in a jungle, cold color palette, muted colors, detailed, 8k"
|
||||
image = pipe(prompt, num_inference_steps=30).images[0]
|
||||
```
|
||||
|
||||
Scaled dot product attention improves the latency from 4.63 seconds to 3.31 seconds.
|
||||
|
||||
<div class="flex justify-center">
|
||||
<img src="https://huggingface.co/datasets/sayakpaul/sample-datasets/resolve/main/progressive-acceleration-sdxl/SDXL%2C_Batch_Size%3A_1%2C_Steps%3A_30_2.png" width=500>
|
||||
</div>
|
||||
|
||||
## torch.compile
|
||||
|
||||
PyTorch 2 includes `torch.compile` which uses fast and optimized kernels. In Diffusers, the UNet and VAE are usually compiled because these are the most compute-intensive modules. First, configure a few compiler flags (refer to the [full list](https://github.com/pytorch/pytorch/blob/main/torch/_inductor/config.py) for more options):
|
||||
|
||||
```python
|
||||
from diffusers import StableDiffusionXLPipeline
|
||||
import torch
|
||||
|
||||
torch._inductor.config.conv_1x1_as_mm = True
|
||||
torch._inductor.config.coordinate_descent_tuning = True
|
||||
torch._inductor.config.epilogue_fusion = False
|
||||
torch._inductor.config.coordinate_descent_check_all_directions = True
|
||||
```
|
||||
|
||||
It is also important to change the UNet and VAE's memory layout to "channels_last" when compiling them to ensure maximum speed.
|
||||
|
||||
```python
|
||||
pipe.unet.to(memory_format=torch.channels_last)
|
||||
pipe.vae.to(memory_format=torch.channels_last)
|
||||
```
|
||||
|
||||
Now compile and perform inference:
|
||||
|
||||
```python
|
||||
# Compile the UNet and VAE.
|
||||
pipe.unet = torch.compile(pipe.unet, mode="max-autotune", fullgraph=True)
|
||||
pipe.vae.decode = torch.compile(pipe.vae.decode, mode="max-autotune", fullgraph=True)
|
||||
|
||||
prompt = "Astronaut in a jungle, cold color palette, muted colors, detailed, 8k"
|
||||
|
||||
# First call to `pipe` is slow, subsequent ones are faster.
|
||||
image = pipe(prompt, num_inference_steps=30).images[0]
|
||||
```
|
||||
|
||||
`torch.compile` offers different backends and modes. For maximum inference speed, use "max-autotune" for the inductor backend. “max-autotune” uses CUDA graphs and optimizes the compilation graph specifically for latency. CUDA graphs greatly reduces the overhead of launching GPU operations by using a mechanism to launch multiple GPU operations through a single CPU operation.
|
||||
|
||||
Using SDPA attention and compiling both the UNet and VAE cuts the latency from 3.31 seconds to 2.54 seconds.
|
||||
|
||||
<div class="flex justify-center">
|
||||
<img src="https://huggingface.co/datasets/sayakpaul/sample-datasets/resolve/main/progressive-acceleration-sdxl/SDXL%2C_Batch_Size%3A_1%2C_Steps%3A_30_3.png" width=500>
|
||||
</div>
|
||||
|
||||
> [!TIP]
|
||||
> From PyTorch 2.3.1, you can control the caching behavior of `torch.compile()`. This is particularly beneficial for compilation modes like `"max-autotune"` which performs a grid-search over several compilation flags to find the optimal configuration. Learn more in the [Compile Time Caching in torch.compile](https://pytorch.org/tutorials/recipes/torch_compile_caching_tutorial.html) tutorial.
|
||||
|
||||
### Prevent graph breaks
|
||||
|
||||
Specifying `fullgraph=True` ensures there are no graph breaks in the underlying model to take full advantage of `torch.compile` without any performance degradation. For the UNet and VAE, this means changing how you access the return variables.
|
||||
|
||||
```diff
|
||||
- latents = unet(
|
||||
- latents, timestep=timestep, encoder_hidden_states=prompt_embeds
|
||||
-).sample
|
||||
|
||||
+ latents = unet(
|
||||
+ latents, timestep=timestep, encoder_hidden_states=prompt_embeds, return_dict=False
|
||||
+)[0]
|
||||
```
|
||||
|
||||
### Remove GPU sync after compilation
|
||||
|
||||
During the iterative reverse diffusion process, the `step()` function is [called](https://github.com/huggingface/diffusers/blob/1d686bac8146037e97f3fd8c56e4063230f71751/src/diffusers/pipelines/stable_diffusion_xl/pipeline_stable_diffusion_xl.py#L1228) on the scheduler each time after the denoiser predicts the less noisy latent embeddings. Inside `step()`, the `sigmas` variable is [indexed](https://github.com/huggingface/diffusers/blob/1d686bac8146037e97f3fd8c56e4063230f71751/src/diffusers/schedulers/scheduling_euler_discrete.py#L476) which when placed on the GPU, causes a communication sync between the CPU and GPU. This introduces latency and it becomes more evident when the denoiser has already been compiled.
|
||||
|
||||
But if the `sigmas` array always [stays on the CPU](https://github.com/huggingface/diffusers/blob/35a969d297cba69110d175ee79c59312b9f49e1e/src/diffusers/schedulers/scheduling_euler_discrete.py#L240), the CPU and GPU sync doesn’t occur and you don't get any latency. In general, any CPU and GPU communication sync should be none or be kept to a bare minimum because it can impact inference latency.
|
||||
|
||||
## Combine the attention block's projection matrices
|
||||
|
||||
The UNet and VAE in SDXL use Transformer-like blocks which consists of attention blocks and feed-forward blocks.
|
||||
|
||||
In an attention block, the input is projected into three sub-spaces using three different projection matrices – Q, K, and V. These projections are performed separately on the input. But we can horizontally combine the projection matrices into a single matrix and perform the projection in one step. This increases the size of the matrix multiplications of the input projections and improves the impact of quantization.
|
||||
|
||||
You can combine the projection matrices with just a single line of code:
|
||||
|
||||
```python
|
||||
pipe.fuse_qkv_projections()
|
||||
```
|
||||
|
||||
This provides a minor improvement from 2.54 seconds to 2.52 seconds.
|
||||
|
||||
<div class="flex justify-center">
|
||||
<img src="https://huggingface.co/datasets/sayakpaul/sample-datasets/resolve/main/progressive-acceleration-sdxl/SDXL%2C_Batch_Size%3A_1%2C_Steps%3A_30_4.png" width=500>
|
||||
</div>
|
||||
|
||||
<Tip warning={true}>
|
||||
|
||||
Support for [`~StableDiffusionXLPipeline.fuse_qkv_projections`] is limited and experimental. It's not available for many non-Stable Diffusion pipelines such as [Kandinsky](../using-diffusers/kandinsky). You can refer to this [PR](https://github.com/huggingface/diffusers/pull/6179) to get an idea about how to enable this for the other pipelines.
|
||||
|
||||
</Tip>
|
||||
|
||||
## Dynamic quantization
|
||||
|
||||
You can also use the ultra-lightweight PyTorch quantization library, [torchao](https://github.com/pytorch-labs/ao) (commit SHA `54bcd5a10d0abbe7b0c045052029257099f83fd9`), to apply [dynamic int8 quantization](https://pytorch.org/tutorials/recipes/recipes/dynamic_quantization.html) to the UNet and VAE. Quantization adds additional conversion overhead to the model that is hopefully made up for by faster matmuls (dynamic quantization). If the matmuls are too small, these techniques may degrade performance.
|
||||
|
||||
First, configure all the compiler tags:
|
||||
|
||||
```python
|
||||
from diffusers import StableDiffusionXLPipeline
|
||||
import torch
|
||||
|
||||
# Notice the two new flags at the end.
|
||||
torch._inductor.config.conv_1x1_as_mm = True
|
||||
torch._inductor.config.coordinate_descent_tuning = True
|
||||
torch._inductor.config.epilogue_fusion = False
|
||||
torch._inductor.config.coordinate_descent_check_all_directions = True
|
||||
torch._inductor.config.force_fuse_int_mm_with_mul = True
|
||||
torch._inductor.config.use_mixed_mm = True
|
||||
```
|
||||
|
||||
Certain linear layers in the UNet and VAE don’t benefit from dynamic int8 quantization. You can filter out those layers with the [`dynamic_quant_filter_fn`](https://github.com/huggingface/diffusion-fast/blob/0f169640b1db106fe6a479f78c1ed3bfaeba3386/utils/pipeline_utils.py#L16) shown below.
|
||||
|
||||
```python
|
||||
def dynamic_quant_filter_fn(mod, *args):
|
||||
return (
|
||||
isinstance(mod, torch.nn.Linear)
|
||||
and mod.in_features > 16
|
||||
and (mod.in_features, mod.out_features)
|
||||
not in [
|
||||
(1280, 640),
|
||||
(1920, 1280),
|
||||
(1920, 640),
|
||||
(2048, 1280),
|
||||
(2048, 2560),
|
||||
(2560, 1280),
|
||||
(256, 128),
|
||||
(2816, 1280),
|
||||
(320, 640),
|
||||
(512, 1536),
|
||||
(512, 256),
|
||||
(512, 512),
|
||||
(640, 1280),
|
||||
(640, 1920),
|
||||
(640, 320),
|
||||
(640, 5120),
|
||||
(640, 640),
|
||||
(960, 320),
|
||||
(960, 640),
|
||||
]
|
||||
)
|
||||
|
||||
|
||||
def conv_filter_fn(mod, *args):
|
||||
return (
|
||||
isinstance(mod, torch.nn.Conv2d) and mod.kernel_size == (1, 1) and 128 in [mod.in_channels, mod.out_channels]
|
||||
)
|
||||
```
|
||||
|
||||
Finally, apply all the optimizations discussed so far:
|
||||
|
||||
```python
|
||||
# SDPA + bfloat16.
|
||||
pipe = StableDiffusionXLPipeline.from_pretrained(
|
||||
"stabilityai/stable-diffusion-xl-base-1.0", torch_dtype=torch.bfloat16
|
||||
).to("cuda")
|
||||
|
||||
# Combine attention projection matrices.
|
||||
pipe.fuse_qkv_projections()
|
||||
|
||||
# Change the memory layout.
|
||||
pipe.unet.to(memory_format=torch.channels_last)
|
||||
pipe.vae.to(memory_format=torch.channels_last)
|
||||
```
|
||||
|
||||
Since dynamic quantization is only limited to the linear layers, convert the appropriate pointwise convolution layers into linear layers to maximize its benefit.
|
||||
|
||||
```python
|
||||
from torchao import swap_conv2d_1x1_to_linear
|
||||
|
||||
swap_conv2d_1x1_to_linear(pipe.unet, conv_filter_fn)
|
||||
swap_conv2d_1x1_to_linear(pipe.vae, conv_filter_fn)
|
||||
```
|
||||
|
||||
Apply dynamic quantization:
|
||||
|
||||
```python
|
||||
from torchao import apply_dynamic_quant
|
||||
|
||||
apply_dynamic_quant(pipe.unet, dynamic_quant_filter_fn)
|
||||
apply_dynamic_quant(pipe.vae, dynamic_quant_filter_fn)
|
||||
```
|
||||
|
||||
Finally, compile and perform inference:
|
||||
|
||||
```python
|
||||
pipe.unet = torch.compile(pipe.unet, mode="max-autotune", fullgraph=True)
|
||||
pipe.vae.decode = torch.compile(pipe.vae.decode, mode="max-autotune", fullgraph=True)
|
||||
|
||||
prompt = "Astronaut in a jungle, cold color palette, muted colors, detailed, 8k"
|
||||
image = pipe(prompt, num_inference_steps=30).images[0]
|
||||
```
|
||||
|
||||
Applying dynamic quantization improves the latency from 2.52 seconds to 2.43 seconds.
|
||||
|
||||
<div class="flex justify-center">
|
||||
<img src="https://huggingface.co/datasets/sayakpaul/sample-datasets/resolve/main/progressive-acceleration-sdxl/SDXL%2C_Batch_Size%3A_1%2C_Steps%3A_30_5.png" width=500>
|
||||
</div>
|
||||
139
docs/source/en/tutorials/inference_with_big_models.md
Normal file
139
docs/source/en/tutorials/inference_with_big_models.md
Normal file
@@ -0,0 +1,139 @@
|
||||
<!--Copyright 2024 The HuggingFace Team. All rights reserved.
|
||||
|
||||
Licensed under the Apache License, Version 2.0 (the "License"); you may not use this file except in compliance with
|
||||
the License. You may obtain a copy of the License at
|
||||
|
||||
http://www.apache.org/licenses/LICENSE-2.0
|
||||
|
||||
Unless required by applicable law or agreed to in writing, software distributed under the License is distributed on
|
||||
an "AS IS" BASIS, WITHOUT WARRANTIES OR CONDITIONS OF ANY KIND, either express or implied. See the License for the
|
||||
specific language governing permissions and limitations under the License.
|
||||
-->
|
||||
|
||||
# Working with big models
|
||||
|
||||
A modern diffusion model, like [Stable Diffusion XL (SDXL)](../using-diffusers/sdxl), is not just a single model, but a collection of multiple models. SDXL has four different model-level components:
|
||||
|
||||
* A variational autoencoder (VAE)
|
||||
* Two text encoders
|
||||
* A UNet for denoising
|
||||
|
||||
Usually, the text encoders and the denoiser are much larger compared to the VAE.
|
||||
|
||||
As models get bigger and better, it’s possible your model is so big that even a single copy won’t fit in memory. But that doesn’t mean it can’t be loaded. If you have more than one GPU, there is more memory available to store your model. In this case, it’s better to split your model checkpoint into several smaller *checkpoint shards*.
|
||||
|
||||
When a text encoder checkpoint has multiple shards, like [T5-xxl for SD3](https://huggingface.co/stabilityai/stable-diffusion-3-medium-diffusers/tree/main/text_encoder_3), it is automatically handled by the [Transformers](https://huggingface.co/docs/transformers/index) library as it is a required dependency of Diffusers when using the [`StableDiffusion3Pipeline`]. More specifically, Transformers will automatically handle the loading of multiple shards within the requested model class and get it ready so that inference can be performed.
|
||||
|
||||
The denoiser checkpoint can also have multiple shards and supports inference thanks to the [Accelerate](https://huggingface.co/docs/accelerate/index) library.
|
||||
|
||||
> [!TIP]
|
||||
> Refer to the [Handling big models for inference](https://huggingface.co/docs/accelerate/main/en/concept_guides/big_model_inference) guide for general guidance when working with big models that are hard to fit into memory.
|
||||
|
||||
For example, let's save a sharded checkpoint for the [SDXL UNet](https://huggingface.co/stabilityai/stable-diffusion-xl-base-1.0/tree/main/unet):
|
||||
|
||||
```python
|
||||
from diffusers import UNet2DConditionModel
|
||||
|
||||
unet = UNet2DConditionModel.from_pretrained(
|
||||
"stabilityai/stable-diffusion-xl-base-1.0", subfolder="unet"
|
||||
)
|
||||
unet.save_pretrained("sdxl-unet-sharded", max_shard_size="5GB")
|
||||
```
|
||||
|
||||
The size of the fp32 variant of the SDXL UNet checkpoint is ~10.4GB. Set the `max_shard_size` parameter to 5GB to create 3 shards. After saving, you can load them in [`StableDiffusionXLPipeline`]:
|
||||
|
||||
```python
|
||||
from diffusers import UNet2DConditionModel, StableDiffusionXLPipeline
|
||||
import torch
|
||||
|
||||
unet = UNet2DConditionModel.from_pretrained(
|
||||
"sayakpaul/sdxl-unet-sharded", torch_dtype=torch.float16
|
||||
)
|
||||
pipeline = StableDiffusionXLPipeline.from_pretrained(
|
||||
"stabilityai/stable-diffusion-xl-base-1.0", unet=unet, torch_dtype=torch.float16
|
||||
).to("cuda")
|
||||
|
||||
image = pipeline("a cute dog running on the grass", num_inference_steps=30).images[0]
|
||||
image.save("dog.png")
|
||||
```
|
||||
|
||||
If placing all the model-level components on the GPU at once is not feasible, use [`~DiffusionPipeline.enable_model_cpu_offload`] to help you:
|
||||
|
||||
```diff
|
||||
- pipeline.to("cuda")
|
||||
+ pipeline.enable_model_cpu_offload()
|
||||
```
|
||||
|
||||
In general, we recommend sharding when a checkpoint is more than 5GB (in fp32).
|
||||
|
||||
## Device placement
|
||||
|
||||
On distributed setups, you can run inference across multiple GPUs with Accelerate.
|
||||
|
||||
> [!WARNING]
|
||||
> This feature is experimental and its APIs might change in the future.
|
||||
|
||||
With Accelerate, you can use the `device_map` to determine how to distribute the models of a pipeline across multiple devices. This is useful in situations where you have more than one GPU.
|
||||
|
||||
For example, if you have two 8GB GPUs, then using [`~DiffusionPipeline.enable_model_cpu_offload`] may not work so well because:
|
||||
|
||||
* it only works on a single GPU
|
||||
* a single model might not fit on a single GPU ([`~DiffusionPipeline.enable_sequential_cpu_offload`] might work but it will be extremely slow and it is also limited to a single GPU)
|
||||
|
||||
To make use of both GPUs, you can use the "balanced" device placement strategy which splits the models across all available GPUs.
|
||||
|
||||
> [!WARNING]
|
||||
> Only the "balanced" strategy is supported at the moment, and we plan to support additional mapping strategies in the future.
|
||||
|
||||
```diff
|
||||
from diffusers import DiffusionPipeline
|
||||
import torch
|
||||
|
||||
pipeline = DiffusionPipeline.from_pretrained(
|
||||
- "stable-diffusion-v1-5/stable-diffusion-v1-5", torch_dtype=torch.float16, use_safetensors=True,
|
||||
+ "stable-diffusion-v1-5/stable-diffusion-v1-5", torch_dtype=torch.float16, use_safetensors=True, device_map="balanced"
|
||||
)
|
||||
image = pipeline("a dog").images[0]
|
||||
image
|
||||
```
|
||||
|
||||
You can also pass a dictionary to enforce the maximum GPU memory that can be used on each device:
|
||||
|
||||
```diff
|
||||
from diffusers import DiffusionPipeline
|
||||
import torch
|
||||
|
||||
max_memory = {0:"1GB", 1:"1GB"}
|
||||
pipeline = DiffusionPipeline.from_pretrained(
|
||||
"stable-diffusion-v1-5/stable-diffusion-v1-5",
|
||||
torch_dtype=torch.float16,
|
||||
use_safetensors=True,
|
||||
device_map="balanced",
|
||||
+ max_memory=max_memory
|
||||
)
|
||||
image = pipeline("a dog").images[0]
|
||||
image
|
||||
```
|
||||
|
||||
If a device is not present in `max_memory`, then it will be completely ignored and will not participate in the device placement.
|
||||
|
||||
By default, Diffusers uses the maximum memory of all devices. If the models don't fit on the GPUs, they are offloaded to the CPU. If the CPU doesn't have enough memory, then you might see an error. In that case, you could defer to using [`~DiffusionPipeline.enable_sequential_cpu_offload`] and [`~DiffusionPipeline.enable_model_cpu_offload`].
|
||||
|
||||
Call [`~DiffusionPipeline.reset_device_map`] to reset the `device_map` of a pipeline. This is also necessary if you want to use methods like `to()`, [`~DiffusionPipeline.enable_sequential_cpu_offload`], and [`~DiffusionPipeline.enable_model_cpu_offload`] on a pipeline that was device-mapped.
|
||||
|
||||
```py
|
||||
pipeline.reset_device_map()
|
||||
```
|
||||
|
||||
Once a pipeline has been device-mapped, you can also access its device map via `hf_device_map`:
|
||||
|
||||
```py
|
||||
print(pipeline.hf_device_map)
|
||||
```
|
||||
|
||||
An example device map would look like so:
|
||||
|
||||
|
||||
```bash
|
||||
{'unet': 1, 'vae': 1, 'safety_checker': 0, 'text_encoder': 0}
|
||||
```
|
||||
@@ -10,625 +10,218 @@ an "AS IS" BASIS, WITHOUT WARRANTIES OR CONDITIONS OF ANY KIND, either express o
|
||||
specific language governing permissions and limitations under the License.
|
||||
-->
|
||||
|
||||
# LoRA
|
||||
[[open-in-colab]]
|
||||
|
||||
[LoRA (Low-Rank Adaptation)](https://huggingface.co/papers/2106.09685) is a method for quickly training a model for a new task. It works by freezing the original model weights and adding a small number of *new* trainable parameters. This means it is significantly faster and cheaper to adapt an existing model to new tasks, such as generating images in a new style.
|
||||
# Load LoRAs for inference
|
||||
|
||||
LoRA checkpoints are typically only a couple hundred MBs in size, so they're very lightweight and easy to store. Load these smaller set of weights into an existing base model with [`~loaders.StableDiffusionLoraLoaderMixin.load_lora_weights`] and specify the file name.
|
||||
There are many adapter types (with [LoRAs](https://huggingface.co/docs/peft/conceptual_guides/adapter#low-rank-adaptation-lora) being the most popular) trained in different styles to achieve different effects. You can even combine multiple adapters to create new and unique images.
|
||||
|
||||
<hfoptions id="usage">
|
||||
<hfoption id="text-to-image">
|
||||
In this tutorial, you'll learn how to easily load and manage adapters for inference with the 🤗 [PEFT](https://huggingface.co/docs/peft/index) integration in 🤗 Diffusers. You'll use LoRA as the main adapter technique, so you'll see the terms LoRA and adapter used interchangeably.
|
||||
|
||||
```py
|
||||
import torch
|
||||
from diffusers import AutoPipelineForText2Image
|
||||
Let's first install all the required libraries.
|
||||
|
||||
pipeline = AutoPipelineForText2Image.from_pretrained(
|
||||
"stabilityai/stable-diffusion-xl-base-1.0",
|
||||
torch_dtype=torch.float16
|
||||
).to("cuda")
|
||||
pipeline.load_lora_weights(
|
||||
"ostris/super-cereal-sdxl-lora",
|
||||
weight_name="cereal_box_sdxl_v1.safetensors",
|
||||
adapter_name="cereal"
|
||||
)
|
||||
pipeline("bears, pizza bites").images[0]
|
||||
```bash
|
||||
!pip install -q transformers accelerate peft diffusers
|
||||
```
|
||||
|
||||
</hfoption>
|
||||
<hfoption id="text-to-video">
|
||||
Now, load a pipeline with a [Stable Diffusion XL (SDXL)](../api/pipelines/stable_diffusion/stable_diffusion_xl) checkpoint:
|
||||
|
||||
```py
|
||||
import torch
|
||||
from diffusers import LTXConditionPipeline
|
||||
from diffusers.utils import export_to_video, load_image
|
||||
|
||||
pipeline = LTXConditionPipeline.from_pretrained(
|
||||
"Lightricks/LTX-Video-0.9.5", torch_dtype=torch.bfloat16
|
||||
)
|
||||
|
||||
pipeline.load_lora_weights(
|
||||
"Lightricks/LTX-Video-Cakeify-LoRA",
|
||||
weight_name="ltxv_095_cakeify_lora.safetensors",
|
||||
adapter_name="cakeify"
|
||||
)
|
||||
pipeline.set_adapters("cakeify")
|
||||
|
||||
# use "CAKEIFY" to trigger the LoRA
|
||||
prompt = "CAKEIFY a person using a knife to cut a cake shaped like a Pikachu plushie"
|
||||
image = load_image("https://huggingface.co/Lightricks/LTX-Video-Cakeify-LoRA/resolve/main/assets/images/pikachu.png")
|
||||
|
||||
video = pipeline(
|
||||
prompt=prompt,
|
||||
image=image,
|
||||
width=576,
|
||||
height=576,
|
||||
num_frames=161,
|
||||
decode_timestep=0.03,
|
||||
decode_noise_scale=0.025,
|
||||
num_inference_steps=50,
|
||||
).frames[0]
|
||||
export_to_video(video, "output.mp4", fps=26)
|
||||
```
|
||||
|
||||
</hfoption>
|
||||
</hfoptions>
|
||||
|
||||
The [`~loaders.StableDiffusionLoraLoaderMixin.load_lora_weights`] method is the preferred way to load LoRA weights into the UNet and text encoder because it can handle cases where:
|
||||
|
||||
- the LoRA weights don't have separate UNet and text encoder identifiers
|
||||
- the LoRA weights have separate UNet and text encoder identifiers
|
||||
|
||||
The [`~loaders.PeftAdapterMixin.load_lora_adapter`] method is used to directly load a LoRA adapter at the *model-level*, as long as the model is a Diffusers model that is a subclass of [`PeftAdapterMixin`]. It builds and prepares the necessary model configuration for the adapter. This method also loads the LoRA adapter into the UNet.
|
||||
|
||||
For example, if you're only loading a LoRA into the UNet, [`~loaders.PeftAdapterMixin.load_lora_adapter`] ignores the text encoder keys. Use the `prefix` parameter to filter and load the appropriate state dicts, `"unet"` to load.
|
||||
|
||||
```py
|
||||
import torch
|
||||
from diffusers import AutoPipelineForText2Image
|
||||
|
||||
pipeline = AutoPipelineForText2Image.from_pretrained(
|
||||
"stabilityai/stable-diffusion-xl-base-1.0",
|
||||
torch_dtype=torch.float16
|
||||
).to("cuda")
|
||||
pipeline.unet.load_lora_adapter(
|
||||
"jbilcke-hf/sdxl-cinematic-1",
|
||||
weight_name="pytorch_lora_weights.safetensors",
|
||||
adapter_name="cinematic"
|
||||
prefix="unet"
|
||||
)
|
||||
# use cnmt in the prompt to trigger the LoRA
|
||||
pipeline("A cute cnmt eating a slice of pizza, stunning color scheme, masterpiece, illustration").images[0]
|
||||
```
|
||||
|
||||
## torch.compile
|
||||
|
||||
[torch.compile](../optimization/fp16#torchcompile) speeds up inference by compiling the PyTorch model to use optimized kernels. Before compiling, the LoRA weights need to be fused into the base model and unloaded first.
|
||||
|
||||
```py
|
||||
import torch
|
||||
```python
|
||||
from diffusers import DiffusionPipeline
|
||||
|
||||
# load base model and LoRA
|
||||
pipeline = DiffusionPipeline.from_pretrained(
|
||||
"stabilityai/stable-diffusion-xl-base-1.0",
|
||||
torch_dtype=torch.float16
|
||||
).to("cuda")
|
||||
pipeline.load_lora_weights(
|
||||
"ostris/ikea-instructions-lora-sdxl",
|
||||
weight_name="ikea_instructions_xl_v1_5.safetensors",
|
||||
adapter_name="ikea"
|
||||
)
|
||||
|
||||
# activate LoRA and set adapter weight
|
||||
pipeline.set_adapters("ikea", adapter_weights=0.7)
|
||||
|
||||
# fuse LoRAs and unload weights
|
||||
pipeline.fuse_lora(adapter_names=["ikea"], lora_scale=1.0)
|
||||
pipeline.unload_lora_weights()
|
||||
```
|
||||
|
||||
Typically, the UNet is compiled because its the most compute intensive component of the pipeline.
|
||||
|
||||
```py
|
||||
pipeline.unet.to(memory_format=torch.channels_last)
|
||||
pipeline.unet = torch.compile(pipeline.unet, mode="reduce-overhead", fullgraph=True)
|
||||
|
||||
pipeline("A bowl of ramen shaped like a cute kawaii bear").images[0]
|
||||
```
|
||||
|
||||
Refer to the [hotswapping](#hotswapping) section to learn how to avoid recompilation when working with compiled models and multiple LoRAs.
|
||||
|
||||
## Weight scale
|
||||
|
||||
The `scale` parameter is used to control how much of a LoRA to apply. A value of `0` is equivalent to only using the base model weights and a value of `1` is equivalent to fully using the LoRA.
|
||||
|
||||
<hfoptions id="weight-scale">
|
||||
<hfoption id="simple use case">
|
||||
|
||||
For simple use cases, you can pass `cross_attention_kwargs={"scale": 1.0}` to the pipeline.
|
||||
|
||||
```py
|
||||
import torch
|
||||
from diffusers import AutoPipelineForText2Image
|
||||
|
||||
pipeline = AutoPipelineForText2Image.from_pretrained(
|
||||
"stabilityai/stable-diffusion-xl-base-1.0",
|
||||
torch_dtype=torch.float16
|
||||
).to("cuda")
|
||||
pipeline.load_lora_weights(
|
||||
"ostris/super-cereal-sdxl-lora",
|
||||
weight_name="cereal_box_sdxl_v1.safetensors",
|
||||
adapter_name="cereal"
|
||||
)
|
||||
pipeline("bears, pizza bites", cross_attention_kwargs={"scale": 1.0}).images[0]
|
||||
pipe_id = "stabilityai/stable-diffusion-xl-base-1.0"
|
||||
pipe = DiffusionPipeline.from_pretrained(pipe_id, torch_dtype=torch.float16).to("cuda")
|
||||
```
|
||||
|
||||
</hfoption>
|
||||
<hfoption id="finer control">
|
||||
Next, load a [CiroN2022/toy-face](https://huggingface.co/CiroN2022/toy-face) adapter with the [`~diffusers.loaders.StableDiffusionXLLoraLoaderMixin.load_lora_weights`] method. With the 🤗 PEFT integration, you can assign a specific `adapter_name` to the checkpoint, which lets you easily switch between different LoRA checkpoints. Let's call this adapter `"toy"`.
|
||||
|
||||
> [!WARNING]
|
||||
> The [`~loaders.PeftAdapterMixin.set_adapters`] method only scales attention weights. If a LoRA has ResNets or down and upsamplers, these components keep a scale value of `1.0`.
|
||||
```python
|
||||
pipe.load_lora_weights("CiroN2022/toy-face", weight_name="toy_face_sdxl.safetensors", adapter_name="toy")
|
||||
```
|
||||
|
||||
For finer control over each individual component of the UNet or text encoder, pass a dictionary instead. In the example below, the `"down"` block in the UNet is scaled by 0.9 and you can further specify in the `"up"` block the scales of the transformers in `"block_0"` and `"block_1"`. If a block like `"mid"` isn't specified, the default value `1.0` is used.
|
||||
Make sure to include the token `toy_face` in the prompt and then you can perform inference:
|
||||
|
||||
```py
|
||||
import torch
|
||||
from diffusers import AutoPipelineForText2Image
|
||||
```python
|
||||
prompt = "toy_face of a hacker with a hoodie"
|
||||
|
||||
pipeline = AutoPipelineForText2Image.from_pretrained(
|
||||
"stabilityai/stable-diffusion-xl-base-1.0",
|
||||
torch_dtype=torch.float16
|
||||
).to("cuda")
|
||||
pipeline.load_lora_weights(
|
||||
"ostris/super-cereal-sdxl-lora",
|
||||
weight_name="cereal_box_sdxl_v1.safetensors",
|
||||
adapter_name="cereal"
|
||||
)
|
||||
scales = {
|
||||
"text_encoder": 0.5,
|
||||
"text_encoder_2": 0.5,
|
||||
lora_scale = 0.9
|
||||
image = pipe(
|
||||
prompt, num_inference_steps=30, cross_attention_kwargs={"scale": lora_scale}, generator=torch.manual_seed(0)
|
||||
).images[0]
|
||||
image
|
||||
```
|
||||
|
||||

|
||||
|
||||
With the `adapter_name` parameter, it is really easy to use another adapter for inference! Load the [nerijs/pixel-art-xl](https://huggingface.co/nerijs/pixel-art-xl) adapter that has been fine-tuned to generate pixel art images and call it `"pixel"`.
|
||||
|
||||
The pipeline automatically sets the first loaded adapter (`"toy"`) as the active adapter, but you can activate the `"pixel"` adapter with the [`~loaders.peft.PeftAdapterMixin.set_adapters`] method:
|
||||
|
||||
```python
|
||||
pipe.load_lora_weights("nerijs/pixel-art-xl", weight_name="pixel-art-xl.safetensors", adapter_name="pixel")
|
||||
pipe.set_adapters("pixel")
|
||||
```
|
||||
|
||||
Make sure you include the token `pixel art` in your prompt to generate a pixel art image:
|
||||
|
||||
```python
|
||||
prompt = "a hacker with a hoodie, pixel art"
|
||||
image = pipe(
|
||||
prompt, num_inference_steps=30, cross_attention_kwargs={"scale": lora_scale}, generator=torch.manual_seed(0)
|
||||
).images[0]
|
||||
image
|
||||
```
|
||||
|
||||
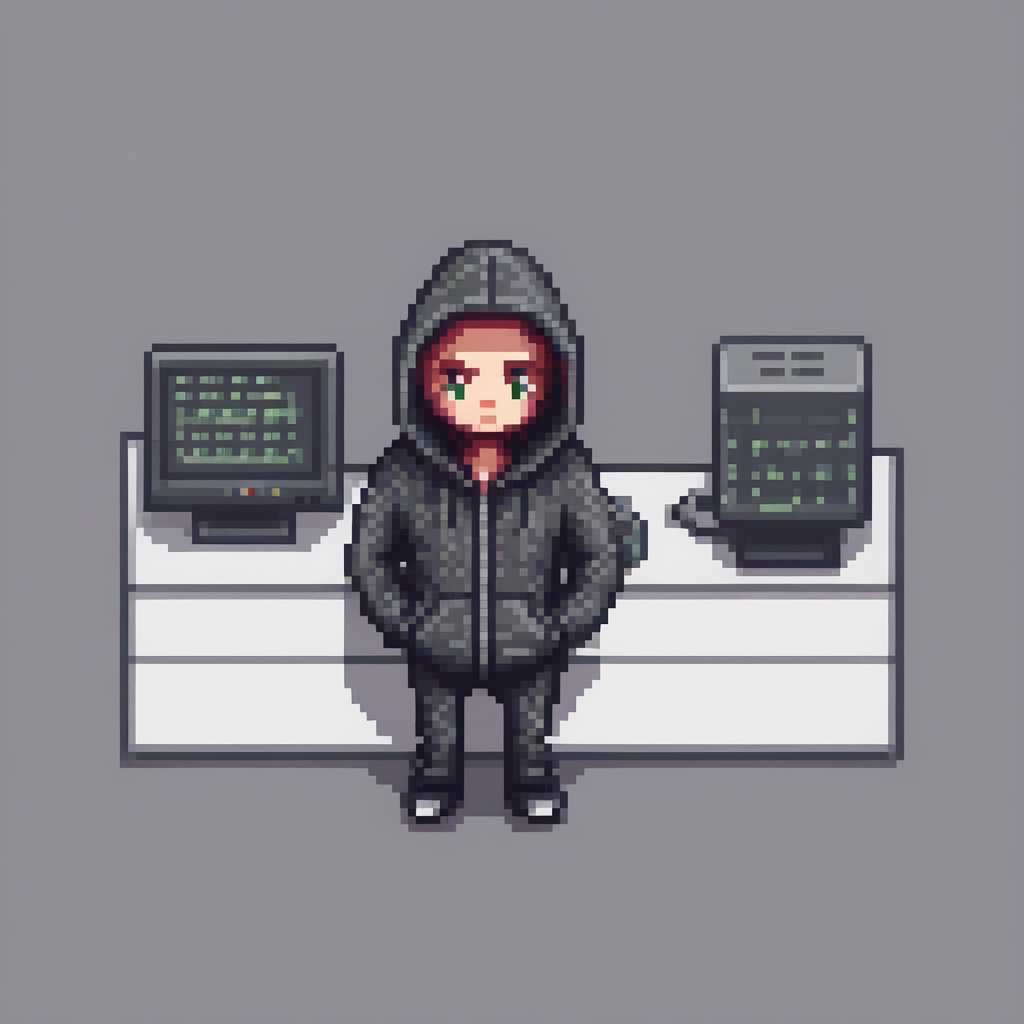
|
||||
|
||||
<Tip>
|
||||
|
||||
By default, if the most up-to-date versions of PEFT and Transformers are detected, `low_cpu_mem_usage` is set to `True` to speed up the loading time of LoRA checkpoints.
|
||||
|
||||
</Tip>
|
||||
|
||||
## Merge adapters
|
||||
|
||||
You can also merge different adapter checkpoints for inference to blend their styles together.
|
||||
|
||||
Once again, use the [`~loaders.peft.PeftAdapterMixin.set_adapters`] method to activate the `pixel` and `toy` adapters and specify the weights for how they should be merged.
|
||||
|
||||
```python
|
||||
pipe.set_adapters(["pixel", "toy"], adapter_weights=[0.5, 1.0])
|
||||
```
|
||||
|
||||
<Tip>
|
||||
|
||||
LoRA checkpoints in the diffusion community are almost always obtained with [DreamBooth](https://huggingface.co/docs/diffusers/main/en/training/dreambooth). DreamBooth training often relies on "trigger" words in the input text prompts in order for the generation results to look as expected. When you combine multiple LoRA checkpoints, it's important to ensure the trigger words for the corresponding LoRA checkpoints are present in the input text prompts.
|
||||
|
||||
</Tip>
|
||||
|
||||
Remember to use the trigger words for [CiroN2022/toy-face](https://hf.co/CiroN2022/toy-face) and [nerijs/pixel-art-xl](https://hf.co/nerijs/pixel-art-xl) (these are found in their repositories) in the prompt to generate an image.
|
||||
|
||||
```python
|
||||
prompt = "toy_face of a hacker with a hoodie, pixel art"
|
||||
image = pipe(
|
||||
prompt, num_inference_steps=30, cross_attention_kwargs={"scale": 1.0}, generator=torch.manual_seed(0)
|
||||
).images[0]
|
||||
image
|
||||
```
|
||||
|
||||

|
||||
|
||||
Impressive! As you can see, the model generated an image that mixed the characteristics of both adapters.
|
||||
|
||||
> [!TIP]
|
||||
> Through its PEFT integration, Diffusers also offers more efficient merging methods which you can learn about in the [Merge LoRAs](../using-diffusers/merge_loras) guide!
|
||||
|
||||
To return to only using one adapter, use the [`~loaders.peft.PeftAdapterMixin.set_adapters`] method to activate the `"toy"` adapter:
|
||||
|
||||
```python
|
||||
pipe.set_adapters("toy")
|
||||
|
||||
prompt = "toy_face of a hacker with a hoodie"
|
||||
lora_scale = 0.9
|
||||
image = pipe(
|
||||
prompt, num_inference_steps=30, cross_attention_kwargs={"scale": lora_scale}, generator=torch.manual_seed(0)
|
||||
).images[0]
|
||||
image
|
||||
```
|
||||
|
||||
Or to disable all adapters entirely, use the [`~loaders.peft.PeftAdapterMixin.disable_lora`] method to return the base model.
|
||||
|
||||
```python
|
||||
pipe.disable_lora()
|
||||
|
||||
prompt = "toy_face of a hacker with a hoodie"
|
||||
image = pipe(prompt, num_inference_steps=30, generator=torch.manual_seed(0)).images[0]
|
||||
image
|
||||
```
|
||||
|
||||

|
||||
|
||||
### Customize adapters strength
|
||||
|
||||
For even more customization, you can control how strongly the adapter affects each part of the pipeline. For this, pass a dictionary with the control strengths (called "scales") to [`~loaders.peft.PeftAdapterMixin.set_adapters`].
|
||||
|
||||
For example, here's how you can turn on the adapter for the `down` parts, but turn it off for the `mid` and `up` parts:
|
||||
```python
|
||||
pipe.enable_lora() # enable lora again, after we disabled it above
|
||||
prompt = "toy_face of a hacker with a hoodie, pixel art"
|
||||
adapter_weight_scales = { "unet": { "down": 1, "mid": 0, "up": 0} }
|
||||
pipe.set_adapters("pixel", adapter_weight_scales)
|
||||
image = pipe(prompt, num_inference_steps=30, generator=torch.manual_seed(0)).images[0]
|
||||
image
|
||||
```
|
||||
|
||||
|
||||
|
||||
Let's see how turning off the `down` part and turning on the `mid` and `up` part respectively changes the image.
|
||||
```python
|
||||
adapter_weight_scales = { "unet": { "down": 0, "mid": 1, "up": 0} }
|
||||
pipe.set_adapters("pixel", adapter_weight_scales)
|
||||
image = pipe(prompt, num_inference_steps=30, generator=torch.manual_seed(0)).images[0]
|
||||
image
|
||||
```
|
||||
|
||||
|
||||
|
||||
```python
|
||||
adapter_weight_scales = { "unet": { "down": 0, "mid": 0, "up": 1} }
|
||||
pipe.set_adapters("pixel", adapter_weight_scales)
|
||||
image = pipe(prompt, num_inference_steps=30, generator=torch.manual_seed(0)).images[0]
|
||||
image
|
||||
```
|
||||
|
||||
|
||||
|
||||
Looks cool!
|
||||
|
||||
This is a really powerful feature. You can use it to control the adapter strengths down to per-transformer level. And you can even use it for multiple adapters.
|
||||
```python
|
||||
adapter_weight_scales_toy = 0.5
|
||||
adapter_weight_scales_pixel = {
|
||||
"unet": {
|
||||
"down": 0.9,
|
||||
"down": 0.9, # all transformers in the down-part will use scale 0.9
|
||||
# "mid" # because, in this example, "mid" is not given, all transformers in the mid part will use the default scale 1.0
|
||||
"up": {
|
||||
"block_0": 0.6,
|
||||
"block_1": [0.4, 0.8, 1.0],
|
||||
"block_0": 0.6, # all 3 transformers in the 0th block in the up-part will use scale 0.6
|
||||
"block_1": [0.4, 0.8, 1.0], # the 3 transformers in the 1st block in the up-part will use scales 0.4, 0.8 and 1.0 respectively
|
||||
}
|
||||
}
|
||||
}
|
||||
pipeline.set_adapters("cereal", scales)
|
||||
pipeline("bears, pizza bites").images[0]
|
||||
pipe.set_adapters(["toy", "pixel"], [adapter_weight_scales_toy, adapter_weight_scales_pixel])
|
||||
image = pipe(prompt, num_inference_steps=30, generator=torch.manual_seed(0)).images[0]
|
||||
image
|
||||
```
|
||||
|
||||
</hfoption>
|
||||
</hfoptions>
|
||||

|
||||
|
||||
## Hotswapping
|
||||
## Manage adapters
|
||||
|
||||
Hotswapping LoRAs is an efficient way to work with multiple LoRAs while avoiding accumulating memory from multiple calls to [`~loaders.StableDiffusionLoraLoaderMixin.load_lora_weights`] and in some cases, recompilation, if a model is compiled. This workflow requires a loaded LoRA because the new LoRA weights are swapped in place for the existing loaded LoRA.
|
||||
You have attached multiple adapters in this tutorial, and if you're feeling a bit lost on what adapters have been attached to the pipeline's components, use the [`~diffusers.loaders.StableDiffusionLoraLoaderMixin.get_active_adapters`] method to check the list of active adapters:
|
||||
|
||||
```py
|
||||
import torch
|
||||
from diffusers import DiffusionPipeline
|
||||
|
||||
# load base model and LoRAs
|
||||
pipeline = DiffusionPipeline.from_pretrained(
|
||||
"stabilityai/stable-diffusion-xl-base-1.0",
|
||||
torch_dtype=torch.float16
|
||||
).to("cuda")
|
||||
pipeline.load_lora_weights(
|
||||
"ostris/ikea-instructions-lora-sdxl",
|
||||
weight_name="ikea_instructions_xl_v1_5.safetensors",
|
||||
adapter_name="ikea"
|
||||
)
|
||||
active_adapters = pipe.get_active_adapters()
|
||||
active_adapters
|
||||
["toy", "pixel"]
|
||||
```
|
||||
|
||||
> [!WARNING]
|
||||
> Hotswapping is unsupported for LoRAs that target the text encoder.
|
||||
|
||||
Set `hotswap=True` in [`~loaders.StableDiffusionLoraLoaderMixin.load_lora_weights`] to swap the second LoRA. Use the `adapter_name` parameter to indicate which LoRA to swap (`default_0` is the default name).
|
||||
You can also get the active adapters of each pipeline component with [`~diffusers.loaders.StableDiffusionLoraLoaderMixin.get_list_adapters`]:
|
||||
|
||||
```py
|
||||
pipeline.load_lora_weights(
|
||||
"lordjia/by-feng-zikai",
|
||||
hotswap=True,
|
||||
adapter_name="ikea"
|
||||
)
|
||||
list_adapters_component_wise = pipe.get_list_adapters()
|
||||
list_adapters_component_wise
|
||||
{"text_encoder": ["toy", "pixel"], "unet": ["toy", "pixel"], "text_encoder_2": ["toy", "pixel"]}
|
||||
```
|
||||
|
||||
### Compiled models
|
||||
|
||||
For compiled models, use [`~loaders.lora_base.LoraBaseMixin.enable_lora_hotswap`] to avoid recompilation when hotswapping LoRAs. This method should be called *before* loading the first LoRA and `torch.compile` should be called *after* loading the first LoRA.
|
||||
|
||||
> [!TIP]
|
||||
> The [`~loaders.lora_base.LoraBaseMixin.enable_lora_hotswap`] method isn't always necessary if the second LoRA targets the identical LoRA ranks and scales as the first LoRA.
|
||||
|
||||
Within [`~loaders.lora_base.LoraBaseMixin.enable_lora_hotswap`], the `target_rank` parameter is important for setting the rank for all LoRA adapters. Setting it to `max_rank` sets it to the highest value. For LoRAs with different ranks, you set it to a higher rank value. The default rank value is 128.
|
||||
The [`~loaders.peft.PeftAdapterMixin.delete_adapters`] function completely removes an adapter and their LoRA layers from a model.
|
||||
|
||||
```py
|
||||
import torch
|
||||
from diffusers import DiffusionPipeline
|
||||
|
||||
# load base model and LoRAs
|
||||
pipeline = DiffusionPipeline.from_pretrained(
|
||||
"stabilityai/stable-diffusion-xl-base-1.0",
|
||||
torch_dtype=torch.float16
|
||||
).to("cuda")
|
||||
# 1. enable_lora_hotswap
|
||||
pipeline.enable_lora_hotswap(target_rank=max_rank)
|
||||
pipeline.load_lora_weights(
|
||||
"ostris/ikea-instructions-lora-sdxl",
|
||||
weight_name="ikea_instructions_xl_v1_5.safetensors",
|
||||
adapter_name="ikea"
|
||||
)
|
||||
# 2. torch.compile
|
||||
pipeline.unet = torch.compile(pipeline.unet, mode="reduce-overhead", fullgraph=True)
|
||||
|
||||
# 3. hotswap
|
||||
pipeline.load_lora_weights(
|
||||
"lordjia/by-feng-zikai",
|
||||
hotswap=True,
|
||||
adapter_name="ikea"
|
||||
)
|
||||
pipe.delete_adapters("toy")
|
||||
pipe.get_active_adapters()
|
||||
["pixel"]
|
||||
```
|
||||
|
||||
> [!TIP]
|
||||
> Move your code inside the `with torch._dynamo.config.patch(error_on_recompile=True)` context manager to detect if a model was recompiled. If a model is recompiled despite following all the steps above, please open an [issue](https://github.com/huggingface/diffusers/issues) with a reproducible example.
|
||||
## PeftInputAutocastDisableHook
|
||||
|
||||
There are still scenarios where recompulation is unavoidable, such as when the hotswapped LoRA targets more layers than the initial adapter. Try to load the LoRA that targets the most layers *first*. For more details about this limitation, refer to the PEFT [hotswapping](https://huggingface.co/docs/peft/main/en/package_reference/hotswap#peft.utils.hotswap.hotswap_adapter) docs.
|
||||
|
||||
## Merge
|
||||
|
||||
The weights from each LoRA can be merged together to produce a blend of multiple existing styles. There are several methods for merging LoRAs, each of which differ in *how* the weights are merged (may affect generation quality).
|
||||
|
||||
### set_adapters
|
||||
|
||||
The [`~loaders.PeftAdapterMixin.set_adapters`] method merges LoRAs by concatenating their weighted matrices. Pass the LoRA names to [`~loaders.PeftAdapterMixin.set_adapters`] and use the `adapter_weights` parameter to control the scaling of each LoRA. For example, if `adapter_weights=[0.5, 0.5]`, the output is an average of both LoRAs.
|
||||
|
||||
> [!TIP]
|
||||
> The `"scale"` parameter determines how much of the merged LoRA to apply. See the [Weight scale](#weight-scale) section for more details.
|
||||
|
||||
```py
|
||||
import torch
|
||||
from diffusers import DiffusionPipeline
|
||||
|
||||
pipeline = DiffusionPipeline.from_pretrained(
|
||||
"stabilityai/stable-diffusion-xl-base-1.0",
|
||||
torch_dtype=torch.float16
|
||||
).to("cuda")
|
||||
pipeline.load_lora_weights(
|
||||
"ostris/ikea-instructions-lora-sdxl",
|
||||
weight_name="ikea_instructions_xl_v1_5.safetensors",
|
||||
adapter_name="ikea"
|
||||
)
|
||||
pipeline.load_lora_weights(
|
||||
"lordjia/by-feng-zikai",
|
||||
weight_name="fengzikai_v1.0_XL.safetensors",
|
||||
adapter_name="feng"
|
||||
)
|
||||
pipeline.set_adapters(["ikea", "feng"], adapter_weights=[0.7, 0.8])
|
||||
# use by Feng Zikai to activate the lordjia/by-feng-zikai LoRA
|
||||
pipeline("A bowl of ramen shaped like a cute kawaii bear, by Feng Zikai", cross_attention_kwargs={"scale": 1.0}).images[0]
|
||||
```
|
||||
|
||||
<div class="flex justify-center">
|
||||
<img src="https://huggingface.co/datasets/huggingface/documentation-images/resolve/main/diffusers/lora_merge_set_adapters.png"/>
|
||||
</div>
|
||||
|
||||
### add_weighted_adapter
|
||||
|
||||
> [!TIP]
|
||||
> This is an experimental method and you can refer to PEFTs [Model merging](https://huggingface.co/docs/peft/developer_guides/model_merging) for more details. Take a look at this [issue](https://github.com/huggingface/diffusers/issues/6892) if you're interested in the motivation and design behind this integration.
|
||||
|
||||
The [`~peft.LoraModel.add_weighted_adapter`] method enables more efficient merging methods like [TIES](https://huggingface.co/papers/2306.01708) or [DARE](https://huggingface.co/papers/2311.03099). These merging methods remove redundant and potentially interfering parameters from merged models. Keep in mind the LoRA ranks need to have identical ranks to be merged.
|
||||
|
||||
Make sure the latest stable version of Diffusers and PEFT is installed.
|
||||
|
||||
```bash
|
||||
pip install -U -q diffusers peft
|
||||
```
|
||||
|
||||
Load a UNET that corresponds to the LoRA UNet.
|
||||
|
||||
```py
|
||||
import copy
|
||||
import torch
|
||||
from diffusers import AutoModel, DiffusionPipeline
|
||||
from peft import get_peft_model, LoraConfig, PeftModel
|
||||
|
||||
unet = AutoModel.from_pretrained(
|
||||
"stabilityai/stable-diffusion-xl-base-1.0",
|
||||
torch_dtype=torch.float16,
|
||||
use_safetensors=True,
|
||||
variant="fp16",
|
||||
subfolder="unet",
|
||||
).to("cuda")
|
||||
```
|
||||
|
||||
Load a pipeline, pass the UNet to it, and load a LoRA.
|
||||
|
||||
```py
|
||||
pipeline = DiffusionPipeline.from_pretrained(
|
||||
"stabilityai/stable-diffusion-xl-base-1.0",
|
||||
variant="fp16",
|
||||
torch_dtype=torch.float16,
|
||||
unet=unet
|
||||
).to("cuda")
|
||||
pipeline.load_lora_weights(
|
||||
"ostris/ikea-instructions-lora-sdxl",
|
||||
weight_name="ikea_instructions_xl_v1_5.safetensors",
|
||||
adapter_name="ikea"
|
||||
)
|
||||
```
|
||||
|
||||
Create a [`~peft.PeftModel`] from the LoRA checkpoint by combining the first UNet you loaded and the LoRA UNet from the pipeline.
|
||||
|
||||
```py
|
||||
sdxl_unet = copy.deepcopy(unet)
|
||||
ikea_peft_model = get_peft_model(
|
||||
sdxl_unet,
|
||||
pipeline.unet.peft_config["ikea"],
|
||||
adapter_name="ikea"
|
||||
)
|
||||
|
||||
original_state_dict = {f"base_model.model.{k}": v for k, v in pipeline.unet.state_dict().items()}
|
||||
ikea_peft_model.load_state_dict(original_state_dict, strict=True)
|
||||
```
|
||||
|
||||
> [!TIP]
|
||||
> You can save and reuse the `ikea_peft_model` by pushing it to the Hub as shown below.
|
||||
> ```py
|
||||
> ikea_peft_model.push_to_hub("ikea_peft_model", token=TOKEN)
|
||||
> ```
|
||||
|
||||
Repeat this process and create a [`~peft.PeftModel`] for the second LoRA.
|
||||
|
||||
```py
|
||||
pipeline.delete_adapters("ikea")
|
||||
sdxl_unet.delete_adapters("ikea")
|
||||
|
||||
pipeline.load_lora_weights(
|
||||
"lordjia/by-feng-zikai",
|
||||
weight_name="fengzikai_v1.0_XL.safetensors",
|
||||
adapter_name="feng"
|
||||
)
|
||||
pipeline.set_adapters(adapter_names="feng")
|
||||
|
||||
feng_peft_model = get_peft_model(
|
||||
sdxl_unet,
|
||||
pipeline.unet.peft_config["feng"],
|
||||
adapter_name="feng"
|
||||
)
|
||||
|
||||
original_state_dict = {f"base_model.model.{k}": v for k, v in pipe.unet.state_dict().items()}
|
||||
feng_peft_model.load_state_dict(original_state_dict, strict=True)
|
||||
```
|
||||
|
||||
Load a base UNet model and load the adapters.
|
||||
|
||||
```py
|
||||
base_unet = AutoModel.from_pretrained(
|
||||
"stabilityai/stable-diffusion-xl-base-1.0",
|
||||
torch_dtype=torch.float16,
|
||||
use_safetensors=True,
|
||||
variant="fp16",
|
||||
subfolder="unet",
|
||||
).to("cuda")
|
||||
|
||||
model = PeftModel.from_pretrained(
|
||||
base_unet,
|
||||
"stevhliu/ikea_peft_model",
|
||||
use_safetensors=True,
|
||||
subfolder="ikea",
|
||||
adapter_name="ikea"
|
||||
)
|
||||
model.load_adapter(
|
||||
"stevhliu/feng_peft_model",
|
||||
use_safetensors=True,
|
||||
subfolder="feng",
|
||||
adapter_name="feng"
|
||||
)
|
||||
```
|
||||
|
||||
Merge the LoRAs with [`~peft.LoraModel.add_weighted_adapter`] and specify how you want to merge them with `combination_type`. The example below uses the `"dare_linear"` method (refer to this [blog post](https://huggingface.co/blog/peft_merging) to learn more about these merging methods), which randomly prunes some weights and then performs a weighted sum of the tensors based on the set weightage of each LoRA in `weights`.
|
||||
|
||||
Activate the merged LoRAs with [`~loaders.PeftAdapterMixin.set_adapters`].
|
||||
|
||||
```py
|
||||
model.add_weighted_adapter(
|
||||
adapters=["ikea", "feng"],
|
||||
combination_type="dare_linear",
|
||||
weights=[1.0, 1.0],
|
||||
adapter_name="ikea-feng"
|
||||
)
|
||||
model.set_adapters("ikea-feng")
|
||||
|
||||
pipeline = DiffusionPipeline.from_pretrained(
|
||||
"stabilityai/stable-diffusion-xl-base-1.0",
|
||||
unet=model,
|
||||
variant="fp16",
|
||||
torch_dtype=torch.float16,
|
||||
).to("cuda")
|
||||
pipeline("A bowl of ramen shaped like a cute kawaii bear, by Feng Zikai").images[0]
|
||||
```
|
||||
|
||||
<div class="flex justify-center">
|
||||
<img src="https://huggingface.co/datasets/huggingface/documentation-images/resolve/main/diffusers/ikea-feng-dare-linear.png"/>
|
||||
</div>
|
||||
|
||||
### fuse_lora
|
||||
|
||||
The [`~loaders.lora_base.LoraBaseMixin.fuse_lora`] method fuses the LoRA weights directly with the original UNet and text encoder weights of the underlying model. This reduces the overhead of loading the underlying model for each LoRA because it only loads the model once, which lowers memory usage and increases inference speed.
|
||||
|
||||
```py
|
||||
import torch
|
||||
from diffusers import DiffusionPipeline
|
||||
|
||||
pipeline = DiffusionPipeline.from_pretrained(
|
||||
"stabilityai/stable-diffusion-xl-base-1.0",
|
||||
torch_dtype=torch.float16
|
||||
).to("cuda")
|
||||
pipeline.load_lora_weights(
|
||||
"ostris/ikea-instructions-lora-sdxl",
|
||||
weight_name="ikea_instructions_xl_v1_5.safetensors",
|
||||
adapter_name="ikea"
|
||||
)
|
||||
pipeline.load_lora_weights(
|
||||
"lordjia/by-feng-zikai",
|
||||
weight_name="fengzikai_v1.0_XL.safetensors",
|
||||
adapter_name="feng"
|
||||
)
|
||||
pipeline.set_adapters(["ikea", "feng"], adapter_weights=[0.7, 0.8])
|
||||
```
|
||||
|
||||
Call [`~loaders.lora_base.LoraBaseMixin.fuse_lora`] to fuse them. The `lora_scale` parameter controls how much to scale the output by with the LoRA weights. It is important to make this adjustment now because passing `scale` to `cross_attention_kwargs` won't work in the pipeline.
|
||||
|
||||
```py
|
||||
pipeline.fuse_lora(adapter_names=["ikea", "feng"], lora_scale=1.0)
|
||||
```
|
||||
|
||||
Unload the LoRA weights since they're already fused with the underlying model. Save the fused pipeline with either [`~DiffusionPipeline.save_pretrained`] to save it locally or [`~PushToHubMixin.push_to_hub`] to save it to the Hub.
|
||||
|
||||
<hfoptions id="save">
|
||||
<hfoption id="save locally">
|
||||
|
||||
```py
|
||||
pipeline.unload_lora_weights()
|
||||
pipeline.save_pretrained("path/to/fused-pipeline")
|
||||
```
|
||||
|
||||
</hfoption>
|
||||
<hfoption id="save to Hub">
|
||||
|
||||
```py
|
||||
pipeline.unload_lora_weights()
|
||||
pipeline.push_to_hub("fused-ikea-feng")
|
||||
```
|
||||
|
||||
</hfoption>
|
||||
</hfoptions>
|
||||
|
||||
The fused pipeline can now be quickly loaded for inference without requiring each LoRA to be separately loaded.
|
||||
|
||||
```py
|
||||
pipeline = DiffusionPipeline.from_pretrained(
|
||||
"username/fused-ikea-feng", torch_dtype=torch.float16,
|
||||
).to("cuda")
|
||||
pipeline("A bowl of ramen shaped like a cute kawaii bear, by Feng Zikai").images[0]
|
||||
```
|
||||
|
||||
Use [`~loaders.LoraLoaderMixin.unfuse_lora`] to restore the underlying models weights, for example, if you want to use a different `lora_scale` value. You can only unfuse if there is a single LoRA fused. For example, it won't work with the pipeline from above because there are multiple fused LoRAs. In these cases, you'll need to reload the entire model.
|
||||
|
||||
```py
|
||||
pipeline.unfuse_lora()
|
||||
```
|
||||
|
||||
<div class="flex justify-center">
|
||||
<img src="https://huggingface.co/datasets/huggingface/documentation-images/resolve/main/diffusers/fuse_lora.png"/>
|
||||
</div>
|
||||
|
||||
## Manage
|
||||
|
||||
Diffusers provides several methods to help you manage working with LoRAs. These methods can be especially useful if you're working with multiple LoRAs.
|
||||
|
||||
### set_adapters
|
||||
|
||||
[`~loaders.PeftAdapterMixin.set_adapters`] also activates the current LoRA to use if there are multiple active LoRAs. This allows you to switch between different LoRAs by specifying their name.
|
||||
|
||||
```py
|
||||
import torch
|
||||
from diffusers import DiffusionPipeline
|
||||
|
||||
pipeline = DiffusionPipeline.from_pretrained(
|
||||
"stabilityai/stable-diffusion-xl-base-1.0",
|
||||
torch_dtype=torch.float16
|
||||
).to("cuda")
|
||||
pipeline.load_lora_weights(
|
||||
"ostris/ikea-instructions-lora-sdxl",
|
||||
weight_name="ikea_instructions_xl_v1_5.safetensors",
|
||||
adapter_name="ikea"
|
||||
)
|
||||
pipeline.load_lora_weights(
|
||||
"lordjia/by-feng-zikai",
|
||||
weight_name="fengzikai_v1.0_XL.safetensors",
|
||||
adapter_name="feng"
|
||||
)
|
||||
# activates the feng LoRA instead of the ikea LoRA
|
||||
pipeline.set_adapters("feng")
|
||||
```
|
||||
|
||||
### save_lora_adapter
|
||||
|
||||
Save an adapter with [`~loaders.PeftAdapterMixin.save_lora_adapter`].
|
||||
|
||||
```py
|
||||
import torch
|
||||
from diffusers import AutoPipelineForText2Image
|
||||
|
||||
pipeline = AutoPipelineForText2Image.from_pretrained(
|
||||
"stabilityai/stable-diffusion-xl-base-1.0",
|
||||
torch_dtype=torch.float16
|
||||
).to("cuda")
|
||||
pipeline.unet.load_lora_adapter(
|
||||
"jbilcke-hf/sdxl-cinematic-1",
|
||||
weight_name="pytorch_lora_weights.safetensors",
|
||||
adapter_name="cinematic"
|
||||
prefix="unet"
|
||||
)
|
||||
pipeline.save_lora_adapter("path/to/save", adapter_name="cinematic")
|
||||
```
|
||||
|
||||
### unload_lora_weights
|
||||
|
||||
The [`~loaders.lora_base.LoraBaseMixin.unload_lora_weights`] method unloads any LoRA weights in the pipeline to restore the underlying model weights.
|
||||
|
||||
```py
|
||||
pipeline.unload_lora_weights()
|
||||
```
|
||||
|
||||
### disable_lora
|
||||
|
||||
The [`~loaders.PeftAdapterMixin.disable_lora`] method disables all LoRAs (but they're still kept on the pipeline) and restores the pipeline to the underlying model weights.
|
||||
|
||||
```py
|
||||
pipeline.disable_lora()
|
||||
```
|
||||
|
||||
### get_active_adapters
|
||||
|
||||
The [`~loaders.lora_base.LoraBaseMixin.get_active_adapters`] method returns a list of active LoRAs attached to a pipeline.
|
||||
|
||||
```py
|
||||
pipeline.get_active_adapters()
|
||||
["cereal", "ikea"]
|
||||
```
|
||||
|
||||
### get_list_adapters
|
||||
|
||||
The [`~loaders.lora_base.LoraBaseMixin.get_list_adapters`] method returns the active LoRAs for each component in the pipeline.
|
||||
|
||||
```py
|
||||
pipeline.get_list_adapters()
|
||||
{"unet": ["cereal", "ikea"], "text_encoder_2": ["cereal"]}
|
||||
```
|
||||
|
||||
### delete_adapters
|
||||
|
||||
The [`~loaders.PeftAdapterMixin.delete_adapters`] method completely removes a LoRA and its layers from a model.
|
||||
|
||||
```py
|
||||
pipeline.delete_adapters("ikea")
|
||||
```
|
||||
|
||||
## Resources
|
||||
|
||||
Browse the [LoRA Studio](https://lorastudio.co/models) for different LoRAs to use or you can upload your favorite LoRAs from Civitai to the Hub with the Space below.
|
||||
|
||||
<iframe
|
||||
src="https://multimodalart-civitai-to-hf.hf.space"
|
||||
frameborder="0"
|
||||
width="850"
|
||||
height="450"
|
||||
></iframe>
|
||||
|
||||
You can find additional LoRAs in the [FLUX LoRA the Explorer](https://huggingface.co/spaces/multimodalart/flux-lora-the-explorer) and [LoRA the Explorer](https://huggingface.co/spaces/multimodalart/LoraTheExplorer) Spaces.
|
||||
[[autodoc]] hooks.layerwise_casting.PeftInputAutocastDisableHook
|
||||
|
||||
120
docs/source/en/using-diffusers/cogvideox.md
Normal file
120
docs/source/en/using-diffusers/cogvideox.md
Normal file
@@ -0,0 +1,120 @@
|
||||
<!--Copyright 2024 The HuggingFace Team. All rights reserved.
|
||||
|
||||
Licensed under the Apache License, Version 2.0 (the "License"); you may not use this file except in compliance with
|
||||
the License. You may obtain a copy of the License at
|
||||
|
||||
http://www.apache.org/licenses/LICENSE-2.0
|
||||
|
||||
Unless required by applicable law or agreed to in writing, software distributed under the License is distributed on
|
||||
an "AS IS" BASIS, WITHOUT WARRANTIES OR CONDITIONS OF ANY KIND, either express or implied. See the License for the
|
||||
specific language governing permissions and limitations under the License.
|
||||
-->
|
||||
# CogVideoX
|
||||
|
||||
CogVideoX is a text-to-video generation model focused on creating more coherent videos aligned with a prompt. It achieves this using several methods.
|
||||
|
||||
- a 3D variational autoencoder that compresses videos spatially and temporally, improving compression rate and video accuracy.
|
||||
|
||||
- an expert transformer block to help align text and video, and a 3D full attention module for capturing and creating spatially and temporally accurate videos.
|
||||
|
||||
|
||||
|
||||
## Load model checkpoints
|
||||
Model weights may be stored in separate subfolders on the Hub or locally, in which case, you should use the [`~DiffusionPipeline.from_pretrained`] method.
|
||||
|
||||
|
||||
```py
|
||||
from diffusers import CogVideoXPipeline, CogVideoXImageToVideoPipeline
|
||||
pipe = CogVideoXPipeline.from_pretrained(
|
||||
"THUDM/CogVideoX-2b",
|
||||
torch_dtype=torch.float16
|
||||
)
|
||||
|
||||
pipe = CogVideoXImageToVideoPipeline.from_pretrained(
|
||||
"THUDM/CogVideoX-5b-I2V",
|
||||
torch_dtype=torch.bfloat16
|
||||
)
|
||||
|
||||
```
|
||||
|
||||
## Text-to-Video
|
||||
For text-to-video, pass a text prompt. By default, CogVideoX generates a 720x480 video for the best results.
|
||||
|
||||
```py
|
||||
import torch
|
||||
from diffusers import CogVideoXPipeline
|
||||
from diffusers.utils import export_to_video
|
||||
|
||||
prompt = "An elderly gentleman, with a serene expression, sits at the water's edge, a steaming cup of tea by his side. He is engrossed in his artwork, brush in hand, as he renders an oil painting on a canvas that's propped up against a small, weathered table. The sea breeze whispers through his silver hair, gently billowing his loose-fitting white shirt, while the salty air adds an intangible element to his masterpiece in progress. The scene is one of tranquility and inspiration, with the artist's canvas capturing the vibrant hues of the setting sun reflecting off the tranquil sea."
|
||||
|
||||
pipe = CogVideoXPipeline.from_pretrained(
|
||||
"THUDM/CogVideoX-5b",
|
||||
torch_dtype=torch.bfloat16
|
||||
)
|
||||
|
||||
pipe.enable_model_cpu_offload()
|
||||
pipe.vae.enable_tiling()
|
||||
|
||||
video = pipe(
|
||||
prompt=prompt,
|
||||
num_videos_per_prompt=1,
|
||||
num_inference_steps=50,
|
||||
num_frames=49,
|
||||
guidance_scale=6,
|
||||
generator=torch.Generator(device="cuda").manual_seed(42),
|
||||
).frames[0]
|
||||
|
||||
export_to_video(video, "output.mp4", fps=8)
|
||||
|
||||
```
|
||||
|
||||
|
||||
<div class="flex justify-center">
|
||||
<img src="https://huggingface.co/datasets/huggingface/documentation-images/resolve/main/diffusers/cogvideox/cogvideox_out.gif" alt="generated image of an astronaut in a jungle"/>
|
||||
</div>
|
||||
|
||||
|
||||
## Image-to-Video
|
||||
|
||||
|
||||
You'll use the [THUDM/CogVideoX-5b-I2V](https://huggingface.co/THUDM/CogVideoX-5b-I2V) checkpoint for this guide.
|
||||
|
||||
```py
|
||||
import torch
|
||||
from diffusers import CogVideoXImageToVideoPipeline
|
||||
from diffusers.utils import export_to_video, load_image
|
||||
|
||||
prompt = "A vast, shimmering ocean flows gracefully under a twilight sky, its waves undulating in a mesmerizing dance of blues and greens. The surface glints with the last rays of the setting sun, casting golden highlights that ripple across the water. Seagulls soar above, their cries blending with the gentle roar of the waves. The horizon stretches infinitely, where the ocean meets the sky in a seamless blend of hues. Close-ups reveal the intricate patterns of the waves, capturing the fluidity and dynamic beauty of the sea in motion."
|
||||
image = load_image(image="cogvideox_rocket.png")
|
||||
pipe = CogVideoXImageToVideoPipeline.from_pretrained(
|
||||
"THUDM/CogVideoX-5b-I2V",
|
||||
torch_dtype=torch.bfloat16
|
||||
)
|
||||
|
||||
pipe.vae.enable_tiling()
|
||||
pipe.vae.enable_slicing()
|
||||
|
||||
video = pipe(
|
||||
prompt=prompt,
|
||||
image=image,
|
||||
num_videos_per_prompt=1,
|
||||
num_inference_steps=50,
|
||||
num_frames=49,
|
||||
guidance_scale=6,
|
||||
generator=torch.Generator(device="cuda").manual_seed(42),
|
||||
).frames[0]
|
||||
|
||||
export_to_video(video, "output.mp4", fps=8)
|
||||
```
|
||||
|
||||
<div class="flex gap-4">
|
||||
<div>
|
||||
<img class="rounded-xl" src="https://huggingface.co/datasets/huggingface/documentation-images/resolve/main/diffusers/cogvideox/cogvideox_rocket.png"/>
|
||||
<figcaption class="mt-2 text-center text-sm text-gray-500">initial image</figcaption>
|
||||
</div>
|
||||
<div>
|
||||
<img class="rounded-xl" src="https://huggingface.co/datasets/huggingface/documentation-images/resolve/main/diffusers/cogvideox/cogvideox_outrocket.gif"/>
|
||||
<figcaption class="mt-2 text-center text-sm text-gray-500">generated video</figcaption>
|
||||
</div>
|
||||
</div>
|
||||
|
||||
Some files were not shown because too many files have changed in this diff Show More
Reference in New Issue
Block a user